How to disable haptic feedback in the ChatGPT Android App

By default, haptic feedback is enabled in the ChatGPT Android App. As a result, your phone or smart device will vibrate a little bit when you or the A.I. input texts.

If you find that the rumble is somewhat annoying and/or causing the battery to drain, then you can check out this guide at Seeking Tech to see how you can disable the feature in this application.

1. To start off, you need to open the ChatGPT App if you haven’t done so already.

2. Inside of the application, tap the hamburger icon, which looks like three horizontal lines, located on the top left.

3. A menu should slide in from the left side of the screen. From there, you need to tap the Settings option.

4. From the Settings menu, you should see Haptic Feedback.

5. Tap the switch to the right of Haptic Feedback in order to turn this feature off.

By disabling this setting, you should no longer feel your smartphone or device rumble when you are inputting text to the chat. Furthermore, your device will no longer vibrate when the A.I. is typing out its answer.

How to fix Remnant 2 HDR and brightness issues on consoles

If you find that the graphics to be too dark, too bright and/or washed out, when playing Remnant 2 on consoles, then you can check out this troubleshooting article from Seeking Tech to see how you can fix these HDR and brightness issues.

Before we begin, it is important to note that Remnant 2 does not natively support HDR, at least not at launch. With that said, the PlayStation 5, Xbox Series X and Xbox Series S all come with the ability to convert SDR to HDR.

1. If you want to play Remnant 2 with SDR to HDR conversion, then you should make sure that you properly set it up on your console.

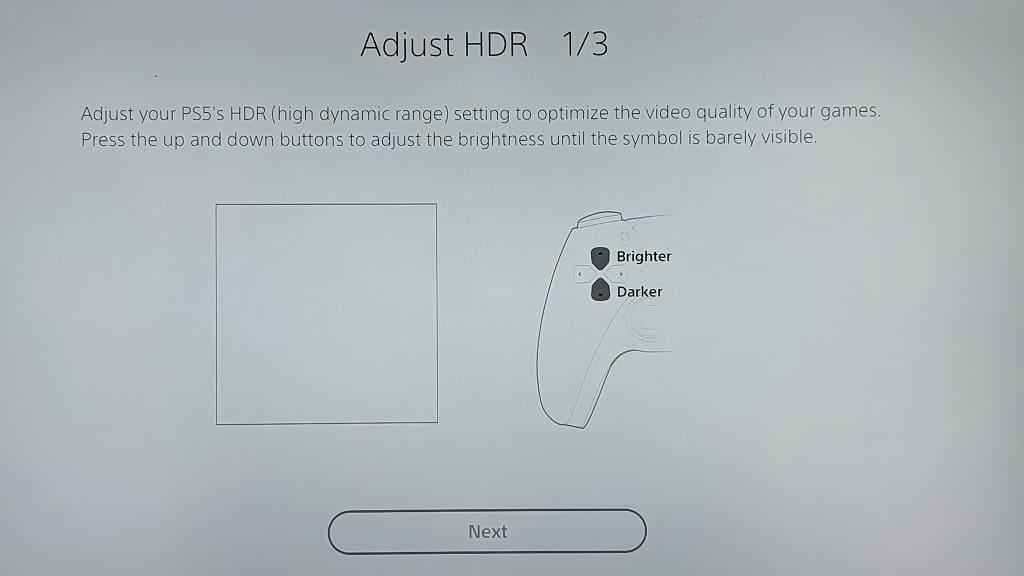
On the PlayStation 5, open the console’s Settings menu and then select Screen and Video > Video Output > HDR > Always On. On the same screen, select Adjust HDR and then follow the on-screen instructions to calibrate the brightness output.

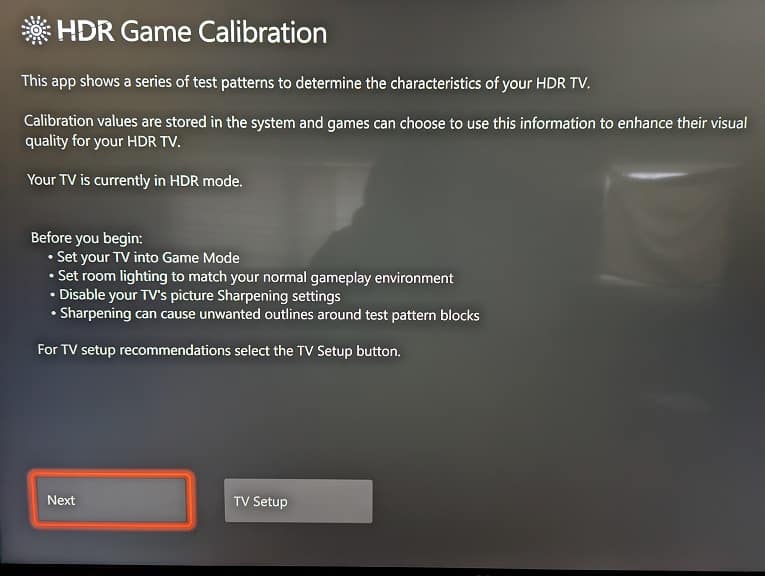
For the Xbox Series X or Xbox Series S, open the system’s Settings menu and then select General > TV & display options > Video modes > Auto HDR. Afterwards, return to the General > TV & display options menu and then select “Calibrate HDR for games.” Finally follow the on-screen instructions.

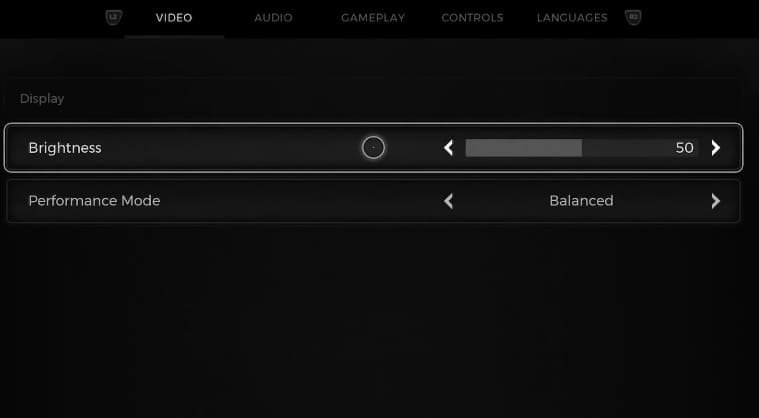
2. If the brightness still looks off, then you can go to the System > Options menu in Remnant 2. From there, you should be able to find the Brightness slider.

By default, this is set to 50. You can increase or decrease it to your liking until the brightness display in the game appears just right.

You may need to return to this menu to re-adjust when moving from a dark scene to a bright scene and vice versa.

3. You can also try adjusting the brightness and contrast settings from your television screen or gaming monitor.

4. You should make sure you have the latest patch downloaded for Remnant 2 as well as a new update may help add HDR support and/or fix the brightness display issues in the game.

Recommended DualSense Edge settings for Remnant 2

To get you through the tough fights in Remnant 2, you might want to consider playing this game with the DualSense Edge. To see what the best settings are when it comes to using this gamepad for the third-person shooting role-playing game, you can take a look at this Seeking Tech guide.

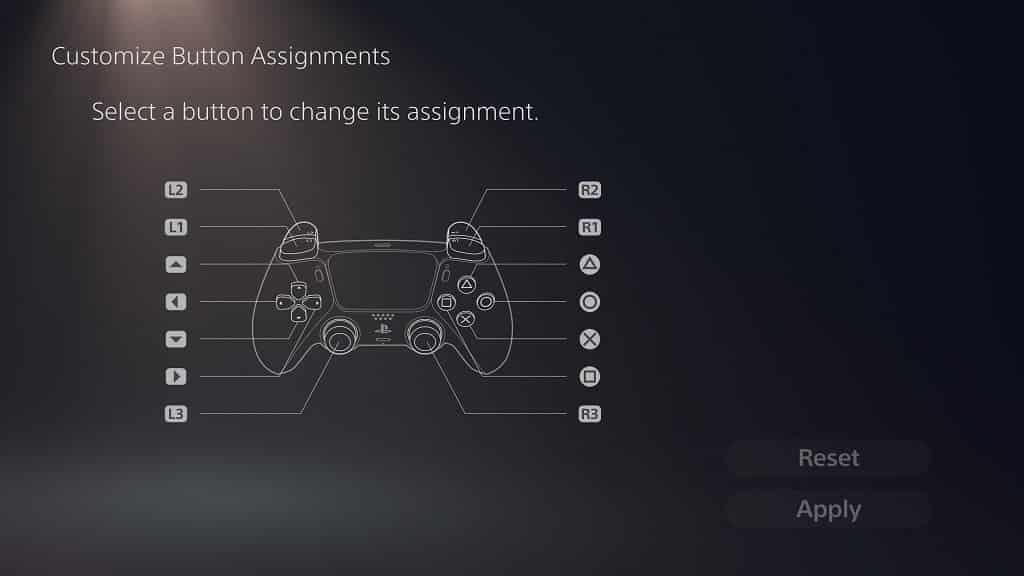
Custom Button Assignments

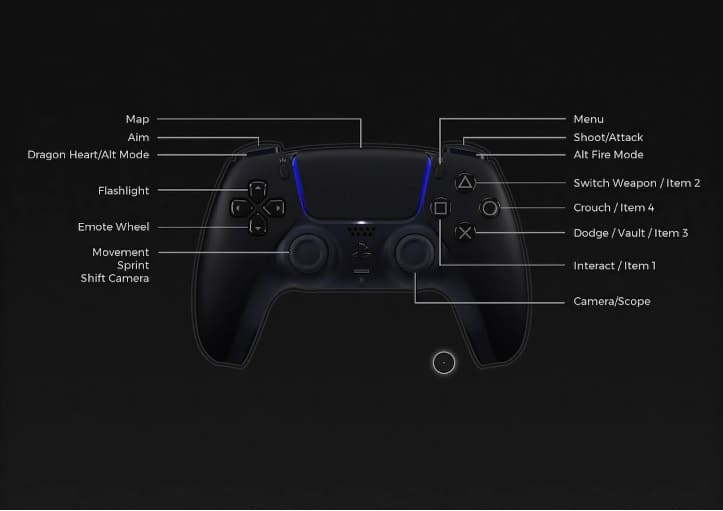
Remnant 2 features the following button layout for the DualSense controller:

  • Left Analog: Move or shift camera
  • L3: Sprint
  • Right Analog: Move camera or scope
  • Up Directional Pad Button: Flashlight
  • Down Directional Pad Button: Emote
  • L1: Dragon Heart or Alt Mode
  • L2: Aim
  • R1: Alt Fire Mode
  • R2: Shoot while aiming or attack when not aiming
  • L2 and R2: Use primary skill
  • Square: Interact or use Item 1
  • Triangle: Switch weapon, or use item 2
  • X: Dodge, vault or use item 3
  • Circle: Crouch or use item 4
  • Touchpad: Map
  • Options: Menu

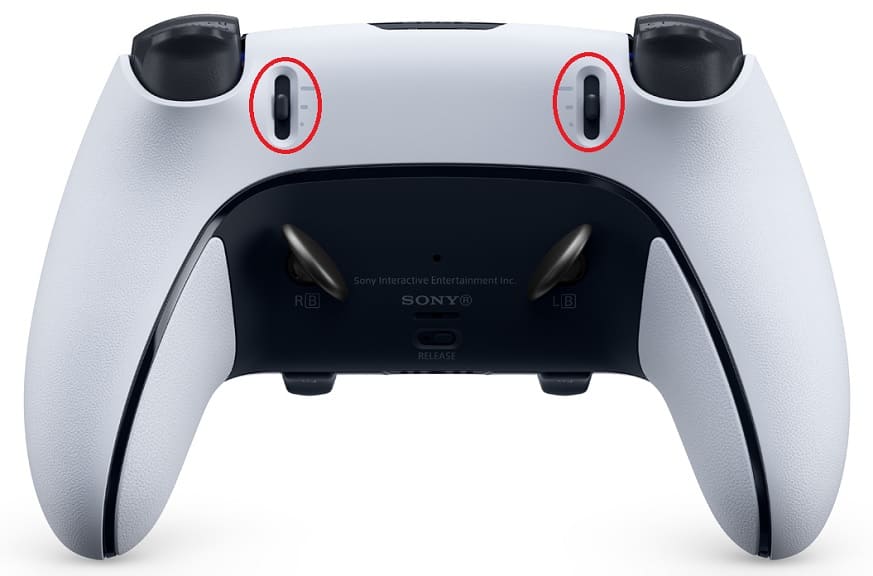
The DualSense Edge features two back buttons that can be assigned to any of the aforementioned action buttons.

We ended up assign the left back button for L3 so that we can sprint without having to press down hard on the left analog stick. For the right back button, we assigned it to the Up Directional Pad Button so that you don’t have to take your left thumb off of the left analog stick in order to turn on the flashlight.

Of course, you can configure the back buttons, as well as other buttons, to your liking. There aren’t any in-game settings in Remnant 2 where you can reassign the buttons. Therefore, you need to use the Custom Button Assignments menu of the DualSense Edge.

Trigger Stops

Since you will be shooting a lot in this game, we recommend that you pull the L2 and R2 sliders located on the backside of the Edge controller all the way to the bottom to enable quick fire.

If you would like the trigger inputs to feel even more responsive in the game, then you can head over to the controller’s Trigger Deadzone menu to further fine tune the sensitivity.

Stick Sensitivity

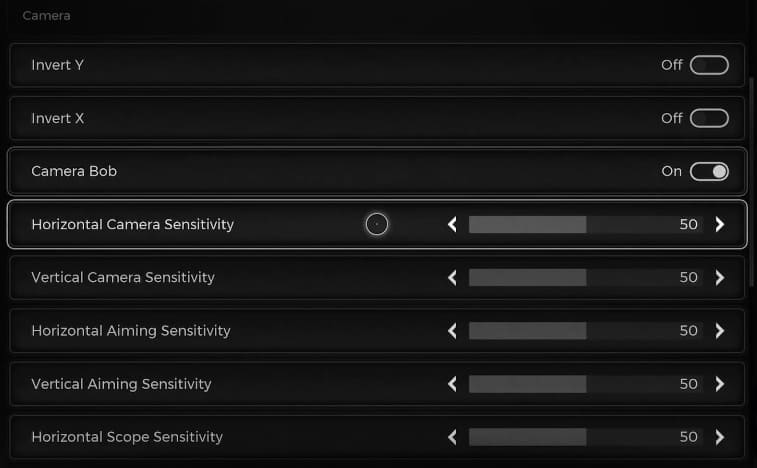
If you have a hard time aiming in the game, then you can head over to the System > Options menu in Remnant 2. From there, you will be able to adjust the following:

  • Horizontal Camera Sensitivity
  • Vertical Camera Sensitivity
  • Horizontal Aiming Sensitivity
  • Vertical Aiming Sensitivity
  • Horizontal Scope Sensitivity

You can also head over to the Stick Sensitivity and Deadzones menu of the DualSense Edge to adjust the sensitivity and dead zones of the controller.

Input Lag

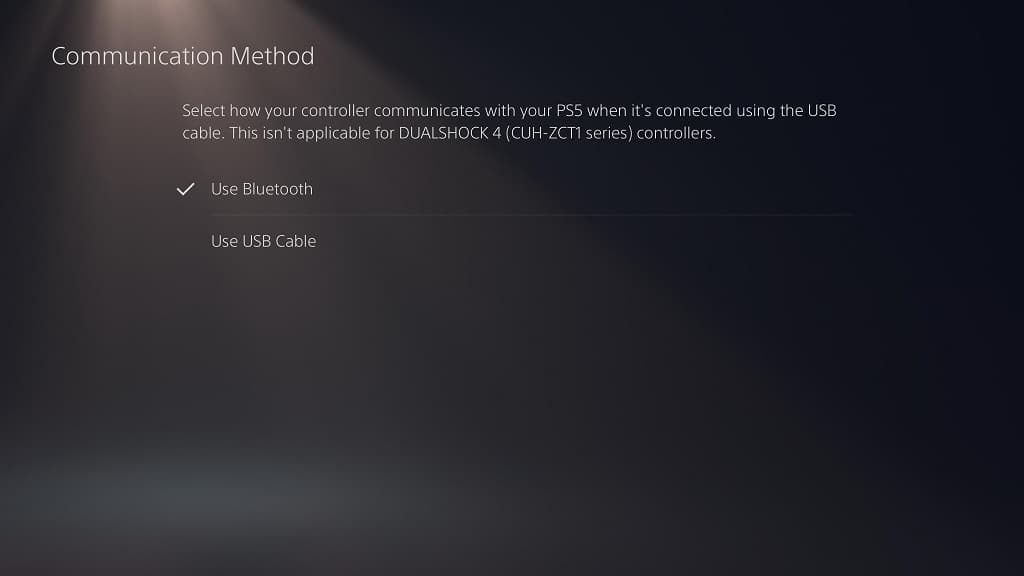
To prevent any potential input lag, we recommend that you use the controller via the USB communication method. In order to do so, you should first plug the DualSense Edge directly to the PS5 via a USB cable.

Afterwards, open the Settings menu of your PlayStation 5 and then select Accessories > Controller (General) > Communication Method > Use USB Cable in order to use the gamepad via wired communication while playing Remnant 2.

How to fix ChatGPT Android app ‘something went wrong’ error

When opening and logging into your ChatGPT account, you may encounter the “something went wrong” error message. To see how you can potentially fix this issue with the Android application, you can take a look at this troubleshooting article from Seeking Tech.

1. For the first potential solution, you can try updating the Google Play Store App by taking the following steps:

  • Open Google Play Store if you haven’t done so already.
  • On the front page of the store, tap your profile picture on the top right side.
  • In the pop-up Google menu, select Settings.
  • Next, you need to select About from the Settings menu.
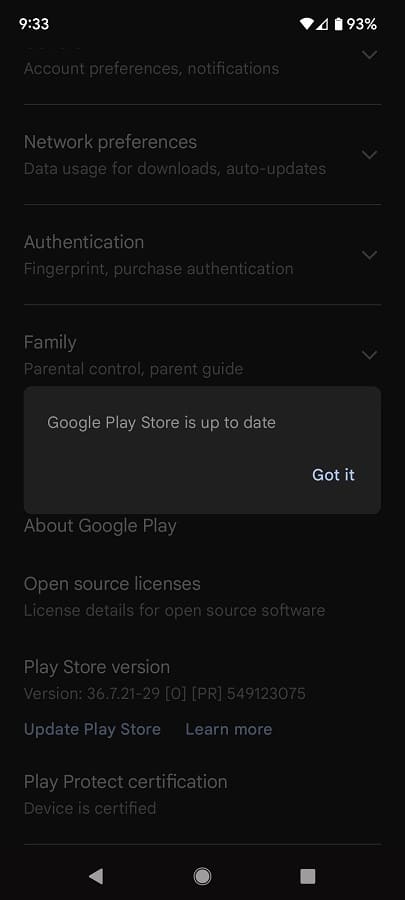
  • In the drop-down menu, you should see the Play Store version. Select the Update Play Store link underneath it.
  • If an update needs to be installed, then the download should automatically start. Otherwise, you should see a message saying that the “Google Play Store is up to date.”

2. You can also try updating the ChatGPT Android App. This can be done by visiting its product page from the Google Play Store. The listing will let you know if a new version of the AI application is available to download.

3. Other apps could conflict with the ChatGPT app. In this case, try to close any other opened apps you have on your device. You may also want to consider closing any applications that are running in the background.

4. Restarting your phone may help with fixing the “something went wrong” error.

5. There is a possibility that there could be an issue with the ChatGPT servers. To check if there are any server downtime or other issues, you can keep an eye on the official OpenAI Twitter page.

If there appears to be a problem with servers, then you might need to wait until they are working normally again in order to use the ChatGPT Android App.

DualSense Edge settings for Exoprimal

To improve your performance, you might want to consider playing Exoprimal with the DualSense Edge. You can check out this guide from Seeking Tech to see what settings you can use for this controller when it comes to fighting against dinosaurs and competing against others in this team-based third-person shooter.

Custom Button Assignments

You can find the default button layout for the DualSense controller in Exoprimal below:

  • X: Jump
  • R2: Primary Attack
  • L2: Active Skill #1 or Aim
  • R1: Active Skill #2
  • L1: Active Skill #3
  • L3: Sprint or Scope Magnification
  • Square: Reload or Interact
  • Triangle: Rig Skill
  • Circle: Place Craft
  • Triangle and Circle: Overdrive
  • Touchpad: Suit Change
  • Up Directional Pad: Comm Wheel
  • Right Directional Pad: Help Navigation
  • Left Directional Pad: Player List
  • Down Directional Pad: Suit Details
  • R3: Set Marker

Since the DualSense Edge comes with two back buttons that can be assigned to any of the action buttons, we suggest that you assign the left back button to L3 and then the right back button to R3.

By using the back button for the L3 actions, you no longer have to awkwardly press down on the left analog stick to run or use the scope magnification. You also no longer need to press the right analog stick down in order to set a marker.

Of course, you can set the back buttons any way you see fit. For more button customizations , you can go to the in-game Settings menu and then navigate your way over to Controller >Button Mapping.

Trigger Stops

To make aiming and firing your weapons a lot more responsive, we suggest that you move the sliders of the L2 and R2 buttons all the way to the bottom on the back of your DualSense Edge.

You can also head over to the Trigger Deadzone menu on the PlayStation 5 to further adjust how sensitive you want the two trigger buttons to be.

Stick Sensitivity and Deadzones

We found that the default sensitivity and dead zones of Exoprimal to be a little off when aiming our weapons.

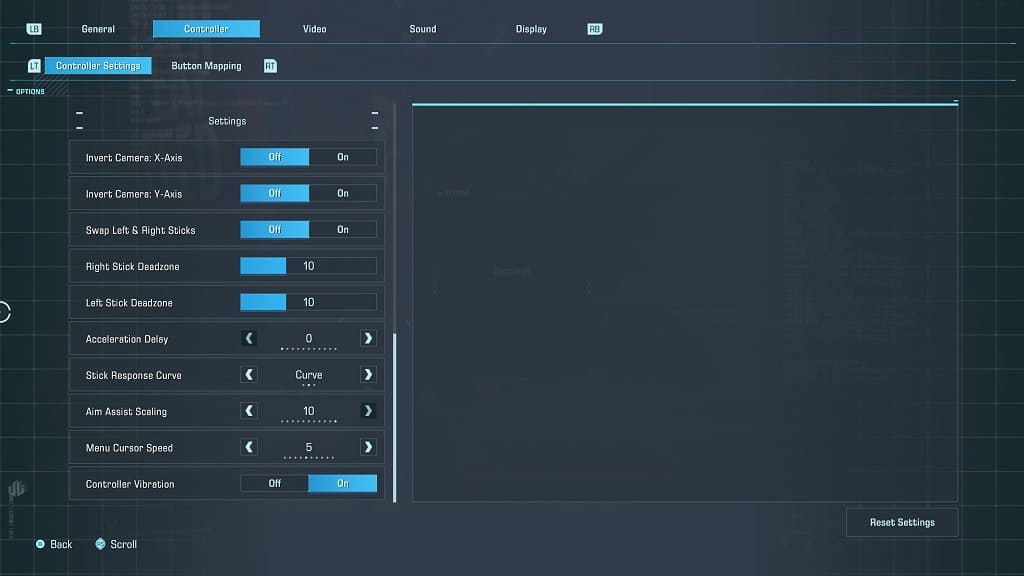
Fortunately, you can manually adjust the aim sensitivity, dead zone, acceleration and response curve of the analog sticks from the in-game Setting menu by heading over to Controller > Controller Settings.

You can also head over to the Stick Sensitivity and Deadzones menu of the Edge from the PS5 system menu if you need to fine tune the analog stick movements.

Wired Communication

To prevent any potential input lag that may have resulted when using the DualSense Edge as a wireless gamepad, we recommend plugging the controller directly into your PS5.

Afterwards, open the console’s Settings menu and then select Accessories > Controller (General) > Communication Method > Use USB Cable.

Keep the Edge plugged into your PS5 to make sure that you are playing Exoprimal with very little button input latency.

What to do if your purchased Pokémon Sleep Premium Pass or diamonds are missing

In Pokémon Sleep, you are able to purchase the Premium Pass and/or diamonds. If you bought these items but they aren’t showing up in your account, then you can check out this troubleshooting article from Seeking Tech.

1. For the first step, you can try closing the app and then opening it again.

2. You can also try restarting your smartphone and then opening Pokémon Sleep after a fresh boot.

3. An unstable internet connection may be causing the purchased items not to show up correctly. Therefore, you should make sure that your phone gets a strong mobile data or Wi-Fi connection before opening the application.

4. The servers may also be suffering some issues. If there are server problems, then you can try checking again when the online features are fully functional.

5. You can also try re-attempting your past purchases by taking the following steps:

  • Open the Pokémon Sleep app and then sign into your account.
  • After logging in, tap the Shops icon.
  • Next, you need to select General Store from the Shops menu.
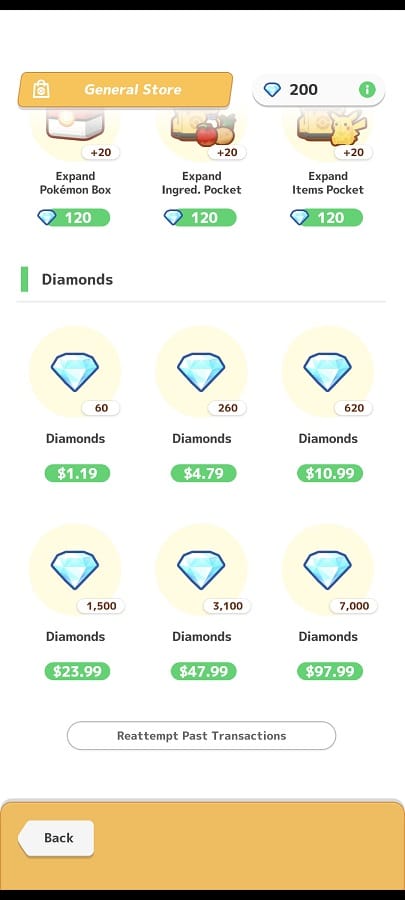
  • In the General Store, scroll all the way down to the bottom and then select the Reattempt Past Transaction option.

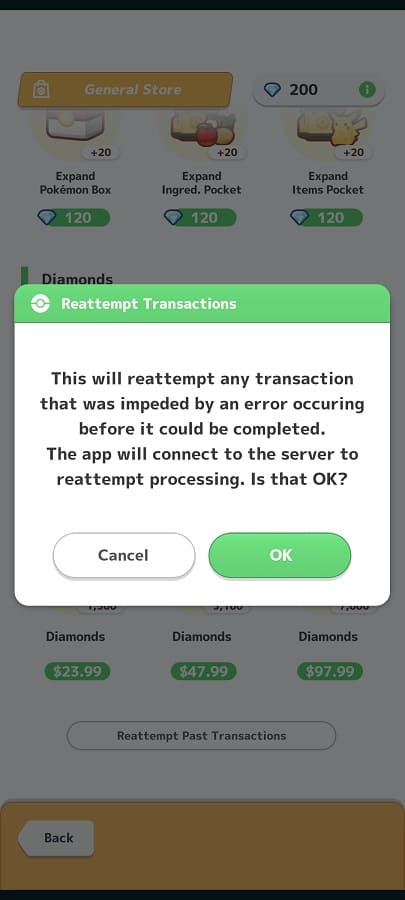
  • You should get a message saying that the app will connect to the server in order to re-attempt any transactions that may have previously stopped due to a processing error. Here, you need to select OK to continue.

6. If you still can’t find the Premium Pass and/or diamonds you purchased, then you should take a look at your purchase history in the Apple App Store or Google Play Store.

If your history shows that you have bought these items, but you can’t find them in the sleep tracking app, then you can contact the customer service team from either Apple or Google.

You can also try contacting the support for Pokémon Sleep. In order to do so, you can visit the official support page.

How to add Venmo payment option to Xbox Series X and Xbox Series S

You can now pay with Venmo when shopping in the Store App directly from your Xbox Series X and Xbox Series S. To see how you can add this payment option on either of these consoles, you can take a look at this tutorial from Seeking Tech.

1. To make things easier, you should first log into your Venmo account on a web browser on a smartphone.

2. Next, you need to turn on your Series X or Series S if you haven’t done so already.

2. In the home screen, you then need to make your way to the Settings App.

You can also head into Settings by pressing the Xbox button on the controller to open the Guide Menu. From there, you can select Settings from the Profile & System tab.

3. Inside of the Settings App, you need to select Account on the left column.

4. On the right side of the same screen, you then need to select “Payment & billing.”

5. From the “Payment & billing” menu, go to “Payment options.”

6. Select Add a new payment method from the Payment Options screen.

7. In the “Add a way to pay” menu, select eWallet.

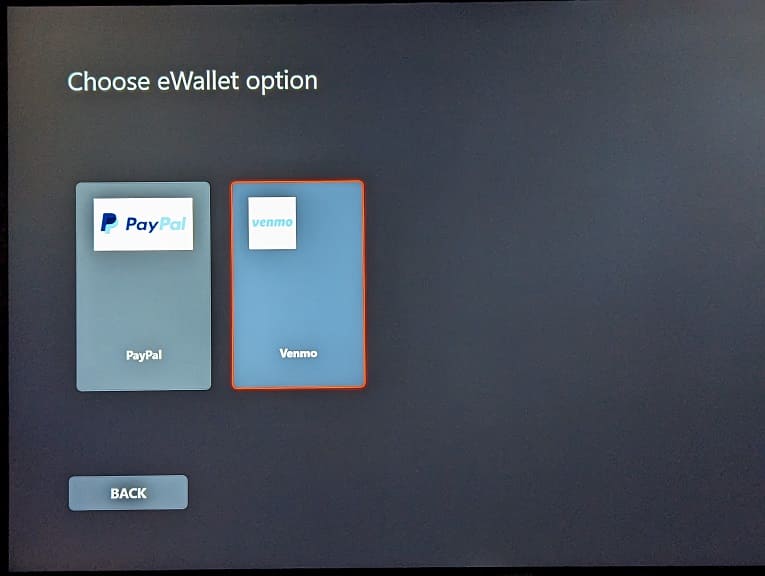
8. You should now be in the “Choose eWallet option” menu, which is where you need to select Venmo.

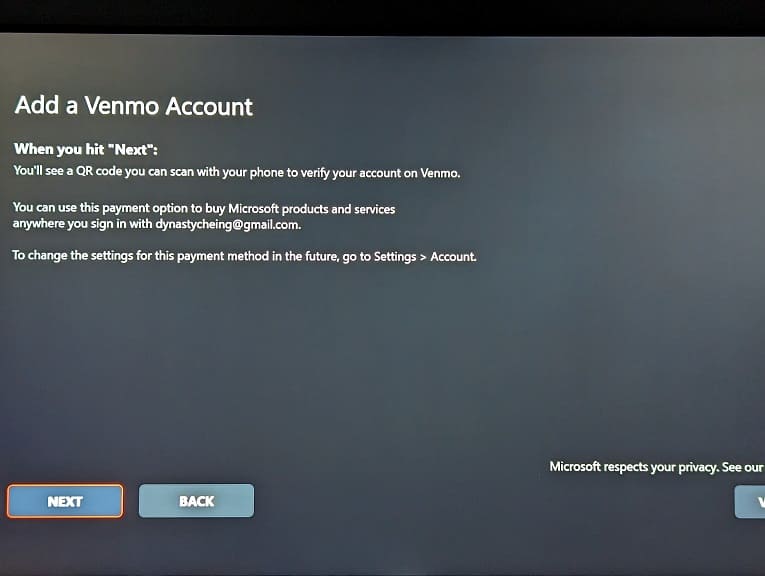
9. The “Add a Venmo Account” screen will explain how you can add Venmo to your Xbox Live account as well as how you can change the settings for this payment method in the future.

Here, you need to select Next to continue.

10. You should then see the QR Code.

If you have a phone that can scan the code, then you will be taken to the Venmo website where you can log into your Venmo account and then link it to your Xbox Live account.

If you don’t have a smartphone that is capable of reading the QR code, then you can select the Go to Venmo option. This should open the web browser on your Xbox Series X or Xbox Series S. From there, log into your Venmo account and then connect it to your Xbox Live account.

How to use PayPal Pay Later option when buying games for Xbox

You are now able to use the PayPal Pay Later payment option when purchasing games for your Xbox Series X, Xbox Series S, Xbox One X, Xbox One S or Xbox One. To find out how you can do so, you can take a look at this guide from Seeking Tech.

Before we begin, it is important to note that you can’t currently use PayPal Pay Later if you are buying through the Shop App directly on your Xbox console. Instead, you need to use the web browser version of the same digital store.

1. To start off, you need to head over to the Xbox Store website.

2. Next, make sure you are signed into the same Microsoft account that is linked to your Xbox Live account.

3. You can then start adding any games, downloadable content and other digital products for your Xbox console.

Keep in mind that the minimum order for PayPal Pay Later is $30 for bi-weekly payments or $199.99 for monthly payments.

The bi-weekly payments are interest-free. You will need to pay for 25% of the total order immediately and then the other three 25% payments two weeks at a time. This type of payment will work with orders of up to $1,500.

If you decide to go with a monthly payment method, then you will be charged interest. The fixed APR can be anywhere between 9.99% to 35.99% depending on your credit score. During special promotional periods, the rates can be dropped as low as 4.99%. For the monthly payment method, the maximum order limit is $10,000.

Since you are buying games and/or DLC for your Xbox, you will most likely use the bi-weekly payments feature for PayPal Pay Later.

4. Once you are done adding items into the cart, select the shopping cart icon.

5. In the cart, make sure you meet the minimum requirement for PayPal Pay Later, which is $30, for the total amount of the order. You should then select the Checkout option.

6. In the Step 1: Payment section, make sure that the Payment Method is set to PayPal Pay Later or Pay Now.
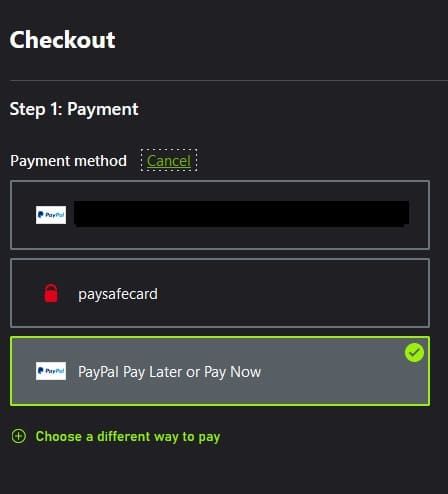
If it isn’t, select the Change link and then the “Select a different way to pay” link. Afterwards, make sure that the PayPal Pay Later or Pay Now is selected.

7. Go through the rest of the checkout process to purchase the items in the cart and then select the Pay Later option.

8. You can then choose to either Pay in 4 for biweekly payments or Pay Monthly. If you select pay Monthly, then you will be able to pick between a 6-month, 12-month or 24-month payment plan.

How to fix Exoprimal input lag

You may encounter some input lag while playing Exoprimal. To see how you can lower the latency in this third-person multiplayer shooter, you can take a look at this guide from Seeking Tech.

1. If you haven’t done so already, you should make sure that you plug the controller directly to your PC or console. Using the gamepad over a wired connection should reduce the input lag when compared to using a wireless connection.

On the PS5, you also need to go to the console’s Settings menu and then select Accessories > Controllers > Communication Method > Use USB so that you can use the DualSense as a wired controller.

On a PS4 or PS4 Pro console, head over to the console’s Settings menu and then select Devices > Controllers > Communication Method > Use USB Cable in order to use the DualShock 4 as a wired pad.

2. If you are playing Exoprimal on a television screen, then you should check to see if you have Game Mode, or a similar sounding mode, enabled.

This picture setting is designed to lower the input lag when playing video games.

3. Exoprimal is an online-only game. Therefore, you should make sure you have a stable internet connection to reduce any potential latency.

If possible, we recommend connecting your PC or console to the internet via an Ethernet cable. If you can only use Wi-Fi, you should make sure that the signal is strong enough.

When playing, we also recommend that you stop any downloads or streams on the same network to free up bandwidth when playing the game.

4. If you are having problems aiming, then you can open the in-game Settings menu of Exoprimal and then head over to the Controller > Controller Settings.

From there, you will be able to change the sensitivity, dead zone, acceleration as well as other aiming features.

How to disable data sharing in Pokémon Sleep

If you previously enabled data sharing on Pokémon Sleep but would like to disable this feature, then you can check out this tutorial from Seeking Tech to see how you are able to properly do so.

1. To begin, open the sleep tracking application and then sign into your account if you haven’t done so already.

2. From the start screen, tap the Main Menu option at the bottom.

3. Next, you need to select the Settings and More option from the Main Menu.

4. Tap General Settings in the pop-up menu.

5. You then need to select the Other tab.

6. From the Other tab in the General Settings menu, scroll down to the Data Sharing section and then tap the Regarding Data Sharing option.

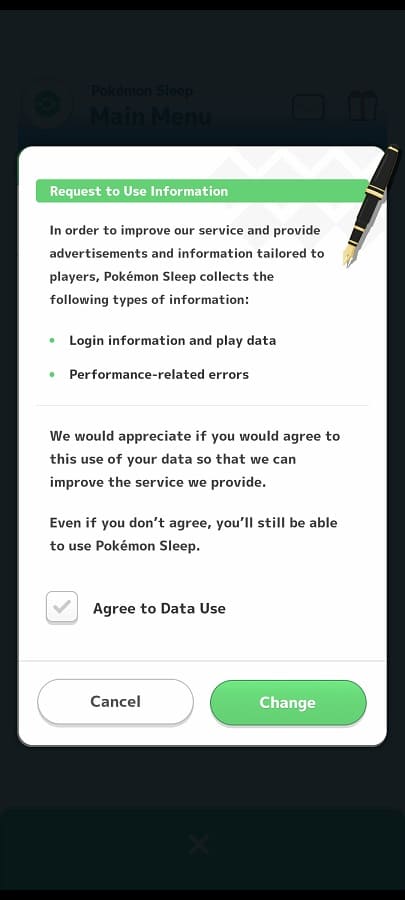
7. You should now be in the Request to Use Information screen.

This screen reveals that the app is tracking your login information, play data and any performance issues. It will also reveal that the tracked data may be used for advertisements and/or improving the app’s services.

8. To disable data sharing, make sure that the checkmark next to the Agree to Data Use setting located at the bottom of the Request to Use Information is greyed out.

9. Afterwards, select the Change option.

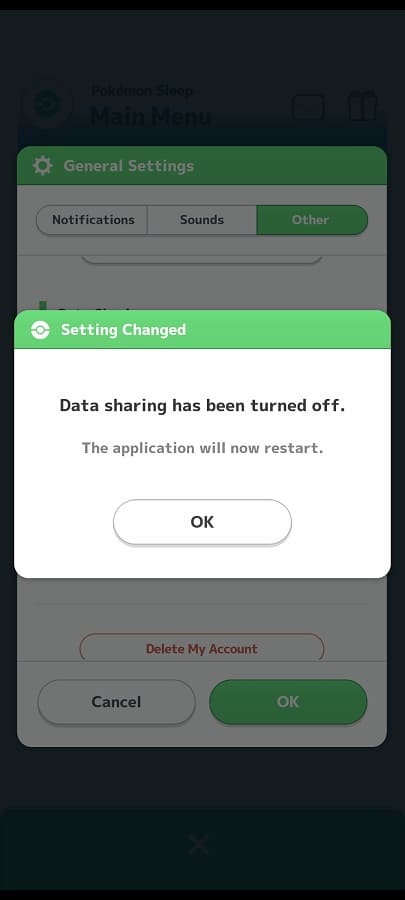
10. You should get a notification saying that “data sharing has been turned off.”

The Pokémon Sleep app should then automatically restart on its own.