How to disable camera shake in Remnant 2

Some actions may cause the camera to shake in Remnant 2. If this camera motion is causing you to get migraine and/or motion sickness, then you can check out this guide from Seeking Tech to see how you can turn this graphical feature off.

1 For the first step, you need to open the in-game menu.

If you are playing with a DualSense controller, then you can do so by pressing the Options button. If you are using an Xbox One or Xbox Series gamepad, then you should press the Menu button.

2. From the in-game menu, use the L2 and R2 triggers of the DualSense or LT and RT triggers of the Xbox controller to make your way over to System.

3. Once you get to the System tab, you need to select Options.

4. Inside of the Options menu, use the triggers on your controller again to navigate over to Gameplay.

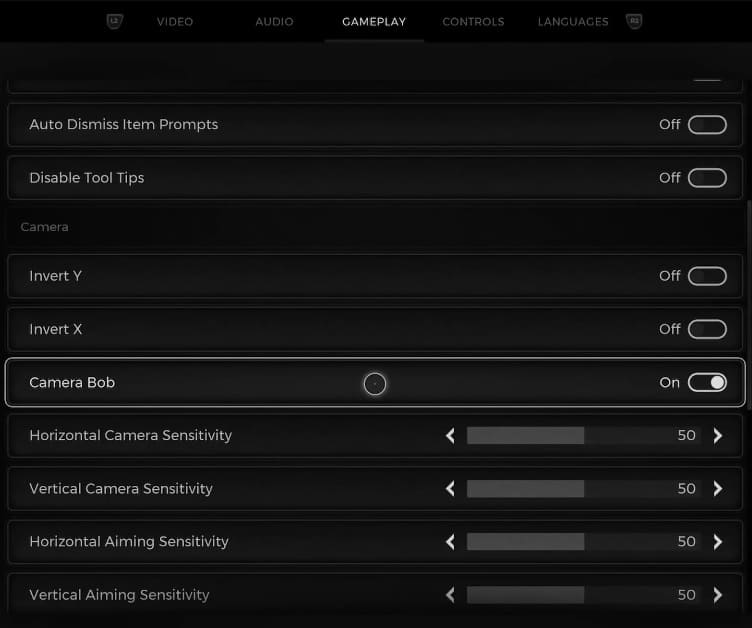
5. Once you get to the Gameplay tab, move the menu cursor over to Camera Bob. It should be in between the Invert X and Horizontal Camera Sensitivity options.

6. Make sure that the Camera Bob option is set to off in order to turn off the camera shaking effect.

When you return to the game, you should notice that the camera will no longer bob around as much.

How to reduce Remnant 2 input lag on PS5, Xbox Series X and S

You may notice a delay when pressing your controller in Remnant 2 and seeing the corresponding action appear on the screen.

To see how you can reduce the input lag for the PS5, Xbox Series X or Xbox Series S version of this third-person shooting RPG, you can take a look at this troubleshooting article from Seeking Tech.

1. If you haven’t done so already, make sure that your console is directly connected to your television set or monitor. Using a splitter or pass-through device in the HDMI connection may introduce extra latency.

2. Modern television sets come with a Game Mode or a similarly named display setting that is designed to lower input lag when playing videogames such as Remnant 2. So, make sure you enable it from the TV setting menus.

3. In the TV menus, you can also try turning off any motion interpolation, upscaling and other settings that may add to the input delay.

4. Playing the game at higher frame rates should result in lower latency. To change the performance mode, you need to take the following steps:

  • While playing the game, press the Options button on the DualSense or Menu button on the Xbox Series controller to bring up the in-game menu.
  • From the in-game menu, use the L2 and R2 or LT and RT buttons to make your way to the System tab, where you can then select Options.
  • From the Options menu, use the L2 and R2 or LT and RT buttons to navigate over to the Video tab.
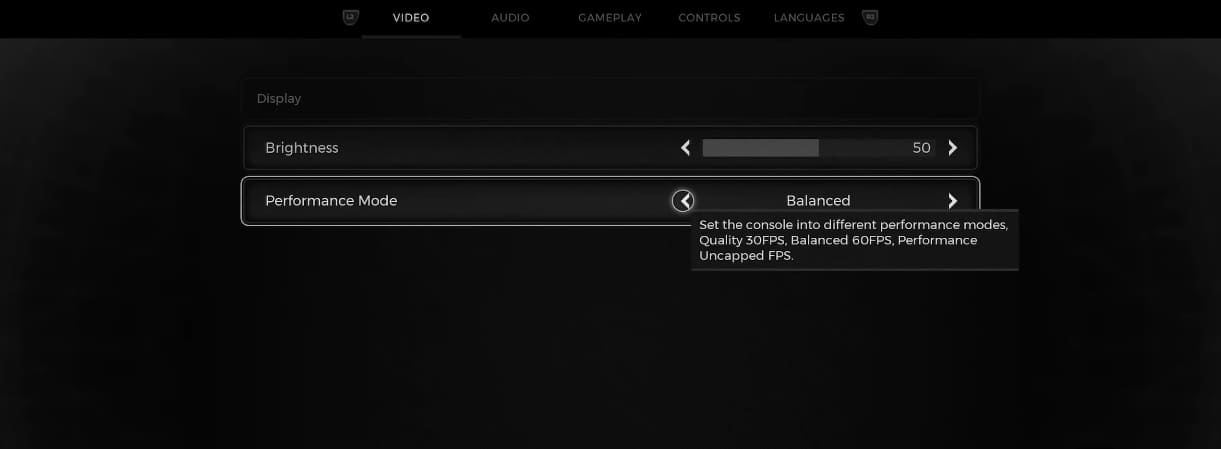
  • You should then see the Performance Mode setting. Make sure to change this to either Balanced or Performance.

5. If the input lag is making aiming difficult in Remnant 2, then you can adjust the sensitivity of the right analog stick by opening the in-game menu and then going to System > Options.

6. You can also try plugging in the controller to your console as wired communication should be faster and more responsive when compared to a wireless connection.

The Xbox Series X and Xbox Series S consoles should automatically switch over to wired communication when you plug the Xbox Series controller into the USB port.

On the PS5, you need to head over to the console’s Settings menu after plugging in the DualSense. Afterwards, select Accessories > Controller (General) > Communication Method > Use USB Cable in order to enable wired communication.

6. If possible, you can also try connecting your console to a different screen. The input lag reduction performance may be better on the new television or monitor when compared to the original screen.

Recommended Xbox Elite Wireless Controller Series 2 settings for Remnant 2

If you are struggling in Remnant 2, then you can try playing with an Xbox Elite Wireless Controller Series 2. You can check out this Seeking Tech article to see what the best settings for this gamepad are when it comes to improving your performance in the third-person shooting RPG.

P1, P2, P3 and P4 Button Assignments

You can check out the default Xbox button layout for Remnant 2 below:

  • Left Analog: Move or shift camera
  • Press Down on the Left Analog: Sprint
  • Right Analog: Move camera or scope
  • Up Directional Pad Button: Flashlight
  • Down Directional Pad Button: Emote
  • LB: Dragon Heart or Alt Mode
  • LT: Aim
  • RB: Alt Fire Mode
  • RT: Shoot while aiming or attack when not aiming
  • LT and RT: Use primary skill
  • X Button: Interact or use Item 1
  • Y Button: Switch weapon, or use item 2
  • A Button: Dodge, vault or use item 3
  • B Button: Crouch or use item 4
  • View Button: Map
  • Menu Button: Menu

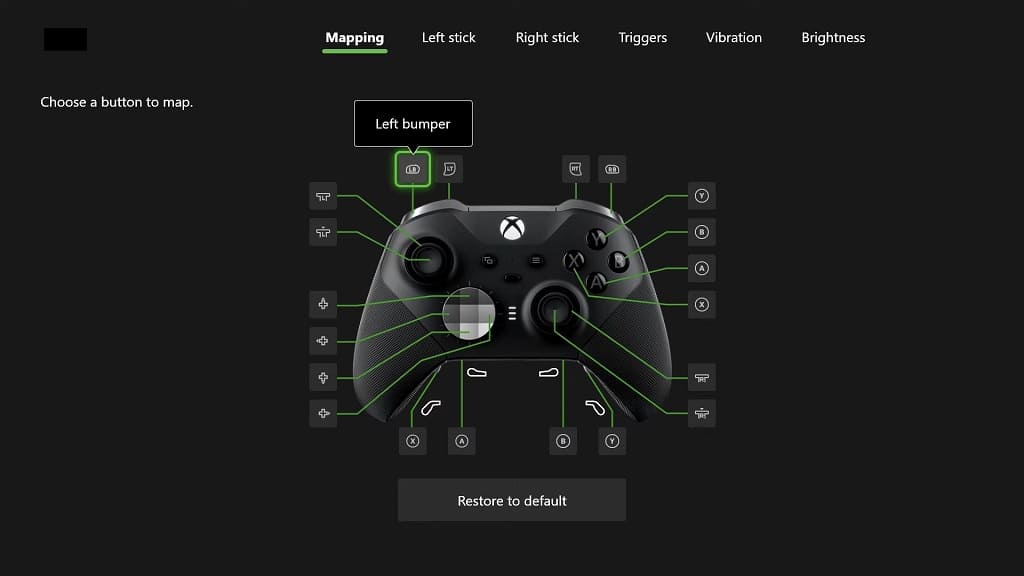
With the Xbox Elite Wireless Controller Series 2, you can also assign any of the aforementioned action buttons to the back paddles.

What we suggest doing is to assign the Left Analog Stick button to either P3 or P4 so that you don’t have to press down on the analog to sprint. You can use the three other back buttons to your liking.

For instance, you can assign LB to P3 or P4 and RB to P1 or P2 so that you will only need to use your index fingers for the LT and RT triggers.

Trigger Locks

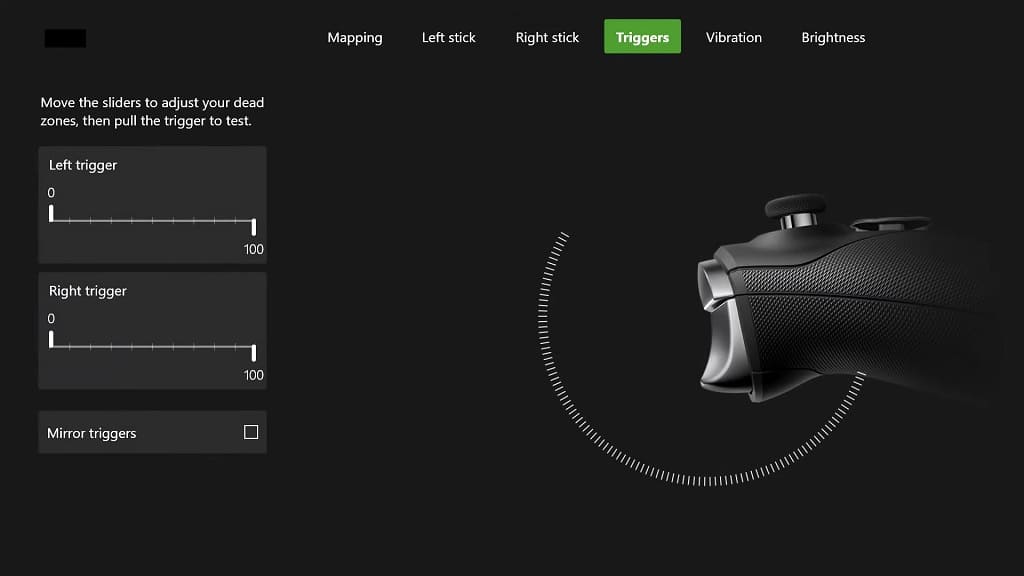
To make the LT and RT buttons more responsive in Remnant 2, we recommend that you move the sliders for the trigger locks located on the back of the Xbox Elite Wireless Controller Series 2 all the way to the bottom to enable quick fire.

You can use the Triggers menu of the controller to test out the responsiveness of the trigger inputs after you change the sliders.

Sensitivity and Deadzones

If aiming in Remnant 2 does not feel very responsive to you, then you can try adjusting the Horizontal Camera Sensitivity, Vertical Camera Sensitivity, Horizontal Aiming Sensitivity, Vertical Aiming Sensitivity and/or Horizontal Scope Sensitivity.

You can find these sliders by opening the in-game menu and then navigating over to System > Options.

For further fine tuning when it comes to aiming, you can head over to the Right Stick menu of the Xbox Elite Wireless Controller Series 2.

Wired Connection

To prevent any potential input lag, we suggest plugging the Xbox Elite Wireless Controller Series 2 directly to your Xbox Series X or Xbox Series S console. The communication method should automatically be switched from wireless to wired, which should result in less latency controller inputs.

How to disable motion blur in Remnant 2

By default, motion blur is enabled in Remnant 2. If you find that this blurring effect is making it hard to see and concentrate in this third-person shooting role-playing game, then you can check out this tutorial at Seeking Tech to see how you can disable this feature.

1. If you haven’t done so already, make sure you download the latest patch for Remnant 2 as the ability to toggle motion blur on or off was added post launch.

To manually update on the PS5, move the menu cursor over to the game’s icon on the home screen menu of the console. You then need to press the Options button on the DualSense and then select the Check for Update option.

On the Xbox Series X or Xbox Series S, you need to move the menu cursor over to the Remnant 2 icon from either the guide or home menu of the system. You then need to press the Menu button on the Xbox controller, select “Manage game and add-ons” and then select Updates.

2. With the game updated, you need to press the Options button on a PlayStation controller or Menu button on the Xbox controller during gameplay to open the in-game menu.

3. From there, use the L2/R2 buttons or LT/RT buttons to navigate towards the System tab and then select Options.

4. Inside the Options menu, make sure you are viewing the Video tab.

If you aren’t then you can use the L2/R2 buttons or LT/RT buttons to change tabs until you get to that location.

5. On consoles, the Motion Blur setting should be in between the Brightness and Performance Mode settings.

6. Make sure that Motion Blur is set to off and then exit out of the System > Options menu.

When you return to your game, you should no longer notice any exaggerated motion blurring.

How to fix Remnant 2 HDR and brightness issues on consoles

If you find that the graphics to be too dark, too bright and/or washed out, when playing Remnant 2 on consoles, then you can check out this troubleshooting article from Seeking Tech to see how you can fix these HDR and brightness issues.

Before we begin, it is important to note that Remnant 2 does not natively support HDR, at least not at launch. With that said, the PlayStation 5, Xbox Series X and Xbox Series S all come with the ability to convert SDR to HDR.

1. If you want to play Remnant 2 with SDR to HDR conversion, then you should make sure that you properly set it up on your console.

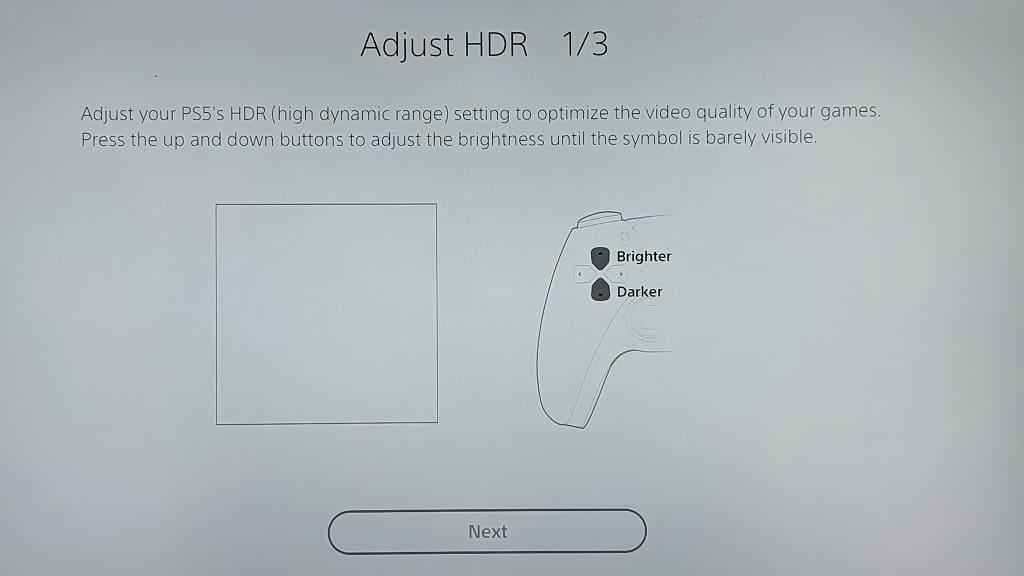
On the PlayStation 5, open the console’s Settings menu and then select Screen and Video > Video Output > HDR > Always On. On the same screen, select Adjust HDR and then follow the on-screen instructions to calibrate the brightness output.

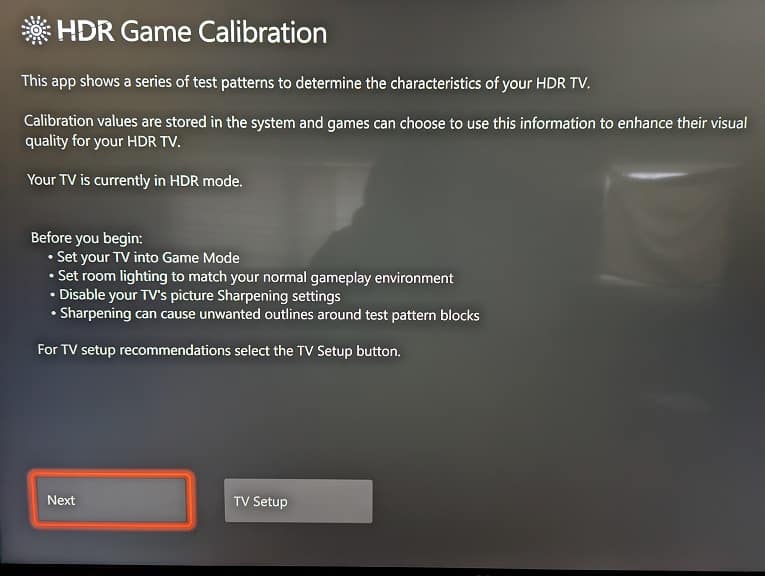
For the Xbox Series X or Xbox Series S, open the system’s Settings menu and then select General > TV & display options > Video modes > Auto HDR. Afterwards, return to the General > TV & display options menu and then select “Calibrate HDR for games.” Finally follow the on-screen instructions.

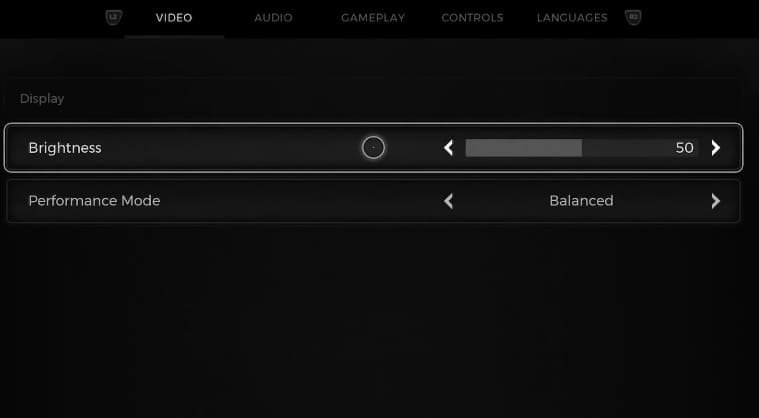
2. If the brightness still looks off, then you can go to the System > Options menu in Remnant 2. From there, you should be able to find the Brightness slider.

By default, this is set to 50. You can increase or decrease it to your liking until the brightness display in the game appears just right.

You may need to return to this menu to re-adjust when moving from a dark scene to a bright scene and vice versa.

3. You can also try adjusting the brightness and contrast settings from your television screen or gaming monitor.

4. You should make sure you have the latest patch downloaded for Remnant 2 as well as a new update may help add HDR support and/or fix the brightness display issues in the game.

Recommended DualSense Edge settings for Remnant 2

To get you through the tough fights in Remnant 2, you might want to consider playing this game with the DualSense Edge. To see what the best settings are when it comes to using this gamepad for the third-person shooting role-playing game, you can take a look at this Seeking Tech guide.

Custom Button Assignments

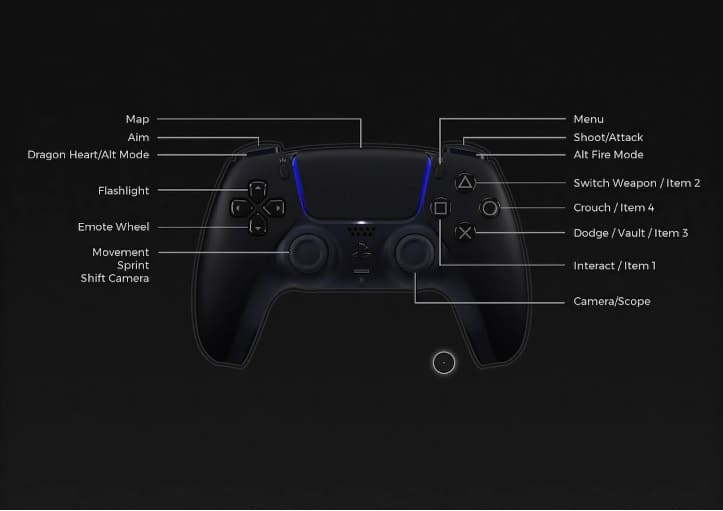
Remnant 2 features the following button layout for the DualSense controller:

  • Left Analog: Move or shift camera
  • L3: Sprint
  • Right Analog: Move camera or scope
  • Up Directional Pad Button: Flashlight
  • Down Directional Pad Button: Emote
  • L1: Dragon Heart or Alt Mode
  • L2: Aim
  • R1: Alt Fire Mode
  • R2: Shoot while aiming or attack when not aiming
  • L2 and R2: Use primary skill
  • Square: Interact or use Item 1
  • Triangle: Switch weapon, or use item 2
  • X: Dodge, vault or use item 3
  • Circle: Crouch or use item 4
  • Touchpad: Map
  • Options: Menu

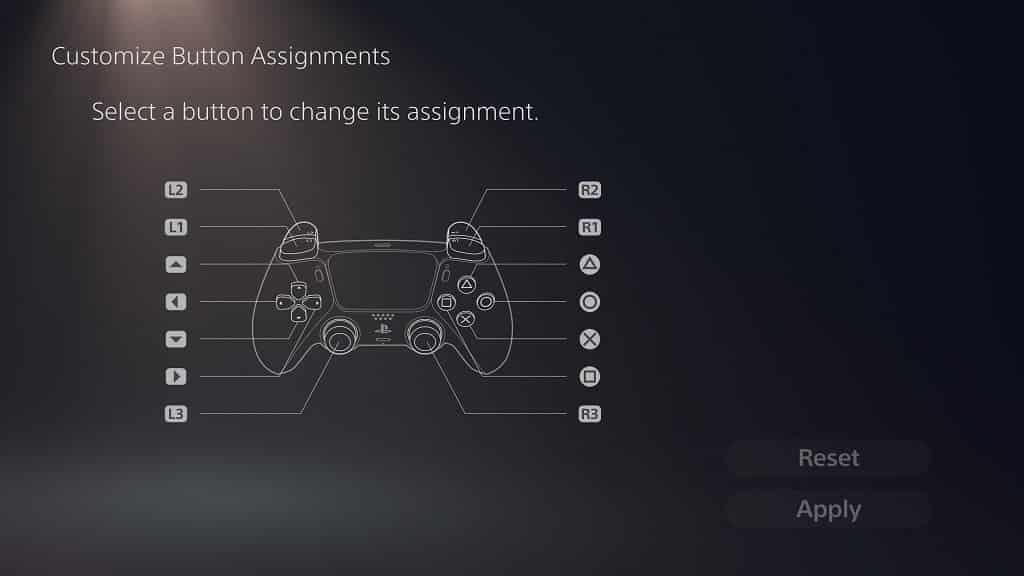
The DualSense Edge features two back buttons that can be assigned to any of the aforementioned action buttons.

We ended up assign the left back button for L3 so that we can sprint without having to press down hard on the left analog stick. For the right back button, we assigned it to the Up Directional Pad Button so that you don’t have to take your left thumb off of the left analog stick in order to turn on the flashlight.

Of course, you can configure the back buttons, as well as other buttons, to your liking. There aren’t any in-game settings in Remnant 2 where you can reassign the buttons. Therefore, you need to use the Custom Button Assignments menu of the DualSense Edge.
Trigger Stops

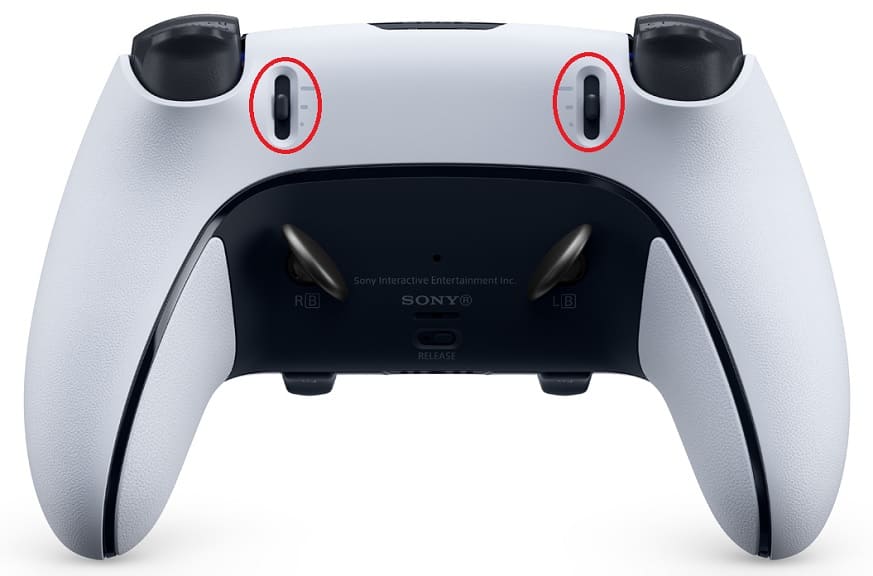
Since you will be shooting a lot in this game, we recommend that you pull the L2 and R2 sliders located on the backside of the Edge controller all the way to the bottom to enable quick fire.

If you would like the trigger inputs to feel even more responsive in the game, then you can head over to the controller’s Trigger Deadzone menu to further fine tune the sensitivity.
Stick Sensitivity

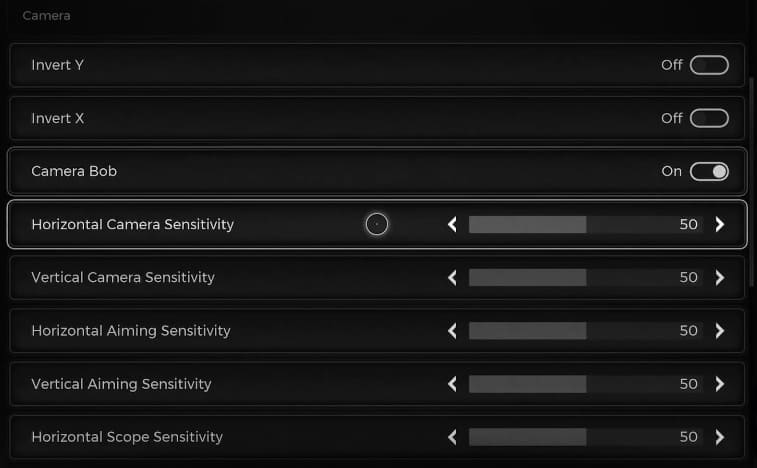
If you have a hard time aiming in the game, then you can head over to the System > Options menu in Remnant 2. From there, you will be able to adjust the following:

  • Horizontal Camera Sensitivity
  • Vertical Camera Sensitivity
  • Horizontal Aiming Sensitivity
  • Vertical Aiming Sensitivity
  • Horizontal Scope Sensitivity

You can also head over to the Stick Sensitivity and Deadzones menu of the DualSense Edge to adjust the sensitivity and dead zones of the controller.
Input Lag

To prevent any potential input lag, we recommend that you use the controller via the USB communication method. In order to do so, you should first plug the DualSense Edge directly to the PS5 via a USB cable.
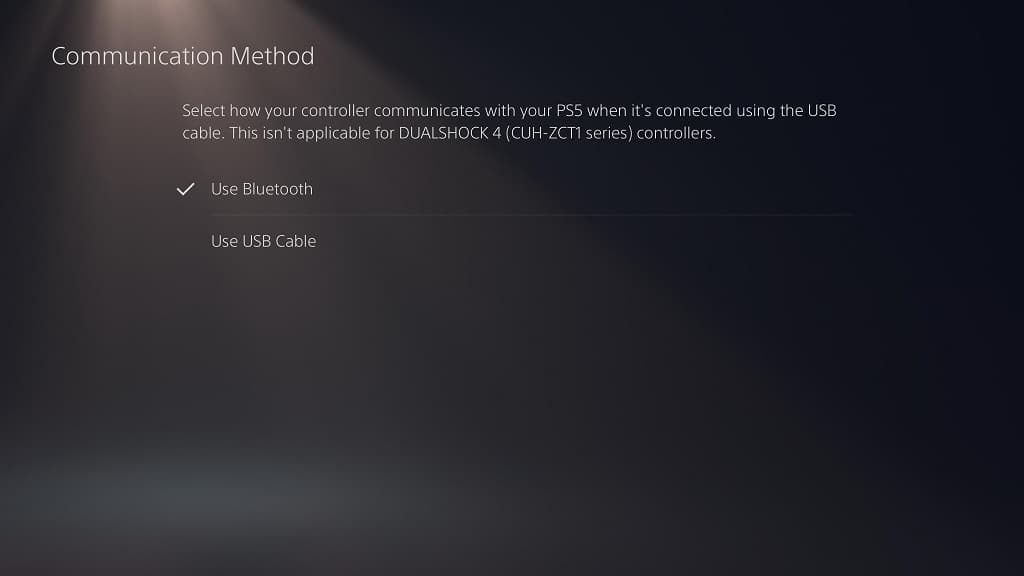
Afterwards, open the Settings menu of your PlayStation 5 and then select Accessories > Controller (General) > Communication Method > Use USB Cable in order to use the gamepad via wired communication while playing Remnant 2.