How to use the Xbox Series X and S thumbstick recalibration tool

Microsoft has updated the Xbox Series X and Xbox Series S consoles with a new thumbstick recalibration tool. If the analogs of your controller doesn’t not seem quite right, then you can check out this guide to see how you can use this feature.

1. If you haven’t done so already, make sure you have the latest firmware installed on your console.

2. Next, you need to head over to the Settings app of your Series X or Series S.

3. From there, make your way over to Devices & connections > Controller & headsets.

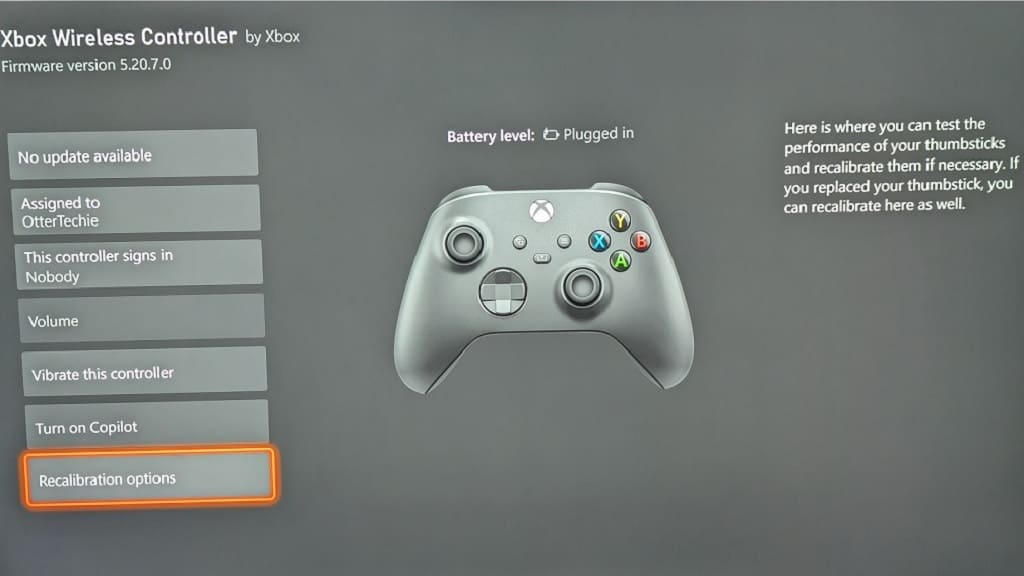
4. On the Xbox Accessories menu, select the “…” option on the controller that you want to recalibrate.

5. You can then select “Recalibrate option,” which has the following description:

Here is where you can test the performance of your thumbsticks and recalibrate them if necessary, If you replaced your thumbstick, you can recalibrate here as well.

6. If you are asked to update your controller, follow the instructions on screen and then select the Update Now option.

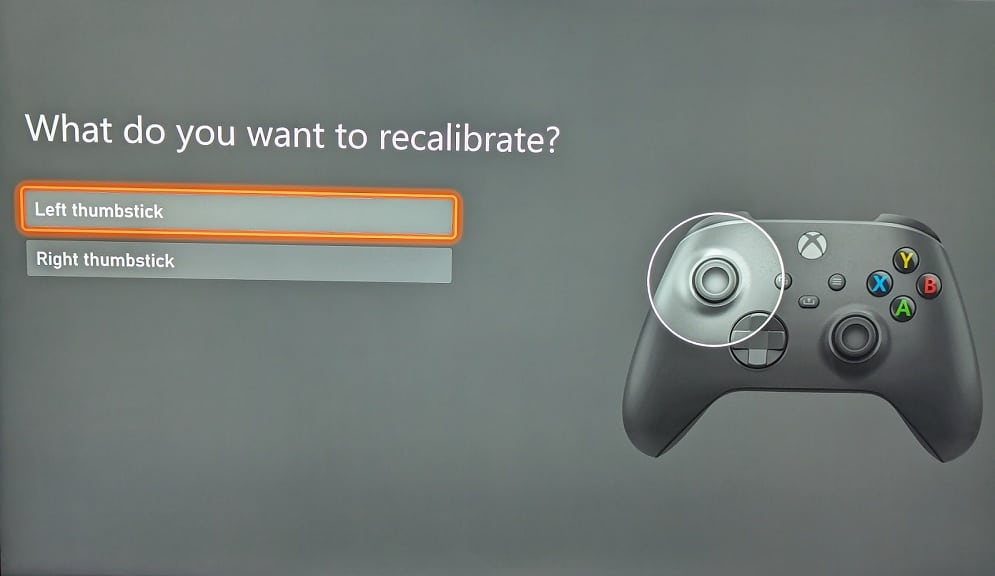
7. On the next screen, you should be able to choose to calibrate either the left analog stick or right analog stick.

8. You should then follow the instructions on the screen to calibrate your analog.

How to view your Microsoft Rewards on Xbox Series X and S

A new firmware update has made finding your Microsoft Rewards information a lot easier than before on your Xbox Series X or Xbox Series S. To find out how you can properly locate this section, you can take a look at this tutorial from Seeking Tech.

1. For the first step, make sure you updated your Xbox

2. Next, you need to press the Xbox logo button on the controller in order to open the Guide menu.

3. In the Guide menu, press the RB button to change tabs until you made your way over to “Profile & system.”

4. Afterwards, you need to select your account name, which should be the top option of the tab.

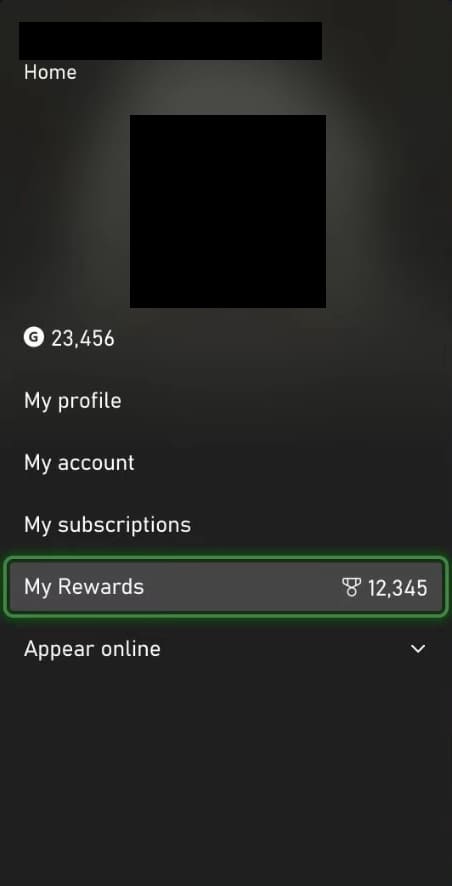
5. You should then be able to find and select My Rewards in the pop-up menu.

6. In the Rewards section of your profile, you will be able to find your daily, weekly and monthly gaming tasks.

On the top right corner, you can also select the “Redeem points” option. On the next menu, you should be able to redeem your Microsoft Reward Points on a variety of items.

How to enable VRR for gaming only on Xbox Series X and S

The Xbox Series X and Xbox Series S both support Variable Refresh Rate for compatible television sets and gaming monitors. Outside of gaming, this feature may cause flickering, stuttering, inaccurate HDR and other display issues.

Fortunately, a new firmware update allows you to customize when you can enable VRR. To find out how you can properly do so, you can check out this tutorial from Seeking Tech.

1. To start off, make sure you have the latest firmware downloaded on your Series X or Series S; otherwise, you won’t be able to customize when VRR will be turned on.

To manually update your console, make sure it is connected to the internet. Afterwards, go to Settings > System > Updates.

2. Once your Xbox has been updated, go back to the Settings menu.

3. From the front page of Settings, select General > TV & display options > Video modes.

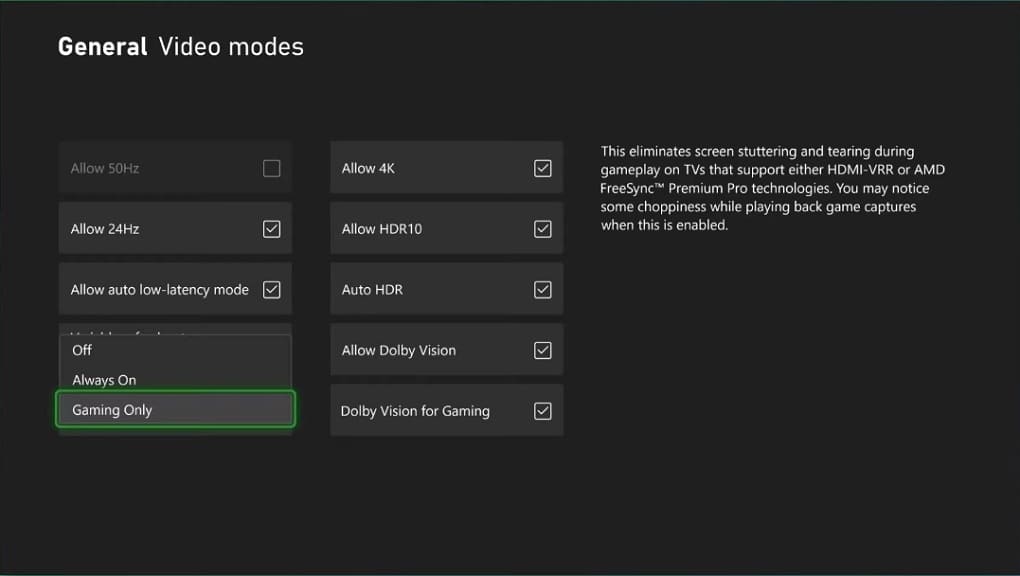
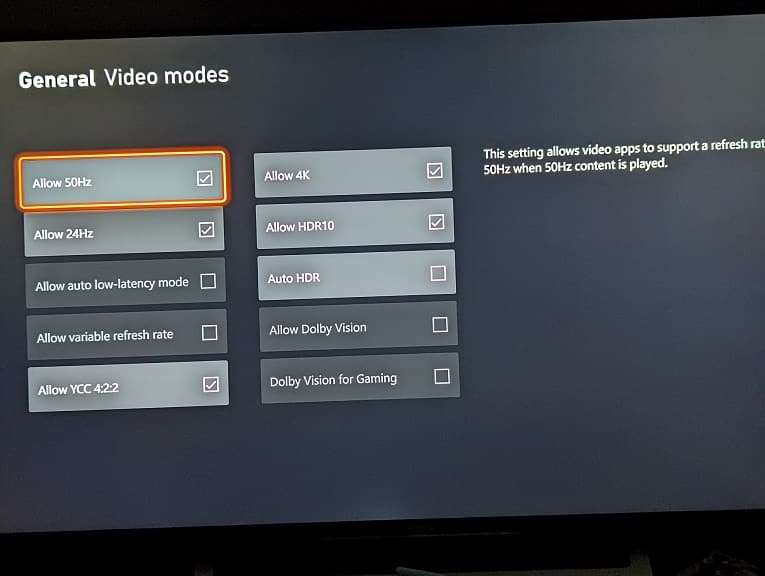
4. In the General – Video modes menu, move the cursor down to Variable Refresh Rate. This setting should show the following description:

This eliminates screen tearing and stuttering during games on TVs that support either HDMI-VRR or AMD FreeSync Premium Pro technologies. You may notice some choppiness while playing back game captures when this is enabled.

5. In the Variable Refresh Rate drop-down menu, you can select to turn this feature completely off, enable it for video games only or set it to be always enabled.

6. Once you are done, you can exit the Settings menu.

How to add Venmo payment option to Xbox Series X and Xbox Series S

You can now pay with Venmo when shopping in the Store App directly from your Xbox Series X and Xbox Series S. To see how you can add this payment option on either of these consoles, you can take a look at this tutorial from Seeking Tech.

1. To make things easier, you should first log into your Venmo account on a web browser on a smartphone.

2. Next, you need to turn on your Series X or Series S if you haven’t done so already.

2. In the home screen, you then need to make your way to the Settings App.

You can also head into Settings by pressing the Xbox button on the controller to open the Guide Menu. From there, you can select Settings from the Profile & System tab.

3. Inside of the Settings App, you need to select Account on the left column.

4. On the right side of the same screen, you then need to select “Payment & billing.”

5. From the “Payment & billing” menu, go to “Payment options.”

6. Select Add a new payment method from the Payment Options screen.

7. In the “Add a way to pay” menu, select eWallet.

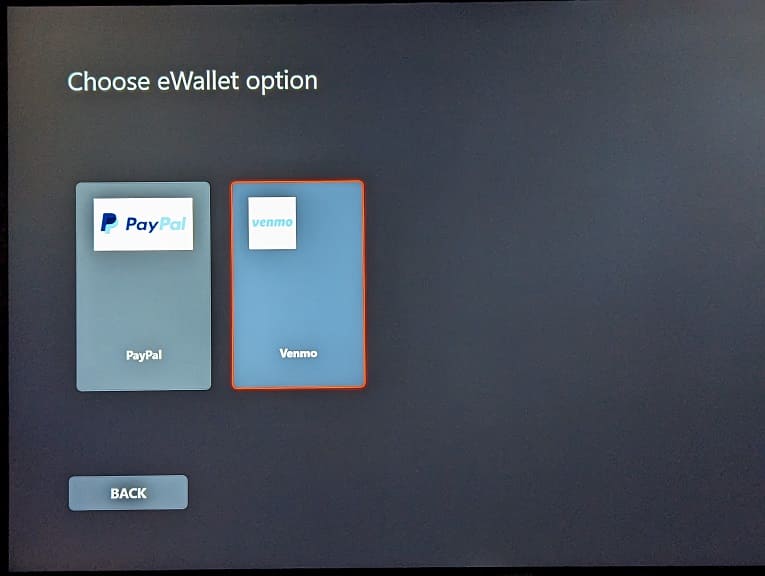
8. You should now be in the “Choose eWallet option” menu, which is where you need to select Venmo.

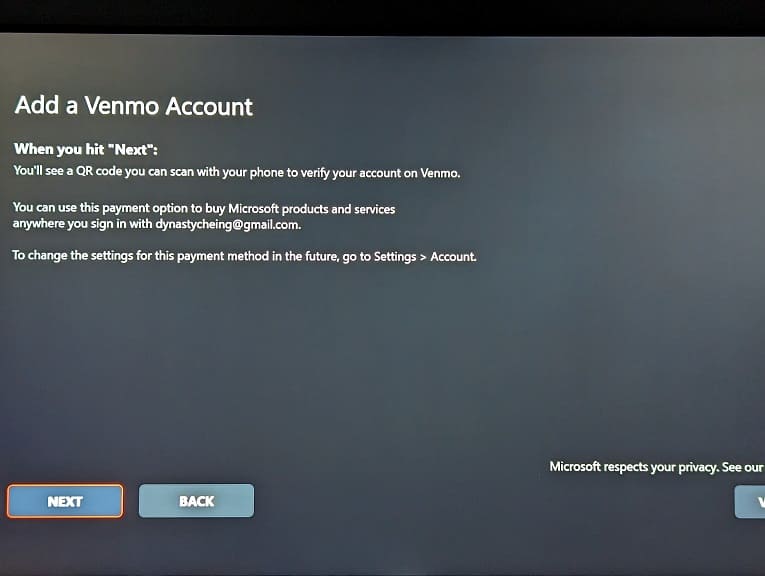
9. The “Add a Venmo Account” screen will explain how you can add Venmo to your Xbox Live account as well as how you can change the settings for this payment method in the future.

Here, you need to select Next to continue.

10. You should then see the QR Code.

If you have a phone that can scan the code, then you will be taken to the Venmo website where you can log into your Venmo account and then link it to your Xbox Live account.

If you don’t have a smartphone that is capable of reading the QR code, then you can select the Go to Venmo option. This should open the web browser on your Xbox Series X or Xbox Series S. From there, log into your Venmo account and then connect it to your Xbox Live account.

How to use PayPal Pay Later option when buying games for Xbox

You are now able to use the PayPal Pay Later payment option when purchasing games for your Xbox Series X, Xbox Series S, Xbox One X, Xbox One S or Xbox One. To find out how you can do so, you can take a look at this guide from Seeking Tech.

Before we begin, it is important to note that you can’t currently use PayPal Pay Later if you are buying through the Shop App directly on your Xbox console. Instead, you need to use the web browser version of the same digital store.

1. To start off, you need to head over to the Xbox Store website.

2. Next, make sure you are signed into the same Microsoft account that is linked to your Xbox Live account.

3. You can then start adding any games, downloadable content and other digital products for your Xbox console.

Keep in mind that the minimum order for PayPal Pay Later is $30 for bi-weekly payments or $199.99 for monthly payments.

The bi-weekly payments are interest-free. You will need to pay for 25% of the total order immediately and then the other three 25% payments two weeks at a time. This type of payment will work with orders of up to $1,500.

If you decide to go with a monthly payment method, then you will be charged interest. The fixed APR can be anywhere between 9.99% to 35.99% depending on your credit score. During special promotional periods, the rates can be dropped as low as 4.99%. For the monthly payment method, the maximum order limit is $10,000.

Since you are buying games and/or DLC for your Xbox, you will most likely use the bi-weekly payments feature for PayPal Pay Later.

4. Once you are done adding items into the cart, select the shopping cart icon.

5. In the cart, make sure you meet the minimum requirement for PayPal Pay Later, which is $30, for the total amount of the order. You should then select the Checkout option.

6. In the Step 1: Payment section, make sure that the Payment Method is set to PayPal Pay Later or Pay Now.
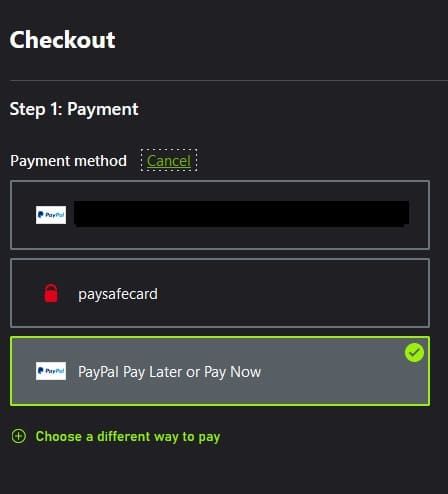
If it isn’t, select the Change link and then the “Select a different way to pay” link. Afterwards, make sure that the PayPal Pay Later or Pay Now is selected.

7. Go through the rest of the checkout process to purchase the items in the cart and then select the Pay Later option.

8. You can then choose to either Pay in 4 for biweekly payments or Pay Monthly. If you select pay Monthly, then you will be able to pick between a 6-month, 12-month or 24-month payment plan.
What to do if Xbox Series X or Xbox Series S is not auto updating

The Xbox Series X and Xbox Series S are capable of auto updating as the consoles can download the latest firmware and game patches without any manual inputs from the end users. If you find that the updates aren’t automatic, then you can check out this guide from Seeking Tech to see how you can potentially fix this issue.

1. If your console isn’t updating in sleep mode, then we recommend that you check your settings. In order to do so, you first need to open the Settings menu of your Series X or Series S and then navigate over to General > Power options.

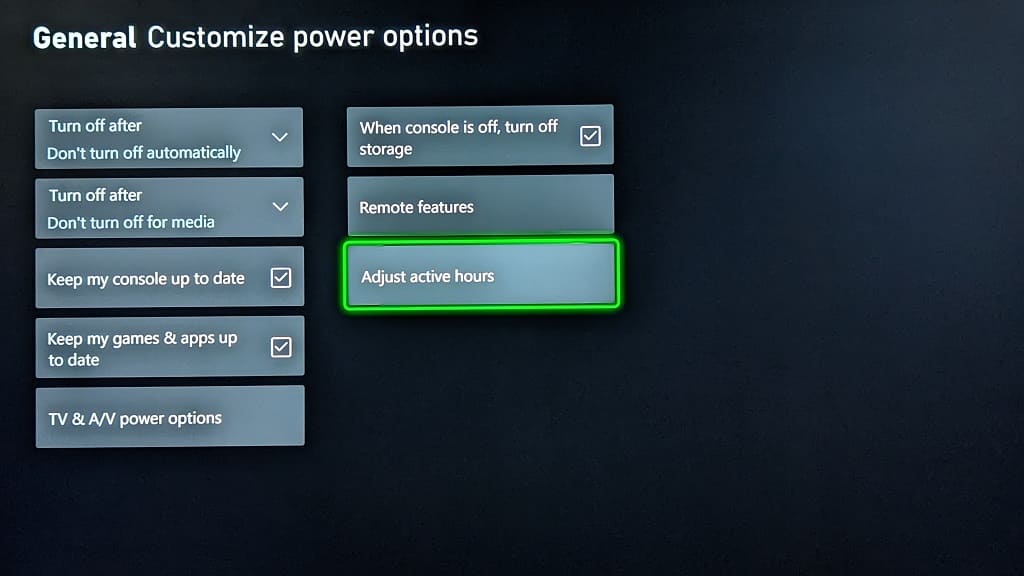
From the “General – Power options” menu, make sure that Sleep is selected. Afterwards, select Customize power options.” On the next screen, make sure that the “Keep my console up to date” and “Keep my games up to date” boxes are checked while the “When console is off, turn off storage” is unchecked.

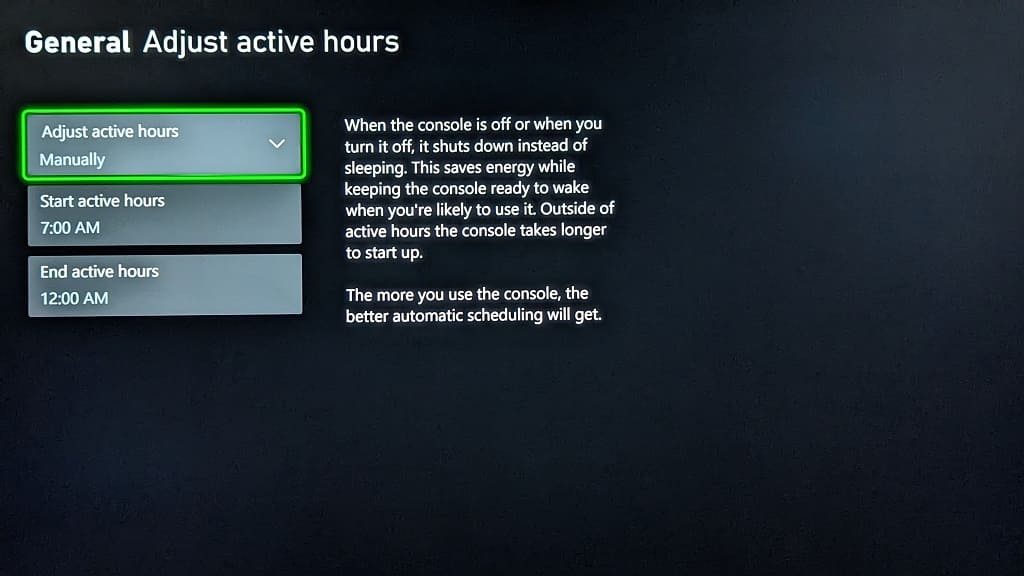
You can also select the “Adjust active hours” option from the “General – Customize power options” menu and then adjust the active hours so that your console will go into sleep mode instead of turning completely off.

2. If the updates still aren’t automatically downloading or installing, then you can try power cycling the console by doing the following:

  • Press and hold the power button on your Xbox Series X or Xbox Series S for around 10 seconds to turn it off completely.
  • Once the console has shut down, unplug its power cable from the power outlet.
  • Next, you need to wait for a minimum of 5 minutes.
  • Afterwards, re-plug the power cable of the console back into the power outlet.
  • Turn your Series X or Series S back on again.

3. If you have games installed on a USB storage drive, then you can try moving them to the Internal Storage or the Expansion Card.

4. You can also try factory resetting the console. To do so, open the Settings menu of the Xbox Series X or Xbox Series S. From there, select System > Console info > Reset console.

When asked how you want to reset your console, you can try the “Reset and Keep My Games & Apps” option first. If that doesn’t help kickstart your gaming system to auto update on its own, then you can try the “Reset and Remove Everything” option after selecting Settings > System > Console info > Reset console.

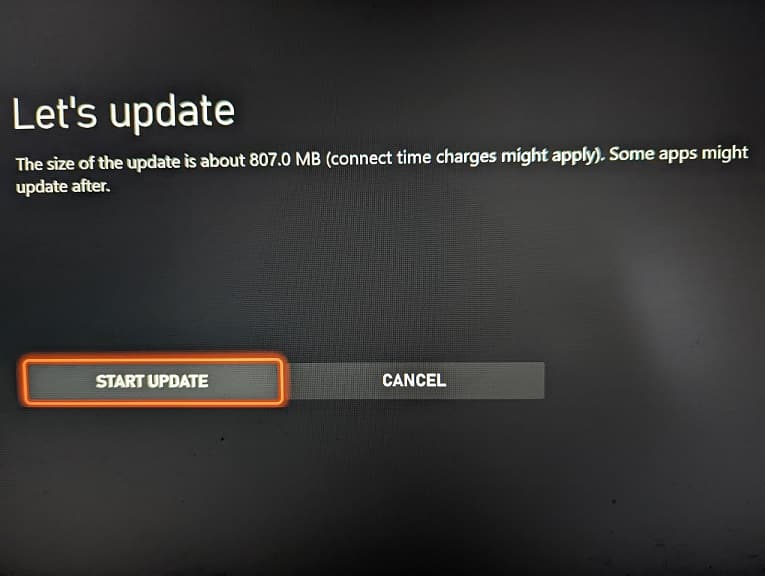
5. You can also try manually updating the firmware for your console by going to Settings > System > Updates. A new system software may make the automatic updates more reliable.

6. If none of the aforementioned steps have worked so far, then there is not much else you can do other than to manually update.

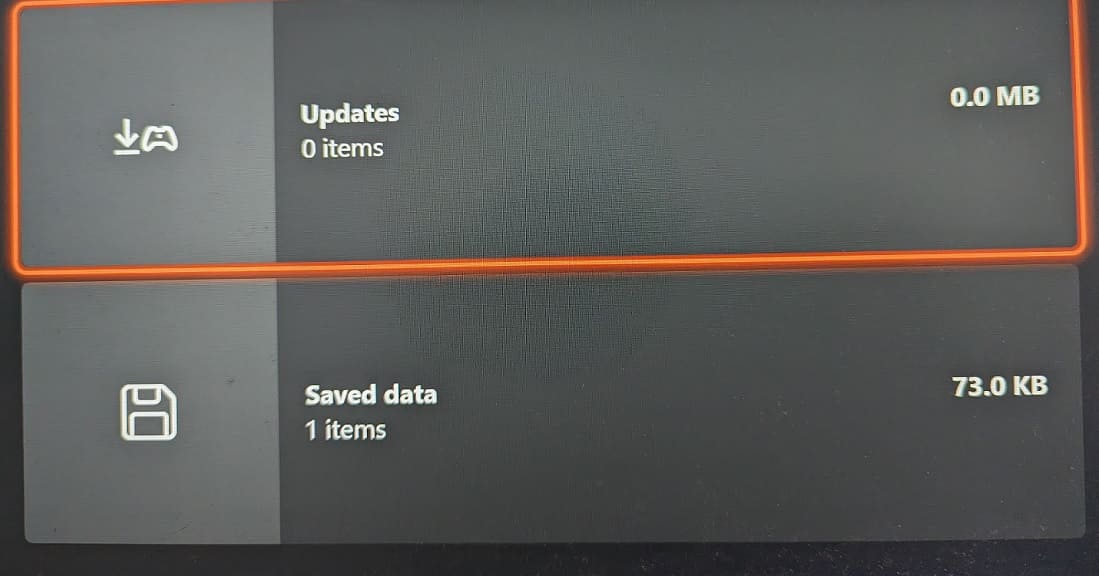
To do so for a specific game, move the menu cursor over to its icon from the dashboard menu. Afterwards, press the Menu button on the controller to bring up a pop-up window, which is where you can select the “Manage game and add-ons” option. Finally, select Updates on the next screen.

How to connect the WH-1000XM5 to Xbox Series X or S

If you have the Sony WH-1000XM5 Wireless Noise Cancelling Headphones and would like to use it with your Xbox Series X or Xbox Series S, then you can take a look at this guide from Seeking Tech to see how you can properly connect this accessory.

Can you connect WH-1000XM5 to Xbox Series X or Xbox Series S via Bluetooth?

Unfortunately, the Xbox Series X and Xbox Series S do not support Bluetooth connections. As a result, you won’t be able to connect the headset wirelessly to your game console.

However, there are two workarounds that you can do. The first of which is to pair and connect the WH-1000XM5 to a television screen that supports audio output over a Bluetooth connection. You should then be able to use the headphones with the Xbox as well as doing any other activities with your TV.

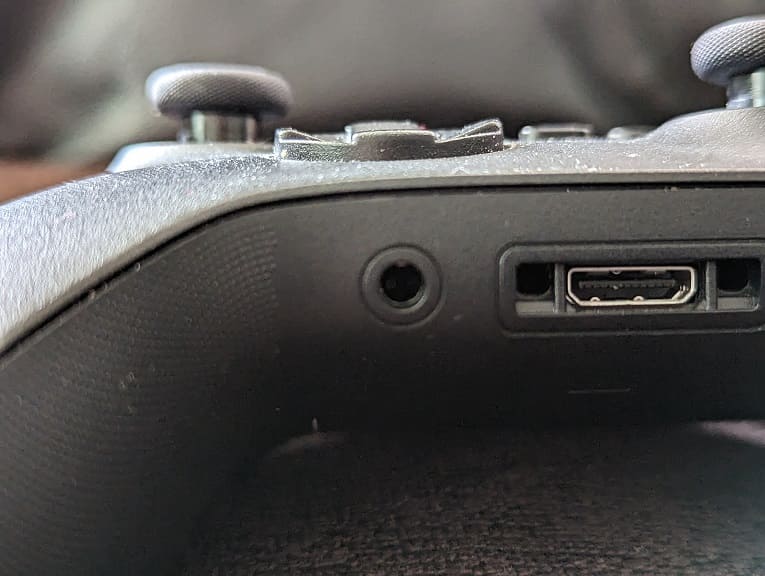
For the second method, you can buy a Bluetooth 5.0 Wireless Audio 3.5mm Adapter. You will need to plug the adapter into the 3.5mm audio port of the Xbox Series controller. You should then be able to pair and connect the WH-1000XM5 to the adapter.

If you are interested in an Xbox compatible adapter for Bluetooth headsets, then we recommend checking out the UGREEN Bluetooth 5.0 Transmitter and Receiver 2 in 1 Wireless 3.5mm Bluetooth Adapter. You can find this product on Amazon with this link. (#CommissionsEarned).

How to connect WH-1000XM5 to Xbox Series X or Xbox Series by using an audio cable

Of course, you can also simply plug in the WH-1000XM5 to your Xbox controller. In order to do so, you need to take the following steps:

1. Use the audio cable that came included with the WH-1000XM5 to plug one end of the cable to the headphones.

2. Plug the other end of the cable to the audio port of the Xbox controller.

3. The audio output of your Xbox should automatically be switched over to the WH-1000XM5.

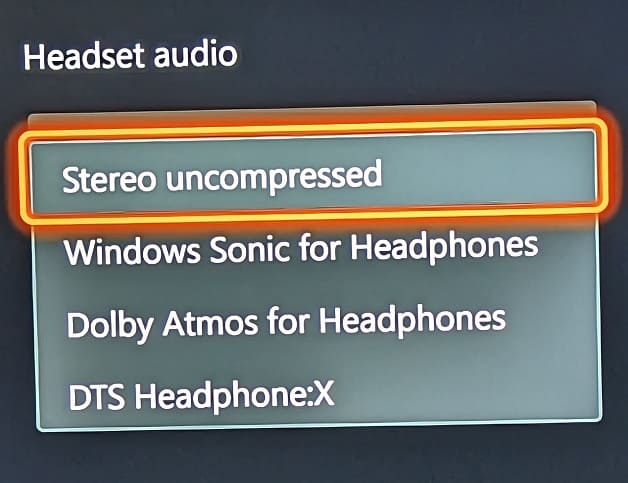
4. By default, this headset will be using the Stereo Uncompressed format. In order to change to a different one, go to the Settings menu of your Series X or Series S.

From there, select General > Volume & audio output > Headset format. In the drop-down menu, you will be able to select the following:

  • Stereo uncompressed
  • Windows Sonic for Headphones
  • Dolby Atmos for Headphones
  • DTS Headphone:X

5. From the same General – Volume & audio output menu, you can also select the “Audio testing & details” option.

On the next screen, scroll down to the “Formats supported by your headset” section. This will show you a list of supported formats for the Sony WH-1000XM5.

What to do if your Xbox Series X or S can’t detect your Wi-Fi network

When setting up the Xbox Series X or Xbox Series S to connect to your Wi-Fi, you may notice that your console wasn’t able to detect your wireless network. To see how you can fix this issue, you can take a look at this troubleshooting article from Seeking Tech.

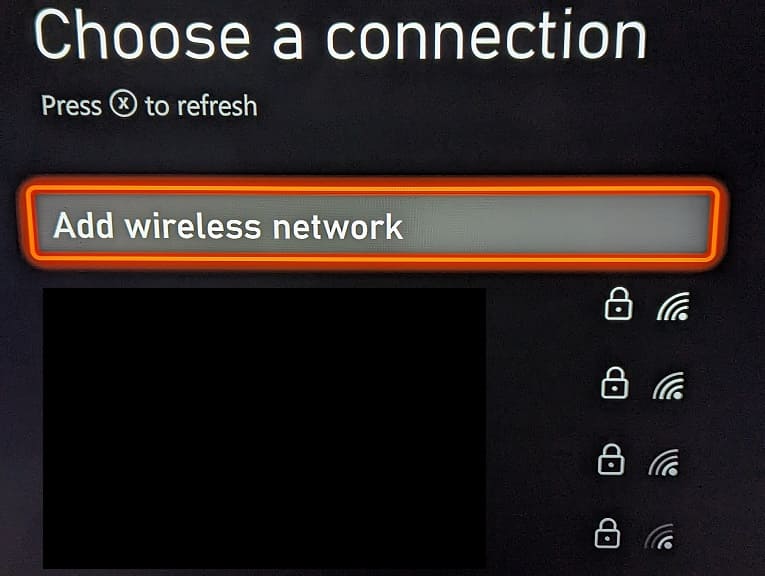
1. For the first step, you can try refreshing the list of networks from the “Choose a connection” menu on your Xbox.

In order to do so, head over to Settings > General > Network settings > Set up wireless network. From the “Choose a connection” screen, press the X button to refresh the list.

2. If your Wi-Fi still can’t be found, then you can select the “Add wireless network” option from the aforementioned “Choose a connection” menu.

Afterwards, use the on-screen keyboard to manually input your input the SSID of your WiFi network and then press the Menu button on the controller to begin the search.

3. If manually inputting the SSID doesn’t work, then you can try moving your modem, router and/or gateway closer to the game console.

4. You should also make sure that there aren’t any walls or metal objects that may be blocking the direct line of sight between the Wi-Fi access point and your Series X or Series S.

5. Other wireless devices, such as a wireless headset, may also cause interference with the Wi-Fi internet connection as well.

So, if you have these in the same vicinity as your Xbox and/or wireless access point, then you can try turning them off.

6. If possible, you can also try extending your Wi-Fi signal by using a repeater, extender, node or bridge.

7. A factory reset of your Xbox Series X or Xbox Series S may help too. In order to do so, you need to head over to Settings > System > Console info > Reset console > Reset and Keep My Games & Apps.

8. Power cycling your networking devices could help get your Wi-Fi detected as well. In order to do so, you can try taking the following steps:

  • Turn off your game console.
  • You also need to turn off your modem, router and other devices connected to your home network. If some of these electronics don’t have a power switch, then you need to unplug their power cords.
  • Wait for at least 5 minutes.
  • Turn your modem, router and other networking devices back on.
  • You then need to wait until the Internet is back online again on your home network.
  • Turn on your Xbox and then go to Settings > General > Network settings > Set up wireless network to see if your console is now able to detect your Wi-Fi network.

9. There is a possibility that either your networking device or the Wi-Fi card on your Xbox may be defective. If your Wi-Fi works with other devices, then there may be something wrong with your Series X or Series S.

In this case, you may need to get your console repaired or replaced.

How to fix distorted and glitchy Netflix videos on Xbox Series X and S

When trying to stream a video through the Netflix App on the Xbox Series X or Xbox Series S, you may end up getting a distorted and/or glitchy picture. To see how you can fix this issue, you can take a look at this troubleshooting article from Seeking Tech.

1. Based on our experience, the distortion will most likely occur when you are streaming Dolby Vision content in the Netflix App on a compatible television screen without first enabling DV support on your Xbox.

To fix this problem, you need to open the Settings App of your Series X or Series S. Afterwards, head over to the General > TV & display options > Video modes menu. From there, make sure that the Allow Dolby Vision setting is enabled.

Afterwards, you need to do a hard reset of your console. In order to do so, go back to the front page of the Settings App and then select General > Network settings > Advanced settings > Alternate MAC Address. Afterwards, select Clear and then Restart.

Once that is done, you can try playing the same problematic Netflix video to see if it can display properly.

2. If you have Dolby Vision already enabled but are still seeing the glitchy image, then you can try factory resetting your Xbox.

To do so, head over to the Settings App and then select System > Console Info > Reset Console > Reset and Keep My Games & Apps.

3. You can also try turning off the Allow Dolby Vision setting from the General > TV & display options > Video modes menu and hen hard resetting your console.

4. You should also make sure that you have the latest patch installed for the Netflix App as well.

To manually update, press the Menu button on the controller while the cursor is over the Netflix icon in the system menus of your Xbox. Afterwards, select Manage app > Updates.

5. Power cycling the console may help as well.

In order to do so, turn off your Series X or Series S and then unplug the power cord from the system. Afterwards, wait for at least 5 minutes before plugging the power cord back in and turning on your console.

6. If you are still getting a distorted picture, then you can try unplugging the HDMI cable and then plugging it back in.

7. If possible, you can try using a new HDMI cable to connect your Xbox to the television set.

How to sort by price on the Xbox Store App of Xbox Series X and S

Thanks to a new firmware update, you can now sort by price from the Microsoft Store App on your Xbox Series X or Xbox Series S console. To find out how to do so, you can take a look at this tutorial from Seeking Tech.

1. If you haven’t already, you should make sure that you have the latest software update downloaded on your gaming system as the price sorting feature was added recently.

You can check if there is a new firmware available by first opening the Settings App on your Series X or Series S. Afterwards, navigate over to System > Updates. If you see that there is an update available on the System – Updates page, then make sure you download and install it before you move on to the next step.

2. With your console updated, open the Microsoft Store App. You can do so quickly by pressing the Xbox logo button on the controller, which should bring up the Guide menu. From there, select the shopping bag icon located at the bottom.

3. Inside of the Store, navigate over a page that shows a list of content that you want to sort the pricing range for. For this guide, we will be heading to the Top Paid Games page.

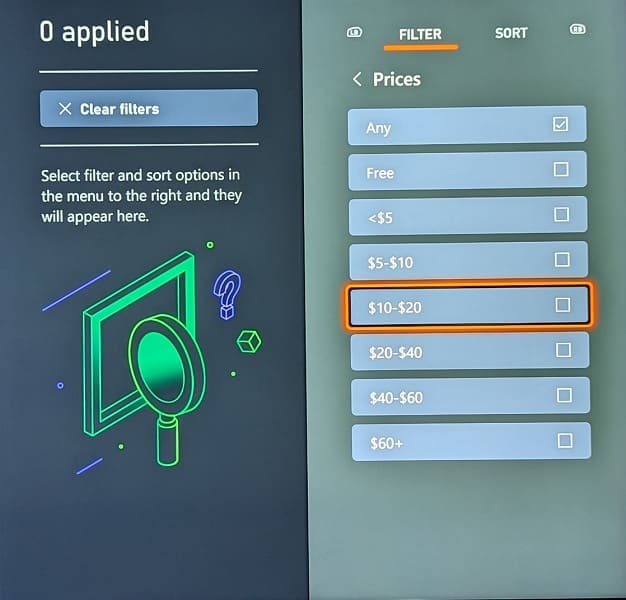
4. Once you get to a page that shows a list of games or other content, press the X button on the controller to open the Filter menu.

5. The Filter menu should appear on the right side of the screen. From there, you need to select Prices.

In the Prices section, you will be able to select the following:

  • Any
  • Free
  • <$5
  • $5-$10
  • $10 -$20
  • $20-$40
  • $46-$60
  • $60+

By default, the Prices filter is set to Any, which means that all price ranges will be shown in the listing. If you pick any of the other options, then Any will automatically be deselected.

Select the pricing range that you want to view. Keep in mind that you can combine multiple ranges in order to fit your browsing needs.

7. Once you are done applying the Price filter, press the B button twice, once to back out of the Prices section and one more time to exit the Filter menu.

You should now be able to view the games on the page based on the pricing range you selected.