How to fix the ‘you’ve hit today’s limit’ error in Pokémon Sleep

When trying to track your sleeping habits in Pokémon Sleep, you may end up seeing the following error messages:

  • “You can track up to two sessions of sleep per day. You’ve hit today’s limit.”
  • “You can’t start tracking sleep right now because your device’s current time overlaps with the time of a sleep session you previously tracked.”

To see how you can fix these limit issues, you can check out this troubleshooting article from Seeking Tech.

Before we start it is important to note that you can only track up to 2 sleeping sessions a day. The app refers to a session as a minimum of 90 minutes when it comes to you snoozing off. Changing your time zone to another may also cause these error messages to pop-up.

1. If you are getting this limit warning, then there is not much you can do but to wait.

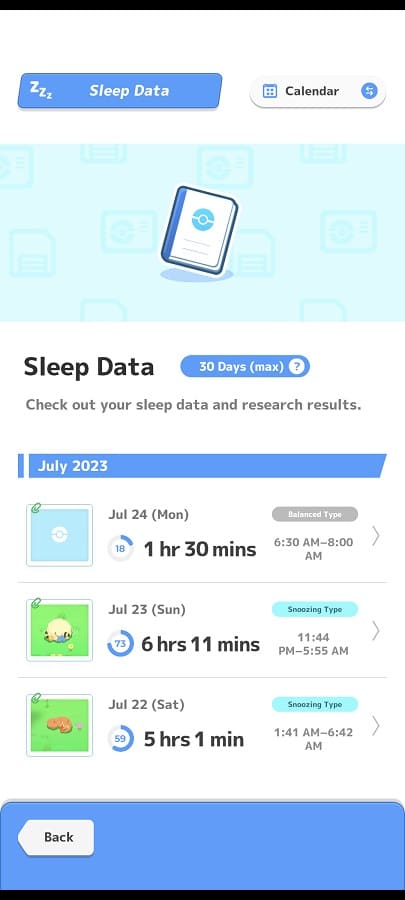
You may not be able to track your sleep again until 24 hours have passed since your second to last recorded sleeping session. You can see your sleep data by selecting Main Menu after logging into your account. You can then select Sleep Data from the Main Menu.
2. If waiting until 24 hours have passed since your second to last recorded sleeping session does not work, then you can try waiting until the next day. The app should roll over to a new day at 4:00 a.m. in your local time.

Xbox Elite Wireless Controller Series 2 settings for Exoprimal

To improve your performance in Exoprimal, you can try using the Xbox Elite Wireless Controller Series 2. You can take a look at this guide to see what the best settings are to use for this gamepad when it comes to playing this multiplayer third-person shooter.

P1, P2, P3 and P4 Button Assignments

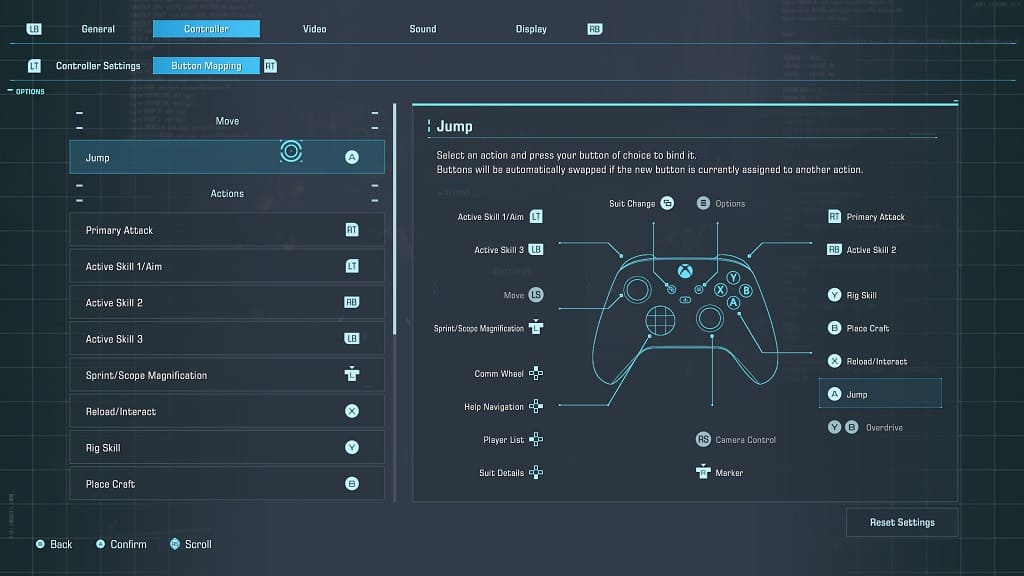
You can find the default Xbox button layout for Exoprimal below:

  • A: Jump
  • RT: Primary Attack
  • LT: Active Skill #1 or Aim
  • RB: Active Skill #2
  • LB: Active Skill #3
  • Left Stick Button: Sprint or Scope Magnification
  • X: Reload or Interact
  • Y: Rig Skill
  • B: Place Craft
  • Y and B: Overdrive
  • View: Suit Change
  • Up Directional Pad: Comm Wheel
  • Right Directional Pad: Help Navigation
  • Left Directional Pad: Player List
  • Down Directional Pad: Suit Details
  • Right Stick Button: Marker

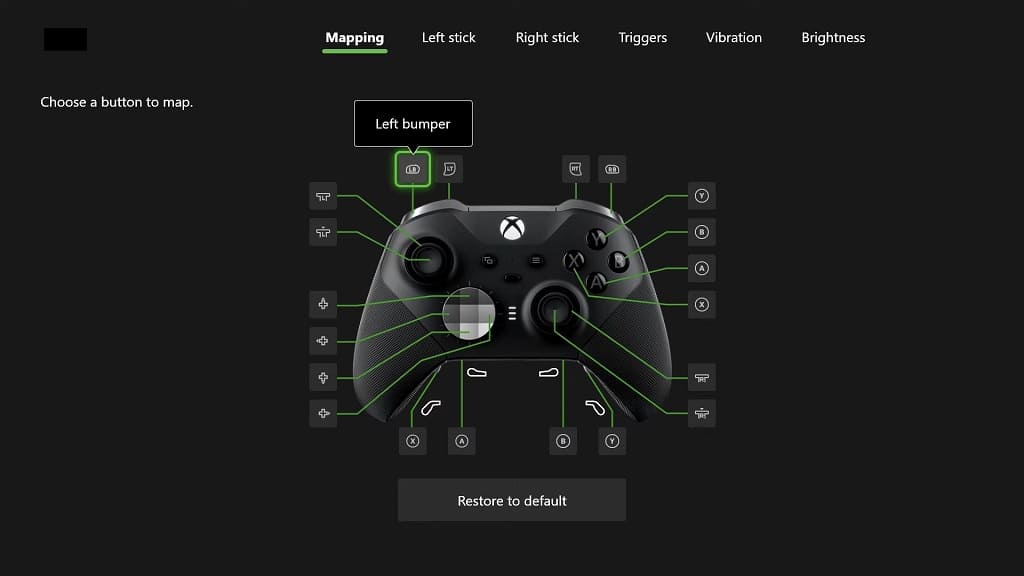
When it comes to the four back buttons, we recommend assigning the Left Analog Stick button to P4 and the Right Analog Stick button to P2. This will make it so that you can use the back buttons to sprint and set a marker, which feels more natural and responsive than having to press down on an analog stick.

We then assign the LB and RB buttons to the two remaining back buttons. Doing so frees up our index fingers to be used exclusively for the LT and RT triggers.

For additional button mapping changes, you can go to the Settings > Controller > Button Mapping menu in Exoprimal.

Trigger Locks

To get a faster response when using the LT button to use a skill/aim or the RT button to use a primary attack, we recommend that you move the trigger locks on the backside of the Xbox Elite Wireless Controller Series 2 all the way down.

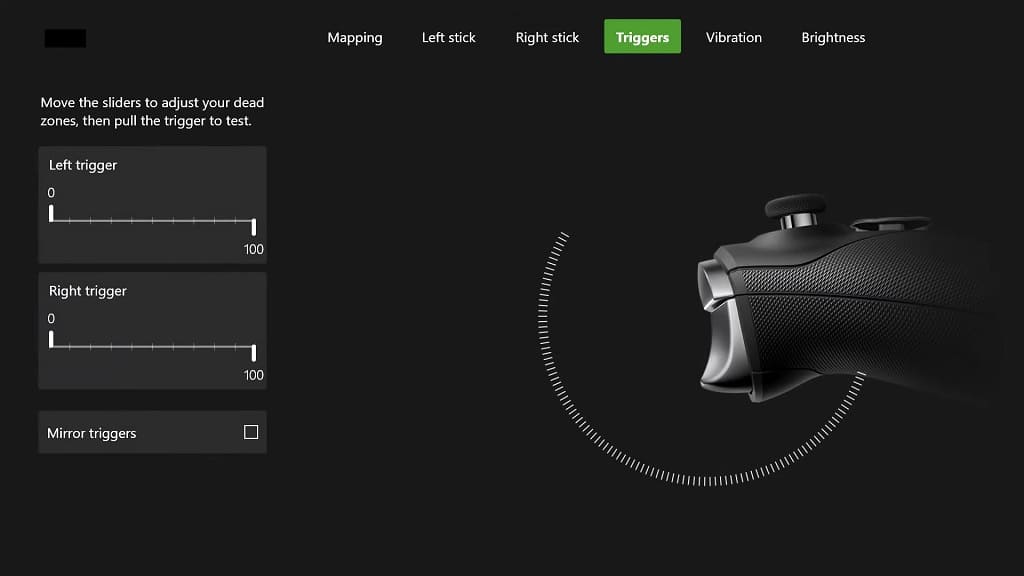
You can also head over to the Triggers menu of the gamepad in order to change the deadzone if you want the triggers to be even more sensitive.

Sensitivity and Deadzones

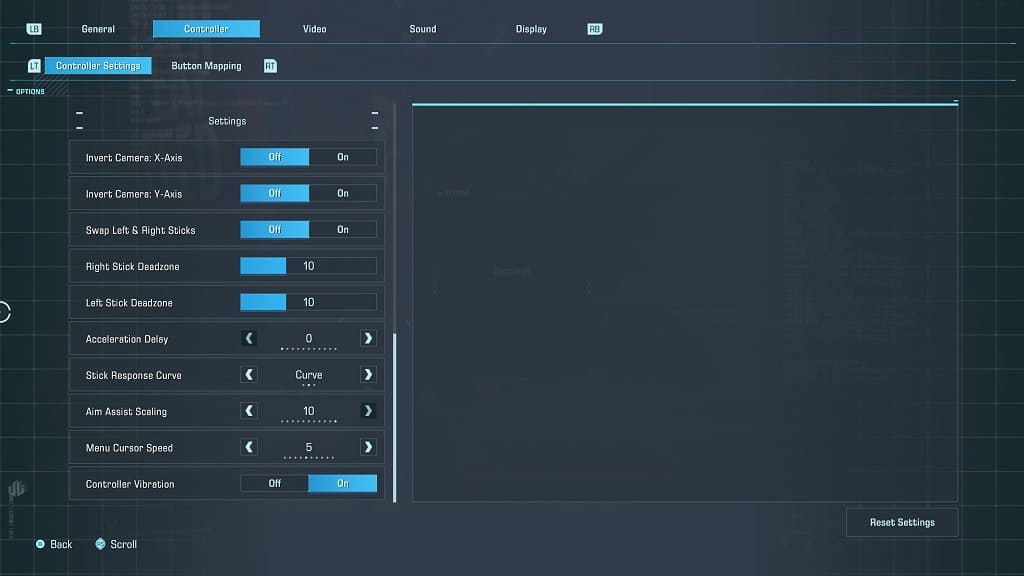
We found aiming to be a little stiff when using the right analog stick in Exoprimal under the defualt settings. Thankfully, you can go to the Settings > Controller > Controller Settings menu in the game to change the sensitivity, deadzone, acceleration delay and stick response curve.

Of course, you can also head over to the Right Stick menu of the Xbox Elite Wireless Controller Series 2 for further fine tuning.

You may need to play around with the right analog settings for a little bit until you get the correct parameters where your aiming feels quick and natural.

Wired Connection

If you haven’t done so already, we recommend that you plug in the Xbox Elite Wireless Controller Series 2 to your Xbox console. This is because a wired connection should produce less input lag when compared to using the same gamepad over wireless communication.

How to manually add sleep data in Pokémon Sleep

If you forgot to open the Pokémon Sleep app before your bedtime, or something went wrong with the tracking, then you are still able to manually add sleep data. To find out how you can manually input your own statistics, you can take a look at this tutorial from Seeking Tech.

1. To start off, you need to log into your account and then open the Main Menu.

2. From the Main Menu, you should see your sleeping chart over the past week located at the top. Here, you need to select the Add Sleep Data option on the bottom right of the chart.

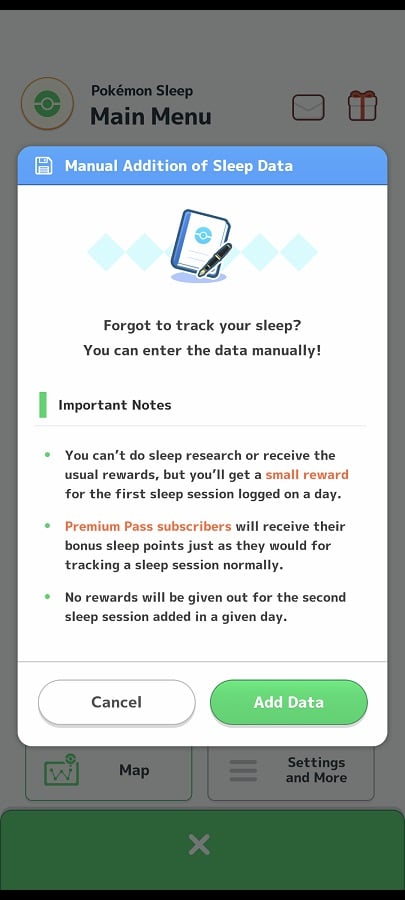
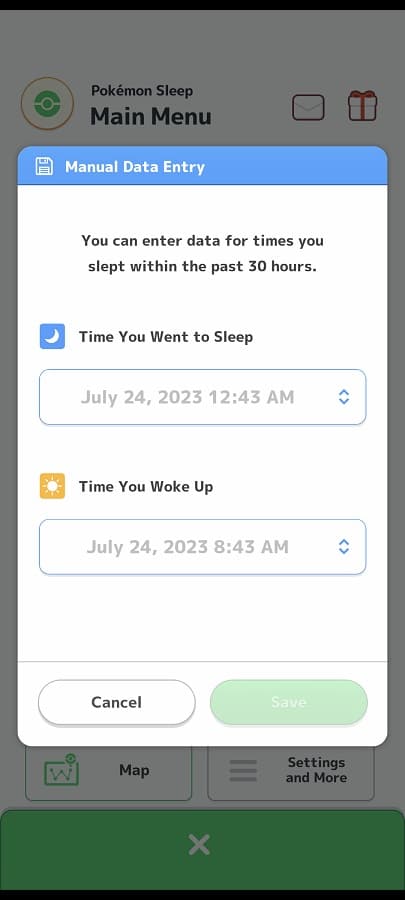
3. You should then see the Manual Addition of Sleep Data screen, which should show you the following information:

Sleep data that are manually added won’t be applied to sleep research. You also won’t get any rewards aside from the one you get from logging into the server every day.

Here, you need to select the Add Data option.

4. In the Manual Data Entry, select the drop-down menu below the Time You Went to Sleep section and then select the date and time you went to sleep.

5. Next, you need to select the drop-down menu below the Time You Woke Up section and then select the date and time you woke up.

6. Once you are done, select Save.

7. You should see a Confirm Data notification saying that you won’t be able to edit or delete the sleep session that you are about to manually add.

Here, you need to select Save to confirm the addition.

What microtransactions are included in Pokémon Sleep?

Although the app is free to use, Pokémon Sleep features microtransactions as you can purchase in-game items. You can check out this guide from Seeking Tech to see how this feature works in the sleep tracking app.

Microtransaction Currency

Diamonds are the microtransaction currency in Pokémon Sleep. You will be able to earn these through normal usage of the app or pay for them with real money.

Diamond Pricing

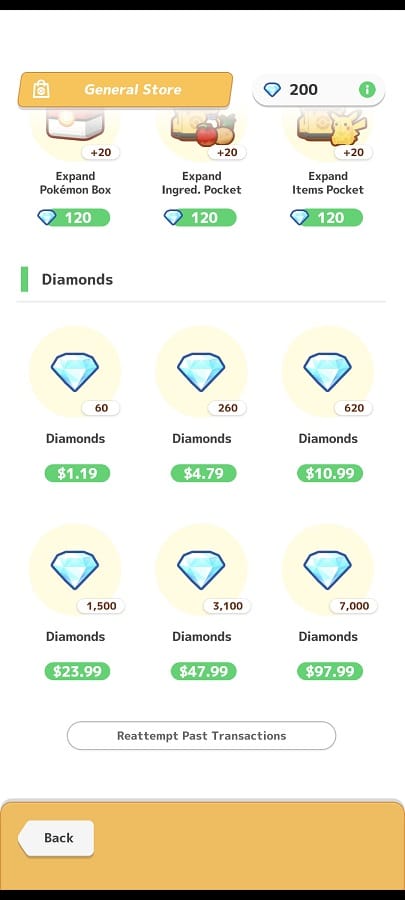
In the U.S. region, you will be able to purchase Diamonds in the following increments:

  • 60 Diamonds for $1.19
  • 260 Diamonds for $4.79
  • 620 Diamonds for $10.99
  • 1,500 Diamonds for $23.99
  • 3,100 Diamonds for $47.99
  • 7,000 Diamonds for $97.99

How to buy Diamonds in Pokémon Sleep

In order to purchase Diamonds, you need to do the following:

  • Log into your account and then tap the Shops icon in the main menu.
  • In the Shops menu, you then need to tap General Store.
  • From the General Store menu, scroll all the way down until you get to the Diamonds section.

How to exchange Diamonds for in-game items

To exchange the premium currency for in-game items, you have to take the following steps:

  • Go back to the aforementioned Shops > General Store menu.
  • From there, you will be able to purchase limited-time bundles, bargain bundles, items and upgrades by using Diamonds.

How to check out Diamonds balance

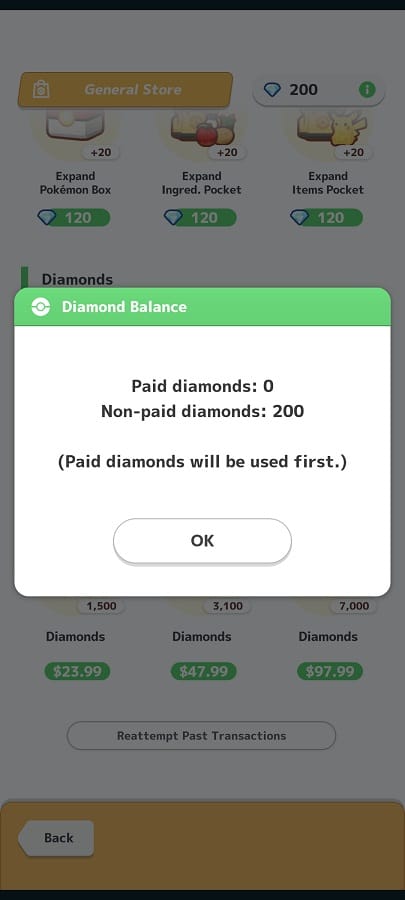
In order to check how many Diamonds you have in your inventory, you need to tap the Diamond option located on the top right of the Shops > General Store menu. Afterwards, you should be able to see how the number of Paid Diamonds and Non-Paid Diamonds you are holding.

When exchanging Diamonds for in-game items, your Paid Diamonds will be used up first before your Non-Paid Diamonds that you earned from using the app.

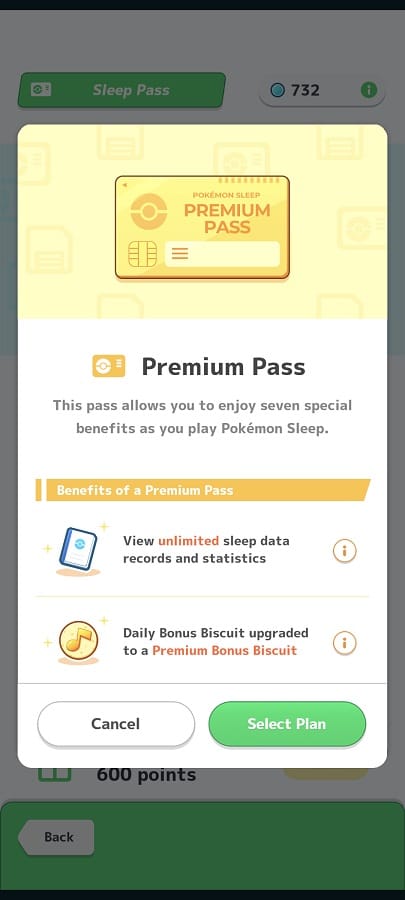
Along with microtransactions, you can also spend money in Pokémon Sleep by subscribing to the Preimium Pass. To find out more about this subscription, you can check out this article.

What are the benefits of the Pokémon Sleep Premium Pass?

Pokémon Sleep offers a premium pass that features several bonuses. To find out what these benefits are, you can check out this article from Seeking Tech.

Sleep Data

With the Pokémon Sleep Premium Pass, you will be able to view all your sleep tracking data. Without the pass, you can only check out your previous statistics from the past 30 days.

The data will always be stored on the server regardless of whether you have a pass or a basic member. So, once you become a premium subscriber, you will be able to unlock all of your previous statistics that are more than 30 days old.

Daily Bonus Biscuit

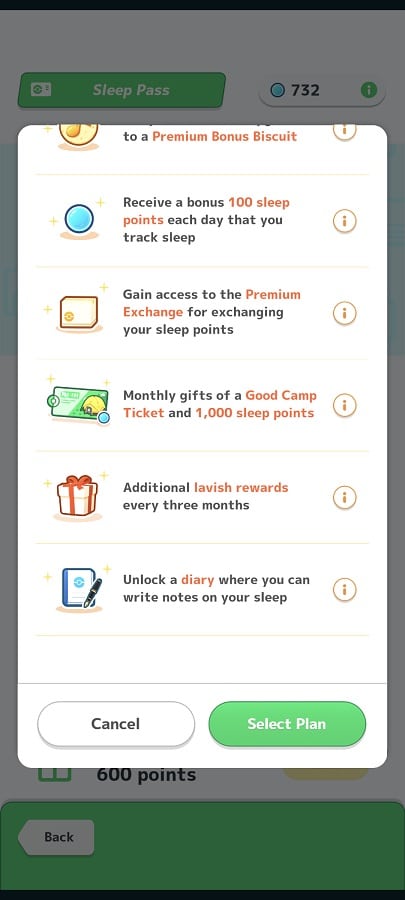
Instead of a normal Bonus Biscuit, you will get a Premium Bonus Biscuit every day. These snacks will raise a Pokémon friendship by 4 points.

Bonus Sleep Points

By having a premium pass, you will get an additional 100 sleep points every day after tracking your snoozing habits. Furthermore, you will also receive a monthly bonus of 1,000 sleep points.

Premium Exchange

The Premium Exchange is an exclusive digital shop for pass holders as you can purchase items by using your sleep points. This store can be found by tapping Shops on the main menu and then Premium Exchange in the next screen.

Good Camp Ticket

Another monthly bonus is the Good Camp Ticket, which gives you access to the good camp area for seven days.

3-Month Rewards

If you stay subscribed for three months consecutively, then you will get the following items each time:

  • Hard Candy L
  • Sub Skill Seed
  • Dream Cluster M

Diary

One last bonus in the diary. This allows you to write down notes for your sleep session. There is a character limit of 200.

Free Trial and Pricing

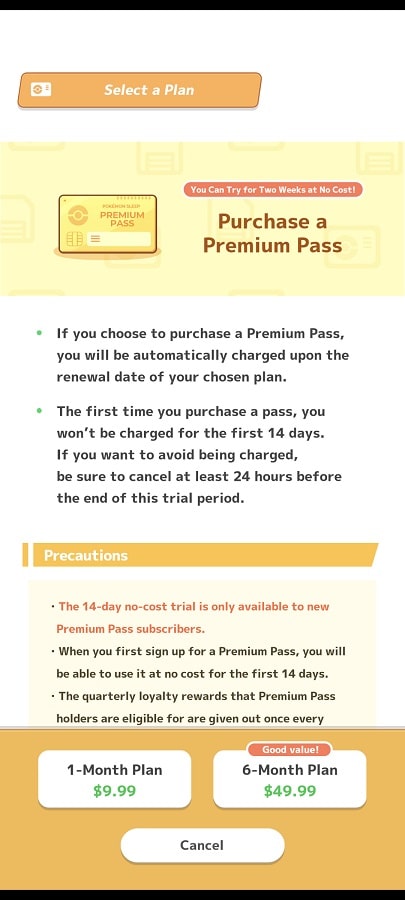
You can try out the Pokémon Sleep Premium Pass for two weeks. Afterwards, you will be charged $9.99 for a 1-month plan or $49.99 for a 6-month plan.

How to disable audio recordings in Pokémon Sleep

Pokémon Sleep will track your sleeping habits by using the microphone of your smartphone. To see how you can disable the audio recordings in this app, you can take a look at this tutorial from Seeking Tech.

Before we begin, it is important to note that your audio recordings aren’t shared with any third-party companies or the Research Community. The data is actually never sent to the Pokémon Sleep servers. Instead, it will remain stored on your device for either 24 hours or until you start up your next sleep tracking session.

If you still want to disable audio recordings, then you can try taking the following steps:

1. Open the Main Menu in the Pokémon Sleep app.

2. Next, you need to select Sleep Data from the Main Menu.

3. You should then select your latest sleep tracking session from the list in the Sleep Data menu. The audio from the older sessions should already be deleted.

4. In the next screen, scroll down and then select Recordings.

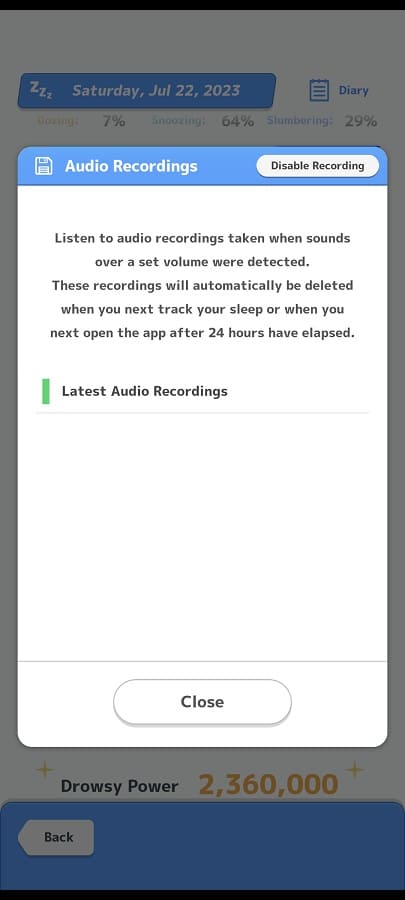
5. In the Audio Recordings menu, you will see the following description:

Listen to audio recordings taken when sounds over a set volume were detected. These recordings will automatically be deleted when you next track your sleep or when you next open the app after 24 hours have elapsed.

Here, you need to select the Disable Recording option located on the top right corner of the menu.

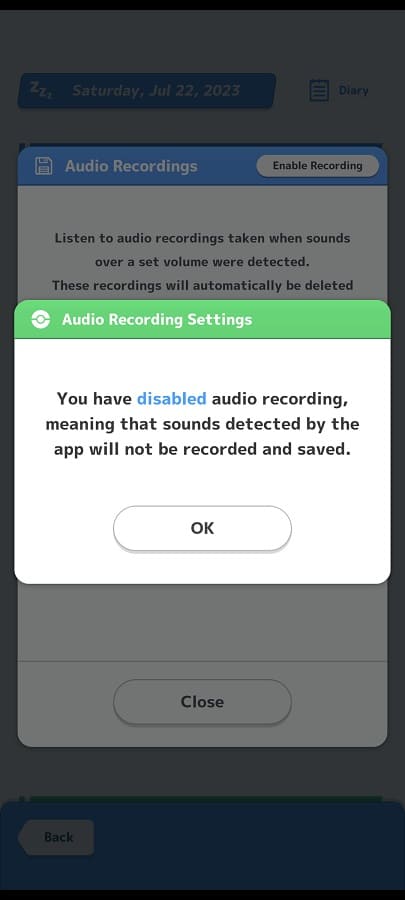
6. If done correctly, you should see the following message:

You have disabled audio recording, meaning the sounds detected by the app will not be recorded or saved.

Select the OK option to return to the Audio Recordings menu. You can then back out of the Main Menu.

By disabling audio recording, the Pokémon Sleep will no longer record any sounds that you make when it is tracking your sleeping tendencies.

How to fix Pokémon Sleep tracking issues

Pokémon Sleep is an app designed to track your sleeping habits. If this program does not appear to be tracking accurately when you are snoozing, then you can check out this troubleshooting article from Seeking Tech to see how you can fix this issue.

Before we begin, it is important to note that the application won’t track your sleeping time right away after you tap the Sleep or Start Tracking Sleep button. Instead, it tries to track the time when it thinks that you are actively asleep.

The “Slumbering” state is when the app thinks that you have gone into deep sleep while the “Dozing” state is when it thinks that you have entered into a light sleep.

1. For the first step, you should make sure that you follow the instructions to ensure accurate tracking.

For the uninformed, you should keep your smartphone charged and the Pokémon Sleep opened. It is also recommended that you place the phone near your pillow; if that is not possible, then you should put the device somewhere close to your body.

Furthermore, it is important that you avoid turning off the screen of your phone as the app should darken the screen automatically to conserve battery usage.

2. If you are sleeping with another person or pet, then the movements of others may cause inaccurate tracking. In this case, you can try moving the phone closer to your body or sleeping by yourself.

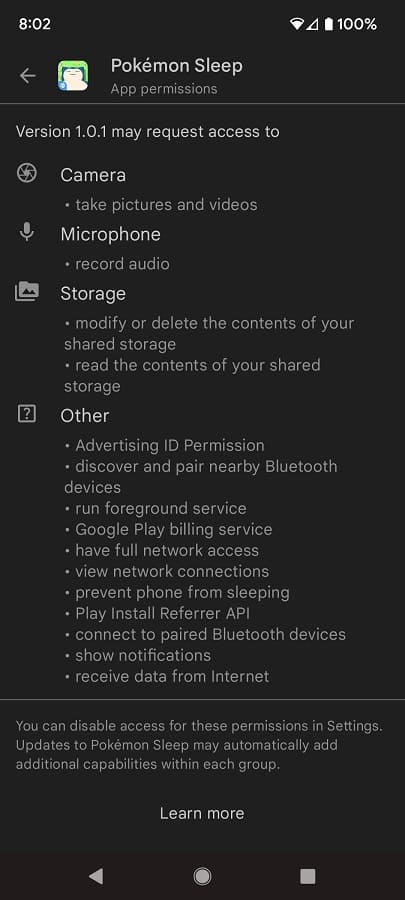
3. Make sure you have the proper permissions enabled for using this app. For instance, you want to enable the following for the Android version:

  • Microphone (record audio)
  • Storage (modify or delete contents of your shared storage)
  • Other (run foreground service, have full network access. Prevent phone from sleeping, etc.)

4. If you haven’t done so already, make sure you download the latest Pokémon Sleep as a new update may improve the tracking abilities of the mobile app.

How to fix Pokémon Sleep crashing and slow downs

If Pokémon Sleep keeps crashing and/or slowing down on your smartphone, then you can take a look at this troubleshooting article to see how you can potentially make this app run more stable.

1. For the first step, you should make sure that the application is compatible with your operating system.

It is recommended that you use on an Android 7 (or later) phone, iOS 14 (or later device) or iPhone 7 (or later) phone.

2. If your phone meets the minimum requirements but you are still having stability problems, you can try restarting your phone. Doing so will close all apps as well as any background processes that may have been conflicting with Pokémon Sleep.

Once your device has boot back up again, make sure that only the sleep tracking application is opened.

2. If you are still experiencing crashing and/or performance issues, then you can try closing other apps that you have running in the background.

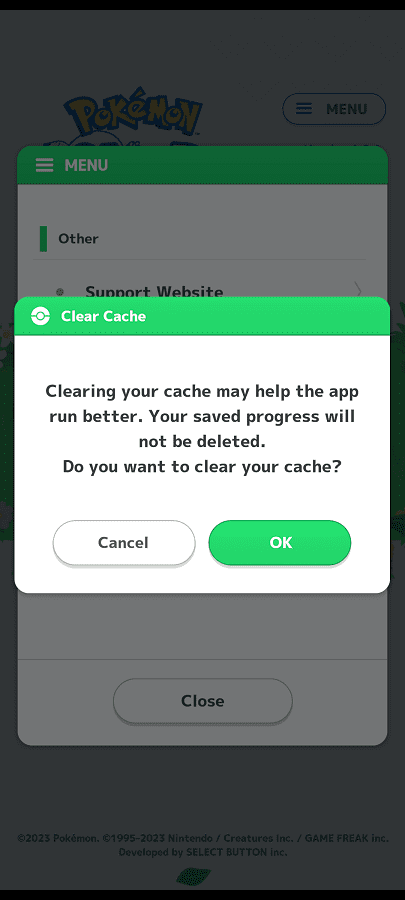
3. Furthermore, you can try clearing the cache by tapping the Menu option in the Tap to Start screen. In the pop-up menu, select Clear Cache and then OK. Afterwards, you need to close to application and then open it again.

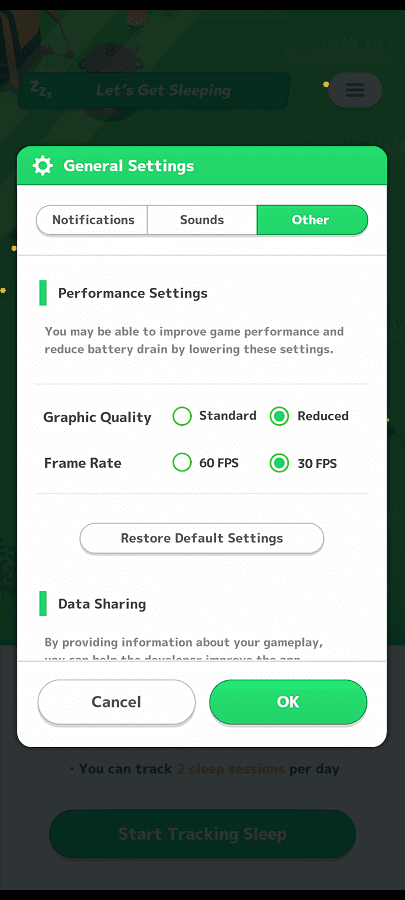
4. You can also try lowering the graphics.

In order to do so, tap the Main Menu option and then select Settings and More. Next, you need to select General Settings and then Other. You should now see the Performance Settings; from there, change Graphic Quality to Standard and Frame Rate to 30 FPS in order to reduce the hardware resources used to run the app.

5. Make sure you have the latest patch downloaded for the sleep tracking app as it may improve stability and/or performance.

6. Furthermore, you should also check to see if you have the latest operating system firmware installed on your device as a new update may help improve the general stability and performance.

How to turn off cross play in Naraka Bladepoint

By default, cross-platform play is enabled is Naraka: Bladepoint as players on PC, PlayStation 5, Xbox One, Xbox One S, Xbox One X, Xbox Series S and Xbox Series X are able to match up with each other.

If you want an even playing field in this battle royale game, then you might want to consider turning off cross-play. If you are interested in disabling this feature, then you can take a look at this tutorial from Seeking Tech.

1. For the first step, you need to open the in-game menu.

If you are playing with a PlayStation controller such as the DualSense or DualShock 4, then you can do so by pressing and holding the Options button.

If you are playing with an Xbox controller such as the Xbox One or Xbox Series gamepads, then you need to press and hold the Menu button.

2. In the pop-up menu that appears in the middle of the screen, you then need to select Setting.

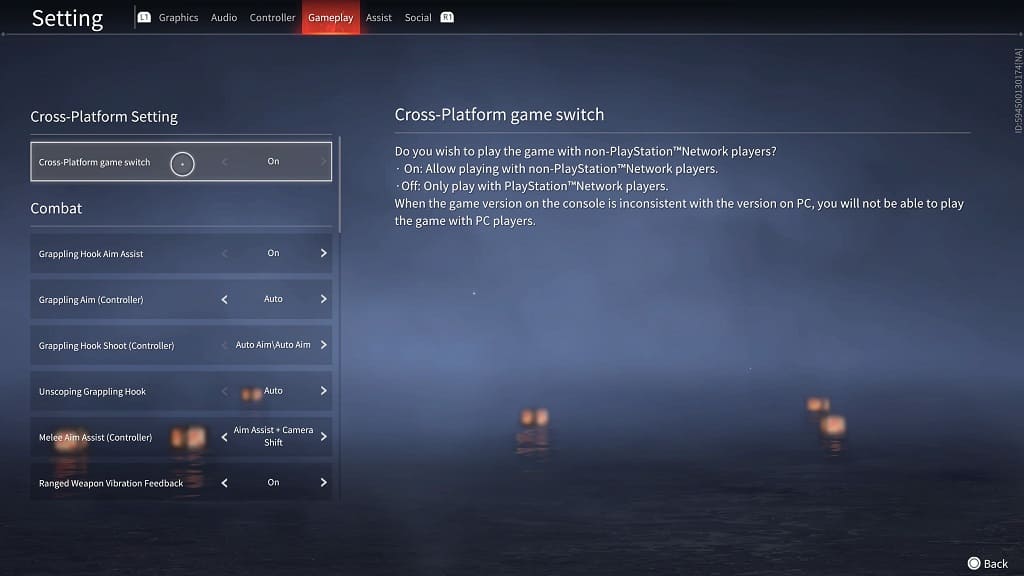
3. Once you get to the Setting menu, select use the L1 and R1 buttons on the PlayStation controller or LB or RB buttons on the Xbox controller to make your way to the Gameplay tab.

4. The top option in the Gameplay tab should be Cross-Platform Game Switch.

5. Make sure that the Cross-Platform Game Switch setting is set to Off.

6. If you try to disable cross-play on the Xbox One, Xbox One S, Xbox One X, Xbox Series S or Xbox Series X of Naraka Bladepoint, then you won’t be able to do so from the in-game menu.

Instead, you need to open the Settings menu of your Xbox console and then select Account > Privacy & online safety > Xbox privacy > View details & customize > Communication & multiplayer.

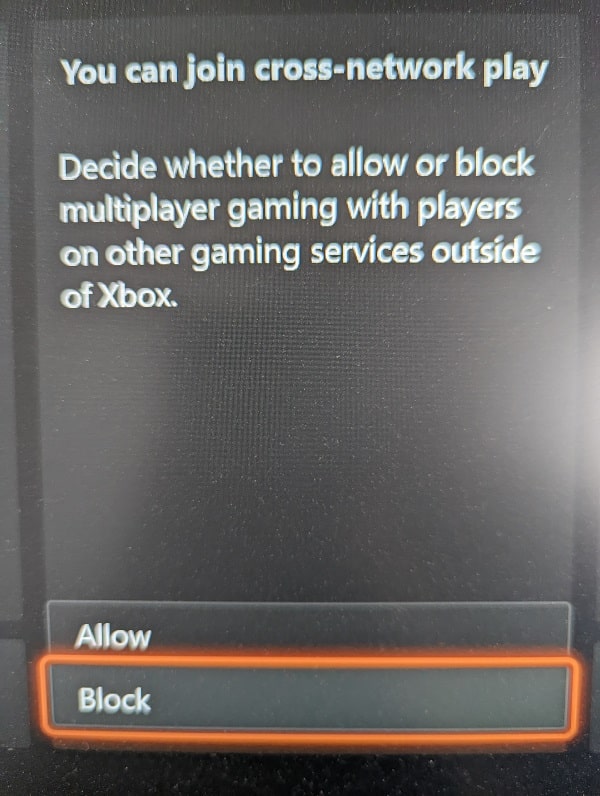
From the “Account – Communication & multiplayer for [your Xbox Live username]” menu, make sure that the “You can join cross-network play” setting is set to Block.

How to fix login issues in Pokémon Sleep

When trying to log into your account in Pokémon Sleep, you may run into the following error message:

  • “Please wait a while, then try again.”

To see how you can potentially fix this sign in problem, you can take a look at this troubleshooting article from Seeking Tech.

This message usually occurs when there is an issue with the app servers. It may be due to too many users trying to access the application at the same time. Alternatively, problems could arise due to a server glitch and/or maintenance.

Since the “Please wait a while, then try again” message is not related to the end user side, you can’t do much other than to wait until the servers are functioning normally again.

To keep updated when there is some downtime with the app, we recommend that you check the official Pokémon Sleep Twitter page with this link to see if there are any current problems.

If you don’t see any messages about the servers being down on Twitter, then the problem may be due to sever overload. In this case, you can try to log into Pokémon Sleep again after waiting a few minutes in between attempts to see if you can eventually sign into your account in the mobile application.