What is the ‘4K Transfer Rate’ option on PS5?

If you are experiencing issues with your television or/monitor properly displaying the video outputted from PlayStation 5, then you may have to use the “4K Transfer Rate” option from the system menu.

So, what does changing the “4K Transfer Rate” setting on the PS5 help with? You can find out in this guide at Seeking Tech.

What is 4K Transfer Rate?

4K Transfer Rate is also known as chroma subsampling, a feature that compresses the colors from the video output signal on your PlayStation 5.

How to find the “4K Transfer Rate” setting on PS5

To find the “4K Transfer Rate” setting on the PlayStation 5, you need to take the following steps:

1. First off, make sure you are in the home screen main menu of the PS5. This is the place where you can select which game to play, head to the PlayStation Store and perform other actions.

2. From the home screen, select the gear cog symbol, which represents the “Settings” menu, on the top right corner.

3. In the “Settings” menu, select “Screen and Video” from the list of available options.

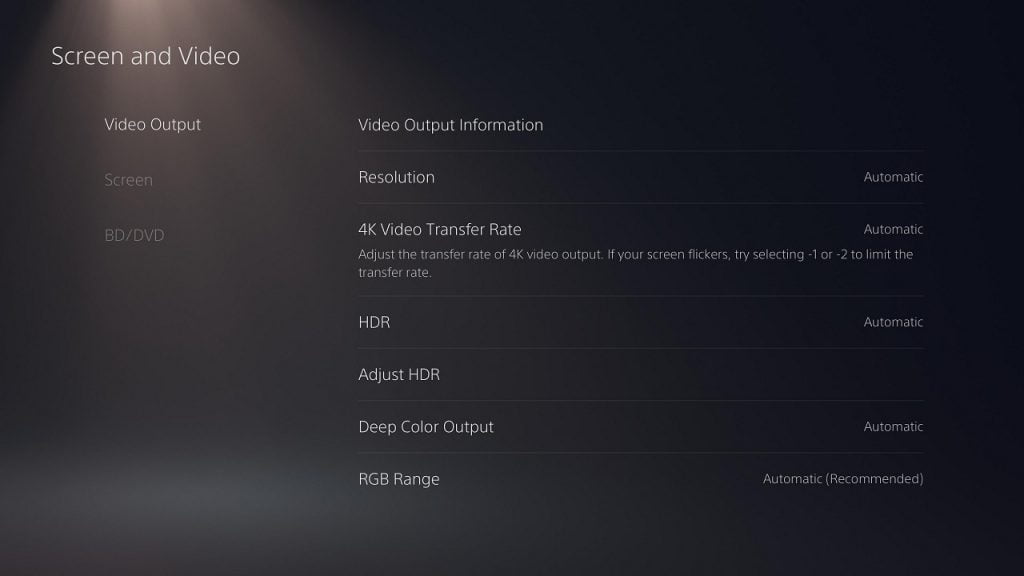
4. In the “Screen and Video” menu, select the “Video Output” option on the left side of the screen.

5. On the right side, you will see the “4K Video Transfer Rate” option.

What happens when you set “4K Transfer Rate” to Automatic on PS5

By default, the “4K Transfer Rate” option is set to Automatic on the PlayStation 5.

This means that the system will automatically choose which of the 0, –1 or –2 options is best suited for the television or monitor it is connected to.

What happens when you set “4K Transfer Rate” to -1 on PS5

If you are experiencing issues, such as flickering or HDR not displaying correctly, then you can try manually setting the “4K Transfer Rate” on the PlayStation 5.

By setting the “4K Transfer Rate” to –1, you will restrict the video output bandwidth to the HDMI 2.0 specification, which is 18 Gbps. This means that you can only display the following in 4K video settings:

  • 4K HDR at 60 Hz with YUV420
  • 4K HDR at 60 Hz with YUV422
  • 4K HDR at 50 Hz with YUV420
  • 4K HDR at 50 Hz with YUV422

With the “4K Transfer Rate” set to -1, you won’t be able to use the following video output settings:

  • 4K and 120 Hz
  • 4K and 50 Hz/60 Hz with RGB/YUV444 DeepColor

What happens when you set “4K Transfer Rate” to -2 on PS5

If you decide to set the “4K Transfer Rate” to –2, restrict the video output bandwidth to the HDMI 1.4 specification, which is 10.2Gbps. As a result, you can only display the following 4K settings:

  • 4K HDR at 60 Hz with YUV420
  • 4K HDR at 50 Hz with YUV420

With the “4K Transfer Rate” at –2, you won’t be able to use the following video output settings:

  • 4K and 120 Hz
  • 4K and 50 Hz/60 Hz with RBG/YUV444

What is the best “4K Transfer Rate” setting on PS5?

The best setting to start with is to leave “4K Transfer Rate” to Automatic as the PS5 should be able to detect the HDMI spec of your TV or monitor.

If you are experiencing issues with screen flickering and/or HDR looking not looking correct, then you can manually change the setting to –1 or –2 to see if either of these options will resolve your issues.

How to change download location on PS5

With the PlayStation 5, as well as the PlayStation 5 Digital Edition, you can change the location to download your games.

You can check out this guide from Seeking Tech to see how you can do so.

Connecting a Compatible USB storage drive to PS5

Before we being, it is important to note that you can currently only switch the download location to between the Console Store or USB Extended Storage.

For the Extended Storage, the minimum interface requirement is SuperSpeed USB 5 Gbps (which is USB 3.0, USB 3.1 Gen1 and USB 3.2 Gen1). If you are using an USB 3.2 Gen1x2 interface USB storage drive, then the speed will be limited to 5 Gbps.

The maximum supported interface speed is SuperSpeed USB 10 Gbps (which is USB 3.1 Gen2, USB 3.2 Gen2 and USB 3.2 Gen1x2). If you are using an USB 3.2 Gen2x2 interface USB storage drive, then the speed will be limited to 10 Gbps.

When it comes to capacity, you need at least 250 GB. The maximum supported capacity for the PlayStation 5 is 8 TB.

If you have a compatible USB external drive, connect it to one of the USB ports on the PS5. If your storage drive requires an additional power supply, make sure you plug that in to the power source and then turn on your drive.

How to format the USB Extended Storage on PS5

If you haven’t formatted your USB drive for the PS5, then you will have to do so before being able to use it.

If you want to format the external storage drive, you need to do the following:

1. First off, you should copy any important data off of the USB Extended Storage as formatting the drive for the PlayStation 5 will remove all previously data that have been stored.

2. Plug the external drive to the PS5 system.

3. On the PlayStation 5, make sure that you are in the home screen, which is the main menu where to can pick which game to play.

4. In the home screen, go to “Settings,” which you can find on the top right corner of the screen.

5. In the “Settings” menu, go to “Storage.”

6. In the “Storage” menu, select “USB Extended Storage” on the left side.

7. On the right side in the same “Storage” menu, select the “Format as USB Extended Storage” option.

How to change the download location for PS4 games

Currently, you can only change the download location for PlayStation 4 games on the PlayStation 5.

In order to do so, you need to do the following:

1. Connect your USB Extended Storage to the PlayStation 5.

2. From the home screen of the PS5, head to “Settings.”

3. Under the “Settings” menu, head to “Storage.”

4. From the “Storage” menu, select “USB Extended Storage” from the list of options on the left side.

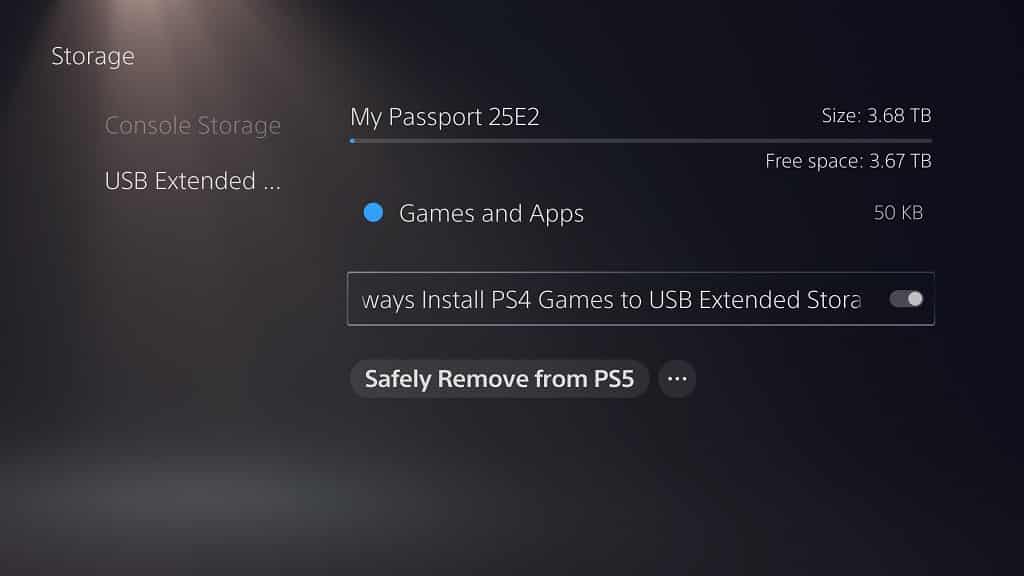
5. On the right side from the same “Storage” menu, you will see the “Always Install PS4 Games to USB Extended Storage” option.

If the circle to the right of the option is black, then that means that your PS4 game downloads will be sent to the console storage of the PS5.

To change the circle from black to white, simply select the “Always Install PS4 Games to USB Extended Storage” option. The white circled indicates that all PS4 game downloads will be sent to the “USB Extended Storage.”

How to change the download location for PS5 games

Unfortunately, you currently can’t change the download location for PlayStation 5 games.

Instead, you first have to download the PS5 game onto the console storage. You can then transfer the game from the console storage to the USB Extended Storage.

Keep in mind that, although you can play PS4 games on the PlayStation 5 directly from the external HDD or SSD, you won’t have the same luxury with PS5 games.

So, if you want to play a PS5 game that you have stored on the USB Extended Storage, you need to move the game from the USB Extended Storage to the console storage.

If you want to move PS5 games from the USB Extended Storage to the console storage, as well as from the console storage to the USB Extended Storage, you can check out our previous tutorial.

How to view hidden trophies on PS5

A recent firmware update for the PlayStation 5 and PlayStation 5 Digital Edition makes it easier to view hidden trophies.

You can follow this guide at Seeking Tech to see you can do so.

Why trophies are hidden on PlayStation 5

Before we begin, it is important to note that game developers hide trophies in order to prevent spoilers. So, if you are sensitive to being spoiled, we don’t recommend viewing hidden trophies until you at least beat the main campaign of a game.

How to view hidden PS5 trophies from the system menu

In order to view hidden trophies from the system menu on the PlayStation 5, you need to do the following:

1. First off, you need to access the Trophies menu.

To access the Trophies menu from the home screen, which is the main menu you use to select a videogame to play, you need to select your profile picture that is located on the top right corner of the screen.

To access the Trophies menu while playing a game, press the PS button on your DualSense to bring up the control center quick menu. In the control center, navigate down and then to the right. You need to select your profile picture, which should be between the controller and power icons. Alternatively, you can simply press and hold the PS button while playing a game to got to the home screen.

3. In the Profile pop-up menu, select the Trophies option.

4. In the Trophies menu, you will see a list of games that you must recently played in descending order. Here, you need to select the game in which you want view to its hidden trophies.

5. In the game’s trophy menu, you will see its trophies. You will be able to sort, by selecting the “Sort by” option or pressing the square button on your DualSense, with the following criteria:

  • Game Default
  • Not Earned
  • Rarity (from Ultra Rare to Common order)
  • Earned Date (from New to Old order)
  • Grade (from Platinum to Bronze order)

Select the hidden trophy that you want to view with the X button on your DualSense.

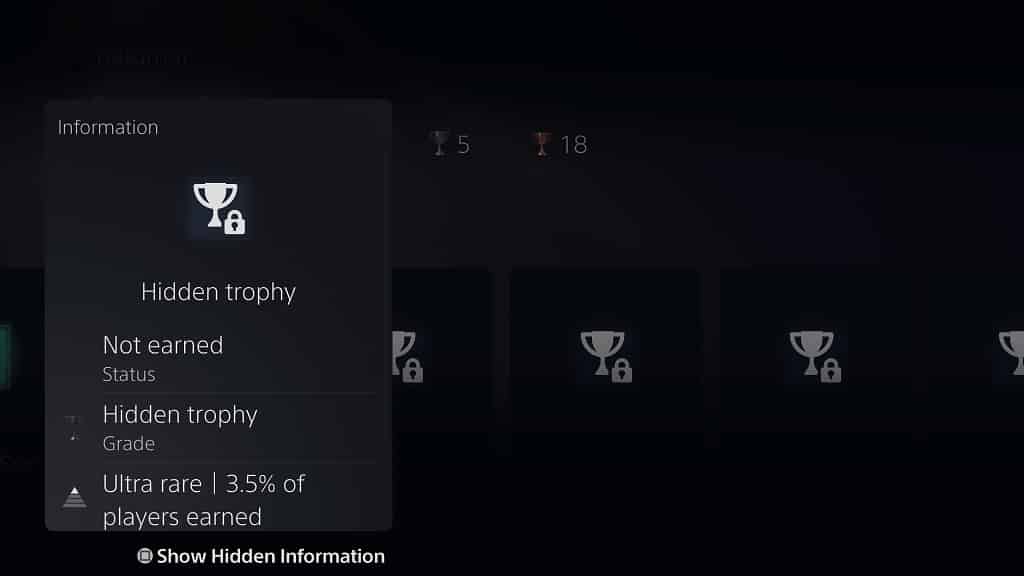
6. In the pop-up menu, press the square button on your DualSense to shown the hidden trophy information.

You should be able to see the trophy’s title, description and grade.

How to turn off a crashed or frozen PS5

When playing the PlayStation 5, or PlayStation 5 Digital Edition, the system may crash and freeze. If you can’t turn your system off in this situation, then you can follow this troubleshooting guide from Seeking Tech.

How to turn off a frozen PS5 with your controller

In order to turn off a PlayStation 5 with your controller, you need to do the following:

1. Press the PS button on your DualSense controller. This will bring up the Control Center quick menu.

2. In the Control Center, navigate downwards until you get to the list of options at the bottom.

3. In the list of options, navigate all the way to the right until you see the Power option.

4. Select the Power option.

5. In the pop-up menu, select the Turn Off PS5 option. You will get a “Preparing to turn off PS5” message on screen.

How to turn off a frozen PS5 using the power button

If your crashed or frozen PlayStation 5 is not responding to your DualSense controller, you can try using the power button on the system to shut it down.

To do so, you need to take the following steps:

1. Locate the power button on your PS5, which is found on the middle black-colored part of the system. On the PlayStation 5 Digital Edition, it is right next to the disc eject button. On the standard PlayStation 5, the power button is the only button that can be pressed.

2. Press and hold the power button on your PS5 system. You should hear a beeping noise almost immediately. After around three more seconds, you should hear a second beeping noise and then get a “Preparing to turn off PS5” message on screen.

3. If your system is not responding, then we recommend pressing and holding the power button again. This time, you should hold the power button for as long as possible (at least 20 seconds if not longer) to forcibly shut down your PlayStation 5.

Can you unplug a frozen PS5?

Unplugging a PlayStation 5 system may cause hardware damage that may require you to send your PS5 to Sony for repair.

Therefore, we don’t recommend unplugging the system until you exhausted all of the aforementioned methods to turning off a frozen and unresponsive system.

What to do after shutting down a frozen PS5?

After successfully shutting down a PlayStation 5 that has crashed, we recommend turning it back on again to see if it is functioning normally.

The system may attempt to self-diagnose and fix itself.

You may also get an error message where you can send a crash report to Sony.

As an extra precaution, you might want to consider clearing the cache of your PlayStation 5. If you are interested in doing so, then you can check out this tutorial.

You may also want to rebuild the database and/or reinstall the firmware of your PS5. In order to do so, you can check out this guide.

If you are constantly experiencing crashing and freezing with your PlayStation 5, then you should consider contacting PlayStation Support to possibly send your system in for repair.

How to find list of videogames that support the PS5 Game Help feature

The PlayStation 5 and PlayStation 5 Digital Edition come with the Game Help feature, which is designed to provide tips to certain sections of a video game. Not all PS5 games support this feature, however.

You can check out this guide from Seeking Tech to see how you can find a list of videogames that support Game Help.

PlayStation Plus Requirement

In order to use the Game Help feature, you need to be a subscriber to PlayStation Plus. This service also offers other benefits such as online multiplayer, exclusive discounts in addition to a list of games you can download and play at no additional costs.

If you aren’t a member, you can purchase a one-year subscription to the PlayStation Plus on Amazon with this link. (#CommissionsEarned).

How to find the PlayStation Plus App on PS5

The PlayStation Plus has its own app on the PlayStation 5.

To find this application, you need to do the following:

1. First off, make sure you are in the home screen. This is the main menu of the system where you can select a game to open and play.

2. You should also make sure that you are in the Games section of the home screen. If you are in the Media section, press the L1 button on your DualSense to go to the Games section.

3. In the Games section of the home screen, find and select the yellow plus symbol, which represents the PlayStation Plus App.

4. If you can’t find the app on the home screen, you can select the blue shopping bag symbol, which represents the PlayStation Store App.

5. In the PlayStation Store, press the R1 button on your DualSense until you get to the Subscription section.

6. In the Subscription section of the PlayStation Store, select PlayStation Plus to launch into the PS Plus app.

How to view PS5 Game Help feature list

Now that you are in the PlayStation Plus App, you need to take the following steps:

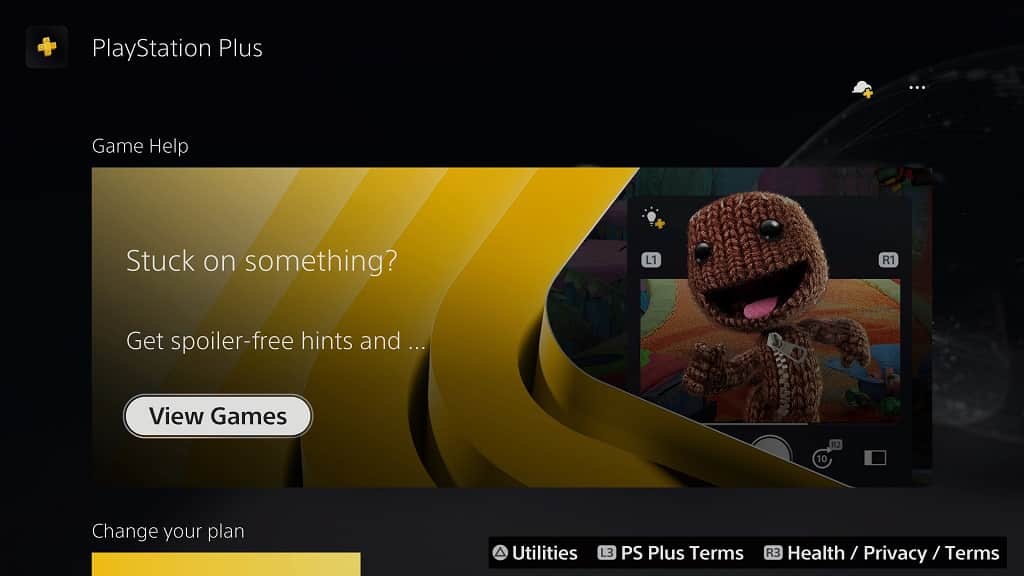
1. From the first screen inside the application, scroll down until you see the Game Help section. Select the View Games option.

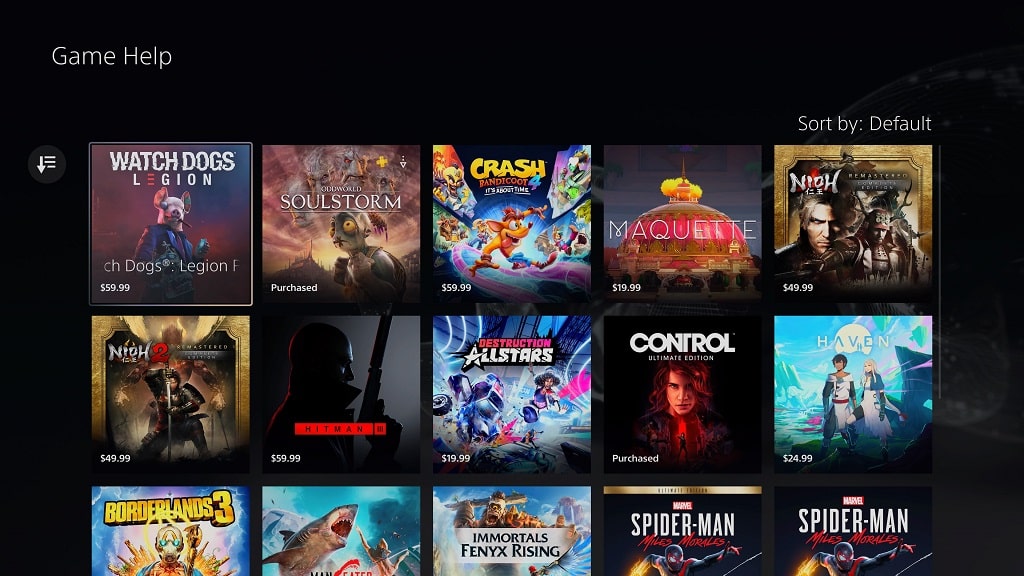
2. In the Game Help menu, you will see a list of games that currently support the feature.

3. You can sort the list based on certain criteria by selecting the symbol, which has three horizontal lines and a down pointing arrow, to the left of the listing.

You have the following sorting options:

  • Default
  • Name (A – Z)
  • Name (Z – A)
  • Release Date (Old – New)
  • Release Date (New – Old)
  • Price (Low – High)
  • Price (High – Low)

You can also use the following filters:

Price:

  • Free
  • Under $1.99
  • $10.00 – $19.99
  • $20.00 – $39.99
  • $40.00 – $59.99
  • $60.00 – $79.99

Genre:

  • Action
  • Adventure
  • Role-Playing Games
  • Unique
  • Puzzle
  • Driving/Racing
  • Shooter

Platform:

  • PS5
  • PS4

Age Rating:

  • Everyone
  • Everyone 10+
  • Teen
  • Mature

Last but not least, you can also select the Reset Filters option, which will remove all of the previously applied filters.

What games support the PS5 Game Help feature?

As of this writing, the following videogames support the Game Help feature on the PlayStation 5:

  • Astro’s Playroom
  • Borderlands 3
  • Bugsnax
  • Control Ultiamte Edition
  • Crash Bandicoot 4: It’s About Time
  • Demon’s Souls
  • Destrcution AllStars
  • Devil May Cry 5 Special Edition
  • Haven
  • HITMAN 3
  • Immortals Fenyx Rising
  • Maneater
  • Marquette
  • Marvel’s Spider-Man: Miles Morales
  • Nioh Remastered – The Complete Edition
  • Nioh 2 Remastered – The Complete Edition
  • Oddworld: Soulstorm
  • Ratchet and Clank: A Rift Apart
  • Sackboy: A Big Adventure
  • Watch Dogs: Legion

How to make the PS5 menu text easier to read

The default menu text can be a little difficult to read on the PlayStation 5 and PlayStation 5 Digital Edition.

If you want to make the text in the menus easier to read, then you can follow this guide at Seeking Guide.

How to change text size on PS5

To change the text size when using the menus on PlayStation 5, you need to do the following:

1. From the home screen, which is the main menu where you can select which game to play, go to Settings. You will find Settings on the top right corner of the screen as it has a gear cog symbol.

2. In the Settings menu, go to Accessibility.

3. In the Accessibility menu, select Display on the left side.

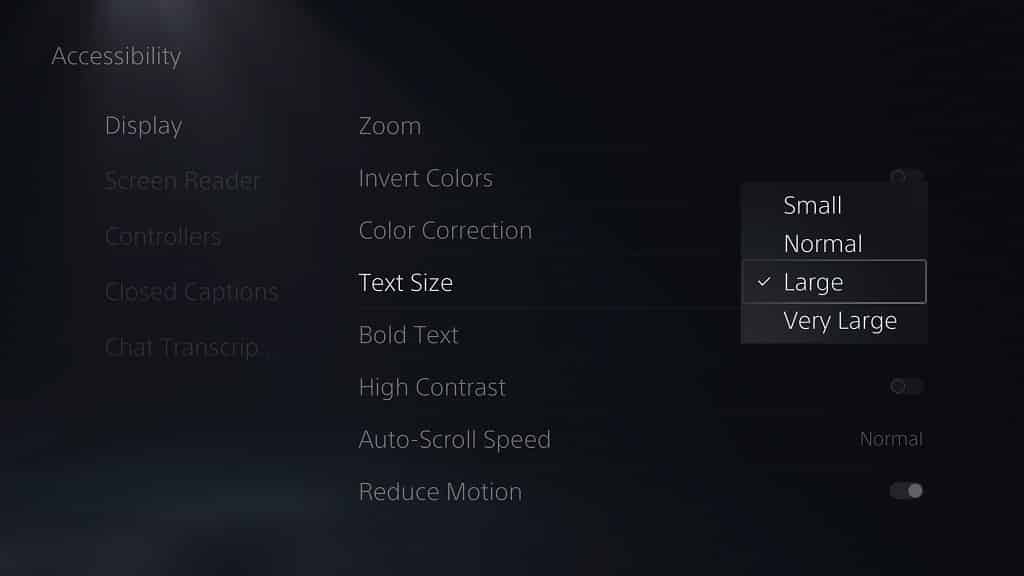
4. On the right side of the same Accessibility menu, select the Text Size option.

5. In the pop-up menu, you can choose between the following:

  • Small
  • Normal
  • Large
  • Very Large

How to manually zoom in on PS5

A new feature was recently added to the PlayStation 5 where you can manually zoom into the menus.

If you are interested in activating this feature, you need to take the following steps:

1. Go to Settings from the home screen.

2. In Settings, go to Accessibility.

3. In Accessibility, select Display from the list of options on the left.

4. On the right side of the same screen select Zoom.

5. In the Zoom menu, you will see the Enable Zoom option.

If the switch to the right of the wording is black, select the Enable Zoom option to turn the switch white to enable this feature.

6. Underneath the Enable Zoom option, you will see the Adjust Display Area to Movement. With this enabled, the zoomed-in camera will follow your movements.
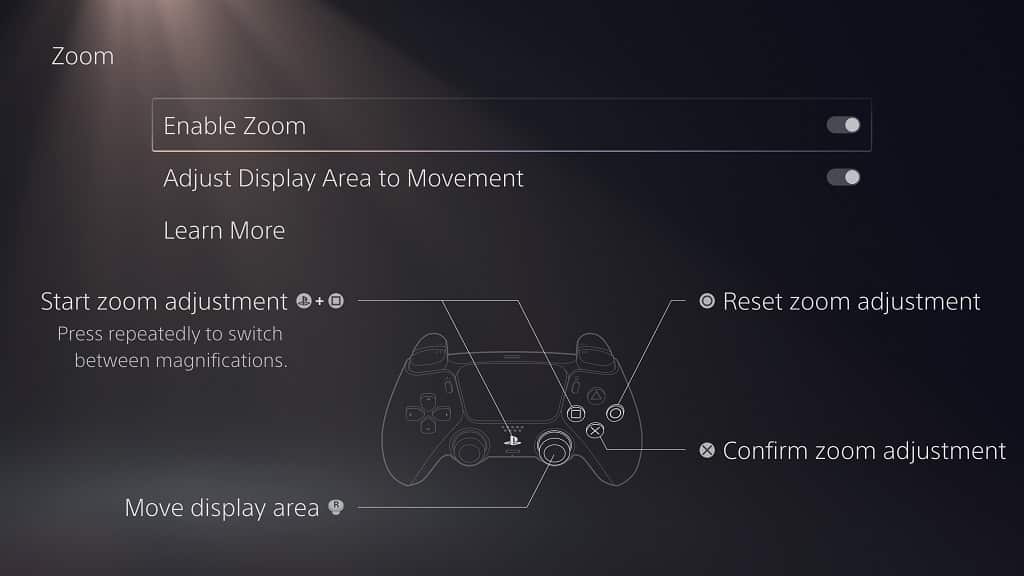
7. In order to manually zoom in, you need to press the PS and square buttons at the same time. To zoom in closer, you need to press the same two buttons again.

You can use either the left or right analog stick to adjust the display area as well.

8. You can press the X button to confirm the zoomed in display. You can also press the Circle button to cancel and return the screen to its normal display distance.

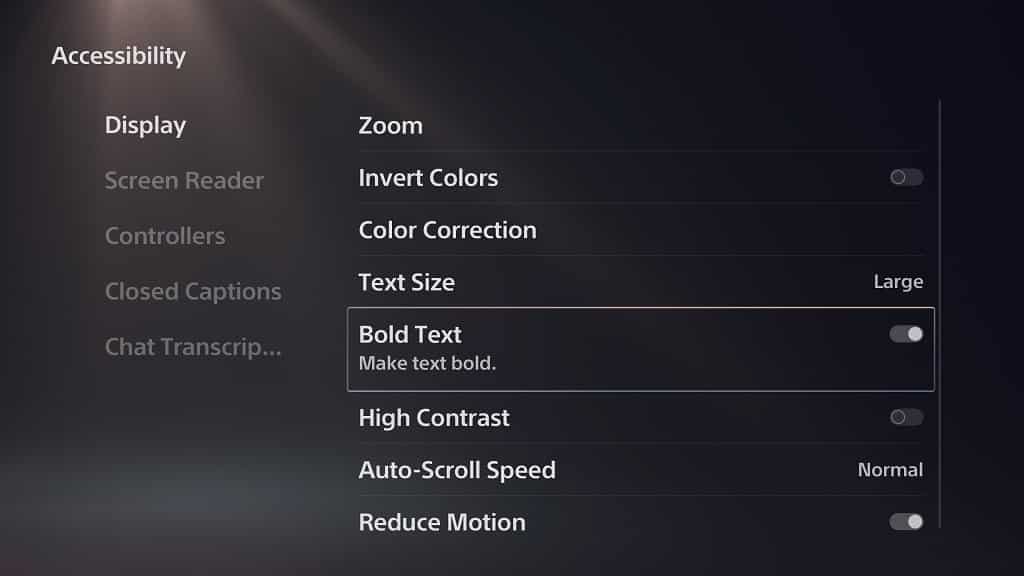
How to bold menu text on PS5

To bold the text when using menus on the PlayStation 5, you need to do the following:

1. Return to the Accessibility menu. You can do so from the home screen main menu by going to Settings and then Accessibility.

2. Once you are in the Accessibility menu, select the Display option on the left side.

3. On the right side of the same menu, you should see the Bold Text option.

If the switch to the right of the wording is black, select the Bold Text option to turn the switch white, which means that the feature has been enabled.
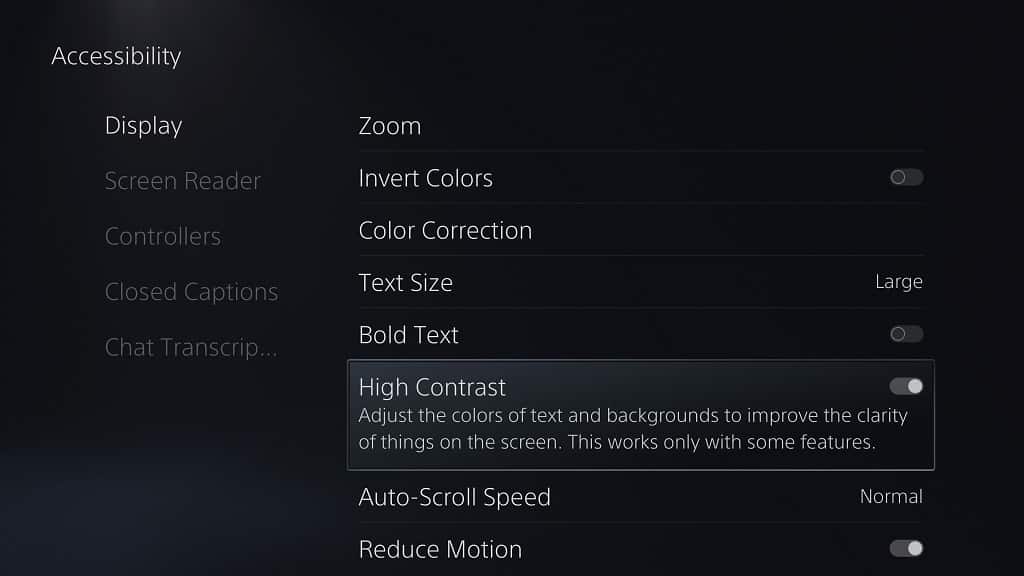
How to enable high contrast on PS5

High contrast is a feature darkened the background image, which makes it easier to read the menu text on PlayStation 5.

If you want to enable it, then you need to do the following:

1. From the home screen, go to Settings and then Accessibility.

2. In Accessibility, select Display on the left side.

3. On the right side in the same Accessibility menu, you will find the High Contrast option.

If the switch to the right of the wording is black, select the High Contrast option to turn the switch white in order to enable this feature.
How to invert colors on PS5

If you want to invert the colors on the PlayStation 5, you need to take the following steps:

1. At the home screen, head into Settings and then select Accessibility.

2. Now that you are in the Accessibility menu, select Display from the list of options on the left side.

3. On the right side in the same menu, you will see the Invert Colors option.

If the switch to the right of the wording is black, select the Invert Colors option to turn the switch white, which indicates that the feature has been enabled.

How to enable Grayscale, Protanopia, Deuteranopia and Tritanopia color filters on PS5

If you want to use the Grayscale, Protanopia, Deuteranopia and Tritanopia color filters on PlayStation 5, you need to do the following:

1. From the home screen, you need to go to Settings and then Accessibility.

2. Once you are in the Accessibility menu, you need to select Display from the list of available options on the left side of the screen.

3. On the right side of the same screen, you need to select Color Correction.

4. In the Color Connection menu, make sure that the Enable Color Filter option is enable so that you can gain access to the Color Filter option below it.

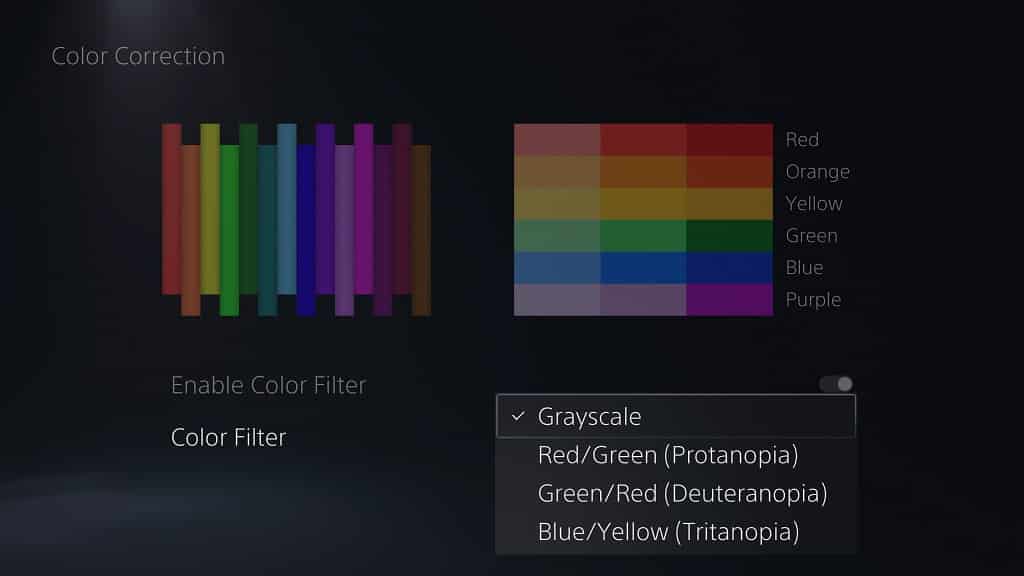
5. Select the Color Filter option to bring up a pop-up menu where you can choose between the following:

  • Grayscale
  • Red/Green (Protanopia)
  • Green/Red (Deuteranopia)
  • Blue/Yellow (Tritanopia)

How to change the auto-scroll speed on PS5

To change how fast a line of text horizontally scrolls across the screen, you need to do the following:

1. Go to Settings from the home screen.

2. Go to Accessibility.

3. Select Display from the list of options on the left side of the Accessibility menu.

4. On the right side in the same Accessibility menu, select Auto-Scroll Speed.

5. In the Auto-Scroll Speed menu, you can pick between the following:
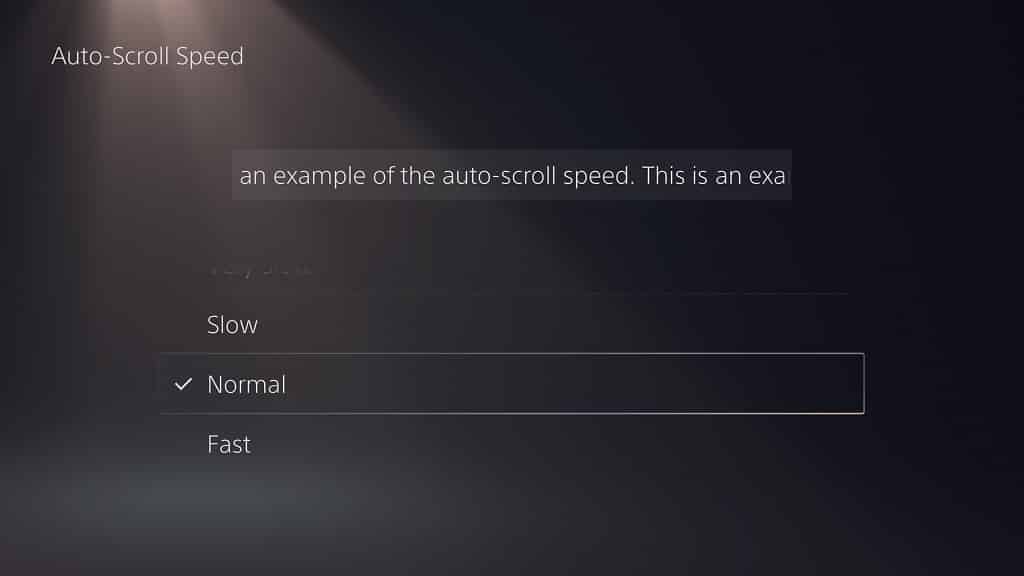
  • Slow
  • Normal
  • Fast

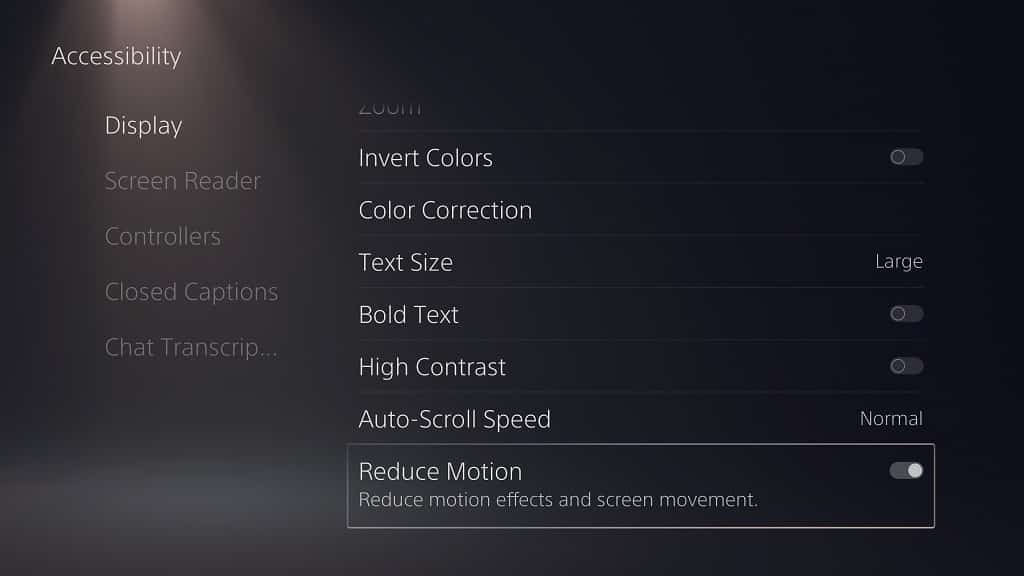
How to reduce motion effects and screen movement on PS5

If the menu motion and/or movement is causing you issues when using the PlayStation 5, you can reduce these effects.

In order to do so, you need to take the following steps:

1. From the home screen, head into Settings.

2. From the Settings menu, head into Accessibility.

3. From the Accessibility menu, select Display on the left side.

4. On the right side of the same Accessibility menu, you will see the Reduce Motion option.

If the switch to the right of the wording is black, select the Reduce Motion option to turn the switch white. This will enable the Reduce Motion feature.
How to enable screen reader on PS5

If you would like to use a screen reader on PlayStation 5, then you need to do the following:

1. Go to the Settings menu from the home screen.

2. Once you are inside Settings, you need to go the Accessibility menu.

3. Inside Accessibility, you need to select Screen Reader on the left side of the menu.

4. On the right side of the same menu, you will see the Enable Screen Reader option.

If the switch to the right of the wording is black, select the Enable Screen Reader option to turn the switch white and enable this feature.

5. With Screen Reader enabled, you can customize the voice speed, voice type and voice volume.
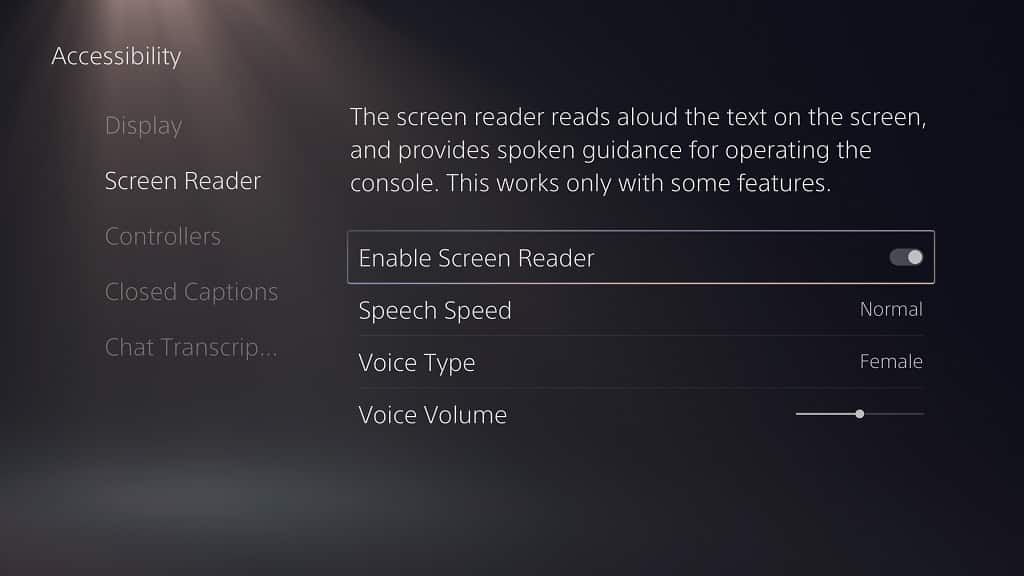
For the Voice Speed option, you have the following choices:

  • Slow 3
  • Slow 2
  • Slow 1
  • Normal
  • Fast 1
  • Fast 2
  • Fast 3
  • Fast 4
  • Fast 5

For the Voice Type option, you can choose between the following:
  • Male
  • Female

How to turn off Bluetooth on PS5

With the PlayStation 5, as well as the PlayStation 5 Digital Edition, you can disable the Bluetooth connection.

If you are interested in doing so, then you can check out this step-by-step tutorial at Seeking Tech.

Why you should turn off Bluetooth on PlayStation 5

The main reason to disable Bluetooth on PlayStation 5 is that so you can use a wired controller without any potential disruptions and interferences.

By using a Bluetooth connection, there is a chance that you may experience lag, unresponsiveness and even disconnections. These issues could occur when there are environmental factors that block or hinder the Bluetooth connection. The hindrances include solid objects as well as other wireless signals.

By using a wired connection with your controller, you don’t have to worry about lag, unresponsiveness and disconnection issues.

How to disable Bluetooth on PS5

In order to disable Bluetooth on your PlayStation 5 system, you need to do the following:

1. First off, make sure you are in the home screen, which is the main system menu where you can select which game to play in addition to being able to perform other tasks.

2. In the home screen, you should see the gear cog symbol on the top right corner. Navigate over and then select the symbol to go to the “Settings” menu.

3. In the “Settings” menu, find and select the “Accessories” option from the list.

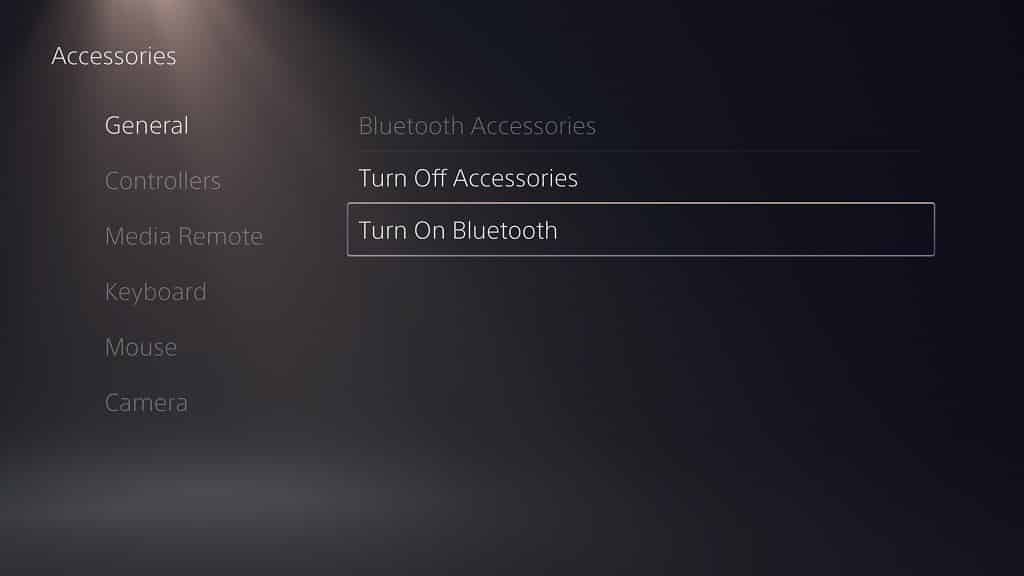
4. In the “Accessories” menu, select the “General” option, which should be the top-most choice on the left side.

5. On the right side of the same “Accessories” menu, select the “Turn Off Bluetooth” option.

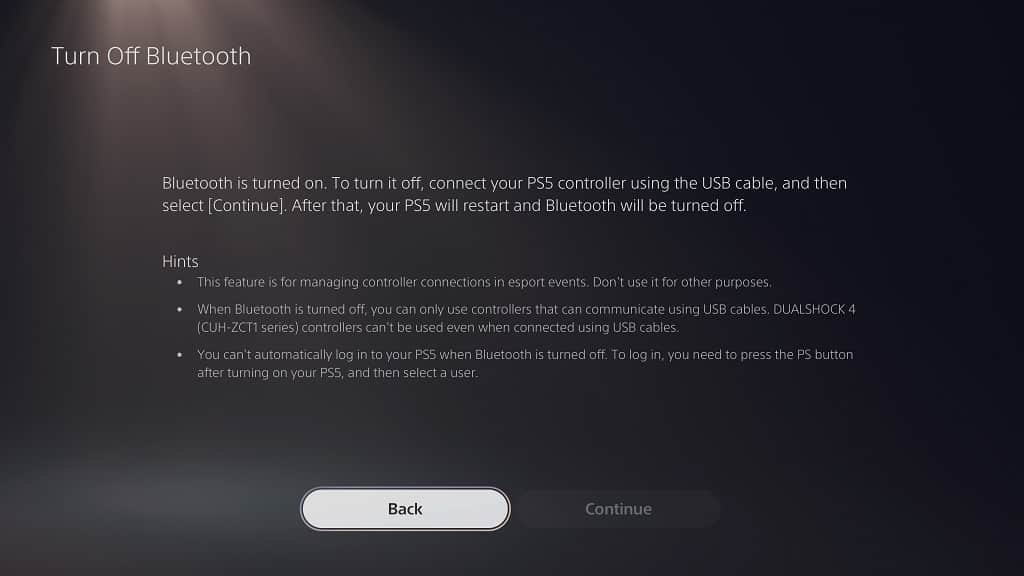
6. In the “Turn Off Bluetooth” menu, connect your controller to the PlayStation 5 via an USB cable if you haven’t done so already.

7. With the controller connected to the USB port, the “Continue” option can be selected.

8. Select the “Continue” option. The PlayStation 5 will then restart with Bluetooth disabled.

Keep in mind that, by turning off Bluetooth, the auto login feature will be disabled.

Not to mention that the controller will need to be connected to your PS5 system through USB at all times.

It is also worth noting that, on the PlayStation 5, you can’t use the DualShock 4 with the Bluetooth connection disabled.

How to enable Bluetooth on PS5

If you want to reenable Bluetooth on PlayStation 5 after turning it off, you need to do the following:

1. Connect your controller to the USB port of the PS5 by using an USB cable.

2. Turn on the PlayStation 5 and go to the home screen menu.

3. In the home screen, go to the “Settings” menu.

4. Once you are in the “Settings” menu, select the “Accessories” option from the list.

5. Once you are in the “Accessories” menu, select the “General” option from the list on the left side of the screen.

6. On the right side of the same “Accessories” menu, select the “Turn On Bluetooth” option from the list.

7. Once you are in the “Turn On Bluetooth” menu, select the Yes option. Your PlayStation 5 system will restart with Bluetooth enabled.

How to automatically log in to PS5

When you turn on your PlayStation 5 or PlayStation 5 Digital Edition system, you have to select a PlayStation Network account before going to the home screen.

If you want to skip this extra step, then you can follow this tutorial from Seeking Tech to see how you can log in to the PS5 automatically.

Turning on Bluetooth

The automatic PSN log in feature requires Bluetooth to work.

By default, Bluetooth is enabled on the PlayStation 5. To check if the wireless connection is turned on, you can take the following steps:

1. Go to the home screen. This is the main menu after you turn on your PS5 and manually chose your user account to log into.

2. From the home screen, go to “Settings.” You will find the “Settings” option, which is attached to the gear cog symbol, on the upper right corner of the screen.

3. Once you are inside the “Settings” menu, you need to select the “Accessories” option.

4. Once you are inside the “Accessories” menu, you need to select the “General” option on the left side of the screen.

5. On the right side of the same “Accessories” menu, you will see either “Turn On Bluetooth” or “Turn Off Bluetooth.”

If you see “Turn On Bluetooth,” select that option.

6. In the “Turn On Bluetooth” menu, select the “Yes” option.

7. The PlayStation 5 system will then restart with Bluetooth enabled.

How to enable auto log in on PS5

To enable the automatic PSN login feature on the PlayStation 5, you need to do the following:

1. Turn on your PlayStation 5.

2. In the “Welcome Back to PlayStation” menu, you need to select the PSN account you want to automatically sign into.

3. In the home screen menu, head into the “Settings” menu.

4. In “Settings,” head into the “Users and Accounts” menu.

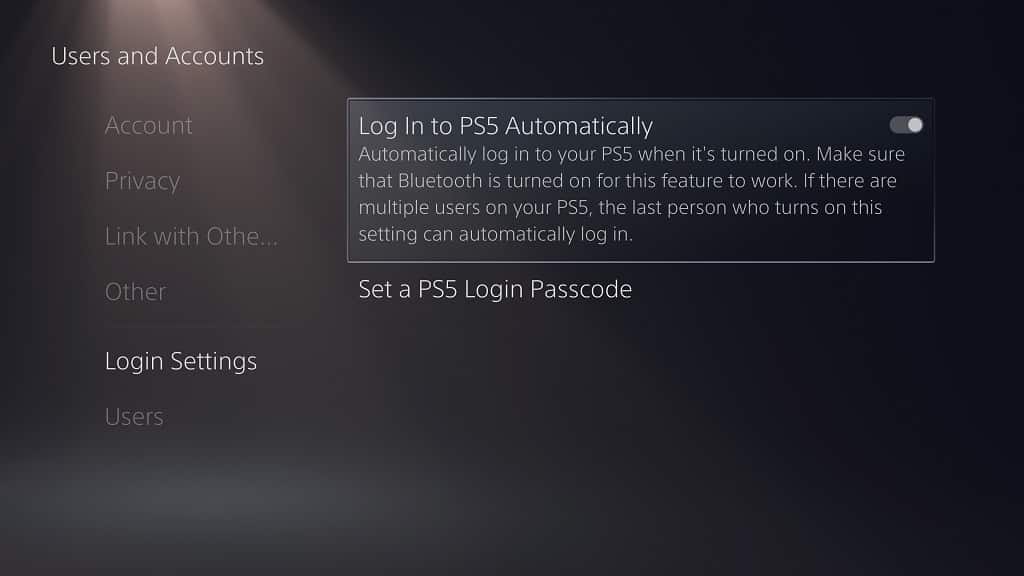
5. In “Users and Accounts,” select “Login Settings” from the list of options on the left side.

6. On the right side of the same “Users and Accounts” menu, you will see the “Log In to PS5 Automatically” option.

If the switch to the right of the wording is black, select the “Log In to PS5 Automatically” option to turn the switch white and enable that setting.

The next time you turn on or restart your system, you should automatically be logged into the same account that you use to enable this feature.

How to switch users with auto login enabled on PS5

If you have multiple user accounts on your PlayStation 5 but want to keep using the auto login feature, then you can simply switch users.

To do so, you need to do the following:

1. Select your profile picture.

You can find your profile picture on the upper right corner of the home screen. You can also press the PS button on your DualSense controller to bring up the control center and then select your profile picture at the lower right corner on the screen.

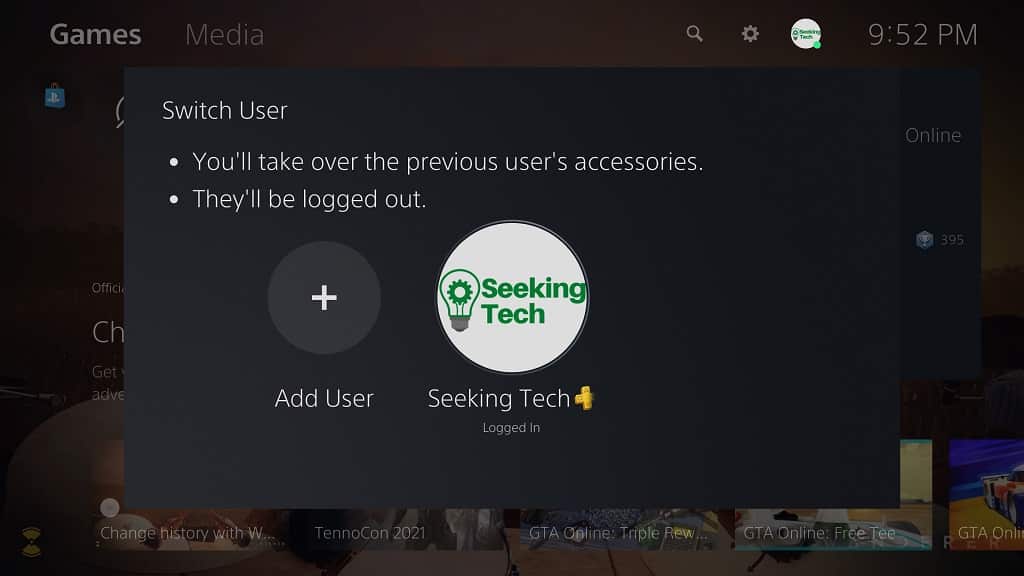
2. In the pop-up menu, select the “Switch User” option.

3. In the “Switch User” menu, select the PlayStation Network user account you want to switch to.

How to automatically login to PS5 with another user

You can only use the automatic login feature for one user account at a time.

If you want to change which account gets logged into automatically, you can take the following steps:

1. Switch to the user account that you want to automatically log into.

2. Go to the “Settings” menu from the home screen.

3. Go to the “Users and Accounts” menu from “Settings.”

4. In “Users and Accounts,” select the “Login Settings” option on the right side.

5. On the right side of the same “Users and Accounts” menu, you will see the “Log In to PS5 Automatically” option.

The “Log In to PS5 Automatically” option should be enabled. Select that option to disable the setting so that the PlayStation 5 will “forget” the previous user account that was used for the automatic login.

6. Select the “Log In to PS5 Automatically” option again. Now the user that is currently logged into the PlayStation 5 will become the default account for the automatic login feature.

How to wishlist games, view the wishlist and remove wishlist games on PS5

With the PlayStation 5, as well as the PlayStation 5 Digital Edition, you can add games that you haven’t purchased to a wishlist.

You can follow this tutorial from Seeking Tech to see how you can add wishlist games, find the wishlist and remove wishlist games on the PS5.

How to add a game to your wishlist on PS5

In order to add a videogame on your wishlist, you need to do the following:

1. Go to the home screen. This is the main menu of your PlayStation 5 system where you can select a game to play.

2. In the home screen menu, select the blue shopping bag, which is the symbol for the PlayStation Store.

3. In the PlayStation Store, press the Triangle button on you DualSense to go directly to the search symbol.

4. Press the X button to enter the Search menu.

5. In the Search menu, select the “Search of games and add-ons” filed to open a virtual keyboard where you can input texts.

Alternatively, you can select the microphone symbol to use voice search. To find out more on how you can use your voice to search for games, you can check out this tutorial.

6. Once you are done inputting the text into the search field, select the “Done” option from the virtual keyboard or press the R2 button on your DualSense to confirm the search.

7. Select the game you want to add to your wishlist from the search results.

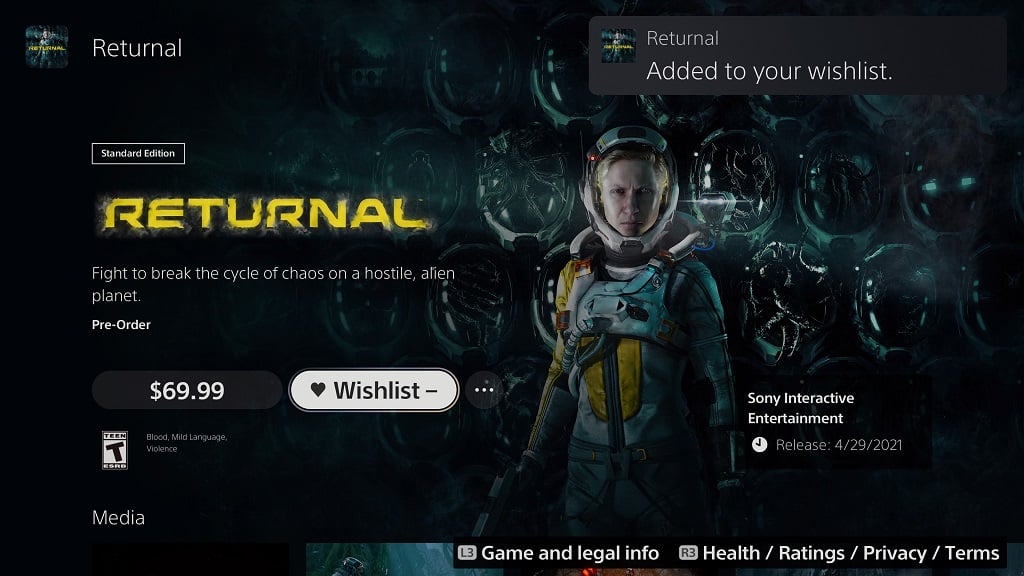
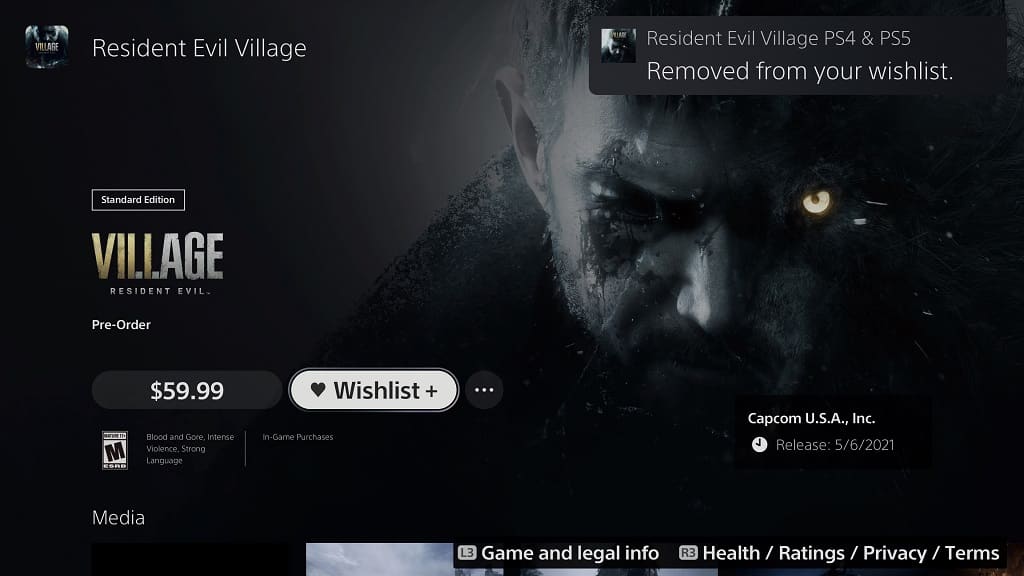
8. In the game’s product page, select the “Wishlist +” option.

How to customize wishlist notifications on PS5

To customize when notifications about your wishlist games will show up, you need to do the following:

1. In the home screen, select the gear cog symbol located on the upper right corner of the screen, which should bring you to the “Settings” menu.

2. In the “Settings” menu, you need to select the “Notifications” option near the bottom of the list.

3. In the “Notifications” menu, select the “Wishlist Updates” option near the bottom of the list.

4. In the pop-up menu, you will have four choices:

The “Show Pop-Ups” option will allow you to choose whether or not you want to get notifications on your wishlist games. If the switch to the right of the wording is white, then notifications are enabled. If the switch is black, then notifications are disabled and the other three options underneath (“During Games,” “During Videos” and “During Broadcasts”) will also be turned off.

The “During Games” option will allow you to choose whether or not you want to get wishlist notifications when playing a game. If you want to enable this option, make sure the switch to the right of the wording is white.

The “During Videos” option will allow you to choose whether or not you want to get wishlist notifications when watching a video. To enable this option, the switch to the right of the wording needs to be white.

The “During Broadcasts” option will allow you to choose whether or not you want to get wishlist notifications when you are live streaming a game. You need to make sure that the switch to the white of the wording is white if you want this option enabled.

For more information on how you can disable pop-op notifications for your wishlist and more, you can check out this guide.

How to find your wishlist games on PS5

To view the games you have wishlisted on the PlayStation 5, you need to take the following steps:

1. Go to the PlayStation Store from the home screen.

2. In the PlayStation Store, select the heart symbol, which is on the upper right side of the screen in-between the search and shopping cart options.

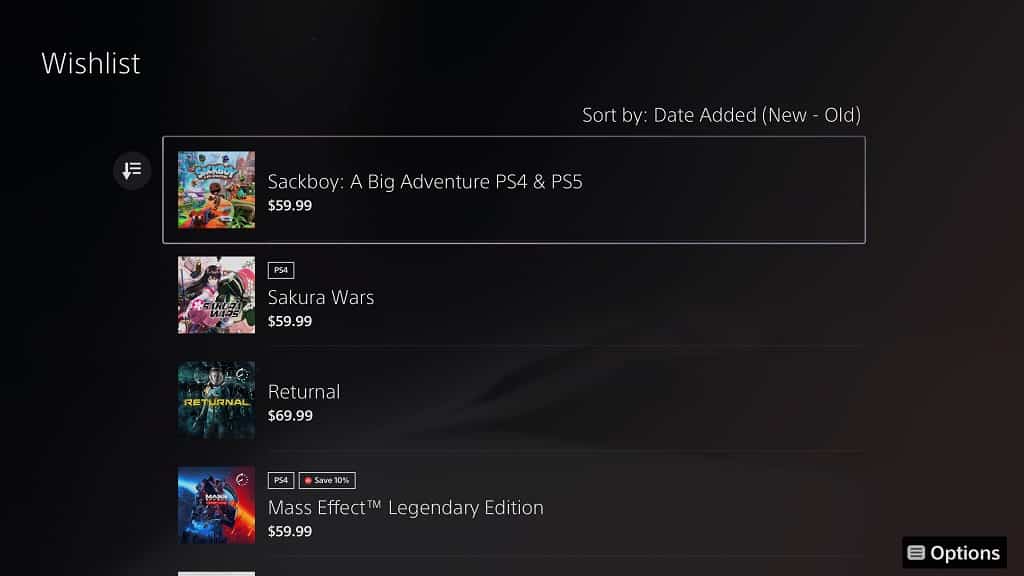
3. In the Wishlist menu, you will see a list of games you have wishlisted.

You can sort through the listing by selecting the “Sort” option, which is located to the left (it has a symbol that features three horizontal lines and a down pointing arrow).

You can sort the list based on the following:

  • Date Added (New – Old)
  • Date Added (Old – New)
  • Name (A – Z)
  • Name (Z – A)
  • Price (Low – High)
  • Price (High – Low)
  • Release Date (New – Old)
  • Release Date (Old – New)

How to remove a game from your wishlist on PS5

To remove a game from your wishlist on the PlayStation 5, you need to do the following:

1. Head over to the PlayStation Store from the home screen.

2. In the PlayStation Store, go the Wishlist menu.

3. In the Wishlist menu, highlight the game you want to be removed.

4. You can press the X button to go to the game’s product page, where you can select the “Wishlist -” option to remove the game from the list.

Alternatively, you can press the Options button on your DualSense with the game highlighted to bring up a pop-up menu where you can select the “Wishlist -” to remove the game.

How to fix disconnection issues with DualSense

When playing with the DualSense controller on your PlayStation 5 or PlayStation 5 Digital Edition, you may have noticed that the gamepad may randomly disconnect from the system.

If your controller is disconnecting, then you can check out this troubleshooting tutorial from Seeking Tech.

Make Sure Your DualSense Battery is Charged

The first step we recommend taking is to make sure that your DualSense battery is charged.

If your controller is running low on battery, your PS5 will give you a pop-up notification on the screen.

You can also tell how much battery life you have left be pressing the PS button to bring up the quick menu. On the bottom row of options, you will see the controller symbol with a battery symbol located underneath it. If your DualSense in running low on battery charge, the battery symbol will be empty and start flashing.

If you are having issues with recharging your DualSense, then you can check out this tutorial.

Remove Bluetooth Interference

If your controller has plenty of battery life and is still disconnecting, the next step we recommend taking is to remove any potential Bluetooth interference.

To make sure that you have a strong Bluetooth communication between your DualSense and PS5, you can do the following:

1. Make sure that the DualSense and PS5 is within close proximity to each other.

2. Make sure that there are no solid walls or other objects between the controller and console.

3. Make sure that the controller and/or system isn’t close to a Wi-Fi router or satellite.

4. If you have other Bluetooth connections active, try to disable them.

How to reset your DualSense to factory settings

To get rid of the disconnects, you can also try resetting and then resyncing your DualSense controller.

To do so, you need to do the following:

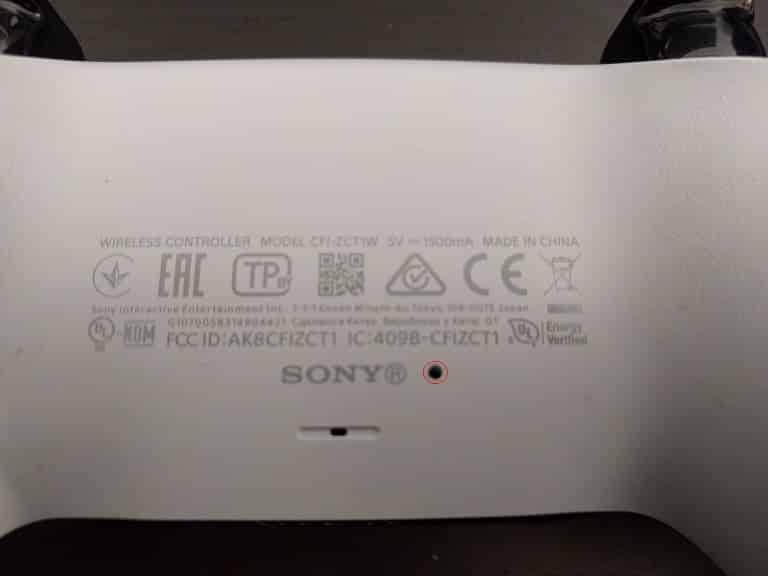
1. Press and hold the reset button on the DualSense for at least five second. The button is located in a small hole on the back of the controller.

You will need to use a pin of something similar to push down on the reset button in the hole.

2. After resetting your controller, you need to pair it again with your PlayStation 5. To do so, you can use the USB Type-A to USB Type-C cable that came with the system to connect the DualSense to the PS5.

3. Press the power button on your PlayStation 5 system to turn it on.

4. Press the PS button on your DualSense to re-sync the controller to the PS5 console.

How to restore default settings

If resetting the DualSense does not work with eliminating the disconnections, you can try restoring the default settings of your PlayStation 5.

To do so, you can take the following steps:

1. Make sure your PlayStation 5 is turned off.

2. Press and hold the power button on PS5 system until you hear a second beep. This should launch you into the Safe Mode.

3. Connect your DualSense to your PlayStation 5 console via an USB cable and then press the PS button.

4. In the Safe Mode menu, select the “4. Restore Default Settings” option.

5. In the next screen, select the “Yes” option.

How to use DualSense as a wired controller on PS5

In none of the aforementioned fixes work with the disconnects, you can try using your DualSense as a wired controller on the PlayStation 5.

To do so, you need to do the following:

1. First, you need to connect your DualSense to the PlayStation 5 using an USB cable.

2. Turn on your PS5 system and then select your user profile. You should be in the home screen menu where you can select which game to play.

3. From the home screen, go to “Settings.” You will find this option on the upper right corner of the screen.

4. In the “Settings” menu, you need to go to “Accessories.”

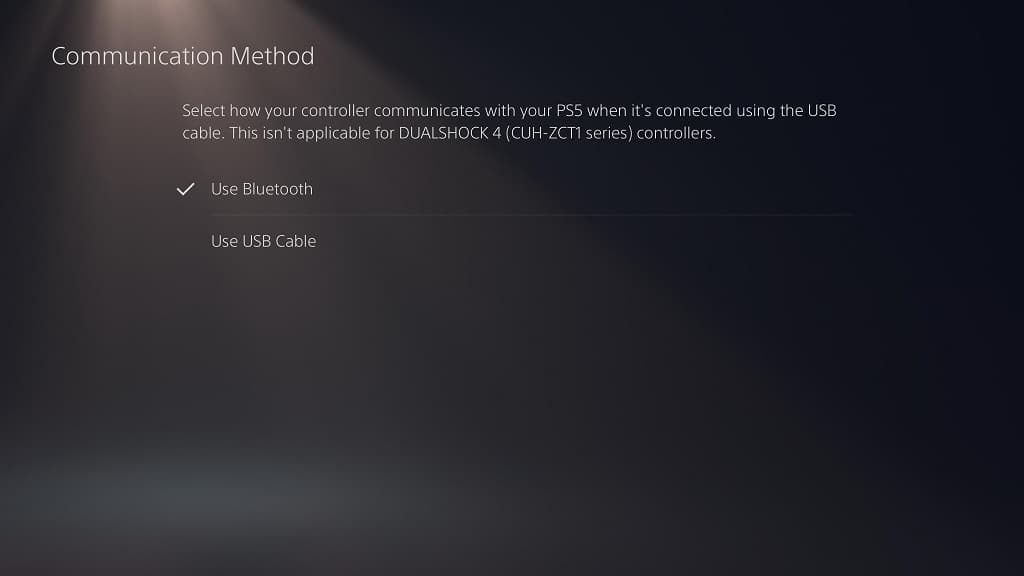
5. In the Accessories” menu, you need to select “Controllers” on the left tab and then “Communication Method” on the same side of the screen.

6. In the “Communication Method” menu, select “Use USB Cable.”

Keep in mind that your DualSense needs to be connected to your PlayStation 5 system via an USB cable at all times if you want to use your gamepad as a wired controller.

If none of methods resolve the disconnection issues, it is very likely that you may have to send in your DualSense controller to PlayStation for repair.