How to update the DualSense wirelessly on PS5

Thanks to a recent firmware release, you can now update the DualSense controller without having to connect it to your PlayStation 5 or PlayStation 5 Digital Edition console by using a USB cable. To find out you can do so, you can take a look at this tutorial from Seeking Tech.

The ability to update the DualSense controller wirelessly was added through a recent system software for the PS5. Therefore, you should make sure that your console is updated if you haven’t done so already. You should get an update prompt when you turn on the gaming system and connect it to the PlayStation Network.

You can also manually update the console by taking the following steps:

1. To begin, you need to head over to the home menu of the PlayStation 5 or PlayStation 5 Digital Edition, which can be done quickly by pressing and holding the PS button of the DualSense controller for around 1 second. You can also press and then quickly release the same PS button; afterwards, select the home icon from the Control Center quick menu.

2. Next, you need to head over to the Settings menu, which you can do by selecting the gear cog icon on the top right side from the home menu.

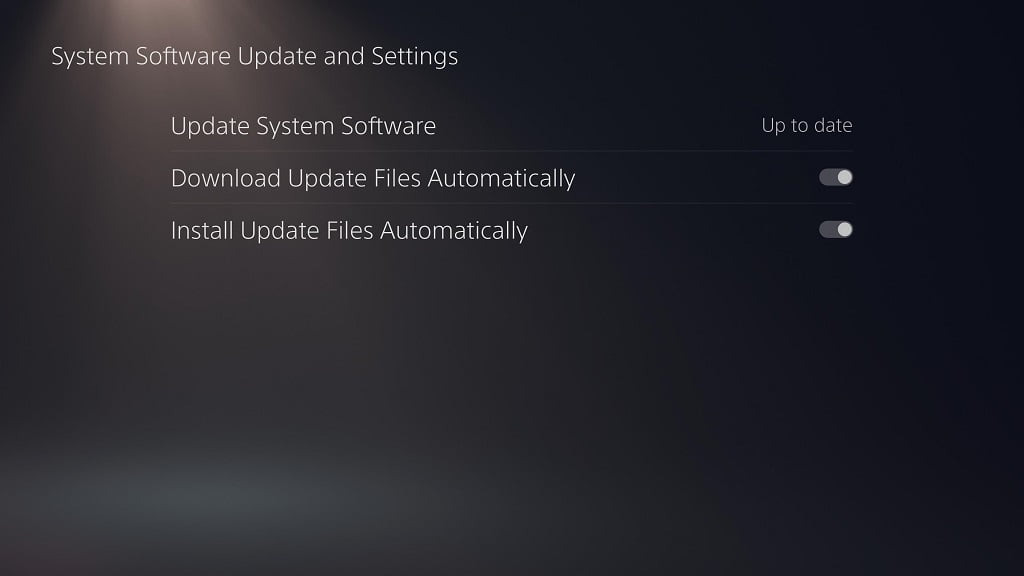
3. Once you get to Settings, you need to select System > System Software > System Software Update and Settings > Update System Software > Update Using Internet.

4. Once your PS5 has been updated, it should automatically reboot. After the system has restarted, you can then turn on the DualSense controller.

5. If there is a new firmware available to be downloaded or installed for the gamepad, then you should see a message appear on the screen.

If you don’t see the notification, then you need to take the following steps:

1. Go back to the home screen of your PlayStation 5 or PlayStation 5 Digital Edition if you aren’t there already.

2. You then need to select the gear icon to head into Settings.

3. From the Settings menu, select Accessories.

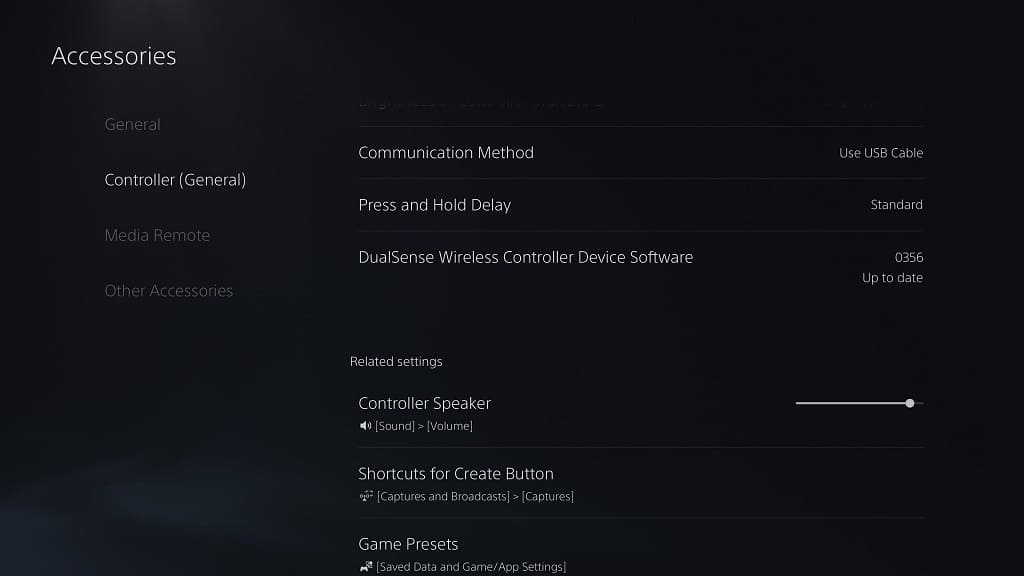
4. After getting to the Accessories menu, you first need to select Controller (General).

5. On the right side of the same screen, scroll down until you see “DualSense Wireless Controller Software” option.

6. If this setting shows that the gamepad is “Up to Date” then it has already been updated to the latest firmware.

Otherwise, you need to select “DualSense Wireless Controller Software” to manually start the update process.

7. Do not turn off the system while the update is occurring. The process should only take seconds to be completed.

How to tell that you have the new and improved DualSense model 

Earlier this year, Sony made a revision to the DualSense controller. The new model features thicker trigger springs as well adding an extra plastic piece on the analog sticks. As a result, the revision should help the trigger springs last longer as well as providing better protection against stick drift.  

To see how you can identify whether or not you have a new model of the DualSense, you can take a look at this guide from Seeking Tech. 

DualSense Color Variations  

All color variations of the controller released in 2022 and later should be the new model that has improved trigger springs and extra analog stick piece. These should include the following colors: 

  • Nova Pink 
  • Starlight Blue 
  • Galactic Purple 
  • Grey Camouflage 
  • God of War Ragnarök Limited Edition 

How to check the White, Black and Cosmic Red DualSense variants 

Before 2022, Sony released the White, Midnight Black and Cosmic Red color versions of the DualSense. These variants may or may not be redesigned.

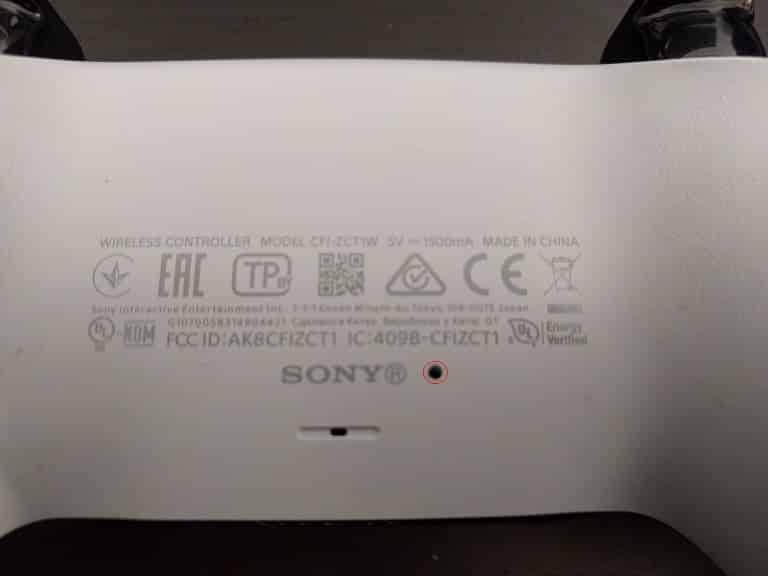
Unfortunately, the only way you can tell is to take the White, Midnight Black or Cosmic Red DualSense out of the packaging box and then check the back of the gamepad.  

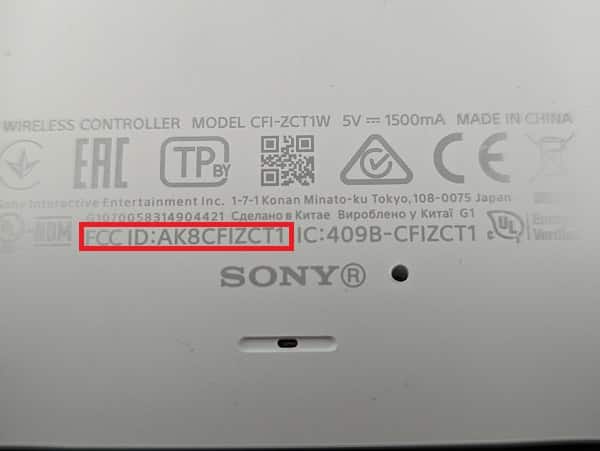
On the back side, you should see the FCC ID code.

If the code ends with the number 1, then it indicates that you have the original model of the DualSense. Therefore, the gamepad will have thinner springs on the L2 and R2 buttons along with missing the extra protective plastic piece that protects the analog sticks against stick drift. 

If the FFC ID code ends with the number A, then it indicates that you have the revised DualSense model. As a result, you should get stronger springs as well as better protection against stick drifting.  

If you want a video guide to see how you can find this identification code, then you can check out the following clip done by John Glasscock: 

Thankfully, the revision should eventually fully replace the original model. Therefore, you should find less of the original being sold brand new on the marketplace as time passes.

To see a direct comparison between the original DualSense model and its revision, then you can take a look at the following video from TronicsFix: 

It is important to note that, even with the revision, the controller may eventually break. Therefore, make sure you take care of the DualSense when you are using it to play games. Furthermore, you should occasionally clean the gamepad in order to prevent any dust and other potentially harmful materials from getting inside.

How to turn off DualSense

The DualSense is a new game controller that is designed the PlayStation 5. You can check out this step-by-step guide to see how you can turn off the power of this gamepad.

How to turn off DualSense in the PS5 Control Center

The quickest way to turn off the DualSense is through the Control Center quick menu on the PlayStation 5.

In order to do so, you need to take the following steps:

1. The first step is to press the PS button on your DualSense controller, which should bring up the Control Center.

2. In the Control Center, navigate to the bottom portion of the menu and then select the “Acessories” option, which has a controller icon, by pressing the X button on your DualSense.

By default, “Accessories” is located between the “Mic” option and you profile picture.

3. In the pop-up menu, select the controller which you want to turn off.

4. Afterwards, select the “Turn Off” option to shut down the power of the controller.

How to turn off DualSense in the PS5 Settings

You can also turn off the DualSense in the settings menu of the PlayStation 5.

In order to do so, you need to do the following:

1. First off, you should be in the Home Screen, which is the main menu of the system after it boots up. This is where you can select a videogame to play.

If you are in a game or app, you can press and hold the PS button on your DualSense to bring up the Home Screen.

2. From the Home Screen, go to “Settings.”

You will find the “Settings” option on the upper right corner of the screen as it has a gear cog symbol. It should be in between the “Search” option and your profile picture.

3. Inside the “Settings” menu, select the “Accessories” option from the list.

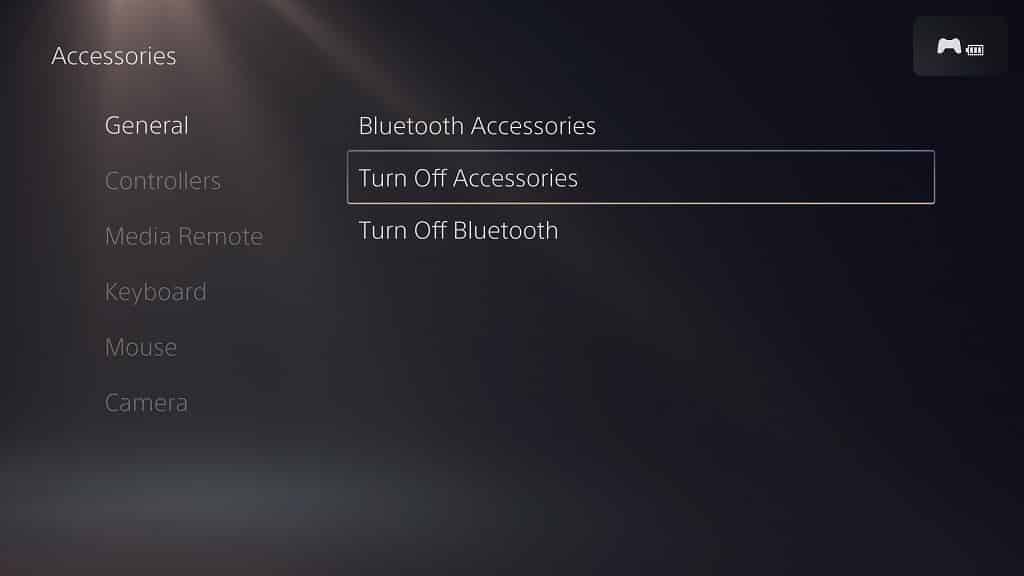
4. Inside the “Accessories” menu, select “General” from the available options on the left side.

5. On the right side in the same “Accessories” menu, select “Turn Off Accessories.”

6. In the “Turn Off Accessories” menu, select the controller which you want to turn off.

How to turn off DualSense without using PS5 menus

You can also power off the DualSense without using the menus on the PlayStation 5.

If you are interested in doing so, then you need to take the following step:

1. Press and hold the PS button on your DualSense for around 10 seconds.

The controller lights should eventually go out, which signals that the gamepad has been turned off.

How to automatically turn off DualSense after a set amount of time

You are also able to automatically turn off the DualSense after a set amount of time

If you want to do so, you need to do the following:

1. Head to “Settings” from the Home Screen.

2. Under the “Settings” menu, select “System” from the list of options.

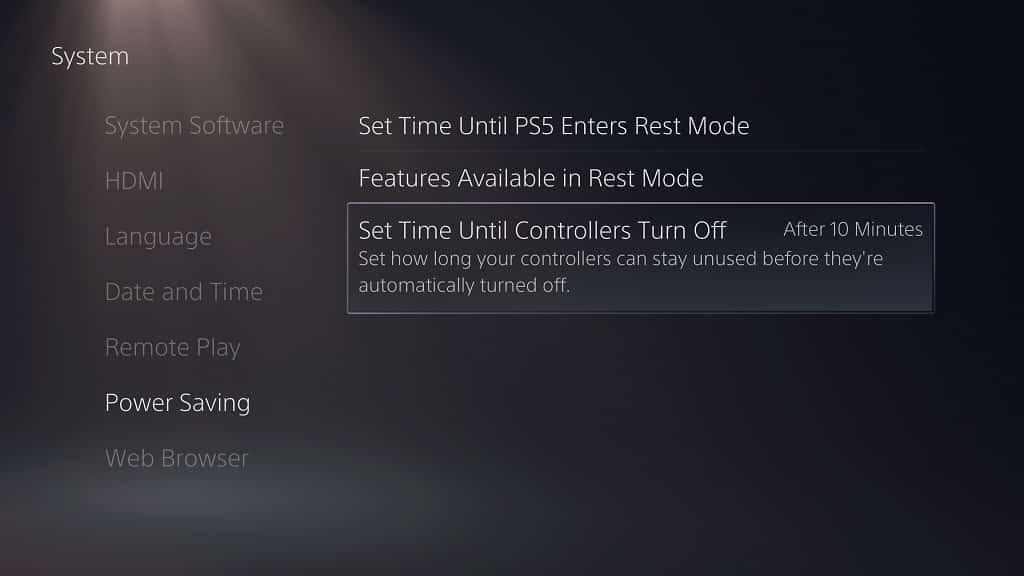
3. Under the “System” menu, select “Power Saving” from the available options on the left side.

4. On the right side of the same “System” menu, select the “Set Time Until Controllers Turn Off” option.

5. In the pop-up menu, you can pick between the following time periods:

  • “After 10 Minutes”
  • “After 30 Minutes”
  • “After 60 Minutes”
  • “Don’t Turn Off”

If you want to use the same controller again after turning it off, you can press the PS button on the DualSense.

How to pair DualShock 4, DualSense and Xbox wireless controllers to Pixel 6/Pixel 6 Pro

The DualShock 4, DualSense, Xbox One wireless controller and Xbox Series wireless controllers are all compatible with the Google Pixel 6 and Google Pixel 6 Pro.

You can take a look at this step-by-step guide at Seeking Tech to see how you can pair these Bluetooth gamepads to your Android smartphone.

How to pair DualShock 4 and DualSense to Pixel 6/Pixel 6 Pro

In order to connect your DualShock 4 or DualSense to the Google Pixel 6 and Google Pixel 6 Pro, you need to do the following:

1. First off, we recommend unplugging the power cable from your PlayStation 4 and/or PlayStation 5 console as the pairing process may turn the game systems on.

2. If you have an USB cable connected to the DualShock 4 or DualSense, then make sure that you unplug it.

3. If your controller is not already turned off, press and hold the PS button until you no longer see any lights appear on the light bar.

4. On your Pixel 6 or Pixel 6 Pro, go to the Settings app.

This app can be found by swiping upwards from an empty space in the home screen, which will reveal a list of installed applications on your phone.

5. In the Settings app, select the “Connected devices” option.

6. Inside the “Connected devices” menu,” select the “Pair new device” option.

7. If you have a DualShock 4 press and hold the Share button. If you have a DualSense, press and hold the Create button.

8. With the Share/Create button held down, you then need to press and hold the PS button.

After a short while, you should see the light bar of your PS4 or PS5 controller double blinking at regular intervals. This indicates that the gamepad has been set to pairing mode.

9. In the “Pair new device menu” on your Pixel 6 or Pixel 6 Pro, your DualShock 4 or DualSense will show up as “Wireless Controller.” Select it to start the pairing process.

10. In the “Pair with Wireless Controller” notification, select Pair to connect your wireless PlayStation gamepad to your smartphone.

How to pair Xbox One and Xbox Series S/X controllers to Pixel 6/Pixel 6 Pro

In order to pair the wireless controller that came with your Xbox One, Xbox One S, Xbox One X, Xbox Series S or Xbox Series X to the Google Pixel 6 and Google Pixel 6 Pro, you need to do the following:

1. Unplug the power cable from your Xbox One, Xbox One S, Xbox One X, Xbox Series S or Xbox Series X game console.

2. If an USB cable is attached to your controller, make sure that you also disconnect it.

3. If the Xbox One or Xbox Series gamepad is turned on, press the Xbox button for six second to power it down.

4. On your Pixel 6 or Pixel 6 smartphone, head to the Settings app.

5. After getting to Settings, tap “Connected devices.”

6. Inside the “Connected devices” menu, tap “Pair new device.”

7. Next, turn on your Xbox One or Xbox Series controller by pressing the Xbox button.

8. Afterwards, you need to press and hold the pair button on the controller for three seconds.

The light indicator on the Xbox button should then blink rapidly, signaling that the gamepad is in pairing mode.

9. On your Pixel 6 or Pixel 6 Pro, you should see your Xbox One or Xbox Series controller as “Xbox Wireless Controller.” Tap it to being the pairing process.

10. In the “Pair with Wireless Controller” notification, tap Pair to connect your Xbox controller to the phone.

How to pair DualShock 4, DualSense and Xbox controllers with 2021 Apple TV

With the 2021 Apple TV, you will be able to connect to PlayStation and Xbox wireless controller. You can follow this guide from Seeking Tech to see how you can connect these gamepads to your media player.

Supported 2021 Apple TV Models

This guide will cover the following models of the Apple TV:

  • 2021 32GB Apple TV HD (MHY93LL/A)
  • 2021 32GB Apple TV 4K (MXGY2LL/A)
  • 2021 64GB Apple TV 4K (MXH02LL/A)

How to pair DualShock 4 to 2021 Apple TV

In order to pair the DualShock 4, which is the official controller of the PlayStation 4, to a 2021 Apple TV, you need to do the following:

1. Turn on your 2021 Apple TV.

2. Press the PS and Share button at the same time until the light bar of the controller begins to flash.

3. Follow the on-screen instructions on the Apple TV to pair the DualShock 4 to media device.

How to pair DualSense to 2021 Apple TV

To pair the DualSense, which is the official controller of the PlayStation 5, you need to do the following:

1. Make sure that your 2021 Aple TV is turned on.

2. Press and hold the PS and Create button at the same time until the light indicator of the DualSense beings to flash.

3. Follow the on-screen instructions on your Apple TV to pair the DualSense.

How to pair Xbox controllers to 2021 Apple TV

You will be able to pair the following Xbox controllers to your 2021 Apple TV:

  • Xbox Wireless Controller with Bluetooth (Model Number: 1708) for Xbox One, Xbox One S and Xbox One X
  • Xbox Elite Wireless Controller Series 2
  • Xbox Adaptive Controller
  • Xbox Wireless Controller for Xbox Series S and Xbox Series X

To pair any of these Xbox controllers, you need to take the following steps:

1. Turn the Apple TV on if you haven’t done so already.

2. Press the Xbox button on the controller to turn the gamepad on.

3. With the Xbox controller turned on, press and hold the Pairing button on the gamepad for a few seconds.

4. Follow the on-screen instructions on your 2021 Apple TV to pair your Xbox controller.

How to fix PS and Xbox controller pairing issues with 2021 Apple TV

If you are experiencing issues with connecting, pairing or using a PlayStation and/or Xbox controller on your 2021 Apple TV, then you can find some possible fixes below:

1. First off, we recommend checking to see if your controller still have any battery life.

2. You should also check to see if your gamepad and 2021 Apple TV have been updated to the latest firmware.

3. Next, you can try moving your controller closer to your Apple TV.

4. You should also make sure that there aren’t any physical obstructions that may be interfering with the Bluetooth signals.

The list of objects that may weakened the signal that connects your gamepad to your media player include bricks, bulletproof glass, concrete, glass, marble, metal, plaster, water, wood as well as synthetic materials.

5. You should also avoid using your Apple TV nearby any of the following objects: cordless phones, fluorescent lights, microwave ovens, Wi-Fi router and wireless video cameras.

6. Turn off other Bluetooth or Wi-Fi devices that you aren’t using.

Both Bluetooth and Wi-Fi utilize the 2.4 GHz band. If your Wi-Fi router supports 5.0 GHz band as well, you can try moving some of your Wi-Fi connected devices from the 2.4 GHz band to the 5.0 GHz band so that you can get a better Bluetooth connection.

How to unpair PS and Xbox controllers on 2021 Apple TV

If you are still experiencing problems with connecting and/or using your PlayStation and/or Xbox controllers with your 2021 Apple TV, you can try unpairing the controller and then pairing it back again.

In order to unpair the controller, you need to do the following:

1. On your 2021 Apple TV, go to Settings.

2. Next, you should select Remotes and Devices.

3. Afterwards, select Bluetooth.

4. Select the controller you want to unpair from your 2021 Apple TV.

5. Select Unpair Device.

To pair your controller to your Apple TV again, you can follow the aforementioned instructions earlier in this guide.

How to fix disconnection issues with DualSense

When playing with the DualSense controller on your PlayStation 5 or PlayStation 5 Digital Edition, you may have noticed that the gamepad may randomly disconnect from the system.

If your controller is disconnecting, then you can check out this troubleshooting tutorial from Seeking Tech.

Make Sure Your DualSense Battery is Charged

The first step we recommend taking is to make sure that your DualSense battery is charged.

If your controller is running low on battery, your PS5 will give you a pop-up notification on the screen.

You can also tell how much battery life you have left be pressing the PS button to bring up the quick menu. On the bottom row of options, you will see the controller symbol with a battery symbol located underneath it. If your DualSense in running low on battery charge, the battery symbol will be empty and start flashing.

If you are having issues with recharging your DualSense, then you can check out this tutorial.

Remove Bluetooth Interference

If your controller has plenty of battery life and is still disconnecting, the next step we recommend taking is to remove any potential Bluetooth interference.

To make sure that you have a strong Bluetooth communication between your DualSense and PS5, you can do the following:

1. Make sure that the DualSense and PS5 is within close proximity to each other.

2. Make sure that there are no solid walls or other objects between the controller and console.

3. Make sure that the controller and/or system isn’t close to a Wi-Fi router or satellite.

4. If you have other Bluetooth connections active, try to disable them.

How to reset your DualSense to factory settings

To get rid of the disconnects, you can also try resetting and then resyncing your DualSense controller.

To do so, you need to do the following:

1. Press and hold the reset button on the DualSense for at least five second. The button is located in a small hole on the back of the controller.

You will need to use a pin of something similar to push down on the reset button in the hole.

2. After resetting your controller, you need to pair it again with your PlayStation 5. To do so, you can use the USB Type-A to USB Type-C cable that came with the system to connect the DualSense to the PS5.

3. Press the power button on your PlayStation 5 system to turn it on.

4. Press the PS button on your DualSense to re-sync the controller to the PS5 console.

How to restore default settings

If resetting the DualSense does not work with eliminating the disconnections, you can try restoring the default settings of your PlayStation 5.

To do so, you can take the following steps:

1. Make sure your PlayStation 5 is turned off.

2. Press and hold the power button on PS5 system until you hear a second beep. This should launch you into the Safe Mode.

3. Connect your DualSense to your PlayStation 5 console via an USB cable and then press the PS button.

4. In the Safe Mode menu, select the “4. Restore Default Settings” option.

5. In the next screen, select the “Yes” option.

How to use DualSense as a wired controller on PS5

In none of the aforementioned fixes work with the disconnects, you can try using your DualSense as a wired controller on the PlayStation 5.

To do so, you need to do the following:

1. First, you need to connect your DualSense to the PlayStation 5 using an USB cable.

2. Turn on your PS5 system and then select your user profile. You should be in the home screen menu where you can select which game to play.

3. From the home screen, go to “Settings.” You will find this option on the upper right corner of the screen.

4. In the “Settings” menu, you need to go to “Accessories.”

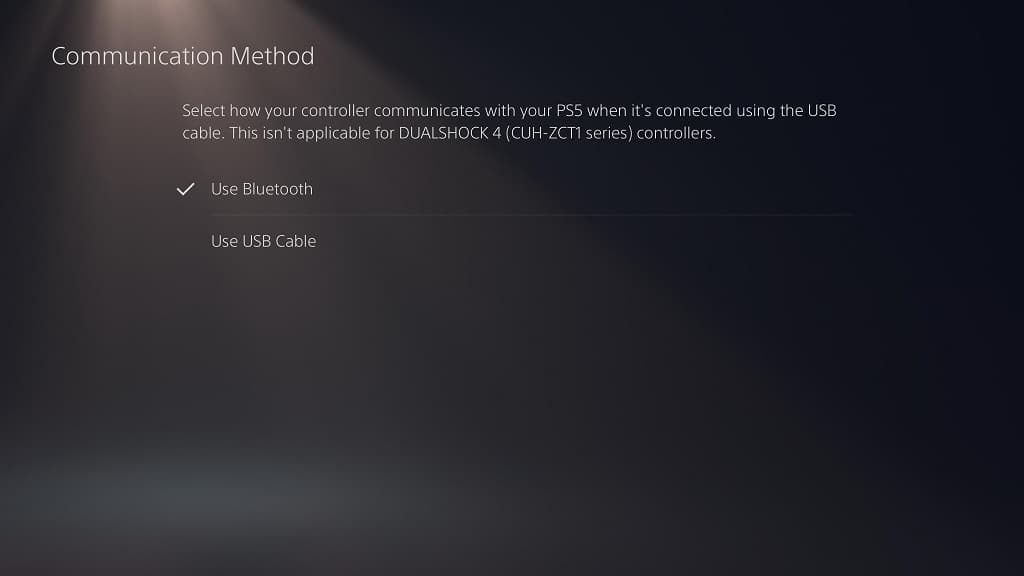
5. In the Accessories” menu, you need to select “Controllers” on the left tab and then “Communication Method” on the same side of the screen.

6. In the “Communication Method” menu, select “Use USB Cable.”

Keep in mind that your DualSense needs to be connected to your PlayStation 5 system via an USB cable at all times if you want to use your gamepad as a wired controller.

If none of methods resolve the disconnection issues, it is very likely that you may have to send in your DualSense controller to PlayStation for repair.

How to fix DualSense battery drain issues

If you have a DualSense, you may have noticed that the battery of the controller will mysteriously drain when not in use.

If you are experiencing this problem, then you can follow this guide at Seeking Tech to find some potential fixes.

Unplug the DualSense from USB port

If you keep your DualSense plugged into a USB port, even after the controller and the PlayStation 5 (or PC) are turned off, then it may lead to battery drainage overnight or over an extended period of time.

Therefore, we recommend disconnecting the DualSense from the USB port when you are not recharging its internal battery.

If you are recharging the battery for the PS5 controller, then you can wait until it is fully charges before unplugging it from the USB port.

Resetting the DualSense

The battery drainage could also be related to the software inside the DualSense. Thus, you may want to perform a factory reset on the controller and then update to the latest firmware.

In order to do so, you need to take the following steps:

1. Locate the small hole located on the back of the DualSense. It should be the right of the SONY trademark.

2. Use a pin, toothpick or another similarly sized object to press down on the reset button at the bottom of this small hole.

3. Hold down this button for around 3 to 5 seconds in order to reset the PS5 controller.

4. After holding the reset button down for the aforementioned length of time, let go of the button.

5. Now connect the DualSense to your PlayStation 5 via an USB cable.

6. Turn on the PlayStation 5 system.

7. Press the PS button on your DualSense.

8. Select your user profile to go the home screen menu.

9. If the system detects that there is a new firmware for the DualSense, it will prompt you to update. Follow the on-screen instructions to update to the latest firmware for the PS5 controller.

How to automatically turn off the DualSense controller

If you are still experiencing issues with your DualSense draining battery power when not in use, you can also automatically turn off the controller after a set amount of time.

In order to do so, you need to do the following:

1. First off, you need to be in the home screen, which is the main menu where you can select which game to play.

2. From the home screen, select the gear cog icon, which represents Settings, located on the top right corner.

3. From the Settings menu, select System from the list of available options.

4. From the System menu, select Power Saving from the list of options on the left side.

5. On the right side of the same System menu, select Set Time Until Controllers Turn Off.

With this option, you can set how long your gamepad will stay unused before it automatically shuts down.

6. In the pop-up menu, you have the following options:

  • After 10 Minutes
  • After 30 Minutes
  • After 60 Minutes
  • Don’t Turn Off

To prevent any battery drainage, we recommend choosing any of the After 10 Minutes, After 30 Minutes and After 60 Minutes options.

For the best option when it comes to saving the battery life of the DualSense from depleting, you should select the After 10 Minutes option.

If you are looking for more tips in regards to increasing the battery life of your DualSense before having to recharge the controller again, then you can check out this tutorial.

How to change the Create button functions for DualSense on PS5

With the PlayStation 5 and PlayStation 5 Digital Edition, Sony decided to rename the Share button to the Create button.

The Create button on the DualSense is designed to capture screenshots and videos. There are several ways you can customize how this button functions.

If you are interested in doing so, then you can follow this guide from Seeking Tech.

How to change the DualSense Create button functionalities on PS5

To change how the Create button on the DualSense works when connected to the PlayStation 5, you need to do the following:

1. If you haven’t done so already, you need to go to the home screen. This is the main system menu you use to browse through which game to play.

2. From the home screen menu, look for the gear cog icon on the top right corner. Select the icon to head into “Settings.”

3. Once you are in the “Settings” menu, you should select the “Captures and Broadcasts” options at the very bottom of the list.

4. In the “Captures and Broadcasts” menu, you should select the “Captures” option on the left.

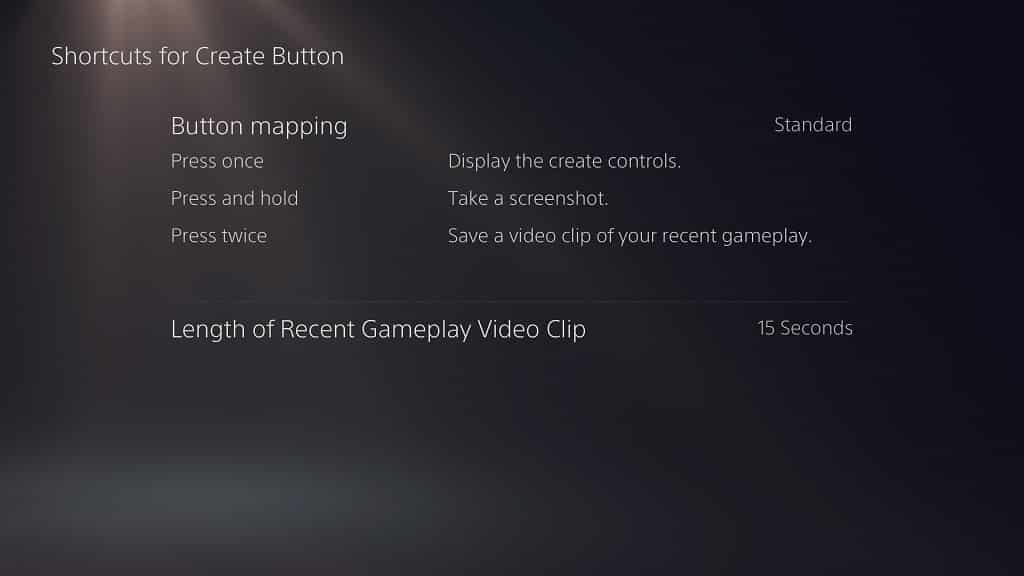
5. On the right side of the same “Captures and Broadcasts” menu, you should select the “Shortcuts for Create Button” option.

6. In the “Shortcuts for Create Button” menu, select the “Button mapping” option.

7. In the pop-up menu, you will have three choices:

  • “Standard”
  • “Easy Screenshots”
  • “Easy Video Clips”

You can take a look at what each of these custom settings does below:

Standard:

  • Press Create Button Once: Open the create control quick menu.
  • Press and Hold Create Button: Capture a screenshot.
  • Press Create Button Twice: Record a clip of your recently gameplay.

Easy Screenshots:

  • Press Create Button Once: Capture a screenshot.
  • Press and Hold Create Button: Open the create control quick menu.
  • Press Create Button Twice: Record a clip of your recently gameplay.

Easy Video Clips:

  • Press Create Button Once: Capture a screenshot.
  • Press and Hold Create Button: Open the create control quick menu.
  • Press Create Button Twice: Manually start or end a video recording.

Select to whichever option you feel is best based on your screenshot and video capturing needs.

To set how long you are required to press and hold the Create button in order for it to be registered as a different function as opposed to a single press, you need to take the following steps:

1. Inside the home screen menu, you need to head to “Settings.”

2. From inside the “Settings” menu, you need to select the “Accessibility” option near the top of the list.

3. Inside the “Accessibility” menu, you have to select the “Controllers” option on the left side of the screen.

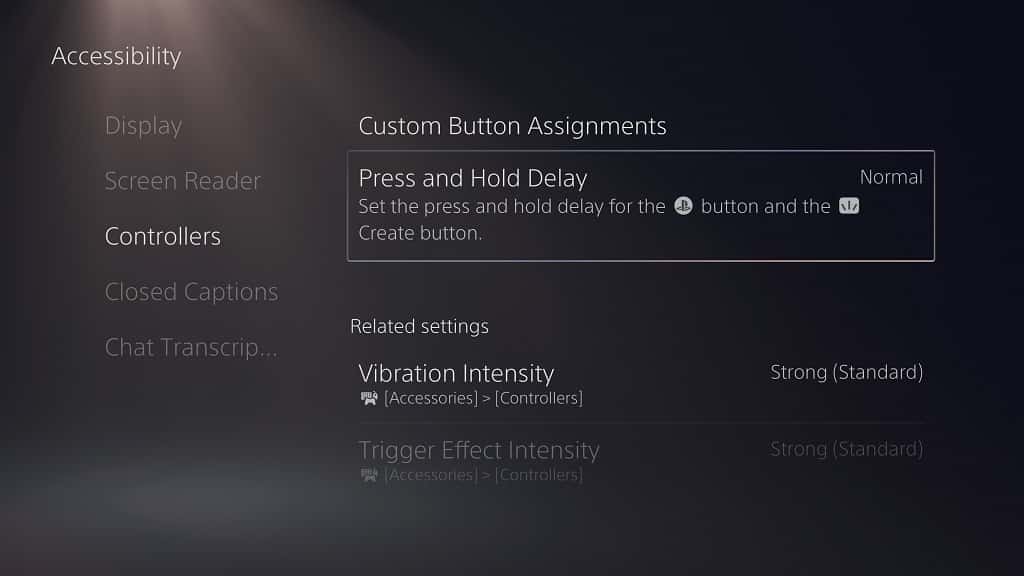
4. On the right side of the same “Accessibility” menu, you need to select the “Press and Hold Delay” option.

5. In the pop-up menu, you can select either “Normal” (if you want the press and hold action for the Create button to be shorter) or “Long” (if you want the press and hold action for the Create button to be longer).

How to fix mushy and sticky buttons on DualSense

When using the DualSense controller, you may have noticed that pressing a button may feel mushy or even sticky.

If the button does not seem as clicky as before, or even seems to be stuck, then you can follow this troubleshooting guide from Seeking Tech for some potential fixes.

Why DualSense button gets mushy and sticky

The buttons on your DualSense gamepad can get mushy and sticky due to several factors.

The oil, dirt and other containments on your thumbs, for example, can easily go through the outer edge of the button and end up inside the gamepad.

Dust particles can also get inside and cause issues with the buttons.

How to prevent DualSense button from getting mushy or stuck

To prevent your buttons on the PS5 controller from getting mushy or even stuck, you can do the following:

1. Wash your hands thoroughly before using the DualSense.

2. Store the controller in a well aerated room with low humidity.

3. If you are not going to use your controller for an extended period of time, you can use a dust cover or store it is a closed cabinet to prevent any dust buildup.

4. Clean the surface of the gamepad occasionally.

Fix #1: Apply Pressure on Button with Circular Motion

The first fix we recommend taking is by pressing down hard on the button that you feel mushy or sticky with your thumb.

With the button held down, you should then try to move the button in a circular motion. This can be done clockwise, counterclockwise or in both directions.

Make sure you apply pressure on the edges of the button to loosen it.

Keep doing this procedure until the button on your PlayStation 5 controller gets unstuck and feels clickily to press again.

Fix #2: Clean Edges of Button with WD-40 Specialist Contact Cleaner

If the aforementioned method does not work, then we suggest cleaning the button.

We do not recommend opening the DualSense as it is a rather complicated process. Not to mention that you can easily break the PS5 gamepad if you aren’t careful when disassembling and reassembling.

Instead, we recommend cleaning the edges of the button.

One of the methods is to use the WD-40 Specialist Contact Cleaner. This product is designed to remove oil, dirt, residue and condensation of electronics. The solution dries quickly and won’t leave behind any residue.

If you don’t have the cleaning product, then you can purchase one on Amazon with the following link:

To apply the WD-40 Specialist Contact Cleaner on the mushy or sticky DualSense button, you need to do the following:

1. First off, you need to make sure that the DualSense is completely turned off. You can tell that the PlayStation 5 controller is powered off where there are no lights coming out of it.

2. Using the smart straw of the WD-40 Specialist Contact Cleaner, spray along the edges of the mushy or sticky button. When applying, make sure you don’t press the PS button as doing so will power the controller on.

3. After spraying all around the edges of the problematic button, wait a few minutes to make sure that the WD-40 Specialist Contact Cleaner solution has completely dried.

4. Afterwards, test to see if the button feels normal to press again. If not, you can try spraying the edges again.

Fix #3: Clean Edges of Button with Isopropyl Alcohol

Another method to cleaning the DualSense button is by applying isopropyl alcohol.

Highly concentrated isopropyl alcohol will help remove oil, dirt and other residues. Not to mention that it will also dry quickly and won’t leave behind any residues on its own.

If you don’t have any isopropyl alcohol available, then we recommend picking up the MG Chemicals – 824-1L on Amazon via the following link:

To clean the button using isopropyl alcohol, you need to do the following:

1. Make sure that your DualSense is completely turned off.

2. Apply the isopropyl alcohol to a brush or cotton swap.

3. Clean the outer edges of the mushy or stick button. Make sure to are getting the cleaning solution in the crevices. During this time, you should also make sure that you don’t accidentally push the PS button as it will turn the controller on.

4. Wait a few minutes for the isopropyl alcohol to completely dry out and the test the button again to see if it feels clicky to press. If you are still experiencing issues, you can try cleaning the edges again.

How to pair additional DualSense, DualShock 4 and other controllers on PS5

Along with the DualSense, the PlayStation 5 (as well as the PlayStation 5 Digital Edition), can be played with the DualShock and other controllers.

You can follow this step-by-step guide at Seeking Tech on how to pair additional controllers to your PS5.

PS5 Controller Compatibility

The first step we recommend taking is to make sure that your controller is compatible with the PlayStation 5.

The most compatible gamepad is, of course, the DualSense. This controller, which comes with new features such as built-in microphone, haptic feedback and impulse triggers, is guaranteed to work with any PS5 game.

If you want an additional DualSense, then you can purchase the controller on Amazon with the following link:

The PlayStation 5 is also compatible with the DualShock 4. With that said, the DS4 cannot be used to play PS5 games. Instead, the PlayStation 4 controller can only be used to play backwards compatible PS4 games on the PlayStation 5 system.

If you are interested, you can purchase the DualShock 4 on Amazon via the following link:

A vast majority of third-party controllers for the PlayStation 4 (including arcade sticks, flight sticks and racing wheels) should also be able to work with the PlayStation 5.

Some of these input devices may need a firmware update. So, you may have to contact the manufacturer of your controller to see if there are any software updates that will add PS5 compatibility.

You may also want to look to see if there are any PS5-specific pairing instructions. If there isn’t any, you can try pairing the third-party controller on the PlayStation 5 using the same pairing method as the PlayStation 4 system.

How to pair an additional controller on PS5 using USB

The fastest way to pair an additional controller on your PlayStation 5 is by using an USB cable.

To do so, you can take the following steps:

1. Connect your controller to your PlayStation 5 using a USB cable. For the uninformed, the DualSense uses an USB Type-C to USB Type-A cable while the DualShock 4 uses a micro-USB to USB-Type A cable.

2. If you haven’t done so already, turn on your PlayStation 5. You can do so by pressing the PS button on a controller that was previously paired with the system. You can also simply use the power button on the system.

3. Press the PS button on the unpaired controller.

4. To differentiate between controllers, you will then be asked to attached a user profile to the newly paired controller. If you select the same user profile as the older paired controller, then the older controller will automatically turn off and the newly paired controller will become the default input device.

If you are planning to play a local multiplayer game using two or more players, then you need to select the Add User option from the user profile selection screen. In the Add User menu, the new player can create their own PlayStation Network account, sign into an existing PlayStation Network or simply play as a guest.

How to pair an additional controller on PS5 using Bluetooth

Pairing a controller to your PlayStation 5 wirelessly is convenient as you don’t need to look for the correct USB cable.

In order to pair an additional controller on your PlayStation 5 using Bluetooth, you can take the following steps:

1. First, make sure that your controller has some battery life. If you have a DualSense or DualShock, you can tell that there is still some battery life left by pressing the PS button and seeing lights flashing.

2. Use the controller that has already been paired to your PlayStation 5 to turn on the system.

3. Select your user profile to go to the home screen.

4. In the home screen, go to Settings, which you can find on the upper right corner of the screen.

5. In the Settings menu, go to Accessories.

6. In the Accessories menu, select General on the left tab and then Bluetooth Accessories on the right side of the same screen.

7. With the unpaired controller, press and hold both the PS button as well as the Create/Share button at the same time.

The Create/Share button is located directly to the right of the directional pad. This button is referred to as Share on PlayStation 4 controllers. For the PlayStation 5, Sony changed its name to Create.

8. The unpaired controller should appear in the “Accessories found” section.
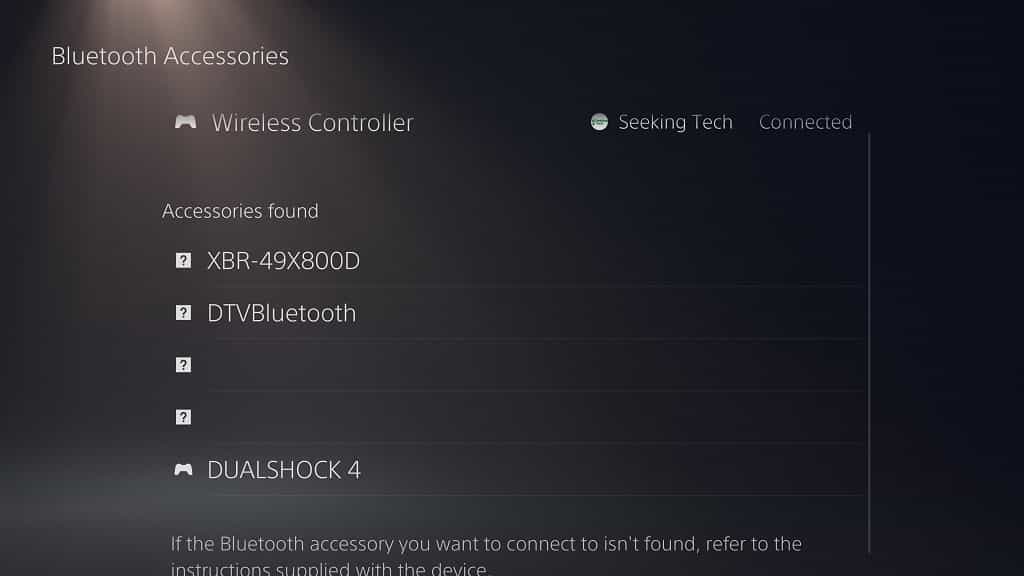
9. With your previously paired controller, quickly select the unpaired controller from the “Accessories found” section.

If you are too slow, you will get an error message, which means you have to followed Step #7 again as you need to press and hold the PS button and Create/Share button to make the unpaired controller appear on the list again.

10. In the pop-up menu, select the Yes option to confirm the pairing.
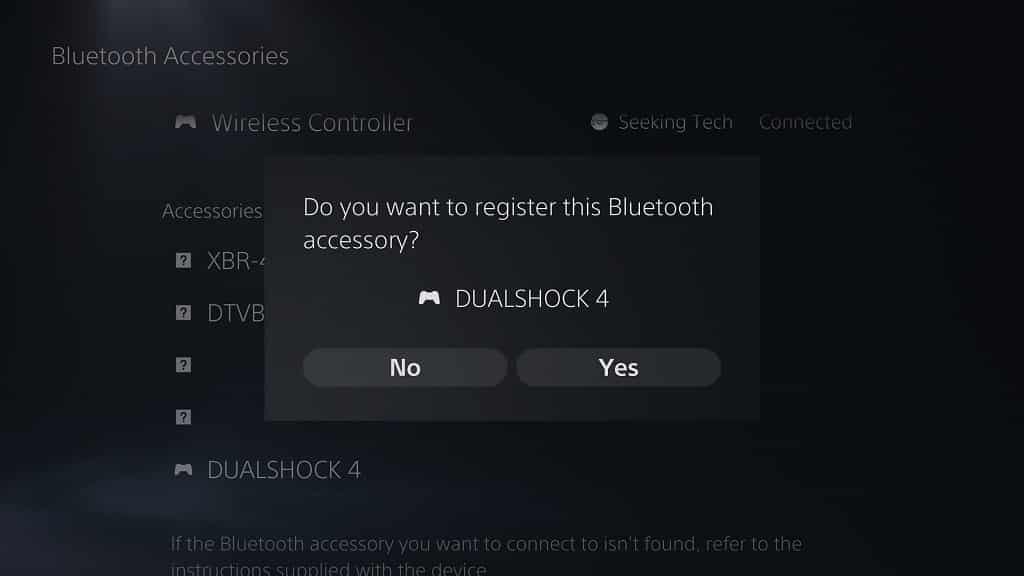
11. Afterwards, you need to select a profile for the newly paired controller. You can follow the same instructions we mentioned above in order to attach your controller to a user profile.

How to unpair a controller on PS5

In order to unpair a controller on the PlayStation 5, you need to do the following:

1. Go to Settings from the home screen of the system menu.

2. In Settings, go to Accessories.

3. In Accessories, select General from the left side and then Bluetooth Accessories on the right side of the same screen.

4. Find the controller you want to unpair under the ‘Registered accessories” section.

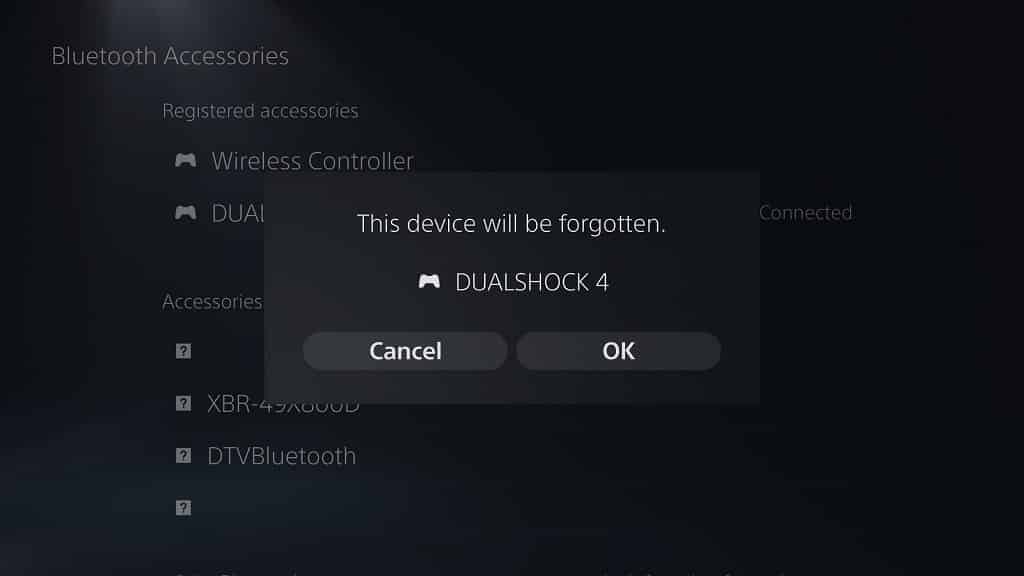
5. Select the controller and then Delete in the pop-up menu.

6. In the next pop-up menu, select OK to unpair the controller.
How many controllers can be connected at the same time on the PlayStation 5?

You can connect as many as four controllers at the same time on the PS5 system.

Can you pair the same controller on multiple systems?

You can’t pair the same controller on multiple systems. Any time you pair a controller to a new system, the controller will automatically forget its previous pairing.