How to disable pop-up notifications on PS5

With the PlayStation 5 and PlayStation 5 Digital Edition, Sony added new notification features such as activity challenges, accolades and wish list updates. On top of existing features that were brought over from the PlayStation 4, you could end up getting a lot of pop-up notifications that may distract you when you are playing a game, live streaming a game or watching a video.

If you are interested in disabling pop-up notifications on PS5, you can take the following steps in this guide at Seeking Tech:

1. After turning on your system, you have to select a user profile to enter into the main system menu.

2. In the main menu, scroll up and then right until you see the “Settings” icon, which looks like a gear. Select it to enter into the “Settings” menu.

3. In “Setting,” select “Notifications.”

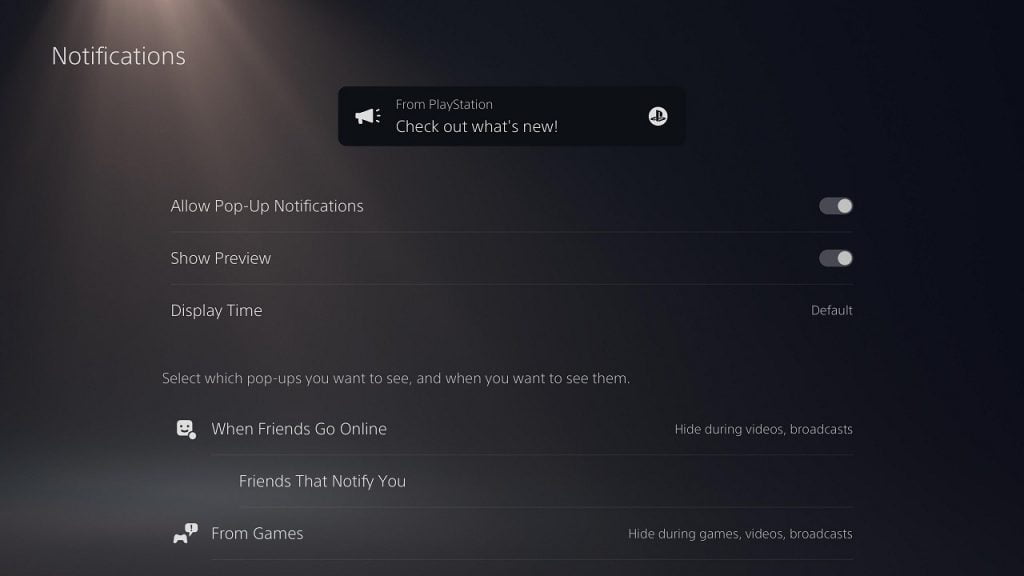
4. In the “Notifications” menu, you will see the “Allow Pop-Up Notifications.” With this option enabled (which is indicated by a white circle to the right of the wording), you will get pop-up messages. With this disabled (which is indicated by a transparent circle to the right of the wording), you won’t get any kind of pop-ups.

5. If you would like to turn on some notification types but want to turn off others, you should enable “Allow Pop-Up Notifications.”
How to change pop-up notifications for when friends on online on PS5

To change how you get notifications whenever your friends are logged into the PlayStation Network online service, you need to select the “When Friends Go Online” option from the “Notifications” menu.

In the “When Friends Go Online” sub-menu, you have the following customization options:

1. “Show Pop-Ups,” which gives you the option to completely disable all pop-up messages for this type of notification. If you want these messages to appear in certain circumstances, you should enable this option.

2. “During Games,” which lets you decide whether or not you want to enable this type of notification when you are playing a videogame.

3. “During Videos,” which lets you decide whether or not you want to enable this type of notification when you are watching a video.

4. “During Broadcasts,” which lets you decide whether or not you want to enable this type of notification when you are live streaming a videogame.

5. With the “When Friends Go Online”, you can also customize the settings to only allow pop-up notifications from certain friends. You can choose who to allow or disallow with the “Friends That Notify You” option.

How to change game pop-up notifications on PS5

The “From Games” sub-menu from the “Notifications” menu lets you choose when you can disable pop-up messages from videogames. These customization options are the same as above as you have “Show Pop-Ups,” “During Games,” “During Videos” and “During Broadcasts.”

With the “Games That Notify You” option, you will be able to allow or disallow which videogame you would like to get pop-up notifications from.

How to change other pop-up notifications on PS5

You can also customize other pop-up notification types in the “Notifications” menu. With the other options, you will have the same customization options as we mentioned above: “Show Pop-Ups,” “During Games,” “During Videos” and “During Broadcasts.”

You can take a look at the other types below:

1. “Game Invitations” will notify you whenever you receive an invite to join an online game.

2. “Trophies” will alert you whenever you unlock a trophy in a videogame.

3. “Activity Challenges” will notify you when you get new game challenges.

4. “Friend Requests” will alert you when you receive a friend request.

5. “Messages” will notify you when you receive a message.

6. “Voice Chat” will alert you when a friend wants to start a voice chat session with you.

7. “Accolades” will notify you when you receive accolades from other players.

8. “Song Change” will alert you when a song starts to play.

9. “Downloads and Copies” will notify you the status of downloads and installations.

10. “Uploads” will alert you the status of uploads.

11. “Wishlist Updates” will notify you of updates for games and other products you have on your wishlist.

12. “From PlayStation” will alert you of news and updates straight from the PlayStation Team.

13. “Subscriptions” will notify you of updates from subscription services such as PlayStation Now and PlayStation Plus.

How to disable and avoid rest mode on PS5

If you haven’t heard already, owners of the PlayStation 5 and/or PlayStation 5 Digital Edition are reporting issues with the new videogame systems. Many believed that some of these are caused by the rest mode.

If you want to be cautious, you can follow this guide at Seeking Tech to disable and avoid using the PS5’s rest mode.

What is rest mode on PS5?

Rest mode lets your PlayStation 5 run in a low-powered state, allowing you to boot up your system faster in addition to letting you pick up where you left off in a videogame.

In rest mode, your PS5 can also supply power to USB ports, which you can use to recharge your DualSense controller.

Furthermore, the system will also stay connected to the internet so that it can download update files, update content and backup your saved data to a cloud server.

Last but not least, you can access your PlayStation 5 remotely in rest mode as you can use the PlayStation App on your phone or the Remote Play feature on other devices.

In remote access, you can buy and download games.

With Remote Play, you can play PlayStation 5 videogames on supported devices like you PC, PS4 or smartphone.

How to manually avoid putting your PS5 in rest mode

To make sure you don’t manually put your PlayStation 5 in rest mode, you have to make sure to completely turn your system off.

To do so with your DualSense controller, press the PS button to bring up a pop-up menu. From there, navigate down to access the control center. Scroll right until you see the “Power” setting.

Once you select “Power,” you will be given three choices: “Enter Rest Mode,” “Turn Off PS5” and “Restart PS5.” Choose the “Turn Off PS5” to completely shut down your system.

You will be able to tell that your PlayStation 5 is turned off if the console isn’t displaying any light.

If your console is displaying a white light, it means that the PS5 is turned on.

If it is displaying orange light, it means that the PlayStation 5 is in rest mode.

Disabling Rest Mode Features

There are also a few rest mode features that you can disable.

How to disable Remote Play on PS5

To disable Remote Play on the PlayStation 5, first power on your system and then log in with a user to enter the main system menu.

From there, select “System” and then “Remote Play”.

If the “Enable Remote Play” option is already turned on (you can tell that this is the case when the circle to the right of the wording is white) then you can select it to turned it off (by doing so, the circle will become transparent and move to the left).

How to disable automatic rest mode on PS5

In order to disable your PS5 from automatically entering into rest more after a set amount of time of inactivity, head to the aforementioned “Settings” menu and then select “System.”

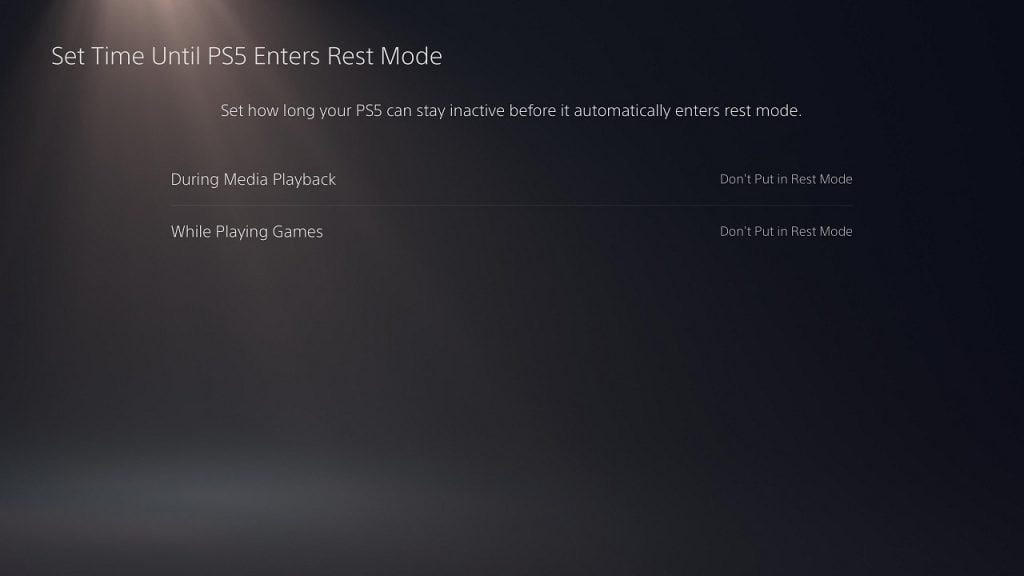
In the “System” menu, select “Power Saving” and then “Set Time Until PS5 Enters Rest Mode.” In this menu you can set the time for “During Media Playback” and “While Playing Games.”

For “During Media Playback,” you can pick between “After 1 Hour,” “After 2 Hours,” “After 3 Hours,” “After 4 Hours,” “After 5 Hours” and “Don’t Put in Rest Mode.”

For “While Playing Games,” you can pick between “After 20 Minutes, “After 1 Hour,” “After 2 Hours,” “After 3 Hours,” “After 4 Hours,” “After 5 Hours” and “Don’t Put in Rest Mode.”

You should set “Don’t Put in Rest Mode” for both “During Media Playback” and “While Playing Games” settings.

How to disable other rest mode features on PS5

To disable rest mode features on the PlayStation 5, go to the aforementioned “Settings” menu and head to “System.”

In the “System” menu, select “Power Saving” and then “Features Available in Rest Mode.” In this menu you have the following options:

The “Supply Power to USB Ports” setting allows you to recharge accessories such as DualSense. You have multiple options with this setting: “Always,” “3 Hours” and “Off.” Set “Supply Power to USB Ports” to “Off.”

The “Stay Connected to the Internet” setting allows you to download update files, download update content and back up save data to the cloud in rest mode. If this is turned on (which is indicated by a white circle to the right of the wording), you need to select this setting to turn it off.

The last setting is “Enable Turning On PS5 from Network,” which lets you power on your system over the internet via the PlayStation App or Remote Play. If this is enabled (which is indicated by a white circle to the right of the wording), you can disable the setting by selecting it. If you already disable the above-mentioned “Enable Turning On PS5 from Network” setting, then the “Stay Connected to the Internet” setting should automatically be disabled as well.

How to disable data collection on PS5

With the PlayStation 5 and PlayStation 5 Digital Edition, Sony can collect data on your activities, including your voice.

If you don’t want your personal data to be collected on the PS5, you can follow this guide at Seeking Tech to disable these features.

Accessing the “Privacy” menu in PS5

The data collection settings can be accessed from the “Privacy” menu.

To get there, you first have to select a user profile to enter the main system menu.

From there, go up and the scroll right until you see the “Settings” option, which has a gear symbol. Select that option with the X button on your DualSense to enter the “Settings” menu.

In “Settings,” select “Users and Accounts.”

In the “Users and Accounts” menu, select “Privacy.”

How to limit the data you provide to PS5

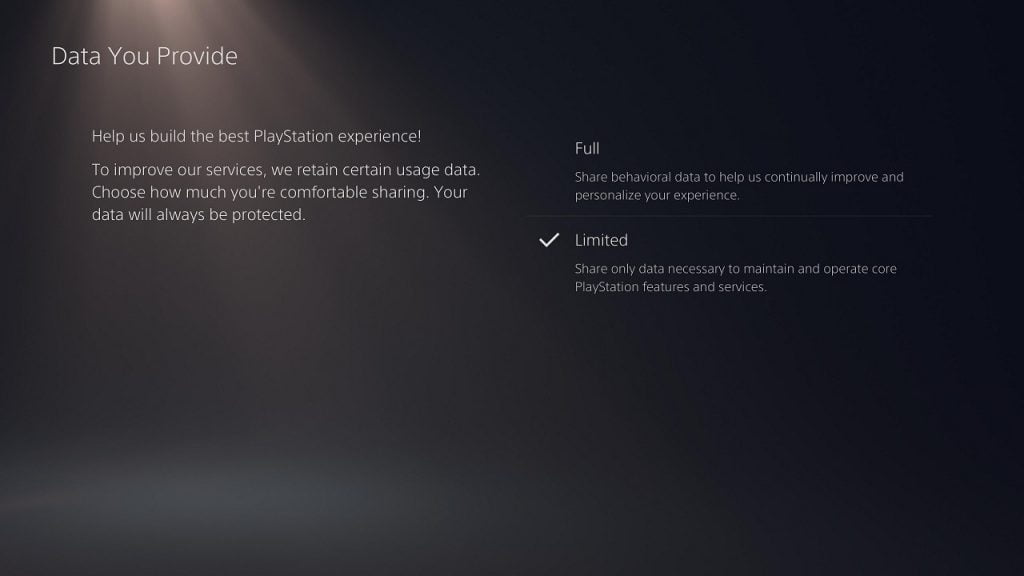
One of the settings in the “Privacy” sub-menu is “Data You Provide.”

You have two options here with the default one being “Full,” which means that you will share behavioral data to Sony so that they can improve and personalized your experiences with the PlayStation 5. The other option is “Limited,” which means that you will only share data to help improve the core features and services on the PS5.

The best option here is “Limited.” Although you will still be sharing data, it won’t be your personal behavioral data.

Personalization

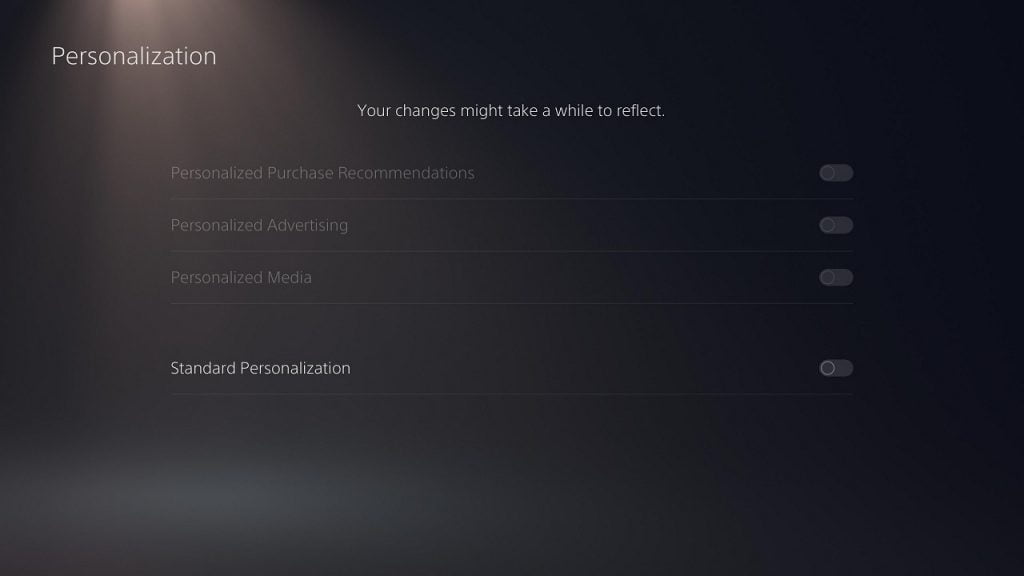
One of the other settings in the “Privacy” sub-menu is “Personalization.” With this option, you can activate or deactivate the following:

1. “Personalized Purchase Recommendations” will allow the PlayStation Store to show you personalized product and service recommendations. This incorporates both the data collected by Sony as well as data collected from third-party sources. Keep in mind that even if you disable this feature, you will still get product and service recommendations although these will be less personalized.

2. “Personalized Advertising” will allow Sony to show you personalized ads in their products, their services, third-party applications and third-party websites. Even if you disable this, you will still get advertisements although the ads won’t be personalized.

3. “Personalized Media” will allow Sony to show personalized video and music recommendations in media services and applications integrated on the PlayStation 5. If disabled, you may still get personalized recommendations although it won’t be from Sony; instead, the media services and applications may use their own data on you to pull recommendations.

4. “Standard Personalization” will allow Sony to show you general non-commercial personalization. If you disable this setting, you will still get some features that are personalized although they will be less relevant.

To reduce the data collecting as much as possible, we recommend disabling “Personalized Purchase Recommendations,” “Personalized Advertising,” “Personalized Media” and “Standard Personalization.”

You can disable or enable these settings by selecting them from the “Personalization” menu. You will know if a setting is disabled when the circle next to the wording is transparent and moved to the left.

We should also note that if you disable “Standard Personalization,” you will automatically disable “Personalized Purchase Recommendations,” “Personalized Advertising” and “Personalized Media” as well.

How to disable voice data collection on PS5

You can also turn off the voice data collection on your PlayStation 5.

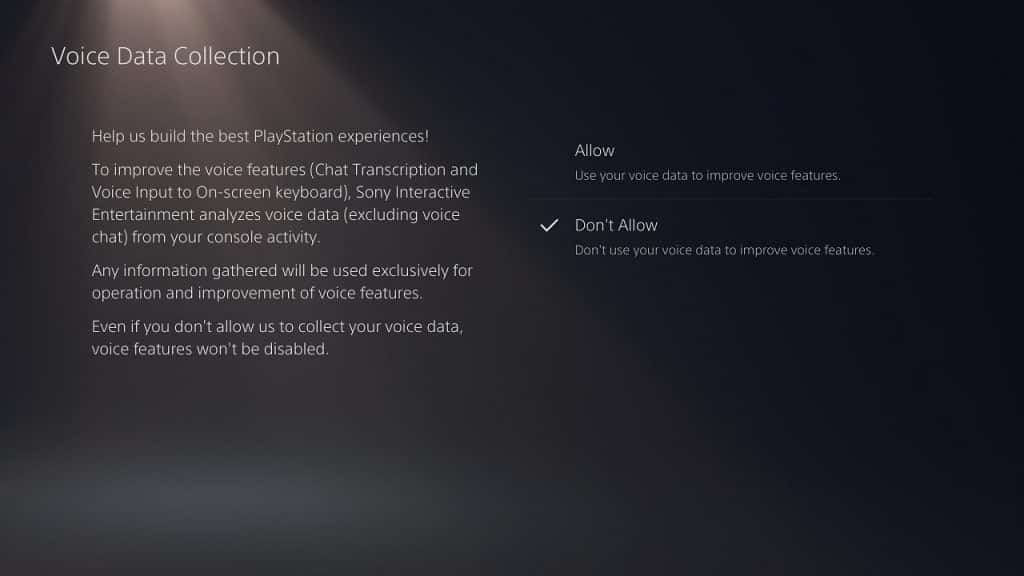
To do so, head to the aforementioned “Settings” menu and then select “Privacy.” From there, select “Voice Data Collection.”

In the “Voice Data Collection” menu, you have two choices. “Allow” means that you will be granting Sony permission to analyze your voice data in order to help improve voice features. The company won’t be recording your voice chat. The other option is “Don’t Allow,” which means that you won’t be sharing your voice data.

To disable voice data collection, select “Don’t Allow.” Keep in mind that even if you disable this setting, you can still use voice-related features.

How to tell if you are playing the PS4 or PS5 version of a game

The PlayStation 5 and PlayStation 5 Digital Edition are backwards compatible with a vast majority of PlayStation 4 video games. Some of these games feature an upgrade option (where you can get the PS5 version of the same game if you already own the PS4 version) or cross buy option (where you can get both the PS4 and PS5 versions when you purchase a game).

Sony doesn’t exactly make it obvious which version of the game you are playing in the hub area of the system menu. If you are having trouble figuring this out, you can follow this guide at Seeking Tech.

Method #1

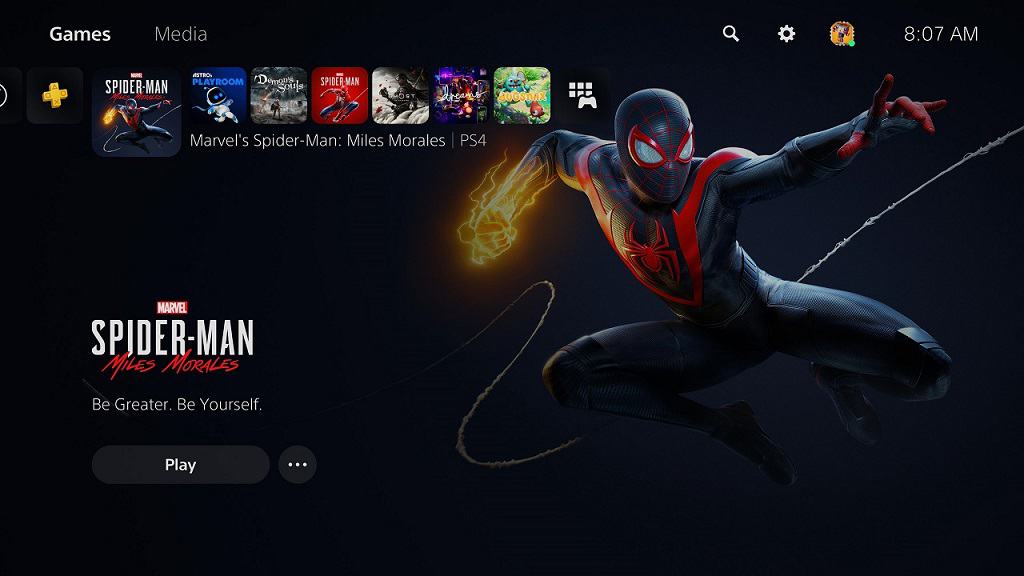
The first method is to scroll to the game from the main system menu. To the right of the game’s icon, you will see the plain text version of the game’s title. If you are playing the PS4 version, you will see “PS4” to the right of the title.

Method #2

The second method is by pressing the “Options” button on your DualSense (which has three horizontal lines and located directly left of the Triangle button) when you highlight the game in question from the main system menu. In the new submenu, scroll down and select “Game Version.” The current version of the game is displayed with a checkmark next to it.

How to switch between the PS4 and PS5 version of a game

To switch from the PS4 version to the PS5 version of a game and vice versa, first make sure you are on the main system menu. Afterwards, navigate to the game you want to switch.

With the game in question highlighted, press the “Options” button on your controller to bring up a submenu. In here, select “Game Version,” which shows what version of the game is currently being played on the PlayStation 5 via a check mark.

To switch to the other version, you first highlight it and then confirm your selection by pressing the X button on your controller. Keep in mind that you may have to download the version you selected if you haven’t done so already.

How to delete one version of a game

To delete one version of a game, first make sure you are in the main system menu. You can then navigate to the game.

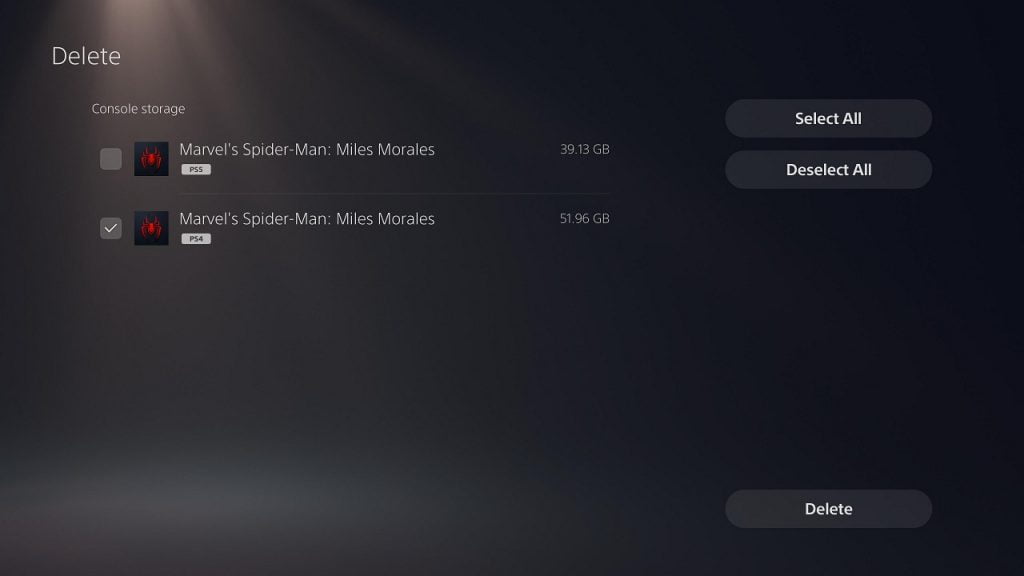
With the game highlighted, press the “Options” button on your controller to bring up a submenu. Afterwards, select “Delete.”

If done correctly, you will be brought to the “Delete” screen. In here, you can select which version to remove from storage. Be default, both the PS4 and PS5 versions are selected. So, make sure you deselect the version you want to keep on your storage.

How to automatically mute the DualSense microphone

One of the new features of the DualSense is the inclusion of a microphone. The mic is automatically activated when the PlayStation 5 controller is powered on. If you want to automatically mute the microphone when your DualSense is turned on, you can follow this guide at Seeking Tech.

1. After choosing a user, you will be at the main system menu of the PlayStation 5. From here, navigate upward and then right until the “Settings” option (which has a gear looking symbol that is directly to the left of your profile picture) is highlighted. Press the X button on your controller to enter settings.

2. In the “Settings” menu, select “Sound” from the list.

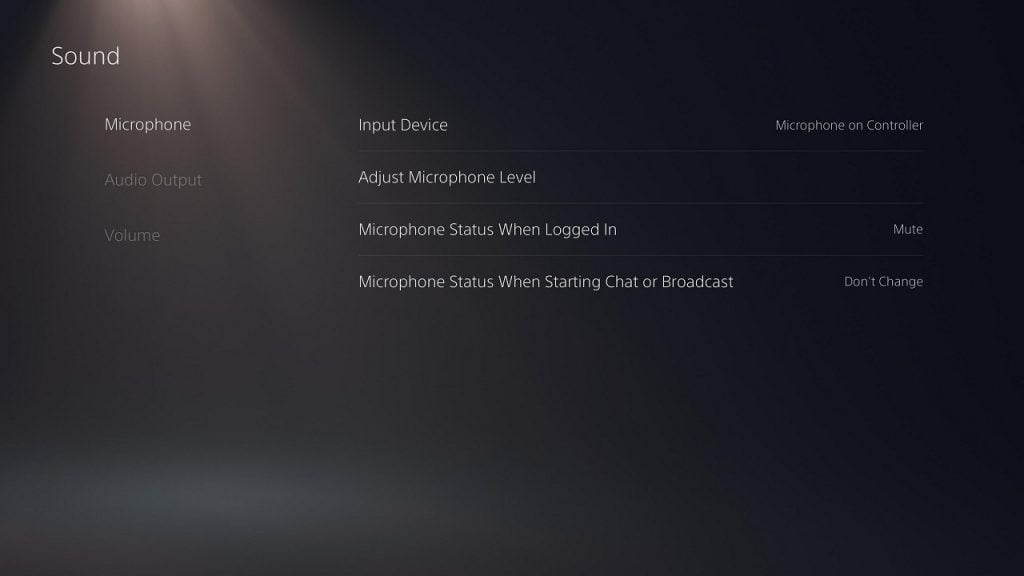
3. In the “Sound” menu, select “Microphone” from the list.

4. In the “Microphone” menu select “Microphone Status When Logged In.” The default option is set to “On” with “Mute” being the other option.

5. To deactivate the microphone on your DualSense when the controller is turned on, you need to change the option to “Mute.”

How to deactivate DualSense microphone when starting chat or broadcast

The microphone on your DualSense will also be automatically activated when you start a chat or broadcast session.

If you want to change this setting, you can take the following steps:

1. In the aforementioned “Microphone Menu,” select “Microphone Status When Starting Chat.” The default option here is “Don’t Change” with the other option being “Switch to Mute.”

2. To mute the microphone, you need to change the option for “Microphone Status When Starting Chat” to “Switch to Mute.”

How to manually mute and unmute the DualSense microphone

If you look at your DualSense, you will notice a white stripe underneath the PS button. When the microphone is muted, the stripe will show an orange indicator. When the mic is activated, the stripe won’t be lighted at all.

You can actually press this same stripe to mute and unmute the microphone of the DualSense. You will also hear a chime and get a visual notification on the top right side of your television when you mute or unmute the DualSense’s microphone.

How to extend the DualSense’s battery life

Although the DualSense contains a bigger battery capacity than the DualShock 4, the PlayStation 5 controller can still drain pretty fast due to the new features that were added. Fortunately, there are a few ways you can extend the battery life of the game pad, which you can find out in this guide at Seeking Tech.

How to automatically turn off your DualSense after set amount of time

The first setting you can change is the automatic shut off for your PS5 controller. This setting will turn your PS5 controller off after a set amount of time of inactivity.

If you are interested in doing so, you can take the following steps:

1. After selecting which user profile to use, you will be at the main system menu.

2. From the main menu, navigate upwards and then go right until you see “Settings” (which has a gear logo). Enter the “Settings” menu.

3. In “Settings,” scroll down and select “System.”

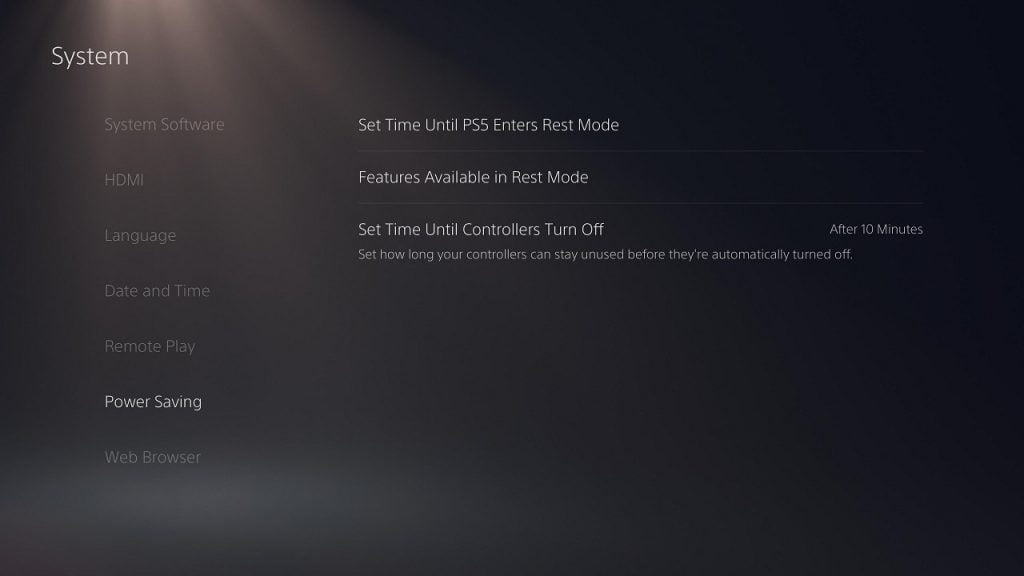
4. In the “System” menu, scroll down and select “Power Saving.”

5. In the “Power Saving” sub-menu, select “Set Time Until Controllers Turn Off.” This setting lets you set how long of a period your DualSense can stay unused before it automatically shuts off. The default option is “Don’t Turn Off” while the other options are “After 10 Minutes,” “After 30 Minutes” and “After 60 Minutes.” To get the best battery life, you should select the “After 10 Minutes” option.

How to lower the volume of the DualSense speaker

To extend the DualSense battery life, you can also try lowering the volume of the controller’s built-in speaker with the following steps:

1. From the aforementioned “Settings” menu, scroll down and select “Accessories.”

2. In the “Accessories” menu, select “Controllers.”

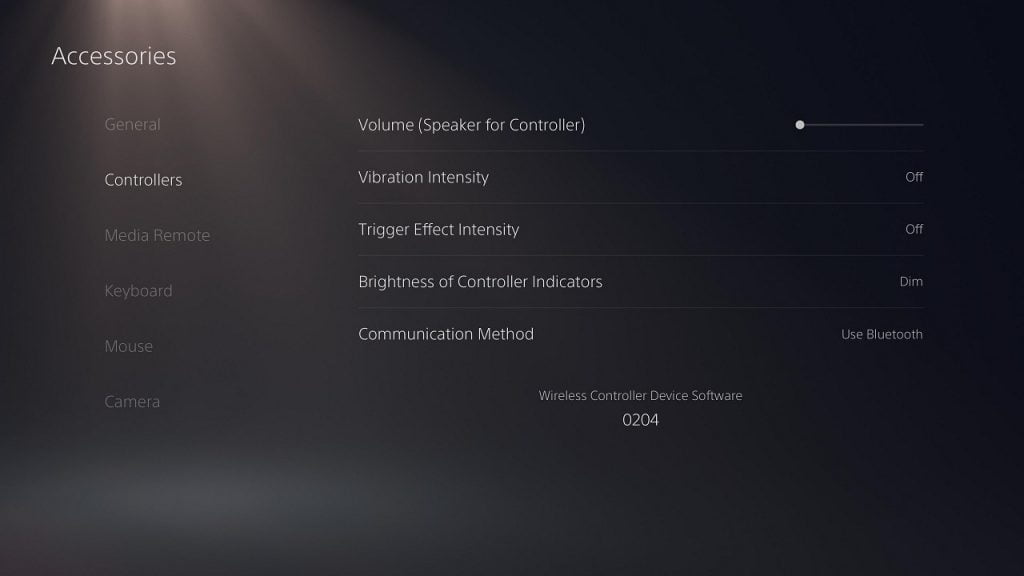
3. In the “Controllers” sub-menu, select “Volume (Speaker for Controller).” With this option, you can lower the sound output volume of the controller’s speakers. For the best energy saving, we recommend moving the meter all the way to the left to mute it. If you would like to maintain this functionality, you can try one of the lower volume settings instead.

How to lower DualSense vibration intensity

You can also try lowering the strength of the DualSense haptic feedback vibration to increase the battery life of your controller.

If you are interested in doing so, you can take the following step:

In the aforementioned “Controllers” sub-menu, select “Vibration Intensity.” The default option for this feature is “Strong” with the other options being “Medium,” “Weak” and “Off.” To use the least amount of power, you should set the vibration intensity to “Off.” If you would like to still feel vibrations, you can choose “Weak” or “Medium” instead.

How to lower DualSense trigger effect intensity

You can also reduce the intensity of the impulse triggers to save power.

To do so, you can take this step:

In the aforesaid “Controllers” sub-menu, select “Trigger Intensity.” The default option for this is also “Strong” with alternatives being “Medium,” “Weak” and “Off.” To get the best power saving for your controller, set the trigger effect intensity to “Off.” If you would like to keep using impulse triggers, you can try the “Weak” or “Medium” setting instead.

How to lower DualSense indicators brightness levels

You can also lower the brightness levels of the DualSense indicators in an effort to reduce the gamepad’s battery usage.

To do so, you need to do the following:

In the aforementioned “Controllers” sub-menu, select “Brightness of Controller Indicators.” The standard option here is “Bright” with the other options being “Medium” and “Dim.” To get the most efficient power usage, set the brightness to “Dim.”

Keep in mind that lowering the brightness of the indicators may hinder your experience on games and apps that use these indicators of the DualSense. If you are experiencing issues, you can set the brightness back to the “Bright” option.

About using earphones, headphones and headsets

Just like the DualShock 4, you can connect your earphones, headphones and/or headsets to your DaulSense via the 3.5 mm audio port. Doing so will drain the battery life of the PS5 controller, however. In order to extend the battery life of your gamepad, we recommend using another method of sound output (such as television speakers, headsets with USB cables or transmitters, sound bars and more).

About Recharging Your DualSense

Just like other rechargeable batteries, the DualSense batteries will lose their capacity and efficiency every time you recharge. So, it is best that you wait until the battery indicator gets down to one of zero bars before recharging. You should also make sure that the controller’s battery is fully charged before using it again.

Using DualSense as a wired controller for PS5

Even if the internal battery of your DualSense can no longer hold a charge, you can still use your gamepad on the PlayStation 5 as a wired connection. To do so, you need to head to the aforementioned “Controllers” sub-menu and select “Communication Method.”

The default connection method is “Use Bluetooth.” Connect the Dualsense to your PlayStation 5 via an USB cable and then select “Use USB Cable” in order to use your gamepad as a wired controller.

What media discs and game discs can be played on PS5?

The PlayStation 5 is compatible with 4K Ultra HD Blu-Ray, which is a first for Sony gaming systems. The new console also supports a lot more other media discs as well, according to its safety guide.

You can take a look at the list in this guide at Seeking Tech.

Compatible Media Discs

In addition to the aforementioned 4K UHD, the PS5 can also play Blu-Rays and DVDs. You can find a list of compatible media discs below:

  • 4K Ultra HD Blu-Ray
  • Blu-Ray
  • BD-ROM
  • BD-R
  • BD-RE 2.0 or later
  • DVD-ROM
  • DVD+R
  • DVD+RW
  • DVD-R
  • DVD-RW
  • AVCHD

Compatible Game Discs

With the PlayStation 5, you will be able to play PS5 Format Ultra HD Blu-Ray game discs and PS4 Format Blu-Ray game discs. In order to play physical PlayStation 4 videogames on the PlayStation 5, the PS4 games need to be compatible with the PS5.

Region Codes for U.S. PS5

You can find the region codes for the supported Blu-Ray media discs, DVD media discs and PS4 Blu-Ray discs for the U.S. region of the PlayStation 5 below:

  • Blu-Ray Disc: A
  • DVD: 1 and All
  • PlayStation 4 Blu-Ray Disc: 1 and All
  • Incompatible Media Discs

There are also a sizeable lists of incompatible media discs, the biggest of which is CD-ROM. You can take a look at the list below:

  • BD-RE 1.0
  • CD-ROM
  • DVD-A
  • SACD
  • 8cm discs
  • Cracked discs
  • Deformed discs
  • Repaired discs
  • Discs with stickers attached
  • Discs with paper attached
  • Non-circular discs

If you have a DualDisc, the PlayStation 5 can only play the DVD video side and not the CD audio side.

Incompatible Game Discs

The PlayStation 5 is not backwards compatible with PS1, PS2 and PS3 games. So, the fifth Sony home console won’t be able to play the following discs from previous generations:

  • PlayStation Format CDs
  • PlayStation 2 Format CDs
  • PlayStation 2 Format DVDs
  • PlayStation 3 Format Blu-Ray Discs

We should also note that the PlayStation 5 Digital Edition Is not compatible with any media discs or game discs as it does not come with a disc drive. Furthermore, discs that have scratches, dust particles and/or incompatible recording process may not play on the PS5.

How to disable PS5 trophy screenshot capture and video clip recording

The PlayStation 5 and PlayStation 5 Digital Edition automatically enable screenshot and video clip recording every time you earn a trophy. This can be troublesome as these media will take up space on the internal solid state drive on your system.

Fortunately, you can disable trophy screenshot capture and video clip recording.

To do so, you can take the following steps in this guide at Seeking Tech:

1. After turning on your PlayStation 5 or PlayStation 5 Digital Edition, select a user to bring up the system menu.

2. In the system menu, navigate upwards and then scroll right until you see “Settings” (which has a gear symbol) and the X button on your DualSense to enter it.

3. Under the “Settings” menu, scroll down to “Captures and Broadcasts” and select it.

4. In the “Captures and Broadcasts” menu, scroll down and select the “Trophies” section.

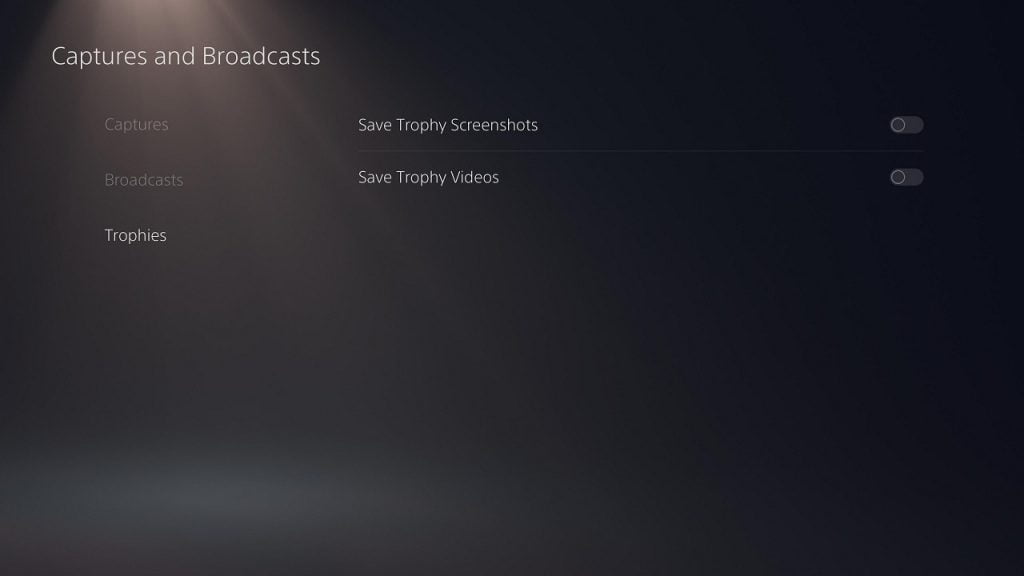
5. In the “Trophies” submenu, you have three options: “Save Trophy Screenshots” (automatically take a screenshot when you earn a trophy), “Save Trophy Videos” (automatically record a video clip when you earn a trophy) and “Trophy Video Duration” (which lets you record videos in duration of 15 seconds or 30 seconds).

6. To disable “Save Trophy Screenshots”, press the X button with that option highlighted. To disable “Save Trophy Videos,” press the X button with that option highlighted. You will know if these options are disabled when the white circle next to them become transparent and move from right to left. When you disable “Save Trophy Videos,” the “Trophy Video Duration” option will also disappear.

How to delete PS5 trophy screenshots and video clips

1. You can also delete your existing trophy screenshots and video clips. To do so, you can take the following steps:

2. In the “Settings” menu, scroll down to the “Storage” option and select it.

3. In the “Storage” menu, select “Console Storage” and then down until you see “Media Gallery.” Press X to enter it.

4. In “Media Gallery,” scroll right to the “Trophies” tab.

5. You can now select any individual screenshot or video clip you want to delete.

6. With the screenshot or video clip highlighted, you can then press the “Options” button on your DualSense (the button with the three horizontal lines directly to the left of the Triangle button). You then select the option to delete that file from the storage drive.

7. Alternatively, you can scroll to the left to the “Select Multiple” (which has a check symbol) to select multiple media files simultaneously. You can scroll all the way right to the “Select All” option. After making you selection, scroll right to the menu and then down to “Delete” in order to remove the media files.

How to turn off PlayStation Plus Auto-Renew on PS5

If you want to turn off automatic renewal for your PlayStation Plus service directly on your PlayStation 5, you can follow this guide at Seeking Tech.

About PlayStation Plus

The PlayStation Plus is a subscription service for the PlayStation 4, PlayStation 4 Pro, PlayStation 5 and PlayStation 5 Digital Edition.

You need to be a member in order to play most multiplayer games online. You will also get access to select games, which are added on a monthly basis, in addition to exclusive discounts and other benefits.

About PlayStation Plus Auto-Renew

Automatic renewal is enabled by default. Even if you turn off auto-renew, PlayStation will turn it back on every time you decide to re-subscribe or extend your subscription.

Turning Off PlayStation Plus Auto-Renew on PS5

To turn off the auto-renew option of the PlayStation Plus on PlayStation 5 or PlayStation 5 Digital Edition, you can take the following steps:

1. After powering on your PS5 or PS5 Digital, select the user that has an active PlayStation Plus subscription (the profile image will be have a yellow plus sign).

2. On the main system menu, press up or the directional pad or left analog stick. This will give you access to the options on the upper tab. From there, press right on the D-pad or left analog stick until you get to “Settings” (which has a gear symbol). Press the X button with “Settings” highlighted to bring up the “Settings” menu.

3. In “Settings,” scroll select “Users and Accounts.”

4. In “Users and Accounts,” press right on the D-Pad and left analog stick and then select “Payment and Subscriptions.”

5. In “Payment and Subscriptions,” scroll down and select “Subscriptions.”

6. In “Subscriptions,” select “PlayStation Plus.”

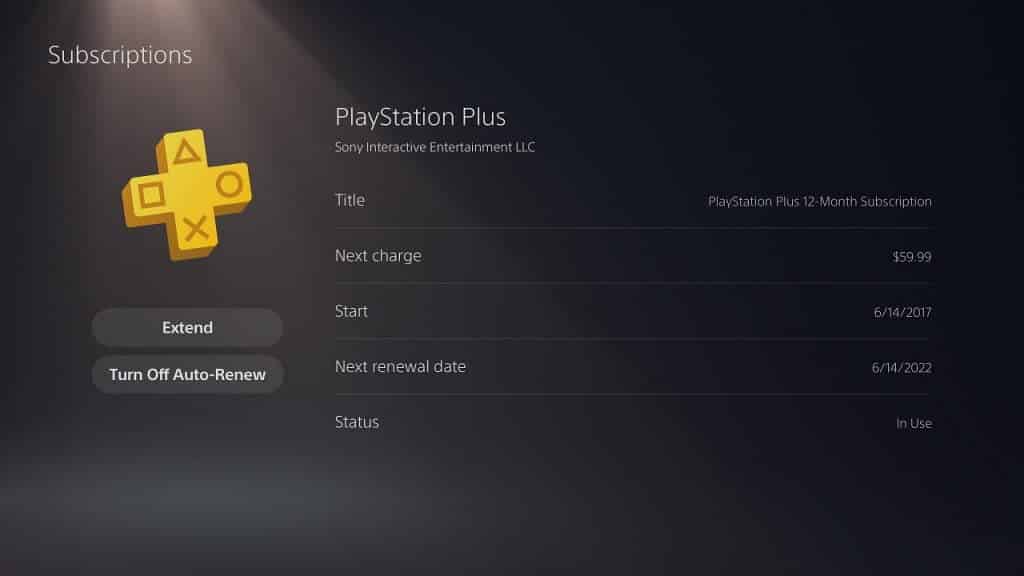
7. In the PlayStation Plus menu, you get to see the current membership status, including the start date, next charge date and next renewal date. In the same menu, you also have two options: “Extend” and either “Turn-Off Auto-Renew” or “Turn-On Auto-Renew.”

8. If you see “Turn-On Auto-Renew,” then you don’t have to do anything as your PlayStation Plus subscription is already set to disable automatic renewal.

9. If you see “Turn-Off Auto-Renew,” then you should select that option. You will then be prompted to confirm your action, which you can do by selecting “Yes.”

10. Afterwards, you will see a feedback page where you can give a reason as to why you want to disable automatic renewal. You can choose a reason or simply skip it. Either way, you need to select “OK” for the final confirmation.

11. If done correctly, you will be right back at the PlayStation Plus menu and you will see “Turn-On Auto-Renew” as an option.

12. If you want to turn automatic renewal back on, you simply select the “Turn-On Auto-Renew” option from the PlayStation Plus menu.

Compatible HDMI Cables for the PS5, Xbox Series X and Xbox Series S

Although the PlayStation 5, Xbox Series X and Xbox Series S come with HDMI cables, these connectors may be too short in length to fit your setup in your entertainment center.

You can follow this guide to find compatible extra long HDMI cables for these videogame systems.

Quick Summary 

The PlayStation 5 comes with a 5.5 feet HDMI 2.1 cable, the Xbox Series X comes with a 6.5 feet HDMI 2.1 cable and the Xbox Series S comes with a 6.5 HDMI 2.0 cable.

If you want to use a longer cable that can take full advantage of these game consoles, then we recommend picking up either the 10-foot Zeskit 8K Ultra HD High Speed 48 Gpbs HDMI 2.1 Cable or 16-foot Zeskit 8K Ultra HD High Speed 48 Gpbs HDMI 2.1 Cable. 

HDMI Version Included with PS5, Xbox Series X and Xbox Series S

Both the PlayStation 5 and Xbox Series X come with a HDMI 2.1 cable.

The Xbox Series S comes with a HDMI 2.0 cable.

With HDMI 2.1, you will be able to play games in the following refresh rates and resolutions:

  • 30Hz at 1080p
  • 60Hz at 1080p
  • 120Hz at 1080p
  • 30Hz at 1440p
  • 60Hz at 1440p
  • 120Hz at 1440p
  • 30Hz at 4K
  • 60Hz at 4K
  • 120Hz at 4K
  • 30Hz at 10K
  • 60Hz at 10K

The HDMI 2.0 supports the following refresh rates and resolutions:

  • 30Hz at 1080p
  • 60Hz at 1080p
  • 120Hz at 1080p
  • 30Hz at 1440p
  • 60Hz at 1440p
  • 120Hz at 1440p
  • 30Hz at 4K
  • 60Hz at 4K

HDMI 2.1 also come with extra features not found in HDMI 2.0 such as Auto Low Latency Mode (ALLM) Display Stream Compression (DSC), Dolby TrueHD, DTS-HD Master Audio and Variable Refresh Rate (VRR).

In order to use HDMI 2.1 features, you need to connect your videogame system to a TV with HDMI 2.1 ports.

If you connect your console to a HDMI 2.0 port using a HDMI 2.1 cable, your video output will be limited to the HDMI 2.0 supported refresh rates, resolutions and features.

What all of this mean is that you need to know what version is the long HDMI cable you are buying.

Otherwise, you could end up missing out on some display features.

In general, we recommend getting a HDMI 2.1 cable over HDMI 2.0 cable as the newer version is future-proof. Even if your current television set don’t have any HDMI 2.1 ports, any new TV models will most likely have them in the future. Not to mention that HDMI 2.1 cables are backwards compatible with HDMI 2.0 ports.

PS5, Xbox Series X and Xbox Series S HDMI Cable Lengths

The HDMI 2.1 cable that comes with the PlayStation 5 is around 5.5 feet long.

The HDMI 2.1 cable that is included with the Xbox Series X is around 6.5 feet long.

Last but not least, the HDMI 2.0 cable that comes with the Xbox Series S is around 5.5 feet long.

Compatible Extra Long HDMI 2.1 Cable for PS5, Xbox Series X and Xbox Series S

The best long HDMI 2.1 cable we recommend is the Zeskit 8K Ultra HD High Speed 48 Gpbs HDMI Cable.

The product supports all of the refresh rates, resolutions and features from HDMI 2.1.

It comes in lengths of 3 feet, 6.5 feet, 10 feet and 16 feet.

If you are interested, you can purchase the longer versions with the following links from Amazon:

Compatible Extra Long HDMI 2.0 Cable for PS5, Xbox Series X and Xbox Series S

If you still want to get a long HDMI 2.0 cable instead, then we suggest buying the Zeskit Cinema Plus High Speed HDMI 2.0b Cable as it supports all the HDMI 2.0 refresh rates, resolutions and features.

This cable is available in six different lengths: 1.5 foot, 3 feet, 6.5 feet, 10 feet, 16 feet and 29 feet.

You can buy the longer lengths, if you are interested, on Amazon with the following links: