When playing your PlayStation 5 (or PlayStation 5 Digital Edition) in HDR, you may run into issues with dulled or washed-out colors.
You can follow this Seeking Tech guide to find some potential fixes to these problems.
Optimizing Your TV for PS5 HDR
The first step we recommend taking is to make sure your television set is optimized for using HDR on PlayStation 5.
The firmware of your TV should be up-to-date.
Furthermore, the correct HDR-capable HDMI port must be used when connecting your game system.
You should also make sure that you are playing the PS5 using the game mode settings of your television set.
If your TV have HGiG and Dynamic Tone Mapping modes, we recommend using either HGiG or turning off both options instead of Dynamic Tone Mapping.
There are many other settings that you can use to calibrate your HDR picture.
For now, we recommend leaving the rest of the settings to default and do the calibrating with the PlayStation 5.
How to fix HDMI handshake issues with PS5
If the HDR colors appear fine when turning on your PS5 in one occasion but appeared washed out in another, then the HDR color problems may be related to a HDMI handshake issue between the PlayStation 5 and your TV.
Below are several ways you can reset the handshake problems (and potentially fix the dulled or washed-out HDR):
1. Turn off your TV and turn it back on again.
2. Power off your PS5 and turn it back on again.
3. Disconnect the HDMI cable and reconnect it again.
4. Disable and enable HDR on the PS5. You can do this by going to “Settings” from the Home Screen menu. In “Settings,” select “Screen and Video” and then “Video Output.” Afterwards, select the “HDR” setting and change it to “Off.” Select “HDR” again and change it to “Automatic” in order to complete the reset.
How to fix the dulled/washed-out HDR on PS5
If your HDR problems aren’t related to the HDMI handshake, you can try changing the HDR settings on your PlayStation 5.
Below are a few settings that we recommend changing to get a better HDR picture:
How to change the PS5 RGB Range
Most of the issues relating to incorrect HDR colors on the PlayStation 5 is due to a mismatch of RGB ranges of the game console and your television set.
For now, we recommend leaving the RGB range of your television to its default setting and only changing the RGB range of the PS5.
To do so, you can take the following steps:
1. In the Home Screen menu, go to “Settings.”
2. From the “Settings” menu, head to “Screen and Video.”
3. In the “Screen and Video” menu, select “Video Output” on the left side and then “RGB Range” on the right side.
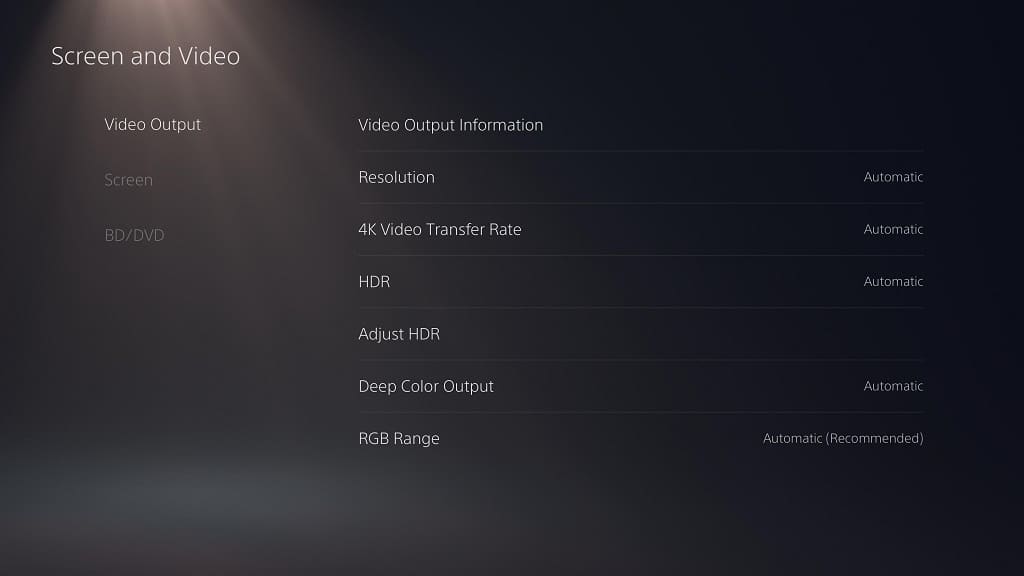
4. The default option is “Automatic (Recommended).” Select either the “Limited” or “Full” option instead. Afterwards, test the new setting out in a game to see if the HDR colors are still washed out.
5. If you are still experiencing issues, you can try the other option that you didn’t pick in the “RGB Range” settings and test the results.
6. If none of the options work, you can try to change the RGB range of your television set and then retest using with the “Limited” and “Full” options on the PS5.
How to change the PS5 4K Video Transfer Rate
You can also try limiting the transfer rate of your HDMI if you are getting dulled HDR colors.
To do so, you can take the following steps:
1. From the Home Screen menu, go to “Settings” and the “Screen and Video.”
2. From the “Screen and Video” menu, select “Video Output” on the left tab and then “4K Video Transfer Rate.”
3. The default option is “Automatic.” Select either “-1” or “-2” instead and then test out the new setting in a game.
4. If your first choice was ineffective, you can try the other option in “4K Video Transfer Rate.” Afterwards, retest the game to see if you get better contrast.
On a side note, changing the transfer rate will also help with flickering issues. You can find out more with this guide.
How to adjust PS5 HDR
If none of the above potential fixes work, we recommend adjusting the HDR on your PlayStation 5.
You can do so with the following steps:
1. Go to the aforementioned “Screen and Video” menu from “Settings.”
2. In the “Screen and Video” section, select “Video Output” and then “Adjust HDR.”
3. In the three subsequent screens, we recommend following the on-screen instructions to adjust the brightness until the symbol in the box is barely visible. Once you are done adjusting, you can test out the HDR in a game.
4. If you are still having problems, we recommending readjusting the HDR again. Instead of following the on-screen instructions this time, we recommend being a little bit more aggressive. For the first two screens, once you increase the brightness to barely seeing the symbol in the box, we suggest going up one more level in brightness. For the final screen, we suggest going down one more level after you darkened your screen to where the symbol in the box is barely visible. Retest the game to see if you get better results.
How to disable PS5 HDR
If none of the aforementioned potential fixes resolve the dulled/washed HDR colors, then we recommend simply disabling HDR altogether to see if SDR looks better on your television.
You can take the following steps to disable HDR on PlayStation 5:
1. In “Settings,” go back to “Screen and Video” and then select “Video Output” on the left side. Afterwards, select “HDR” on the right side.
2. The default option for the “HDR” setting is “Automatic.” Change this to “Off” to disable the visual feature.
3. The screen will then refresh itself. By disabling HDR, you will also disable Deep Color Output. After all that, test out a PS5 game to see if you prefer the SDR image to the HDR image.