How to fix sticky DualSense Edge buttons

If the directional pad or face buttons of your DualSense appears to be sticky, then you can check out this troubleshooting article from Seeking Tech to see how you can get them unstuck.

1. For the first step, you can try to loosen up the button by doing the following:

  • Press down hard on the sticky button.
  • Rotate the button while it is pressed down several times clockwise.
  • You can then rotate it a few times counterclockwise.
  • Hopefully, this method will loosen some of the debris that may have been causing the directional pad or face buttons to be stuck.

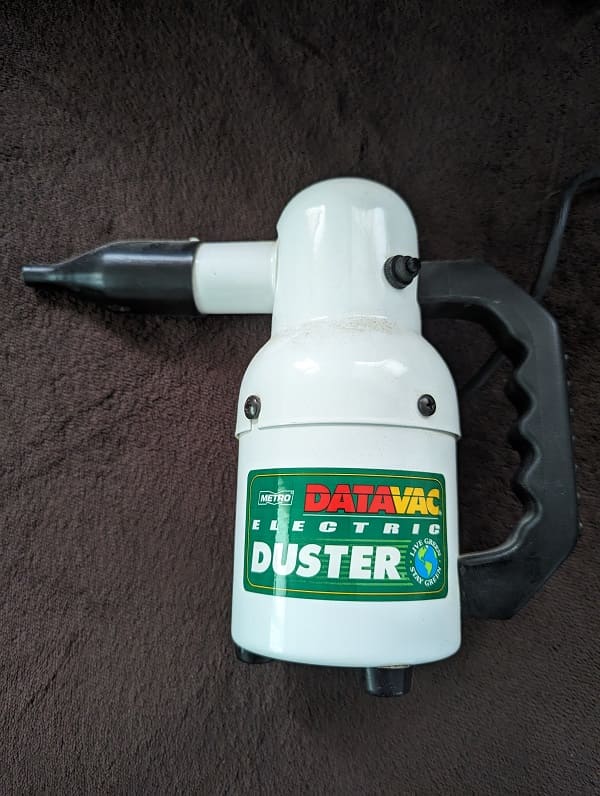
2. If you have an air duster, then you can try blowing air on the outer edges of the sticky button. You may be able to get enough high-pressure air inside of the controller to block off the dust and other substances.
3. You can also try cleaning the button.

In order to do so, you can try using a dry lint-free cloth while the controller is turned off. If that doesn’t work, then you can try adding 99% isopropyl alcohol to remove some of the stickier substances.

If you decide to use the aforementioned solution, try to seep a little it in between the edges of the problematic button. You can then press down hard on the button before rotating it clockwise and counterclockwise to clean the internal portions.

4. You may also want to try taking the controller apart so that you can do a more thorough cleaning on the internal parts. With that said, this is a very complicated process that may end up causing more harm to the gamepad.

If you are still interested in doing so, then you can check out the following How-FixIT YouTube video to see how you can properly dissemble and clean the DualSense Edge:

5. If you can’t seem to loosen the sticky buttons, then you might want to consider sending in your controller to be repaired or replaced.

How to fix DualSense Edge vibration issues

The DualSense Edge supports the same haptics used as the DualSense. If the vibrations do not seem as strong, or the premium controller does not rumble at all, then you can take a look at this troubleshooting article from Seeking Tech.

1. For the first step, try to re-charge your controller. The low battery life may lead to a weaker rumble.

2. If re-charing the controller did not make the vibrations feel stronger, then we recommend checking the in-game menu of the game you are currently playing. Some titles may have options where you can adjust the vibration intensity or turn it off completely.

2. If the game has vibrations fully enabled but you are still experiencing issues with your DualSense Edge, then you should try looking in the system menus.

To do so, you need to take the following steps:

  • Press and hold the PS button to open the home menu of your PS5.
  • Select the gear icon on the top right side of the home screen to open the Settings menu.
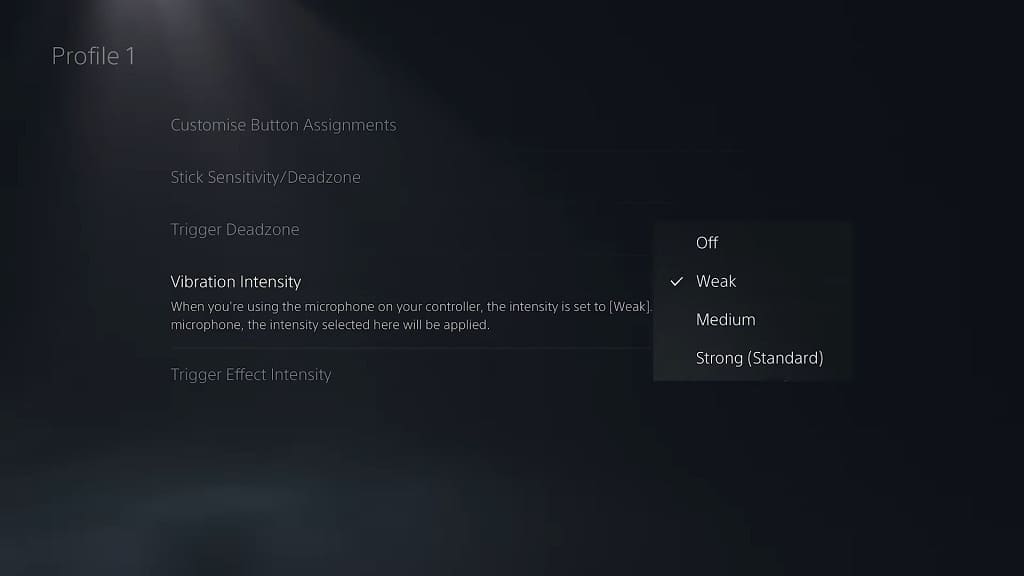
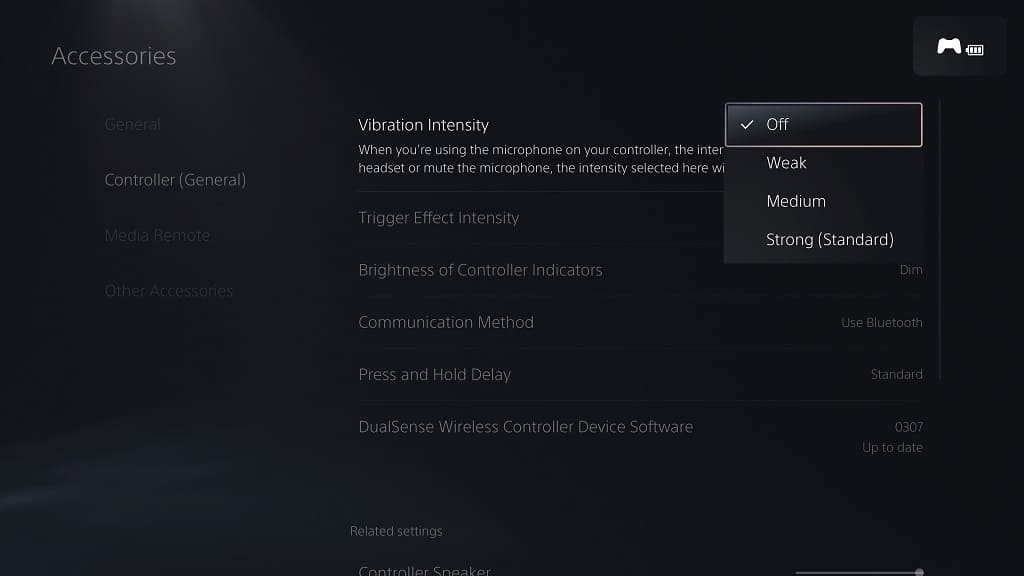
  • From the front page of Settings, go to Accessories > (Controller General) > Vibration Intensity.
  • Set Vibration Intensity to Strong (Standard).

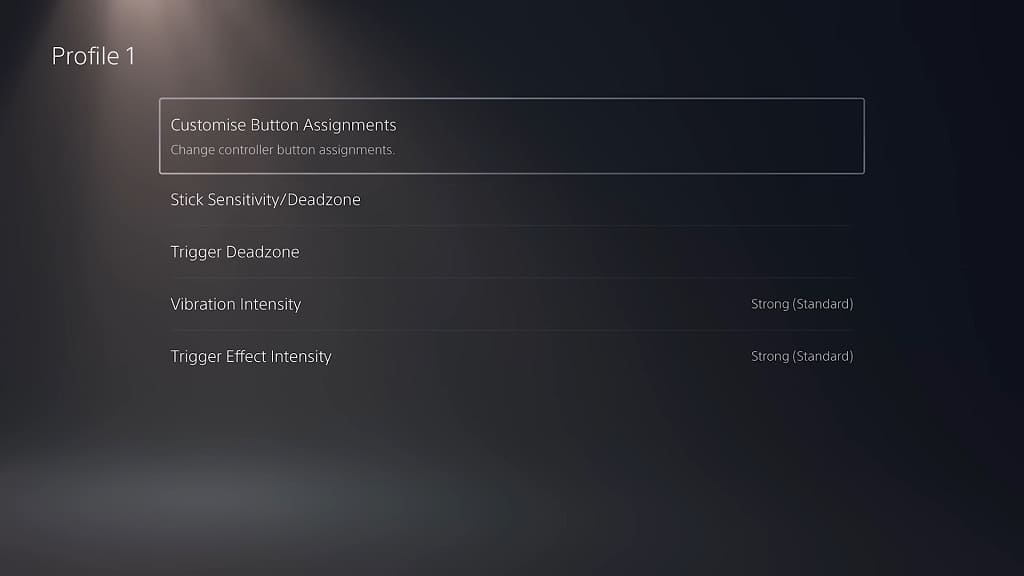
3. If you are using custom profiles for the DualSense Edge, then you need to open the Settings menu. Afterwards, navigate over to Accessories > DualSense Edge Wireless Controller > Custom Profiles.

In the Custom Profiles menu, select or create a custom profile. Next, select Vibration Intensity and then set it to Strong (Standard).

4. You can also try updating the firmware of your DualSense Edge. To find out how you can properly do so, you can take a look at this previous tutorial.

5. If the haptics still aren’t working properly on the controller, then you can try resetting the accessory.

In order to do so, you first need to completely turn off your PlayStation 5 or PlayStation 5 Digital Edition console.

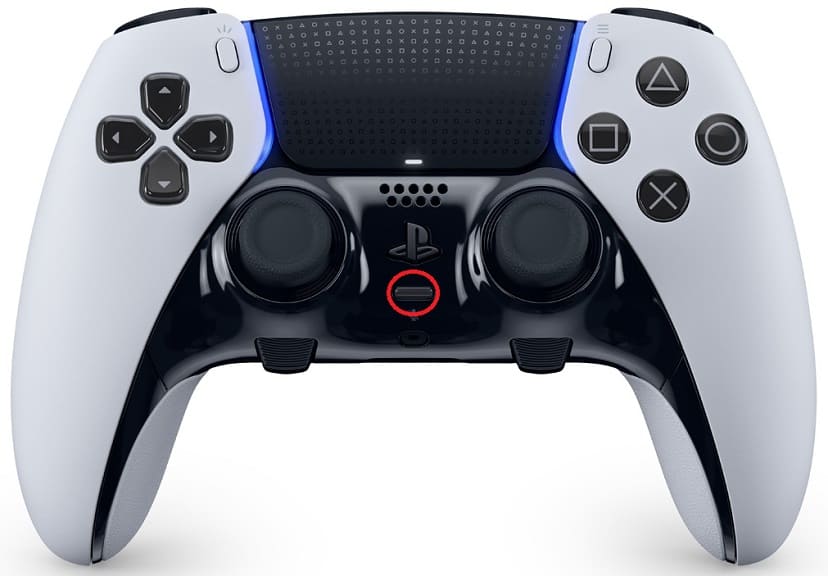
Afterwards, you need a small, thin pin. This is because you need to press down on a button located at the bottom of a small hole located on the back of the DualSense Edge. You will need to hold that button for around 5 seconds to reset the gamepad.

Once you are done with resetting the pad, connect the DualSense Edge to the USB port of the PS5 by using the USB cable that came with the controller. Finally, press the PS button on the gamepad to re-sync it with the game console.

6. If none of the potential solutions have worked so far, then there may be a hardware issue. In this case, you may have to send your DualSense Edge in for repair.

DualSense Edge settings for Dead Island 2

If you have a DualSense Edge, then you can use this premium controller to get a leg up in Dead Island 2. To see how you can get the most out of this gamepad, you can take a look at this guide from Seeking Tech.

Analog Caps and Back Buttons Attachments

In regard to the analog caps and back button attachments that you can use with the DualSense Edge for Dead island 2, we recommend that go with the combination that gives you the most comfort and/or feel of control.

You may need to play around with these add-ons for the controller for a little bit in order to find your preferences. With that said, the combination you used for first-person shooters should work well with this first-person action-adventure game as well.

Trigger Stops

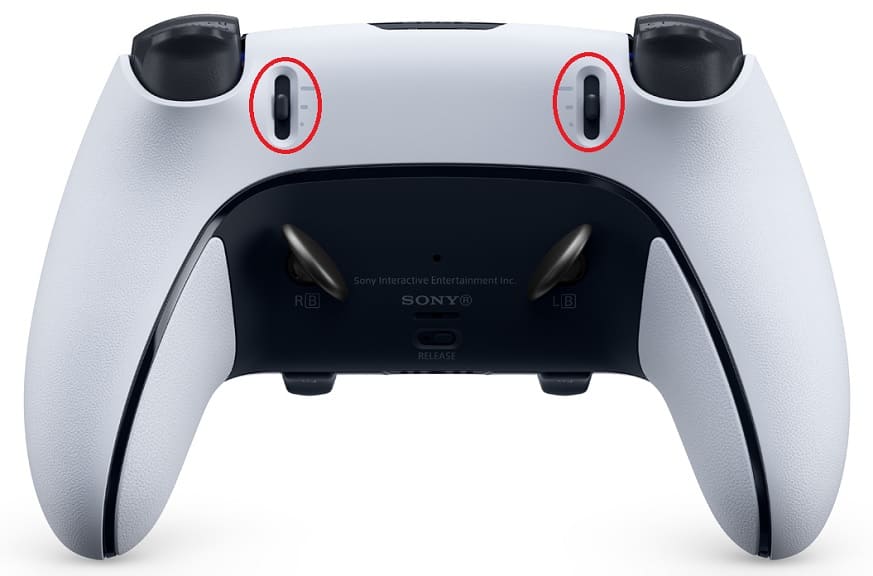
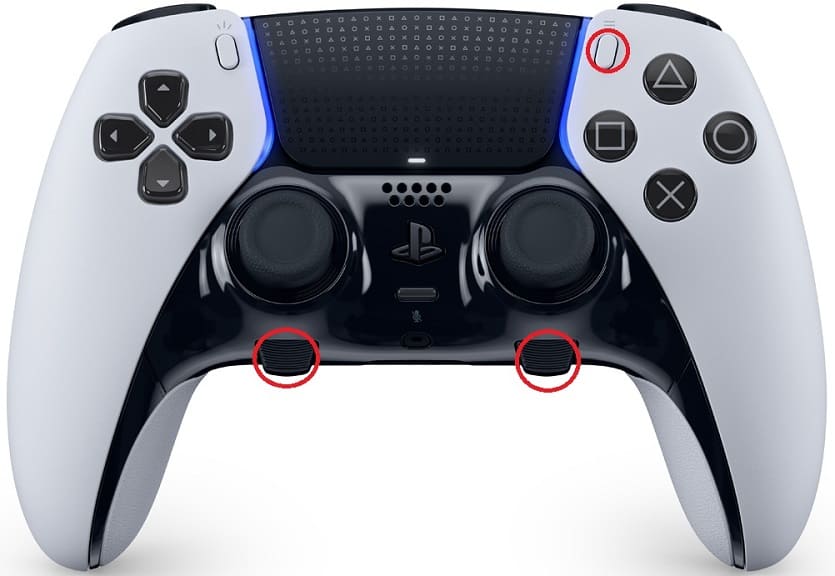
We suggest that you move the trigger stops located on the back of the DualSense Edge all the down for DI2. By doing so, it should take less time to attack or throw as you only need to press the R2 button slightly to perform these actions.

You should also be able to aim faster as the L2 button will only need to be pressed slightly.

Customize Button Assignments

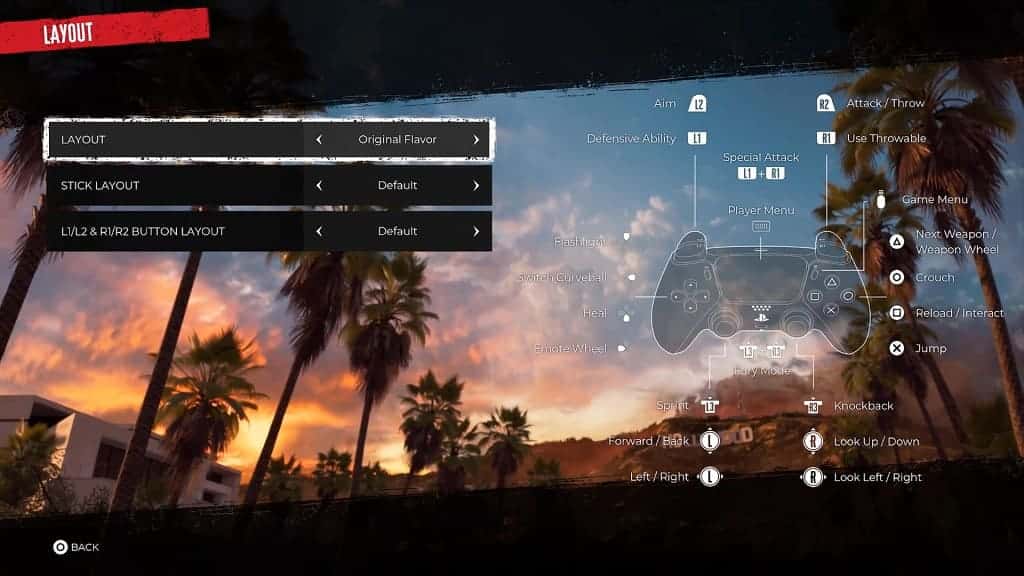
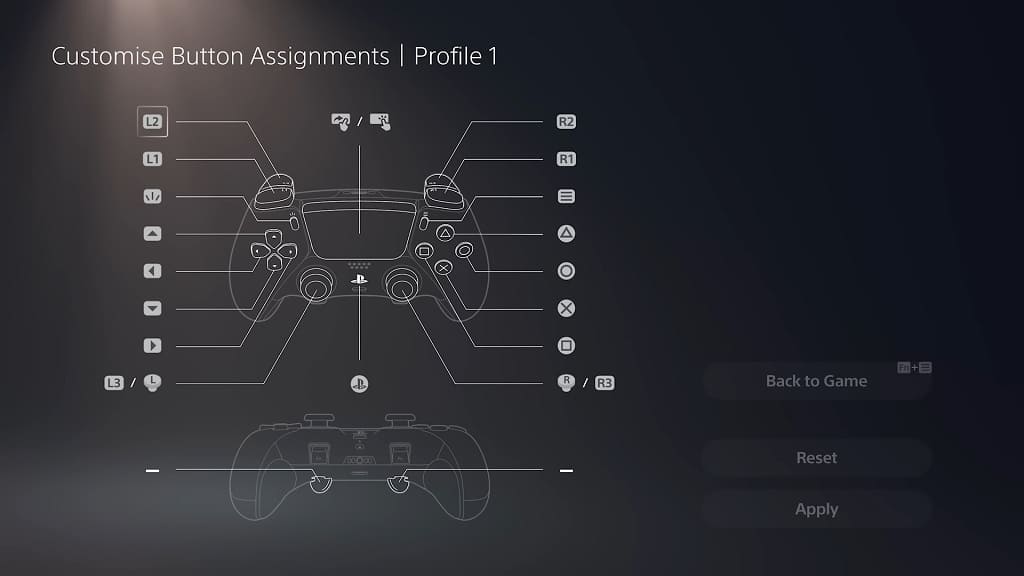
As for the back buttons, we recommend assigning L3 function to the left back button and R3 function to the right back button.

By default, the L3 button is used for sprinting in Dead Island 2; therefore, pressing down on the left analog stick may feel more awkward when compared to pressing down on the back button.

The default function of R3 is to knockback the target. It is more awkward to press down on the right analog stick than by simply pressing the right back button.

By pressing the L3 and R3 buttons with the default layout, you will also activate fury mode. This should be easier to use with the back buttons as opposed to pressing down on the analogs.

To prevent yourself from accidentally using spring, knockback and/or fury mode, we suggest disabling the L3 and R3 buttons once you reassign their functions to the back buttons.

Stick Sensitivity/Deadzone and Trigger Deadzone

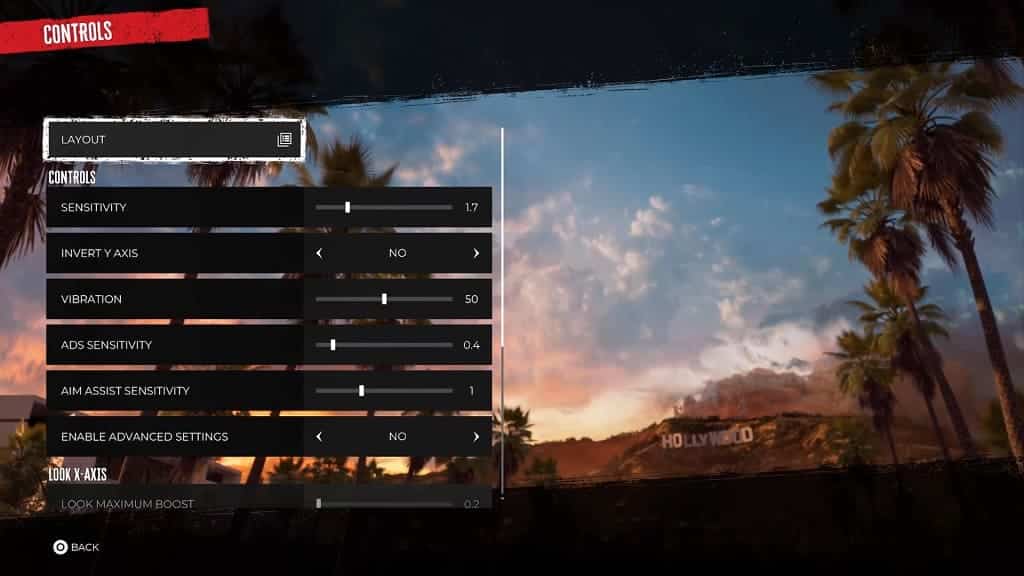
With the DualSense Edge, you can use the system menus of the PlayStation 5 to adjust the sensitivity and deadzone settings for the analog sticks. Before doing so, however, we recommend that you first head over to the Control section of the Options menu in Dead Island 2. From there, you can use the in-game setting to adjust the sensitivity, acceleration and dead zones of the analog sticks.

If your analogs still do not feel quite right after changing the in-game settings, then you can then go to the Stick Sensitivity/Deadzone menu on your PlayStation 5 to make additional adjustments.

If you feel like the L2 and R2 buttons still aren’t as response as you would like even after moving the trigger stops all the way to the bottom on the back of the DualSense, then you can head over to the Trigger Deadzone menu of the DualSense Edge to make additional changes.

DualSense Edge settings for Resident Evil 4 Remake

When compared to the normal DualSense, the Edge version adds two back buttons, trigger stops and many other features. To see what the best settings are for this controller when it comes to playing the Resident Evil 4 Remake on your PlayStation 5 or PlayStation 5 Digital Edition console, you can take a look at this guide.

Analog Caps

When it comes to the analog caps for the DualSense, you can use whichever you are comfortable with. In our case, we used the same standard caps you found installed on the normal DualSense.

Back Buttons Attachments

We also recommend using whichever back button attachment you are comfortable with.

If you have smaller hands, then the levers may feel more accessible. If you have bigger hands, then the half dome attachments may be more comfortable.

Trigger Stops

If you want to fire your weapon as quickly as possible in the Resident Evil 4 Remake, then we suggest that you move the sliders located at the top back side of the gamepad all the way down.

By doing so, you should be able to aim your weapon faster by holding the L2 button. You can also shoot your weapon or attack with your knife quickly by pressing down on the R2 button.

Keep in mind that, by setting the trigger stop sliders all the way down, you will also disable the adaptive trigger features in RE4. Therefore, you will no longer feel any resistance when pressing down on the two triggers.

If you would want to feel more immersive, then we recommend that you set the trigger stops all the way up and then make sure that the Trigger Effects setting is set to Strong (Standard) on the PS5 system menus. Afterwards, make sure that the Adaptive Triggers setting is enabled in the in-game menu of Resident Evil 4.

If you would rather have the quick-fire benefits, then you can keep the trigger stop sliders all the way down.

Customize Button Assignments

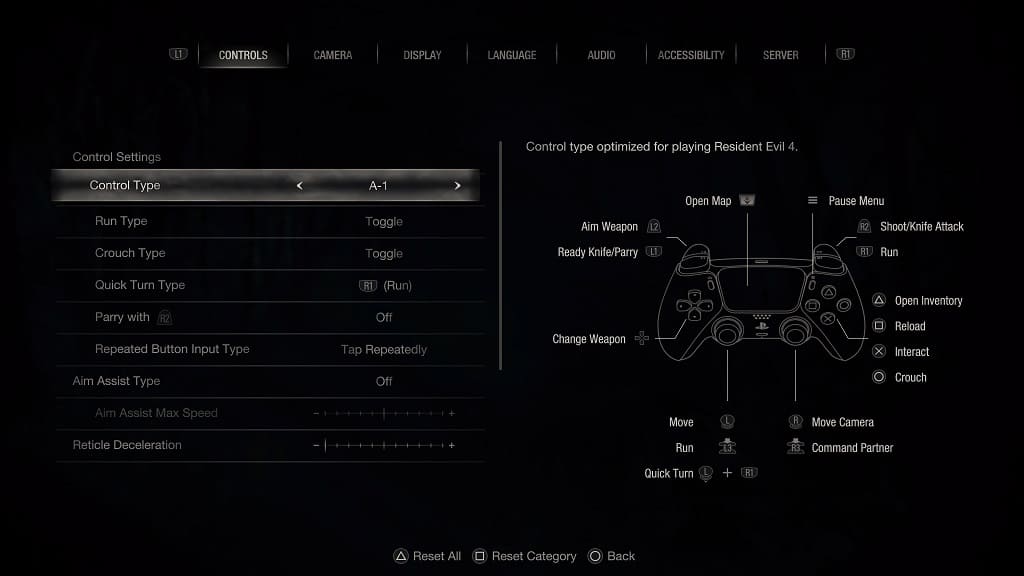
When it comes to the custom button assignments, we recommend setting the left back button to the run button. If you are using the default A-1 Control Type for Resident Evil 4 Remake, then you can set the left back button to function as R1 and then disable the L3 button.

To perform the quick turn action with this new setup, you need hold the left back button and then move the left analog downwards.

You can set the right back button to any button you want. For us, we replaced the R3 functionality, which is to command your partner in the A-1 Control Type, with the right back button. Afterwards, we disable the R3 button.

By disabling the L3 and R3 button, you should prevent yourself from doing any unintended actions if you accidentally press down on your control sticks.

Stick Sensitivity/Deadzone and Trigger Deadzone

There is a notable issue in the Resident Evil 4 Remake when it comes to aiming as there seem to be major deadzones for the analog sticks.

In this case, you can try adjusting the camera controls by going to the Camera tab in the Options in the game.

If the analog sticks still don’t feel quite right even if you turn up the sensitivity settings in the game’s menus, then you can use the Stick Sensitivity/Deadzone section the DualSense Edge Profile menu in order to adjust your controller’s deadzone.

You can also fine tune the trigger deadzone of the controller as well from the same Profile menu.

What to do if you can’t adjust the DualSense Edge haptic feedback intensity

The DualSense Edge supports the same haptic feedback as the normal DualSense. If you are having trouble trying to adjust the intensity level for this controller, then you can take a look at this troubleshooting article at Seeking Tech.

1. Keep in mind that the vibration feedback will automatically set to Weak if you turn on the built-in microphone of the controller even if you previously changed it to Medium or Strong.

Therefore, we recommend that you look at the Mute button on the DualSense Edge, which should be just below the PS button.

If the button is showing an orange light, then it indicates that the mic is currently disabled. If it isn’t showing any lights, then you need to press the button to mute the microphone.

2. It is also important to note that the rumble settings you set for your videogame will override the vibration intensity setting you set for your DualSense Edge.

In this case, we recommend looking at the menus of the game you are currently playing to see if the rumble setting matches what you want.

3. For the uninformed, you can save multiple profiles directly to your DualSense Edge. If these profiles have different rumble settings, then make sure you have the right one selected.

In order to quickly switch profiles, you need to press and hold one of the two Function (Fn) buttons, which are located below the left and right analog sticks. With one of the Fn buttons held down, you can then need to press one of the face buttons (triangle, circle, cross or square) in order to change to your desired profile.

4. If you still can’t adjust the intensity level of the haptic feedback, then you can try factory resetting the DualSense Edge.

5. We also recommend that you update the firmware of the DualSense Edge as a new release may help fix the rumble issues you may be experiencing with the controller.

What to do if you can’t change the DualSense Edge trigger effect intensity

Like the normal DualSense, the DualSense Edge features customizable trigger effects. If you can’t seem to change the intensity level, then you can take a look at this troubleshooting article from Seeking Tech to see what you can do.

1. It is very important to note that using the short or medium trigger stops on the DualSense Edge will completely disable the adaptive triggers. As a result, you won’t feel any resistance when pressing down the L2 and R2 buttons.

If you want to add resistance to these buttons, then you need to move the trigger stop sliders located on the back side of the all the way to the top-most option, which is the normal stop range.

2. If you leave the built-in microphone on the DualSense Edge turned on, then the trigger effect intensity will automatically set to Weak no what you do. This is probably done to conserve battery life as the Edge has a shorter one when compared to the normal version.

Therefore, you need to mute the built-in mic if you want a higher intensity level. In order to do so, you can simply press the small mute button located just below the PS button.

When the built-in microphone is muted, you should see the same mute button light up an orange light. You should also get an on-screen indicator as well.

3. Even if you change the DualSense Edge trigger effect intensity on a system level, the in-game settings will override it.

For example, if you have the intensity level set to Strong on your PS5’s system menus but turned off adaptive trigger support in a game, then you won’t feel any resistance when pressing the L2 and R2 buttons while playing that specific title.

Therefore, you should also check the in-game settings to see if there are any ways you can adjust the trigger effect.

4. If you still can’t adjust the adaptive trigger intensity of your DualSense Edge, then you can try resetting the controller.

5. You can also updating the controller to the latest available firmware as the trigger issues may be software related.

6. If none of the aforementioned steps have worked so far, then we suggest contacting the PlayStation Support team for additional support. There is a possibility that the controller may be defective.

DualSense Edge settings for Call of Duty: Modern Warfare II and Warzone 2.0

The DualSense Edge is a new premium controller created by Sony. To see what are the best settings for the gamepad when it comes to playing Call of Duty: Modern Warfare II and Call of Duty: Warzone 2.0 on your PlayStation 5 console, you can take a look at this guide from Seeking Tech.

Analog Caps

When it comes to the analog caps, we recommend going with whatever gives you the best grip. For us, we found that the standard caps work the best.

Keep in mind that you will be able to mix and match between the standard, high dome and low dome caps for the left and right analog sticks.

Back Buttons Attachments

For the back button attachments, we recommend using the levers if you have smaller hands or half domes if you have bigger ones. Or you can do with whichever feels the most comfortable and give you the quickest response.

You can also mix and match for the left and right back buttons.

Trigger Stops

We recommend that you move the trigger stop sliders located on the back of your DualSense Edge all the way to the bottom. By doing so, the controller will be able to register your L2 and R2 buttons quickly.

This will also disable the adaptive trigger effects in the game.

Customize Button Assignments

When customizing your Button Assignments for one of your profiles that is stored on your DualSense Edge, we suggest setting the left back button to L3 and the right back button to R3. You can then disable both the L3 and R3 buttons.

We tend to have problems when it comes to pressing these two buttons. Not to mention that it is very easy to trigger these if you accidentally press down too hard on the left and right analog sticks.

Stick Sensitivity/Deadzone and Trigger Deadzone

You can also use the Stick Sensitivity/Deadzone and Trigger Deadzone menus from your DualSense Edge profile to fine tune the sensitivity of the analog sticks and triggers to your liking.

This may be helpful if you start to notice some drift in the left, right or both analogs.

Using the DualSense Edge as wired controller

We highly recommend that you use the DualSense Edge as a wired controller as it will reduce the input lag.

Call of Duty: Modern Warfare II and Warzone 2.0 Controller Menu

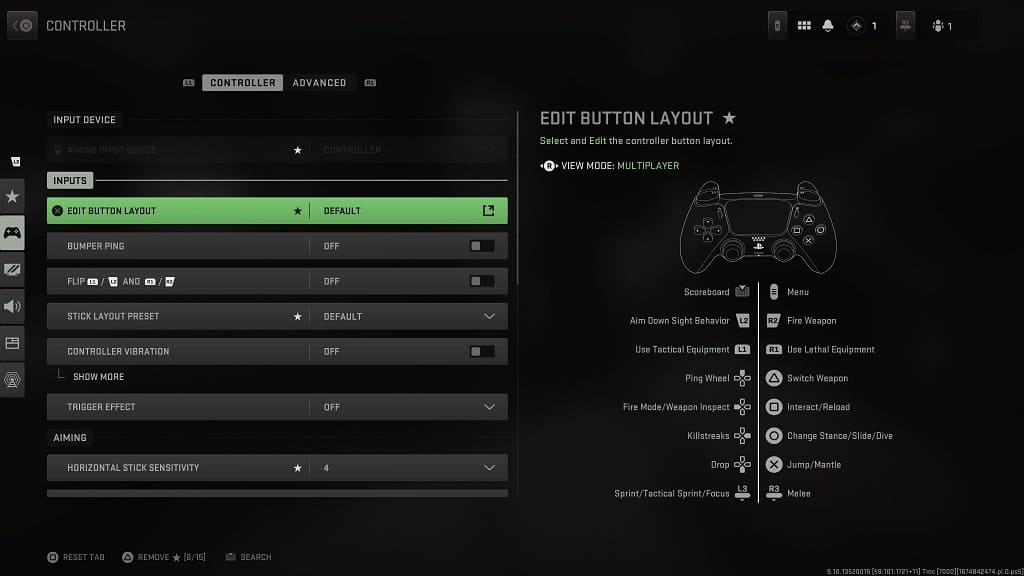
Next, you can go to the Controller menu from inside Call of Duty: Modern Warfare II and Call of Duty: Warzone 2.0.

From there, we recommend that you turn off Controller Vibration as it can be distracting when it comes to multiplayer matches. In the same menu, you can also change the button layout and add gyro aiming if you prefer using motion to help fine tune your accuracy.

We suggest playing around with all of the available settings in this Controller menu until you find the right combinations to boost your performance in multiplayer.

How to fix DualSense Edge battery drain issues

If you haven’t heard already, the DualSense Edge has a shorter battery life than the regular DualSense. This is because the premium version added several new features while maintaining the same shape as the normal model. Not to mention that the battery capacity of the Edge is 1050 mAh, which is 30% less than the 1560 mAh battery of the standard version.

To see how you can extend the battery life of the DualSense Edge so that you won’t have to recharge it as often, you can take a look at this article from Seeking Tech.

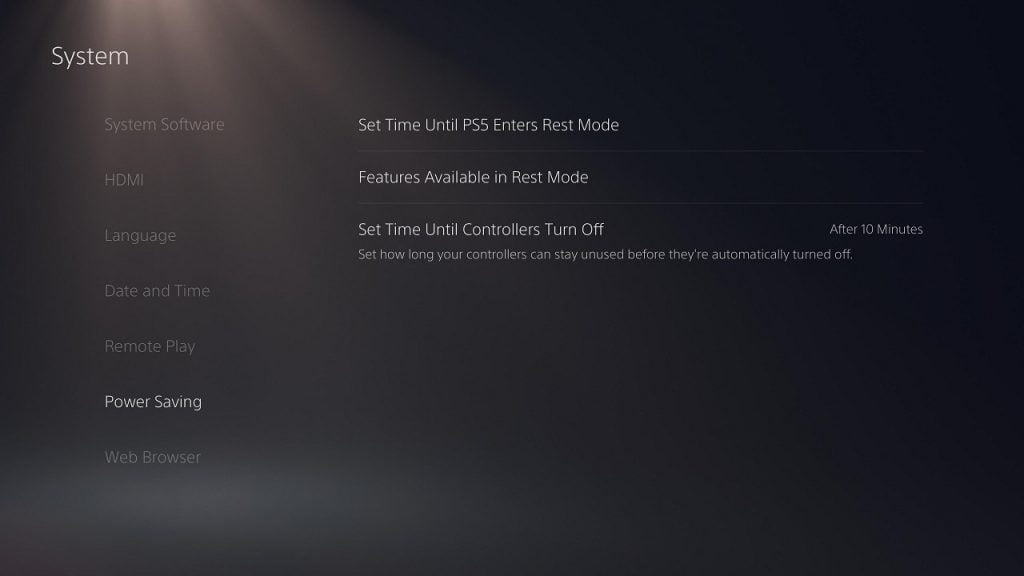
1. For the first step, we recommend using the Power Saving option on your PlayStation 5 or PlayStation 5 Digital Edition console.

In order to do so, you need to go to the Settings menu of the gaming system and then select System > Power Saving > Set Time Until Controllers Turn Off. In the drop-down window, we recommend selecting After 10 Minutes.

So, if you left your DualSense Edge idle for 10 minutes, then it will turn off on its own, conserving the battery charge as a result.

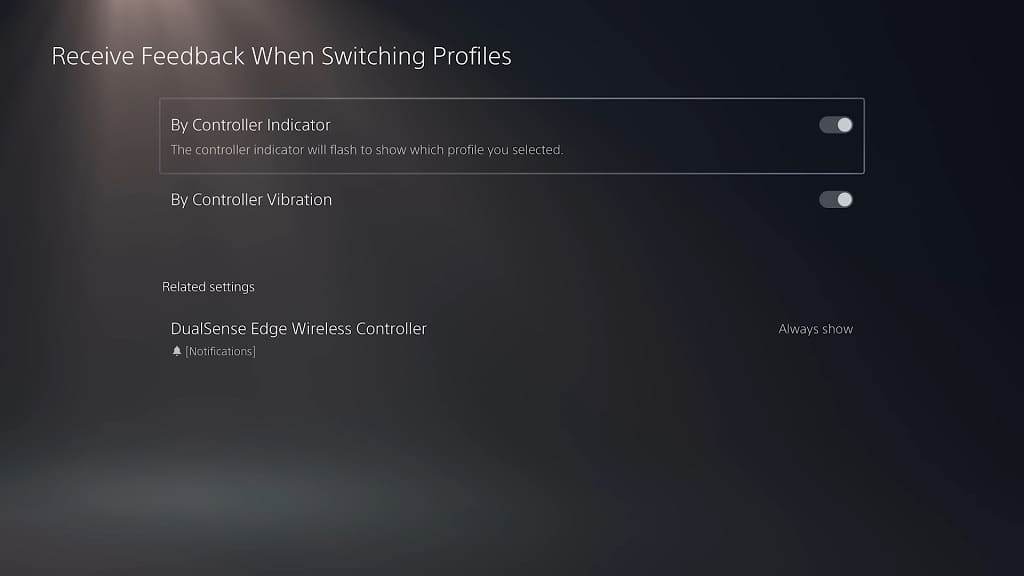
2. You can also turn off the feedback features while switching profiles. In order to do so, head back to the Settings menu of your PS5 and then select Accessories > DualSense Edge Wireless Controller > Receive Feedback while Switching Profiles.

Next, you need to disable By Controller Indicator and By Controller Vibration from the Receive Feedback When Switching Profiles menu.

3. We recommend turning down the brightness of the controller lights as well.

To do so, go to Settings > Accessories > DualSense Edge Wireless Controller. From there, you need to select Brightness of Controller Indicators. Finally, select Dim from the drop-down menu.

4. If you aren’t using the built-in microphone, then you should mute it. To do so, you need to press the mute button located directly below the PS button.

The mute button should light up when the built-in microphone of the gamepad is muted.

5. The DualSense Edge comes with the same adaptive triggers as the DualSense. If you aren’t planning on using this feature, then you can disable it by following the steps laid out in this detailed guide.

6. We also suggest turning off the haptic feedback of the controller to stop it from draining more battery charge. To find out how to do so, you should check out this previous post.

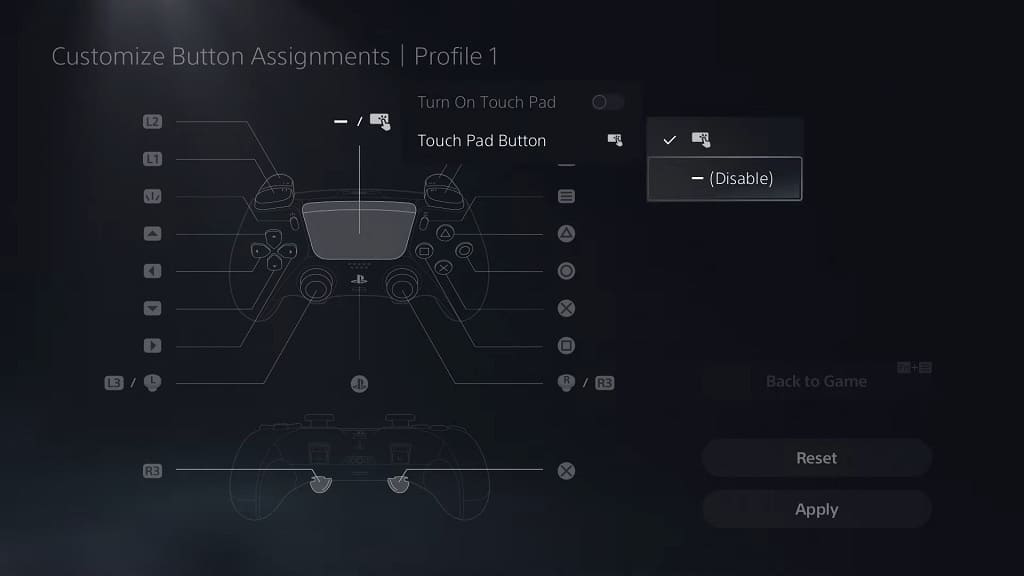
7. The touch pad of the DualSense Edge is also a massive battery drain. Thankfully, you are able to disable it with the premium controller. In order to do so, you need to follow these steps.

8. If you don’t want to worry about the battery life of the Edge, then we recommend that you use it as a wired controller. The gamepad comes with a length USB cable, which should give you plenty of room to play over a wired connection. Not to mention that you will most likely end up getting lower input lag as well.

How to change the DualSense Edge adaptive trigger intensity

Like the normal DualSense, the new DualSense Edge also features adaptive triggers. When used, the L2 and R2 buttons will require more pressure to press down. If you would rather use these triggers normally and/or would like to save on the battery life of the controller, then you can make this effect weaker. You can also completely disable this feature.

To find out how to do so, you can check out this walkthrough at Seeking Tech.

1. The first step is to turn on both your controller and your PlayStation 5 or PlayStation 5 Digital Edition console if you haven’t done so already.

2. With both devices turned on, you need to hold one of the Fn buttons on the DualSense Edge and then press the Options button in order to open the Custom Profiles menu on your PS5.

3. Inside the Custom Profile menu, you can either select an existing profile or create a new one.

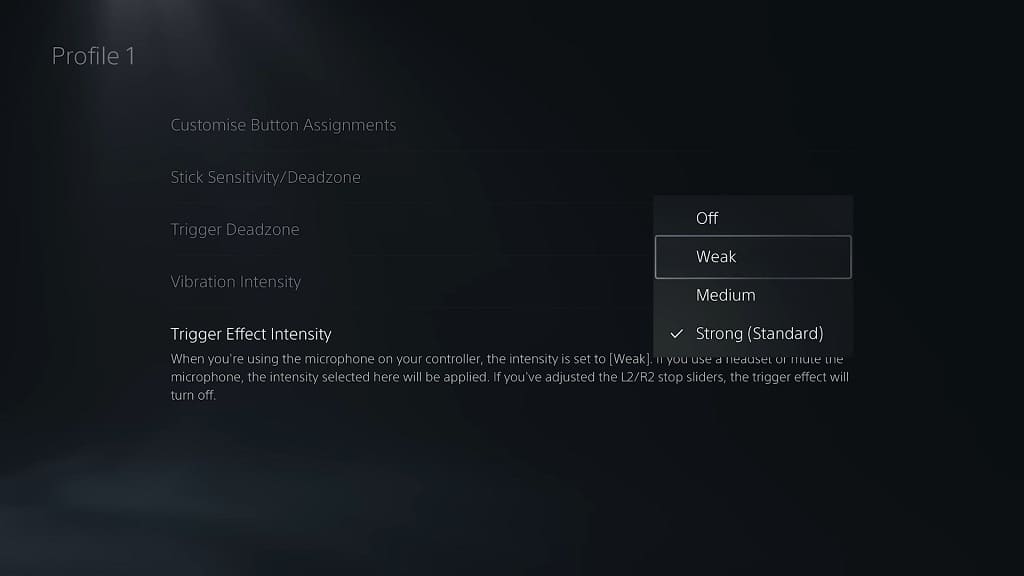
4. Once you get to the Profile menu, you should be able to find the Trigger Effect Setting with the following description:

  • “When you’re using the microphone on your controller, the intensity is set to [Weak]. If you use a headset or mute the microphone, the intensity selected here will be applied. If you’ve adjusted the LR/R2 stop sliders, the trigger effects will turn off.”

5. Select the Trigger Effect Setting to bring up a pop-up menu.

6. From the small window, you can choose to reduce the adaptive trigger effects to Weak or Medium.

7. If you want to turn off this feature completely, then you can select Off from the aforementioned small window.

8. To keep using your customized trigger intensity level, make sure you need to have the right profile selected when using the DualSense Edge.

9. Keep in mind that the adaptive trigger effect will always be set to Weak if you have the built-in microphone turned on for your DualSense Edge. Therefore, you may have to mute the mic to get to your desired intensity level.

10. Furthermore, the trigger intenstiy level will be set to Off if you move the trigger stop sliders located at the backside of the DualSense Edge to either Medium or Short. Instead, you need to keep the sliders in the Long position, which is the top-most option.

How to change the DualSense Edge vibration intensity

Just like the regular DualSense, you are able to change the haptic feedback intensity of the premium DualSense Edge controller. This is helpful if you don’t find the default intensity level suitable and/or want to extend the battery life of the game pad before needing to recharge it again.

To find out how to do so with the Edge. you can follow the steps laid out in this tutorial at Seeking Tech.

1. For the first step, you need to turn on both the controller and your PlayStation 5 console if you haven’t done so already.

2. Next, you need to hold down one of the two Fn buttons that are located below the two analog sticks.

3. With one of the Fn buttons held down, press the Options button on the controller to go into the Custom Profiles menu.

4. From there, select a profile that you want to edit or create a new one.

5. You should eventually get to the Profile menu, where you should see the Vibration Intensity setting with the following description:

“When you’re using the microphone on your controller, the intensity is set to [Weak]. If you use a headset or mute the microphone, the intensity selected here will be applied.”

6. Select the Vibration Intensity setting. By default, it should be set to Strong (Standard).

7. In the small pop-up window, you can change lower the haptic rumble to Medium or Weak.

If you want to turn off vibration completely for the DualSense Edge, then you need to set the Vibration Intensity setting here to Off.

8. Make sure that you use the same profile where you made your Vibration Intensity changes when using the DualSense Edge. Otherwise, the level will be changed back to Strong (Standard).

Furthermore, as stated above, if you the built-in microphone is turned on, then the intensity level will be set to Weak no matter what. Therefore, you may need to mute the mic on the controller.