How to play Minecraft Legends with keyboard and mouse on Xbox

Minecraft Legends supports keyboard and mouse on the Xbox One, Xbox One S, Xbox One X, Xbox Series S and Xbox Series X game console. So, if you are used to playing real time strategy titles with this combination, then you can check out this guide at Seeking Tech to see how you can enable this input.

How to enable keyboard and mouse for Minecraft Legends

Minecraft Legends offers a plug and play connection when it comes to enabling keyboard and mouse input.

Therefore, you simply need to connect these control options to the USB ports of your Xbox console. While a Bluetooth keyboard and mouse won’t work, those that use a wireless USB dongle may be compatible if you plug the dongle into the USB ports of the Xbox.

Once the game detects input from the keyboard or mouse, it should automatically switch to those inputs. At that point, you can turn off your Xbox controller in order to save on its battery life.

When we first connected our wired mouse to the Xbox to play Minecraft Legends, we found that the mouse pointer moves a little bit too slow for our liking.

If you feel the same way, then you can change the cursor speed from the Settings menu of your Xbox. From there, select Devices & Connections > Mouse. You can then use the slider to change the pointer speed.

Minecraft Legends keyboard customizations

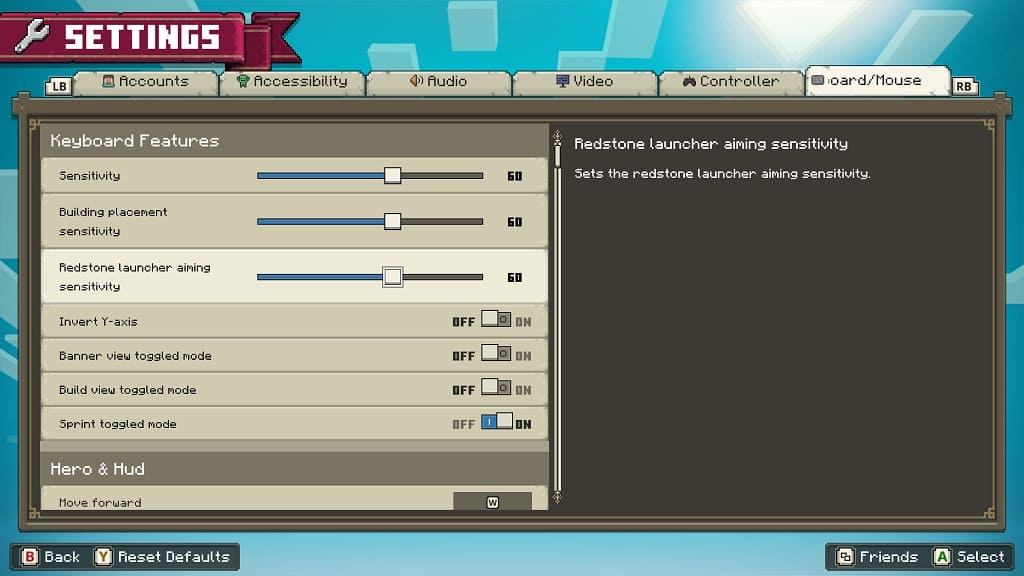
By heading to the Keyboard/Mouse tab in the Settings menu of Minecraft, you will be able to adjust the Camera Sensitivity, Building Placement Sensitivity and Redstone Launcher Aiming Sensitivity by using the sliders at the top.

On the same screen, you will also be able to turn on or turn off the following features:

  • Invert Y-Axis
  • Banner View Toggled Mode
  • Build View Toggled Mode
  • Sprint Toggle Mode

Minecraft Legends keyboard and mouse button layouts

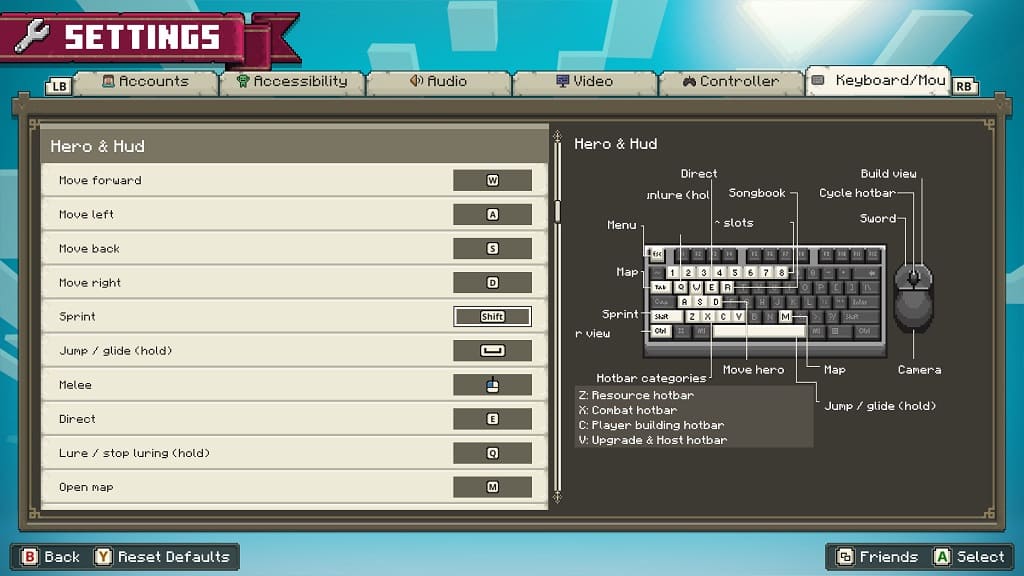
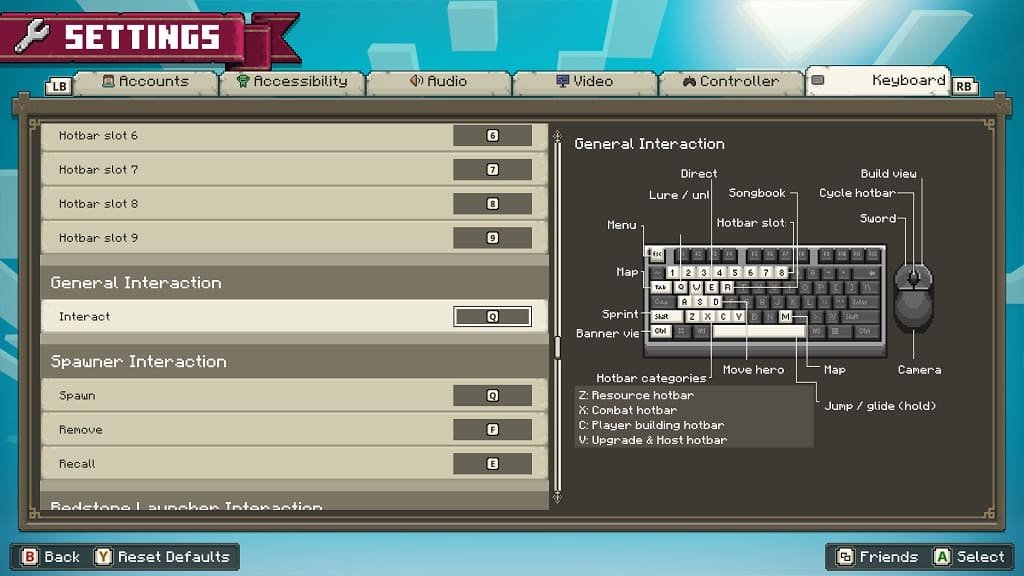
In the same Keyboard/Mouse tab of the Settings menu in Minecraft Legends, you will find the button layout for this input method. You can find images of these layouts below:

Hero and HUD keyboard and mouse button layout:
General Interaction keyboard and mouse button layout:
Spawner Interaction keyboard and mouse button layout:
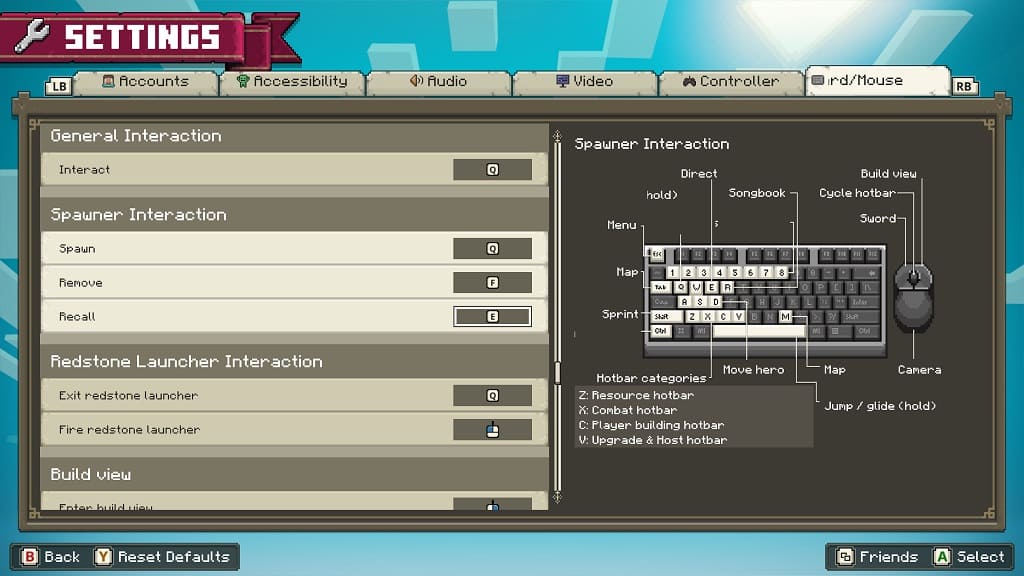
Redstone Launcher Interaction keyboard and mouse button layout:
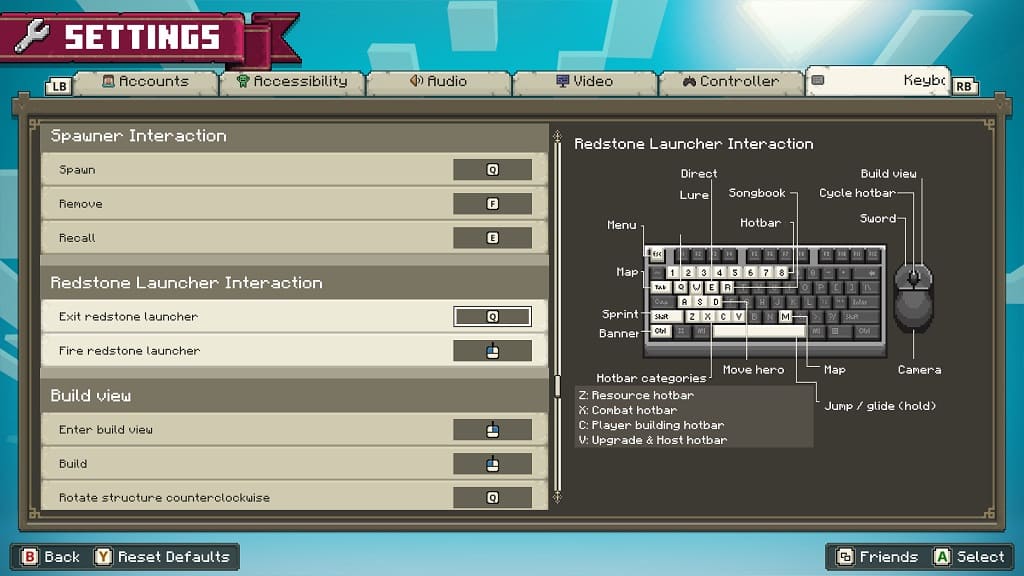
Build View keyboard and mouse button layout:
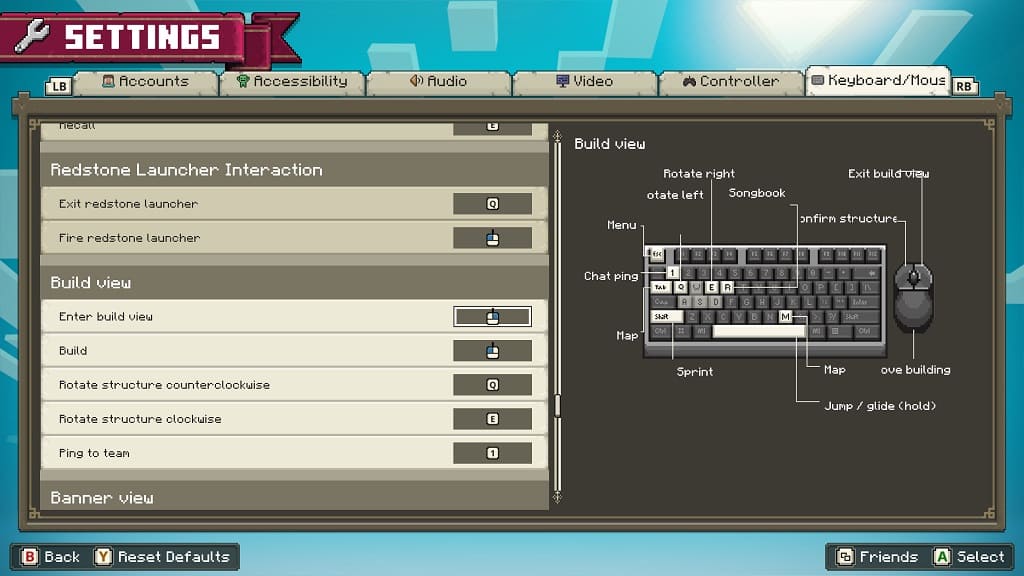
Banner View keyboard and mouse button layout:
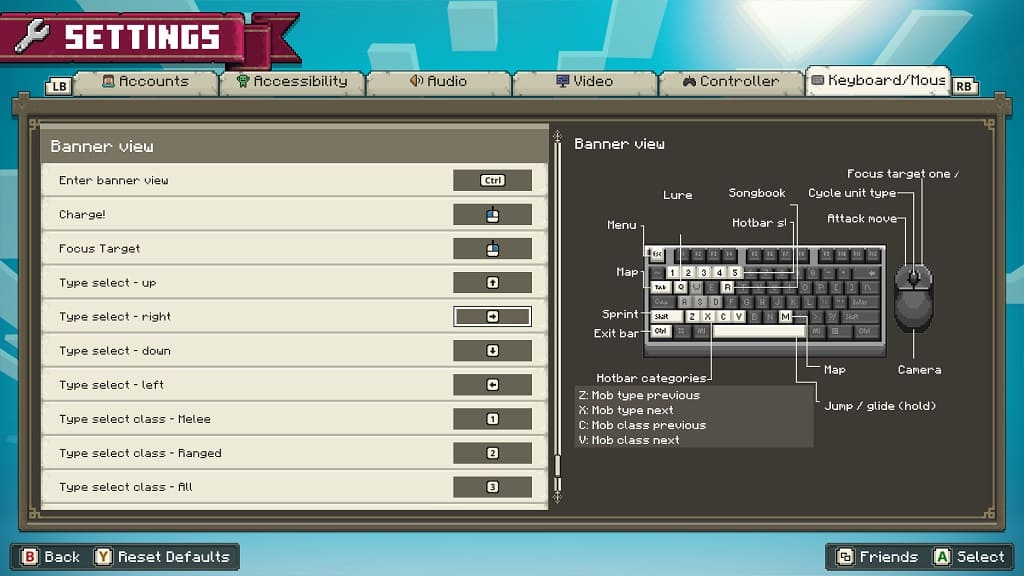
You can also change any of the key inputs to another one from this menu if you don’t like some of the default options.

How to turn off the narrator in Minecraft Legends

By default, Minecraft Legends feature a narrator that will read off the text that appears on the screen. If you forgot to turn this off when you first boot up this real time strategy game, then you can check out this tutorial from Seeking Tech to see how you can properly do so.

1. For the first step, make sure you open Minecraft Legends on your Nintendo Switch, PC, PlayStation 4, PlayStation 4 Pro, PlayStation 5, PlayStation 5 Digital Edition, Xbox One, Xbox One X, Xbox One S, Xbox Series X or Xbox Series S console if you haven’t done so already.

2. Next, you need to head over to the Settings menu in the game, which you can do so from either the main menu or pause screen.

In order to bring up the pause screen, you can press the + button on Switch, Options button on PS4/PS5 or Menu button on Xbox.

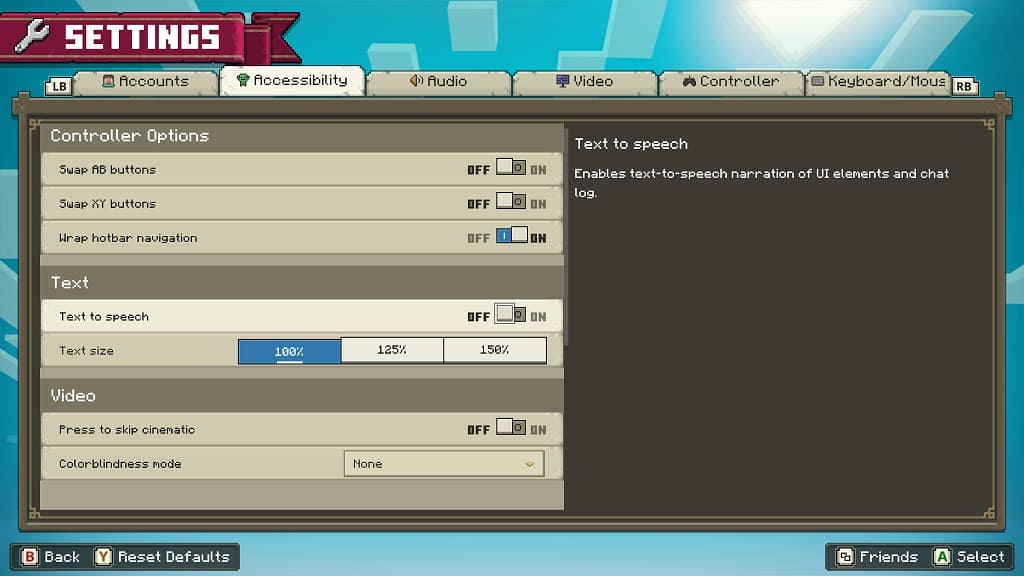
3. After getting to the Settings menu, you need to switch over to the Accessibility tab.

You can do so by pressing the R button on the Nintendo Switch, R1 button on PlayStation or RB button on Xbox.

4. In the Accessibility tab, move the cursor down until you get to the Text to Speech setting, which should have the following description:

  • “Enables text-to-speech narration of UI elements and chat log.”

5. If Text to Speech is set to “On” then you need to select it to switch this option to “Off.”

6. Once the narrator has finished reading its current lines, it will fully turn off.

When you return to the name, you should no longer hear a voice while playing Minecraft Legends.

How to turn off Wi-Fi on Xbox Series X and Xbox Series S

The Xbox Series X and Xbox Series S feature a Wi-Fi 5 card as you will be able to connect the console online over a 802.11ac or older wireless connection. If you want to turn off the Wi-Fi connection to these gaming systems for one reason or another, then you can take a look at this tutorial to see how you can do so.

Method #1

For the first method, you can simply set your console to go offline by taking the following steps:

  • To start off, you need to open the Settings menu of the Series X or Series S. You can do so by selecting Settings from the home menu or in the Profile & System tab of the Xbox Guide menu.
  • Inside of Settings, make sure you are in the General section on the left column.
  • On the right side of the same screen, you then need to select Network Settings.
  • After getting to the Network menu, you should be able to select the Go Offline feature.
  • Once your console is offline, you can also select the Forget Wireless Network option if you want to delete the Wi-Fi connection information on the console. Afterwards, you will have to select the Set Up Wireless Network option in the Network menu if you want to set up a new Wi-Fi connection.

Method #2

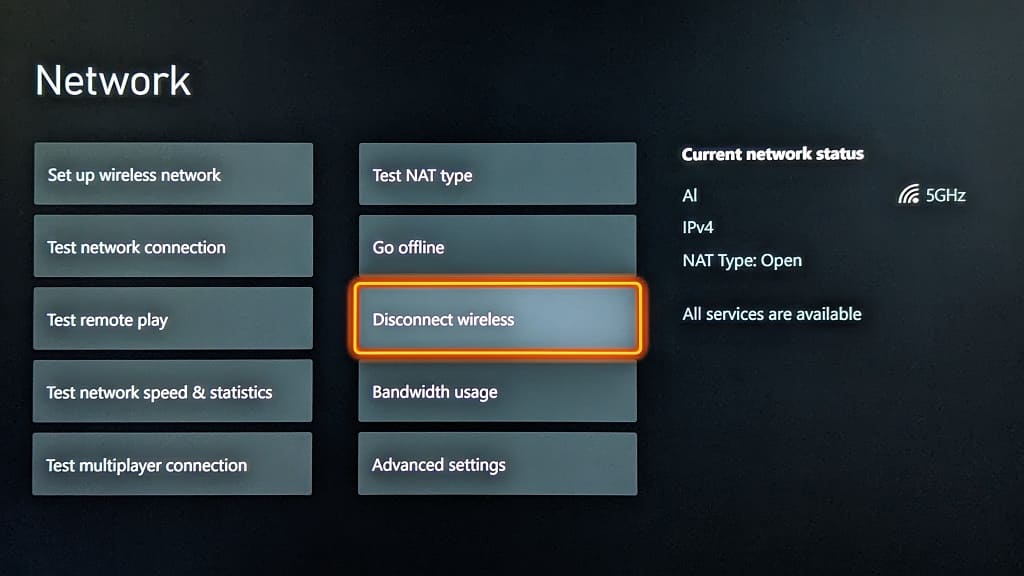
For the second method, you can head back to the Settings menu of your Xbox Series X or Xbox Series S. From there, select General and then Network Settings.

Once you arrive at the Network menu, you can then select the Disconnect Wireless option. By doing so, you will no longer be using the Wi-Fi connection. If you want to use Wi-Fi again afterwards, then you need to select the Set Up Wireless Network option from the Network menu.

Method #3

If you want to use a wired LAN connection instead of Wi-Fi for your Series X or Series S, then you can simply plug in the Ethernet cable to the console.

The system will automatically disable the Wi-Fi connection and switch over to the wired connection.

For the uninformed, a wired LAN connection should provide faster and more stable speeds when compared to Wi-Fi. So, if you are experiencing a lot of lag or slow downloads over Wi-Fi, then switching over to a wired Internet connection may help resolve these issues.

Keep in mind that you won’t be able to play games or use apps online on your Xbox if you disconnected your Wi-Fi without an Ethernet connection.

How to adjust the active hours for Xbox Series X and Series S

In order to make your Xbox Series X or Xbox Series S run more efficiently, Microsoft recently added the ability to adjust the active hours for your console. This will help your system use up less electricity, and therefore save you money on your energy bill, outside of the active hours timeline in Sleep Mode.

To see how you can access this feature, you can take a look at this tutorial from Seeking Tech.

1. If you haven’t done so already, make sure you update the system software of your Series X or Series S as this feature has been added through a firmware update.

To check if there is a new version of the console available to download, you can open the Settings menu and then select System > Updates. If there is a new file available, make sure you download and install it before continuing.

2. Once your Xbox is updated, head back to the Settings menu.

3. From the front page of Settings, you need to select General on the left column and then Power Options on the right side of the same screen.

4. You should now be in the General – Power Options menu. Here, you should make sure that you select Sleep in the “Choose how this console turns off” section. Otherwise, you won’t be able to access the Active Hours feature.

5. After making sure you have Sleep Mode set to Active, you then need to select Customize Power Options on the right side of the General – Power Options menu.

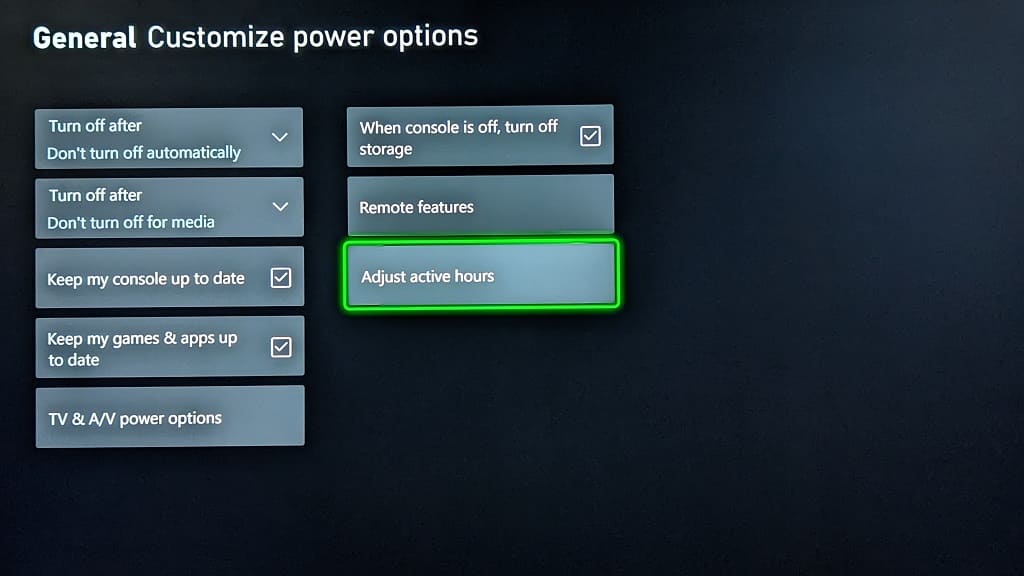
6. In the General – Customize Power Options menu, you need to select Adjust Active Hours.

Note: if you don’t see the Adjust Active Hours option, then you should make sure that you have the latest firmware installed. Restarting your console may also make it appear as well.

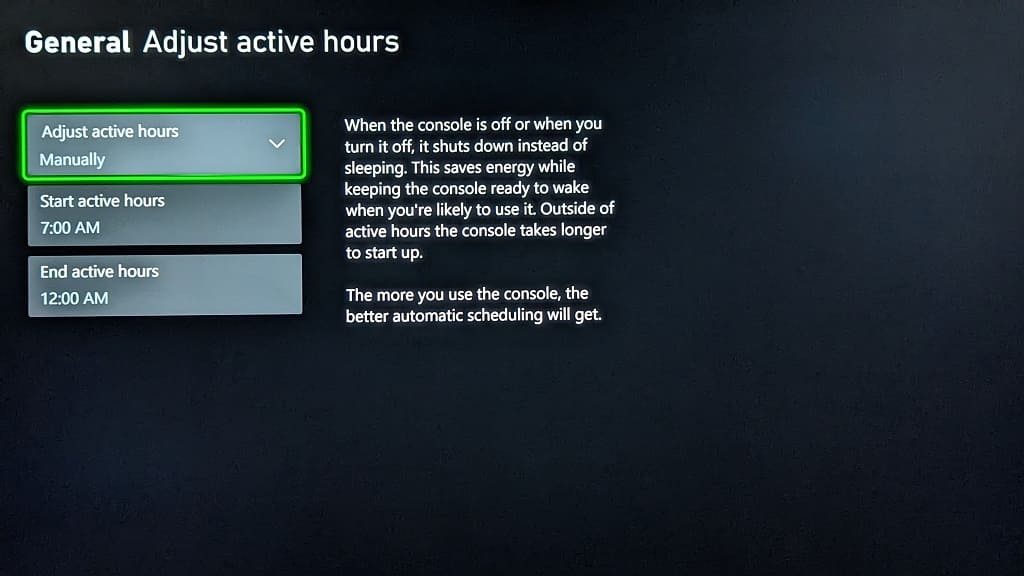
7. You should finally be in the General – Adjust Active Hours menu, which has the following description of the feature:

  • “When the console is off or when you turn it off, it shouts down instead of sleeping. This saves energy while keeping the console ready to wake when you’re likely to use it. Outside of active hours the console takes longer to start up. The more you use the console, the better automatic scheduling will get.”

8. When you select the Adjust Active Hours drop-down menu, you will have the following options:

  • The Always Active option is for those who want to keep their Xbox Series X or Xbox Series S in Sleep Mode at all times. This uses the most energy.
  • The Automatically option will let the console pick the best time. Your Series X or Series S will learn your habits when it comes to when you are actively using the system. It will then adjust the Active Hours to fit your usage schedule. As a result, the console will be put in Sleep Mode during hours where it expects you to use it. During inactive hours, the same console will be completely turned off.
  • The Manually option will let you set the active hours timeline. By selecting this, you should see the Start Active Hours and End Active Hours options appear. You can use these to set the range to your liking.

How to find deals if you are an Xbox Game Pass subscriber

One of the perks of being a member of Xbox Game Pass is that you can get special discounts. To see how you can find deals that are exclusive to subscribers of this service, you can take a look at this tutorial from Seeking Tech.

1. For the first step, make sure you turn on your Xbox One, Xbox One S, Xbox One X, Xbox Series S or Xbox Series X console if you haven’t done so already.

2. You should also make sure that you are signed into the Xbox Live account that is currently subscribed to Xbox Game Pass or Xbox Game Pass Ultimate.

3. Next, you need to open the Store App on your console.

You can do so by selecting Store from the home screen on the dashboard. Alternatively, you can press the Xbox logo button on the controller and then select the shopping bag icon to open the shopping application.

4. Inside of the Store App, move the cursor to the left until you see the left column menu.

5. From there, move the cursor to the Home option and then select the Deals option.

6. Once you get to the Deals section, scroll down until you get to the Xbox Games Specials row.

7. In the aforementioned row, scroll all the way to the right and then select the Xbox Games Special – Show All option.

8. You should now see a full list of games and downloadable content that are currently discounted for Xbox Game Pass subscribers.

9. If you want to filter this list, then you need to press the X button.

10. On the Filter tab, you will be able to filter the sale list based on the following categories:

  • Accessibility
  • Genre
  • Age Rating
  • Multiplayer
  • Play with
  • Prices
  • Supported Language
  • Technical Features

10. If you want to sort the list, then you need to switch over to the Sort tab in the aforementioned Filter menu. Afterwards, you can sort the Xbox Game Pass deals list based on the following order:

  • Relevance
  • Title A – Z
  • Title Z – A

How to fix Ghostwire Tokyo frame rate issues on Xbox Series X and S

When playing the Ghostwire Tokyo on your Xbox Series X or Xbox Series S, you may notice some frame rate drops and/or stuttering. To see how you can get this first-person action-adventure game to run smoother, you can take a look at this troubleshooting article from Seeking Tech.

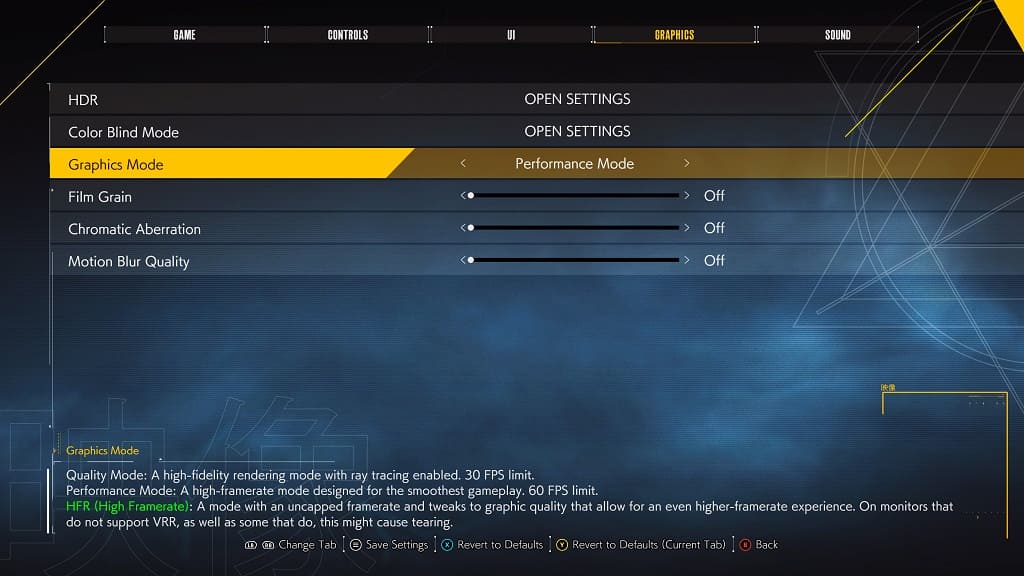
1. For the first step, you should make sure you are playing the game in Performance Mode, which increases the frame rate to a maximum of 60 per second.

You can change modes by heading into the Graphics tab of the Options menu. You can find the Options menu from either the main menu or pause screen.

2. If your television or computer monitor supports Variable Refresh Rate, then you should make sure you enable it on the settings of your screen. VRR will make minor frame rate drops less noticeable in addition to preventing the screen from tearing.

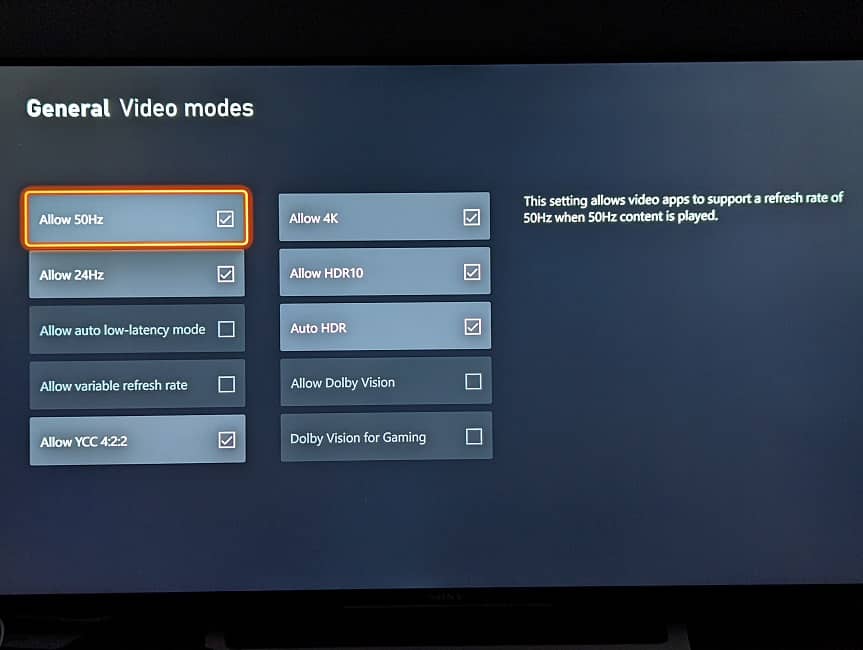
After enabling Variable Refresh Rate from your TV or monitor, you should make sure you do the same on your game system. In order to do so, head over to the Settings menu of your Series X or Series S. From there, go to General > TV & display options > Video modes. Inside the General – Video modes menu, make sure that the Allow Variable Refresh Rate setting is enabled.

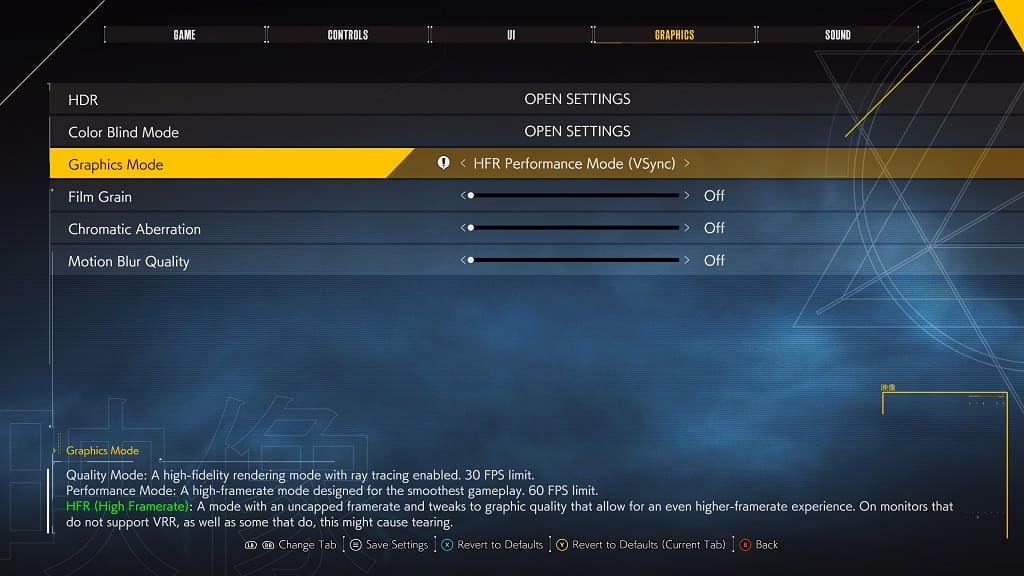
3. If you have a 120 Hz television set or monitor, then you can try set the graphics mode to any of the following in order to get even higher frame rates:

  • High Frame Rate Quality Mode
  • High Frame Rate Performance Mode
  • High Frame Rate Quality Mode (VSync)
  • High Frame Rate Performance Mode (VSync)

By playing the game at more than 60 frames per second, minor frame drops should be less noticeable, especially if you are also playing with Variable Refresh Rate enabled.

4. Quick Resume can cause performance issues in Ghostwire Tokyo as well as other Xbox Series X and Xbox Series S games.

  • So, if you are experiencing frame rate drops, we recommend that you try restarting the game. In order to do so, you need to take the following steps:
  • Press the Xbox button on the controller to open the Guide quick menu.
  • From there, move the cursor over to the Ghostwire Tokyo icon and then press the Menu button on the controller.
  • In the small pop-up window, select the Quit option.
  • Once the game has closed, open it again.
  • Resume your progress to see if you can get the game to run more smoothly after a fresh reboot.

How to enable and disable fast scrolling on Xbox Series X and Xbox Series S

You can use the fast scrolling feature to quickly move through a menu on your Xbox Series X and Xbox Series S. To see how you can enable, as well as disable, this feature, you can take a look at this tutorial from Seeking Tech.

How to turn on fast scrolling on Xbox Series X and Xbox Series S

In order to enable fast scrolling on your console, you can try either of the two following methods:

Method #1:

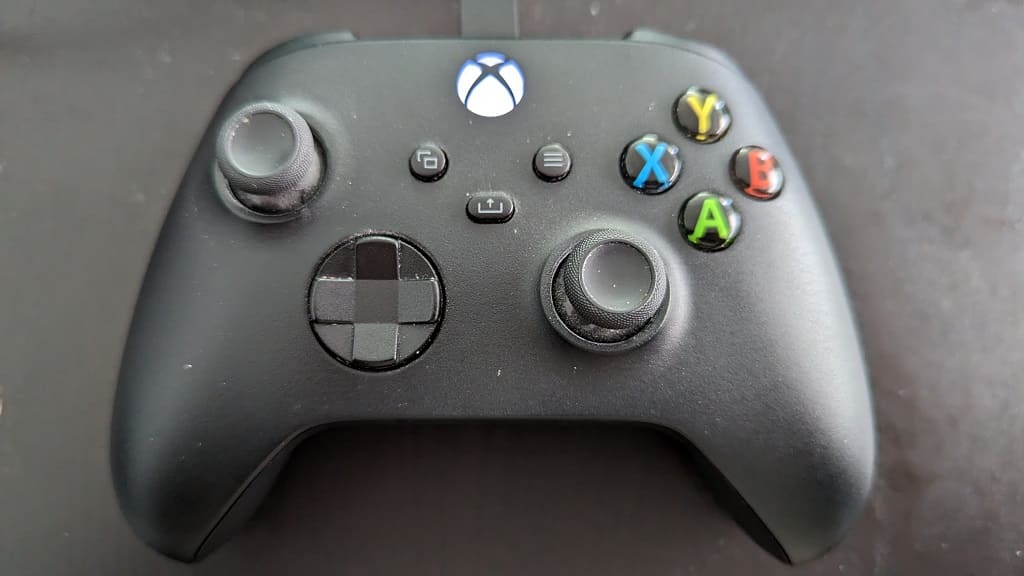
For the first method, you can simply hold the left analog stick or one of the direction button.

Initially, you will only move once space; if you keep holding the same analog position or button for more than one second, however, then fast scroll should automatically activate.

Method #2:

You can bypass the one second wait to activate fast scrolling. In order to do so, you need to press down on the right analog stick and then use either the left analog stick or directional pad to scroll. The fast scrolling feature should work immediately.

How to turn off fast scrolling on Series X and Series S

If you want to turn off fast scrolling on your system, then you can try the following methods:

Method #1:

The first method you can try is to avoid holding down on the right analog stick when you are moving the left analog stick or pressing the directional pad buttons. Otherwise, the fast scrolling feature will automatically be enabled.

Method #2:

For the second method, you should avoid holding the left analog stick in the same direction, as well as holding down on a directional pad button, for more than one second. If you keep holding, then fast scrolling will be activated.

Method #3:

You should also make sure that your left analog stick and directional pad are clean as stick buttons may cause the fast scrolling to turn on.

Furthermore, you should also make sure that the left analog isn’t suffering from any drifting problems.

How to fix Ghostwire Tokyo screen tearing issues on Xbox Series X and S

When playing the Xbox Series X and Xbox Series S versions of Ghostwire Tokyo, you may notice that there is a lot of screen tearing or ripping. To see how you can get rid of this graphical issue, you can take a look at this troubleshooting article from Seeking Tech.

1. For the first potential fix, you can try changing the graphics mode in Ghostwire Tokyo by taking the following steps:

  • Start by opening the Options menu. If you are currently playing this first-person action-adventure title, you can get there by pressing the Menu button to pause the game. From there, you should be able to head to Options.
  • In Options, use the LB and RB buttons until you get to the Graphics tab.
  • On the Graphics tab, move the cursor to Graphics Mode.
  • If your television or monitor display has a maximum refresh rate of 60 Hz, make sure you set Graphics Mode to Performance Mode.
  • If your display is capable of 120 Hz refresh rate, then you should change Graphics Mode to either HFR Quality Mode (VSYNC) or HFR Performance Mode (VSYNC). Out of these two, we recommend going with HFR Performance Mode (VSYNC) if you want to eliminate as much of the screen tearing as possible.

2. If your TV or monitor supports Variable Refresh Rate, then you should make sure you enable this feature from its menu.

Afterwards, head to the Settings menu of your Xbox Series X or Xbox Series S (you can get there by pressing the Xbox logo button on the controller and then selecting Settings from the Profile & System tab).

In Settings, select General > TV & display options > Video modes. Finally, make sure that Allow Variable Refresh Rate is selected in the General – Video Modes menu.

3. You should also make sure that you have the latest patch for Ghostwire Tokyo installed as a new update may help fix the screen tearing.

To manually check if there is a new update available for this first-person action-adventure game, press the Xbox logo button and then move the cursor to the Ghostwire Tokyo icon. Afterwards, press the Menu button on the controller and then select Manage Game and Add-Ons. In the Manage – Ghostwire Tokyo screen, select Updates.

If there is a new update available, make sure you download and install it onto your Series X or Series S.

How to find Xbox Play Anywhere games on Xbox Series X and S

Video games that support Xbox Play Anywhere can be played on Xbox and Windows 10 PC.

What’s neat about this feature is that you only have to purchase the title once to gain access to both the Xbox and PC versions. Furthermore, your save file and achievements will also carry over if you decide to switch from playing the game from one platform to the other.

To see how you can find the complete list of Xbox Play Anywhere games on your Xbox Series X and Xbox Series S, you can take a look at this tutorial from Seeking Tech.

1. To start off, you need to open the Store App on your console. You can find this shopping application from the home menu of the dashboard.

Alternatively, you can press the Xbox logo button on the controller at any time to open the Guide menu. You can then select the shopping bag icon at the bottom of the first tab you see to open the store.

2. Once you arrive at the Store App, navigate to the left side of the screen until you get the left column menu to pop up.

3. From there, select Games.

4. In the Games section of the Store App, keep scrolling down until you get to the Xbox Play Anywhere roll.

5. Next, you need to scroll all the way to the right and then select the Show All option.

6. You should now be in the Xbox Play Anywhere menu, which will show the full list of games that support the feature.

7. If you want to filter this listing, then you need to press the X button.

8. In the Filter tab, you will see the following filtering options:

  • Accessibility
  • Genre
  • Age Rating
  • Multiplayer
  • Play with
  • Prices
  • Supported Language
  • Technical Features

9. From the same Filter menu, you can also switch to the Sort tab by pressing the RB button. In the sorting tab, you will be able to order the listing based on the following:

  • Relevance
  • Title A- Z
  • Title Z – A

How to find Games with Gold titles you previous redeemed on Xbox One and Xbox Series X/S

Games with Gold is a feature of Xbox Live Gold where you get to claim 2 to 4 titles on a monthly basis. If you previously redeemed these games on your Xbox One, Xbox One S, Xbox One X, Xbox Series S and Xbox Series X console but don’t know where to find them, then you can take a look at this tutorial from Seeking Tech.

1. Before we begin, it should be noted that you need to previously claim the games when they were made available in Games with Gold. If you didn’t redeem in time, then you won’t be able to find these titles on your Xbox account.

It should also be noted that any Xbox 360 games you claimed previously will be listed separately from the Xbox One and Xbox Series X/S GwG catalog.

2. To start off, turn on your Xbox console and then sign into the Xbox Live account that you used to previously redeem the Games with Gold titles.

3. Next, you need to head over to the home menu on the dashboard if you aren’t there already.

In order to do so, press the Xbox logo button on the controller and then select the house icon at the bottom of the Guide menu.

4. From the home menu, find and select My Games & Apps.

5. On the left side of the new screen, you need to select Full Library.

6. On the right side of the same screen, press the RB button on the controller once to switch over to the Owned Games tab.

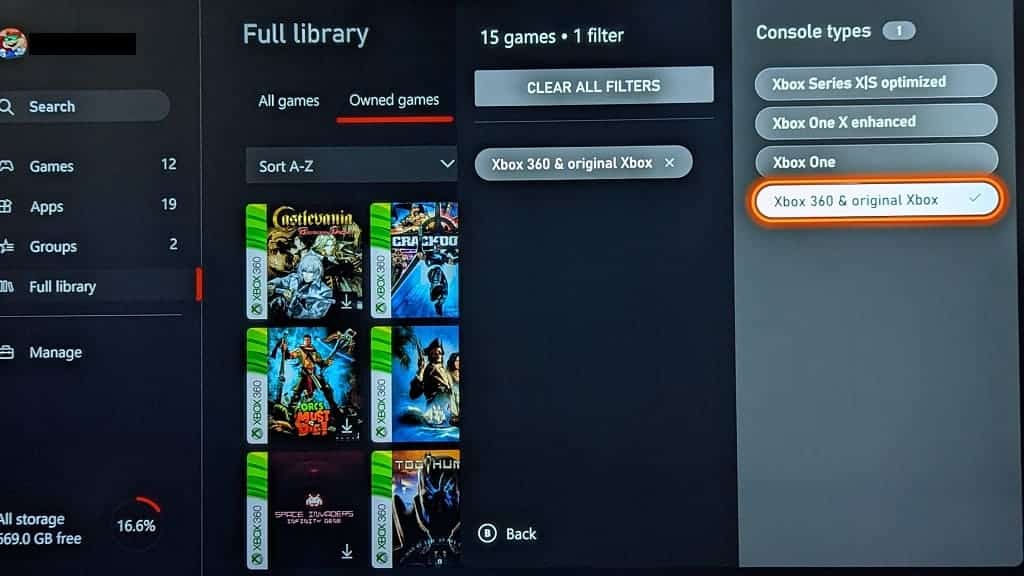
7. The Owned Games tab shows a list of games you previously purchased. This listing should include the Xbox 360 games that were claimed through Games with Gold.

To filter this listing to only show Xbox and Xbox 360 games, select the Filter option in the Owned Games tab. Afterwards, you need to select Console Types and then Xbox 360 & Original Xbox.

For any Xbox 360 game you claimed with Xbox Live Gold, you are able to play them with or without being an active Xbox Live Gold subscriber.

8. To view Xbox One and Xbox Series X/S titles that you previously claimed via Games with Gold, return to the Full Library section in the My Games & Apps menu.

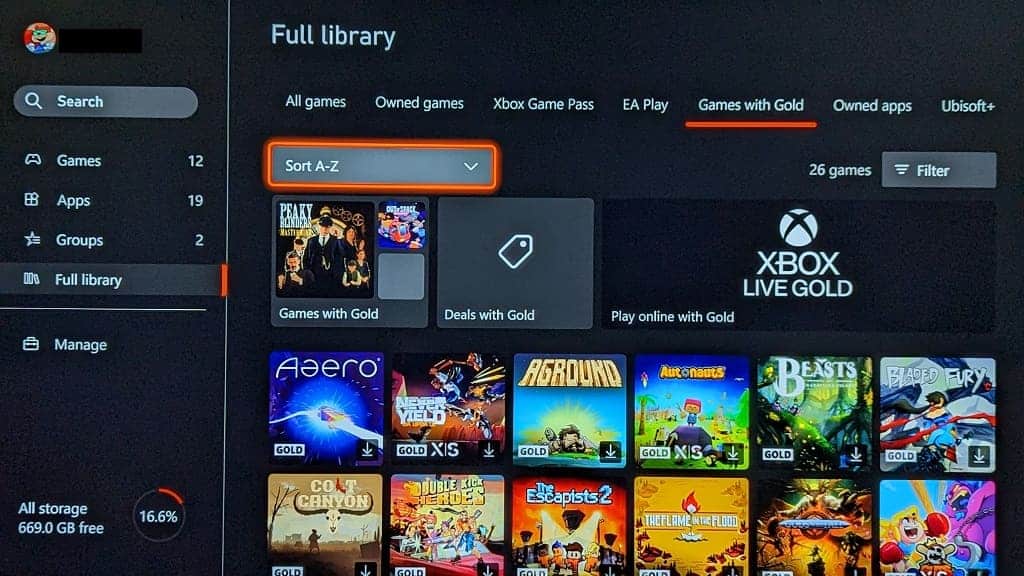
9. Afterwards, press the RB button several times until you get to the Games with Gold tab.

You should be able to view the full list of titles Xbox One and Xbox Series X/S titles that you redeemed.

If you are still an active member of Xbox Live Gold, then you are able to download and play them.