How to extend the DualSense’s battery life

Although the DualSense contains a bigger battery capacity than the DualShock 4, the PlayStation 5 controller can still drain pretty fast due to the new features that were added. Fortunately, there are a few ways you can extend the battery life of the game pad, which you can find out in this guide at Seeking Tech.

How to automatically turn off your DualSense after set amount of time

The first setting you can change is the automatic shut off for your PS5 controller. This setting will turn your PS5 controller off after a set amount of time of inactivity.

If you are interested in doing so, you can take the following steps:

1. After selecting which user profile to use, you will be at the main system menu.

2. From the main menu, navigate upwards and then go right until you see “Settings” (which has a gear logo). Enter the “Settings” menu.

3. In “Settings,” scroll down and select “System.”

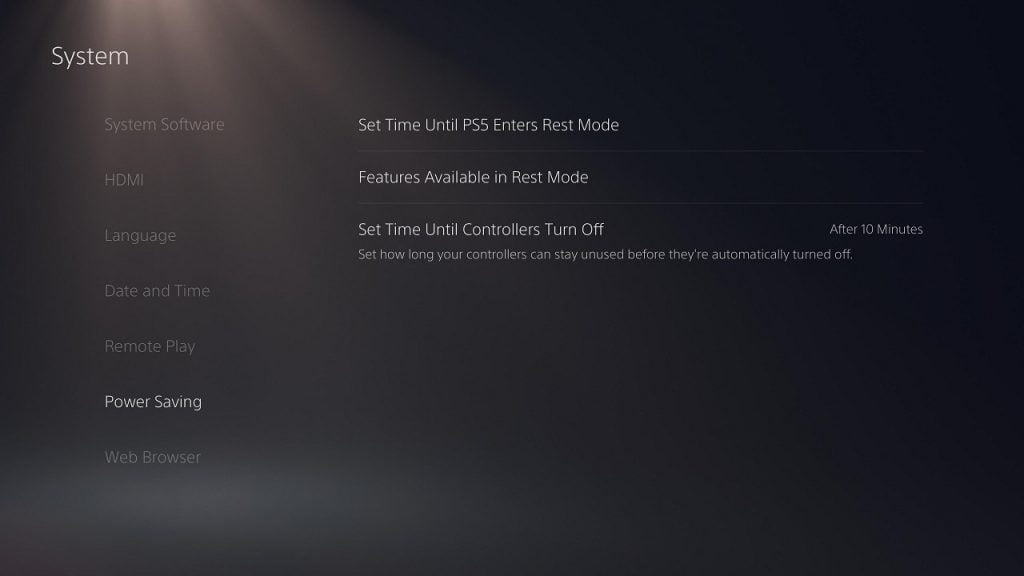
4. In the “System” menu, scroll down and select “Power Saving.”

5. In the “Power Saving” sub-menu, select “Set Time Until Controllers Turn Off.” This setting lets you set how long of a period your DualSense can stay unused before it automatically shuts off. The default option is “Don’t Turn Off” while the other options are “After 10 Minutes,” “After 30 Minutes” and “After 60 Minutes.” To get the best battery life, you should select the “After 10 Minutes” option.
How to lower the volume of the DualSense speaker

To extend the DualSense battery life, you can also try lowering the volume of the controller’s built-in speaker with the following steps:

1. From the aforementioned “Settings” menu, scroll down and select “Accessories.”

2. In the “Accessories” menu, select “Controllers.”

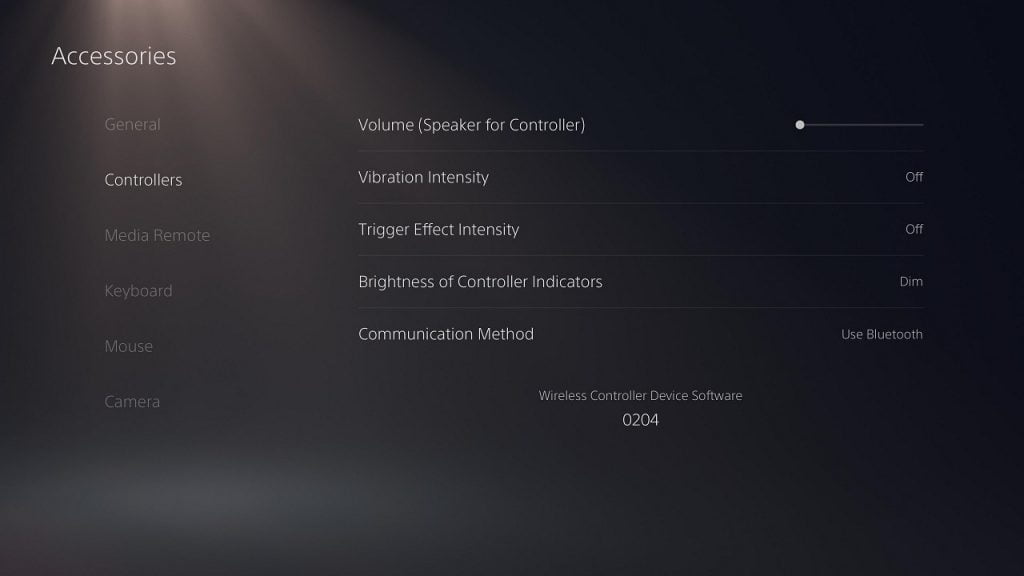
3. In the “Controllers” sub-menu, select “Volume (Speaker for Controller).” With this option, you can lower the sound output volume of the controller’s speakers. For the best energy saving, we recommend moving the meter all the way to the left to mute it. If you would like to maintain this functionality, you can try one of the lower volume settings instead.
How to lower DualSense vibration intensity

You can also try lowering the strength of the DualSense haptic feedback vibration to increase the battery life of your controller.

If you are interested in doing so, you can take the following step:

In the aforementioned “Controllers” sub-menu, select “Vibration Intensity.” The default option for this feature is “Strong” with the other options being “Medium,” “Weak” and “Off.” To use the least amount of power, you should set the vibration intensity to “Off.” If you would like to still feel vibrations, you can choose “Weak” or “Medium” instead.

How to lower DualSense trigger effect intensity

You can also reduce the intensity of the impulse triggers to save power.

To do so, you can take this step:

In the aforesaid “Controllers” sub-menu, select “Trigger Intensity.” The default option for this is also “Strong” with alternatives being “Medium,” “Weak” and “Off.” To get the best power saving for your controller, set the trigger effect intensity to “Off.” If you would like to keep using impulse triggers, you can try the “Weak” or “Medium” setting instead.

How to lower DualSense indicators brightness levels

You can also lower the brightness levels of the DualSense indicators in an effort to reduce the gamepad’s battery usage.

To do so, you need to do the following:

In the aforementioned “Controllers” sub-menu, select “Brightness of Controller Indicators.” The standard option here is “Bright” with the other options being “Medium” and “Dim.” To get the most efficient power usage, set the brightness to “Dim.”

Keep in mind that lowering the brightness of the indicators may hinder your experience on games and apps that use these indicators of the DualSense. If you are experiencing issues, you can set the brightness back to the “Bright” option.

About using earphones, headphones and headsets

Just like the DualShock 4, you can connect your earphones, headphones and/or headsets to your DaulSense via the 3.5 mm audio port. Doing so will drain the battery life of the PS5 controller, however. In order to extend the battery life of your gamepad, we recommend using another method of sound output (such as television speakers, headsets with USB cables or transmitters, sound bars and more).

About Recharging Your DualSense

Just like other rechargeable batteries, the DualSense batteries will lose their capacity and efficiency every time you recharge. So, it is best that you wait until the battery indicator gets down to one of zero bars before recharging. You should also make sure that the controller’s battery is fully charged before using it again.

Using DualSense as a wired controller for PS5

Even if the internal battery of your DualSense can no longer hold a charge, you can still use your gamepad on the PlayStation 5 as a wired connection. To do so, you need to head to the aforementioned “Controllers” sub-menu and select “Communication Method.”

The default connection method is “Use Bluetooth.” Connect the Dualsense to your PlayStation 5 via an USB cable and then select “Use USB Cable” in order to use your gamepad as a wired controller.

What media discs and game discs can be played on PS5?

The PlayStation 5 is compatible with 4K Ultra HD Blu-Ray, which is a first for Sony gaming systems. The new console also supports a lot more other media discs as well, according to its safety guide.

You can take a look at the list in this guide at Seeking Tech.

Compatible Media Discs

In addition to the aforementioned 4K UHD, the PS5 can also play Blu-Rays and DVDs. You can find a list of compatible media discs below:

  • 4K Ultra HD Blu-Ray
  • Blu-Ray
  • BD-ROM
  • BD-R
  • BD-RE 2.0 or later
  • DVD-ROM
  • DVD+R
  • DVD+RW
  • DVD-R
  • DVD-RW
  • AVCHD

Compatible Game Discs

With the PlayStation 5, you will be able to play PS5 Format Ultra HD Blu-Ray game discs and PS4 Format Blu-Ray game discs. In order to play physical PlayStation 4 videogames on the PlayStation 5, the PS4 games need to be compatible with the PS5.

Region Codes for U.S. PS5

You can find the region codes for the supported Blu-Ray media discs, DVD media discs and PS4 Blu-Ray discs for the U.S. region of the PlayStation 5 below:

  • Blu-Ray Disc: A
  • DVD: 1 and All
  • PlayStation 4 Blu-Ray Disc: 1 and All
  • Incompatible Media Discs

There are also a sizeable lists of incompatible media discs, the biggest of which is CD-ROM. You can take a look at the list below:

  • BD-RE 1.0
  • CD-ROM
  • DVD-A
  • SACD
  • 8cm discs
  • Cracked discs
  • Deformed discs
  • Repaired discs
  • Discs with stickers attached
  • Discs with paper attached
  • Non-circular discs

If you have a DualDisc, the PlayStation 5 can only play the DVD video side and not the CD audio side.

Incompatible Game Discs

The PlayStation 5 is not backwards compatible with PS1, PS2 and PS3 games. So, the fifth Sony home console won’t be able to play the following discs from previous generations:

  • PlayStation Format CDs
  • PlayStation 2 Format CDs
  • PlayStation 2 Format DVDs
  • PlayStation 3 Format Blu-Ray Discs

We should also note that the PlayStation 5 Digital Edition Is not compatible with any media discs or game discs as it does not come with a disc drive. Furthermore, discs that have scratches, dust particles and/or incompatible recording process may not play on the PS5.

How to fix unresponsive microphone input in Astro’s Playroom

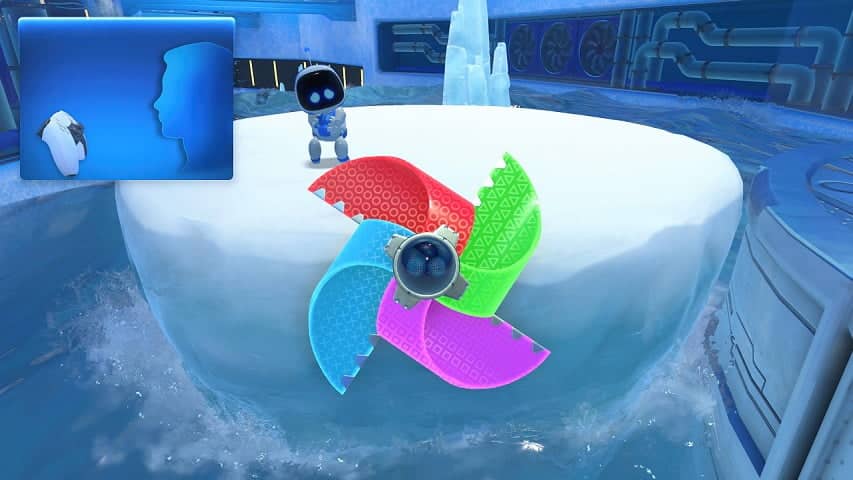
Astro’s Playroom is a videogame that is pre-installed with every PlayStation 5 and PlayStation 5 Digital Edition. When playing, you may eventually come up to a section where the game will tell you to blow into the microphone input of your DualSense controller.

If you are having issues in this section, you can follow this guide at Seeking Tech for some potential fixes.

Why the DualSense mic is unresponsive in Astro’s Playroom

Based on our tests, this issue mainly occurs when you are using a headphone or headset with your PlayStation 5. Once the system detects your headphone or headset, it will automatically switch the microphone input device from the microphone on the DualSense controller to the microphone on your headphone or headset. Keep in mind that not all headphones will have this issue.

You can check the microphone input device in the Settings section of the system menu. From there, select “Sound” and then “Microphone.”

Solution for Headphone

If you running into issues with unresponsive microphone input when using a headphone (which don’t have a microphone), then an easy way to get past these sections that require you to blow on a mic is by pressing the mic mute button. The button is located below the “PS” button on your DualSense controller. You can tell the microphone Is muted when it displays an orange light.

Once the Astro’s Playroom game detects that your microphone has been muted, it will move you through the problematic section without any inputs.

Solution for Headset

If you have a headset, you need to blow directly into the mic on your headset.

If you are still having issues, you can try going to “Settings” from the main system menu and then select “Sound.” From there, select “Microphone” and then “Adjust Microphone Level.” In this section, you can test out the sensitivity of your headset microphone and adjust the microphone level. If your input level is too low, try increasing the microphone level.

If blowing into your headset microphone still does not work, you can try muting your microphone on your headset during the mic-blowing sections in Astro’s Playroom and see if the game will move you through without any inputs.

If none of the above works, simply disconnect your headset from the PlayStation 5. The system will automatically revert the microphone input to your DualSense controller. So, you should now be able to blow on it. Once again, you can check your mic status from the main system menu by going to “Settings,” then “Sound” and then “Microphone.”

How to disable PS5 trophy screenshot capture and video clip recording

The PlayStation 5 and PlayStation 5 Digital Edition automatically enable screenshot and video clip recording every time you earn a trophy. This can be troublesome as these media will take up space on the internal solid state drive on your system.

Fortunately, you can disable trophy screenshot capture and video clip recording.

To do so, you can take the following steps in this guide at Seeking Tech:

1. After turning on your PlayStation 5 or PlayStation 5 Digital Edition, select a user to bring up the system menu.

2. In the system menu, navigate upwards and then scroll right until you see “Settings” (which has a gear symbol) and the X button on your DualSense to enter it.

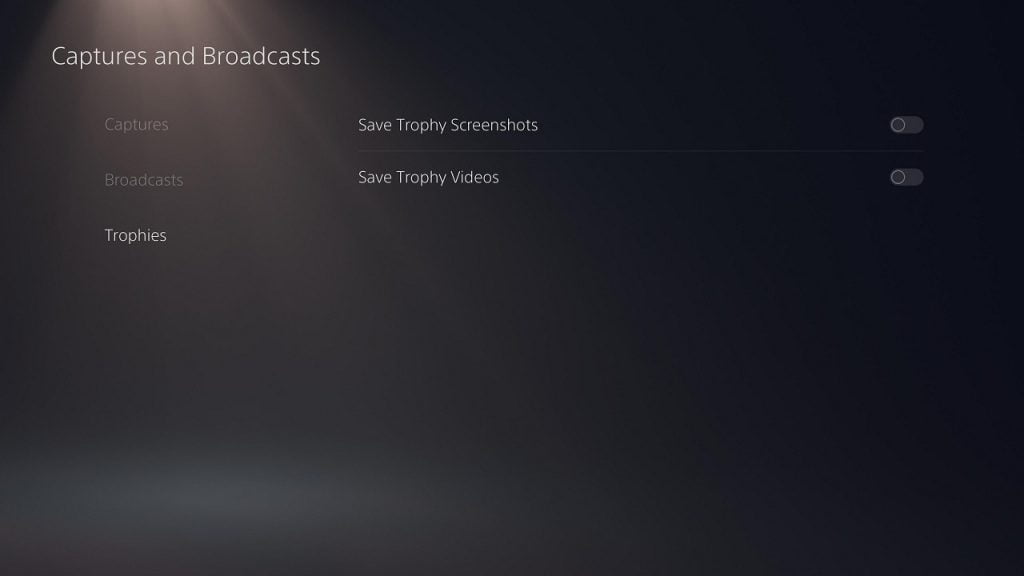
3. Under the “Settings” menu, scroll down to “Captures and Broadcasts” and select it.

4. In the “Captures and Broadcasts” menu, scroll down and select the “Trophies” section.

5. In the “Trophies” submenu, you have three options: “Save Trophy Screenshots” (automatically take a screenshot when you earn a trophy), “Save Trophy Videos” (automatically record a video clip when you earn a trophy) and “Trophy Video Duration” (which lets you record videos in duration of 15 seconds or 30 seconds).

6. To disable “Save Trophy Screenshots”, press the X button with that option highlighted. To disable “Save Trophy Videos,” press the X button with that option highlighted. You will know if these options are disabled when the white circle next to them become transparent and move from right to left. When you disable “Save Trophy Videos,” the “Trophy Video Duration” option will also disappear.

How to delete PS5 trophy screenshots and video clips

1. You can also delete your existing trophy screenshots and video clips. To do so, you can take the following steps:

2. In the “Settings” menu, scroll down to the “Storage” option and select it.

3. In the “Storage” menu, select “Console Storage” and then down until you see “Media Gallery.” Press X to enter it.

4. In “Media Gallery,” scroll right to the “Trophies” tab.

5. You can now select any individual screenshot or video clip you want to delete.

6. With the screenshot or video clip highlighted, you can then press the “Options” button on your DualSense (the button with the three horizontal lines directly to the left of the Triangle button). You then select the option to delete that file from the storage drive.

7. Alternatively, you can scroll to the left to the “Select Multiple” (which has a check symbol) to select multiple media files simultaneously. You can scroll all the way right to the “Select All” option. After making you selection, scroll right to the menu and then down to “Delete” in order to remove the media files.

How to turn off PlayStation Plus Auto-Renew on PS5

If you want to turn off automatic renewal for your PlayStation Plus service directly on your PlayStation 5, you can follow this guide at Seeking Tech.

About PlayStation Plus

The PlayStation Plus is a subscription service for the PlayStation 4, PlayStation 4 Pro, PlayStation 5 and PlayStation 5 Digital Edition.

You need to be a member in order to play most multiplayer games online. You will also get access to select games, which are added on a monthly basis, in addition to exclusive discounts and other benefits.

About PlayStation Plus Auto-Renew

Automatic renewal is enabled by default. Even if you turn off auto-renew, PlayStation will turn it back on every time you decide to re-subscribe or extend your subscription.

Turning Off PlayStation Plus Auto-Renew on PS5

To turn off the auto-renew option of the PlayStation Plus on PlayStation 5 or PlayStation 5 Digital Edition, you can take the following steps:

1. After powering on your PS5 or PS5 Digital, select the user that has an active PlayStation Plus subscription (the profile image will be have a yellow plus sign).

2. On the main system menu, press up or the directional pad or left analog stick. This will give you access to the options on the upper tab. From there, press right on the D-pad or left analog stick until you get to “Settings” (which has a gear symbol). Press the X button with “Settings” highlighted to bring up the “Settings” menu.

3. In “Settings,” scroll select “Users and Accounts.”

4. In “Users and Accounts,” press right on the D-Pad and left analog stick and then select “Payment and Subscriptions.”

5. In “Payment and Subscriptions,” scroll down and select “Subscriptions.”

6. In “Subscriptions,” select “PlayStation Plus.”

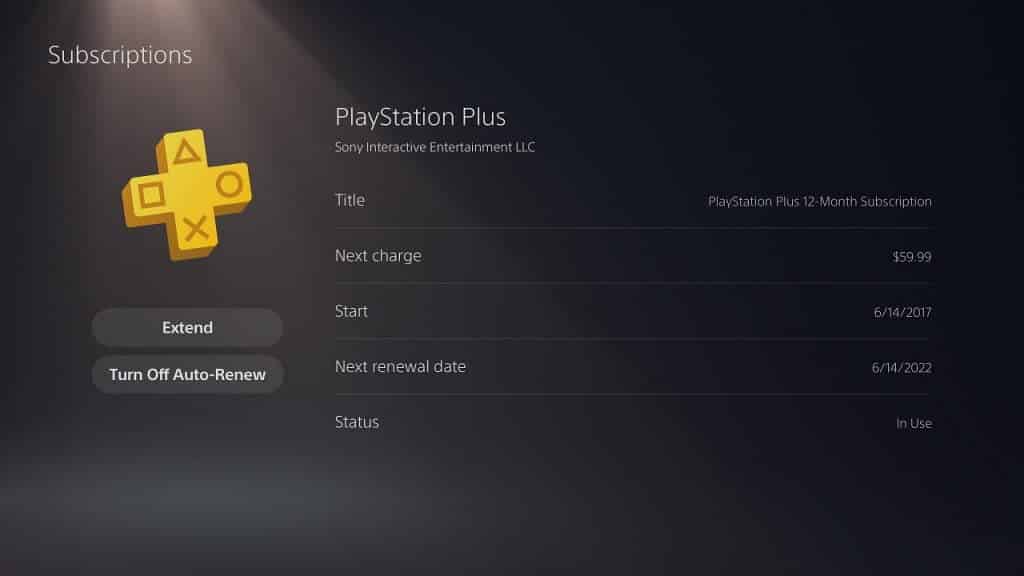
7. In the PlayStation Plus menu, you get to see the current membership status, including the start date, next charge date and next renewal date. In the same menu, you also have two options: “Extend” and either “Turn-Off Auto-Renew” or “Turn-On Auto-Renew.”

8. If you see “Turn-On Auto-Renew,” then you don’t have to do anything as your PlayStation Plus subscription is already set to disable automatic renewal.

9. If you see “Turn-Off Auto-Renew,” then you should select that option. You will then be prompted to confirm your action, which you can do by selecting “Yes.”

10. Afterwards, you will see a feedback page where you can give a reason as to why you want to disable automatic renewal. You can choose a reason or simply skip it. Either way, you need to select “OK” for the final confirmation.

11. If done correctly, you will be right back at the PlayStation Plus menu and you will see “Turn-On Auto-Renew” as an option.

12. If you want to turn automatic renewal back on, you simply select the “Turn-On Auto-Renew” option from the PlayStation Plus menu.

ASUS ZenWiFi AX (XT8) and AC (CT8) Safety Guide

When it comes to operating both the AX (XT8) and AC (CT8) models of the ASUS ZenWiFi Whole-Home Tri-Band Wi-Fi Mesh System, there are several precautions that you should take or you risk causing potential harm to the device as well as yourself.

This Seeking Tech guide will help you safely setup and operate the XT8 and CT8.

Operating Temperature and Humidity

Both the ASUS ZenWiFi AX and AC are designed to be operated between the temperature range of 32°F (or 0°C) and 104°F (40°C). Anything colder or hotter than the recommended range could cause some issues with the hardware. The humidity level should also be between 50% to 90%.

When not in use, you should also store the ASUS ZenWiFi Whole-Home Tri-Band Wi-Fi Mesh Systems in an environment with a temperature range between (or 0°C) and 158°F (40°C) in addition to a humidity level between 20% to 90%.

Placement

To protect the XT8 and CT8, ASUS recommends that you place the systems on an even and stable surface. Otherwise, the casing could end up cracking over time.

You should also avoid exposing both Wi-Fi Mesh Systems from being near water or moisture. As we stated above, the hardware can operate at a humidity level between 50% to 90%.

If you decide to mount either the AX or AC, ASUS suggests that you don’t hang it any higher than 2 meters off the ground (or 6.56 feet).

Surrounding Objects

ASUS recommends putting the ASUS ZenWiFi AX (XT8) and AC (CT8) in an open location for best performance. Having a lot of room is also ideal for the safety of both systems as well.

You should not put any objects on top of the hardware. Even if the object is light, it could cause issues such as overheating.

You should also avoid covering the vents, as the devices need them to dispel warm air away from its innards. Of course, you should also avoid stuffing any foreign objects into the systems.

Preventing Electric Shock

To prevent yourself from getting shocked, you should disconnect the power cable from the electrical outlet anytime you decide to move the ASUS ZenWiFi.

You should also avoid connecting any damaged cords, accessories and/or peripherals to the XT8 and CT8.

If the power adapter broke, it is best that you ask a qualified service technician or retailer for repair unless you are qualified to do so yourself.

Radiation and Radio Frequency Exposure

Both devices are in compliance with the FCC’s radiation exposure limit in addition to being under the Innovation, Science and Economic Development Canada radio frequency exposure limits. With that said, ASUS still recommends that you out some distance between you and both ZenWiFi Whole-Home Tri-Band Wi-Fi Mesh Systems.

For the AC (CT8), you need a distance of at least 28 cm (or 11.02 inches). For the AX (XT8), you need a distance of 30 cm (or 11.81 inches).

You can find the exact safety verbage of both ZenWiFi Whole-Home Tri-Band Wi-Fi Mesh Systems in the following manuals: