Xbox Elite Wireless Controller Series 2 settings for Exoprimal

To improve your performance in Exoprimal, you can try using the Xbox Elite Wireless Controller Series 2. You can take a look at this guide to see what the best settings are to use for this gamepad when it comes to playing this multiplayer third-person shooter.

P1, P2, P3 and P4 Button Assignments

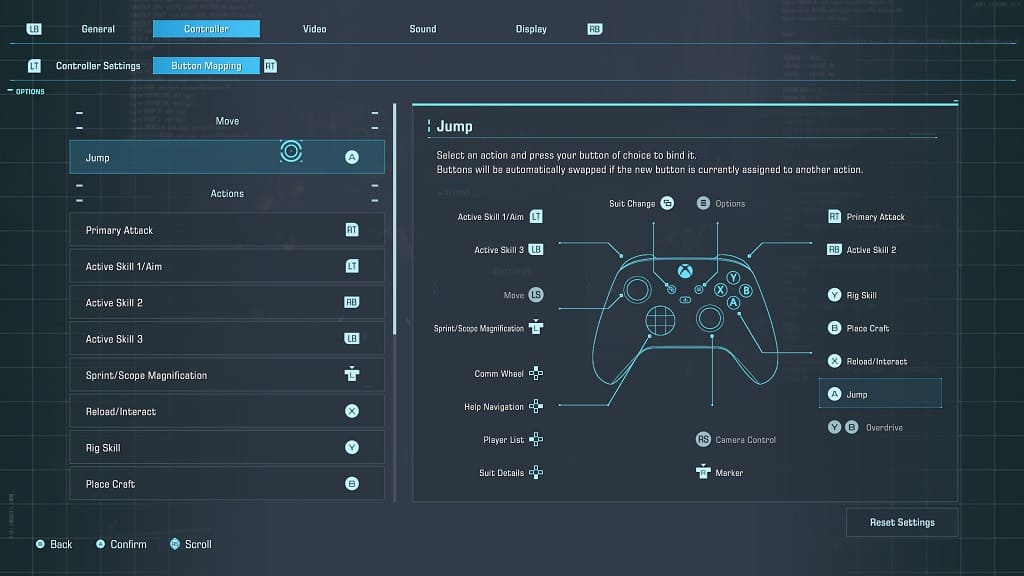
You can find the default Xbox button layout for Exoprimal below:

  • A: Jump
  • RT: Primary Attack
  • LT: Active Skill #1 or Aim
  • RB: Active Skill #2
  • LB: Active Skill #3
  • Left Stick Button: Sprint or Scope Magnification
  • X: Reload or Interact
  • Y: Rig Skill
  • B: Place Craft
  • Y and B: Overdrive
  • View: Suit Change
  • Up Directional Pad: Comm Wheel
  • Right Directional Pad: Help Navigation
  • Left Directional Pad: Player List
  • Down Directional Pad: Suit Details
  • Right Stick Button: Marker

When it comes to the four back buttons, we recommend assigning the Left Analog Stick button to P4 and the Right Analog Stick button to P2. This will make it so that you can use the back buttons to sprint and set a marker, which feels more natural and responsive than having to press down on an analog stick.

We then assign the LB and RB buttons to the two remaining back buttons. Doing so frees up our index fingers to be used exclusively for the LT and RT triggers.
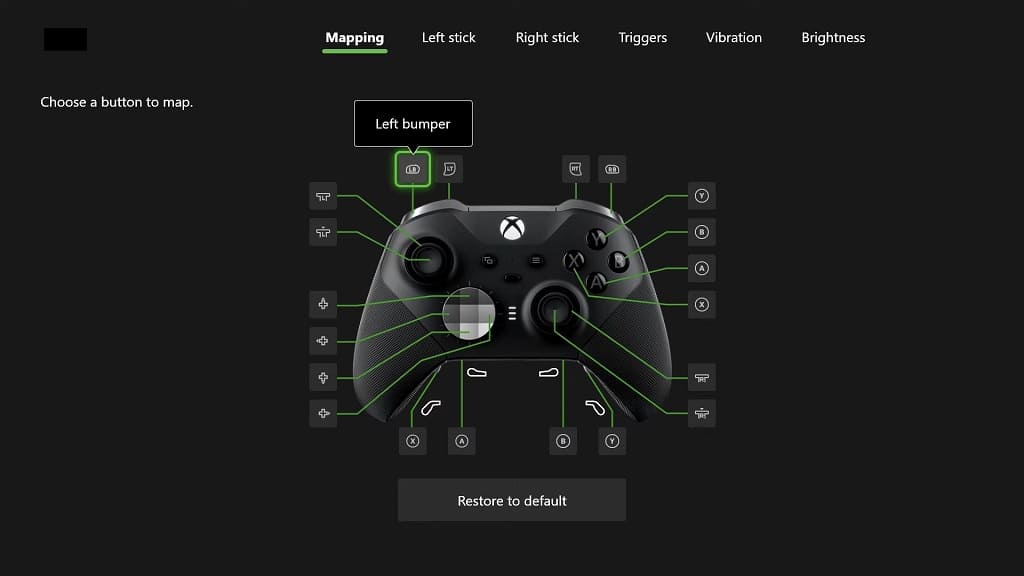
For additional button mapping changes, you can go to the Settings > Controller > Button Mapping menu in Exoprimal.

Trigger Locks

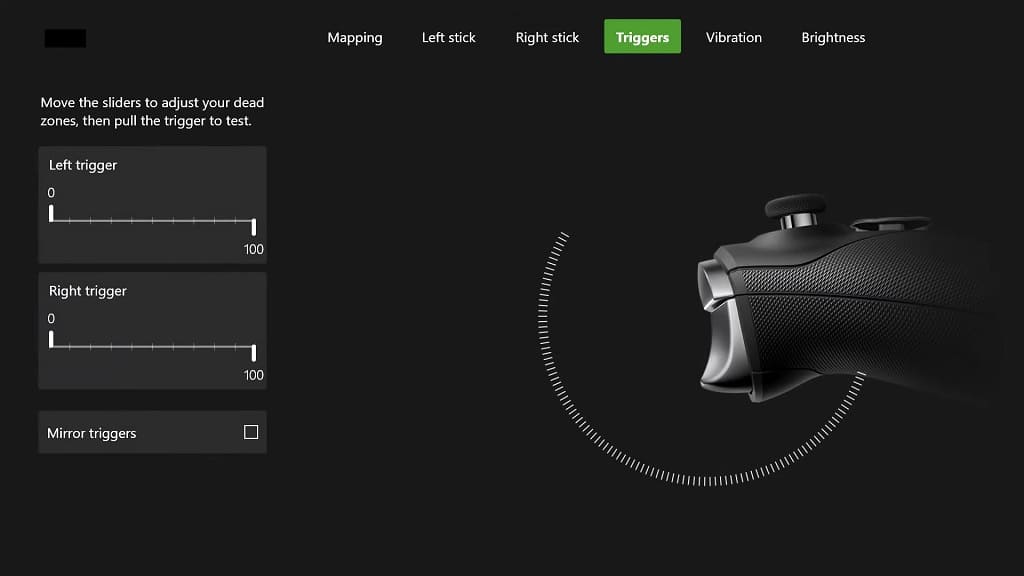
To get a faster response when using the LT button to use a skill/aim or the RT button to use a primary attack, we recommend that you move the trigger locks on the backside of the Xbox Elite Wireless Controller Series 2 all the way down.

You can also head over to the Triggers menu of the gamepad in order to change the deadzone if you want the triggers to be even more sensitive.
Sensitivity and Deadzones

We found aiming to be a little stiff when using the right analog stick in Exoprimal under the defualt settings. Thankfully, you can go to the Settings > Controller > Controller Settings menu in the game to change the sensitivity, deadzone, acceleration delay and stick response curve.
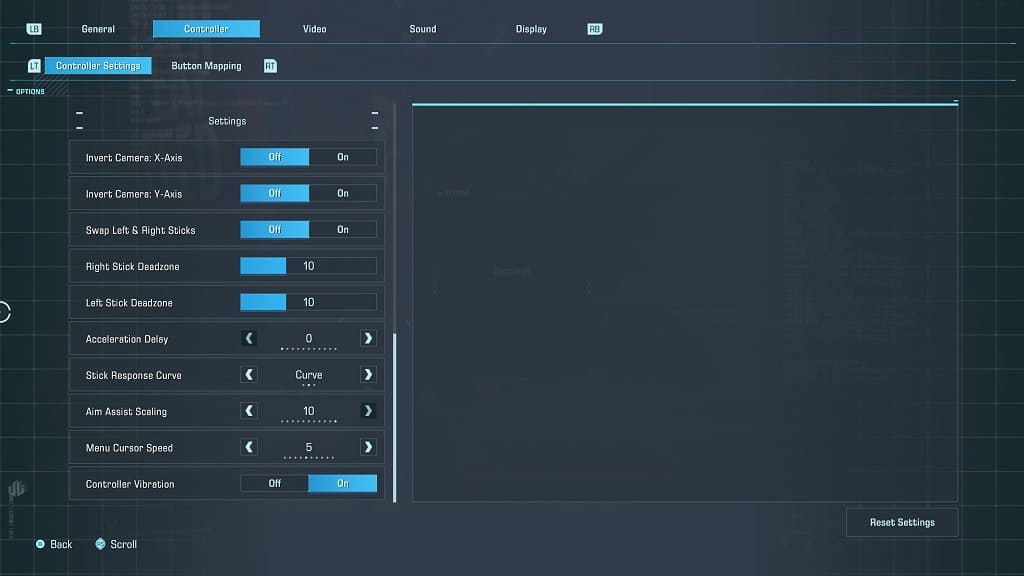
Of course, you can also head over to the Right Stick menu of the Xbox Elite Wireless Controller Series 2 for further fine tuning.

You may need to play around with the right analog settings for a little bit until you get the correct parameters where your aiming feels quick and natural.

Wired Connection

If you haven’t done so already, we recommend that you plug in the Xbox Elite Wireless Controller Series 2 to your Xbox console. This is because a wired connection should produce less input lag when compared to using the same gamepad over wireless communication.

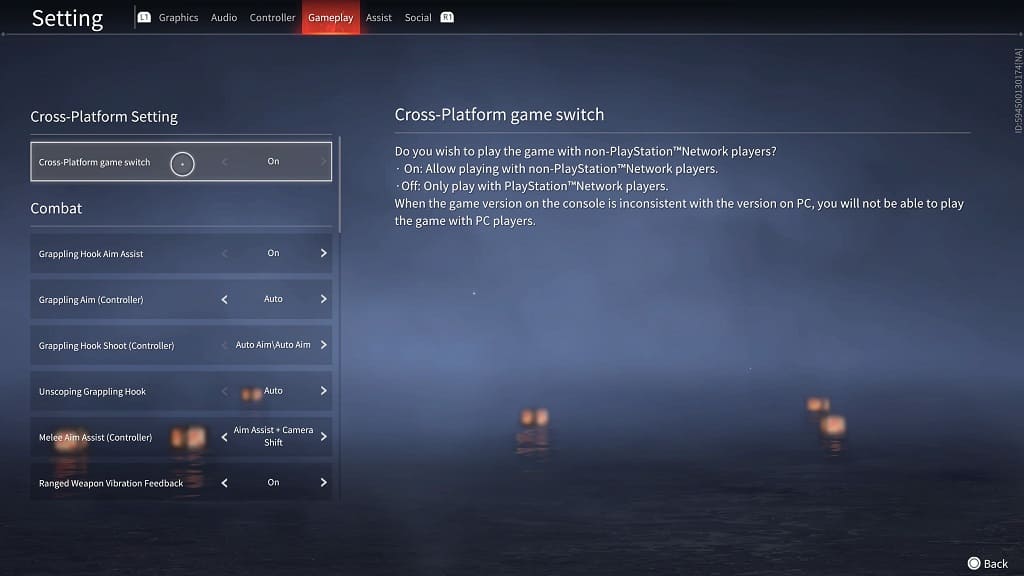
How to turn off cross play in Naraka Bladepoint

By default, cross-platform play is enabled is Naraka: Bladepoint as players on PC, PlayStation 5, Xbox One, Xbox One S, Xbox One X, Xbox Series S and Xbox Series X are able to match up with each other.

If you want an even playing field in this battle royale game, then you might want to consider turning off cross-play. If you are interested in disabling this feature, then you can take a look at this tutorial from Seeking Tech.

1. For the first step, you need to open the in-game menu.

If you are playing with a PlayStation controller such as the DualSense or DualShock 4, then you can do so by pressing and holding the Options button.

If you are playing with an Xbox controller such as the Xbox One or Xbox Series gamepads, then you need to press and hold the Menu button.

2. In the pop-up menu that appears in the middle of the screen, you then need to select Setting.

3. Once you get to the Setting menu, select use the L1 and R1 buttons on the PlayStation controller or LB or RB buttons on the Xbox controller to make your way to the Gameplay tab.

4. The top option in the Gameplay tab should be Cross-Platform Game Switch.

5. Make sure that the Cross-Platform Game Switch setting is set to Off.

6. If you try to disable cross-play on the Xbox One, Xbox One S, Xbox One X, Xbox Series S or Xbox Series X of Naraka Bladepoint, then you won’t be able to do so from the in-game menu.

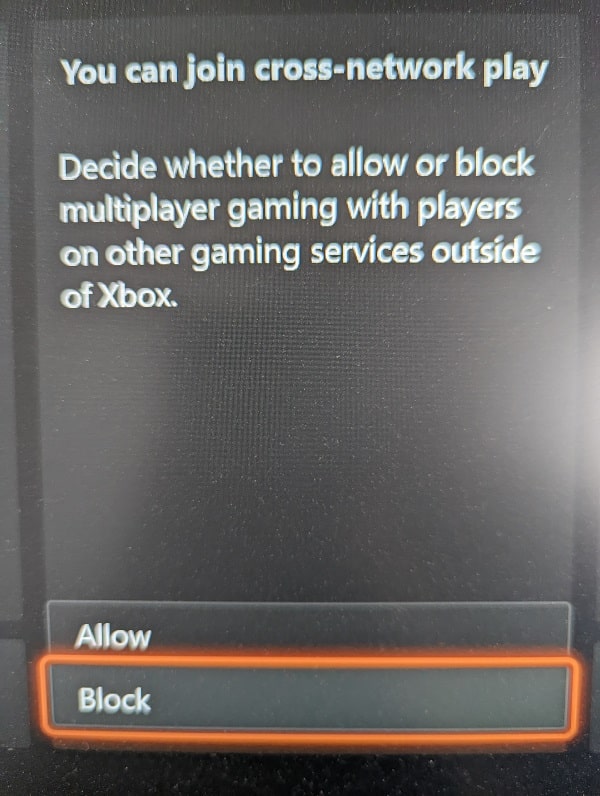
Instead, you need to open the Settings menu of your Xbox console and then select Account > Privacy & online safety > Xbox privacy > View details & customize > Communication & multiplayer.

From the “Account – Communication & multiplayer for [your Xbox Live username]” menu, make sure that the “You can join cross-network play” setting is set to Block.

How to disable adaptive triggers in Naraka Bladepoint on PS5

By default, the PlayStation 5 version of Naraka: Bladepoint supports adaptive triggers. If you find that this feature to be annoying and/or causing you to miss your shots when using a long-range weapon, then you can check out this guide to see how you are able to disable this feature.

Method #1

For the first solution, you can use the in-game Setting menu by taking the following steps:

1. While playing Naraka Bladepoint, press and hold the Options button on the DualSense controller to bring up the in-game menu.

Keep in mind that this online game won’t pause while you are using the menus; therefore, you will be vulnerable if your enemies spot you.

2. In the pop-up menu, select Controls.

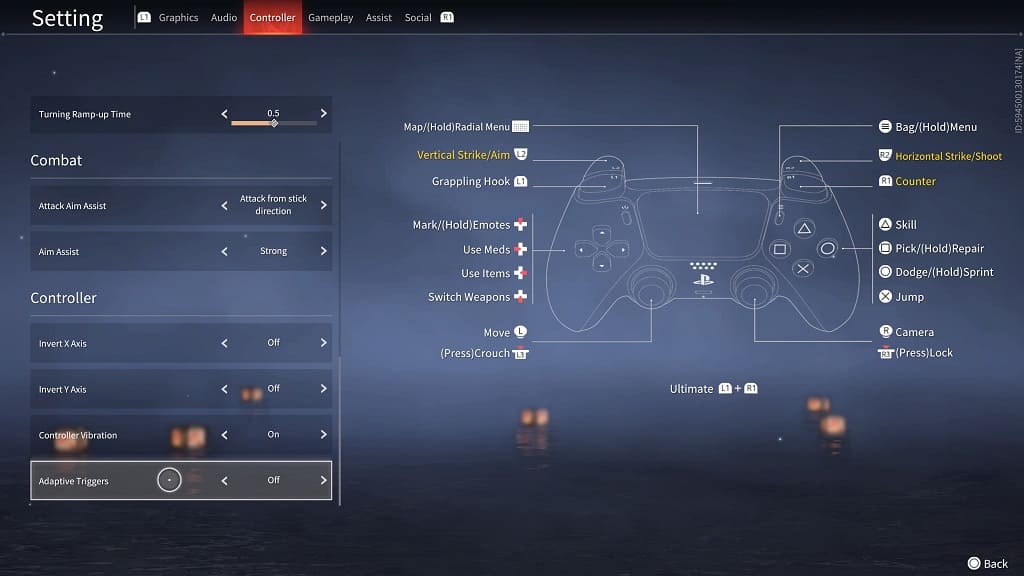
3. From the Controller tab of the Settings menu, use the right analog stick of the DualSense to scroll all the way down to the bottom. You should be able to find the Adaptive Triggers setting.

4. Move the menu cursor to the Adaptive Triggers setting and then use left or right directional pad to turn it off.

5. With adaptive triggers disabled, back out of the Controller tab in the Settings menu and then return to the game.

You should no longer notice any resistance when firing a long-range weapon.

Method #2

For the second solution, you can disable the adaptive trigger feature for all PS5 games by doing the following:

1. Head to the home screen of your PlayStation 5 console by pressing and holding the PS button on the DualSense.

2. From the home screen, head into the Settings menu by select the gear cog icon on the upper right corner.

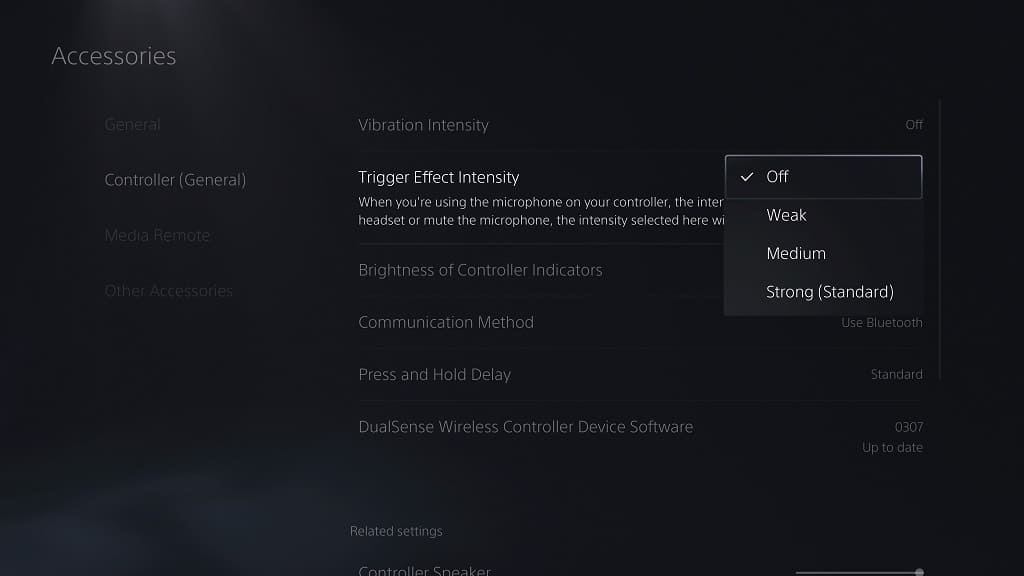
3. Inside of Settings, scroll down and select Accessories.

4. After getting to the Accessories menu, select Controller (General) on the left side and then Trigger Effect Intensity of the right side of the same screen.

6. Make sure that the Trigger Effect Intensity setting is set to Off.

Recommended Samsung CU8000 settings for PS5, Xbox Series X and S

The CU8000 is an entry level 4K television set released by Samsung in 2023. If you have this TV and would like to optimize it for the PlayStation 5, Xbox Series X and/or Xbox Series S, then you can follow this guide from Seeking Tech.

Model Numbers

This guide is based on the 43-inch, 50-inch, 55-inch, 65-inch, 75-inch and 85-inch versions of the Samsung CU8000, which should include the following model numbers:

43″:

  • UN43CU8000
  • UN43CU8000FXZA

50”:

  • UN50CU8000
  • UN50CU8000FXZA

55”:

  • UN55CU8000
  • UN55CU8000FXZA

65”:

  • UN65CU8000
  • UN65CU8000FXZA

75”:

  • UN75CU8000
  • UN75CU8000FXZA

85”:

  • UN85CU8000
  • UN85CU8000FXZA

Supported CU8000 Console Gaming Features

With the 43-inch, 50-inch, 55-inch, 65-inch and 75-inch screen sizes of the CU8000, the following features are supported when it comes to playing games on the PlayStation 5, Xbox Series X and Xbox Series S:

  • Auto Low Latency Mode
  • HDR10
  • Up to 60 frames per second

If you have the 85-inch version of this CU8000, then you will also be able to use Variable Refresh Rate in addition to playing games at up to 120 frames per second.

Recommended CU8000 settings

To get the most out of the Samsung CU8000 when it comes to playing PS5, Series X and/or Series S games, you need to take the following steps:

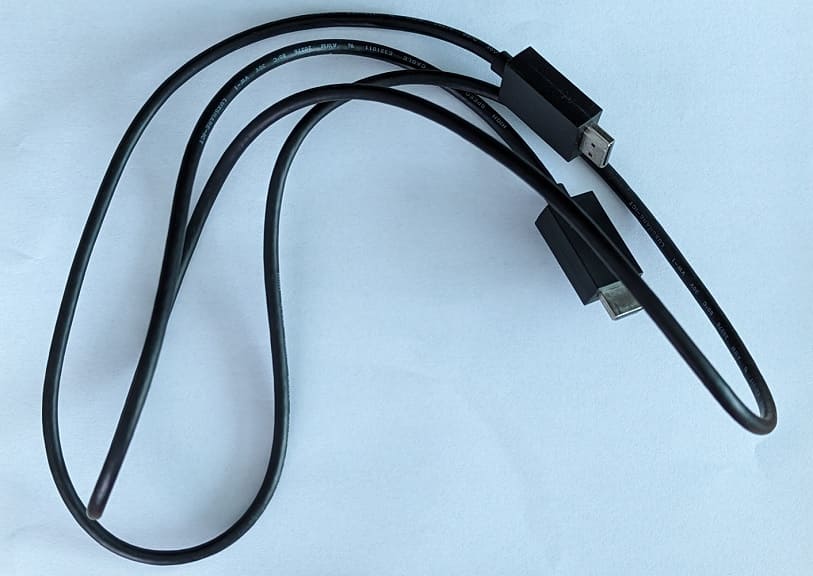
1. Connect your console to the TV if you haven’t done so already. Make sure you use the HDMI cable that came with your PlayStation 5, Xbox Series X and/or Xbox Series S for the best compatibility.

2. Next, you need to use your television remote to make your way over to the External Device Manager menu.

From there, select Input Signal Plus and then make sure that this feature is enabled for the HDMI port that is connected to your console.

3. From the same External Device Manager menu, select Game Mode and then make sure Game Mode is set to On.

By enabling Game Mode, the input lag should be reduced when playing videogames. For the 85-inch CU8000, this mode should automatically turn on the Variable Refresh Rate feature as well.

4. You should also make sure that the Color Space is set to Auto in the Color Space Settings menu of your television set.

5. The next step you should take is to go to the Settings menu of your console.

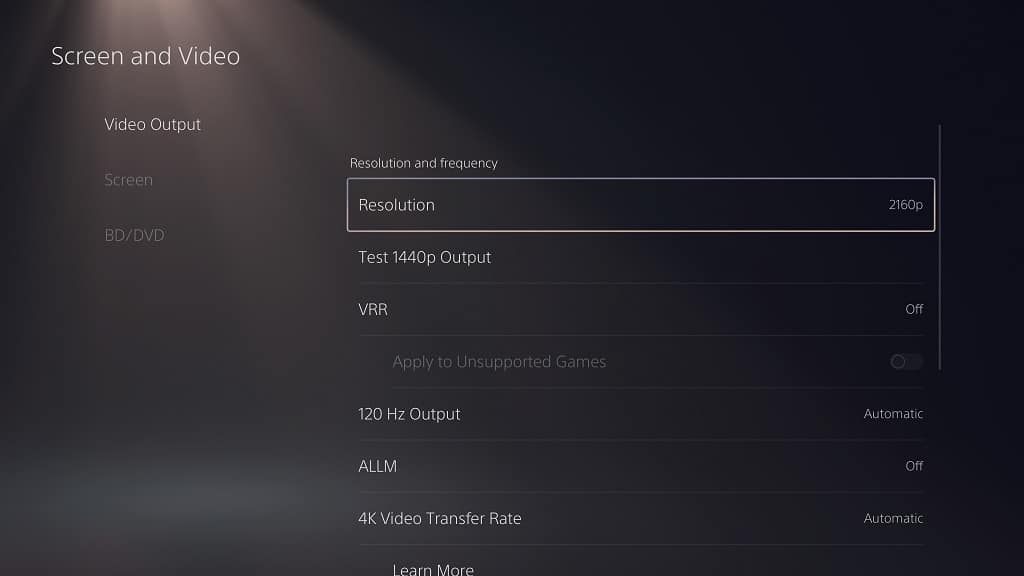
On the PlayStation 5, go to Screen and Video > Video Output.

Afterwards, you should make sure that the following is set to Automatic:

  • ALLM
  • 4K Transfer Rate
  • Deep Color Output
  • RGB Range

If you have the 85-inch set, then you should also set 120 Hz and Variable Refresh Rate to Automatic as well from the Video Output menu as well.

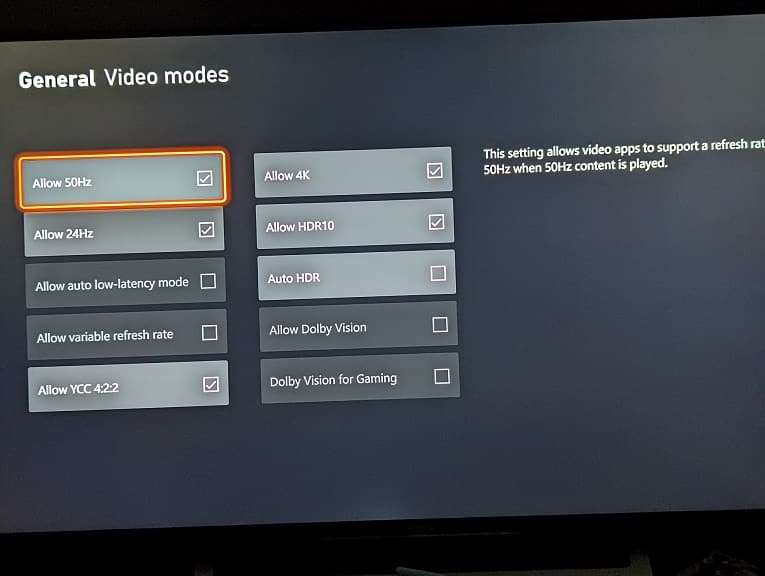
For the Xbox Series X and Xbox Series S, navigate over to General > TV & Display Options > Video Modes.

You should then make sure that the following settings are selected:

  • Allow Auto-Low Latency Mode
  • Allow 4K
  • Allow HDR10

If you are using the 85-inch screen size variant, then you should also select the Allow Variable Refresh Rate option in the Video Modes menu as well.

6. You then need to optimize the HDR brightness output.

To do so from the PS5, go back to the Settings > Screen and Video > Video Output menu and then select Adjust HDR.

On the Series X and Series S, return to the Settings > General > TV & display options menu and then select Calibrate HDR for Gaming.

In both cases, you should see instructions appear on the TV screen that will direct you on how to adjust the HDR brightness output.

7. You should now be done with setting up your television set. With that said, you can use the Picture Clarity Settings of your CU8000 to make some of the games look smoother.

In this menu, you can use Judder Reduction for games that run at 30 fps. You can also use the LED Clear Motion feature from the same screen to add black frame insertion.

Both of these are completely optional as the effects vary from game to game.

How to find the missing Exoprimal alpha variant exosuits

The Overdrive Kit 1 pack for Exoprimal comes with the following variants:

  • Deadeye α
  • Zephyr α
  • Barrage α
  • Vigilant α
  • Roadblock α:
  • Krieger α
  • Murasame α
  • Witchdoctor α
  • Skywave α
  • Nimbus α

If you can’t seem to locate these DLC suits, then you can check out this troubleshooting guide from Seeking Tech.

1. To start off, it is important to note that the aforementioned alpha variant exosuits won’t be made available until the first title update for Exoprimal. The first major patch is currently scheduled for August 16, 2023.

If that date hasn’t passed yet, then you simply need to wait until the title update arrives before gaining access to the new suits.

2. If you have the latest patch downloaded after the aforementioned date but the alpha variant exosuits are still missing, then you should check to see if you have the DLC properly installed.

If you are playing on PlayStation 5, for instance, you need to open the home screen of your console and then move the menu cursor over to the Exoprimal icon. Afterwards, press the Options button on the controller and then select Manage Game Content.

On the Xbox consoles, move the menu cursor over to the Exoprimal icon on the guide menu or home menu. Next, you need to press the Menu button on the controller and then select Manage Game and Add-Ons. Finally, select the top option on the right side of the Manage – Exoprimal screen.

Try to look to see if you have the Early Unlock Ticket Pack 1 downloaded and installed as that should contain the variants.

3. If you still can’t find the suits, then you can try uninstalling the game and/or DLC pack. Afterwards, re-download the game and/or DLC pack to see if doing so will make the alpha variant exosuits appear.

4. One last step you can take is to contact Capcom directly. When doing so, make sure you have your Capcom ID information as well as your proof of purchase.

You should be able to contact the company with this link.

How cross save and cross progression works in Exoprimal

Exoprimal supports cross save and cross progression. To see how these features work in this online multiplayer game, you can take a look at this guide from Seeking Tech.

Limitations

While Exoprimal supports cross save and cross progression, you are limited by ecosystem.

The Xbox One, Xbox One S, Xbox One X, Xbox Series S, Xbox Series X and Windows PC versions support the same progression with each other.

If you are playing on the PlayStation ecosystem, then you can only share your progress between the PlayStation 4, PlayStation 4 Pro and PlayStation 5 versions.

If you have the Steam version, then you won’t be able to carry your progress to any of the other versions of the same game.

How cross save works in Exoprimal

The player’s progress is saved through the Capcom ID cloud storage. So, in order to transfer your save data, all you need to do is log into the appropriate accounts on the new platform.

In the Xbox ecosystem, you should be using the same Xbox Live account and Capcom ID to log into the Exoprimal servers.

For the PlayStation ecosystem, you need to use the same PlayStation Network account and Capcom ID.

Any changes you made in the Settings menu on the original platform won’t be carried over to the new platform. For this data, you need to use the PlayStation Plus or Xbox Live cloud storage servers for transfers. Alternatively, you can simply adjust the Settings on the new platform to match your customize preferences from the old platform.

Can add-on content be carried over between different versions?

Any add-on content you purchased should be carried over to a different version of the game as long as you are in the same ecosystem.

Therefore, DLC you bought with your Xbox Live account should unlock for the Xbox One, Xbox One S, Xbox One X, Xbox Series S, Xbox Series X and Windows PC versions.

The DLC you purchased with a PSN account should work for the PS4, PS4 Pro and PS5 versions.

Will achievement progress carry over?

Thanks to the Smart Delivery feature, Exoprimal achievements should carry over if you are playing the game on the Xbox ecosystem.

Will trophy progress carry over?

Your trophy progress won’t automatically carry over from the PlayStation 4 to the PlayStation 5 and vice versa.

With that said, you may be able to unlock specific trophies after finishing the first wargame session on the new platform and then viewing the results screen. Any progress-based trophies you previously earned on the original platform may unlock on the new platform.

How to fix brightness issues in Exoprimal on PS5, Xbox Series X and S

You may find that some of the environments in Exoprimal videogame to be overly bright, too dark or look washed out.

To see how you can fix the brightness issues with the PlayStation 5, Xbox Series X and Xbox Series S versions of this multiplayer third-person shooter, you can take a look at this troubleshooting article from Seeking Tech.

1. To start off, we recommend that you try re-calibrating the HDR output of your console.

You can do so on the PS5 by going to the system’s Settings menu and then selecting Screen and Video > Video Output > Adjust HDR.

If you are playing on Xbox Series X or Xbox Series S, then you need to make your way to its Settings menu, where you should then select General > TV & display options > Calibrate HDR for gaming.

Follow the directions on the screen to re-calibrate the HDR output and then see if any of brightness problems you encountered previously have gone away in Exoprimal.

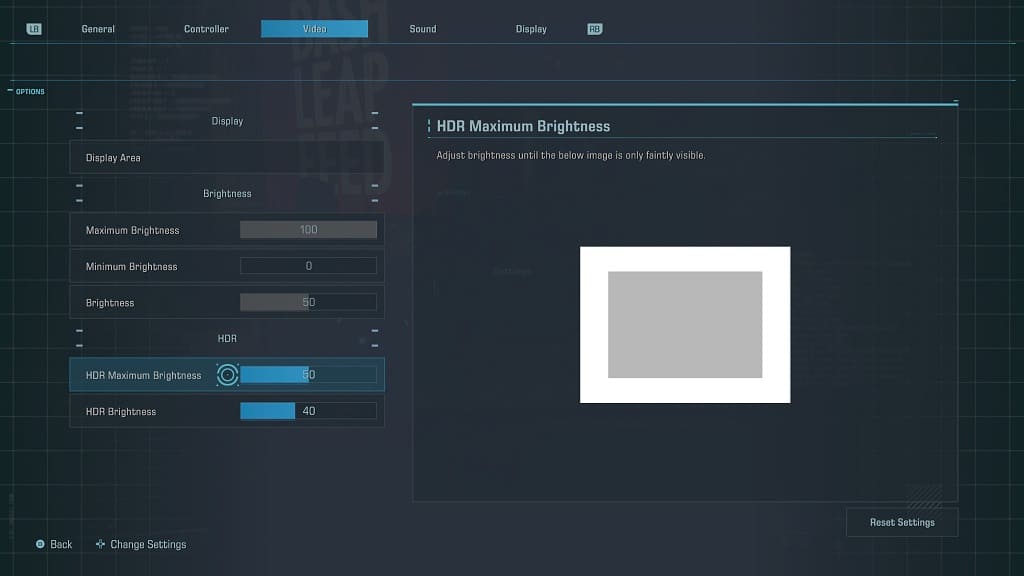
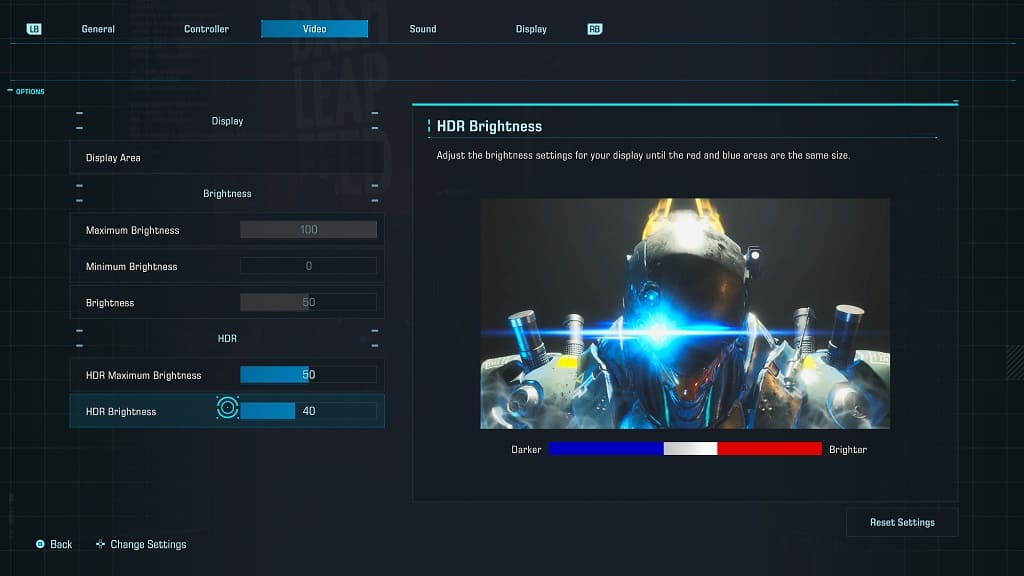
2. If the HDR brightness still looks off to you, then you need to head over to the Options > Settings > Video menu in the game. From there, you should be able to see the HDR Maximum Brightness and HDR Brightness sliders.

By default, the HDR Maximum Brightness setting is set to 50 while the HDR Brightness setting is set to 40. Try changing these values and then returning to gameplay to see if you can get better visibility.

You may have to go back to this screen frequently when moving from a dark area to a bright area or vice versa.

3. If the HDR still does not look quite right, then you can try playing Exoprimal in SDR.

In order to disable HDR on the PS5, you need to head over to the console’s Settings menu and then select, Screen and Video > Video Output > HDR. Afterwards, set the HDR setting to Off.

On the Series X or Series S, make you way to the system’s Settings menu and then navigate towards General > TV & display options > Video modes. From there, make sure that the Allow HDR10, Auto HDR and Dolby Vision for Gaming settings are not selected.

After disabling HDR, restart Exoprimal. Afterwards, go back to the Options > Settings > Video menu in the game. In the Brightness section, you should now be able to adjust the Maximum Brightness, Minimum Brightness and Brightness levels.

4. If the brightness still does not look right, then you can try playing the game on another screen.

How to fix aiming issues in Exoprimal

You may find that the default controls of Exoprimal when using a gamepad to be a little stiff when it comes to aiming. To see how you can get a better feel when using your weapons and abilities, you can take a look at this guide from Seeking Tech.

1. To begin, you need to head over to the Settings menu.

If you already loaded into your save file, then you need to press the Options button on the PlayStation controller or Menu button on the Xbox Controller. In the pop-up menu, you then need to select Settings.

2. In the Settings menu, head over to the Controller sections.

You are able to change sections by using the L1 and R1 buttons on the PlayStation pad or LB and RB buttons on the Xbox pad.

3. In the Controller section, you should be viewing the Controller Settings tab. If you are viewing the Button Mapping tab instead, then you need to press L2 or R2 to switch to the proper location.

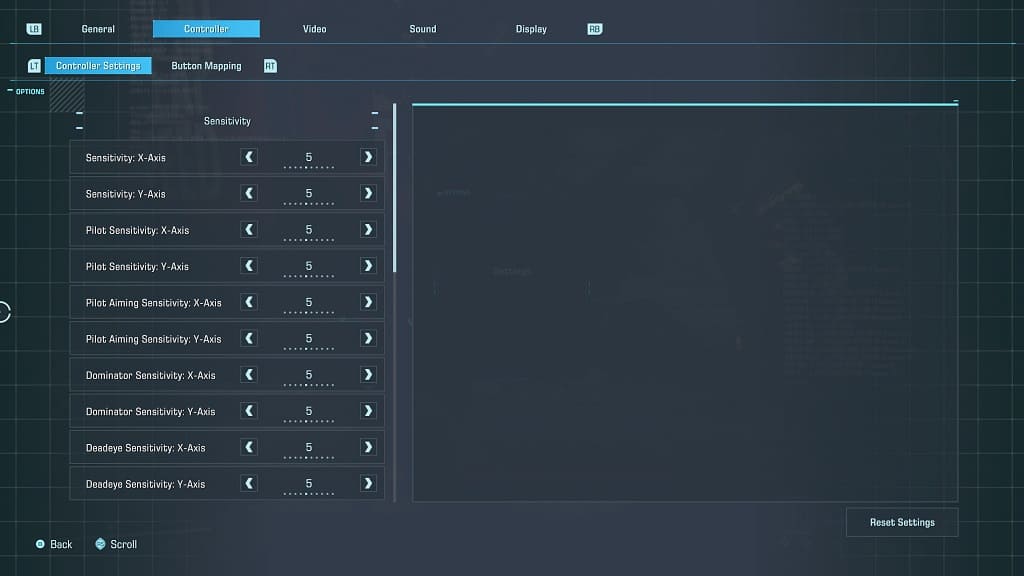
4. From the Controller Settings tab, you will be able to adjust the following Sensitivity settings when it comes to aiming:

  • Sensitivity: X-Axis
  • Sensitivity: Y-Axis
  • Pilot Aiming Sensitivity: X-Axis
  • Pilot Aiming Sensitivity: Y-Axis
  • Dead Eye Sensitivity: X-Axis
  • Dead Eye Sensitivity: Y-Axis
  • Vigilant Scope Sensitivity (x2.0): X-Axis
  • Vigilant Scope Sensitivity (x2.0): Y-Axis
  • Vigilant Scope Sensitivity (x3.0): X-Axis
  • Vigilant Scope Sensitivity (x3.0): Y-Axis

5. If you scroll further down the same screen, you will also be able to adjust the following when it comes to aiming sensitivity:

  • Right Stick Deadzone
  • Acceleration Delay
  • Stick Response Curve
  • Aim Assist Scaling

6. Any time you make changes in the Controller Settings tab, make sure you test out the new aiming configurations in the game.

It may take a little bit of testing to get the aiming in Exoprimal to feel more natural.

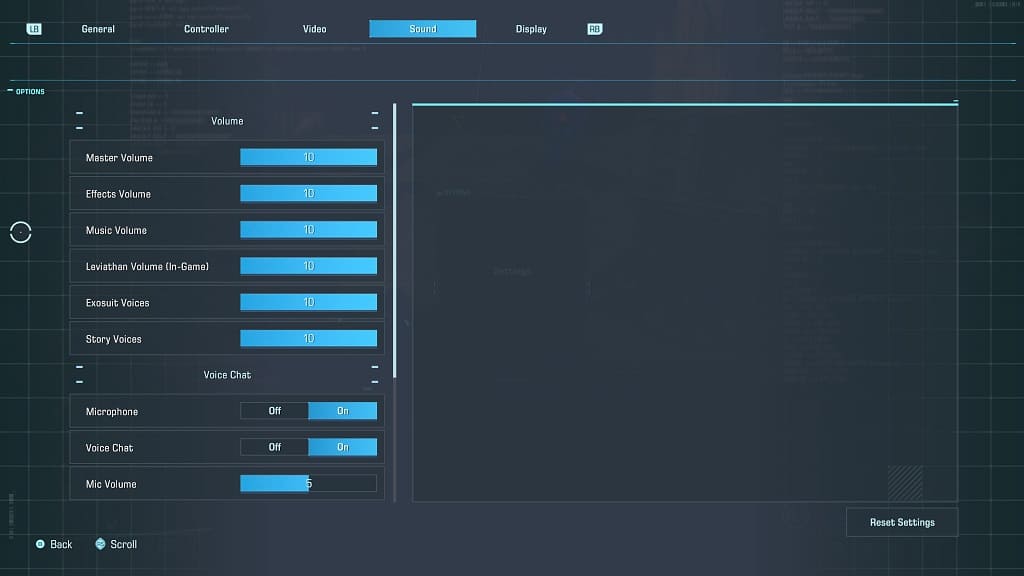
How to fix audio mix issues in Exoprimal

You may notice that some sound elements in Exopimal may sound too low. For example, you can find that the voices may get drowned out by the background music or special effects.

To see how you can fix the audio mix in this third-person shooter, you can take a look at this tutorial from Seeking Tech.

1. To change the sound mix, you need to first open up the Options menu.

This can be done by pressing the Options button on the DualShock 4 and DualSense or the Menu button on the Xbox Series and Xbox One controllers.

2. In the pop-up Options menu, you need to move the cursor with the left analog stick to point it to Settings and then select it by pressing the X button on a PlayStation controller or the A button on an Xbox controller.

3. In the Settings menu, use the L1 and R1 buttons on PlayStation or LB and RB buttons on Xbox to change tabs until you get to Sound.

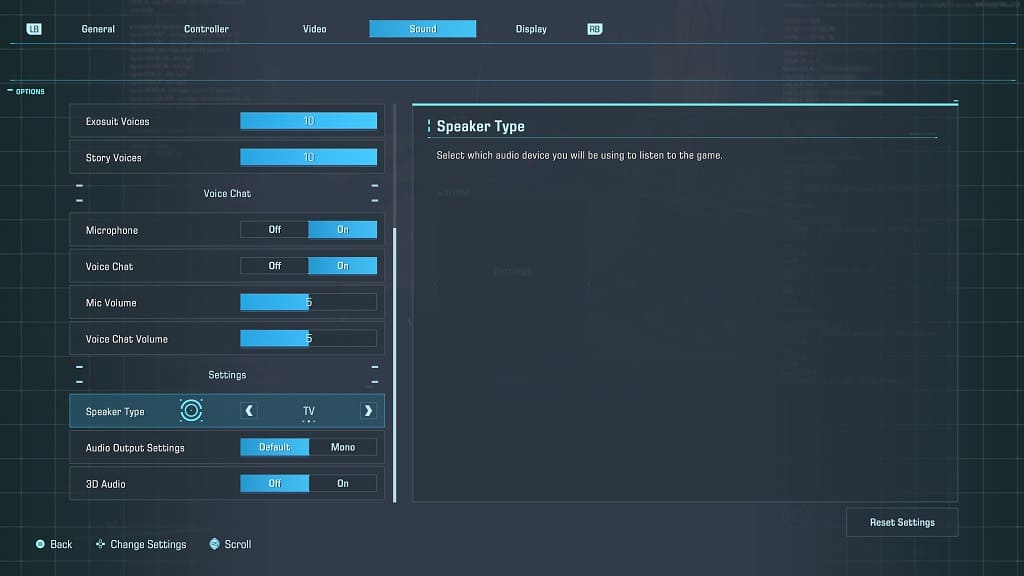
4. After getting to the Sound tab, scroll all the way down to the Settings section.

5. From there, make sure you have the correct Speaker Type selected. You will be able to switch between Home Theater, Speaker and Headphones.

6. You can also try toggling the 3D Audio option On if you previously have it disabled or vice versa to see if you are able to get a better audio mix.

7. If certain audio components in Exoprimal still sounds off, then you can return to the Options > Settings > Sound menu.

At the top of this screen, you will be able to manually adjust the volume for the following:

  • Master Volume
  • Effects Volume
  • Music Volume
  • Leviathan Volume (In-Game)
  • Exosuit Voices
  • Story Voices

If you have a hard time hearing the dialogue, for example, then you can try turning down the effects and music volumes while keeping the exosuit and story voice volumes at the highest level.

How to reduce the PlayStation VR2 screen door effect

When playing certain games with the PlayStation VR2, you may notice that there is a screen door effect. To see how you can potentially reduce this visual filter, you can take a look at this guide from Seeking Tech.

What is the screen door effect?

When you are looking through the PlayStation VR2 lens, you may notice that there is a grid overlay placed on top of the image. As a result, the graphics may appear as if you are looking through a screen door.

This effect occurs due to your eyes being extremely up close on the screen in the VR headset. You will notice the same effect if you look up close to your computer monitor and/or television screen.

The grids are actually tiny pixels that aren’t noticeable if you are looking at your monitor and/or TV at a normal viewing distance. Because you are looking up close at the lens of the PS VR2, the screen door effects become more noticeable.

Although the PlayStation VR2 has a resolution of 2000 x 2040 pixels per eye, which is significantly more than the 960 × 1080 pixels per eye of the first PS VR headset, the grid like filter can still be visible in certain virtual reality titles.

How to reduce the screen door effects in PlayStation VR2 games

The screen door effect varies on a game-by-game basis as some titles are more susceptible than others.

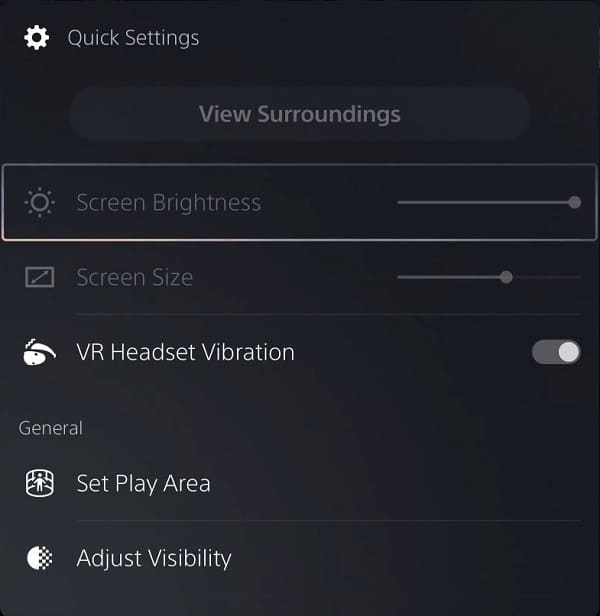
In some cases, you may be able to make the grids less visible by adjusting the brightness level. In order to do so, we suggest that you first look for the brightness slider from the in-game menu for the game you are playing.

If you aren’t able to adjust the brightness by using the in-game menu, then you can press the PS button on either the Left or Right PlayStation VR2 Sense Controller. From there, select the PlayStation VR2 Quick Settings card. You should then be able to adjust the brightness output of the VR headset.

If the brightness option is greyed out, then you should make sure that you are wearing the PlayStation VR2 first before entering the PlayStation VR2 Quick Settings menu.