What to do if the Xbox Series X or S Guide Menu is not showing up

By pressing the Xbox logo button on your controller, you should be able to get the Xbox Guide menu to show up. If you don’t see the quick menu appear, then you can check out this troubleshooting article to see how you can potentially fix your problem.

1. The guide menu issue may be related to the game you are currently playing. In this case, the first step you can take is to restart your console.

In order to do so, you need to press and hold the Xbox button on your controller. You should then see a “What do you want to do?” notification. From there, select the Restart Console option.
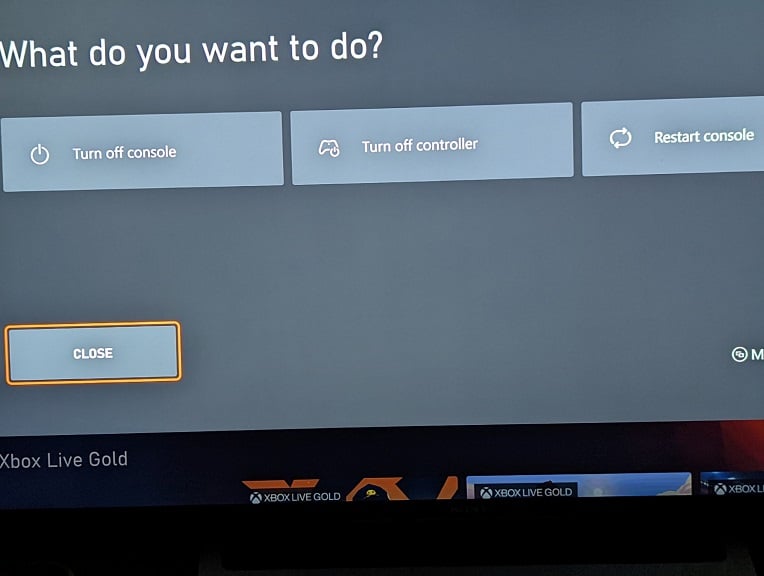
After restarting your Xbox Series X or Xbox Series S, press the Xbox button to see if you are able to get the Guide menu to show up.

2. If you still can’t get the Guide menu to appear, then you can try quitting the game that you are currently playing. In order to do so, you need to do the following:

  • In the Home menu of your Series X or Series S, hover over the game that you currently have suspended.
  • Next, you need to press the Menu button, which has the three horizontal lines, on your controller.
  • In the pop-up menu, select the Quit option to completely close the game.
  • Afterwards, press the Xbox button to see if you are able to bring up the Guide menu.

3. You can also try clearing the cache of your console by doing a power cycle. In order to do so, you can take the following steps:

  • To start off, you need to turn off your console. You can do so, by long pressing the Xbox button on your controller and then select the Turn Off Console option. Alternatively, you can press the Xbox power button located on the console to turn it off.
  • Once the system has been shut down, unplug the power cord.
  • With your Xbox Series X or Xbox Series S unplugged, you then need to wait for at least 2 minutes.
  • After at least 2 minutes have passed, you can plug the power cord back into the console.
  • Next, you need to power on the gaming system again.
  • Once the Series X or Series S have booted up, trying pressing the Xbox button to see if you are able to bring up the Guide menu.

4. You can also try connecting another controller and then pressing its Xbox button. If the other game pad works, then there may be a problem with your current controller.

How to turn off the sleep mode for Xbox Series X and S

When you try to shut down your Xbox Series X or Xbox Series S console, the system may go into sleep mode instead. To see how you can disable this low power state mode, you can follow the steps laid out in this tutorial at Seeking Tech.

What are the benefits of using sleep mode?

If you decide to leave sleep mode on, then you can boot up your Xbox Series X and Xbox Series S faster when compared to cold booting the console after it has been completely shut down. This can be helpful if you can’t currently save your progress in a video game but don’t want to leave your system turned completely on while you are away.

You will also be able to remotely turn on your system by using the official Xbox app from another device.

What are the issues associated with using sleep mode?

The main problem with using sleep mode is that it will use a lot more power consumption. According to Microsoft, this low power state mode can consume around 20 times more power as opposed to using the normal shutdown method.

As a result, your gaming system will end up costing you on your energy bill even if you aren’t actively using it.

You may also experience crashes or other problems with certain games when using the sleep mode of your Xbox Series X or Xbox Series S.

Due to the increased power consumption and potential glitches, we recommend that you avoid using sleep mode whenever possible.

How to disable sleep mode

If you want to disable the sleep mode on your Xbox Series X or Xbox Series S console completely, then you need to take the following steps:

1. To start off, make sure you have the latest firmware downloaded as the ability to fully disable sleep mode was added through a new update.

If you haven’t done so already, then you need to turn on your console, connected it to the Internet and then open the Settings App.

From there, you need to go to System > Updates. If there is a new console update available, make sure you download and install it to your Xbox Series X or Xbox Series S.

2. With your console updated, go back to the front page of the Settings App.

3. On the left column of the first Settings page, you need to select General.

4. On the right side of the same screen, you need to select Power Options.

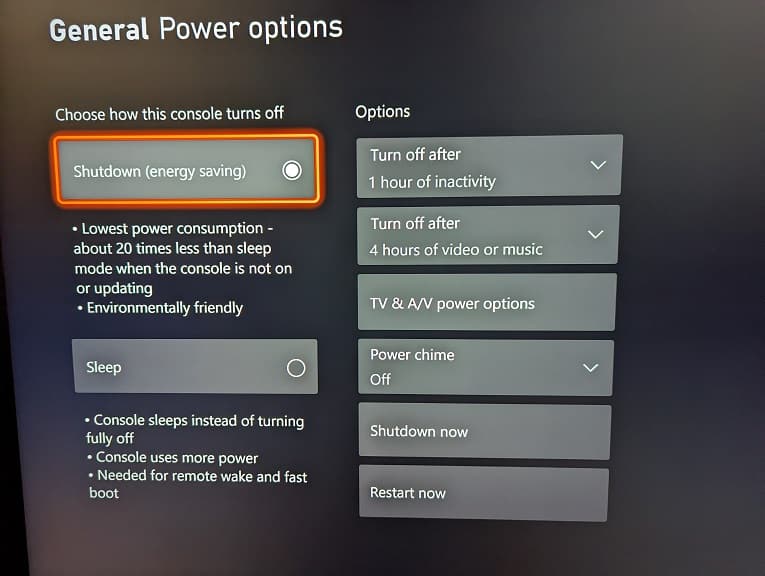
5. In the General – Power Options menu, you should see the “Choose how this console turns off” column. From there, make sure you select the Shutdown (Energy Saving) option.

The next time you turn off your Xbox Series X or Xbox Series S, the console will now fully shut down as opposed to going into sleep mode.

How to use your Xbox Series X or S to change the TV volume

Thanks to a new system software update, you can now directly control your TV volume from your Xbox Series X or Xbox Series S console. To find out how to do so, you can follow the steps laid out in this article from Seeking Tech.

1. To start off, make sure that you have the latest firmware installed as this feature was only added recently.

To force your Xbox Series X or Xbox Series S to update, you can try doing the following:

  • If you haven’t done so already, power on your console and then connect it to the Internet.
  • Next, open up the Settings app.
  • In Settings, scroll down to System in the left column and then select Updates on the right side.
  • If you see the “Update console” option located at the top, then you need to select it to start the download and installation process. If you see the top option greyed out with the “No console update available” wording, then it indicates that your Series X or Series S has already been updated to the latest system software.

2. Go back to the first page of the Settings app.

3. From the front page of Settings, scroll to General on the left column and then select “TV & display options” on the right side.

4. In the “General – TV & display options” menu, you need to select the “Device control” option that should be underneath the Display column.

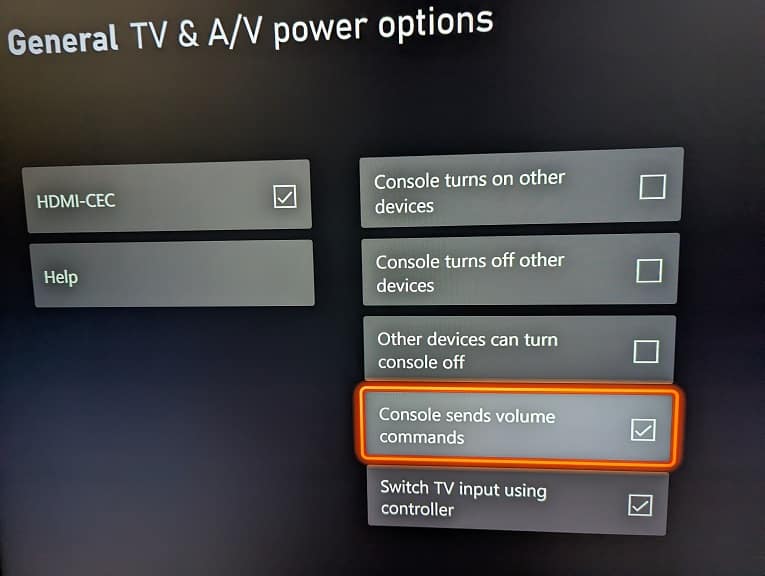
5. Inside of the “General – TV & A/V power options” menu, you first need to make sure that the HDMI-CEC box is checked.

6. In the same menu, you also need to make sure that the “Console sends volume commands” box is checked as well.

7. Afterwards, back out of the “General – TV & A/V power options” menu.

8. You should then see a notification asking you to restart your Xbox Series X or Xbox Series S for the changes to take effect. Here you need to select the Restart Now option.

9. Once you have everything set up, press the Xbox logo button on your controller in order to bring up the Xbox guide menu.

10. You should be on the left-most tab. If you are in another tab, then you need to press the LB button to switch to the tab that has the Xbox logo icon.

11. In the left-most tab of the Xbox Guide menu, select the “Audio & music” icon, which is the right-most option located at the very bottom.

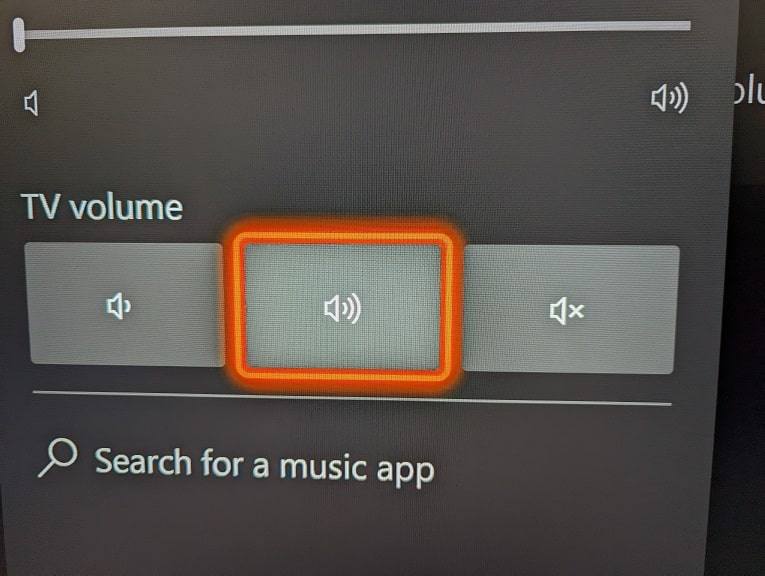
12. After getting to the “Audio & music” in the Xbox Guide menu, you should see the “TV volume” row near the bottom.

The left-most icon on this row will lower the volume of your television speakers. The middle icon will increase the TV volume. The right-most icon will mute the sound coming out of your television set.

If you can’t change the TV volume after following all of the aforementioned steps, then your TV may not support HDMI-CEC or may have the feature turned off in its settings.

How to turn off Xbox Series X and S beeping noise

When you turn on or turn off your Xbox Series X or Xbox Series S, you will hear an audible beeping sound coming from the game console. This noise can be quite loud, especially if you are trying to get in some quality gaming time while someone is sleeping nearby.

Thankfully, a new firmware update for the Xbox Series consoles enabled the ability to turn off the beeping noise. To see how you can do so, you can check out this tutorial from Seeking Tech.

Downloading and installing the new Xbox Series X and S system software

If you haven’t done so already, make sure you download and install the latest system software for your Series X or Series S console.

To manually update, you can try doing the following:

  • Turn on your gaming console and then make sure that it is connected to the internet.
  • In the home menu, go to the Settings app.
  • Inside of Settings, select System from the left column.
  • On the right side of the same screen, you then need to select Updates.
  • After getting to the System – Updates menu, you may see the Update Console option. If you do, select it in order to start downloading and installing the update. If you see “No console update available” instead, then it means that your system is already up to date when it comes to firmware.

Method #1:

For the first method of turning off the beeping sound coming from your Xbox Series X or Xbox Series S, you can use the Power Options menu by taking the following steps:

  • Go to the Settings app of your console.
  • From the front page of Settings, you need to select General from the list of options available on the left side.
  • You then need to select Power Options on the right side of the same menu.
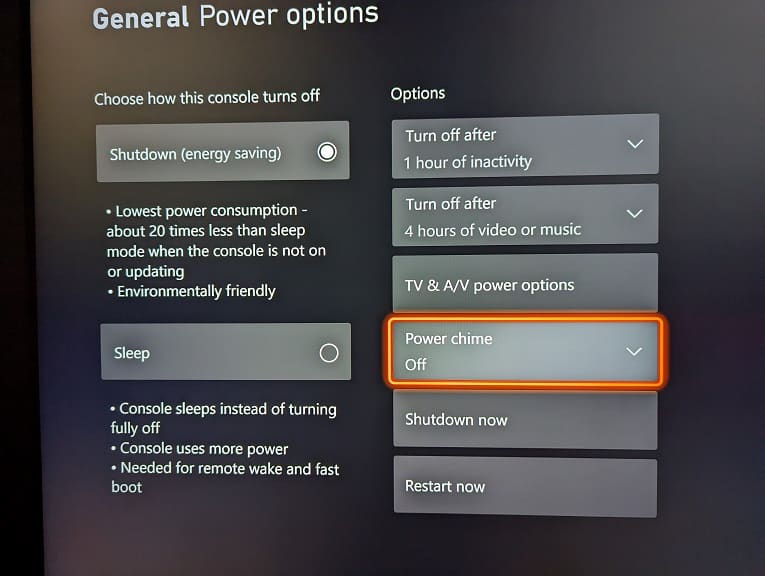
  • In the General – Power Options menu, select Power Chime.
  • In the drop-down menu, you can choose between the “Off” option to disable the startup and shut down beeping noises in all scenarios. Alternatively, you can also choose the “Only with power button or voice” option, which limits the beeping noise to only when you use voice controls or when you press the power button on the console to turn it on or off.

Method #2:

For the second method, you need to use the Volume & Audio Output menu by doing the following:

  • Head over to the Settings app on your Xbox Series X or S.
  • After getting to Settings, you first need to select General from the left side.
  • You then need to select Volume & Audio Output on the right side.
  • From the General – Volume & Audio Output menu, you need to select Additional Options.
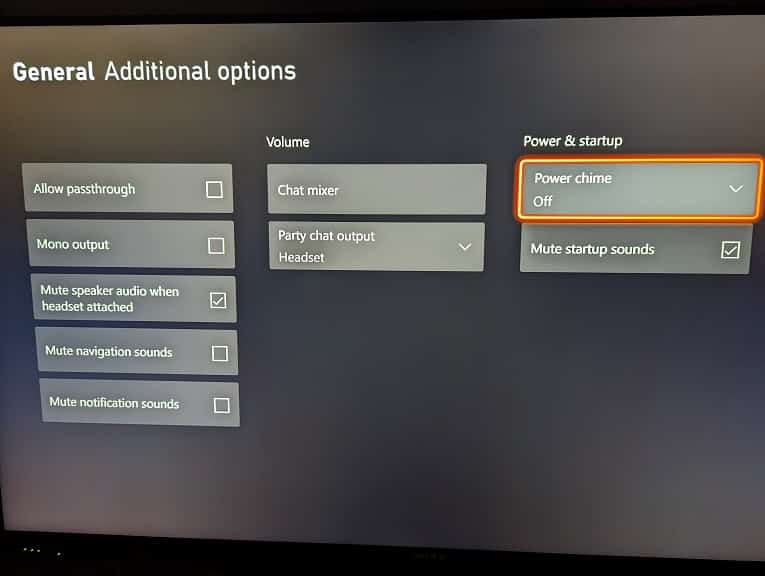
  • Once you arrived in the General – Additional options menu, select Power Chime.
  • In the Power Chime drop-down menu, you can select either the “Off” or “Only with power button or voice” options.

What to do if FPS Boost is greyed out on Xbox Series X and Xbox Series S

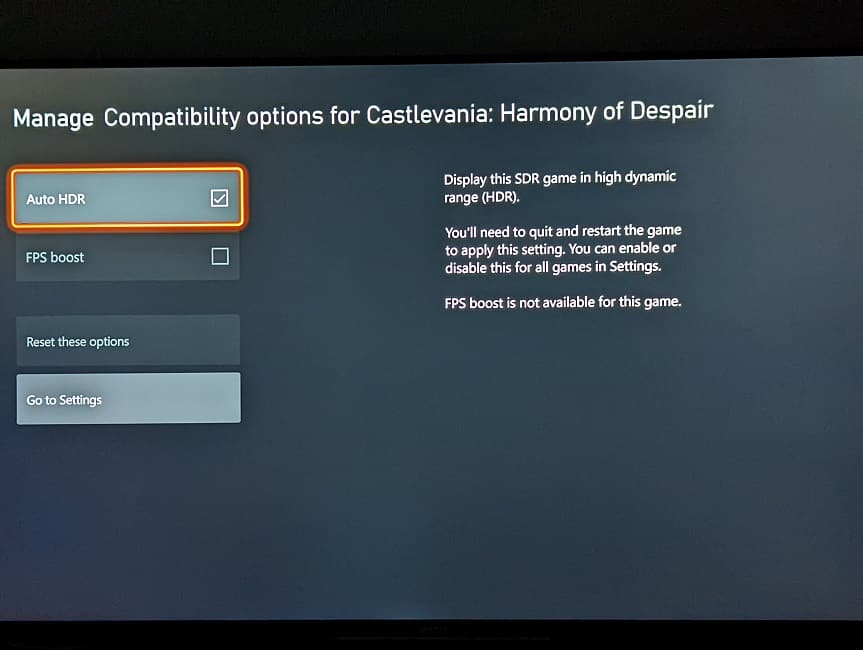
FPS Boost is a feature that lets you play a backwards compatible video game at a higher frame rate than what the software was originally capable of running.

If this option is greyed out and can’t be selected, then you can take a look at this troubleshooting article from Seeking Tech to see what you can do to potentially fix this issue.

1. The first step we recommend taking is to make sure that the game you are trying to enable FPS Boost for actually supports the feature.

The compatibility may depend on whether you have an Xbox Series X or Xbox Series S. Furthermore, some games may have FPS Boost enabled by default. Therefore, there is no need to manually enable it.

You can find the full list of backwards compatible games with this link.

2. You should also make sure that your television set or monitor is capable of displaying games at 60 Hz. For games that support FPS Boost for up to 120 frames per second, then the screen needs to support 120 Hz.

To see what refresh rate are supported on your television set or computer monitor when it is connected to your Xbox console, you need to take the following steps:

  • Start by going into the Settings app on your Xbox Series X or Xbox Series S. If you can’t find it, then you can press the Xbox button on the controller to bring up the Guide menu. From there, scroll to the right until you get to the “Profile & system” tab. Finally, select Settings.
  • In the Settings menu, select “TV & display options.”
  • Inside the “General – TV & display options” screen, select “4K TV details.”
  • The “General – 4K TV details” screen will show you what your screen is capable of displaying when it comes to resolution, refresh rate and more.

3. If the game and television set are capable of supporting higher frame rates, then you can try power cycling your console and then re-test to see if FPS Boost can be enabled.

In order to do so, you need to do the following:

  • Press and hold the Xbox button.
  • Select the “Turn off console” option.
  • After the console has shut down, unplug it from the power outlet.
  • Wait for at least 30 seconds.
  • Plug the console back into the power outlet.
  • Turn the console back on.
  • Go to the “Manage game and add-ons” menu of the game that you are trying to enable FPS Boost for.
  • Select “Compatibly options.”

You should see the FPS Boost setting. Hopefully, it won’t be greyed out after power cycling your Xbox Series X or Xbox Series S.

4. If you are still having issues when it comes to not being able to select FPS Boost for a specific game, then you can try updating the game to the latest available patch.

5. You can also try updating your Xbox Series console to the latest available firmware.

What to do if HDR10 and Dolby Vision are greyed out on Xbox Series X and S

When you try to enable HDR10 or Dolby Vision on your Xbox Series X or Xbox Series S console, then option to do so may be greyed out.

To see how you can make both HDR10 and Dolby Vision be selectable, you can take a look at this troubleshooting guide from Seeking Tech.

1. To start off, we recommend that you verify that your television set or computer monitor supports HDR10 (which may also be referred simply as HDR) and/or Dolby Vision.

2. Depending on your screen, you may also need to manually enable HDR10 or Dolby Vision. We recommend looking in the settings menu of your TV or monitor to see if this option is available.

3. When connecting your Xbox Series X or Xbox Series S to the screen, make sure you use the cable that came with the console.

Thet Series X includes a HDMI 2.1 cable in the box while the Series S includes a HDMI 2.0 cable. Both of these types will provide enough bandwidth to enable HDR10 and Dolby Vision.

4. You should also make sure that you are using the correct HDMI port on your television set. For best compatibility, make sure you plug the HDMI cable into a HDMI 2.0 or HDMI 2.1 port.

5. To see whether or not your Xbox Series console is able to detect the HDR10 or Dolby Vision capabilities of the screen, you can take the following steps:

  • Start by going to the Settings app on your Xbox Series X or Xbox Series S.
  • From the Settings menu, navigate over to the General tab in the left column and then select “TV & display options.”
  • After getting to the “General – TV & display options” menu, select “4K TV details.”
  • In the “General – 4K TV details” screen, you should see whether or not HDR10 and Dolby Vision are supported for the screen you are currently using.

6. Updating the firmware of your computer monitor or television set may help resolve its HDR issues.

To update the screen, you need to follow the instructions provided in the user manual or website from the manufacturer.

7. You should also make sure that your Xbox Series X or Xbox Series S has been updated to the latest available firmware as a new release may improve HDR compatibility.

8. If you are using 120 Hz refresh rate, then it may cause the HDR10 and/or Dolby Vision options to be greyed out. In this case, you can try lowering the refresh rate to 60 Hz.

In order to do so, you need to do the following:

  • Open the Settings app on your console and then go to “TV & display options.”
  • Inside the “General – TV & display options” menu, select “Refresh rate.”
  • In the drop-down menu, select “60 Hz.”

9. You can also try disabling several video modes to see if doing so will make HDR10 and/or Dolby Vision selectable.

In order to do so, we recommend taking the following steps:

  • Launch the Settings app on your Series X or Series S.
  • In Settings, go to “TV & display options.”
  • From the next screen, select “Video modes.”
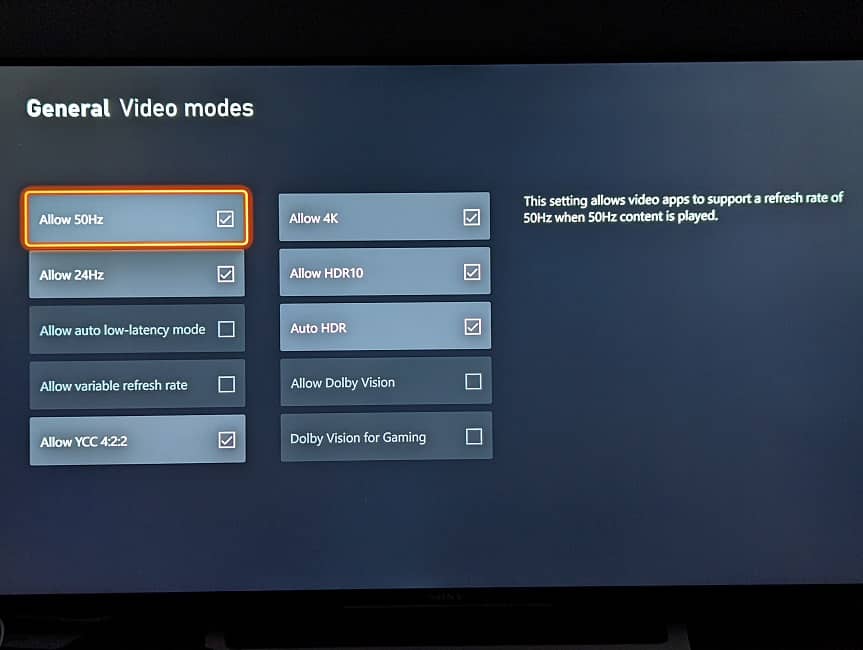
  • Inside the “General – Video modes” menu, try to disable “Allow auto-low latency mode” and “Allow variable refresh rate.”
  • After disabling both aforementioned modes, see if you can enable the “Allow HDR10,” “Allow Dolby Vision” and/or “Dolby Vision for Gaming” options in the same “General – Video modes” menu.

What to do if the 120 Hz refresh rate is greyed out on Xbox Series X or S

Both the Xbox Series X and Xbox Series S consoles support 120 frames per second.

If the 120 Hz refresh rate option is greyed out when you try to enable it, then you can take a look at this troubleshooting guide at Seeking Tech to see what steps you can take to make this option selectable.

1. To start off, make sure you are using the correct HDMI cable for your Xbox Series X or Xbox Series S. Both of these consoles support HDMI 2.1 cables.

The Series X comes with a HDMI 2.1 cable included in the box while the Series S comes with a HDMI 2.0. You should still be able to unlock the 120 Hz refresh rate mode if you are using a HDMI 2.0 cable to connect these game consoles to your television set or gaming monitor.

2. Next, you should make sure that you are connected the HDMI cable to a HDMI 2.0 or HDMI 2.1 port of your TV or monitor. This is because some screens have different HDMI port versions.

If your console is connected to a HDMI port below version 2.0, then there may not be enough bandwidth to enable 120 frames per second.

3. We also recommend checking the display details in the menu of your Xbox Series X or Xbox Series S. In order to do so, you need to take the following steps:

  • Go to Settings from the home screen of your Xbox. If you can’t find it, you need to press the Xbox button on your controller and then navigate to the right until you see the “Profile & system” tab. From there, you can head into Settings.
  • Inside Settings, select “TV & display options.”
  • From the “General – TV & display options” menu, select “4K TV details.”
  • In the “General – 4K TV details” menu, you should see the resolution, refresh rate and other features that are supported by your television screen or gaming monitor when it comes to using your Xbox Series X or Xbox Series S.

4. If your TV or monitor is capable of 120 Hz but your Xbox isn’t able to detect it, then you can try disabling a few video modes to see if doing so will fix the problem.

In order to disable certain video modes, you need to do the following:

  • From the Settings menu of your Xbox Series X or Xbox Series S, you need to go to “TV & display options.”
  • In the “General – TV & display options” menu, you then need to select “Video modes.”

Inside the “General – Video modes menu,” you can try disabling the following:

  • Allow variable refresh rate
  • Allow Dolby Vision
  • And Dolby Vision for Gaming

We recommend disabling one of these at a time and then check to see if you can use 120 Hz on your Xbox Series X or S.

5. You can also try manually forcing your Xbox console to display at 1080p or 1440p as doing so may unlock 120 Hz.

To do so, you need to take the following steps:

  • In the Settings of your game console, go to “TV & display options.”
  • Inside the “General – TV & display options” menu, select Resolution.
  • In the drop-down menu, select either 1080p or 1440p.
  • Next, you need to select Refresh rate.
  • The 120 Hz option should no longer be greyed out.

How to view hidden achievements on Xbox Series X and Xbox Series S

Thanks to a recent firmware update, you are now able to view hidden achievements directly on your Xbox Series X or Xbox Series S console. To find out how to do so, you can take a look at this tutorial from Seeking Tech.

1. Before anything else, make sure that your Xbox Series X or Xbox Series S console has been updated to the latest firmware.

To check whether or not a new firmware is available, you can take the following steps:

  • Turn on your Xbox Series X or Xbox Series S.
  • Make sure that you console is connected to the internet.
  • Press the Xbox button to open the Guide menu.
  • From the Guide menu, switch tabs until you get to Profile & System.
  • After getting to the Profile & System tab, select Settings.
  • In Settings, select System from the left column and then Updates on the right side.
  • From the System – Updates menu, you should see whether or not there is a new firmware available. If there is, then make sure you download and install it.
  • In the System – Updates menu, we recommend that you check the box next to the “Keep my console up to date” option so that your Series X or Series S will automatically update wherever the next firmware is available.

2. With the system up to date, press the Xbox button to open the Guide menu.

3. From the Guide menu, switch tabs until you get to Game Activity.

4. In the Game Activity section, select the “Achievements” option if you want to view the hidden achievements for the currently game you are playing. If you aren’t playing any games at the moment, then the “Achievements” option will show the achievement list for the last game you played on the console.

Alternatively, you can also select the “All Achievements” option, which shows a list of all your games, that contain achievements, you have played on your Xbox account. After choosing “All Achievements,” you then need to select a game before you continue to the next step.

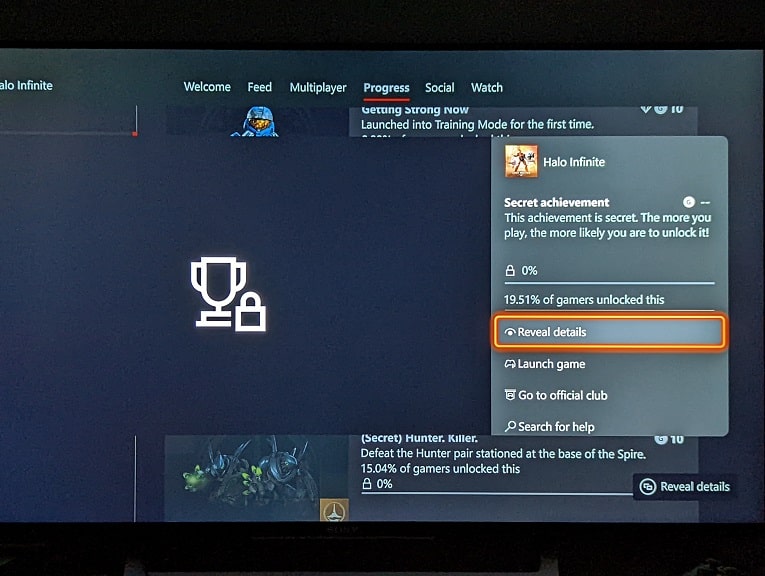
5. Next, you need to select a secret achievement from the list.

6. In the pop-up menu, you should then select the “Reveal details” option.

How to hide secret achievements on Xbox Series X and Xbox Series S

If you want to re-hide a secret achievement directly on your Series X or Series S, you can do the following:

1. Open the Guide menu and then head over to the Game Activity section.

2. Next, select “Achievements” or “All Achievements.” If you select “All Achievements,” then you need to select the game that contains secret achievements that you want to re-hide.

3. Afterwards, select the achievement that you want to hide again. For the uninformed, achievements that can be hidden should have “(Secret)” written in front of its name.

4. In the pop-up menu, you then need to select the “Hide details” option.

How to fix Xbox One, Xbox Series S and Xbox Series X NAT issues when using an eero router

If you are connecting your Xbox One, Xbox One S, Xbox One X, Xbox Series S and/or Xbox Series X game console to an eero router, then you may get a “Moderate” or “Strict” error message when trying to play an online video game.

To see how you can fix these internet gaming connection issues, you can take a look this troubleshooting article at Seeking Tech.

Before we start, it should be noted that this guide is based on eero 6, eero 6+, eero Pro 6 and eero Pro 6E. With that said, these steps should apply to all the other eero routers as well.

How to enable UPnP on your erro router

The first step we recommend taking is to make sure you have UPnP enabled on your eero router. In order to do so, you need to take the following steps:

1. Open the eero app on your smartphone or mobile device.

2. Make sure you are signed into your eero account that this connected to your router.

3. In the eero app, tap the Settings icon.

4. Inside of the Settings menu, tap Advanced.

5. From the Advanced menu, make sure that UPnP is turned on.

Afterwards, test out the internet connection on your Xbox One, Xbox One S, Xbox One X, Xbox Series S or Xbox Series X.

You may need to refresh the connection on your game console for the changes be effective. To refresh the internet connection, you can simply restart the system.

How to open ports on your erro router for Xbox One and Xbox Series online gaming

If your Xbox console is still displaying the “Moderate” or “Strict” error message when you are trying to play an online game after enabling UPnP on your eero, then you can try opening some ports in the router by doing the following:

1. Open the eero app on your phone or mobile device.

2. Sign into your eero account if you haven’t done so already.

3. After signing into the application, tap the Settings icon.

4. Next, you need to tap Advanced.

5. In the Advanced menu, tap Reservations and Port Forwarding.

6. Afterwards, tap the “Add a reservation” option.

7. You should now see a list of devices. Here, you need to tap your Xbox console.

8. You then need to tap the “Open a port” option.

9. Follow the on-screen instructions.

You need to open the 88, 500, 3544 and 4500 ports from the UDP protocol.

You also need to open the 80 port from the TCP protocol.

Finally, you need to also open the 3074 and 53 ports from the UDP & TCP protocol.

Once you are done opening the ports, try to play an online game on your Xbox console. You may have to restart your game system in order to reset its internet connection for the port changes to apply.

10. If you are still having connection issues when trying to play an Xbox One or Xbox Series game online, then we recommend contacting eero for additional support.

How to automatically switch to the Xbox Series S or Xbox Series X input on your TV

A new feature was recently added to the Xbox Series S and Xbox Series X where your television set will automatically switch to the input that is playing your console.

To see how you can use this feature, you can take a look at this tutorial from Seeking Tech.

1. The first step you can take is to make sure that your television supports HDMI-CEC. You can try to look through the digital or physical manual to see if your TV has this feature.

2. If you believed that your television set supports HDMI-CEC, then the next step is to make sure that it is enabled on your TV.

Open the Settings menu of your TV and then check to see if there is an option to turn on HDMI-CEC or something similar to it.

3. Once you have your television ready, turn on your Xbox Series S or Xbox Series X.

4. Next, you need to head over to the Settings menu on your game system.

If you can’t find Settings from the home screen, then you can do the following:

  • Press the Xbox button on the controller.
  • In the Guide menu, press RB button several times until you get to the “Profile & system” tab.
  • Next, you need to select Settings.

5. From the Settings menu, select General on the left column.

6. On the right side of the same menu, you then need to select “Sleep mode & startup.”

7. Inside the “General – Sleep mode & startup” menu, you need to select “TV & A/V power options” on the left column.

8. In the “General – TV & A/V power options” menu, make sure that HDMI-CEC is enabled.

9. In the same screen, you then need to enable the “Switch TV input using controller” setting.

10. Press the B button on the controller to back out of the “General – TV & A/V power options” menu.

11. You should get a Restart your Xbox console notification stating that your Xbox Series S or Xbox Series X needs to be restarted in order for the changes to take effect.

12. Select Restart Now.

13. Once the system has rebooted, the “Switch TV input using controller” setting will be activated.

You can test this new feature by switching your TV to a different input. Afterwards, you can press the Xbox button on your controller. If done correctly, your television set should switch to the input displaying your Xbox Series X or Xbox Series S.