How to prevent Samsung Odyssey Neo G8 burn-in issues

If you display the same static image on your Samsung Odyssey Neo G8, then you may run into burn-in issues. To see how you can prevent these problems with this curved gaming monitor, you can follow this guide at Seeking Tech.

How to prevent screen burn-in for the Odyssey Neo G8

In order to prevent screen burn-in for this curved gaming monitor, you can try taking the following precautionary actions:

1. The first step is pretty easy as you can simply turn off the Odyssey Neo G8 when you are not looking at it.

2. If you need to use the monitor for many continuous hours, then we suggest taking short breaks every hour. During your break, make sure you turn off your screen.

3. If possible, avoid displaying static images in the same spot on your monitor.

If you are playing a videogame with a head-up-display, then look through the in-game options to see if there is anyway where you can turn off or limit the HUD.

For apps with static images, you can try displaying a different app occasionally.

You should also check to see if these is an option where you can adjust the opacity level of static content.

4. If the connected device comes with a setting that will dim its image output after a certain amount of time has passed since it last detected any activities, then we suggest enabling this feature.

5. You can also set up a screen saver on the connected device.

If you are using a Windows 10 PC, for example, then you can do the following:

  • Go to Settings.
  • Make sure you are in the Home section of Settings.
  • Next, you need to select Personalization.
  • Inside the Personalization menu, select Lock Screen on the left column.
  • You then need to select Screen Saver Settings on the right side of the same menu.
  • In the pop-up Screen Saver Settings menu, you can select the screen saver type that you want to use as well as the wait time until it activates when your computer detects so sign of any activities.

6. We also highly recommend using the screen timeout setting as it will automatically turn off the Samsung Odyssey Neo G8 after a certain amount of past since the last activity was detected.

In order to do so with a Windows 10 PC, for instance, you need to take the following steps:

  • Head to Settings.
  • You should then go to the Home section of Settings.
  • In the Home section, go to Personalization.
  • After getting to the Personalization menu, you need to select Lock Screen on the left column and then Screen Timeout Settings on the right side.
  • In the Power & Sleep menu, you can set when the screen timeout will go into effect. We recommend going with 30 minutes or less for this setting.

What to do if you see burn-in on your Samsung Odyssey Neo G8

If you see a burned-in image on your Samsung Odyssey Neo G8, then there is a possibility that it is only temporary. In this case, we recommend that you let your monitor display something else aside from the static image that cause the problem in order to see if the afterimage will eventually fade away on its own.

If the burned-in image remains after some time has passed, then it may be permanent. If this is the case, you may need to get your monitor replaced.

How to fix Samsung Odyssey Neo G8 sound issues

When using your Samsung Odyssey Neo G8, you may get low volume sound output. In some cases, you may not be able to hear anything at all. To see how you can fix these problems, you can take a look at this troubleshooting guide at Seeking Tech.

1. To start off, make sure you connect the other device directly to the curved gaming monitor.

Using a DVI to HDMI cable won’t transfer any audio. Other adapters, splitters and pass-through devices may also mute the sound output.

2. You should also check to see if the video cable has any visible damage. If there are notable defects, then you can try getting a new cable.

3. If the connected device offers multiple ways of outputting sound, then you need to set this setting to the Odyssey Neo G8.

If you are using a Windows 10 PC, for example, then you need to go to Settings > System > Sound. Select the dropdown menu in the “Choose your output device” section and then select the monitor for the sound output.

4. Make sure you accidentally didn’t mute the audio in the media player, videogame and/or the connected device.

5. You can also try increasing the volume level in the media player, videogame and/or the connected device.

6. If you have your earphones, headphones or headset connected to the monitor, then you should try unmuting your listening device.

7. You can also try turning up the volume level on your earphones, headphones or headset.

8. A new firmware for the Samsung Odyssey Neo G8 may help fix its sound output problems as well.

If you are having a difficult time trying to update this gaming monitor, then we recommend that you take a look at this article.

9. Power cycling the monitor, as well as the connected device, may be able to fix this problem.

In order to do so, you can try taking the following steps:

  • Turn off the Samsung Odyssey Neo G8 and the connected device.
  • Next, you need to unplug both from the power outlets.
  • Wait for several minutes and then plug both back into the power outlets.
  • Turn on the Odyssey Neo G8 and the connected device again.
  • Test to see if you are able to get any sound output after the power cycle process.

How to prevent your Samsung Odyssey Neo G8 from running too hot

When using your Samsung Odyssey Neo G8, you may notice that the curved gaming monitor is running hot. To see how you can prevent this display from overheating, you can take a look at this troubleshooting article from Seeking Tech.

How to prevent your Odyssey Neo G8 from getting too hot

In order to avoid overheating your curved gaming monitor, you need to do the following:

1. The first step we recommend taking is to make sure you have enough space behind the monitor. Samsung suggests that you should leave at least 10 cm of open-air space for proper heat dissipation.

2. You should also avoid putting the Odyssey Neo G8 is an enclosed space as doing so will trap the heat being dissipated from the screen, causing the monitor to heat up faster than normal.

3. Do not place the curved gaming monitor near any heat source such as a fireplace, heater or stove.

4. When it comes to temperature, the Samsung Odyssey Neo G8 should be operated within the recommended range of 10 °C to 40 °C (or 50 °F to 104 °F).

For non-operation, the monitor should be stored within the range of -20 °C to 45 °C (or -4 °F to 113 °F).

5. For humidity, the device should be operated within a range of non-condensing 10% to 80%.

The recommended humidity range for storage is a little bit wider at non-condensing 5% to 95%.

6. The aforementioned precautionary steps for the screen should also be applied to the AC/DC adapter as well since this part can easily overheat and may end up causing issues.

7. Keeping your Samsung Odyssey Neo G8 dust-free should also help with heat dissipation.

You can check out this guide to see how you can properly clean this gaming monitor.

8. If your monitor heats up easily even if you take all of the aforementioned precautionary steps, then we suggest contacting Samsung in order to get additional support.

What to do if your Odyssey Neo G8 gets too hot

If your Samsung Odyssey Neo G8 gets very hot, then you can try doing the following:

1. To start off, turn off the curved gaming monitor.

2. After shutting down the device, unplug it from the power outlet.

3. You may also want to unplug any other cables you have connected to the screen as well.

4. Next, we recommend that you let your Samsung monitor cool down at room temperature.

If you want to cool down the screen faster, you can use a fan in order to increase the air circulation around the device.

5. Once the Odyssey Neo G8 has cooled down, you can plug it back into the power outlet and then reconnect any cables you previously unplugged.

6. You should be able to turn the screen back on and then use it normally.

Keep in mind that you may hear cracking or popping noises when your monitor is heating up and cooling downing. This is due to the internal components of the device expanding or contracting. While it may sound alarming, these noises are considered to be normal.

How to clean the Samsung Odyssey Neo G8

The Samsung Odyssey Neo G8 is an expensive 4K curved gaming monitor. To see how you can properly clean this screen, you can take a look at this tutorial from Seeking Tech.

What cleaning cloth and solution should you use for Samsung Odyssey Neo G8?

If you are only cleaning off a thin layer dust, then you can simply use a dry cloth for this monitor. For harder to remove spots, you can use plain water or highly-concentrated isopropyl alcohol.

If you are looking for specific product recommendations, then we will be using the MagicFiber Microfiber Cleaning Cloth and MG Chemicals 99.9% Isopropyl Alcohol Electronics Cleaner. You can find both of these products on Amazon, if you are interested, with the following links:

How to clean the Odyssey Neo G8 monitor

In order to clean the Samsung Odyssey Neo G8, you can try taking the following steps:

1. To start off, you need to turn off your monitor.

2. With the screen turned off, unplug it from the power outlet. You should also unplug any DisplayPort, HDMI, USB and other cables you have connected to the screen.

3. If the power cable and/or AC/DC adapter are dusty, then you can wipe off the dust particles by using a dry cloth.

4. Next, you may want to apply a cleaning solution to a cleaning cloth.

You do not want to put any solution directly on your monitor as it could easily seep into the internals of your Odyssey Neo G8 if you aren’t careful and cause liquid damage.

For the cloth, make sure it is lint-free as any rough objects may scratch the screen.

You should also make sure that the cloth isn’t too damp in order to prevent water damage. If it is, then you need to squeeze out the excess liquid before you continue.

5. Next, you can start wiping your gaming monitor.

Make sure you wipe gently on the screen display area as you don’t want to press too hard on it as doing so may cause scratches as well as other issues.

We also recommend using a circular motion so that you don’t leave any streaks after wiping.

6. Once you are done with the cleaning process, you need to wait until the Samsung Odyssey Neo G8 dries up at room temperature.

You can speed up this drying process by putting a fan near your monitor as it will provide better air circulation.

You should avoid using any heat source, such as a hair blow dryer, as you could need up causing heat damage to the screen.

7. Once the monitor has dried, you can plug it back into the power outlet. You can also reconnect the DisplayPort, HDMI, USB and other cables you have previously plugged into the monitor.

8. It should now be safe to turn on and then start using your Samsung Odyssey Neo G8 normally again.

How to fix Samsung Odyssey Neo G8 flickering issues

When trying to use your Samsung Odyssey Neo G8, you may notice that your screen will start to flicker. To see how you can potentially fix these flickering issues for this curved gaming monitor, you can take a look at this troubleshooting guide from Seeking Tech.

1. The first step we recommend taking is to check if the DisplayPort and/or HDMI cable are securely connected to the back of the monitor as well as the port on the connected device.

2. You can also try unplugging and then re-plugging the DisplayPort and/or HDMI cable.

3. If you are using a HDMI splitter or HDMI pass-through device, then it may be causing these problems. Therefore, we recommend that you directly connect the video cable from the other device to your Odyssey Neo G8 with nothing else in between.

4. If possible, you can try using a different DisplayPort and/or HDMI cable to see if the screen flicker will go away.

5. Power cycling the game monitor, as well as the connected device, may also help fix the flickering errors.

In order to do so, you can try taking the following steps:

  • Turn off the connected device.
  • Once the connected device has been turned off, unplug it from the power outlet.
  • Turn off your Samsung Odyssey Neo G8.
  • Once the monitor has shut down, unplug it from the power outlet.
  • Wait for several minutes.
  • Plug both the monitor and the connected device back into the power outlet.
  • Turn on the connected device.
  • Turn on the monitor.

6. If your screen is still flickering, then you can try updating its firmware.

If you have a hard time trying to install the new driver, then you can check out this troubleshooting article.

7. You should also update the connected device as well. If you are using a PC, make sure you download the latest driver for your graphical cards if you haven’t done so already.

8. Moreover, you can try enabling VRR control, which may help fix the screen flickering issues.

To do so, use the 5-Way Button on the monitor to go to Menu > System. From there, set VRR Control to On.

9. If enabling VRR Control does not work, then you can try disabling Adaptive Sync by using the 5-Way Button of the monitor to go to Menu > Game. Afterwards, set Adaptive Sync to Off.

10. In the same Game menu on your Samsung Odyssey Neo G8, you can also try changing the refresh rate.

11. You can try disabling the FreeSync Premium Pro feature as well.

To do so, head back to the aforementioned Game menu of your monitor and then make sure that you turn off FreeSync Premium Pro.

12. If the flickering issues only happens when you are playing a certain game, then you can try changing the in-game graphical settings.

13. You can also try to update to the latest available patch as a new version may help resolve the flickers.

14. Changing the refresh rate on the connected device may also help.

If you are using a Windows 10 PC, for example, then you can go to Settings > System > Display > Advanced display settings. Afterwards, change the refresh rate.

15. Moreover, changing the output resolution of the connected device may also remove the flickers as well.

In order to do so with a Windows 10 PC, you need to head over to Settings > System > Display > Advanced display settings. You should then be able to change the resolution.

16. If you are only getting flickering when you are using the HDMI connection, then you can try increasing the port version on the monitor.

In order to do so, use the 5-Way Button of your Odyssey Neo G8 to go to Menu > System > Input Port Ver. You then need to set this setting to HDMI, 2.0↑.

If your screen is still flickering after trying all of the aforementioned potential solutions, then we suggest contacting Samsung to get additional help.

Recommended Samsung Odyssey Neo G8 settings for PS5, Xbox Series X and S

The Samsung Odyssey Neo G8 is a 4K curved gaming monitor that comes with multiple HDMI 2.1 ports. You can check out this guide at Seeking Tech to see what are the best settings to use when connecting your PlayStation 5, PlayStation 5 Digital Edition, Xbox Series X and/or Xbox Series S consoles to this display.

What PS5, Xbox Series X and Xbox Series S features are supported by the Odyssey Neo G8?

The Samsung Odyssey Neo G8 supports all the advanced features of the new consoles as you will be able to play games at 120 frames per second in up to 4K resolution. This gaming monitor also supports HDR and Variable Refresh Rate.

Recommend Odyssey Neo G8 settings for PS5, Xbox Series X and S

To optimize the Samsung Odyssey Neo G8 for your PS5, PS5 Digital Edition, Xbox Series X and/or Xbox Series S, then you need to take the following steps:

1. The first step you should take is to connect your console to the gaming monitor.

Make sure you are using a HDMI 2.1 cable for the connection. The PS5, PS5 Digital Edition and Xbox Series X should come with this cable included in the box. On the other hand, the Xbox Series S only comes with a HDMI 2.0 cable.

2. When connecting your console to the Odyssey Neo G8, make sure that you are doing so directly. Avoid using HDMI pass-through devices or splitters as these may introduce lag or cause other issues.

3. With the console connected, turn it on.

4. Turn on your gaming monitor and then make sure it is showing the input source of your connected console.

5. Use the 5-Way Button on the monitor in order to go to Menu > System > Input Port Ver. Afterwards, set the input port version to HDMI, 2.0↑.

6. Go back to the System menu. From there, make sure you set Local Dimming to High, set VRR Control to On and then Eco Saver Mode to Off.

7. Head back to Menu and then select Game.

In the Game sub-menu, make sure you set Refresh Rate to 120 and then Adaptive Sync to On.

8. Go back to Menu again and then select Picture.

In the Picture sub-menu, make sure you set Brightness to 10.

9. We suggest leaving everything else on your Samsung Odyssey Neo G8 to its default values.

10. You should also make sure that you have the correct settings on your console.

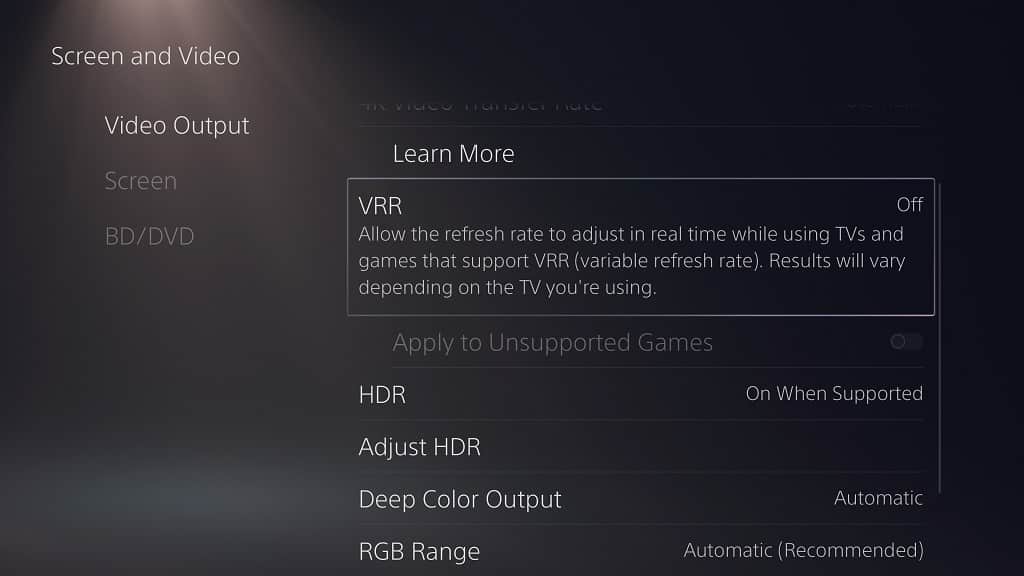
If you have a PS5 or PS5 Digital Edition, then you need head over to the system’s Settings menu and then select Screen and Video. Afterwards, set Resolution to 2160p, HDR to On When Supported as well as the following settings to Automatic:

  • 4K Transfer Rate
  • VRR
  • ALLM
  • Deep Color Output
  • RGB Range
  • Enable 120 Hz Output

Finally, select the Adjust HDR option in the aforementioned Screen and Video menu and then follow on-screen instructions to optimized your PS5’s HDR setting for this monitor.

On the Xbox Series S or Xbox Series X, you need to go to your console’s Settings menu. Afterwards, head over to Settings > General > TV & display options and then set the resolution to 4K UHD.

In the TV & display options menu, you should then to select Video modes. Next, you need to makes sure that you enable the following settings:

  • Auto-low latency mode
  • Variable refresh rate
  • 4K
  • HDR10

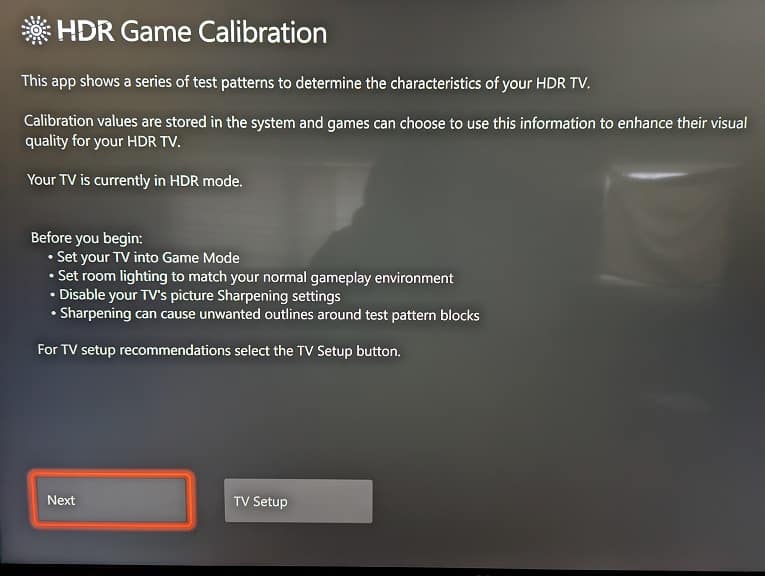
Go back to the TV & display options menu and select Calibrate HDR for games. Follow the on-screen instructions to calibrate your Xbox Series X or S HDR settings for the Samsung Odyssey Neo G8.

11. You should now be set to go when it comes to setting up your gaming monitor with your game console.

With that said, you may need to make additional adjustment on a game-by-game basis. In these cases, we recommend using the graphical options from the in-game menus first before adjusting the monitor’s or console’s settings.

How to fix Samsung Odyssey Neo G8 power and no picture issues

When turning on your Samsung Odyssey Neo G8, you may not get any power and/or picture. To see how you can potentially fix these problems, you can take a look at this troubleshooting article from Seeking Tech.

How to fix Samsung Odyssey Neo G8 power issues

If your power LED indicator of your gaming monitor isn’t showing any lights, then you can try doing the following:

1. Make sure that the power cable is properly connected.

2. You can also try unplugging and re-plugging the power cable.

3. Moreover, you can try using a different power outlet.

4. When pressing the power button, try putting more pressure.

5. The Odyssey Neo G8 should be operating within the recommended temperature range of 10 °C to 40 °C (or 50 °F to 104 °F) as well as the recommended non-condensing humidity range of 10% to 80%.

6. If your monitor feels hot, then we suggest unplugging it from the power outlet and then letting it cool down at room temperature before plugging it back in and trying to turn it back on again.

7. There is a possibility that the Odyssey Neo G8 is actually turned on but the power LED indicator may have been disabled.

To enable the indicator, try to use the 5-Way Button on the monitor to go to System > Power LED On.

How to fix Samsung Odyssey Neo G8 no picture issues

If you can turn on your gaming monitor but can’t get a picture to show up (or you get the “check the cable connection and the settings of the source device” message), then you can try doing the following:

1. To start off, make sure that the HDMI and/or DisplayPort cables are properly connected to the monitor as well as the source device.

2. We also recommend inspecting the HDMI and/or DisplayPort cables to see if there are any visible defects. If there are, then you can try using a different cable.

3. You should make sure that your Odyssey Neo G8 is displaying the correct input source.

In order to do so, use the 5-Way Button and then go to System > PC/AV Mode > HDMI, DisplayPort. Afterwards, select a different source to see if you can get a picture to show up on the screen.

4. Make sure that the connected device is turned on. If it is in rest mode, sleep mode or any other type of power saving mode, then you may need to wake it up in order to get a picture to show up.

5. Try to power cycle you monitor as well as the connected device.

In order to do so, turn off both and then unplug them from the power outlet. After waiting for a few minutes, you can plug the monitor and the other device back into the power outlet and then turn them back on.

There is a possibility that these issues are hardware related as it be due to a defective HDMI port, DisplayPort or other internal problems. If you believe that you have a defective monitor, then we recommend contacting the support team at Samsung.

How to fix Samsung Odyssey Neo G8 firmware update issues

You are able to update the firmware of your Samsung Odyssey Neo G8. If you have a hard time getting a new driver to install for this gaming monitor, then you can take a look at this troubleshooting guide from Seeking Tech.

1. To start off, it is important to note that you will need an USB storage device that has been formatted to FAT32.

To format an USB drive, you need to connect it to a computer. If you are using a Windows PC, for example, then you need to do the following:

  • Connect the USB storage drive to one of the USB ports.
  • Open the File Explorer.
  • Right click the USB drive.
  • Select the “Format…” option.

Make sure you set the File System to FAT32 and then start the formatting process.

Keep in mind that formatting the USB storage drive will erase all previously stored data. So, if you have important files already stored on the drive, then you should copy it over to another destination before you go through with the formatting process.

2. You should also make sure that you are downloading the driver from the correct region. If you are in the United States, for example, then you can download the latest firmware with this page.

3. After downloading the driver unto your computer, make sure that you properly copy it over to the USB storage drive.

The Samsung Odyssey Neo G8 will only detect BIN (.bin) or IMG (.img) files in the root directory. If you place these files inside a folder in the USB drive, then the monitor won’t be able to detect it.

4. There should only be one update .bin or .img file on the root directory of the USB drive. Remove any other files of the same file type.

5. Make sure you are also following the driver update process on your monitor correctly as well by doing the following:

  • Connect the USB storage device with the firmware update to the USB port of your gaming monitor.
  • Open the menu of your Samsung Odyssey Neo G8 and then go to Support.
  • In Support, you then need to select Software Update.

5. When trying to update, you may get the following message:

“No update files found on your USB device. Please check your USB device and try again.”

In this case, make sure that your USB storage device is properly connected to the USB port of the Odyssey Neo G8.

As we stated above, you should also double check to see if you have the correct BIN (.bin) or IMG (.img) file placed in the root directory of your USB storage device.

6. During the update process, avoid turning off your monitor. If the Odyssey Neo G8 does power off during the middle of a firmware update, then its driver will be reverted to its previous version.

In this case, you can try updating again.

Keep in mind that the screen may change to a different color and/or start to flicker. These behaviors are considered to be normal and should go away once the firmware update has been completed.

How to fix Alienware AW3423DW color issues

When using the 34” Alienware AW3423DW Curved QD-OLED, you may notice that the colors may look slightly off than what you may be expecting. To see how you can potentially get a more accurate color display for this gaming monitor, you can check out this guide from Seeking Tech.

1. The first step you can take is to make sure that there isn’t anything wrong with your gaming monitor.

In order to do so, you need to use the built-in diagnostic tool, which you can learn more about in this article.

2. If the connected device has a RGB setting, then you might also want to try changing it. This is because that, if the ranges of the monitor and the connected devices do not match, then the colors will most likely end up looking as good as you were expecting.

3. If the connected device has a setting where you can change the HDR brightness levels, then you may want to try to adjust it to see if you can get a better color.

4. Some apps and games may also have customized HDR settings that you might want to adjust as well.

5. If you try to force HDR on non-HDR content, then the colors of the converted image may end up looking worse.

Therefore, you may want to disable automatic HDR or dynamic tone mapping on the device that is connected to your AW3423DW if possible.

6. The 34” Alienware AW3423DW Curved QD-OLED offers two HDR modes. With the HDR Peak 1000, you are able to reach higher brightness levels while HDR 400 True Black is more suitable for darker scenes.

So, if the colors look off in one of these modes, then you might want to switch to the other one.

In order to do so, you can take the following steps:

  • To start off open the on-screen display of the monitor by moving or pressing down on the analog stick of the AW3423DW.
  • From the on-screen display, you need to select the Menu option.
  • After getting to the Menu, you need to select Game.
  • Next, you need to go to HDR Mode.
  • Finally, change the HDR Mode.

7. You can also try adjusting the colors on your gaming monitor by doing the following:

  • Move or press down on the analog stick to head into the on-screen display.
  • With the on-screen display opened, go to Menu.
  • From the Menu, you need to select Game.
  • On the same screen, you then need to select Preset Modes.
  • In this menu, you can select the color presets based on the game genre you are playing. The available options are FPS, MOBA/RTS, RPG, Sports, Warm and Cool.
  • From the same menu, you can also manually adjust the colors by selecting the Custom Color option. Furthermore, you can use the Creator option if you have HDR disabled on the monitor.

How to fix Alienware AW3423DW HDR brightness issues

The 34” Alienware AW3423DW Curved QD-OLED features two HDR modes as you can use HDR Peak 1000 or HDR 400 True Black. If the image shown on the screen appears to be too dark or too bright, then you can check out this troubleshooting article from Seeking Tech to see how you can get a more accurate high dynamic range picture.

1. The first step you can take is to adjust the Brightness and Contrast settings of the AW3423DW by taking the following steps:

  • Open the on-screen display (OSD) of your monitor by moving or pressing down on the joystick located below the screen.
  • Next, you need to select Menu.
  • From the Brightness/Contrast.
  • Adjust the Brightness first before trying to adjust the Contrast.

2. You can also adjust the Dark Stabilizer setting by doing the following:

  • Open the OSD of the AW3423DW by pressing down or moving its joystick.
  • From the OSD, head to Menu.
  • You should then select Game.
  • Change the Dark Stabilizer setting to a different value and then test to see if the brightness level of your monitor is more accurate.

3. On your computer, laptop, game system or other connected device, you can try adjust the HDR brightness levels as well.

4. On the connected device, you may also want to disable any settings that will convert SDR to HDR. This conversion, which could be called Auto HDR or Tone Mapping, could lead to the display image looking brighter or darker than what you may have expected.

5. If possible, you can also try adjusting the RGB Range of the connected device as there may be a mismatch with your monitor.

6. HDR Peak 1000 is best used for brighter content while the HDR 400 True Black is better for darker content.

If you are using the HDR Peak 1000 mode on a SDR content or content that does not require a lot of brightness, for example, then the resulting image may end up looking darker than the HDR 400 True Black mode.

On the other hand, using the HDR 400 True Black mode on brighter content may lead to a darker than expected image.

In order to switch HDR modes with this gaming monitor, you need to do the following:

  • Move or press down on the joystick of your Alienware AW3423DW to open the OSD.
  • From there, select Menu.
  • Inside of Menu, you need to select Game.
  • You then need to select HDR Mode.

7. If possible, you can also try adjust the HDR brightness settings on the game or app you are using for the HDR content.

8. Even if a content supports HDR, it may be implemented poorly. So, no matter what settings you adjust on your monitor or connected device, the picture may end up looking too dark or too bright.

If HDR from other content looks great, then your issue may be related to the poor HDR implementation from the content creator. In this appears to be case, you can’t really do anything to improve the HDR picture.