How to control the Street Fighter 6 camera with an arcade stick

A lot of players prefer using an arcade stick when it comes to playing Street Fighter 6. When exploring the environments in the Battle Hub or World Tour mode, however, controlling the camera can be confusing as there is no second analog stick for a vast majority of fight sticks.

To see how you can control the camera when using an arcade stick, you can take a look at this tutorial from Seeking Tech.

How to control the camera with a PlayStation theme fight stick

In order to control the camera with a PlayStation arcade stick you need to press and hold the R1 button along with a corresponding face button. You can find the button layout for the camera movement below:

  • Move Camera Upwards: R1 and X
  • Move Camera Downwards: R1 and Circle
  • Rotate Camera to the Right: R1 and Triangle
  • Rotate Camera to the Left: R1 and Square

How to control the camera with an Xbox theme fight stick

If you are using an Xbox fighting stick, then you have to press and hold the RB button to go along with a corresponding face button. You can find the button layout below:

  • Move Camera Upwards: RB and A
  • Move Camera Downwards: RB and B
  • Rotate Camera to the Right: RB and Y
  • Rotate Camera to the Left: RB and X

If you would like to invert your camera controls, then you need to head over Camera tab from the Options menu. From there, select Control Settings on the left side.

On the right side, you should see the Rotational (Horizontal) and Rotational (Vertical) settings. You can set these to Normal or Inverted.
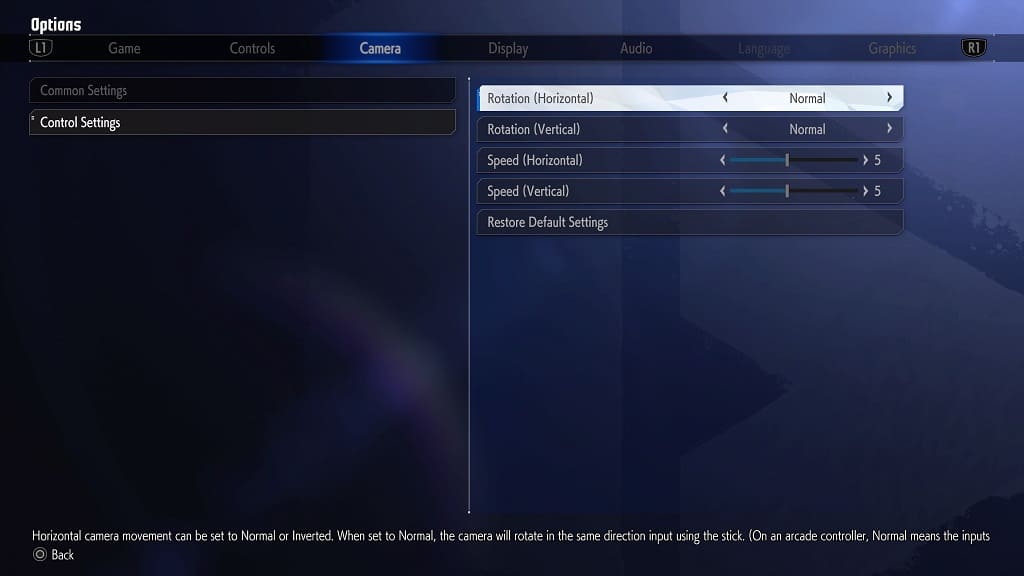
In the same Controls Settings menu, you can also adjust the horizontal and vertical camera movement speed.

Once you are done, exit the Options menu and then play the Battle Hub or World Tour mode. Test out the new camera settings to see if you prefer it to the default settings.

Xbox Elite Wireless Controller Series 2 settings for Street Fighter 6

You can use the Xbox Elite Wireless Controller Series 2 to gain the upper hand in Street Fighter 6. To see which settings you should use for the premium gamepad when playing this fighting game, you can check out this guide from Seeking Tech.

P1, P2, P3 and P4 Button Assignments

There are additional actions that you can assign to the back paddles of your Xbox Elite Wireless Controller Series 2.

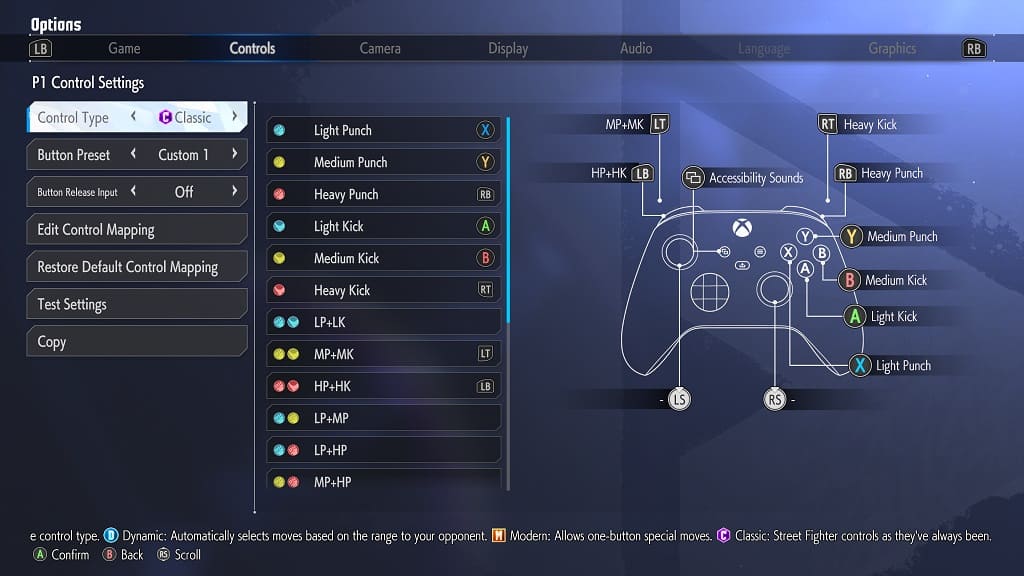
If you are using the Classic control type, then you will have the following default button layout:

  • X Button: Light Punch
  • Y Button: Medium Punch
  • RB Button: Heavy Punch
  • A Button: Light Kick
  • B Button: Medium Kick
  • RT Button: Heavy Kick
  • LT Button: Medium Punch and Medium Kick
  • LB Button: Heavy Punch and Heavy Kick

The following actions can also be assigned if you are using Classic controls:

  • Light Punch and Light Kick
  • Light Punch and Medium Punch
  • Light Punch and Heavy Punch
  • Medium Punch and Heavy Punch
  • Light Punch, Medium Punch and Heavy Punch
  • Light Kick and Medium Kick
  • Light Kick and Heavy Kick
  • Medium Kick and Heavy Kick
  • Light Kick, Medium Kick and Heavy Kick
  • Taunt
  • Simultaneous Input Assistance

The Classic control type unlocks more move and higher damage potential when compared to the Modern control type. You can find the Modern button layout, which is the default setting for Street Fighter VI, below:
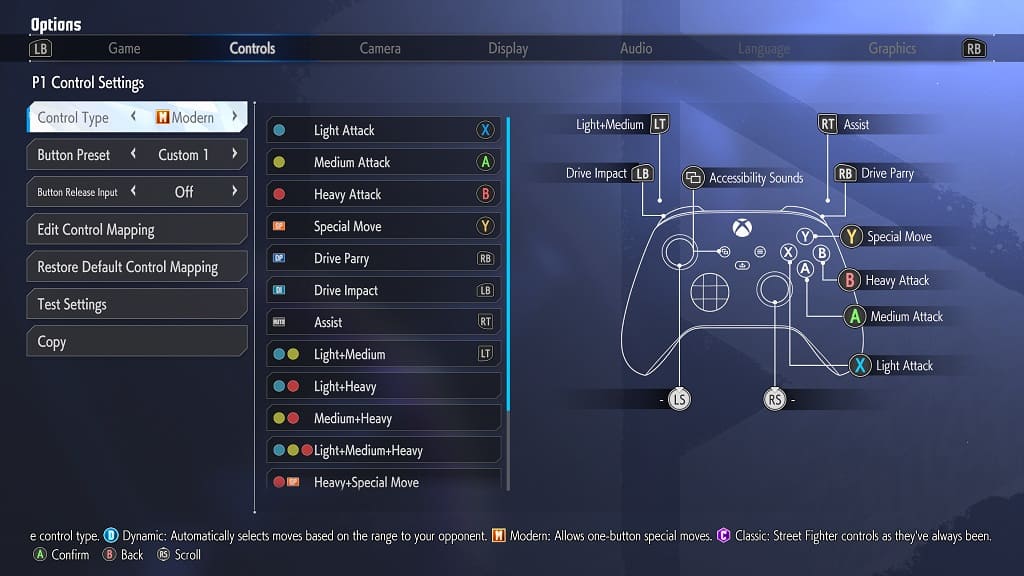
  • X Button: Light Attack
  • A Button: Medium Attack
  • B Button: Heavy Attack
  • Y Button: Special Move
  • RB Button: Dive Parry
  • LB Button: Drive Impact
  • RT Button: Assist
  • LT Button: Light and Medium

You can also add the following actions if you are using the Modern control type:

  • Light and Heavy Attack
  • Medium and Heavy Attack
  • Light, Medium and Heavy Attack
  • Heavy and Special Move
  • Taunt

We recommend assign any of the actions that you used most often to the Left Analog Button and Right Analog Button from the Controls tab in the Options menu. You can then use the Mapping menu to set the Left Analog Button to P3 or P4 and the Right Analog Button to P1 or P2.

You can assign which ever back paddles you didn’t previously use to any other buttons. If you don’t feel like using the LT or RT buttons to pull off certain attacks, for example, then you can assign these actions to the two remaining back paddles.

While Street Fighter 6 also features a Dynamic control type, you won’t be able to add any additional actions to it.

Trigger Locks

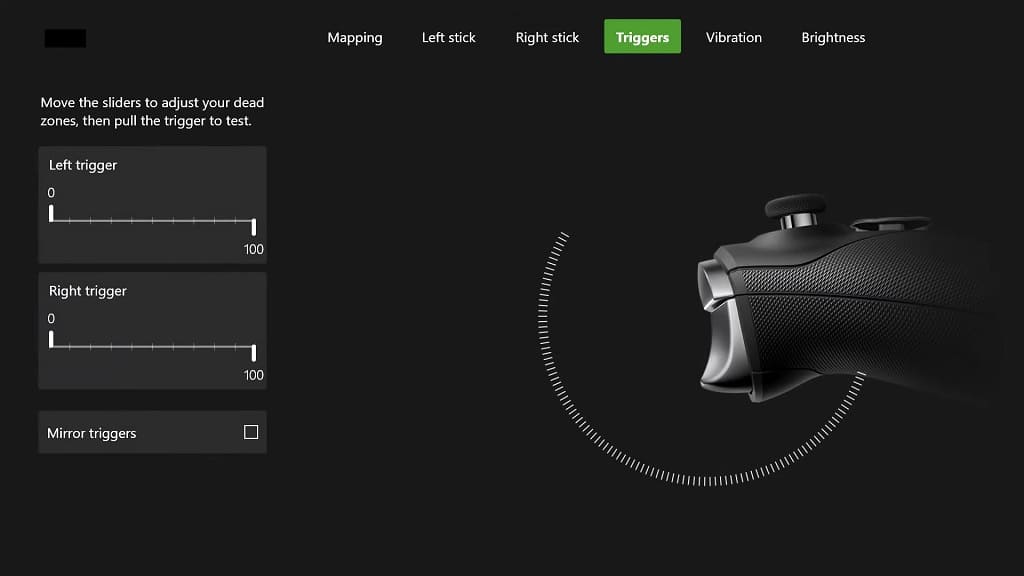
If you still want to use the LT and RT buttons, then we recommend that pull the trigger lock sliders located on the backside of the Xbox Elite Wireless Controller Series 2 all the way down. By doing so, the game will be able to register the input for these triggers much quicker.

You can further customize the deadzones of these buttons from the Triggers menu of the gamepad.

Stick Deadzones

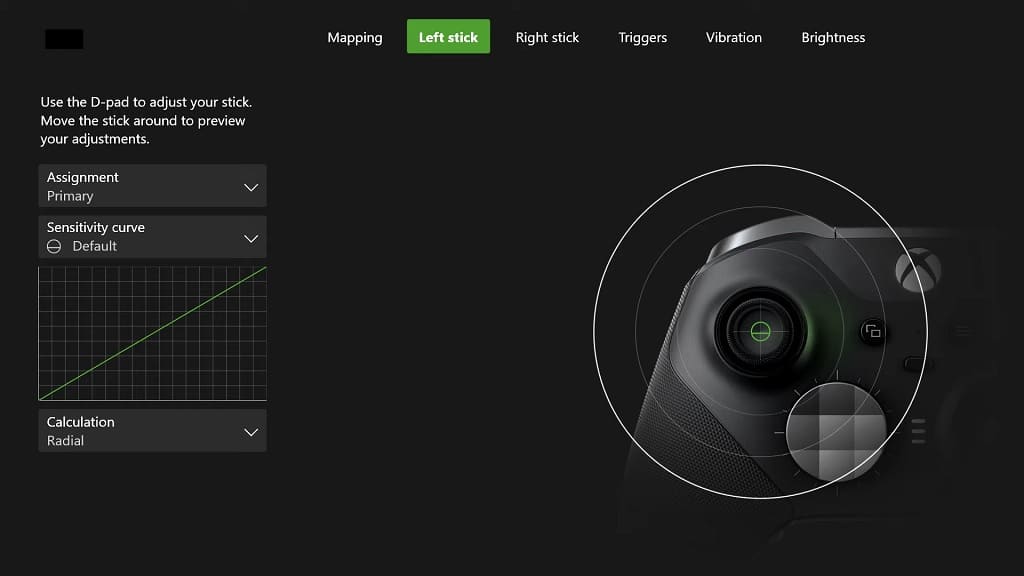
If you are using the left analog for movement inputs, then you may want to use the Left Stick menu of the Xbox Elite Wireless Controller Series 2 to adjust the pad’s deadzone. This can be helpful if the game isn’t recognizing the analog movements.

Wired Connection

Last but not least, we recommend that you plug in the Xbox Elite Wireless Controller Series 2 to your Xbox Series X or Xbox Series S. By doing so, the communication will be done through the USB cable, which should result in less input lag when compared using the same controller over a wireless connection.

What to do if Capcom ID log in is not working in Street Fighter 6

If you want to play multiplayer matches with others over the internet, as well as partake in other activities that require an online connection, then you will need a Capcom ID account for Street Fighter 6. If you can’t seem to sign into your account in this fighting game, then you can take a look at this troubleshooting article from Seeking Tech to see what you can do.

1. For the first step, we recommend that you visit the My Page section of the official Capcom ID website.

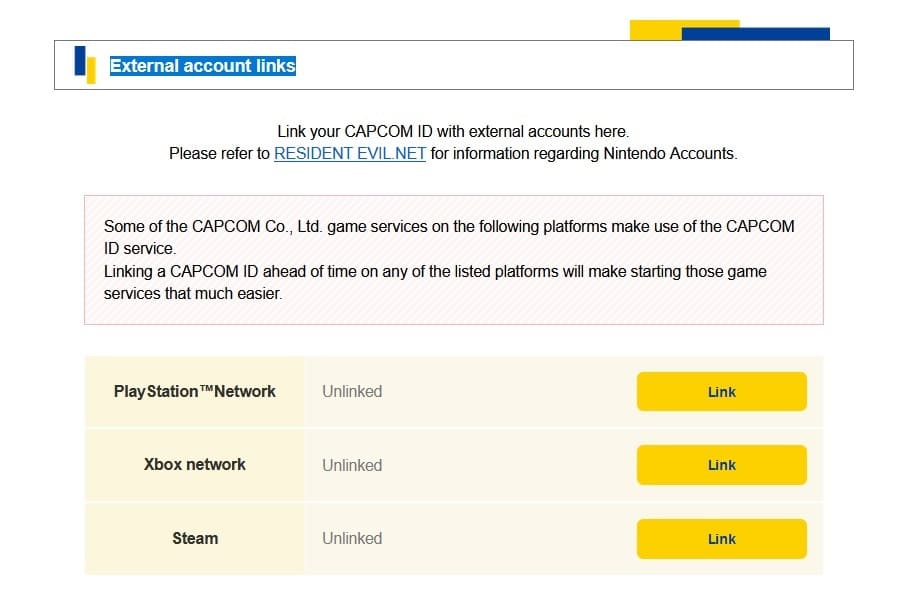
Once you are signed in, scroll down to the “External account links” section. Here, you should see the Xbox Live, PlayStation Network and Steam accounts that are linked to your Capcom ID.

External account links section from the official Capcom ID website

You should make sure that your Xbox, PSN or Steam account matches the one you are using to play Street Fighter VI. Otherwise, you won’t be able to log in.

If you are using a different account on your PC or console, then you need to switch to the one that is listed in the aforementioned “External account links” section.

It is very important to note that you won’t be able to link to a different Xbox Live, PlayStation Network or Steam account to your Capcom ID. You also won’t be able to use the same Xbox, PSN or Steam you previously linked to a newer ID even if you unlink them beforehand.

2. If you still aren’t able to get past the “Yes, I agree” screen when signing into your Capcom ID account in Street Fighter 6, then you can try creating a new ID account.

As we stated above, you can link your Xbox Live, PlayStation Network or Steam account to a new Capcom ID if you already linked then to an older ID.

Keep in mind that you will also lose out on any data that is stored online by changing your Capcom ID. These include your avatar as well as your rankings.

3. There is a possibility that the Street Fighter 6 servers are down at the moment. In this case, wait until the servers are fully operational again before trying to log into your account in the game.

4. You should also make sure that you have the latest patch installed for this fighting game.

5. If you are still stuck in the sign in screen, then we suggest that you contact the customer service team on the official Street Fighter 6 website to get direct support for your log-in problems.

Recommended DualSense Edge settings for Street Fighter 6

You can gain a little bit of an advantage when playing Street Fighter 6 with a DualSense Edge controller as opposed to a standard DualSense. You can check out this guide from Seeking Tech to see what are the best settings you should be using for the Edge for the latest SF installment.

Custom Button Assignments

The two back buttons can be used to add additional actions.

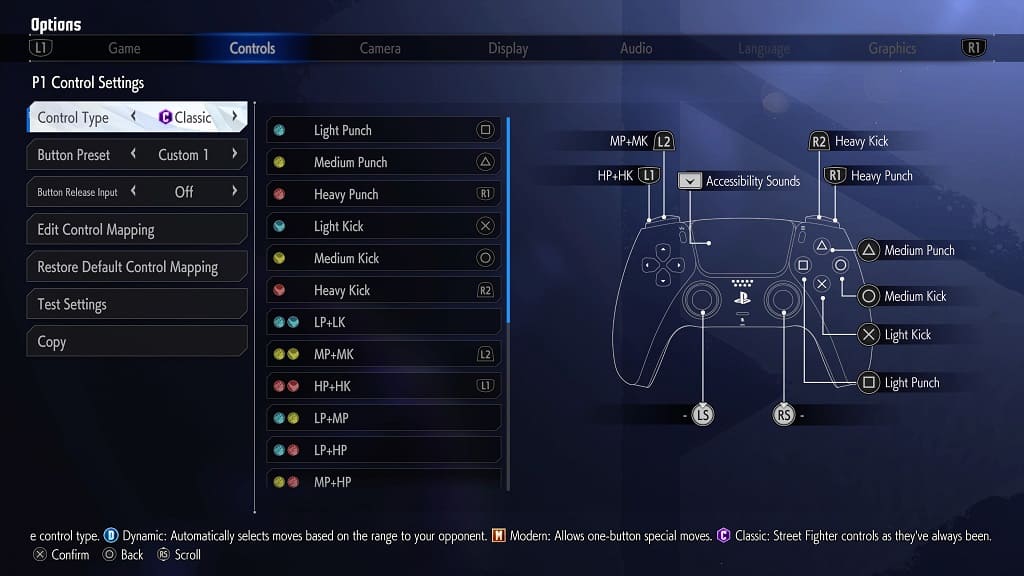
If you are using the Classic control type, which we highly recommend doing so as you will unlock the full move set and damage potential of your characters, then you will have the following default layout:

  • Square Button: Light Punch
  • Triangle Button: Medium Punch
  • R1 Button: Heavy Punch
  • X Button: Light Kick
  • Circle Button: Medium Kick
  • R2 Button: Heavy Kick
  • L2 Button: Medium Punch and Medium Kick
  • L1 Button: Heavy Punch and Heavy Kick
  • Touch Pad Button: Accessibility Sounds

The following actions can also be assigned to any buttons on the controller:

  • Light Punch and Light Kick
  • Light Punch and Medium Punch
  • Light Punch and Heavy Punch
  • Medium Punch and Heavy Punch
  • Light Punch, Medium Punch and Heavy Punch
  • Light Kick and Medium Kick
  • Light Kick and Heavy Kick
  • Medium Kick and Heavy Kick
  • Light Kick, Medium Kick and Heavy Kick
  • Taunt
  • Simultaneous Input Assistance

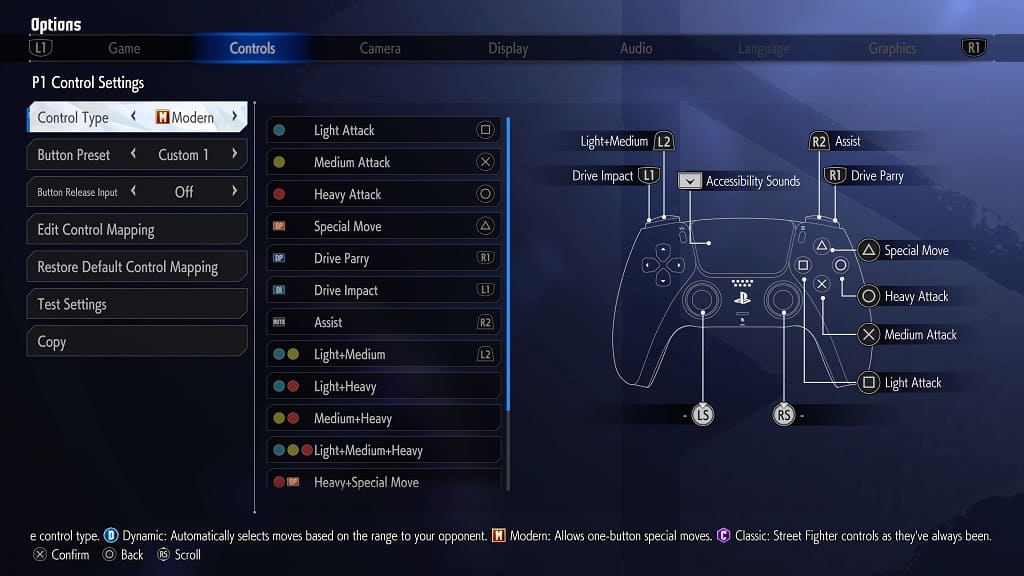
If you want to stick with the Modern control type, then you should see the following default button layout:

  • Triangle Button: Light Attack
  • X Button: Medium Attack
  • Circle Button: Heavy Attack
  • Triangle Button: Special Move
  • R1 Button: Dive Parry
  • L1 Button: Drive Impact
  • R2 Button: Assist
  • L2 Button: Light Attack and Medium Attack
  • Touch Pad Button: Accessibility Sounds

You can also add the following actions to any buttons on the gamepad:

  • Light and Heavy Attack
  • Medium and Heavy Attack
  • Light, Medium and Heavy Attack
  • Heavy and Special Move
  • Taunt

While the Dynamic control type is also available, there aren’t any additional actions you can add to your controller for this simplified layout.

To add any of the aforementioned unassigned actions to the two back buttons of the DualSense, go to the Controls section of the Options tab and then select either Player 1 Side Control Settings (Battle) or Player 2 Side Control Settings (Battle). Afterwards, select Edit Control Mapping.

Look for the actions that you want to map to the back buttons of the Edge and then set it to L3 and R3.

Once you are done saving your changes, open the Customize Button Assignments menu of the controller and then add L3 and R3 to the two back buttons.

Trigger Stops

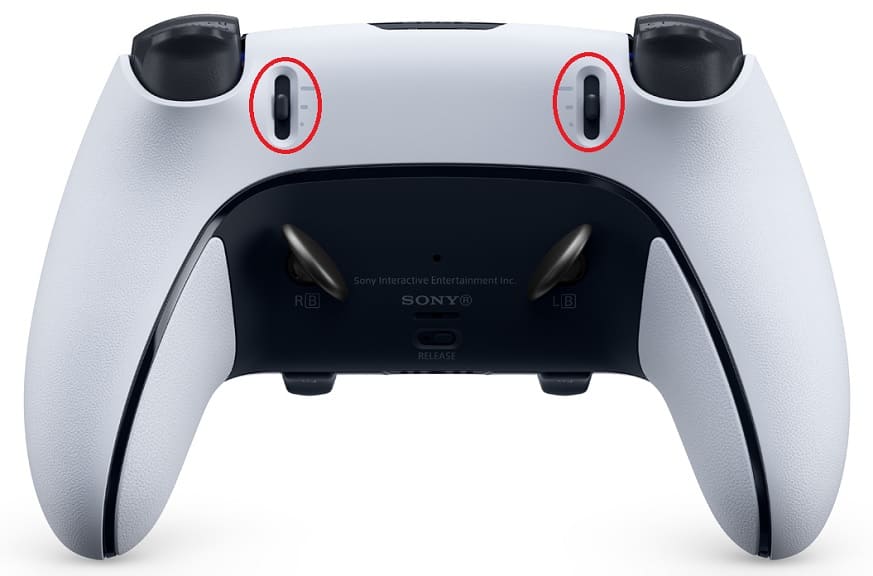
If you haven’t done so already, pull the sliders located on the backside of your Edge all the way down. By doing so, Street Fighter 6 should be able to register your L2 and R2 inputs a lot quicker. In a fighting game, a few extra milliseconds can make all the difference.

You can also further adjust the sensitivity of these trigger buttons from the DualSense Edge’s Trigger Deadzone menu.

Stick Sensitivity and Deadzones

If you prefer using the analog stick instead of the directional pad, then you can use the Stick Sensitivity and Deadzones menu of the controller to adjust the left analog if you are having problems getting your command inputs registered in Street Fighter VI.

Analog Caps and Back Buttons Attachments

As for the analog caps and back button attachments that came with the DualSense Edge, we recommend going with whichever combination that gives you the most comfort as you will most likely by constantly mashing your controller.

Wired Communication

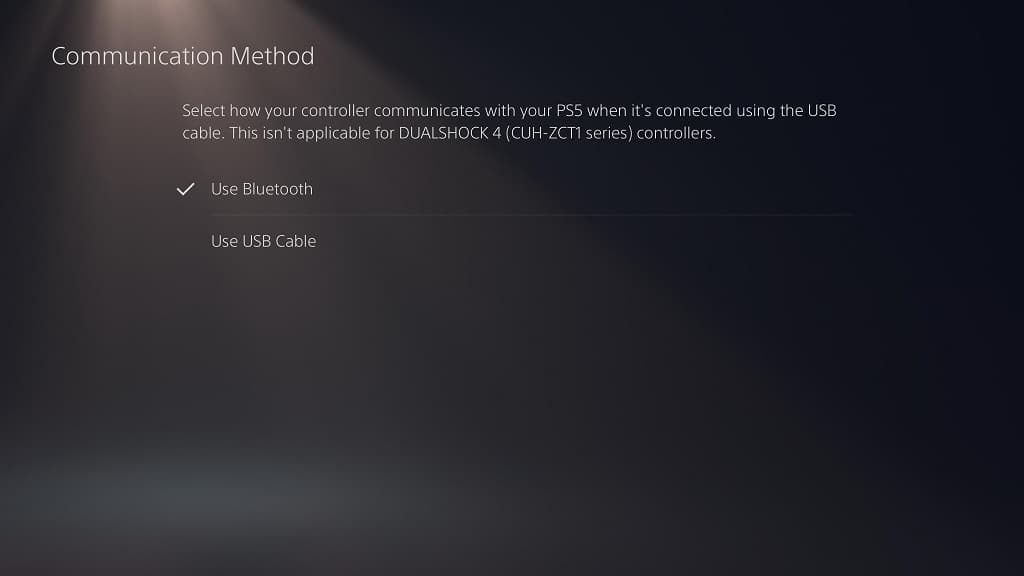
To reduce input lag, we suggest that you plug your Edge controller directly to one of the USB ports of your PS5 console. Afterwards, open the Settings menu of your system and then go to Accessories > Controller (General) > Communication Method. Finally, make sure that Use USB cable is selected.

By doing so, you should be able to reduce the latency when it comes to your button inputs.

How to enable Street Fighter 6 simultaneous input assistance

You can turn on simultaneous input assistance when playing Street Fighter 6 when using the Classic control type. To find out how can enable the feature for this fighting game, you can take a look at this tutorial from Seeking Tech.

What is simultaneous input assistance?

You can read the official description for this feature below:

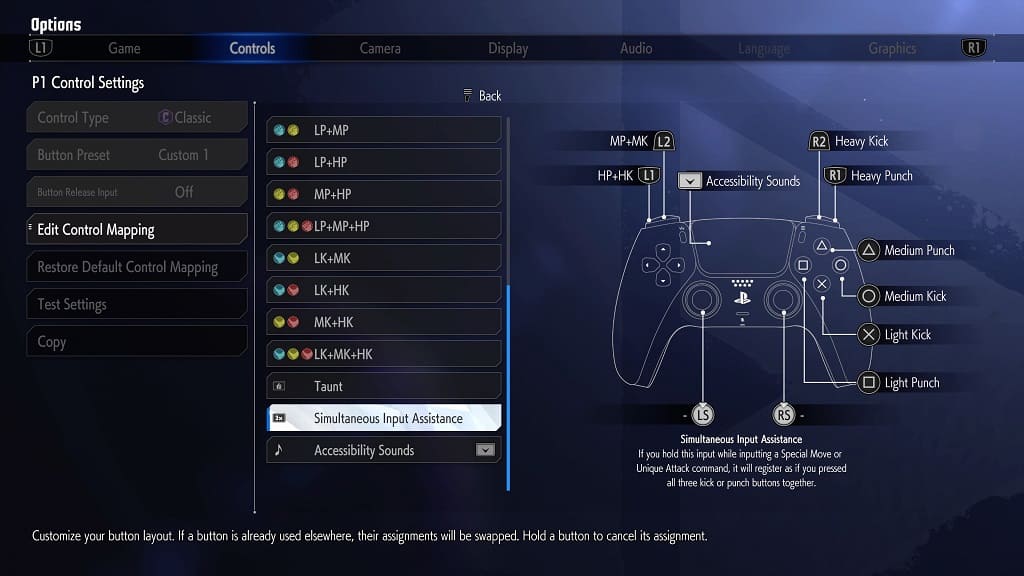
If you hold this input while inputting a Special Move or Unique Attack command, it will register as if you pressed all three kick or punch buttons together.

So, if you press the simultaneous input assistance button and a punch button together, it will register as if you are pressing the light, medium and heavy punch buttons at the same time. If you press the simultaneous input assistance button and a kick button together, then it will register as if you are pressing the light, medium and heavy kick buttons at the same time.

This feature may be helpful if you have a hard time pulling off some of the special moves and/or unique attacks with the Classic control type.

How to turn on simultaneous input assistance

In order to enable simultaneous input assistance in SF6, you need to take the following steps:

1. Go to the Mode Select menu. You won’t be able to turn this feature on from the Options menu from the pause screen in the middle of a match. Therefore, you have to exit back out all the way to the main menu.

2. From the Mode Select screen, press the Options button if you are playing with a PlayStation controller layout or Menu button if you are playing with an Xbox controller layout to open the Multi Menu.

3. Head into Options from the Multi Menu.

4. After getting to the Options menu, press L1/R1 on the PlayStation controller or LB/RB on the Xbox controller to switch to the Controls tab.

5. In the Controls tab, select either Player 1 Side Control Settings (Battle) if you prefer starting out the match on the left side of the screen or Player 2 Side Control Settings (Battle) if you prefer starting on the right side.

6. In the P1 Control Settings or P2 Control Settings screen, you first need to make sure that the Control Type is set to Classic.

This is because the simultaneous input assistance function isn’t available if you are playing with the Modern or Dynamic control type.

7. Afterwards, scroll down and then select Edit Control Mapping.

8. Scroll down the list of configurable actions until the cursor gets to Simultaneous Input Assistance.

9. Press a button you want to assign this action to.

10. Once you are done, press the Options button on the PlayStation controller or Menu button on the Xbox controller to back out of the Edit Control Mapping section.

11. You should get a Confirmation notification asking if you want to save your changes. Here, you need to select Yes in order to save and apply the simultaneous input assistance feature.

To use this function in a match, you can press the simultaneous input assistance button and the kick/punch button at the same time. Alternatively, you can also hold the simultaneous input assistance button and then press the kick/punch button.

How to find missing items you bought from the Street Fighter 6 Goods Shop

When you purchase an item from the Goods Shop in Street Fighter 6, you may not be able to unlock it immediately. To see how you can get these missing items to show up, you can take a look at this troubleshooting article from Seeking Tech.

According to Capcom, the in-game times may take longer than usual to appear due to server congestion if a lot of players are using the Goods Shop at the same time.

1. For the first potential fix, you can try restarting your PC or console.

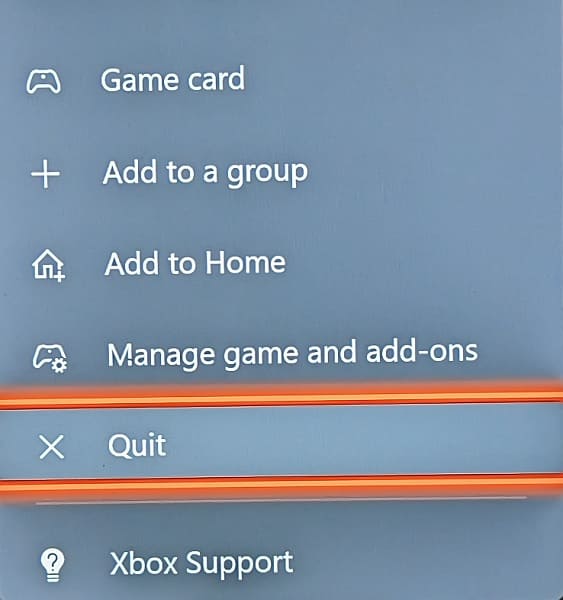
Keep in mind that the Xbox Series X and Xbox Series S use quick resume; therefore, you should quit the game before you restart your console by doing the following:

  • Press the Xbox logo on the controller to open the Guide menu.
  • Move the cursor in the Guide menu over to the Street Fighter 6 icon.
  • Press the Menu button on the controller.
  • Finally, select Quit from the small window menu.
  • Press and hold the Xbox button and then select the “Restart console” option.

After the reboot, log back into your account in Street Fighter 6 to see if you are able to locate the items you previously bought.

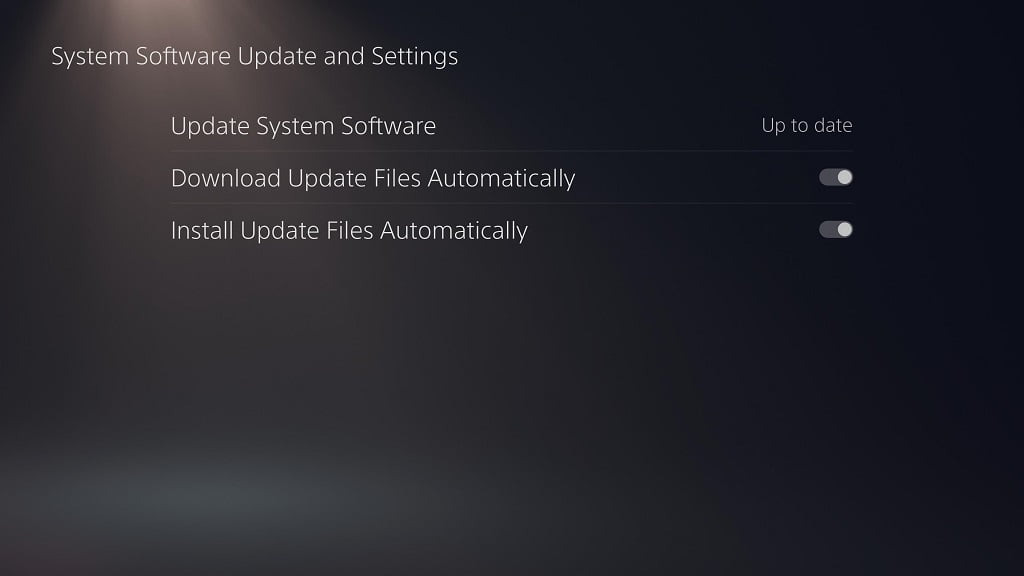
2. If the Goods Shop you purchased still isn’t showing up after a system restart, then you should make sure you have the latest firmware downloaded for your PlayStation 4, PlayStation 4 Pro, PlayStation 5, PlayStation 5 Digital Edition, Xbox Series X or Xbox Series S.

If you are playing SF6 on a PC, then can try downloading the latest client update for Steam.

Once you updated your hardware, open the game and log into your Capcom ID account to see if your missing Goods Shop items show up.

3. If you still can’t find the in-game content you purchased in the store, then we recommend that you contact the Capcom customer service team at the official Street Fighter website. You can do so by using this form.

When contacting Capcom, make sure you know the full name, as well as the quantity, of the missing item you purchased from the Goods Shop.

You will also need your User Code, which can be found in the Profile section of the Multi Menu. You can open this menu from the Mode Select screen by pressing the Options button if you are using a PlayStation controller or Menu button if you are using an Xbox controller.

Hopefully, they will be able manually add your lost Goods Shop item.

How to change the Street Fighter 6 voice and subtitle language

Street Fighter 6 supports multiple voice and subtitle languages. To see how you can change these settings, you can take a look at this tutorial from Seeking Tech.

What voice languages are supported in SF6?

At launch, you can only change the voice language in Street Fighter VI to either English or Japanese.

How to change the voice language

In order to change the language the character speaks in this fighting game, you need to take the following steps:

1. If you haven’t done so already, head to the Mode Select menu.

2. From there, press the Options button if you are using a DualSense/DualShock 4 controller or Menu button if you are using an Xbox game pad to open the Multi Menu.

3. Next, you need to go to Options from the Multi Menu.

4. Inside of the Options screen, use the L1/R1 on PlayStation or LB/RB buttons on Xbox to change tabs until you get to Language.

5. From the Language tab, you first need to select Voice Settings. This will let you change the language of your avatar, the World Tour mode as well as other scenarios.

By default, this is set to English if you are playing the game in the U.S. and other western regions. You can also set this to Japanese if you would like to hear the dialogue in a different language.

6. Once you are done with Voice Settings, select to FH/BH Cabinet Match Voice Language Settings from the same Language tab in the Options screen.

Here, you can change the language for the voices you hear during the Fighting Ground and Battle Hub matches. By default, this is also set to English with Japanese as the alternate choice.

7. Once you are done, press the circle or B button to exit the Options menu.

8. When asked to confirm your voice language changes, select the Yes option.

How to change the text language in Street Fighter 6

If you want to change the language of the display text in this fighting game, then you need to do the following:

1. Go to the Mode Select screen.

2. Open the Multi Menu.

3. Head into Options.

4. Change to the Language tab from the Options screen.

5. Select Display Language.

6. You should be able to pick between the following languages:

  • English
  • Japanese
  • French
  • Italian
  • German
  • Spanish – Spain
  • Arabic
  • Portuguese – Brazil
  • Polish
  • Russian
  • Simplified Chinese
  • Traditional Chinese
  • Korean

English is the default language if you are playing Street Fighter 6 in the U.S. or other English speaking regions.

Can you share Street Fighter 6 DLC?

You are able to game share Street Fighter 6 with another PlayStation Network or Xbox Live account. So, are you also able to share the DLC packs from this fighting game? You can find out in this article from Seeking Tech.

If you read the description on the PlayStation Store for any of the available add-ons for Street Fighter VI, you should see a line that states that game sharing is not allowed for DLC. This is because the add-on is tied to the PlayStation Network account used.

Even if the PSN account used for the purchase is a Family Manager. The rest of the accounts on your PlayStation 4 or PlayStation 5 won’t be able to gain access to the DLC even if they are playing from the same console. Instead, you will have to logged into the game with Family Manager account.

The same restrictions should also be applied with your Xbox Live account for the Xbox Series S and Xbox Series X version of the fighting game.

You can find the exact wording on the PlayStation Store below:

This DLC can only be used by the PSN account that purchased the content. Even if the Family Manager purchases the DLC, the content won’t be available to their Family Members.

Keep in mind that you should be able to gain access to the DLC you purchased as long as you are signed into the same account even if you are playing on another console.

The same benefit should also be applicable for the Xbox Live account if you are playing on an Xbox Series S or Xbox Series X.

You can find the exact wording on the PlayStation Store for this benefit below:

You can download and play this content on the main PS5 console associated with your account (through the “Console Sharing and Offline Play” setting) and on any other PS5 consoles when you login with your same account.

So, if you want a friend or family member to gain access to your DLC purchases, then they will need to sign in with your PlayStation Network account.

At launch, you are able to purchase the Year 1 Character Pass, Year 1 Ultimate Pass as well as several Fighter Coins packs for Street Fighter 6.

What’s the difference between SF6 Drive Tickets, Fighter Coins and Zenny?

In Street Fighter 6, you will encounter three different kinds of currency. To see what the major differences are between Drive Tickets, Fighter Coins and Zenny, you can take a look at this comparison article from Seeking Tech.

What are Drive Tickets?

A Drive Ticket is an in-game virtual currency that you can earn by completing specific challenges in Street Fighter VI. You can find these challenges by going to the Rewards section in the Multi Menu. Afterwards, switch over to the Challenges tab.

With Drive Tickets, you can purchase many of the same in-game items from the Goods Shop, such as costumes and emotes, as Fighter Coins. With that said, the same items usually cost more in tickets than coins.

There is currently no way you can use real-life money to purchase Drive Tickets in Street Fighter 6. However, you will get these as bonuses by purchasing the yearly character pass or season pass.

What are Fighter Coins?

As we mentioned above, many of the same items from the Goods Shop can also be bought with Fighter Coins. Furthermore, this virtual currency can only be used to purchase certain premium content in SF6 such as new DLC characters.

The main way to acquire these virtual coins is by spending real money to purchase them in increments. The following are available based on the pricing in the U.S region:

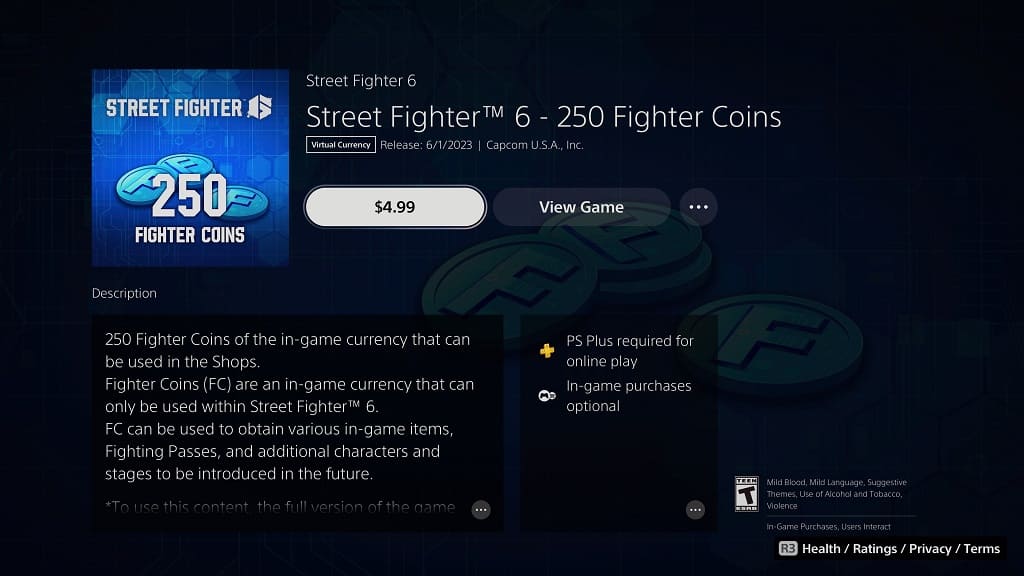
  • 250 Fighter Coins – $4.99
  • 610 Fighter Coins – $11.99
  • 1,250 Fighter Coins – $23.99
  • 2,750 Fighter Coins – $49.99

To find out more about these microtransactions, you can take a look at this post.

Fighter Coins can also be obtained as rewards for completing certain objects in the Fighters Pass. At launch, the Fighters Pass rewards aren’t currently available; therefore, these coins can only be purchased with real cash.

What is Zenny?

Zenny is a virtual currency that is exclusive to the World Tour mode. For the uninformed, this is a new single-playing campaign that lets you explore the locations and meet legendary characters from the Street Fighter franchise via your user created avatar.

You can use these to buy gear, cosmetics as well as food and drinks.

Zenny can be acquired through the following methods:

  • Complete missions and quests
  • Fulfill the listed conditions in fights
  • Selling items in your inventory in shops
  • Partake in part-time minigame jobs
  • Open chests
  • Found in the environment

How to disable crossplay in Street Fighter 6

By default, Street Fighter 6 supports cross network play. As a result, players on PC, PlayStation 4, PlayStation 4 Pro, PlayStation 5, PlayStation 5 Digital Edition, Xbox Series S and Xbox Series X can all be matched up with each other online.

On the PlayStation consoles, you will need to subscribe to PlayStation Plus Essential, PlayStation Plus Extra, PlayStation Plus Deluxe or PlayStation Plus Premium in order to play with others online.

For the Xbox Series systems, you have to be a member of either Xbox Live Gold or Xbox Game Pass Ultimate (which includes Gold) to play online matches.

If you would rather disable crossplay, then you can take a look at this tutorial from Seeking Tech to see how you can do so.

Method #1

For the first method, you can take the following steps:

1. Go back to the Mode select screen if you aren’t there already.

2. From there, open the Multi Menu. If you are using a PlayStation controller, then you can do so by pressing the Options button. For the Xbox controllers, you need to press the Menu button instead.

3. Once you get to Multi menu, select Options.

4. Inside the Options menu, you should be in the Game tab. If not, use the L1/R1 buttons on the PlayStation gamepad or LB/RB buttons on the Xbox gamepad to change tabs until you get to the correct location.

5. You should be able to find Crossplay setting.

Method #2

For the second method, you can do the following:

Go to the Battel Hub lobby.

From there, open the Matchmaking menu.

You should be able to see and adjust the Crossplay Settings from there.

By disabling cross-play, PS4 and PS5 players can only be matched up online with each other. If you are playing on Xbox Series S or Xbox Series X, then you can only play with players on these two Xbox consoles. For PC players, you can only play with others that are also playing on computers.