How to turn off DualSense

The DualSense is a new game controller that is designed the PlayStation 5. You can check out this step-by-step guide to see how you can turn off the power of this gamepad.

How to turn off DualSense in the PS5 Control Center

The quickest way to turn off the DualSense is through the Control Center quick menu on the PlayStation 5.

In order to do so, you need to take the following steps:

1. The first step is to press the PS button on your DualSense controller, which should bring up the Control Center.

2. In the Control Center, navigate to the bottom portion of the menu and then select the “Acessories” option, which has a controller icon, by pressing the X button on your DualSense.

By default, “Accessories” is located between the “Mic” option and you profile picture.

3. In the pop-up menu, select the controller which you want to turn off.

4. Afterwards, select the “Turn Off” option to shut down the power of the controller.

How to turn off DualSense in the PS5 Settings

You can also turn off the DualSense in the settings menu of the PlayStation 5.

In order to do so, you need to do the following:

1. First off, you should be in the Home Screen, which is the main menu of the system after it boots up. This is where you can select a videogame to play.

If you are in a game or app, you can press and hold the PS button on your DualSense to bring up the Home Screen.

2. From the Home Screen, go to “Settings.”

You will find the “Settings” option on the upper right corner of the screen as it has a gear cog symbol. It should be in between the “Search” option and your profile picture.

3. Inside the “Settings” menu, select the “Accessories” option from the list.

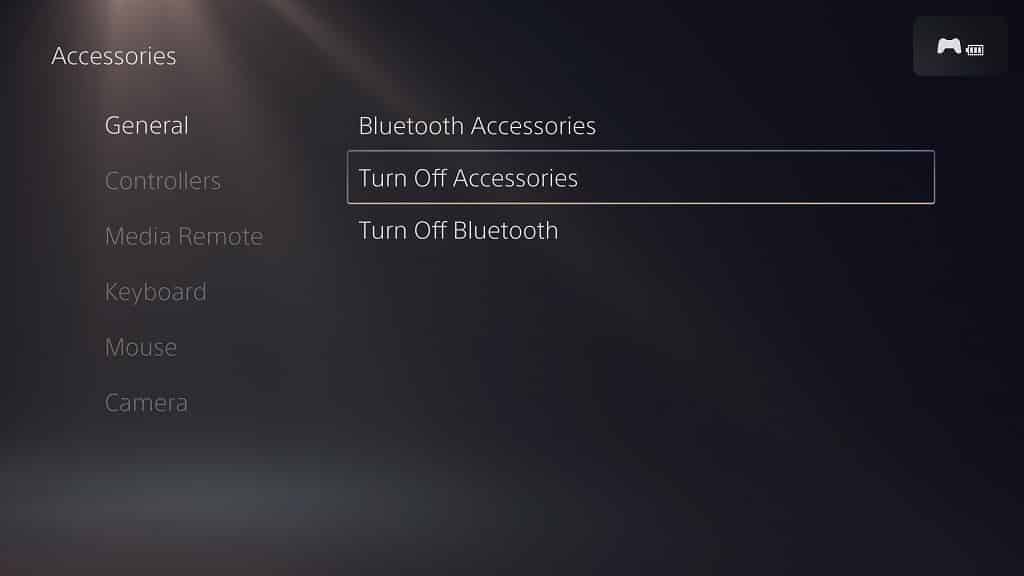
4. Inside the “Accessories” menu, select “General” from the available options on the left side.

5. On the right side in the same “Accessories” menu, select “Turn Off Accessories.”

6. In the “Turn Off Accessories” menu, select the controller which you want to turn off.
How to turn off DualSense without using PS5 menus

You can also power off the DualSense without using the menus on the PlayStation 5.

If you are interested in doing so, then you need to take the following step:

1. Press and hold the PS button on your DualSense for around 10 seconds.

The controller lights should eventually go out, which signals that the gamepad has been turned off.

How to automatically turn off DualSense after a set amount of time

You are also able to automatically turn off the DualSense after a set amount of time

If you want to do so, you need to do the following:

1. Head to “Settings” from the Home Screen.

2. Under the “Settings” menu, select “System” from the list of options.

3. Under the “System” menu, select “Power Saving” from the available options on the left side.

4. On the right side of the same “System” menu, select the “Set Time Until Controllers Turn Off” option.

5. In the pop-up menu, you can pick between the following time periods:

  • “After 10 Minutes”
  • “After 30 Minutes”
  • “After 60 Minutes”
  • “Don’t Turn Off”

If you want to use the same controller again after turning it off, you can press the PS button on the DualSense.

How to install and format the Mushkin Gamma Gen 4.0 to PS5

The Mushkin Gamma Gen 4.0 is compatible with the PlayStation 5 and PlayStation 5 Digital Edition as you can use this solid state drive to store and play PS5 games.

You can check out this step-by-step guide at Seeking Tech to see how you can install and format the Gamma Gen 4.0 for use with Sony’s game console.

Supported Solid State Drives

This tutorial will cover the following capacities:

  • 1 TB Mushkin Gamma Gen 4.0 (Model Number: MKNSSDGA1TB-D8)
  • 2 TB Mushkin Gamma Gen 4.0 (Model Number: MKNSSDGA2TB-D8)
  • 4 TB Mushkin Gamma Gen 4.0 (Model Number: MKNSSDGA5TB-D8)

Compatible Heatsink

You will also need a PS5-compatible heatsink. If you are looking for one, then we recommend picking up the be quiet! MC1 M.2 SSD Cooler, which you can find on Amazon with this link. (#CommissionsEarned).

You can check out this video guide to see how you can install the MC1 M.2 SSD Cooler to the Mushkin Gamma Gen 4.0.

Moving important data off of Mushkin Gamma Gen 4.0

If you used your Mushkin Gamma Gen 4.0 solid state drive before with another device, then we recommend moving any important files you have stored on it to another storage drive. This is because formatting the SSD for PS5 will delete all the previous data store on it.

Updating PS5 firmware

If you haven’t done so already, you should also make sure you also update the firmware of your PlayStation 5 or PlayStation 5 Digital Edition. This is because M.2 solid state drive support was only added in a recent firmware update.

How to insert Mushkin Gamma Gen 4.0 to PS5

After updating your PlayStation 5 system to its latest firmware, you can insert the Gamma Gen 4.0 to the game console.

In order to do so, you can take the following steps:

1. Turn off your PS5 or PS5 Digital Edition console.

2. Unplug the power cable, HDMI cable as well as other cables you have connected to your console.

3. You should also remove the stand if you have it attached.

4. You can then lay your game console down so that the PS logo is facing downwards.

5. You should also position the console so that the backside, which is where the HDMI port and power port are located, is facing you.

6. From your vantage point, put your right hand on the bottom right corner of the outer cover and your left hand on the top left corner of the outer cover.

7. Lift the bottom right corner of the outer cover with your right hand.

8. Using your left hand, slide the outer cover off to the left.

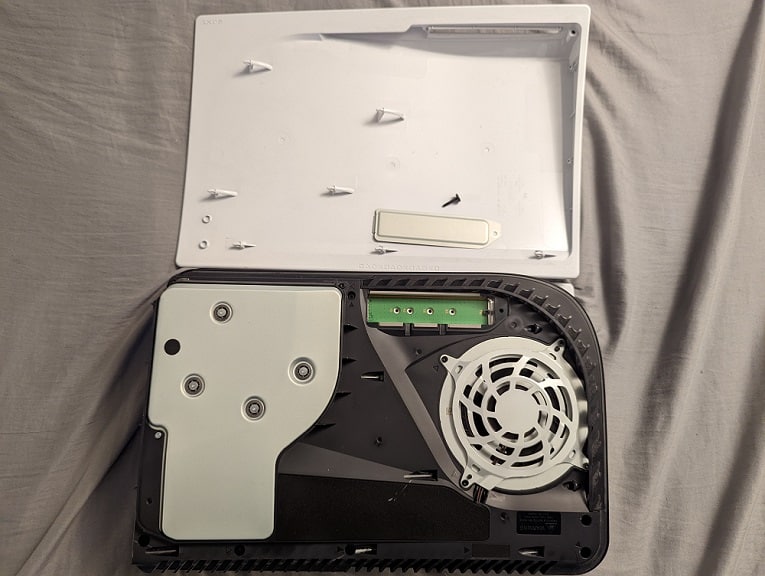
9. With the cover off, you should see the M.2 docking bay, which has a metal cover keeping it close.

10. Use a cross-head screwdriver to unscrew the screw holding the M.2 metal cover in place.

11. Remove the metal cover to gain access to the M.2 docking bay.

12. Inside the bay, use the cross-head screwdriver to unscrew the screw inside it.

13. You should also remove the spacer from the docking bay.

14. Place the spacer you removed from Step #13 into the 80 hole in the docking bay.

15. Insert the Mushkin Gamma Gen 4.0, which should have the heatsink already installed, into the M.2 slot of your PS5 system from a diagonally upwards position.

16. Hold down on the end of the SSD that is sticking upwards and then use the screw you previously removed from Step #12 to secure the Gamma Gen 4.0 into place.

17. Put back the M.2 dock metal cover and then screw it back into place.

18. Slide the outer cover back into place to complete this process.

How to format Mushkin Gamma Gen 4.0 for PS5

After inserting the Mushkin Gamma Gen 4.0 into your PlayStation 5 or PlayStation 5 Digital Edition, you then need to format the drive.

In order to do so, you need to do the following:

1. Reattach the stand to your PS5 system.

2. Reconnect the HDMI cable, power cable and any other cables you previously have connected to your PlayStation 5.

3. Turn on your game console.

4. During the startup process, you should eventually get the M.2 SSD Storage notification screen.

5. Here, you need to press the PS button to turn on your controller.

6. Next, you have to select the Format M.2 SSD option.

7. After the formatting of the drive has been completed, you should see the sequential read speed test of the Mushkin Gamma Gen 4.0 running on your PS5 system.

8. Select the OK option to complete the formatting process and head to the Home Screen.

Where to find Mushkin Gamma Gen 4.0 in the PS5 menus

To find where your newly formatted Mushkin Gamma Gen 4.0 is located in the PlayStation 5 menus, you can do the following:

1. From the Home Screen, navigate to the upper right corner of the screen and then select Settings.

2. In the Settings menu, scroll down and then select Storage.

3. After getting to the Storage menu, you need select M.2 SSD Storage on the left column.

4. On the right side in the same menu, you should be able to see the Mushkin Gamma Gen 4.0 SSD.

You can also use the Storage menu to move games in between different storage options, reformat the Gamma Gen 4.0 and change the default storage location for games.

How to watch YouTube videos in HDR on PS5

Thanks to a recent update, you can now watch YouTube videos in HDR on your PlayStation 5 or PlayStation 5 Digital Edition. In order to do so, you can check out this step-by-step guide from Seeking Tech.

How to download the YouTube app on PS5

To begin, make sure you have the YouTube app install on your system.

If you haven’t done so already, you can take the following steps:

1. From the home screen, which is where you select which games to play, press the R1 button on your DualSense controller to switch over to the Media tab.

2. In the Media tab, select All Apps.

3. In the All Apps section, scroll down and then select the YouTube app.

4. On the YouTube page, select Download.

How to update the YouTube app on PS5

You should also update the YouTube app if you haven’t done so already.

To update, you need to do the following:

1. From the home screen menu, switch to the Media tab.

2. After getting to the Media tab, scroll over to the YouTube app.

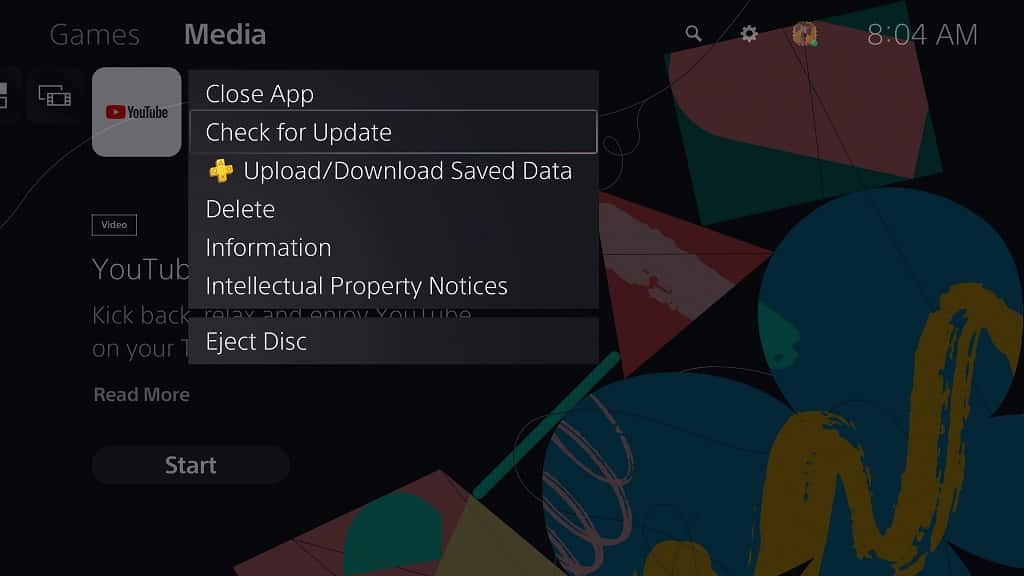
3. With the YouTube app highlighted in the Media tab, press the Options button on your DualSense controller.

4. In the pop-up window, select Check for Update.

How to set up for PS5 to stream HDR videos on YouTube

After updating the YouTube app, you should then make sure that your PlayStation 5 system is properly set up to support HDR.

In order to do so, you need to take the following steps:

1. From the home screen, select the gear wheel icon located on the top right corner of the screen to go to Settings.

2. Inside of Settings, select Screen and Video.

3. After getting to the Screen and Video menu, select Video Output on the left side of the screen.

4. On the right side of the same Screen and Video menu, you then need to select HDR.

5. In the pop-up menu, select either Always On or On When Supported.

Always On will allow your PS5 to show HDR-enabled content in addition to converting SDR content to HDR.

On When Supported will allow your PS5 to show HDR content when it is compatible. This option will also disable the SDR conversion to HDR.

How to tell if you are watching a HDR YouTube video on PS5

To tell whether or not you are a watching a YouTube video with HDR enabled on your PlayStation 5, you can try bringing up a display menu on your television screen that will show the current display information.

If your TV does not have that particular feature, then you can do the following:

1. When you are playing a video in the YouTube app, press any of the directional buttons or move the left analog stick in any direction.

2. Afterwards, select the More option, which has the three bullet points symbol.

3. The second option to the left should show that the video is displaying in HDR.

4. You can also select the “Stats for nerds” option from the aforementioned More menu.

5. In the “Stats for nerds” menu, the bt2020 color indicates that the the YouTube video is displaying HDR. If it shows bt709 instead, then it indicates that the video is showing SDR.

Where to find PlayStation Plus games on PS5

If you are a member of the PlayStation Plus service, you will get free access to select games on the PlayStation 5 and PlayStation 5 Digital Edition.

If you are having a hard time finding the locations for these PlayStation Plus games, then you can check out this step-by-step tutorial at Seeking Tech.

How to get to the PlayStation Plus menu from the Home Screen

To download the latest PlayStation Plus games, you need to go to the PlayStation Plus menu.

The first method is through the Home Screen, which is the main menu where you can perform multiple tasks such as selecting which game to open, going to the PlayStation Store and more.

To do so, you need to take the following steps:

1. First off, you should be in the Home Screen. If you are currently playing a game or using one of the apps, then you can get to the Home Screen by pressing and holding the PS button on the DualSense controller.

2. In the Home Screen, you should see a yellow plus icon in the games section. You need to select this, with the X button of the DualSense controller, to get to the PlayStation Plus menu.

How to get to the PlayStation Plus menu from the PlayStation Store

To get to the PlayStation Plus menu from the PlayStation Store, you need to do the following:

1. From the Home Screen, select the blue shopping bag icon from the PlayStation Store in the games section.

2. Inside the PlayStation Store, use the R1 and L1 buttons on the controller to navigate over to the Subscriptions tab.

3. In the Subscriptions tab, you should see a PlayStation Plus banner. Select that banner to get to the PlayStation Plus menu.

How to download The PlayStation Plus Collection games on PS5

To download PlayStation Plus games on the PlayStation 5, you need to do the following:

1. Once you are inside the PlayStation Plus menu, scroll down and you will see two sections: “Exclusive to PS Plus on PS5” and “Free monthly games.”

2. The “Exclusive to PS Plus on PS5” section features The PlayStation Plus Collection, which are PlayStation 4 games that are only available to download for PlayStation 5 users. Here, we recommend selecting the View All option with the X button on the controller.

3. In the following “The PlayStation Plus Collection” menu, you will find a list of games. Select the game you want to download to go to the game’s page.

4. In the game’s page, select the “Add to Library” option.

5. In the same page, select the “Download” option.

How to download free monthly games on PS5

To download free monthly games on the PlayStation 5, you need to take the following steps:

1. Go back to the PlayStation Plus menu.

2. In the PlayStation Plus menu, scroll down until you see the “Free monthly games” section.

3. Select the game you want to download to go to the game’s page.

4. Inside game’s page, select the “Add to Library” option.

5. In the same page, select the “Download” option to download the game.

Are PlayStation Plus games free on PS5?

We don’t consider the PlayStation Plus games to be free on the PlayStation 5 as you need a PlayStation Plus subscription to play these titles.

With that said, as long as you are a member of the service, you will have full access to the PlayStation Plus games.

Even if you decide to leave at some point and then come back to the PlayStation Plus, you will have access to the PlayStation Plus games as long as you added them to your library when they were made available for PlayStation Plus subscribers.

How to see how many hours you and your friends have played on PS5

With the release of the PlayStation 5 and PlayStation 5 Digital Edition, Sony added a much requested featured in playtime stats.

You can check out this step-by-step tutorial at Seeking Tech to where you can see how many hours you and your friends have spent playing a game.

Where to find your how many hours played stats on PS5

To see your playtime on the PlayStation 5, you need to take the following steps:

1. First off, you need to get to the Profile menu. You can do so in the Control Center quick menu or the Home Screen main menu.

To go to your profile from the Control Center quick menu, press the PS button on your DualSense. Navigate down to the list of options at the bottom and then select your profile picture, which is located in between Accessories and Power options by default.

To go to your profile from the Home Screen, which is the main menu where you can select a game to open or go to the PlayStation Store, press and hold the PS button on your controller. Select your profile picture on the upper right corner in between the Settings option and the clock.

2. In the pop-up menu after selecting your profile picture, select the Profile option.

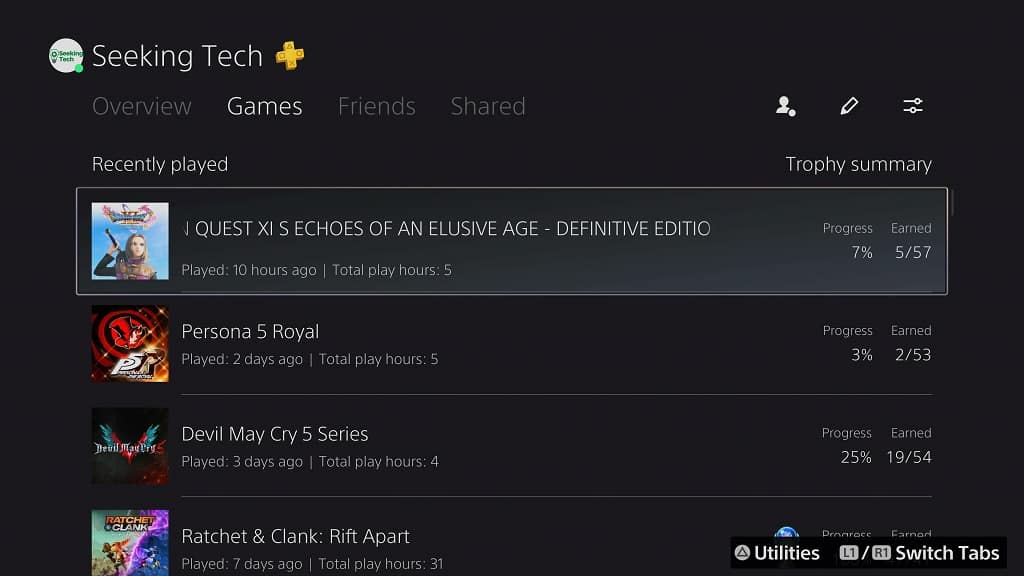
3. In your Profile page, use the L1 and R1 buttons on the controller to move over to the Games tab.

In the Games tab, you will see a list of your recently played games from the newest to the oldest. You will also find your trophy progress, the last time you played that game and the total play hours. The list goes all the way back to games you play on the PlayStation 4.

Where to find playtime stats of your friends on PS5

To find the playtime stats of your friends, you need to do the following:

1. Press the PS button of your DualSense to bring up the Control Center quick menu.

2. In the Control Center, navigate down and then select the Game Base option, which is in between the Notifications and Music options by default.

3. In the Game Base pop-up menu, use the L1 and R1 buttons to go to the Friends tab.

4. In the Friends tab, select the View All Friends option.

5. In the next menu, select the friend.

6. In your friend’s page, use the L1 and R1 buttons to go to the Games tab.

In the Games tab, you will find the playtime history of your friend as long as they set the “Who can see your gaming history” setting from the View and Customize Your Privacy Settings to “Friends Only,” “Friends of Friends” or “Anyone.”

Where to find playtime stats from other players on PS5

To find the hours played stats from other players who aren’t tagged as a friend on the PlayStation Network, you need to take the following steps:

1. Go to the Control Center quick menu.

2. Select the Game Base option.

3. In the pop-up menu, use the L1 and R1 buttons to move to the Friends tab.

4. In the Friends tab, select the “Search for players” option.

5. In the Search section of the gameplay, select the “Search for players” bar.

6. With the on-screen keyboard, type in the PlayStation Network user name of the player.

7. Once you are done, press the R2 button to confirm the search.

8. In the search results menu, navigate until you find the player. Select the player to go to their user page.

9. In their user page, you should find their playtime history as long as they set “Who can see your gaming history” setting from the View and Customize Your Privacy Settings to “Anyone.”

Are the total hours played stats accurate on PS5?

From our experience the total hours stat on the PlayStation 5 is pretty inconsistent, especially when it comes to tracking games that were played on the PlayStation 4.

Not to mention that the system will only show the number of hours played. So, if you want to know the how many minutes or seconds you spent on a game, then you will be out of luck.

You will more likely find a better estimation of playtime by checking the in-game tracker of a specific game if it is available. The playtime stats are usually located in the menus of a game.

How to pair DualShock 4, DualSense and Xbox wireless controllers to Pixel 6/Pixel 6 Pro

The DualShock 4, DualSense, Xbox One wireless controller and Xbox Series wireless controllers are all compatible with the Google Pixel 6 and Google Pixel 6 Pro.

You can take a look at this step-by-step guide at Seeking Tech to see how you can pair these Bluetooth gamepads to your Android smartphone.

How to pair DualShock 4 and DualSense to Pixel 6/Pixel 6 Pro

In order to connect your DualShock 4 or DualSense to the Google Pixel 6 and Google Pixel 6 Pro, you need to do the following:

1. First off, we recommend unplugging the power cable from your PlayStation 4 and/or PlayStation 5 console as the pairing process may turn the game systems on.

2. If you have an USB cable connected to the DualShock 4 or DualSense, then make sure that you unplug it.

3. If your controller is not already turned off, press and hold the PS button until you no longer see any lights appear on the light bar.

4. On your Pixel 6 or Pixel 6 Pro, go to the Settings app.

This app can be found by swiping upwards from an empty space in the home screen, which will reveal a list of installed applications on your phone.

5. In the Settings app, select the “Connected devices” option.

6. Inside the “Connected devices” menu,” select the “Pair new device” option.

7. If you have a DualShock 4 press and hold the Share button. If you have a DualSense, press and hold the Create button.

8. With the Share/Create button held down, you then need to press and hold the PS button.

After a short while, you should see the light bar of your PS4 or PS5 controller double blinking at regular intervals. This indicates that the gamepad has been set to pairing mode.

9. In the “Pair new device menu” on your Pixel 6 or Pixel 6 Pro, your DualShock 4 or DualSense will show up as “Wireless Controller.” Select it to start the pairing process.

10. In the “Pair with Wireless Controller” notification, select Pair to connect your wireless PlayStation gamepad to your smartphone.

How to pair Xbox One and Xbox Series S/X controllers to Pixel 6/Pixel 6 Pro

In order to pair the wireless controller that came with your Xbox One, Xbox One S, Xbox One X, Xbox Series S or Xbox Series X to the Google Pixel 6 and Google Pixel 6 Pro, you need to do the following:

1. Unplug the power cable from your Xbox One, Xbox One S, Xbox One X, Xbox Series S or Xbox Series X game console.

2. If an USB cable is attached to your controller, make sure that you also disconnect it.

3. If the Xbox One or Xbox Series gamepad is turned on, press the Xbox button for six second to power it down.

4. On your Pixel 6 or Pixel 6 smartphone, head to the Settings app.

5. After getting to Settings, tap “Connected devices.”

6. Inside the “Connected devices” menu, tap “Pair new device.”

7. Next, turn on your Xbox One or Xbox Series controller by pressing the Xbox button.

8. Afterwards, you need to press and hold the pair button on the controller for three seconds.

The light indicator on the Xbox button should then blink rapidly, signaling that the gamepad is in pairing mode.

9. On your Pixel 6 or Pixel 6 Pro, you should see your Xbox One or Xbox Series controller as “Xbox Wireless Controller.” Tap it to being the pairing process.

10. In the “Pair with Wireless Controller” notification, tap Pair to connect your Xbox controller to the phone.

How to install the Addlink AddGame A90, A92 and A95 on PS5

In 2021, Addlink released three M.2 solid state drive that were designed to be compatible with the PlayStation 5 and PlayStation 5 Digital Edition.

You can check out this step-by-step guide from Seeking Tech to see how you can install the A90, A92 and A95 to your console.

Moving important data off of A90, A92 and A95

In order to use the Addlink AddGame A90, A92 or A95 with the PlayStation 5, you will need to format the solid state drive. This process will delete all files you have installed on the SSD.

So, if you used A90, A92 or A95 before, then we recommend moving any important files you have installed on the solid state drive before you insert it on your game console.

Updating the PS5 firmware

Support for M.2 solid state drives such as the A90, A92 and A95 were only added to the PS5 and PS5 Digital Edition systems recently through a firmware update. So, if you haven’t done so already, you should make sure that firmware on your console is up to date.

How to insert A90, A92 or A95 to PS5

After meeting the aforementioned prerequisites, you should now insert your Addlink AddGame A90, A92 or A95 solid state drive to your PlayStation 5 or PlayStation 5 Digital Edition system.

In order to do so, you need to take the following steps:

1. If you haven’t done so already, you need to completely turn off your PS5 or PS5 Digital Edition console.

To do so, press the PS button on your controller. Afterwards, select the Power option on the bottom right. In the Power menu, select the Turn Off PS5 option.

2. With your system shut down, remove the HDMI cable, power cable and other cables you have connected to it.

3. You should also remove stand from your console.

4. Next, you need to lie your PS5 down so that the PS logo is underneath.

5. You should also make sure that the backside of the console, which has the HDMI and power port, is facing you.

6. From your point of view, place your right hand on the bottom right corner as well as your left hand on the top left corner of the outer cover.

7. Lift the bottom right corner of the outer cover up with your right hand.

8. Slide the outer cover off with your left hand.

9. Now that the outer cover of your PlayStation 5 system has been removed, locate the M.2 docking bay, which should have a long rectangular metal cover over it.

10. Use a cross-head screwdriver to remove the screw holding the metal cover in place and then remove the metal cover to open the M.2 docking bay.

11. Inside the docking bay, you need to use the cross-head screwdriver again to remove the screw and spacer located at the edge of the dock.

12. Placed the spacer you removed from the previous step to the 80 hole in the docking bay.

13. You can now insert the Addlink AddGame A90, A92 or A95 SSD into the M.2 slot of your PS5 system.

Make sure that the connector aligns with the slot and then insert the SSD from a diagonally upwards position.

14. After inserting the A90, A92 or A95 to your PS5, push down on the opposite end and then use the screw you previously removed from step #11 to fasten the SSD in place.

15. Afterwards, place the metal cover back on and the use the screw you previously removed from step #10 to secure the cover.

16. Slide the outer cover back into place to complete the insertion part of this setup.

How to format A90, A92 or A95 for PS5

After inserting the AddGame A90, A92 or A95 into your PS5 or PS5 Digital Edition system, you then need to format it.

In order to do so, you need to do the following:

1. If you haven’t done so already, plugged the power and HDMI cable back into your system.

2. Power on your PS5.

3. During the startup process, you should see a M.2 SSD Storage screen that will ask you to format your inserted storage drive.

4. Press the PS button on your DualSense controller to turn it on.

5. Afterwards, select the Format M.2 SSD option.

6. After the formatting process has been completed, you should see a screen that shows off the sequential read speed of your AddGame when it is being used by the PlayStation 5.

7. Select the OK option to complete the formatting process and go to the Home Screen.

Where to find A90, A92 or A95 in the PS5 menus

If you have a hard time finding your newly installed AddGame A90, A92 or A95 in the menus of the PlayStation 5, you can do the following:

1. Once you get to the Home Screen, select Settings, which you can find on the upper right corner of the menu.

2. Inside the Settings menu, select Storage from the list of options.

3. In the Storage menu, select M.2 SSD Storage on the left column.

4. On the right side in the same menu, you should see your installed A90, A92 or A95 solid state drive.

The Storage menu on the PlayStation 5 can also be used to move game between different storages, delete games, reformat the M.2 SSD and change the default installation location.

How to disable screenshot notifications on PlayStation 5

The latest firmware update for the PlayStation 5, as well as the PlayStation 5 Digital Edition, added the ability to disable screenshot notifications.

If you are interested in turning off this feature, then you can check out this step-by-step tutorial from Seeking Tech.

Why you should disable screenshot notifications on PS5

Every time you press the Create button on the DualSense (or the Share button of the DualShock 4 if you are using the PS4 controller on the PS5), you will take a screenshot of what is currently being shown on screen.

You will see a pop-up screenshot notification display on the top right corner for at least five seconds. The icon that appears can be distracting.

Not to mention that the pop-up screenshot notification will stay on screen for the aforementioned length of time even if you decide to take another screenshot. As a result, the icon will appear on the captured screen.

Due to these issues, we recommend disabling screenshot notifications on your PlayStation 5 systems if you are capturing a lot of screens.

How to disable screenshot notifications on PS5

The setting to turn off the pop-up screenshot icon is somewhat hidden in the menus of the PlayStation 5 and PlayStation 5 Digital Edition.

To find it, you need to take the following steps:

1. First off, you should be in the Home Screen, which is the main menu where you can choose which game to play, enter the PlayStation Store and perform other actions.

If you are playing a game or using an app on the PlayStation 5 at this moment, you can get to the Home Screen quickly by pressing and holding the PS button on your DualSense or DualShock 4 controller.

2. Once you managed to get to the Home Screen, you need to go into Settings.

Settings can be found in the upper right corner of the screen in between the Search option and your profile picture.

3. After getting in Settings menu, navigate all the way down and then select the Captures and Broadcasts option.

4. Inside the Captures and Broadcasts menu, select the Captures options on the left side.

5. On the right side of the same Captures and Broadcasts menu, you then need to select the Shortcuts for Create Button option.

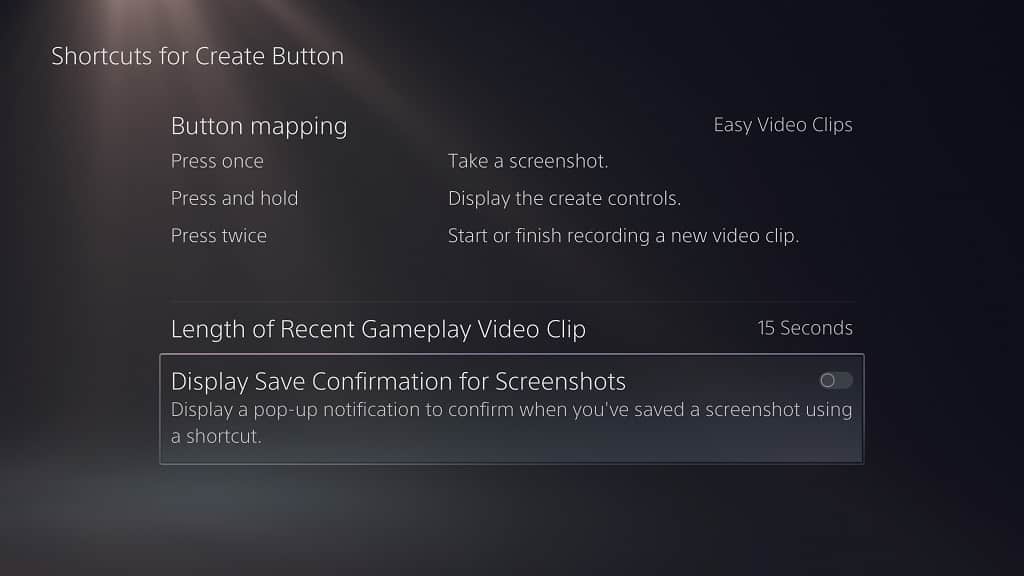
6. In the Shortcuts for Create Button, you should see the Display Save Confirmations for Screenshots setting.

If the switch to the right of the setting is white, then this indicates that the pop-up screenshot notifications are currently turned on.

To disable this feature, simply select the Display Save Confirmations for Screenshots setting to turn the switch to black.

With the screenshot notifications disabled, you will no longer see a pop-up icon appear when you press the capture button. However, you will still get an audio notification, which should sound like a photo camera shot, every time you capture a screenshot.

How to disable pop-up sound notifications on PS5

The latest firmware update for the PlayStation 5 and PlayStation 5 Digital Edition systems added the ability to disable the sound tone whenever a pop-up notification appears on screen.

So, if you would like to disable sound from being played when a pop-up notification is shown, you can check out this step-by-step tutorial from Seeking Tech.

1. First off, you need to get to the Home Screen, which is the main menu of your PlayStation 5 console where you can select which game to play, visit the PlayStation Store and more.

If you are current inside a game or app, you can get to the Home Screen by pressing and holding the PS button on your DualSense controller.

2. Now that you are in the Home Screen, you need to get to Settings.

You can find Settings, which has a gear cog icon, located of the top right corner of the Home Screen main menu.

3. After getting into Settings, navigate down and then select the Notifications option.

This should be the second to last option available in between the Saved Data and Game/App Settings option and the Captures and Broadcasts option.

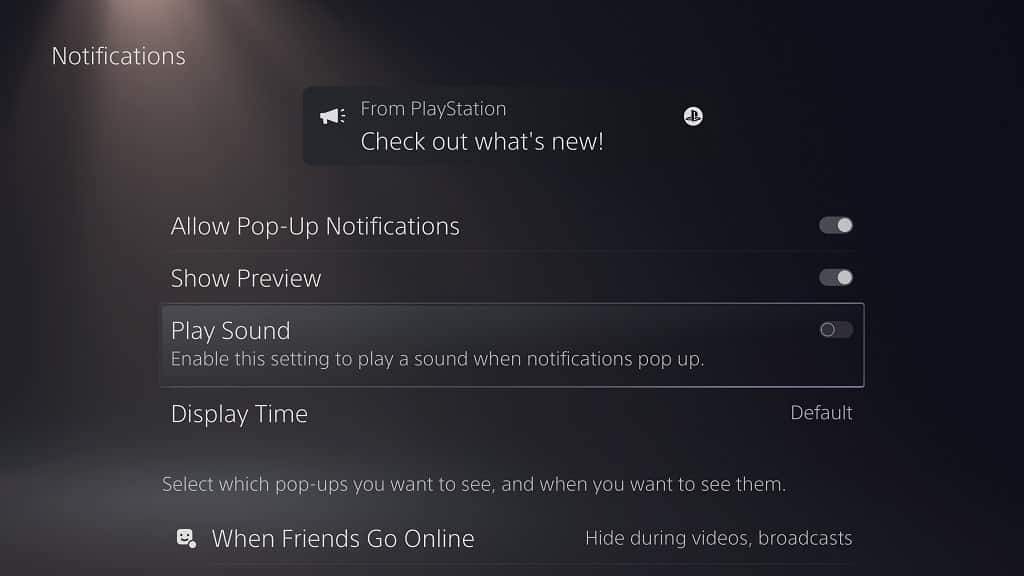
4. Once you are inside the Notifications menu, you should find the Play Sound option near the top.

If the switch to the right of the wording is white, then it indicates that the Play Sound option is currently enabled.

To disable it, simply select the Play Sound option to turn the switch black.

Keep in mind that pop-up notifications will still appear on the screen even if you disable the Play Sound option. To remove these pop-up notifications altogether, or limit the pop-up types, you can check out this guide.

How to enable pop-up sound notifications on PS5

If you want to enable sound notifications again after turning this feature off on your PS5 or PS5 Digital Edition console, you need to take the following steps:

1. From the Home Screen main menu, head over to Settings.

2. Inside the Settings menu, go the Notifications menu.

3. In the Notifications menu, you should see the Play Sound setting.

If the switch to the right of this setting is black, then it indicates that the sound tones for pop-up notifications are currently muted.

To enable this feature, you need to select the Play Sound setting in order to turn the switch white.

How to enable and optimize 3D Audio for TV speakers on PS5

Sony added 3D Audio support for TV Speakers on the PlayStation 5 and PlayStation 5 Digital Edition in a firmware update.

This feature is disabled by default. If you want to enable it, then you can check out this step-by-step tutorial from Seeking Tech.

Updating the firmware of the PS5

Before we being, it should be noted that you need the latest firmware on your PS5 system to use 3D Audio with your television speakers. If your console is connected online then you should get a notification to download and install the new software version of your system.

To manually update the firmware of your PlayStation 5, you can take the following steps:

1. You first need to be in the Home Screen, which is the main menu where you normally select which game to play, go to the PlayStation Store and perform other actions.

2. Inside the Home Screen, select Settings from the top right corner.

3. Once you are in Settings, select System from the list of options.

4. In the Settings menu, first select the System Software option on the left side.

5. On the right side of the same Settings menu, select System Software Update and Settings.

6. In the System Software Update and Settings, you should see the Update System Software option.

If the wording to the right shows that the software is “Up to date,” then your PS5 is already on the latest available firmware.

If not, then you need to select the Update System Software option to manually update.

7. On the System Software Update menu, you can select to update the firmware over the Internet or from an USB drive.

We recommend using the Internet if possible as the USB drive method is a lot more complicated.

How to enable 3D Audio for TV Speakers on PS5

With your PlayStation 5 or PlayStation 5 Digital Edition updated to the latest firmware version, you can now take the following steps to enable 3D Audio for your television speakers:

1. From the Home Screen, enter the Settings menu.

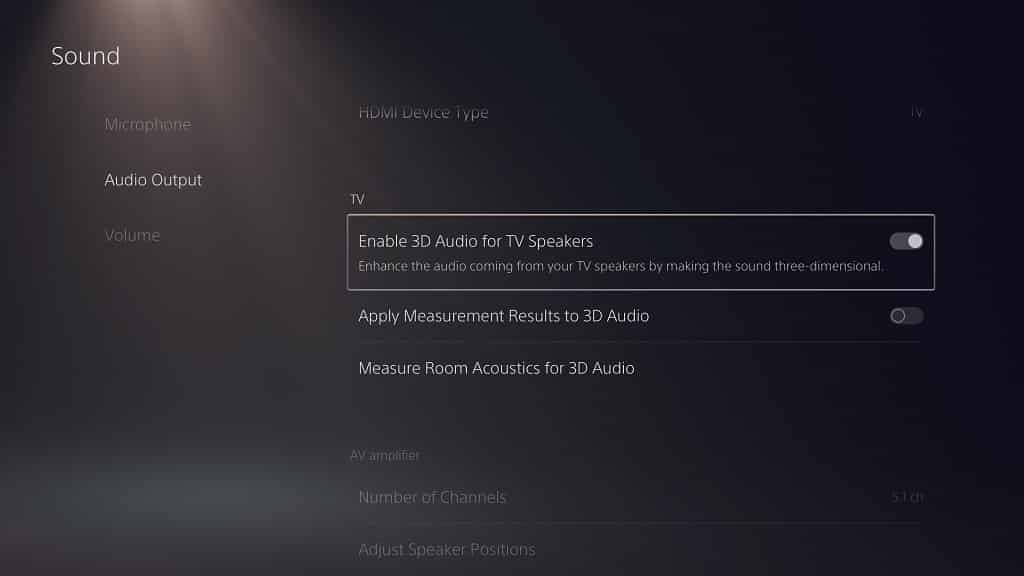
2. From the Settings menu, scroll down and then enter the Sound menu.

3. In the Sound menu, you need to first select the Audio Output option on the left side.

4. On the rights side in the same Sound menu, you then need to select Enable 3D Audio for TV Speakers.

How to optimize 3D Audio for TV Speakers on PS5

After enabling 3D Audio support for your TV speakers on the PlayStation 5, we highly recommend optimizing this feature. Otherwise, you may get a subpar 3D Audio experience.

To optimize 3D Audio for your TV speakers, you need to do the following:

1. From the Home Screen, go to Settings.

2. Inside Settings, go to Sound.

3. In Sound, select Audio Output on the left side.

4. In the same Sound menu, select Measure Room Acoustics for 3D Audio on the right side.

5. In the Measure Room Acoustics for 3D Audio menu, you will get a message that you need to be using a DualSense that is updated to the latest firmware version.

If you have having problems updating to the latest firmware of your DualSense, then you can check out this guide.

6. After updating your DualSense, you need to make sure that it is not connected to your PlayStation 5 system through a USB cable.

If it is, unplugged the USB cable from your controller.

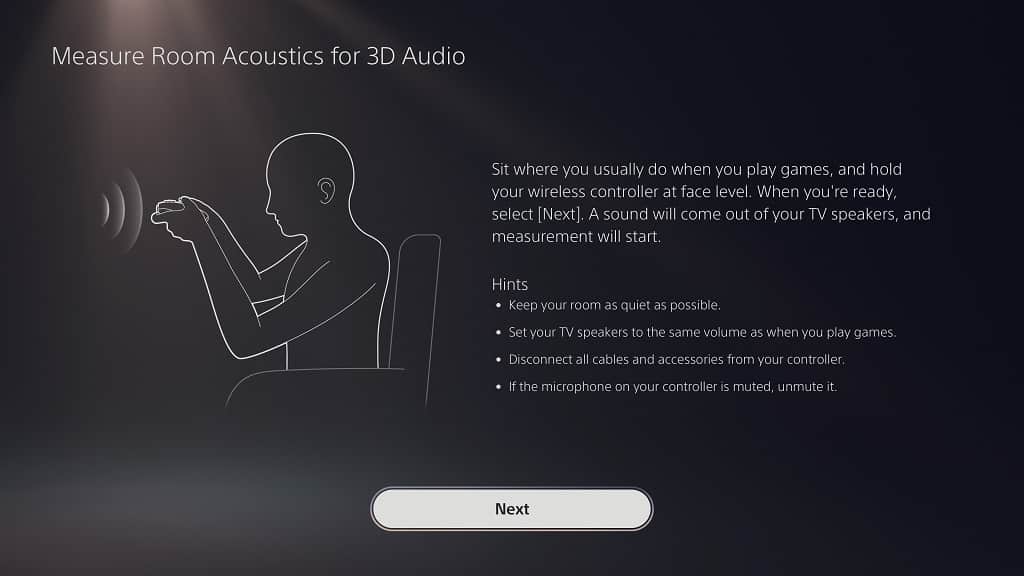
7. After meeting the aforementioned DualSense requirements, select the Next option in the Measure Room Acoustics for 3D Audio menu to continue.

8. On the next screen, you will see a list of “hints” for the measurement.

Before moving on, you need to meet the following requirements:

  • Make sure your room is as quiet as possible.
  • Make sure that the volume of your television is at the same level as when you are playing a game.
  • If you have any cables or accessories attached to your DualSense, make sure you disconnect them from your controller.
  • Make sure that your DualSense microphone is not muted. You can tell that the microphone muted if the mute button on your DualSense controller is displaying an orange light. If your controller is muted, simply press the mute button to turn off the orange light and unmute the microphone.

9. After meeting the aforementioned requirements from Step #8, hold the DualSense in front of your face and make sure to align it you’re your ear level.

10. Once you are ready, select the Next option.

11. The measurement will then start.

Afterwards, select the OK option.

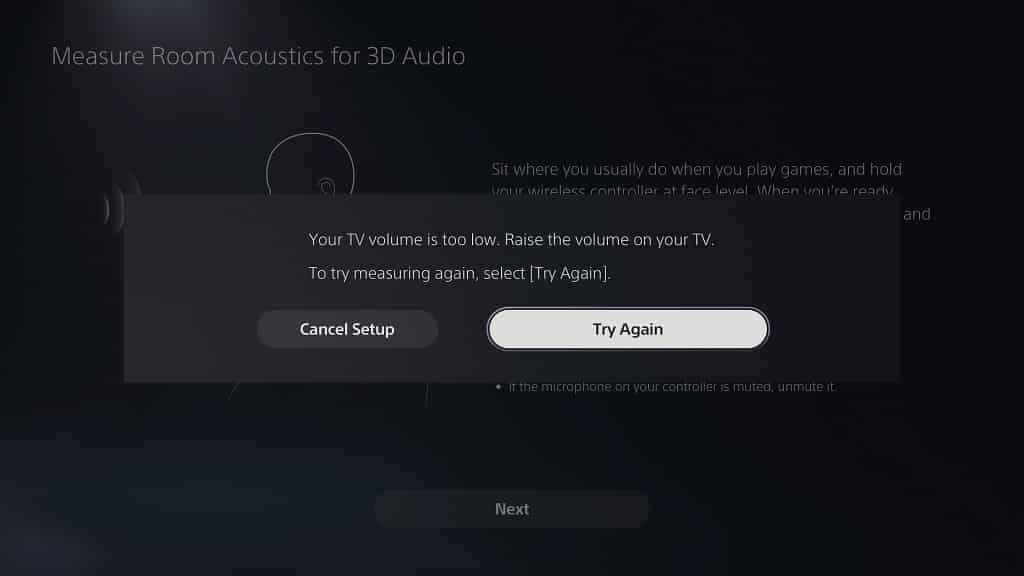
If you get an error message saying that your TV volume is too low, then you need to increase the volume of your television speakers and try the measurement again.

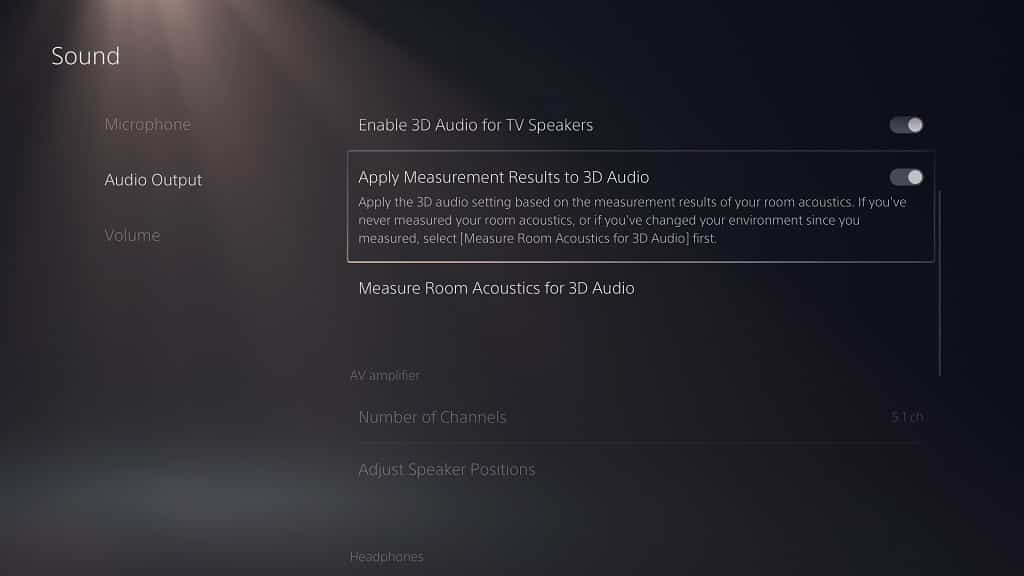
12. You should be back in the Sound menu.

Here you need to make sure that the Apply Measurement Results to 3D Audio is enabled.

If the switch next to the Apply Measurement Results to 3D Audio setting is white, then this indicates that your TV speakers have been optimized for 3D Audio based on your current position.

If the switch is black, then you need to select the Apply Measurement Results to 3D Audio setting to turn the switch white to apply the optimizations.

We recommend remeasuring your room acoustics for 3D Audio if you change your typical viewing position from your television set or are switching TVs.