How to enable voice commands on PS5

Voice commands were recently added to the PlayStation 5 and PlayStation 5 Digital Edition. To see how you can enable and use this feature, you can take a look at this article from Seeking Tech.

What is PS5 voice command?

By enabling the voice command feature on your PlayStation 5 or PlayStation 5 Digital Edition, you can use your voice to open a videogame, opening an app, control media playback as well as other system level features.

How to download and install the new firmware for PS5

Voice commands were added through a new software version of the PS5 and PS5 Digital Edition. If you haven’t done so already, you can update your system to the new firmware by doing the following:

1. Turn on the game console and then make sure it is connected online to the PlayStation Network.

2. If the firmware doesn’t start to download immediately, then you can select the gear icon located on the top right corner of the home screen. For the uninformed, the home screen is the menu where you can select which videogame to play.

3. After getting to Settings, select System from the list of available options.

4. In the System menu, select System Software on the left side and then System Software Update and Settings on the right side afterwards.

5. Once you get to the System Software Update and Settings menu, select Update System Software.

6. Finally, select Update Using Internet.

How to enable voice commands on PlayStation 5

After updating to the latest available firmware, you can enable voice commands by taking the following steps:

1. Head to Settings from the home screen by selecting the gear icon.

2. In the Settings menu, select Voice Command.

3. In the Voice Command menu, select Enable Voice Command.
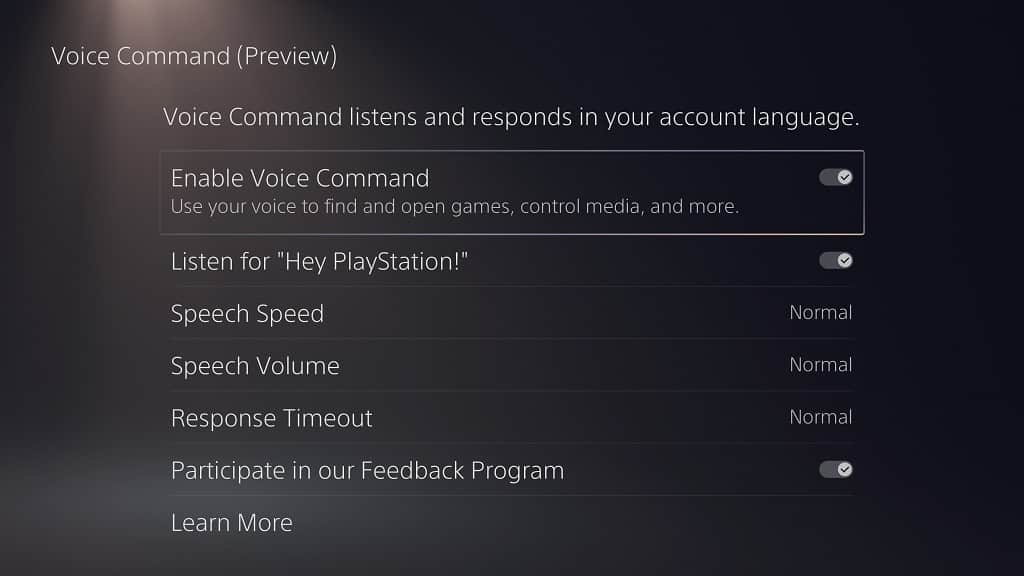
4. We also recommend that you make sure that the Listen for Hey PlayStation feature is turned on. With this enabled you can simply say “Hey PlayStation” to activate voice command.

Otherwise, you will need to press the PS button on your DualSense and then select the Voice option in the Command Center quick menu in order to activate the same feature.

5. In the same Voice Command menu, you also have the following options:

  • Speech Speed will let you change how fast the AI voice will reply. You can pick between Fastest, Faster, Normal, Slower or Slowest.
  • Speech Volume will let you adjust the AI voice volume when replying. You can change it to Loudest, Louder, Normal, Quieter, Quietest or Mute.
  • With Response Timeout, you can set the length of time Voice Command will wait for your voice input before the current session closes. You can change the interval to Fastest, Faster, Normal, Slower or Slowest.
  • With the Participate in our Feedback Program, you can choose whether or not you want to share your experience of using Voice Commander to the development team at PlayStation.
  • Lastly, you can select the Learn More option if you want more information to using voice commands on your PlayStation 5 or PlayStation 5 Digital Edition.
  • With Voice Command enabled, make sure that you have a working microphone. You can use the microphone on your DualSense as well as a mic from a compatible headset.

If you are having issues using the voice command feature, then you can check out this troubleshooting guide.

How to add check marks on enabled settings for PS5

With the PlayStation 5 and PlayStation 5 Digital Edition, you can enable and disable certain settings from the system menu.

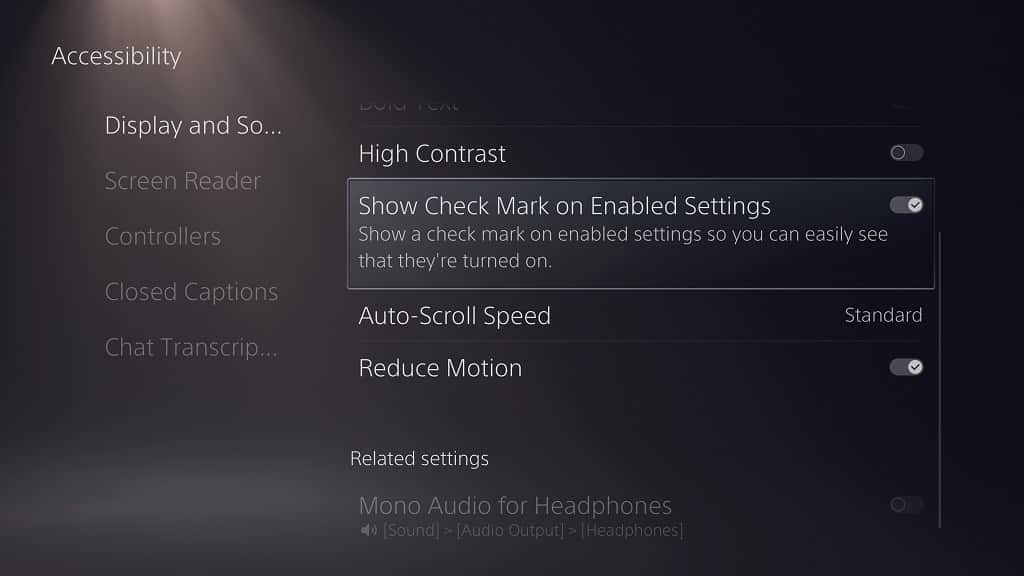
You can normally tell whether or not a setting has been disabled by looking at the switch icon located on the right side. If the switch is white, then it indicates that this setting is currently turned on. If the switch is black, then it means that the setting is turned off.

If you have a hard time telling whether or not a setting has been turned on, then you can add a check mark to enabled settings. In order to do so, you can take a look at this tutorial from Seeking Tech.

How to update your PS5 to the latest available firmware

The “Check Mark on Enabled Settings” feature was added to the PS5 and PS5 Digital Edition through a recent firmware version.

So, if you haven’t done so, you can take the following steps to update:

  • Turn on your PlayStation 5 and PlayStation 5 Digital Edition console.
  • Make sure that your game system is connected to the Internet.
  • If you don’t get a notification that a new firmware update is being downloaded right away, then you can select the gear icon in the home screen in order to go to Settings.
  • From the Settings menu, head over to System.
  • Inside of the System menu, select System Software, which should be the first option available on the left column.
  • On the right side in the same screen, you then need to select System Software Update and Settings.
  • From the System Software Update and Settings menu, select Update System Software.
  • After getting to the System Software Update menu, select Update Using the Internet.

How to add a check mark to enabled settings for PS5

With your PlayStation 5 or PlayStation 5 Digital Edition updated to the most recent firmware, you then need to do the following in order to add a check mark to enabled settings:

  • From the home screen menu (this is where you can select which game to play), select the gear icon located on the top right side.
  • After arriving in the Settings screen, head over to Accessibility.
  • In the Accessibility menu, select Display and Sound on the left column.
  • On the right side of the same menu, select Show Check Mark on Enabled Settings.

With Show Check Mark on Enabled Settings turned on, a check mark should now appear on all the settings that have been activated in the system menus of your PlayStation 5 or PlayStation 5 Digital Edition console.

How to use headphones mono audio on PlayStation 5

Sony recently added the ability to switch to mono audio when using headphones on the PlayStation 5 and PlayStation 5 Digital Edition.

To find out how to do so, you can take a look at this article from Seeking Tech.

Updating your PS5 to the latest available firmware

Mono audio support for the PlayStation 5 and PlayStation 5 Digital Edition was added through a recent firmware update. So, if you haven’t done so already, make sure you update your system.

In order to do so, you can do the following:

1. Go to the home screen, which is the main menu where you can go to the PlayStation Store and select which game to play.

2. From the home screen, head over to Settings by selecting the gear cog icon located on the top right side.

3. In Settings, go to System.

4. Inside the System menu, select System Software on the left column and then System Software Update and Settings on the right side of the same menu.

5. From the System Software Update and Settings menu, select Update System Software.

6. In the System Software Update menu, select with Update Using Internet or Update from USB Drive.

How to enable headphones mono audio support on PS5

After downloading the new firmware for your PlayStation 5 or PlayStation 5 Digital Edition, you can enable support for headphones mono audio by doing the following:

1. Connect your earbuds, earphones, headphones or headset to the game console if you haven’t done so already.

2. From the home screen, navigate over to Settings.

3. In Settings, you need to select Sound.

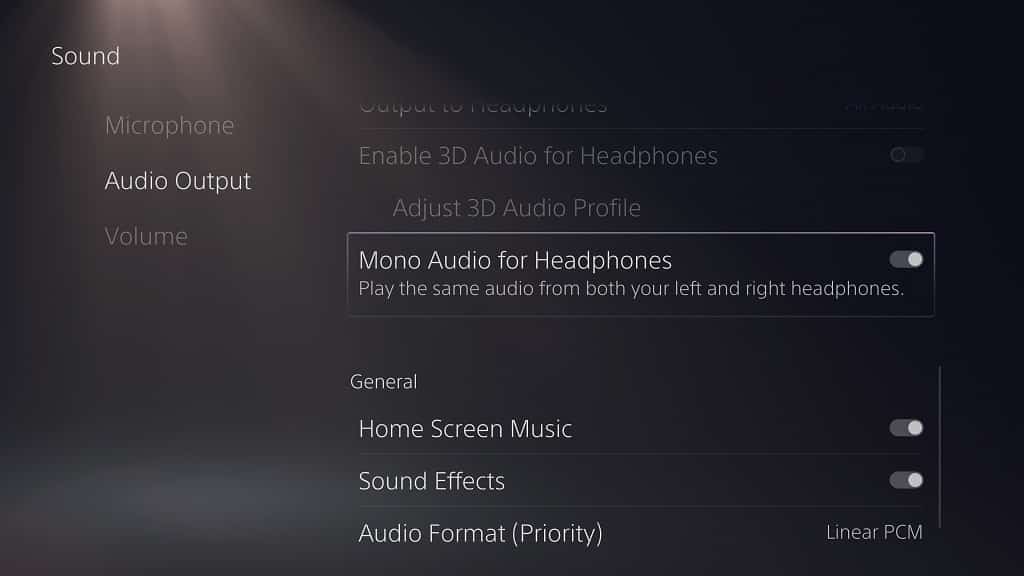
4. After getting to the Sound menu, select Audio Output on the left column and then scroll down to the Headphones section on the right side of the same menu.

5. In the Headphones section, make sure that the “Mono Audio for Headphones” setting is turned on.

Keep in mind that, once you enable mono audio, your headphones won’t be able to take advantage of the 3D audio feature as the “Enable 3D Audio for Headphones” and “Adjust 3D Audio Profile” settings will be greyed out.

So, if you want to use 3D audio with your earbuds, earphones, headphones or headset, then you need to disable mono audio.

How to increase or decrease the headphones mono audio volume on PS5

In order to change the headphones mono audio volume using the system menus of your PlayStation 5 or PlayStation 5 Digital Edition, you need to take the following steps:

1. Head over to Settings from the home screen menu.

2. Inside of Settings, go to Sound.

3. In the Sound menu, select Volume on the left column.

4. On the right side in the same menu, you will be able to adjust the volume of the headphones you have connected to the game console.

How to pin games permanently on the home screen of PS5

Thanks to a firmware update, you can now pin games permanently on the home screen menu of your PlayStation 5 or PlayStation 5 Digital Edition system. In order to do so, you can follow this guide at Seeking Tech.

Updating the firmware of your PS5

The ability to pin your game was added through a recent firmware update. So, if you haven’t done so already, make sure you have the latest system software version installed.

To see how you can manually update your PlayStation 5 or PlayStation 5 Digital Edition system, you can take the following steps:

1. Turn on your PS5 and make sure it is connected to the Internet.

2. If the system doesn’t automatically start to download the firmware, then you need to select the gear icon from the home screen menu.

3. After getting to the Settings menu, select System.

4. In System, you need to start by selecting System Software on the left column and then System Software Update and Settings on the right side in the same menu.

5. In the System Software Update and Settings menu, you then need to select Update System Software.

6. From the System Software Update menu, select Update Using Internet.

You can also select Update from USB Drive if you want to update the firmware through a USB storage.

How to games permanently on the PS5 home screen

In order to pin games so that they will stay on the home screen menu of your PlayStation 5 or PlayStation 5 Digital Edition system, you need to do the following:

1. Turn on your game console if you have done so already.

2. Go to the home screen, which is the main menu where you can select which game that you want to play.

If you are currently playing a game or watching a video in a video app, then you can press and hold the PS button to open the home screen.

3. In the home screen navigate over to the game that you want pinned.

If you game isn’t on the home screen, then go to the Game Library menu from the home screen. In the Game Library menu, select the game that you want pinned and then select Play Game. Afterwards, press and hold the PS button. If done correctly, the game should now appear on the home screen.

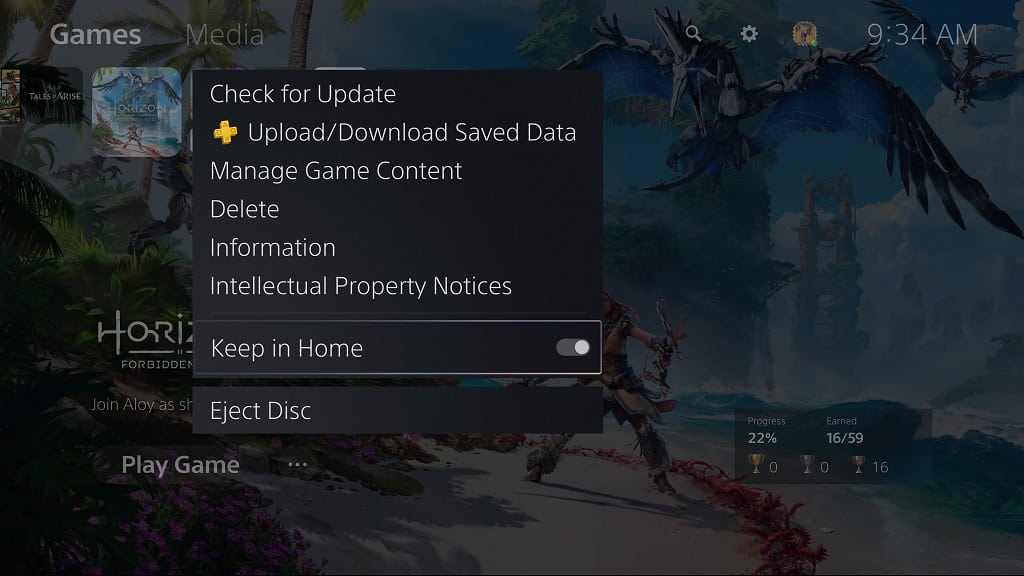
4. With the game highlighted in the home screen menu, press the Options button on your DualSense controller.

5. In the pop-up menu, make sure that the “Keep in Home” option is enabled.

You can pin up to five games and apps on the home screen of your PS5 or PS5 Digital Edition.

What to do when your PS5 can’t detect the M.2 SSD

The PlayStation 5 and PlayStation 5 Digital Edition supports expanded storage through the M.2 slot.

If your gaming console isn’t detecting your solid state drive, then you can take a look at this troubleshooting guide at Seeking Tech.

1. The first step we recommend taking is to make sure that your M.2 SSD is compatible with the PS5.

For the uniformed,you need the following requirements:

  • PCI-Express Gen4x4 interface with a Socket 3 (Key M) connector.
  • In terms of the physical size of the SSD, the PlayStation 5 supports 2230, 2242, 2260, 2280 or 22110.
  • Moreover, the storage capacity should be within a range of 250 GB through 4 TB.
  • A heat sink is required as well.
  • Last but not least, the sequential reading speed should be at least 5,500 MB per second.

2. If your SSD met all of the PS5 requirements but is still up showing up in the menus, then the next step you can take is to update the firmware of your console.

In order to do so, you can try taking the following steps:

  • Turn on your system if you haven’t done already.
  • On the home screen, select the gear cog icon on the top right side of the screen.
  • In Settings, go to System.
  • On the left side of the System menu, select System Software.
  • On the right side of the same screen, select System Software Update and Settings.
  • In the next menu, select Update System Software.
  • Next, you can use either to update over the Internet or by using an USB storage device.

3. If updating the firmware of the game system did not work with getting the M.2 SSD detected, then you can try updating the firmware of the solid state drive.

To do so, you can do the following:

  • Remove the M.2SSD from the game console.
  • Afterwards, you need to insert your M.2 storage drive to a computer with a compatible M.2 slot.
  • With the SSD inserted into your PC, you then need to follow the instructions provided by the manufacturer of the storage drive in order to be able to update its firmware.

4. After updating the firmware version of your M.2 solid state drive, you may also want to reformat the drive while it is still inserted into your computer.

5. Once you are done updating and formatting the solid state drive on the computer, then you can try reinserting the M.2 SSD into your ps5.

To do so, make sure you inserted the storage drive from a diagonally upwards position at a 30-degree angle. If aligned correctly, you shouldn’t have to force the SSD in the m.2 slot.

You can check out the official video from PlayStation to see how you can do so below:

How to fix PS5 M.2 SSD slow reading speed

After your PlayStation 5 or PlayStation 5 Digital Edition has formatted the M.2 solid state drive, you will see the sequential reading speed of the expansion storage.

If the read speed is slower than expected, then you can take a look at this troubleshooting article at Seeking Tech to see what you can do.

1. The first step we recommend taking is to make sure that the sequential read speed is above the minimum requirement of 5,500 MB per second.

As long as the read speed is more than 5,500 mb per second, then you most likely have nothing to worry about when it comes to performance as the PS5 is unlikely to take advantage of the excess speed.

2. If the sequential reading speed is below 5,500 MB per second, then we recommend that you try reformatting the M.2 solid state drive.

In order to do so, you need to take the following steps:

  • Turn on your ps5 if you haven’t done so already.
  • On the home screen, select the gear icon located on the top right side to get to the Settings menu.
  • From the first page of Settings, select Storage.
  • Inside the Storage menu, select M.2 SSD Storage from the left column.
  • On the right side of the same menu, select the Reformat option.
  • After the M.2 drive has been reformatted, you should see its sequential reading speed.

3. If reformatting the expansion solid state drive of your PlayStation 5 does not work, then you can try updating the firmware of the drive.

To do so, you need to do the following:

  • Remove the M.2 SSD from the PS5 or PS6 Digital Edition console and then insert it to a computer with compatible M.2 slot.
  • Next, you need to follow the instructions from the manufacturer of your solid state drive in order to update its firmware.
  • After updating the firmware of your M.2 storage drive, remove it from your PC and then insert it back into your PlayStation 5 console
  • Afterwards, format the drive for PS5 to see if the sequential read speed is faster after you update the firmware of the SSD.

4. You can also make sure that the solid state drive isn’t running too hot as a high temperature can reduce its read speed.

To see what you can do when the PS5-compatible SSD is overheating, you can take a look at this guide.

5. If you are still experiencing issues with the slower than expected read speed, then you might want to consider getting another M.2 solid state drive that is compatible with the PlayStation 5.

If you are looking for a specific product recommendation, then you might want to consider picking up the WD_BLACK 1TB SN850 NVMe Internal Gaming Solid State Drive with Heatsink, which you can find on Amazon with this link. (#CommissionsEarned).

How to fix PS5 M.2 SSD overheating issues

If you are using a M.2 solid state drive for your PlayStation 5 or PlayStation 5 Digital Edition, then you may get the following warning:

  • Temperature Alert
  • Your M.2 SSD is too hot.
  • Close the game, turn off your PS5, and wait until the temperature goes down.

To see how you can potentially fix this overheating issue with the expansion storage drive of your Sony game console, you can take a look at this troubleshooting article at Seeking Tech.

1. The first step we recommend taking is to follow the instructions laid out in the Temperature Alert message.

So, if you PlayStation 5 doesn’t automatically shut down, then you need to turn it off. You then need to leave the console turned off until cools down, which should take at least 15 minutes in most cases.

2. While your system is shut down, you may want to consider removing the metal cover of the M.2 docking bay.

By doing so, heat coming from the expansion solid state drive will dissipate a lot faster. On the other hand, the opened bay will be exposed to dust buildup.

To remove the metal cover, you need to take the following steps:

  • Turn off your PS5 system if you haven’t done so already.
  • Remove the stand, unplug any cables and detach any accessories you have connected to the console.
  • Lay your console down so that the side with the PS logo is at the bottom. The back side of the system, which contain the HDMI and power ports, you should facing you.
  • From your perspective, place your right hand on the bottom right corner of the top-most outer case.
  • Place your left hand on the upper left corner of the top-most outer case.
  • With your right hand, life the bottom right corner of the outer case.
  • Slide the top-most outer case off to the left side.
  • Using a cross head screwdriver, remove the screw holding the M.2 docking bay metal cover in place.
  • You can then remove the metal cover.
  • Afterwards, reattach the top-most outer case by sliding it back in starting from the left side.
  • As long as you occasionally clean dust from inside the console, however, then removing the M.2 metal cover will help fix the overheating issues caused by the M.2 storage drive.

3. You should also make sure that you have a heat sink or heat spreader installed.

If you don’t have one, then we recommend picking up the Sabrent M.2 NVMe Heat Sink for PlayStation 5, which should fit a majority of PS5-compatible solid state drives.

If you are interested, you can purchase the heat sink on Amazon with this link. (#CommissionsEarned).

4. Furthermore, you need to make sure that you keep your PS5 or PS5 Digital Edition system cool as well by giving it plenty of open-air space to help with heat dissipation. Covering your console and/or keeping it cooped up in an enclosed space will cause the internal heat to rise.

How to copy save data from PS5 console storage to USB drive

With the PlayStation 5 and PlayStation 5 Digital Edition, you can copy select save data files from the console storage to an external USB drive.

If you are interested in doing so, then you can check out this step-by-step tutorial at Seeking Tech.

What save files can you copy to an external USB drive on PlayStation 5?

Unfortunately, you can’t copy save data from any PS5 game to an external USB drive. The only way to back up the save files from PS5 games is through the Cloud Storage, which requires a PlayStation Plus membership.

To see how you can upload and download save data for PS5 games, as well as PS4 games, from the cloud storage, you can check out this guide.

Fortunately, you are able to copy save data from any PS4 game to an external USB drive.

How to copy PS4 save data from PS5 system to USB drive

In order to copy save data from PS4 games to the USB drive through the PlayStation 5, you need to take the following steps:

1. First off, you need to connect an external storage drive to the USB port of your PlayStation 5 system.

2. You should also be in the Home Screen, which is the main menu where you can pick which game to open and play.

If you are currently playing a game or using an app, you can get to the Home Screen quickly by pressing and holding the PS button on the DualSense controller.

3. From the Home Screen, you need to get to Settings. You can do so by selecting the gear icon located on the top right corner of the screen, in between the magnifying glass and profile picture.

4. Once you are inside the Settings menu, you need to select Saved Data and Game/App Settings from the list of available options.

5. Once you are Saved Data and Game/App Settings menu, you need to select Saved Data (PS4) on the left side.

6. On the right side of the same Saved Data and Game/App Settings menu, you need to then select the Console Storage option.

7. Inside the Console Storage menu, you need to be in the “Copy to USB Drive” tab. If you are not, you can use the R1 and L1 buttons on your DualSense to get to it.

8. In the “Copy to USB Drive” tab, you will find a list of save data files you can copy over to the USB drive. You have the option to manually select which save data to copy as well as the option to copy every file available.

If you have a lot of save data, you can use the “Sort by” option, which is located to the left of the save data listing. This option has an icon that features a down-pointing arrow with three horizontal parallel lines. In the pop-up “Sort by” menu, you will be able to sort the listing by Last Update, Name or Size.

9. After making your selection, select the Copy option located in the lower right corner to back up your PS4 saves to an external USB storage drive.

How to copy PS4 save data from USB drive to PS5 system

If you want to copy the PS4 save data from the USB drive to the console storage of the PlayStation 5 system, you need to do the following:

1. Make sure the USB drive containing the PS4 save data is plugged into the USB port of your PlayStation 5 console.

2. Go to Settings from the Home Screen.

3. Inside the Settings menu, go to Saved Data and Game/App Settings.

4. Once you are in the Saved Data and Game/App Settings menu, select Saved Data (PS4) from the options available on the left side.

5. On the right side of the same Saved Data and Game/App Settings menu, select USB drive.

6. Inside the USB drive menu, make sure you are in the “Copy to Console Storage” tab. If you are not, you can use the L1 and R1 buttons to navigate to it.

7. In the “Copy to Console Storage” tab, you will see a list of save files you have stored on the external USB drive. Select the data you want to move over to console storage of the PlayStation 5 system.

8. Once you are done with making your selection, select the Copy option located on the bottom right corner of the menu.

How to set up password requirement for PlayStation Store on PS5

Getting a refund for a PlayStation Store purchase you made on the PlayStation 5 or PlayStation 5 Digital Edition is very difficult.

Therefore, we recommend setting up a password requirement during checkout so that you don’t buy anything by accident. This is especially helpful if you have multiple users using the same PlayStation Network account.

If you are interested in doing so, then you can check out this step-by-step tutorial at Seeking Tech to see how you can set up a password for PlayStation Store purchases.

How to get to the Purchase Settings menu

In order to add the password requirement at checkout on the PlayStation Store of the PS5, you need to first head to the Purchase Settings menu. There are two ways to get there.

How to get to the Purchase Settings menu from Settings

The first method is from the Settings menu, which you can do so with the following steps:

1. First off, you need to be in the Home Screen, which is the main system menu of the system. This is where you can select which game to open and play. If you are currently playing a game or using an application, you can press and hold the PS button on the DualSense to bring up the Home Screen.

2. Once you are in the Home Screen, look for the gear icon, which should be in the top right corner of the screen in between the magnifying glass icon and your profile picture. Select the gear icon to go to Settings.

3. Once you are in the Settings menu, select Users and Accounts.

4. Inside the Users and Accounts menu, select Account on the left side.

5. On the right side of the same Users and Accounts menu, select Payment and Subscriptions.

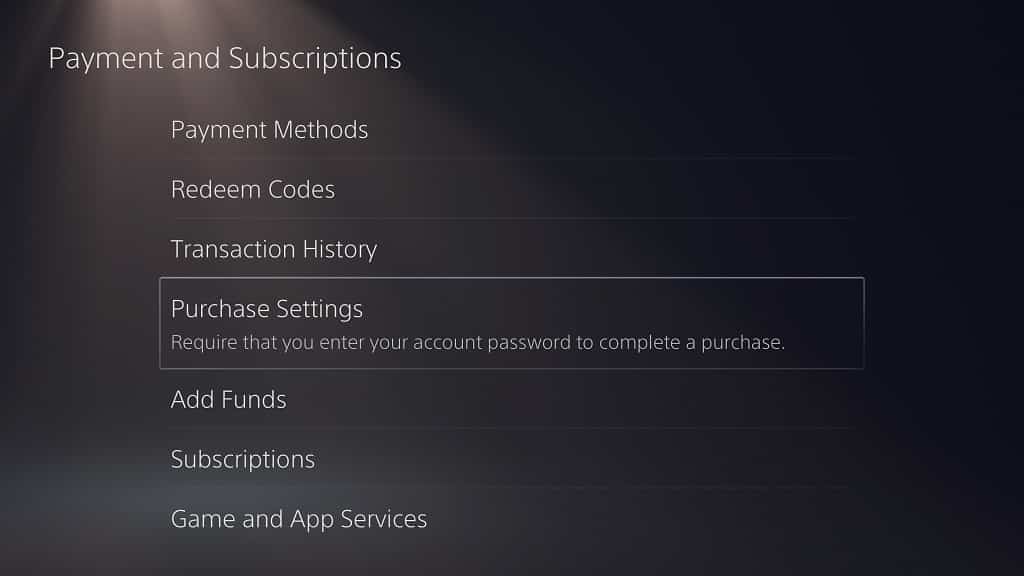
6. In the Payment and Subscriptions menu, select Purchase Settings from the list of available options.

How to get to the Purchase Settings menu from PlayStation Store

You can also get to the Purchase Settings menu from the PlayStation Store of the PS5.

To do so, you need to take the following steps:

1. From the Home Screen main menu, select the blue shopping bag icon to get to the PlayStation Store. The icon is located in the Games section, all the way to the left of the Explore icon and the various icons of games you played on your PS5 system.

2. Inside the PlayStation Store, select the “…” icon to open the “More” pop-up menu.

3. In the “More” pop-up menu, select Purchase Settings from the list of available options.

How to enable password requirement for PlayStation Store on PS5

To enable password requirement during the checkout process when making a purchase on the PlayStation Store of the PlayStation 5, you need to do the following:

1. Once you are in the aforementioned Purchase Settings menu, you will see the “Require Password at Checkout” option.

To the right of this option is a switch. If the switch is black, then it means that the password requirement is currently disabled.

If it is, you need to select this option to turn the switch white, which will enable the need for a password in order to complete a purchase made on the PlayStation Store of the PS5.

The password for the PlayStation Store is the same one you are using to log into the PlayStation Network with your user account.

How to disable password requirement for PlayStation Store on PS5

To disable the password requirement for PlayStation Store purchases on the PlayStation 5, you need do the following:

1. Return to the Purchase Settings menu.

2. Look at the switch to the right of the “Require Password at Checkout” option.

If the switch is white, then it means that the PS Store password requirement is currently enabled.

If it is, select the “Require Password at Checkout” option to turn the switch black, which indicates that you no longer need a password to complete a purchase made on the PlayStation Store of the PlayStation 5.

How to fix PS5 black bars and overscans

When playing the PlayStation 5 and/or PlayStation 5 Digital Edition, you may notice that games don’t completely fill out your television screen or monitor. You may also notice that games have cut off edges as the display area appears to be over-scanned.

If you are experiencing either or both of the aforementioned issues, then you can check out this troubleshooting guide at Seeking Tech to find some potential fixes.

About the PS5 Aspect Ratio

Before we start, it is important to note that the PlayStation 5 is designed for a 16:9 television screen or monitor. If you are using a display with an aspect ratio of 4:3, 16:10 or 21:9, then you may experience either cutoff borders or black bars.

If you aren’t using a 16:9 display with your PS5, then we recommend you play games with visible black bars on your screen. While you can also play games at full screen using the 4:3, 16:10 or 21:9 ratios, the image will be distorted.

Some games are also designed to display at a different ratio no matter what aspect ratio your TV or monitor is built for, even if it is a 16:9 display. Once again, we recommend sticking to the black bars so that you won’t get a distorted image.

If you are worry about the black bars potentially causing permanent burn-in to your television or monitor, then you can check out this guide to see how you can prevent it from happening.

How to fix black bars and cut off edges on PS5

If you are experiencing black bars and/or cut off edges even when playing games designed for the 16:9 aspect ratio on a matching 16:9 display, then you can take the following steps:

1. The first step we recommend taking is to adjust the aspect ratio settings of your television or monitor.

You need to make sure that your display isn’t stretching or cropping the video output from your PS5 system.

2. If changing the aspect ratio settings of your television or monitor does not resolve your issue, then you can try fixing it from the PS5 menus. To do so, you need to first turn on your system if you haven’t done so already.

3. With your PS5 turned on, you need to be in the Home Screen, which is the main system menu where you can select a videogame to open or go to the PlayStation Store.

If you are currently playing a game or using an app on the PS5, you can go to the Home Screen by pressing and holding the PS button on your DualSense.

4. In the Home Screen, locate the Settings menu, which has a gear icon on the top right corner of the screen. Select Settings with the X button on your DualSense controller.

5. Inside the Settings menu, select the Screen and Video option.

6. Inside the Screen and Video menu, select Screen from the list of available options on the left side.

7. On the right side of the same Screen and Video menu, you then need to select Adjust Display Size.

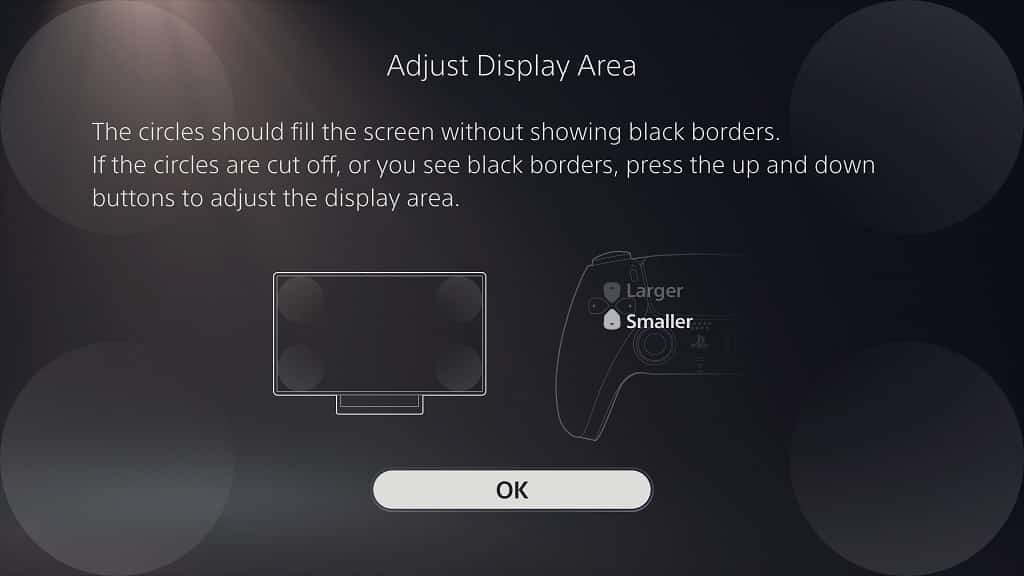
8. Inside the Adjust Display Area menu, you can use the up and down button on the directional pad of your controller (or the up and down direction of the left analog stick) to adjust the viewing area.

The main object here is to get the four circles on the edges as close to the edges of your display as possible without any visible black borders. The edges of the four circles should also not be cut off.

Once you are satisfied with the display area, press the X button on your controller to confirm the change.

If adjusting the display area does not resolve your issue, try changing the display settings from the menu of your television or monitor again.

If none of the aforementioned fixes work, then we recommend connecting your PlayStation 5 to a different television or monitor.