How to fix YouTube PS5 App black or blank screen issues

When trying to watch YouTube videos on your PlayStation 5 or PlayStation 5 Digital Edition system, you may see a black or blank screen instead. To see how you can get the vids to play properly, you can check out this troubleshooting article from Seeking Tech. 

1. The black or blank screen problems are most likely to related to using the Rest Mode of your PS5.  

In this case, you can try restarting your console by pressing the PS button on the DualSense controller and then selecting the Power icon located at the bottom side menu. From the Power menu, you then need to select Restart PS5.  

2. You can also try power cycling your console as it will clear out its cache of temporary files that may be causing the videos not to play correctly. To do so, you can try taking the following steps: 

  • Turn off your PS5 by pressing the PS button, selecting the Power icon and then picking the Turn Off PS5 option. 
  • Unplug the power cord of the console from the power outlet. 
  • Wait for at least 20 minutes. 
  • Plug the power cord back in. 
  • Turn on your PS5 console. 
  • Open the YouTube App. 

3. If you are still seeing a black or blank screen instead of the actual video, then the next potential solution you can try is to reset the app.  

To find out how to do so, you can follow the steps laid out in this tutorial. 
Keep in mind that resetting the YouTube PS5 App will log you out of your YouTube account. Therefore, you will need to sign back in again. 

4. If resetting the video streaming application does not work, then you can do a fresh install by taking the following steps: 

  • Delete the YouTube App from your PS5. 
  • Download the same application again from the All Apps menu in the Media section of the PS5’s home screen. 
  • Test a YouTube video to see if you are still seeing a black or blank screen. 

5. You should also check to see if there is a new software update available for the YouTube App on the PlayStation 5.  

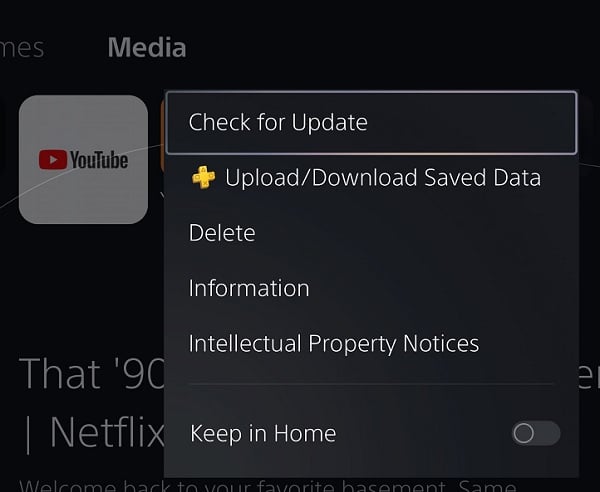
In order to do so, hover over the YouTube icon on the home menu and then press the Options button on your controller. In the pop-up menu, you then need to select the Check for Update option. 
6. If you haven’t done so already, you should also make sure that your PlayStation 5 or PlayStation 5 Digital Edition has been updated to the latest firmware.  

7. Factory resetting your console may also help fix the black or blank screen. By doing so, however, you will also delete all the other data, including game installs, save files and login information, from the system. Therefore, we only recommend doing this as a last resort.  

If you are interested in this method, then we recommend doing the following: 

  • First off, you need to go to the Settings menu of your PS5 and then select System > System Software > Back Up and Restore. 
  • You then need to plug in a compatible USB storage drive to your console. 
  • Once you are ready, select the Back Up Your PS5 option from the Back Up and Restore. 
  • Next, you need to go to Settings > System > System Software > Reset Options. 
  • You then need to select the Reset Your Console option. 
  • Once your console has been factory reset, go back to the System > System Software > Back Up and Restore menu and then select the Restore Your PS5 option.

What to do if the YouTube PS5 App isn’t playing any sound

When trying to watch a YouTube video on your PlayStation 5 or PlayStation 5 Digital Edition system, you may notice that there is no sound. You can take a look at this troubleshooting guide at Seeking Tech to see how you can audio to play properly when using the YouTube PS5 App.  

1. The first step you can try is to try playing a different video in the streaming application. If you can hear audio in the other video, then there may be a problem with the original one.  

If you think that the audio is muted for a specific video, then you can report it by doing the following: 

  • While the video is playing press the X button twice to bring up the overlay menu and then pause the vid. 
  • Next, you need to move up and then to the right so that you can select Settings. 
  • From the Settings menu, select Feedback and then Audio Not Working. 

2. If you aren’t getting any sound on multiple videos, then you can try turning up the volume of your TV, speaker or headset since you may have accidentally muted it. 

3. You can also check to see if your PS5 is outputting to your preferred audio device. You can do so by taking the following steps:  

  • Press and hold the PS button on your controller to bring up the Home Screen. 
  • From there, select Settings on the top right side. 
  • Inside of Settings, select Sound. 
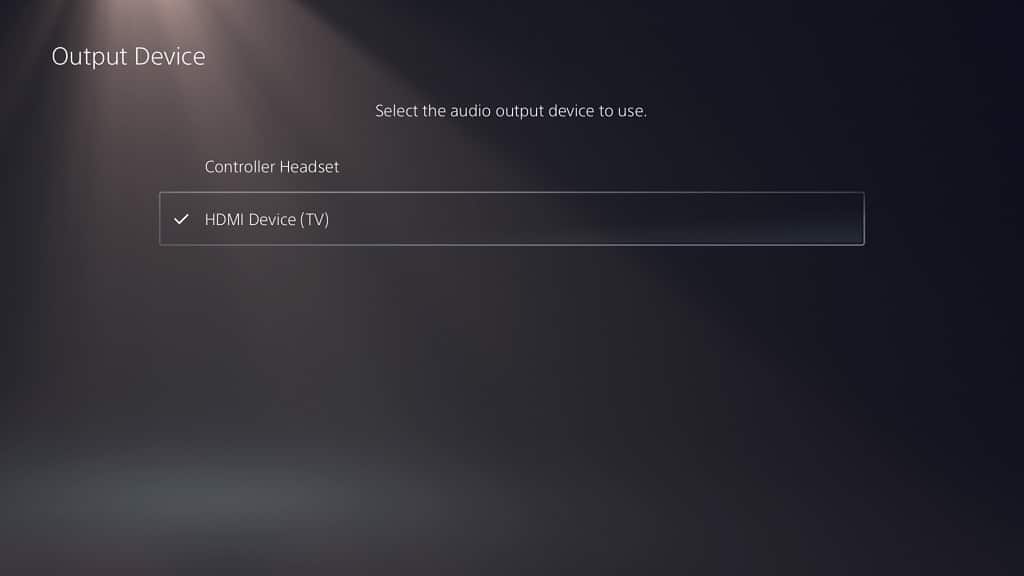
  • In the Sound menu, select Audio Output on the left column and then Output Device on the right side. 
  • On the Output Device screen, you should see a list of connected listening devices that you can switch over to. Keep in mind that audio can only be outputted on one device at a time.  

4. You can also try disconnecting and then reconnecting the audio device to see if doing so will get the sound working in the YouTube App 

5. There is a possibility that the TV speaker, external speaker or headset you are using is defective. In this case, you can try switching over to another audio output device. 

6. If you are still getting no sound, then you can try closing the YouTube PS5 App and then opening it again.  

To close it, you can try doing the following: 

  • Press and hold the PS button to show the Home Screen.  
  • Hover over the YouTube App in the Home Screen. 
  • Press the Options button to bring up a pop-up window. 
  • In the pop-up window, you then need to select the Close App option. 

7. A new update to the YouTube App and/or to the PlayStation 5 operating system may fix the muted videos issue. Therefore, you can try updating the video streaming application and your game console to the latest versions. 

8. You can also try deleting the video streaming application and then download it again. A fresh install may get rid of the muted video playback problem.

What to do if YouTube App PS5 is showing too many ads

When watching YouTube on your PlayStation 5 or PlayStation 5 Digital Edition console, you may be bombarded with video ads. To see how you can reduce or stop advertisements from playing, you can take a look at this troubleshooting article from Seeking Tech.  

1. The only way to completely block ads in the YouTube PS5 App is to subscribe to the YouTube Premium service. If you are a subscriber, then you will be able to watch YouTube videos ad-free on your PS5 as long as you are logged into a YouTube account that has Premium.  

With this membership, you will also be able download videos and watch them without having to connect your non-PlayStation device online. Furthermore, you can have the videos play in the background while you are using another app or turn the screen of your smartphone/tablet off. 

YouTube Premium also includes YouTube Music and YouTube Kids as these services will also be free of ads.  

If you are interested, you can get the subscription with this link. 

If you haven’t use YouTube Premium before, then you may be able to get a free trial before having to pay a monthly fee. 

2. If you don’t want to get YouTube Premium, then you can try reducing the ad length. 

Some video advertisements can be skipped. The skippable ones should have a short countdown appear on the bottom right corner of the video. Once the countdown has ended, you should see the “Skip ad” or “Skip ads” option. Select it in order to skip the currently playing video ad or ads. 

3. Of course, you may also run into unskippable advertisements when watching YouTube videos on your PlayStation 5 or PlayStation 5 Digital Edition. Thankfully, there is a workaround that you can use. 

In order to skip a seemingly unskippable ad, you can try doing the following: 

  • While the video ad is playing, press the circle button on your DualSense controller to back out. 
  • Select the same YouTube video again in order to start playing it.  
  • If another unskippable ad starts to play, then you need to repeat the previous two steps until you get a skippable ad. In some cases, ads may stop showing up when you re-open the video.

How to fix Modern Warfare II and Warzone 2.0 HDR issues on Xbox Series X|S

When playing Call of Duty: Modern Warfare II and/or Call of Duty: Warzone 2.0 on your Xbox Series X or Xbox Series X console, you may notice that the graphics may look a little off. The games can be too bright, too dark or look washed out.  

To see how you can fix these HDR issues, you can take a look at this troubleshooting article from Seeking Tech. 

1. To start off, you can make sure that you have the right HDR settings enabled on your game system. In order to do so, you need to do the following: 

  • Go to the Settings menu. 
  • From Settings, you need to go to General on the left side and then select TV & display options on the right side. 
  • Once you are in the General – TV & display options menu, you need to select Video modes. 
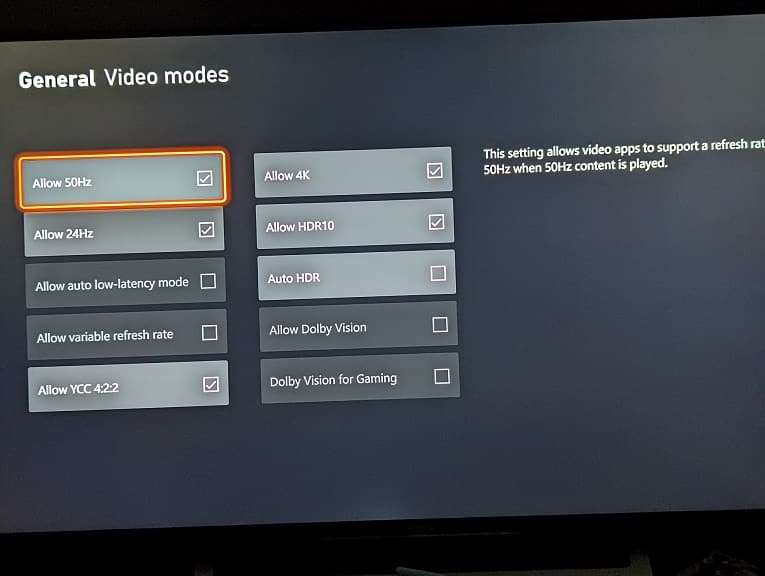
  • In the General – Video modes menu, make sure you the Allow HDR10 option is enabled. If your TV or monitor supports Dolby Vision, then make sure you enable the Allow Dolby Vision and Dolby Vision for Gaming settings as well. 

2. Next, you can try to re-calibrate the HDR brightness output on your Series X or Series S. In order to do so, you can try taking the following steps: 

  • Go to Settings > TV & display options. 
  • From the General – TV & display options menu, select Calibrate HDR for games. 
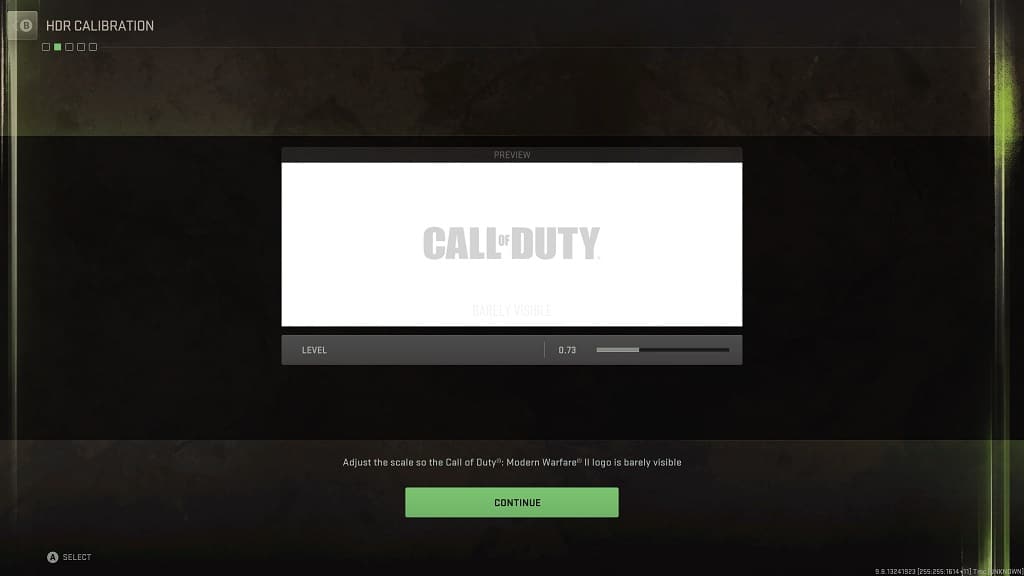
  • Follow the instructions over the next several screens to calibrate the minimum and maximum luminance of the console’s HDR brightness output.  

3. You can also try changing the Allow YCC 4:2:2 setting by going to Settings > TV & display options > Video modes. 

Afterwards, test out Modern Warfare 2 or Warzone 2 to see if you can get better HDR colors with this setting enabled or disabled. 

4. Furthermore, you can try changing the color depth or color space. In order to do so, you need to do the following: 

  • Head over to Settings > TV & display options > Visual fidelity & overscan. 
  • From the General – Visual fidelity & overscan menu, you will be able to change the Color Depth and/or Color Space settings. 
  • After making a change, make sure you test it out while playing the game to see if you can get better results. 

5. If you want to adjust the in-game brightness of Call of Duty: Modern Warfare II and/or Call of Duty: Warzone 2.0, then the only way to do so is to uninstall the game launcher from your Xbox Series console and then re-install it again. 

When opening the game after a fresh install, you should be able to adjust the HDR brightness level. 

6. You can also try adding a color filter by taking the following steps:  

  • Press the menu button while playing Modern Warfare II or Warzone 2.0. 
  • In the pause menu, press the RB button a few times to switch over to the Settings tab. 
  • Press the Y button while you are in the Settings tab to open the Accessibility menu.  
  • From the Accessibility menu, you then need to select the All Accessibility Settings option. 
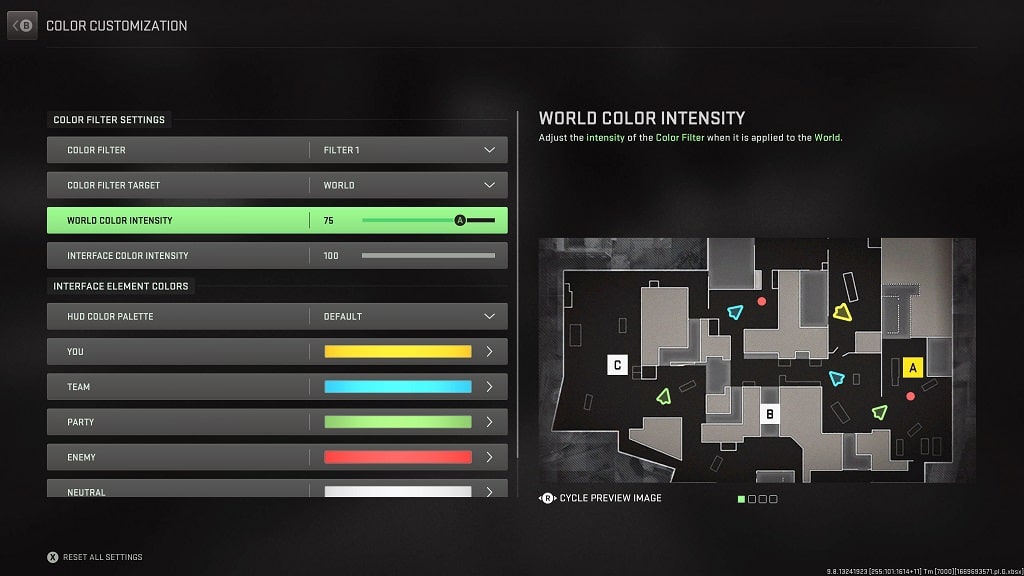
  • Next, you need to select Color Customization. 
  • After getting to the Color Customization menu, you need to select Color Filter and then Filter 1. 
  • Afterwards, select Color Filter Target and then World. 
  • You should now be able to adjust the World Intensity slider. 

After changing the value of the World Intensity slider, test out the new color filter in-game. You can then go back to this menu to make any additional adjustments that you might need.

How to delete watch history, search history and more in YouTube PS5 App

If you want to protect your privacy when it comes to watching YouTube videos on your PlayStation 5 or PlayStation 5 Digital Edition console, then you can check out this guide at Seeking Tech to see how you can delete your watch history, search history and other app data. 

1. To start off, open the YouTube App on your gaming system if you haven’t done so already. 

2. After getting to getting to the video streaming application, press the circle button on your DualSense controller to bring up the menu that appears on the left column. 

If you are currently watching a video, then you need to press the circle button to back out of it. You then need to press the circle button again in order to open the left column menu. 

3. In the left column menu, scroll all the way down and then select Settings.  

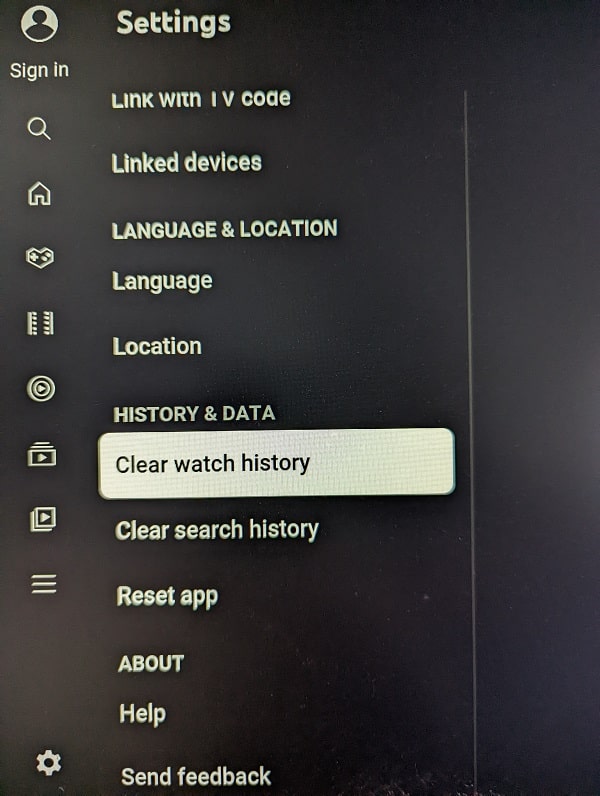
4. If you want to delete your watch history, then you need to scroll down to the Clear Watch History option in the History and Data section. With the Clear Watch History option highlighted, you should see the following appear on the right side of the screen if you are signed into your YouTube account: 

  • “Clear this account’s watch history from all devices. This will also clear your stories watch history.” 

If you aren’t logged into your account, then you should see the following instead: 

  • “Clear videos watched whiles signed out on this device. This will also clear your stories watch history.” 

You need to select the Clear Watch History button on the right side in order to delete this section. 

5. If you want to delete your search history, then you need to highlight the Clear Search History option from the History and Data section from the Settings menu. On the right side, you should then see the following if you are logged into your YouTube account:  

  • “Clear searches made with this account from all devices.” 

If you are signed out of your account, then you should see the following: 

  • “Clear searches made while signed out on this device.” 

You can then select the Clear Search History button located on the right side of the screen to start the deletion. 

6. If you want to delete your saved settings for the YouTube PS5 App (including saved accounts and connected devices), then you need to scroll to the Reset App option from the History and Data section from the Settings menu. The following message should then appear on the right side: 

  • “Clear your settings, including connected devices and accounts.” 

Here, you need to select the Reset App button on the right side. By doing so, you will complete clear out the video streaming application, including your watch history, watch history and any other changes you made. Furthermore, you will also be signed out of your YouTube account if you were previous logged in.

How to gift a PlayStation Gift Card on Amazon

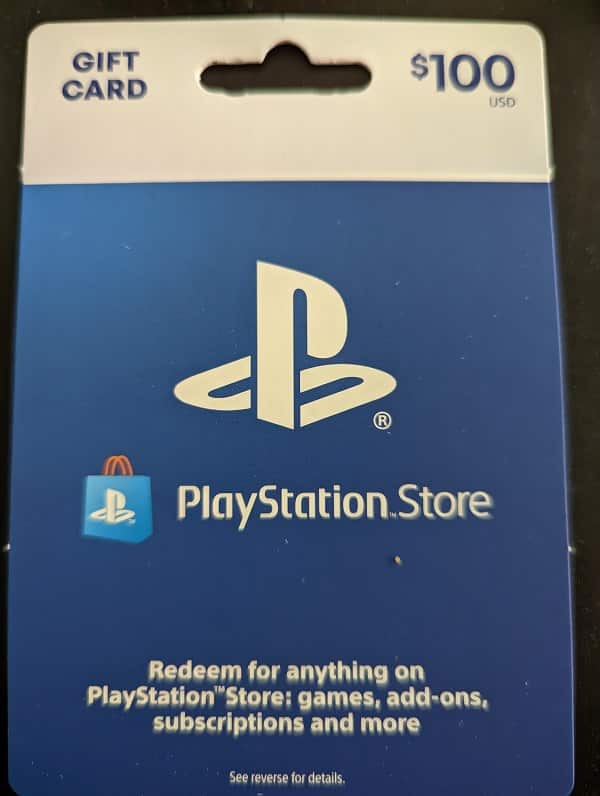
If you are looking for a present to give someone who owns a PlayStation 4, PlayStation 4 Pro, PlayStation 5 and/or PlayStation 5 Digital Edition system, then you can try getting the PlayStation Gift Card. You can check out this tutorial to see how you can gift a PlayStation Gift Card that you can buy from the Amazon website. 

1. To start off, make sure you go to the Amazon website.  

2. On the Amazon site, make sure you are signed into your Amazon account. 

3. Next, you need to search for the PlayStation Gift Card. 

It should be noted that you may find the PlayStation Store Gift Cards and PlayStation Plus Wallet Funds during your search. Aside from the different branding, these products function the same as the funds will be added to the digital wallet of the gift recipient in the PlayStation Store.  

To find out more about how these card types are different, you can take a look at this article. 

Furthermore, you may see the words, “Digital Code,” on the gift card. This indicates that you will only be getting a digital code that will be emailed to you. If you want an actual physical gift card instead, then you will also be able to get one from Amazon. 

You can find the digital code and physical versions of the PlayStation Gift Card on Amazon with the following links: 

It is important to note that there is no gift wrap option available for the digital code version. 

4. After picking the type of gift card you want to purchase, you should now be in the product page. From there, select the denomination you want to gift. 

5. Afterwards, select the Add to Cart button. 

6. Once you are ready to checkout, select the Cart option. 

7. In the Shopping Cart, make sure you select the “This is a gift” box. 

Keep in mind that this box is only visible for the physical version of the PlayStation Gift Card. 

8. You then need to select the Proceed to Checkout button. 

9. If you want Amazon to send the PlayStation Gift Card directly to the gift recipient’s address, then you need to fill out their address information in the Shipping Address section of the Checkout screen. 

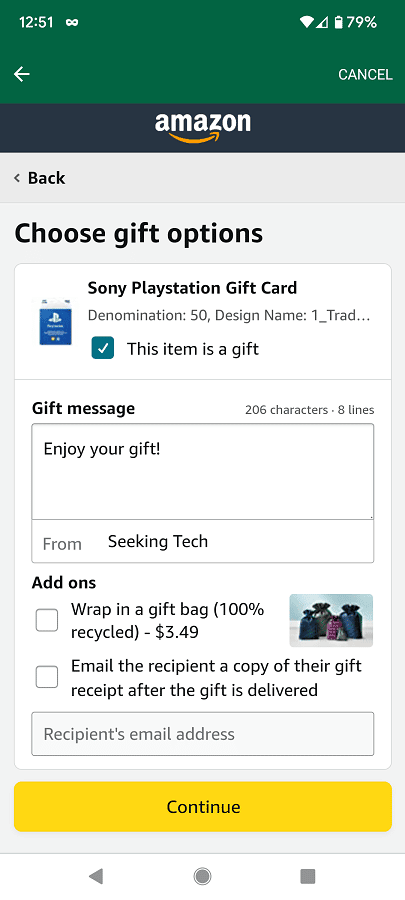
10. In the Choose Gift Options section of the Checkout screen, you will be able to add a gift message.  

You can also ask Amazon to gift wrap the card although it will cost additional money. Finally, you can choose whether or not you want the receipt of your purchase emailed to the gift recipient.  

11. Once you are done with the gift options, proceed to the rest of the checkout process to complete your purchase.  

If you decide to get the digital code version of the PlayStation Gift Card instead, then Amazon won’t be able to directly send the voucher code to the email of the gift recipient.  

Instead, the retailer will send the email directly to you. In this case, you can forward the email to the gift recipient or find another way to deliver the code to your friend or family member.  

How to check PlayStation Store price history for games and DLC

If you see a game or expansion pack you are interested in go on sale in the PlayStation Store, then you may be tempted in taking advantage of the deal.

Before doing so, however, we recommend that to check the price history of the product to see whether or not it was discounted to an even lower price before. This may indicate the price tag may fall even further in the future. 

To see how you can check the pricing history of a digital game or DLC, you can check out this guide at Seeking Tech. 

Can you check the PS Store price history on the PS4 or PS5? 

Unfortunately, there is currently no way you can easily check the price history for a digital product on a PlayStation 4, PlayStation 4 Pro, PlayStation 5 and PlayStation 5 Digital Edition. Although you can use Internet Browser App on your PS4, inputting texts is a cumbersome process with a controller. 

Instead, we recommend using a web browser app from a desktop, laptop, tablet or smartphone so that you can easily check the lowest price point for a game or DLC pack. 

How to check price history for PSN games and add-ons 

To check the price history of products being sold from the PlayStation Store, we recommend that you take the following steps: 

1. To start off, we recommend vising the psprices.com.

This is the best website we found when it comes to tracking the price tags of PlayStation games and expansions. 

2. On the home screen, you need to select the platform for the game or DLC you are trying to buy.  

3. In the next screen, you can select your region on the top right side of the of the screen. 

4. Next, you can use the search bar to find your game or DLC. 

5. The default search results page will show all the games and DLC packs that match your search query.  

You can order this list by selecting the Ordering drop-down menu and then choosing one of the following sorting options: 

  • Last update 
  • Price 
  • Price PS+/Gold 
  • Discount Percentage 
  • Discount Price 
  • Discount End Date  
  • In-Store Discount 
  • Retail Price 
  • Likes 
  • Subscriptions 
  • Subscriptions Last 30 Days 
  • Name 

You can also select the Filter option to filter out the search results based on price, discount percentage, whether or not a demo is available as well as whether or not VR is supported. You can also make the list shows games only, add-ons only or both games and add-ons. 

6. Select the videogame or add-on from the search results page. 

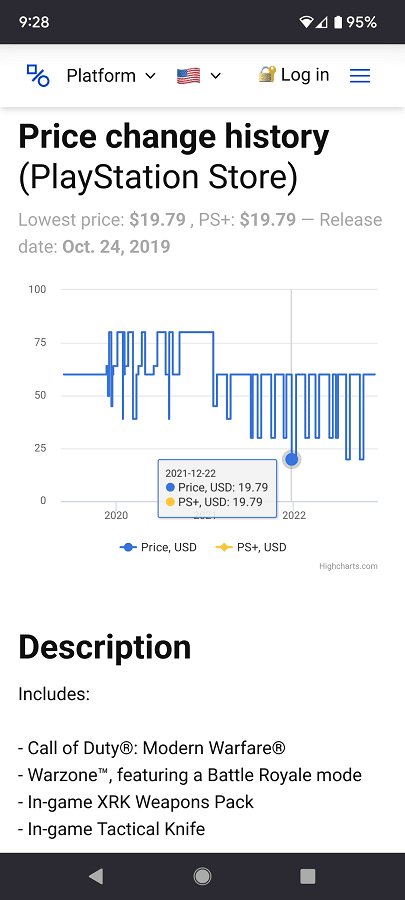
7. On the product page, you should be able to find a chart that shows the price history of the game or DLC on the PlayStation Store in your region. 

You can also see what the lowest price tag for the product was with or without a PlayStation Plus discount.  

If you would like, you can also sign up for an email notification whenever psprices.com detects a price drop for the product on the PlayStation Store.

How to disable autoplay videos in the Xbox Series X and S Store

When browsing through the Microsoft Store App on your Xbox Series X or Xbox Series S console, you may see videos start to automatically play. If you want to disable the autoplay feature, then you can take a look at this tutorial from Seeking Tech. 

1. To start off, turn on your console and then open the Store App if you haven’t done so already. 

The application has a shopping bag icon on the Home screen. If you can’t find it, then you can press the Xbox logo button on your controller to bring up the Guide menu. The shopping bag icon should then appear at the bottom of the menu. 

2. Inside of the Xbox Series X or Xbox Series S Store App, navigate all the way to the left until you get to the left column menu. 

If you are looking at a product page at the moment, then you need to press the B button to back out so that you are able to navigate to the left column menu. 

3. From there, you need to select the Settings option located near the bottom. 

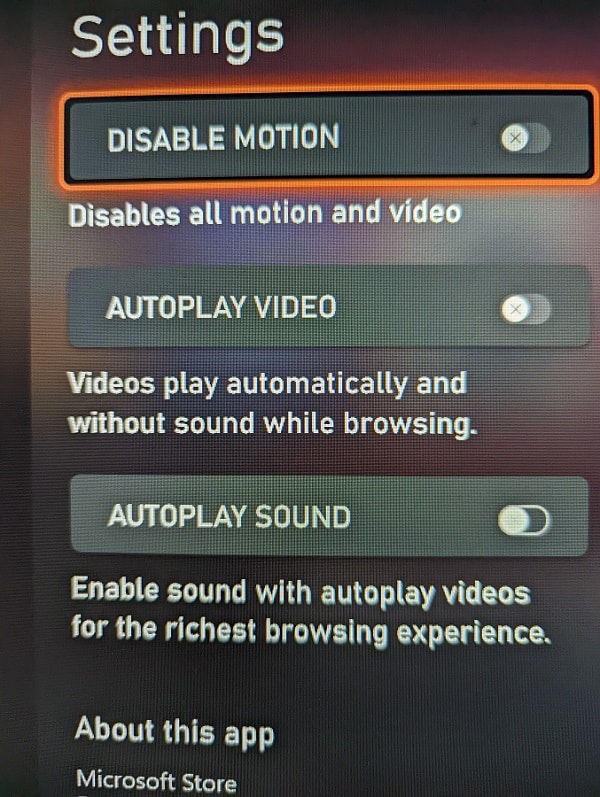
4. Once you get to the Settings menu, you should see the following options: 

  • The Disable Motion option will turn off all auto-playing videos in addition to any other animations.  
  • With the Autoplay Video option, you can choose to enable or disable auto-playing videos (without any sound) when you are browsing through the Microsoft Store App. By default, this option is turned on; therefore, you need to select it in order to turn disable auto-playing vids.  
  • The Autoplay Sound option will automatically add sound to the auto-playing videos. By default, this option is automatically disabled; thus, you can leave it as is unless you want to enable auto-playing videos with sound while you are browsing.  

5. Once you are done making any changes in the Settings menu, press the B button to back out and then the same button again to exit from the left column menu. 

When you browse the Microsoft App Store on your Xbox Series X or Xbox Series S after disabling the auto-play video feature, you should no longer see any trailers or other types of footage automatically start to play.

How to gift an Xbox Gift Card

If you have a friend or family member who play a lot of games on the Xbox One, Xbox One S, Xbox One X, Xbox Series S and/or Xbox Series S, then the Xbox Gift Card is one of the better presents that you can give them as it will offer them plenty of options when it comes to spending the virtual money on the Microsoft Store App.  

To see how can properly gift this card, you can take a look at this tutorial from Seeking Tech.  

Can you buy an Xbox Gift Card in the Microsoft Store Xbox App? 

There is currently no way to purchase an Xbox Gift Card by using the Microsoft Store App on the Xbox One, Xbox One S, Xbox One X, Xbox Series S and Xbox Series S. Instead, you can use the Microsoft Store website, Micrsoft Store App on a non-Xbox device or a third-party retailer. 

How to gift someone an Xbox Gift Card

In order to gift the Xbox Gift Card, you can try taking the following steps: 

1. To start off, it should be noted that you may find two similar gift cards when shopping as there are the Xbox Gift Card and Microsoft Store Gift Card.

Despite the different branding, these products offer the same benefits as they will be adding funds to the digital wallet of the Microsoft Store App of the Xbox console. These credited funds can then be used to buy digital games, expansion packs, microtransactions along with subscription services like Xbox Live Gold, Xbox Game Pass and Xbox Game Pass Ultimate. 

If you want your friend or family member to use the funds for Xbox digital products, then you can give them a hint by gifting the Xbox Gift Card. Otherwise, the Microsoft Store Gift Card is identical in terms of benefits. 

To find out more about the differences between these two products, you can take a look at this comparison guide. 

2. After deciding which card to get, you then need to determine if you like to buy a digital code or an actual physical card. 

A digital code is more convenient as you can easily send the code over email or text. Not to mention that you will also save money without having to pay any shipping costs if the gift recipient live far away.  

If you are planning to meet up with your friend or family member, then you might want to get a physical card instead so that you can deliver the gift personally. 

3. Once you managed to get the digital code or gift card, you can then send it to the gift recipient. 

If you bought a digital code, then you can forward the email that contains the voucher to your loved one. You can also text the code to them. 

If you got a physical card, then you can give it to them personally. If they are far away, then you can try shipping the card to them or sending the voucher on the card via email/text.

Recommended 2022 TCL 4-Series (S455) settings for PS5, Xbox Series X and S

If you got 2022 TCL 4-Series television set, which has a model number that ends with S455, then you can check out this guide to see how you can optimize it for the PlayStation 5, PlayStation 5 Digital Edition, Xbox Series X and Xbox Series S. 

This article should cover the following screen sizes of the 2022 4-Series: 

  • 43″ 2022 TCL 4-Series (43S455) 
  • 50” 2022 TCL 4-Series (50S455) 
  • 55″ 2022 TCL 4-Series (55S455) 
  • 65″ 2022 TCL 4-Series (65S455) 
  • 75″ 2022 TCL 4-Series (75S455) 
  • 85″ 2022 TCL 4-Series (85S455) 

Supported PS5 Features 

The 2022 TCL 4-Series only supports a short list of features from the PlayStation 5 and PlayStation 5 Digital Edition as this TV is capable of playing games at 60 frames per second in HDR10 format. It can also be used with Auto Low Latency Mode. 

120 fps and Variable Refresh Rate are not supported. 

Supported Xbox Series X and Xbox Series S Features 

The story is the same when it comes to the Xbox Series consoles as you are limited to playing games at a 60 Hz refresh rate in HDR10 format. With that said, you can also use ALLM with these gaming systems. 

This TV does not support 120 frames per second, VRR or Dolby Vision on Xbox. 

How to optimize 2022 TCL 4-Series (S455) for PS5, Xbox Series X and S 

In order to optimize the 2022 TCL 4-Series for the new consoles, you can take the following steps: 

1. For the first step, we recommend that you update your TCL TV if you haven’t done so already. Doing so may potentially results in better performance and added features.  

In order to update, connect the screen to the internet and then use your television remote to go to Settings > System > System update > Check now. 

2. After making sure you have the latest firmware installed on your television set, you then need to connect your console to the HDMI ports of the screen. 

All four of the ports of the TCL 4-Series are HDMI 2.0; therefore, you can connect your console to any of them. 

3. Once you have connected your gaming system, use the TV remote to head over to TV Settings menu and then make sure that you set Auto Low Latency Mode to On.  

By doing so, your television set will automatically switch over to Game Mode when it detects your PlayStation 5, PlayStation 5 Digital Edition, Xbox Series X and/or Xbox Series S. For the uninformed, this specialized mode will reduce input lag when playing video games. 

4. Furthermore, you should make sure that you disable Dynamic Contrast, as well as any other settings that requires extra processing that may add input lag, from the Picture Settings menu.  

5. Your 2022 TCL 4-Series should now be optimized for the new consoles. With that said, you should take a look at the settings on your gaming system to make sure you set them up correctly as well. 

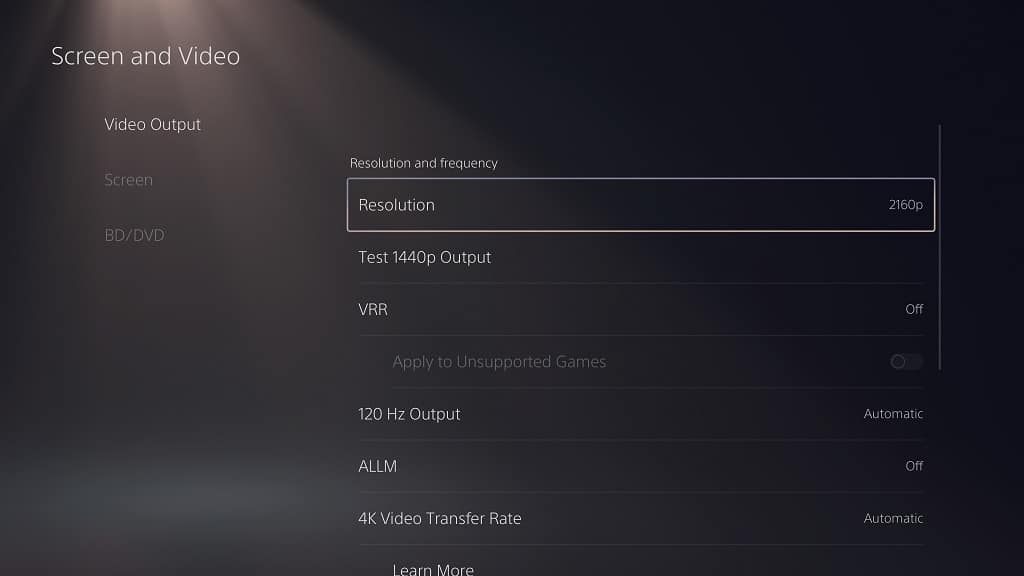
On the PS5 and PS5 Digital Edition, you need to Settings > Screen and Video > Video Output. 

From this menu, you need to do the following: 

  • Set Resolution to 2160p. 
  • Set HDR to On When Supported. 
  • Set ALLM to Automatic. 
  • Set 4K Transfer Rate to Automatic. 
  • Set Deep Color Output to Automatic. 
  • Set RGB Range to Automatic. 

Next, you need to select Adjust HDR. Over the next several screens, you then need to calibrate the HDR output of your console for the 2022 TCL 4-Series. 

On the Xbox Series X and Xbox Series S, you need to first head to General > TV & Display Options > Video Modes. 

From the Video modes menu, make sure you enable the following: 

  • Allow Auto-Low Latency Mode  
  • Allow 4K 
  • Allow HDR10 

Afterwards, return to the General > TV & Display Options menu and then set Resolution to 4K. You then need to select the Calibrate HDR option so that you can start calibrating the HDR brightness output of your Xbox Series console for the 4-Series.