How to install FireCuda 530, WD_BLACK SN850 and AORUS 7000S to PS5

Support for the M.2 solid state drive was finally added to the PlayStation 5 thanks to a firmware update. The internal SSD add-on will allow you to store and play PS5 games.

The list of compatible M.2 storage drives includes the AORUS Gen. 4 7000s as well as the heatsink-equipped versions of the FireCuda 530 and WD_BLACK SN850.

You can check out this guide at Seeking Tech to see how you can install these three SSDs to your PlayStation 5 or PlayStation 5 Digital Edition system.

PS5 Compatible M.2 SSDs

This tutorial should be covering the following M.2 solid state drives that have been confirmed to be compatible with the PlayStation 5:

  • 1 TB GIGABYTE AORUS Gen. 4 7000s with Heatsink (GP-AG70S1TB)
  • 2 TB GIGABYTE AORUS Gen. 4 7000s with Heatsink (GP-AG70S2TB)
  • 500 GB Seagate FireCuda 530 with Heatsink (ZP500GM30023)
  • 1 TB Seagate FireCuda 530 with Heatsink (ZP1000GM30023)
  • 2 TB Seagate FireCuda 530 with Heatsink (ZP2000GM30023)
  • 4 TB Seagate FireCuda 530 with Heatsink (ZP4000GM30023)
  • 500 GB Western Digital WD_BLACK SN850 with Heatsink (WDS500G1XHE-00AFY0)
  • 1 TB Western Digital WD_BLACK SN850 with Heatsink (WDS100T1XHE-00AFY0)
  • 2 TB Western Digital WD_BLACK SN850 with Heatsink (WDS200T1XHE-00AFY0)

Updating to the latest PS5 firmware

Since M.2 solid state drive support was added to the latest firmware update, the first step is to make sure that your PlayStation 5 system is running the latest software version.

To update to the latest PS5 firmware, you can do the following:

1. Turn on the PlayStation 5. If the system is connected to the Internet and detects a firmware update, then you should get a pop-up when you arrive at the Home Screen (which is the main menu where you can select a game to play).

2. If you don’t see a pop-up message, you can force a manual update by going to Settings, which is located at the upper right corner in the Home Screen.

3. In the Settings menu, head to System.

4. In the System menu, select System Software on the left side and then System Software Update and Settings on the right side.

5. In the System Software Update and Settings menu, select Update System Software.
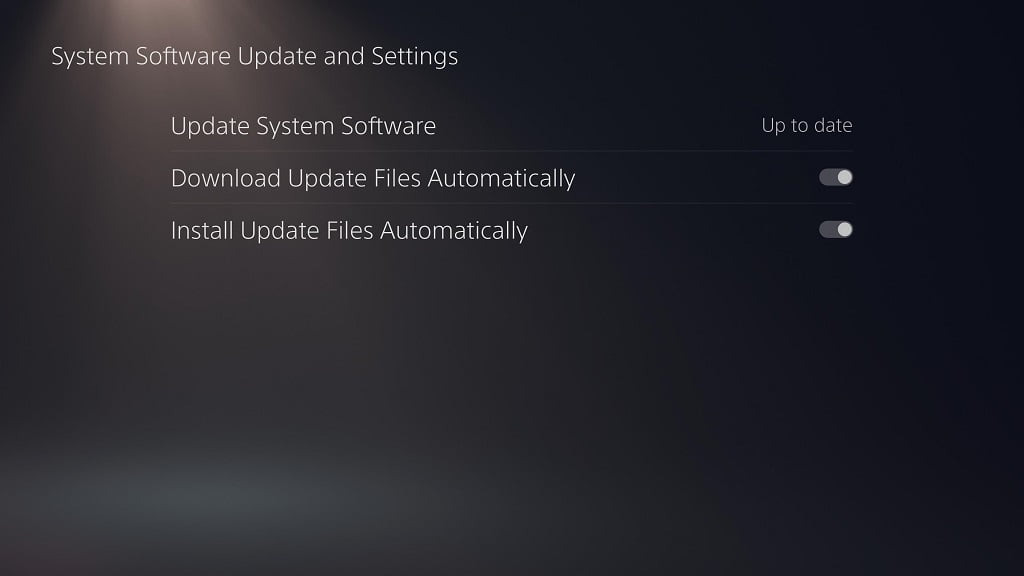
6. In the System Software Update menu, select Update Using Internet.

How to insert FireCuda 530, WD_BLACK SN850 and AORUS 7000S to PS5

After updating the firmware, the next step is to physically insert your FireCuda 530, WD_BLACK SN850 or AORUS 7000S SSD to the PlayStation 5.

To do so, you need to do the following:

1. Turn off the PlayStation 5.

2. Wait until the system is no longer displaying any lights to confirm that the system is completely powered down. Afterwards, unplug any cables you have connected to your PS5.

3. You should also remove the stand from the console if you have it installed.

4. Next, you need to lay the PlayStation 5 down. The side with the PlayStation logo should be underneath. The base of the system, which is where you connect the included stand to if you were to put your PS5 vertical position, should be facing you.

5. From your vantage point, grab the top right corner of the system. Afterwards, gently pull the cover up and then towards you to remove the cover from the system.

6. With the cover off, you should see the long rectangular M.2 slot. Using a #1 Phillips or cross-head screwdriver, you need to unscrew the screw holding the slot cover and then remove the cover.
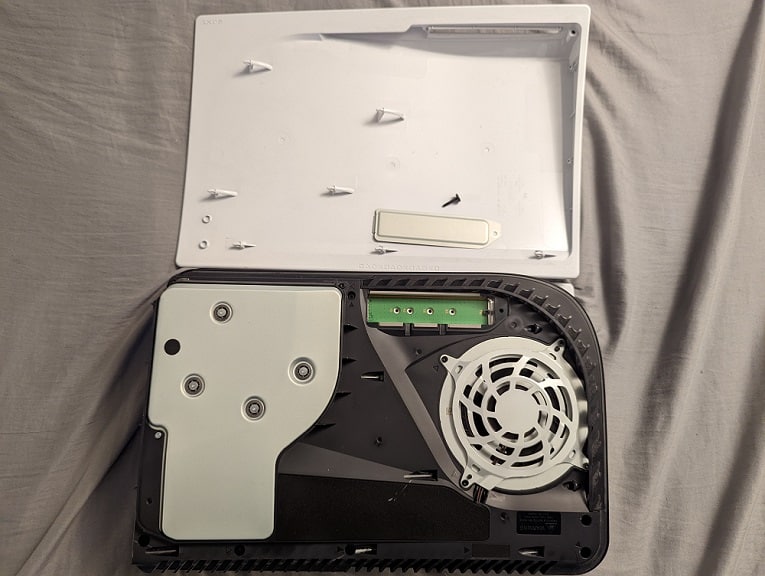
7. Next, you need to unscrew and remove the screw and spacer from inside the M.2 slot.

8. Place the spacer into the 80 screw hole in the M.2 slot.

9. You can now insert your FireCuda 530, WD_BLACK SN850 or AORUS 7000S solid state drive.

To do so, you need to first make sure that the connectors of your SSD is aligned to the connectors of the M.2 slot on the PlayStation 5 system.

You can then insert the connector side of your drive to the M.2 slot from a diagonally upwards position. This means that the other end should be pointing upwards when you connect the drive to the system.

10. After connecting the drive to the slot, push the other end of the FireCuda 530, WD_BLACK SN850 or AORUS 7000S downwards. You then need to use the screw you previously removed from inside the M.2 slot on the end of the SSD to keep it fastened to the motherboard of the PS5.

11. Afterwards, put the cover of the M.2 slot back on. Make sure you use the screw you previously removed from the cover to fasten the slot cover.

12. Slide the previously removed outer cover of the PlayStation 5 system right back into place.

How to format FireCuda 530, WD_BLACK SN850 and AORUS 7000S for PS5

After you physically insert your FireCuda 530, WD_BLACK SN850 or AORUS 7000S to the PlayStation 5, it’s time to format it.

To do so, you need to do the following:

1. Plug in the power cable of your PlayStation 5 and then turn the system on.

2. You should get a message about the newly installed M.2 SSD Storage.
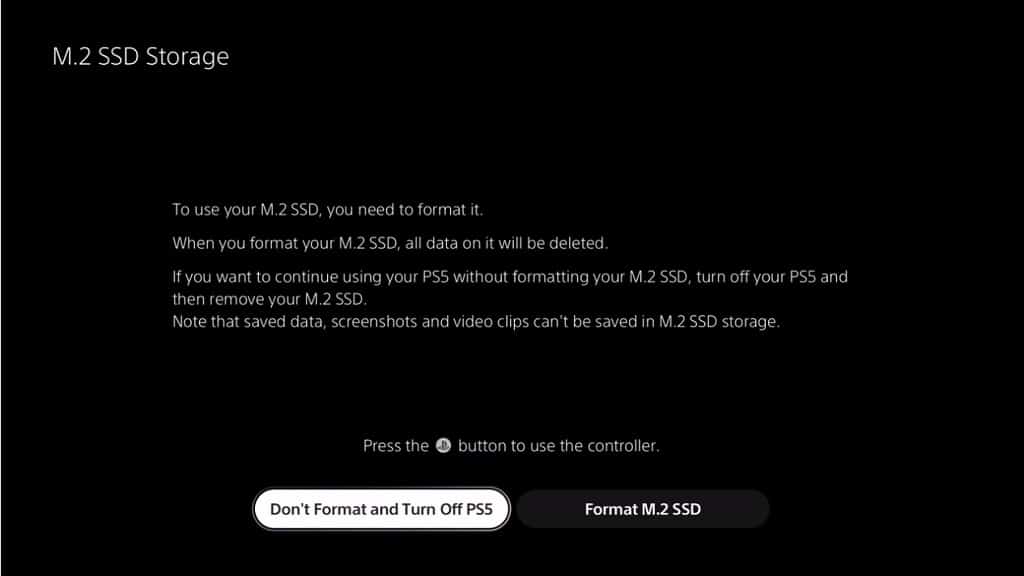
Here, you need to select the Format M2. SSD option.

Keep in mind that formatting will delete all data from your FireCuda 530, WD_BLACK SN850 or AORUS 7000S. So, if you have any important data stored on the solid state drive, make sure you copy the file to somewhere else before formatting the drive for use with the PlayStation 5.

3. After the formatting has been completed, you will see the sequential read speed of the M.2 drive. Here, you need to select the OK option to continue.

Where to find FireCuda 530, WD_BLACK SN850 and AORUS 7000S in the PS5 menu

To find your newly formatted solid state drive, you need to take the following steps:

1. From the Home Screen, go into Settings.

2. In the Settings menu, you need to select the Storage option.

3. In the Storage menu, you need to select the M.2 SSD Storage option on the left side.

4. On the right side of the same Storage menu, you should find your FireCuda 530, WD_BLACK SN850 or AORUS 7000S.

You should be able to see the amount of free space available overall. Furthermore, you will also find how much space is being used by “Games and Apps” as well as “Other” files.

Lastly, you can also reformat the drive in this menu.

What’s the difference between the SK hynix Gold P31 and Samsung 980?

The SK hynix Gold P31 and Samsung 980 are two of the more popular M.2 2280 solid state drives that are currently available.

If you want to know what the major differences are between these internal SSDs, then you can check out this guide at Seeking Tech.

Quick Summary

The SK hynix Gold P31 Solid State Drive is generally faster than the Samsung 980 Solid State Drive at maximum sequential reads, maximum sequential writes, maximum random reads and maximum random writes.

Not to mention that the P31 has better endurance as you will be able to write more data on it than the 980.

The two solid state drives do have the same reliability rating in addition to the same warranty coverage length.

Overall, we recommend getting the SK hynix Gold P31 over the Samsung 980 due to the better performances and endurance.

P31 vs. 980 Comparison Chart

You can take a look at Seeking Tech’s comparison table for the P31 and 980 SSDs below.

SK hynix Gold P31 Solid State DriveSamsung 980 Solid State Drive
Capacity Options500 GB

1 TB
250 GB

500 GB

1 TB
Model Numbers500 GB SK hynix Gold P31: SHGP31-500GM-2

1 TB SK hynix Gold P31: SHGP31-1000GM-2
250 GB Samsung 980: MZ-V8V250B

500 GB Samsung 980: MZ-V8V500B

1 TB Samsung 980: MZ-V8V1T0B
Form FactorM.2 2280M.2 2280
InterfacePCIe Gen 3.0 x4, NVMe 1.3PCIe Gen 3.0 x4, NVMe 1.4
Maximum Sequential Read Speed500 GB SK hynix Gold P31: Up to 3500 MB per second

1 TB SK hynix Gold P31: Up to 3500 MB per second
250 GB Samsung 980: Up to 2900 MB per second

500 GB Samsung 980: Up to 3100 MB per second

1 TB Samsung 980: Up to 3500 MB per second
Maximum Sequential Write Speed500 GB SK hynix Gold P31: Up to 3100 MB per second

1 TB SK hynix Gold P31: Up to 3200 MB per second
250 GB Samsung 980: Up to 1300 MB per second

500 GB Samsung 980: Up to 2600 MB per second

1 TB Samsung 980: Up to 3000 MB per second
Maximum Random Read Speed500 GB SK hynix Gold P31: Up to 570K IOPS

1 TB SK hynix Gold P31: Up to 570K IOPS
250 GB Samsung 980: Up to 230K IOPS

500 GB Samsung 980: Up to 400K IOPS

1 TB Samsung 980: Up to 500K IOPS
Maximum Random Write Speed500 GB SK hynix Gold P31: Up to 600K IOPS

1 TB SK hynix Gold P31: Up to 600K IOPS
250 GB Samsung 980: Up to 320K IOPS

500 GB Samsung 980: Up to 470K IOPS

1 TB Samsung 980: Up to 480K IOPS
Endurance500 GB SK hynix Gold P31: 500 TBW

1 TB SK hynix Gold P31: 750 TBW
250GB Samsung 980: 150 TBW

500GB Samsung 980: 300 TBW

1TB Samsung 980: 600 TBW
Reliability1,500,000 hours MTBF1,500,000 hours MTBF
Warranty5-year warranty5-year warranty
PricingCheck price on Amazon.(#CommissionsEarned)Check price on Amazon.(#CommissionsEarned)

Capacity Options

The Samsung 980 is the only product out of these two to offer a 2 TB capacity option.

You can check out a breakdown of the available capacities for both products below:

SK hynix Gold P31:

  • 500 GB
  • 1 TB

Samsung 980:

  • 250 GB
  • 500 GB
  • 1 TB

Model Numbers

You can find the model number attached to each capacity of the two SSDs in this versus guide below:

  • 500 GB SK hynix Gold P31: SHGP31-500GM-2
  • 1 TB SK hynix Gold P31: SHGP31-1000GM-2
  • 250 GB Samsung 980: MZ-V8V250B
  • 500 GB Samsung 980: MZ-V8V500B
  • 1 TB Samsung 980: MZ-V8V1T0B

Form Factor

Both the P31 and 980 utilize the M.2 2280 form factor.

Interface

As for the interface, the P31 uses PCIe Gen 3.0 x4, NVMe 1.3 while the 980 uses PCIe Gen 3.0 x4, NVMe 1.4.

Maximum Sequential Read Speed

When you compare the same capacities, the 500 GB SK hynix Gold P31 is 400 MB per second faster, or 12.90% faster, than the 500 GB Samsung 980 at maximum sequential reading.

The 1 TB capacity options for both products have the same top speeds in this category.

You can find the maximum sequential read speed per capacity for both SSDs below:

  • 500 GB SK hynix Gold P31: Up to 3500 MB per second
  • 1 TB SK hynix Gold P31: Up to 3500 MB per second
  • 250 GB Samsung 980: Up to 2900 MB per second
  • 500 GB Samsung 980: Up to 3100 MB per second
  • 1 TB Samsung 980: Up to 3500 MB per second

Maximum Sequential Write Speed

As for the maximum sequential writing speed, the 500 GB SK hynix Gold P31 is 500 MB per second faster, or 19.23% faster, than the 500 GB Samsung 980.

The 1 TB SK hynix Gold P31 is also 200 MB per second faster, or 6.67% faster, than the 1 TB Samsung 980.

You can take a look at the maximum sequential write speeds below:

  • 500 GB SK hynix Gold P31: Up to 3100 MB per second
  • 1 TB SK hynix Gold P31: Up to 3200 MB per second
  • 250 GB Samsung 980: Up to 1300 MB per second
  • 500 GB Samsung 980: Up to 2600 MB per second
  • 1 TB Samsung 980: Up to 3000 MB per second

Maximum Random Read Speed

When it comes to maximum random reading, the 500 GB SK hynix Gold P31 is 170K IOPS faster, or 42.5% faster, than the 500 GB Samsung 980.

The 1 TB SK hynix Gold P31 is also 70K IOPS faster, or 14% faster, than the 1 TB Samsung 980.

You can check out the maximum random read speeds below:

  • 500 GB SK hynix Gold P31: Up to 570K IOPS
  • 1 TB SK hynix Gold P31: Up to 570K IOPS
  • 250 GB Samsung 980: Up to 230K IOPS
  • 500 GB Samsung 980: Up to 400K IOPS
  • 1 TB Samsung 980: Up to 500K IOPS

Maximum Random Write Speed

For maximum random writing, the 500 GB SK hynix Gold P31 is 130K IOPS faster, or 27.66% faster, than the 500 GB Samsung 980.

The 1 TB SK hynix Gold P31 is also 120K IOPS faster, or 25% faster, than the 1 TB Samsung 980.

You can take a look at the maximum random write speeds below:

  • 500 GB SK hynix Gold P31: Up to 600K IOPS
  • 1 TB SK hynix Gold P31: Up to 600K IOPS
  • 250 GB Samsung 980: Up to 320K IOPS
  • 500 GB Samsung 980: Up to 470K IOPS
  • 1 TB Samsung 980: Up to 480K IOPS

Endurance

As for endurance, you will be able write more data with the SK hynix Gold P31 than the Samsung 980.

You can find the TBW specs for each capacity of both solid state drives below:

  • 500 GB SK hynix Gold P31: 500 TBW
  • 1 TB SK hynix Gold P31: 750 TBW
  • 250GB Samsung 980: 150 TBW
  • 500GB Samsung 980: 300 TBW
  • 1TB Samsung 980: 600 TBW

Reliability

The P31 and 980 have the same Mean Time Between Failures reliability rating of 1,500,000 hours.

Warranty

The SK hynix Gold P31 Solid State Drive and Samsung 980 Solid State Drive each comes with a 5-year warranty.

Resources:

What’s the difference between the FireCuda 520 and 530?

Seagate recently released the FireCuda 530. So, how does the new M.2 solid state drive compare to the older FireCuda 520?

You can find out in this comparison guide between these two Seagate SSDs.

Quick Summary

For the most part, the Seagate FireCuda 530 is quite a bit faster than the Seagate FireCuda 520 at maximum sequential reading, maximum sequential writing, maximum random reading and maximum random writing.

The only exception is that the 500GB FireCuda 520 is faster than the 500GB FireCuda 520 at random reads.

Unlike the FireCuda 520, the FireCuda 530 also comes with 3 years’ worth of Rescue Data Recovery Services.

On the other hand, the Seagate FireCuda 520 has better endurance and is more power efficient.

FireCuda 520 vs. FireCuda 530 Comparison Chart

You can take a look at Seeking Tech’s comparison table for the FireCuda 520 and FireCuda 530 below.

Seagate FireCuda 520 Solid State DriveSeagate FireCuda 530 Solid State Drive
Capacity Options500GB

1TB

2TB
500GB

1TB

2TB

4TB
Model Numbers500GB: ZP500GM30002

1TB: ZP1000GM30002

2TB: ZP2000GM30002
500GB: ZP500GM30013

1TB: ZP1000GM30013

2TB: ZP2000GM30013

4TB: ZP4000GM30013
Form FactorM.2 2280-D2M.2 2280-D2
Dimensions500GB FireCuda 520: 80.15 mm x 22.15 mm x 3.58 mm

1TB FireCuda 520: 80.15 mm x 22.15 mm x 3.58 mm

2TB FireCuda 520: 80.15 mm x 22.15 mm x 3.58 mm
500GB FireCuda 530: 80.15 mm x 22.15 mm x 2.23 mm

1TB FireCuda 530: 80.15 mm x 22.15 mm x 2.23 mm

2TB FireCuda 530: 80.15 mm x 22.15 mm x 3.58 mm

4TB FireCuda 530: 80.15 mm x 22.15 mm x 3.58 mm
Weight500GB FireCuda 520: 8.0 grams

1TB FireCuda 520: 8.5 grams

2TB FireCuda 520: 8.7 grams
500GB FireCuda 530: 7.7 grams

1TB FireCuda 530: 8.1 grams

2TB FireCuda 530: 10.0 grams

4TB FireCuda 530: 10.6 grams
InterfacePCIe Gen4 ×4, NVMe 1.3PCIe Gen4 ×4, NVMe 1.4
NAND3D TLC3D TLC
Maximum Sequential Read Speed500GB FireCuda 520: Up to 5000 MB per second

1TB FireCuda 520: Up to 5000 MB per second

2TB FireCuda 520: Up to 5000 MB per second
500GB FireCuda 530: Up to 7000 MB per second

1TB FireCuda 530: Up to 7300 MB per second

2TB FireCuda 530: Up to 7300 MB per second

4TB FireCuda 530: Up to 7300 MB per second
Maximum Sequential Write Speed500GB FireCuda 520: Up to 2500 MB per second

1TB FireCuda 520: Up to 4400 MB per second

2TB FireCuda 520: Up to 4400 MB per second
500GB FireCuda 530: Up to 3000 MB per second

1TB FireCuda 530: Up to 6000 MB per second

2TB FireCuda 530: Up to 6900 MB per second

4TB FireCuda 530: Up to 6900 MB per second
Maximum Random Read Speed500GB FireCuda 520: Up to 430K IOPS

1TB FireCuda 520: Up to 760K IOPS

2TB FireCuda 520: Up to 750K IOPS
500GB FireCuda 530: Up to 400K IOPS

1TB FireCuda 530: Up to 800K IOPS

2TB FireCuda 530: Up to 1000K IOPS

4TB FireCuda 530: Up to 1000K IOPS
Maximum Random Write Speed500GB FireCuda 520: Up to 630K IOPS

1TB FireCuda 520: Up to 700K IOPS

2TB FireCuda 520: Up to 700K IOPS
500GB FireCuda 530: Up to 700K IOPS

1TB FireCuda 530: Up to 1000K IOPS

2TB FireCuda 530: Up to 1000K IOPS

4TB FireCuda 530: Up to 1000K IOPS
Endurance500GB FireCuda 520: 850 TBW

1TB FireCuda 520: 1800 TBW

2TB FireCuda 520: 3600 TBW
500GB FireCuda 530: 640 TBW

1TB FireCuda 530: 1275 TBW

2TB FireCuda 530: 2550 TBW

4TB FireCuda 530: 5100 TBW
Reliability1,800,000 hours MTBF1,800,000 hours MTBF
General FeaturesHalogen Free

RoHS Compliance

S.M.A.R.T.

TRIM
Halogen Free

RoHS Compliance

S.M.A.R.T.

TRIM
Average Active Power500GB FireCuda 520: 4.6 W

1TB FireCuda 520: 5.6 W

2TB FireCuda 520: 6.0 W
500GB FireCuda 530: 5.8 W

1TB FireCuda 530: 6.5 W

2TB FireCuda 530: 8.0 W

4TB FireCuda 530: 8.4 W
Average Idle Power (PS3)500GB FireCuda 520: 12 mW

1TB FireCuda 520: 15 mW

2TB FireCuda 520: 25 mW
500GB FireCuda 530: 14 mW

1TB FireCuda 530: 16 mW

2TB FireCuda 530: 24 mW

4TB FireCuda 530: 25 mW
Low Power L1.2 mode500GB FireCuda 520: 2 mW

1TB FireCuda 520: 2 mW

2TB FireCuda 520: 2 mW
500GB FireCuda 530: Less than 5 mW

1TB FireCuda 530: Less than 5 mW

2TB FireCuda 530: Less than 5 mW

4TB FireCuda 530: Less than 5 mW
Operating Temperature0°C to 70°C0°C to 70°C
Storage Temperature-40°C to 85°C-40°C to 85°C
Non-Operating Shock Resistance1500G, 0.5ms1500G, 0.5ms
Rescue Data Recovery ServicesNone3 years
Warranty5 years5 years
PricingCheck price on Amazon.(#CommissionsEarned)Check price on Amazon.(#CommissionsEarned)

Capacity Options

The FireCuda 530 is the only one of the two to offer a 4TB capacity option.

You can find the list of available capacities for these products below:

FireCuda 520:

  • 500GB
  • 1TB
  • 2TB

FireCuda 530:

  • 500GB
  • 1TB
  • 2TB
  • 4TB

Model Numbers

You can also find the model number associated with each capacity below:

FireCuda 520:

  • 500GB: ZP500GM30002
  • 1TB: ZP1000GM30002
  • 2TB: ZP2000GM30002

FireCuda 530:

  • 500GB: ZP500GM30013
  • 1TB: ZP1000GM30013
  • 2TB: ZP2000GM30013
  • 4TB: ZP4000GM30013

Form Factor

The FireCuda 520 and FireCuda 530 both use the same M.2 2280-D2 form factor.

Dimensions

You can find the measurements, shown as Length x Width x Depth, below:

  • 500GB FireCuda 520: 80.15 mm x 22.15 mm x 3.58 mm
  • 1TB FireCuda 520: 80.15 mm x 22.15 mm x 3.58 mm
  • 2TB FireCuda 520: 80.15 mm x 22.15 mm x 3.58 mm
  • 500GB FireCuda 530: 80.15 mm x 22.15 mm x 2.23 mm
  • 1TB FireCuda 530: 80.15 mm x 22.15 mm x 2.23 mm
  • 2TB FireCuda 530: 80.15 mm x 22.15 mm x 3.58 mm
  • 4TB FireCuda 530: 80.15 mm x 22.15 mm x 3.58 mm

Weight

Furthermore, you can check out the weight for each capacity of both products below:

  • 500GB FireCuda 520: 8.0 grams
  • 1TB FireCuda 520: 8.5 grams
  • 2TB FireCuda 520: 8.7 grams
  • 500GB FireCuda 530: 7.7 grams
  • 1TB FireCuda 530: 8.1 grams
  • 2TB FireCuda 530: 10.0 grams
  • 4TB FireCuda 530: 10.6 grams

Interface

For the interface, the FireCuda 520 uses PCIe Gen4 ×4, NVMe 1.3 while the FireCuda 530 uses the PCIe Gen4 ×4, NVMe 1.4.

NAND

The two internal SSDs in this versus guide are equipped with 3D TLC.

Maximum Sequential Read Speed

When you compare the same capacity options, the 500GB FireCuda 530 is 2000 MB per second faster, or 40% faster, than the 500GB FireCuda 530 at maximum sequential reading.

The 1TB and 2TB versions of the FireCuda 530 is 2300 MB per second faster, or 46% faster, than the 1TB and 2 TB versions of FireCuda 520.

You can check out the maximum read speeds below:

  • 500GB FireCuda 520: Up to 5000 MB per second
  • 1TB FireCuda 520: Up to 5000 MB per second
  • 2TB FireCuda 520: Up to 5000 MB per second
  • 500GB FireCuda 530: Up to 7000 MB per second
  • 1TB FireCuda 530: Up to 7300 MB per second
  • 2TB FireCuda 530: Up to 7300 MB per second
  • 4TB FireCuda 530: Up to 7300 MB per second

Maximum Sequential Write Speed

The 500GB FireCuda 530 is 500 MB per second faster, or 20% faster, than the 500GB FireCuda 530 at maximum sequential writing.

The 1TB FireCuda 530 is 1600 MB per second faster, or 36.36% faster, than the 1TB FireCuda 520.

The 2TB FireCuda 530 is 2500 MB per second faster, or 56.82% faster, than the 2TB FireCuda 520.

You can find the maximum sequential write speeds below:

  • 500GB FireCuda 520: Up to 2500 MB per second
  • 1TB FireCuda 520: Up to 4400 MB per second
  • 2TB FireCuda 520: Up to 4400 MB per second
  • 500GB FireCuda 530: Up to 3000 MB per second
  • 1TB FireCuda 530: Up to 6000 MB per second
  • 2TB FireCuda 530: Up to 6900 MB per second
  • 4TB FireCuda 530: Up to 6900 MB per second

Maximum Random Read Speed

For maximum random reading, the 500GB FireCuda 520 is actually 30K IOPS faster, or 7.5% faster, than the 500GB FireCuda 520.

On the other hand, the 1TB FireCuda 530 is 40K IOPS faster, or 5.26% faster, than the 1TB FireCuda 520.

The 2TB FireCuda 530 is also 250K IOPS faster, or 33.33% faster, than the 2TB FireCuda 520.

You can check out the maximum random read speeds below:

  • 500GB FireCuda 520: Up to 430K IOPS
  • 1TB FireCuda 520: Up to 760K IOPS
  • 2TB FireCuda 520: Up to 750K IOPS
  • 500GB FireCuda 530: Up to 400K IOPS
  • 1TB FireCuda 530: Up to 800K IOPS
  • 2TB FireCuda 530: Up to 1000K IOPS
  • 4TB FireCuda 530: Up to 1000K IOPS

Maximum Random Write Speed

When it comes to maximum random writing, the 500GB FireCuda 530 is 70K IOPS faster, or 11.11% faster, than the 500GB FireCuda 520.

The 1TB and 2TB capacities of the FireCuda 530 is 300K IOPS faster, or 42.86% faster, than the 1TB and 2TB capacities of FireCuda 520.

You can check out the maximum random write speeds below:

  • 500GB FireCuda 520: Up to 630K IOPS
  • 1TB FireCuda 520: Up to 700K IOPS
  • 2TB FireCuda 520: Up to 700K IOPS
  • 500GB FireCuda 530: Up to 700K IOPS
  • 1TB FireCuda 530: Up to 1000K IOPS
  • 2TB FireCuda 530: Up to 1000K IOPS
  • 4TB FireCuda 530: Up to 1000K IOPS

Endurance

The FireCuda 520 has better endurance than the FireCuda 530.

You can find the TBW ratings below:

  • 500GB FireCuda 520: 850 TBW
  • 1TB FireCuda 520: 1800 TBW
  • 2TB FireCuda 520: 3600 TBW
  • 500GB FireCuda 530: 640 TBW
  • 1TB FireCuda 530: 1275 TBW
  • 2TB FireCuda 530: 2550 TBW
  • 4TB FireCuda 530: 5100 TBW

Reliability

The two Seagate solid state drives in this comparison have the same Mean Time Between Failures rating at 1,800,000 hours.

General Features

The two SSDs also share the following general features:

  • Halogen Free
  • RoHS Compliance
  • S.M.A.R.T.
  • TRIM

Power Consumption Specifications

In general, the FireCuda 520 is more power efficient than the FireCuda 530.

You can find the power consumption specs below:

Average Active Power

  • 500GB FireCuda 520: 4.6 W
  • 1TB FireCuda 520: 5.6 W
  • 2TB FireCuda 520: 6.0 W
  • 500GB FireCuda 530: 5.8 W
  • 1TB FireCuda 530: 6.5 W
  • 2TB FireCuda 530: 8.0 W
  • 4TB FireCuda 530: 8.4 W

Average Idle Power (PS3)

  • 500GB FireCuda 520: 12 mW
  • 1TB FireCuda 520: 15 mW
  • 2TB FireCuda 520: 25 mW
  • 500GB FireCuda 530: 14 mW
  • 1TB FireCuda 530: 16 mW
  • 2TB FireCuda 530: 24 mW
  • 4TB FireCuda 530: 25 mW

Low Power L1.2 Mode

  • 500GB FireCuda 520: 2 mW
  • 1TB FireCuda 520: 2 mW
  • 2TB FireCuda 520: 2 mW
  • 500GB FireCuda 530: Less than 5 mW
  • 1TB FireCuda 530: Less than 5 mW
  • 2TB FireCuda 530: Less than 5 mW
  • 4TB FireCuda 530: Less than 5 mW

Operating Temperature

The FireCuda 520 and FireCuda 530 have the same operating temperature range of 0°C to 70°C.

Storage Temperature

The two Seagate internal drives also have the same storage temperature range of -40°C to 85°C.

Non-Operating Shock Resistance

The shock resistance, during non-operation, is identical at 1500G, 0.5ms.

Rescue Data Recovery Services

The Seagate FireCuda 530 is the only one of these products to offer Rescue Data Recovery Services as it comes with 3 years of coverage.

Warranty

The Seagate FireCuda 520 Solid State Drive and Seagate FireCuda 530 Solid State Drive each comes with a 5-year limited warranty.

Resources:

How to safely disconnect the Samsung X5

Disconnecting your 500 GB Samsung X5 Portable Solid State Drive (MU-PB500B), 1 TB Samsung X5 Portable Solid State Drive (MU-PB1T0B) or 2 TB Samsung X5 Portable Solid State Drive (MU-PB2T0B) incorrectly may lead to several issues.

You can check out this tutorial at Seeking Tech to see the right ways to unplug your X5.

What happens if you do not safely eject, remove or unmount the Samsung X5?

If you don’t properly eject, remove or unmount your Samsung X5 Portable Solid State Drive, then you may experience loss of data and/or hardware damages.

Unfortunately, Samsung is not legally liable to cover any potential issues that may come up due to you not properly unplugging your SSD.

Therefore, you should make sure you are disconnecting your X5 the right way anytime you use it.

How to safely eject Samsung X5 on Windows PC

To safely eject your X5 from your Windows PC, you need to take the following steps:

1. Look at the LED status indicator on your Samsung X5 Portable Solid State Drive.

If it is displaying a blink white light, then the SSD is currently reading or writing data. You need to wait until the LED turns solid white, which means that it isn’t reading or writing data, therefore making it safe to be ejected from your Windows PC.

2. From your Windows dashboard, select the “Safely Remove Hardware” icon on the taskbar. You may have to select the “Show hidden icons” to find it.

3. Select the Samsung X5 from the list of devices in “Safely Remove Hardware.”

4. In the pop-up dialogue box, select the Eject option.

5. If you can’t find the “Safely Remove Hardware” icon on the default dashboard or in the “Show hidden icons” section, you can try going to Start > Settings > Devices. You should be able to find the X5 here. Select your SSD and then the “Remove device” option.

6. After telling your Windows PC to disconnect your Samsung X5 SSD, you can safely unplug your external drive.

7. Alternatively, you can simply turn off your Windows PC and wait until the LED indicator is no longer displaying a white light to safely unplug the X5.

How to safely remove Samsung X5 on Mac

To safely remove your X5 from your Mac without causing any hardware damage and/or data loss, you need to do the following:

1. Make sure that the portable solid state drive isn’t busy reading or writing any data. The LED indicator on it should be solid white. If the LED is blinking, wait until the SSD finishes its tasks before continuing.

2. On your Mac dashboard, locate the icon for your X5 Samsung drive.

3. You can then drag your X5 icon into the Trash to disconnect.

4. Alternatively, you can select the X5 icon to bring up a menu. Here, you need to select File and then Eject to unmount your external storage drive.

5. Another method is to use the Finder sidebar. Select your X5 drive and then the Eject option.

6. Once you successfully ejected your Samsung X5 on your Mac, you should be able to safely unplug the portable SSD.

7. You can also simply shut down your Mac and wait until the LED indicator on the X5 no longer display any white light to safely disconnect your X5 SSD.

How to safely disconnect Samsung X5 on consoles

To safely disconnect your Samsung X5 Portable Solid State Drive on a home console (such as the PlayStation 4, PlayStation 4 Pro, PlayStation 5, PlayStation 5 Digital Edition, Xbox One, Xbox One S, Xbox One X, Xbox Series S and Xbox Series X), you should take the following steps:

1. Make sure that the LED indicator of your Samsung X5 is solid white. If the LED indicator is blinking, try to close the game and/or application you have opened.

2. Once the LED indicator is solid white, you can simply shut down you gaming console.

3. After you completely powered off your game system, the LED indicator on the Samsung X5 Portable Solid State Drive should not be displaying any white lights.

4. You should now be able to safely unplug the external solid state drive from your game console.

To safely disconnect your Samsung X5 Portable Solid State Drive from a PlayStation 5 or PlayStation 5 Digital Edition while the game system is still turned on, you can check out this tutorial.

How to fix Samsung X5 issues with not being detected or recognized

When using your Samsung X5 Portable Solid State Drive, you may encounter issues with your PC and/or Mac not being able to detect your external SSD.

You can follow this troubleshooting guide from Seeking Tech to see how you can get your computer to recognize the X5.

Before we begin, we should note that this tutorial will cover the 500 GB Samsung X5 Portable Solid State Drive (Model Number: MU-PB500B), 1 TB Samsung X5 Portable Solid State Drive (Model Number: MU-PB1T0B) and 2 TB Samsung X5 Portable Solid State Drive (Model Number: MU-PB2T0B).

Samsung X5 Portable SSD System Requirements

The first step we recommend taking is to make sure that your PC or Mac meets the system requirements of the Samsung X5 Portable Solid State Drive.

This external SSDs will only work with Thunderbolt 3 USB Type-C ports. It is not compatible with Thunderbolt 1 USB Type-C ports, Thunderbolt 2 USB Type-C ports or non-Thunderbolt USB Type-C ports.

When it comes to the operating systems, you need to have a Windows 10 64-bit RS 2 or later for a Windows 10 P. For Mac users, you will need macOS Sierra 10.12 or later.

Samsung X5 Portable SSD Formats

You should also make sure that you are using the correct file system.

By default, the Samsung X5 Portable uses exFAT, which should let your read and write data on both the Windows 10 PC and Mac.

You can also reformat the X5 into NTFS, which you can read and write with a Windows 10 PC. On the Mac, however, the NTFS is a read-only file format.

Furthermore, you can reformat the X5 into the HFS, which you can read and write with a Mac. However, the HFS format is not recognized at all by a Windows 10 PC.

So, if you are having recognition issues, you may want to consider reformatting your Samsung X5 on another compatible computer.

Keep in mind that reformatting will delete all stored data on the external SSD; therefore, you should backup any important data on your X5 external drive before starting this process.

Checking the USB Connectors and Ports

We also recommend checking the USB connector of the X5 in addition to the USB ports of your computer. Make sure that both of these are damage-free and clean.

If the connector and/or port is dirty, we recommend using a cotton swap with highly concentrated isopropyl alcohol (at least 70%) to clean.

When cleaning, the SSD and computer must be powered down. You should also make sure that both the connector and port are completely dried before reconnecting.

Furthermore, you should make sure that the USB connector is properly connected to the USB port when reconnecting.

Approving Samsung X5 on Windows 10

If you are connecting your Samsung X5 Portable Solid State Drive for the first time on Windows 10, you should get a dialog box asking you to approve for usage of Thunderbolt 3 devices. Select “OK.” In the new dialog box, select “Yes” to go to the Windows User Account Control. Find your connected Samsung X5 from the list and then make sure that it set to “Always Connect.” Select “OK” to confirm your change.

If you don’t see any dialog boxes, you can try right clicking the Thunderbolt icon on the Windows 10 system tray and then selecting “Approve Attached Devices.” Afterwards, make sure the X5 is set to “Always Connect.”

If you can’t find the Thunderbolt icon on Windows 10, you can try to search for Thunderbolt Control Center. In the control center, select “Approve Thunderbolt Devices.” You can then set your X5 to “Always Connect.”

Update Firmware

You can also try updating the firmware of your Samsung X5 Portable to see if the new software version will help resolve any of the detection issues.

Unfortunately, you will need to connect your X5 to a computer in order to update its firmware. So, you have to look for another compatible Windows 10 PC or Mac.

To find out how to update the firmware of your Samsung X5 Portable Solid State Drive, you can take a look at this tutorial.

Contact Samsung

If none of the aforementioned solutions help fix the recognition issues, and your Samsung X5 Portable Solid State Drive is still covered under warranty, then you can try contacting Samsung in order to get a possible replacement.

How to format SSD-PG, SSD-PUT and MiniStations for Xbox Series X and S

The Buffalo MiniStation, MiniStation Extreme NFC, MiniStation Thunderbolt, SSD-PG and SSD-PUT can be used as external storage drives for both the new Xbox Series X and Xbox Series S consoles.

You can check out this guide at Seeking Tech to see how you can format these hard disk drives and solid state drives for your Xbox.

Xbox Series X and S Compatible Buffalo External HDDs and SSDs

This guide will cover the following compatible external HDDs and SSDs from Buffalo:

  • 1 TB Buffalo MiniStation Portable Hard Disk Drive (Model Number: HD-PCF1.0U3BB)
  • 2 TB Buffalo MiniStation Portable Hard Disk Drive (Model Number: HD-PCF2.0U3GB)
  • 1 TB Buffalo MiniStation Extreme NFC Portable Hard Disk Drive (Model Number: HD-PZN1.0U3B)
  • 2 TB Buffalo MiniStation Extreme NFC Portable Hard Disk Drive (Model Number: HD-PZN2.0U3B)
  • 1 TB Buffalo MiniStation Thunderbolt Portable Hard Disk Drive (Model Number: HD-PA1.0TU3)
  • 2 TB Buffalo MiniStation Thunderbolt Portable Hard Disk Drive (Model Number: HD-PA2.0TU3)
  • 500 GB Buffalo SSD-PG Rugged and Portable Solid State Drive (Model Number: SSD-PG500U3B)
  • 1 TB Buffalo SSD-PG Rugged and Portable Solid State Drive (Model Number: SSD-PG1.0U3B)
  • 500 GB Buffalo SSD-PUT Rugged and Portable Solid State Drive Stick (Model Number: SSD-PUT500U3B)
  • 1 TB: Buffalo SSD-PUT Rugged and Portable Solid State Drive Stick (Model Number: SSD-PUT1.0U3B)

What types of Xbox games can you store on SSD-PG, SSD-PUT and MiniStations?

You can store backwards compatible Xbox, Xbox 360 and Xbox One games, in addition to the native Xbox Series X and Xbox Series S games, on all of the aforementioned Buffalo external storage drives.

What types of Xbox games can you play on SSD-PG, SSD-PUT and MiniStations?

You should be able to play backwards compatible Xbox, Xbox 360 and Xbox One games directly from the MiniStation, MiniStation Extreme NFC, MiniStation Thunderbolt, SSD-PG and SSD-PUT on both the Xbox Series S and Xbox Series X consoles.

These external drives are too slow to play native Xbox Series X and Xbox Series S games. Instead, you will need to move the game files from the external storage into either the internal storage or the Seagate Storage Expansion Card.

Do you need to format your Buffalo drive for Xbox Series X and S?

If you already format your external Buffalo drive on the Xbox One, Xbox One S or Xbox One X, then you won’t need to format it again for use with the Xbox Series X or Xbox Series S.

If your external Buffalo drive is brand new, or used for something else other than a console from the Xbox One or Xbox Series brands, then you will need to format.

How to format Buffalo SSD-PG, SSD-PUT and MiniStations for Xbox Series X and S

In order to properly format the MiniStation, MiniStation Extreme NFC, MiniStation Thunderbolt, SSD-PG or SSD-PUT for the Xbox Series X and S, you need to take the following steps:

1. Before we begin, make sure you backup any important files you have on the Buffalo drive. This is because reformatting will delete everything off of it.

2. Now that you make sure you won’t lose any important files, connect your external Buffalo storage drive to one of the USB ports on your Xbox Series X or Xbox Series S consoles.

3. Turn on your Xbox Series X or Xbox Series S console.

4. You should get a massage that will ask you to format your storage drive. Select the FORMAT STORAGE DEVICE option.

5. Set up a name for your external Buffalo drive.

6. You should then get a message that asks whether or not you want to set your external drive as the default location for installation.

If you are interested in doing so, select INSTALL NEW THINGS HERE option.

If you want to keep the default installation to the same location as before, you should select the KEEP CURRENT LOCATION option.

7. In the next screen, select the FORMAT STORAGE DEVICE option to begin the formatting process.

Where to find your Buffalo drive from the Xbox Series X and S system menu

After being formatted, you can find out Buffalo storage drive by going to Settings from the Home Screen menu.

In Settings, go to System.

In System, select Storage devices.

In the Storage devices menu, you will find your newly formatted external drive, which should have been labeled for “Games and apps.”

You can also use the Storage devices menu to move files in between the different storage drives that are connected to your console.

How to fix Samsung T5, T7 and T7 Touch detection issues

Your computer or device may not recognize your T5 Portable Solid State Drive, T7 Portable Solid State Drive and T7 Portable Solid State Drive.

If you are having issues with our external Samsung SSD not properly being detected on your PC, Mac and/or other devices, then you can check out this troubleshooting tutorial from Seeking Tech.

Before we start, we should note that this guide will cover all capacity versions of the Samsung T5, T7 and T7 Touch. The list should include the following model numbers:

  • MU-PA250B
  • MU-PA500B
  • MU-PA1T0B
  • MU-PA2T0B
  • MU-PC500R
  • MU-PC500H
  • MU-PC500T
  • MU-PC1T0R
  • MU-PC1T0H
  • MU-PC1T0T
  • MU-PC2T0R
  • MU-PC2T0H
  • MU-PC2T0T
  • MU-PC500
  • MU-PC500S
  • MU-PC1T0
  • MU-PC1T0S
  • MU-PC2T0
  • MU-PC2T0S

Using Correct File Format for T5, T7 and T7 Touch

The first step we recommend taking is to check the file format of your Samsung T5, T7 or T7 Touch.

Be default, the T5, T7 and T7 Touch SSDs are pre-formatted using the exFAT file system. This format is recognized by Mac and Windows operating systems for reading and writing data.

If you changed the file system to NTFS, then your Windows device should still be able to read and write data. For Mac, you can only read off of your external drive for NTFS.

For the HFS file system, Windows will not be able to recognize your SSD. For Mac, you can read and write data with HFS.

So, for best compatibility across multiple devices, we recommend using the exFAT format for your Samsung T5 Portable SSD, Samsung T7 Portable SSD or Samsung T7 Portable SSD.

Check Your USB connections

The next step we recommend taking is to check your USB connections.

Make sure that the USB connectors and ports aren’t dirty. You should also check to see if the cables to fully connected.

Furthermore, you can try using different cables. We recommend using the USB cables that came with your external drive as other cables could lead to compatibility issues.

It is also important to note that the connected device may not be able to detect your T5, T7 or T7 Touch if you are using an USB 2.0 port and the electrical current exceeds the 500 mA maximum limit.

How to fix “No Samsung Portable SSD is connected” error on Mac

If you see the “No Samsung Portable SSD is connected” error message when using the Samsung Portable SSD software on a Mac, then it is due to a security feature that was introduced in the macOS High Sierra 10.13.

This feature basically requires your approvals for installations of third-party software that aren’t directly distributed by Apple.

To fix this issue, close the Samsung Portable SSD Software. Afterwards, select “Security & Privacy” from the “System Preferences” menu. Locate the “System software from developer Samsung Electronics was blocked from loading” message and then click the “Allow” option.

Disconnect and then reconnect your T5, T7 or T7 Touch and then open the Samsung Portable SSD Software.

How to fix detection issues with T5, T7 or T7 Touch on M1 and macOS Big Sur

If your new Mac, which comes equipped the Apple M1 chip and macOS Big Sur, is having issues detecting your T5, T7 or T7 or T7 Touch, then it is likely due to same aforementioned policy where a user approval is required for installing third-party software that aren’t directly distributed by Apple.

To resolve this issue on your Mac, you need to go to Utilities and then Startup Security Utility. Afterwards, you need to select “Security Policy” and then “Reduced Security.” Here, you need to make sure that the box is checked for “Allow user management of kernel extensions from identified developers.”

After checking the aforementioned box, restart your Mac.

Download and then install “Portable SSD Software 1.0 for Mac (The macOS Big Sur user’s only)” from the Samsung official website. Make sure that you are downloading the right version of the program as there are multiple versions.

How to resolve conflicts between Samsung Portable SSD Driver and SAT SMART Driver

If you are using your T5, T7 or T7 Touch on a mac OS X that has the SAT SMART Driver, then you may run into issues with your SSD not showing up in some products.

To resolve this issue, you need to delete the Samsung Portable SSD Driver. To do so, first disconnect your solid state drive from your Mac.

Next, you need to use osascript with the CleanupAll.scpt file located in the directory of the Samsung Portable SSD software (which you can find at Home > Library > Application Support > PortableSSD).

Keep in mind that, by removing the Samsung Portable SSD Driver, you won’t be able to use the security mode of your T5, T7 or T7 Touch.

Game Consoles

If your PS4, PS4 Pro, PS5, PS5 Digital Edition, Xbox One, Xbox One S, Xbox One X, Xbox Seies S and/or Xbox Series X don’t recognize the external Samsung SSD, then you need to disable the security mode on your drive. This is because the security mode will require a password in order to unlock the solid state drive.

To see how you can remove password protection, you can check out this tutorial.

Contacting Samsung

If the connected device still can’t find your SSD even after you follow all of the aforementioned potential fixes, and you are still under warranty, then we recommend contacting Samsung support as you may have a defective storage drive.

WD_BLACK P10 vs. WD_BLACK P10 for Xbox

Western Digital has a regular edition and Xbox edition of the WD_BLACK P10. So, what are the main differences between these gaming hard drives?

You can find out in this comparison guide between the WD_BLACK P10 and WD_BLACK P10 for Xbox.

Quick Summary

The WD_BLACK P10 Game Drive is slightly faster than the WD_BLACK P10 Game Drive for Xbox at maximum sequential reading, which may lead to faster loading and quicker transfers.

On the other hand, the WD_BLACK P10 Game Drive for Xbox comes with a 1-month trial for new Xbox Game Pass Ultimate members.

So, if you want the best speeds, then we recommend getting the regular WD_BLACK P10. If you want to try out the Xbox Game Pass Ultimate service, then you might want to get Xbox edition instead.

WD_BLACK P10 vs. WD_BLACK P10 for Xbox Comparison Chart

You can take a look at Seeking Tech’s comparison table for the regular and Xbox editions of the P10 below.

Western Digital WD_BLACK P10 Game DriveWestern Digital WD_BLACK P10 Game Drive for Xbox
Capacity Options2TB

4TB

5TB
1TB

2TB

3TB

4TB

5TB
Model Numbers2TB WD_BLACK P10 Game Drive: WDBA2W0020BBK-WESN

4TB WD_BLACK P10 Game Drive: WDBA3A0040BBK-WESN

5TB WD_BLACK P10 Game Drive: WDBA3A0050BBK-WESN
1TB WD_BLACK P10 Game Drive for Xbox: WDBA6U0010BBK-WESN

2TB WD_BLACK P10 Game Drive for Xbox: WDBA6U0020BBK-WESN

3TB WD_BLACK P10 Game Drive for Xbox: WDBA5G0030BBK-WESN

4TB WD_BLACK P10 Game Drive for Xbox: WDBA5G0040BBK-WESN

5TB WD_BLACK P10 Game Drive for Xbox: WDBA5G0050BBK-WESN
What’s in the BoxWD_BLACK P10 Game Drive

USB Type-A to Micro-B Cable

Quick Install Guide
WD_BLACK P10 Game Drive for Xbox

USB Type-A to Micro-B Cable

Quick Install Guide

1-month trial offer for Xbox Game Pass Ultimate (new members only)
Dimensions2TB WD_BLACK P10 Game Drive: 118 mm x 88 mm x 12.8 mm (or 4.65 in x 3.46 in x 0.50 in)

4TB WD_BLACK P10 Game Drive: 118 mm x 88 mm x 20.8 mm (or 4.65 in x 3.46 in x 0.82 in)

5TB WD_BLACK P10 Game Drive: 118 mm x 88 mm x 20.8 mm (or 4.65 in x 3.46 in x 0.82 in)
1TB WD_BLACK P10 Game Drive for Xbox: 118 mm x 88 mm x 12.8 mm (or 4.65 in x 3.46 in x 0.50 in)

2TB WD_BLACK P10 Game Drive for Xbox: 118 mm x 88 mm x 12.8 mm (or 4.65 in x 3.46 in x 0.50 in)

3TB WD_BLACK P10 Game Drive for Xbox: 118 mm x 88 mm x 20.8 mm (or 4.65 in x 3.46 in x 0.82 in)

4TB WD_BLACK P10 Game Drive for Xbox: 118 mm x 88 mm x 20.8 mm (or 4.65 in x 3.46 in x 0.82 in)

5TB WD_BLACK P10 Game Drive for Xbox: 118 mm x 88 mm x 20.8 mm (or 4.65 in x 3.46 in x 0.82 in)
Weight2TB WD_BLACK P10 Game Drive: 0.31 lb.

4TB WD_BLACK P10 Game Drive: 0.52 lb.

5TB WD_BLACK P10 Game Drive: 0.52 lb.
1TB WD_BLACK P10 Game Drive for Xbox: 0.31 lb.

2TB WD_BLACK P10 Game Drive for Xbox: 0.31 lb.

3TB WD_BLACK P10 Game Drive for Xbox: 0.52 lb.

4TB WD_BLACK P10 Game Drive for Xbox: 0.52 lb.

5TB WD_BLACK P10 Game Drive for Xbox: 0.52 lb.
InterfaceUSB 3.2 Gen 1 (5 Gbps)USB 3.2 Gen 1 (5 Gbps)
Maximum Sequential Read Speed2TB WD_BLACK P10 Game Drive: Up to 140 MB per second

4TB WD_BLACK P10 Game Drive: Up to 140 MB per second

5TB WD_BLACK P10 Game Drive: Up to 140 MB per second
1TB WD_BLACK P10 Game Drive for Xbox: Up to 130 MB per second

2TB WD_BLACK P10 Game Drive for Xbox: Up to 130 MB per second

3TB WD_BLACK P10 Game Drive for Xbox: Up to 130 MB per second

4TB WD_BLACK P10 Game Drive for Xbox: Up to 130 MB per second

5TB WD_BLACK P10 Game Drive for Xbox: Up to 130 MB per second
Operating Temperature Range5°C to 35°C5°C to 35°C
Storage Temperature Range-20°C to 65°C-20°C to 65°C
Warranty3-year limited warranty3-year limited warranty
PricingCheck price on Amazon.(#CommissionsEarned)Check price on Amazon.(#CommissionsEarned)

Capacity Options

When it comes to capacity options, the Xbox Edition is the only one of the two products to offer a 1TB and 3TB version.

You can find a breakdown of the available capacities’ for both hard disk drives below:

WD_BLACK P10 Game Drive:

  • 2TB
  • 4TB
  • 5TB

WD_BLACK P10 Game Drive for Xbox:

  • 1TB
  • 2TB
  • 3TB
  • 4TB
  • 5TB

Model Numbers

You can also check out the model number attached to each capacity of these two gaming HDDs below:

  • 2TB WD_BLACK P10 Game Drive: WDBA2W0020BBK-WESN
  • 4TB WD_BLACK P10 Game Drive: WDBA3A0040BBK-WESN
  • 5TB WD_BLACK P10 Game Drive: WDBA3A0050BBK-WESN
  • 1TB WD_BLACK P10 Game Drive for Xbox: WDBA6U0010BBK-WESN
  • 2TB WD_BLACK P10 Game Drive for Xbox: WDBA6U0020BBK-WESN
  • 3TB WD_BLACK P10 Game Drive for Xbox: WDBA5G0030BBK-WESN
  • 4TB WD_BLACK P10 Game Drive for Xbox: WDBA5G0040BBK-WESN
  • 5TB WD_BLACK P10 Game Drive for Xbox: WDBA5G0050BBK-WESN

What’s in the Box

The WD_BLACK P10 Game Drive for Xbox is the only product to come with a 1-month trial offer for Xbox Game Pass Ultimate.

This service lets you play a large selection of videogames, which includes new first-party Xbox games, for a monthly fee. The trial offer included with the Xbox edition of the P10 is only for new members of the Xbox Game Pass Ultimate service.

Aside from the trial, the two products come with the same parts.

You can find the full list of content included inside each new retail box below:

Western Digital WD_BLACK P10 Game Drive:

  • WD_BLACK P10 Game Drive
  • USB Type-A to Micro-B Cable
  • Quick Install Guide

Western Digital WD_BLACK P10 Game Drive for Xbox:

  • WD_BLACK P10 Game Drive for Xbox
  • USB Type-A to Micro-B Cable
  • Quick Install Guide
  • 1-month trial offer for Xbox Game Pass Ultimate (new members only)

Dimensions

When you compare the same capacities, the WD_BLACK P10 and WD_BLACK P10 for Xbox are identical when it comes to physical size.

You can find the measurements below:

  • 2TB WD_BLACK P10 Game Drive: 118 mm x 88 mm x 12.8 mm (or 4.65 in x 3.46 in x 0.50 in)
  • 4TB WD_BLACK P10 Game Drive: 118 mm x 88 mm x 20.8 mm (or 4.65 in x 3.46 in x 0.82 in)
  • 5TB WD_BLACK P10 Game Drive: 118 mm x 88 mm x 20.8 mm (or 4.65 in x 3.46 in x 0.82 in)
  • 1TB WD_BLACK P10 Game Drive for Xbox: 118 mm x 88 mm x 12.8 mm (or 4.65 in x 3.46 in x 0.50 in)
  • 2TB WD_BLACK P10 Game Drive for Xbox: 118 mm x 88 mm x 12.8 mm (or 4.65 in x 3.46 in x 0.50 in)
  • 3TB WD_BLACK P10 Game Drive for Xbox: 118 mm x 88 mm x 20.8 mm (or 4.65 in x 3.46 in x 0.82 in)
  • 4TB WD_BLACK P10 Game Drive for Xbox: 118 mm x 88 mm x 20.8 mm (or 4.65 in x 3.46 in x 0.82 in)
  • 5TB WD_BLACK P10 Game Drive for Xbox: 118 mm x 88 mm x 20.8 mm (or 4.65 in x 3.46 in x 0.82 in)

Weight

The regular and Xbox versions of the P10 should also weigh the same when you compare the same capacities.

You can check out the weight specifications below:

  • 2TB WD_BLACK P10 Game Drive: 0.31 lb.
  • 4TB WD_BLACK P10 Game Drive: 0.52 lb.
  • 5TB WD_BLACK P10 Game Drive: 0.52 lb.
  • 1TB WD_BLACK P10 Game Drive for Xbox: 0.31 lb.
  • 2TB WD_BLACK P10 Game Drive for Xbox: 0.31 lb.
  • 3TB WD_BLACK P10 Game Drive for Xbox: 0.52 lb.
  • 4TB WD_BLACK P10 Game Drive for Xbox: 0.52 lb.
  • 5TB WD_BLACK P10 Game Drive for Xbox: 0.52 lb.

Interface

The two portable hard drives in this versus guide utilize the USB 3.2 Gen 1 interface, which provides up to 5 Gbps in transfer speeds.

Maximum Sequential Read Speed

The WD_BLACK P10 is 10 MB per second faster, or 7.69% faster, than the WD_BLACK P10 for Xbox at maximum sequential reading.

You can check out the sequential read speed specs below:

  • 2TB WD_BLACK P10 Game Drive: Up to 140 MB per second
  • 4TB WD_BLACK P10 Game Drive: Up to 140 MB per second
  • 5TB WD_BLACK P10 Game Drive: Up to 140 MB per second
  • 1TB WD_BLACK P10 Game Drive for Xbox: Up to 130 MB per second
  • 2TB WD_BLACK P10 Game Drive for Xbox: Up to 130 MB per second
  • 3TB WD_BLACK P10 Game Drive for Xbox: Up to 130 MB per second
  • 4TB WD_BLACK P10 Game Drive for Xbox: Up to 130 MB per second
  • 5TB WD_BLACK P10 Game Drive for Xbox: Up to 130 MB per second

Operating Temperature Range

The regular and Xbox versions of the WD_BLACK P10 have the same recommended operating temperature range of 5°C to 35°C.

Storage Temperature Range

The two Game Drives also have the same recommended storage temperature range, which is from -20°C to 65°C.

Warranty

The Western Digital WD_BLACK P10 Game Drive and Western Digital WD_BLACK P10 Game Drive for Xbox each includes a 3-year limited warranty.

Resources:

How to safely disconnect Samsung T5, T7 and T7 Touch

Improperly ejecting, removing and unmounting an external solid state drive from Samsung may end up causing issues. You can check out this tutorial at Seeking Tech to see how you can safely disconnect the T5 Portable SSD, T7 Portable SSD and T7 Touch Portable SSD.

This guide is going to cover all capacities of the Samsung T5, T7 and T7 Touch Portable Solid State Drives. You can find the model numbers for each product below:

Samsung T5 Portable:

  • MU-PA250B
  • MU-PA500B
  • MU-PA1T0B
  • MU-PA2T0B

Samsung T7 Portable:

  • MU-PC500R
  • MU-PC500H
  • MU-PC500T
  • MU-PC1T0R
  • MU-PC1T0H
  • MU-PC1T0T
  • MU-PC2T0R
  • MU-PC2T0H
  • MU-PC2T0T

Samsung T7 Touch Portable:

  • MU-PC500
  • MU-PC500S
  • MU-PC1T0
  • MU-PC1T0S
  • MU-PC2T0
  • MU-PC2T0S

What happens if you do not safely eject, remove or unmount the T5, T7 and T7 Touch?

If you did not safely eject, remove or unmount your Samsung external drive, then you risk losing data and potential damaging the SSD hardware.

Unfortunately, Samsung is not liable to cover the loss of data and/or hardware damages caused by unplugging the external storage drive incorrectly.

How to safely remove T5, T7 and T7 Touch on Windows PC

In order to safely eject the T5, T7 or T7 Touch when it is connected to a Windows PC, you need to take the following steps:

1. First off, you need to make sure that your SSD is not currently not reading, writing or transferring any data.

2. On Windows, you should need to select the “Safely Remove Hardware” icon on the taskbar. If you don’t see it, select “Show hidden icons” on the taskbar and you should find it on the pop-up menu.

3. Identify and then select your T5, T7 or T7 Touch.

4. On the pop-up menu, you will find the option to eject your external solid state drive.

5. If you can’t find the “Safely Remove Hardware” icon, then you can go to Start > Settings > Devices. You should be able to find your SSD here.

6. Click on your solid state drive and then select the “Remove device” option.

6. After ejecting your external drive, you can now safely disconnect the SSD without having to worry about potentially losing data or damaging your external drive.

How to safely eject T5, T7 and T7 Touch on Mac

If you want to safely unmount your Samsung T5 Portable Solid State Drive, Samsung T7 Portable Solid State Drive and Samsung T7 Touch Portable Solid State Drive on a Macintosh, then you need to do the following:

1. Make sure that your external SSD is currently not reading, writing or transferring data. If it is, then you should wait until it is done with its tasks before continuing.

2. On Mac, you can then do one of the following:

Drag the icon that represents your Samsung SSD into the Trash.

Select the icon that represents your external drive. Afterwards, select “File” and then “Eject.”

Select the Finder sidebar, locate your SSD and then select the “Eject” button.

3. After ejecting the T5, T7 or T7 Touch, you should be able to remove it from your Mac without causing any harm.

How to safely remove T5, T7 and T7 Touch on consoles

In order to safely eject the Samsung T5, T7 or T7 Touch from a home console (such as the PlayStation 4, PlayStation 4 Pro, PlayStation 5, PlayStation 5 Digital Edition, Xbox One, Xbox One S, Xbox One X, Xbox Series S and Xbox Series X), you can do the following:

1. As always, make sure that your solid state drive aren’t currently being used. If you are playing a game directly off of it, make sure you close the game. If you are downloading or transferring using the external storage drive, wait until the tasks are completed before ejecting it.

2. Once the coast is clear, you can simply turn off the console. You should make sure that your system is completely powered down and not in rest mode.

3. Once your system is turned off, wait for a little bit in order to give some time for your external Samsung SSD to powered down as well.

4. After the wait, you should be able to safely disconnect your T5, T7 or T7 Touch without causing any issues.

You can also eject your external Samsung SSD while your PS5 is turned on. To find out how to do so, you can check out this guide.

What’s the difference between the Transcend SSD220S and SSD230S?

Transcend has two similar SATA III 6Gb/s solid state drives with the SSD220S and SSD230S.

You can check out this comparison guide to see what the major differences are for these models.

Quick Summary

The Transcend SSD230S is faster than the Transcend SSD220S when it comes to maximum sequential reading and maximum random reading.

For the maximum sequential writing, the SSD230S is faster than the SSD220S when you compare similar capacities with the exception of the 960 GB SSD220S and 1 TB SSD230S (which have the same top write speeds).

For maximum random reading, the 120 GB SSD220S is faster than the 128 GB SSD230S. However, the 256 GB, 512 GB and 1 TB SSD230S SSDs are faster than the 240 GB, 480 GB and 960 GB SSDs.

While both storage drives have the same MTBF reliability rating, the SSD230S model does have a higher TBW endurance rating.

SSD220S vs. SSD230S Comparison Chart

You can take a look at Seeking Tech’s comparison table for the SSD220S and SSD230S below.

Transcend SSD220S SATA III 6Gb/s Solid State DriveTranscend SSD230S SATA III 6Gb/s Solid State Drive
Capacity Options120 GB

240 GB

480 GB

960 GB
128 GB

256 GB

512 GB

1 TB

2 TB
Weight45 g (or 1.59 oz)53 g (or 1.87 oz)
Dimensions100 mm x 69.85 mm x 6.8 mm (or 3.94" x 2.75" x 0.28")100 mm x 69.85 mm x 6.8 mm (or 3.94" x 2.75" x 0.28")
Memory Components3D NAND3D NAND
Maximum Sequential Read Speed120 GB SSD220S: Up to 500 MB per second

240 GB SSD220S: Up to 500 MB per second

480 GB SSD220S: Up to 530 MB per second

960 GB SSD220S: Up to 550 MB per second
128 GB SSD230S: Up to 560 MB per second

256 GB SSD230S: Up to 530 MB per second

512 GB SSD230S: Up to 560 MB per second

1 TB SSD230S: Up to 560 MB per second

2 TB SSD230S: Up to 560 MB per second
Maximum Sequential Write Speed120 GB SSD220S: Up to 300 MB per second

240 GB SSD220S: Up to 330 MB per second

480 GB SSD220S: Up to 480 MB per second

960 GB SSD220S: Up to 500 MB per second
128 GB SSD230S: Up to 380 MB per second

256 GB SSD230S: Up to 400 MB per second

512 GB SSD230S: Up to 500 MB per second

1 TB SSD230S: Up to 500 MB per second

2 TB SSD230S: Up to 520 MB per second
Maximum Random Read Speed120 GB SSD220S: Up to 28,000 IOPS

240 GB SSD220S: Up to 40,000 IOPS

480 GB SSD220S: Up to 50,000 IOPS

960 GB SSD220S: Up to 65,000 IOPS
128 GB SSD230S: Up to 35,000 IOPS

256 GB SSD230S: Up to 65,000 IOPS

512 GB SSD230S: Up to 80,000 IOPS

1 TB SSD230S: Up to 85,000 IOPS

2 TB SSD230S: Up to 85,000 IOPS
Maximum Random Write Speed120 GB SSD220S: Up to 75,000 IOPS

240 GB SSD220S: Up to 75,000 IOPS

480 GB SSD220S: Up to 75,000 IOPS

960 GB SSD220S: Up to 75,000 IOPS
128 GB SSD230S: Up to 70,000 IOPS

256 GB SSD230S: Up to 85,000 IOPS

512 GB SSD230S: Up to 85,000 IOPS

1 TB SSD230S: Up to 85,000 IOPS

2 TB SSD230S: Up to 89,000 IOPS
Endurance (TBW)120 GB SSD220S: 40 TB

240 GB SSD220S: 80 TB

480 GB SSD220S: 160 TB

960 GB SSD220S: 320 TB
128 GB SSD230S: 70 TB

256 GB SSD230S: 140 TB

512 GB SSD230S: 280 TB

1 TB SSD230S: 560 TB

2 TB SSD230S: 1120 TB
Reliability (MTBF)2,000,000 hours2,000,000 hours
General FeaturesAdvanced Garbage Collection

DevSleep Mode

LDPC Coding

RAID Engine

S.M.A.R.T.

TRIM and NCQ Command
Advanced Garbage Collection

DDR3 DRAM Cache

DevSleep Mode

LDPC Coding

RAID Engine

S.M.A.R.T.

TRIM and NCQ Command
Operating Temperature Range0°C (32°F) to 70°C (158°F)0°C (32°F) to 70°C (158°F)
Operating Voltage5V±5%5V±5%
Operating System RequirementsMicrosoft Windows 7

Microsoft Windows 8

Microsoft Windows 10

Linux Kernel 2.6.31 or later
Microsoft Windows 7

Microsoft Windows 8

Microsoft Windows 10

Linux Kernel 2.6.31 or later
CertificationsCE

FCC

BSMIKC

RCM
CE

FCC

BSMIKC

RCM
Warranty3-year Limited Warranty5-year Limited Warranty
PricingCheck price on Amazon.(#CommissionsEarned)Check price on Amazon.(#CommissionsEarned)

Capacity Options

Out of these products, the SSD230S offer bigger capacity options, including a 2 TB version.

You can take a look at the available capacity options for both below:

Transcend SSD220S:

  • 120 GB
  • 240 GB
  • 480 GB
  • 960 GB

Transcend SSD230S:

  • 128 GB
  • 256 GB
  • 512 GB
  • 1 TB
  • 2 TB

Weight

The SSD230S is a little bit heavier when compared to the SSD220S.

You can check out the weight specifications below:

  • Transcend SSD220S: 45 g (or 1.59 oz)
  • Transcend SSD230S: 53 g (or 1.87 oz)

Dimensions

The two Transcend internal storage drives are identical when it comes to physical size with the following measurements:

  • 100 mm x 69.85 mm x 6.8 mm (or 3.94″ x 2.75″ x 0.28″)

Memory Components

As for the memory components, the SSD220S and SSD230S are equipped with 3D NAND.

Maximum Sequential Read Speed

When you compare similar capacities, the 128 GB SSD230S is 60 MB per second faster, or 12% faster, than the 120 GB SSD220S at maximum sequential reading.

The 256 GB SSD230S is 30 MB per second faster, or 6% faster, than the 240 GB SSD220S.

The 512 GB SSD230S is 30 MB per second faster, or 5.66% faster, than the 480 GB SSD220S.

The 1 TB SSD230S is 10 MB per second faster, or 1.82% faster, than the 960 GB SSD220S.

You can check out the maximum sequential read speeds below:

  • 120 GB SSD220S: Up to 500 MB per second
  • 240 GB SSD220S: Up to 500 MB per second
  • 480 GB SSD220S: Up to 530 MB per second
  • 960 GB SSD220S: Up to 550 MB per second
  • 128 GB SSD230S: Up to 560 MB per second
  • 256 GB SSD230S: Up to 530 MB per second
  • 512 GB SSD230S: Up to 560 MB per second
  • 1 TB SSD230S: Up to 560 MB per second
  • 2 TB SSD230S: Up to 560 MB per second

Maximum Sequential Write Speed

As for the maximum sequential writing, the 128 GB SSD230S is 80 MB per second faster, or 26.67% faster, than the 120 GB SSD220S.

The 256 GB version of the SSD230S is 70 MB per second faster, or 21.21% faster, than the 240 GB version of the SSD220S.

The 512 GB version of the SSD230S is 20 MB per second faster, or 4.17% faster, than the 480 GB version of the SSD220S.

The 960 GB SSD220S and 1 TB SSD230S have the same top speed in this category.

You can take a look at the maximum sequential write speeds below:

  • 120 GB SSD220S: Up to 300 MB per second
  • 240 GB SSD220S: Up to 330 MB per second
  • 480 GB SSD220S: Up to 480 MB per second
  • 960 GB SSD220S: Up to 500 MB per second
  • 128 GB SSD230S: Up to 380 MB per second
  • 256 GB SSD230S: Up to 400 MB per second
  • 512 GB SSD230S: Up to 500 MB per second
  • 1 TB SSD230S: Up to 500 MB per second
  • 2 TB SSD230S: Up to 520 MB per second

Maximum Random Read Speed

When it comes to random reading, the 128 GB SSD230S is 7,000 IOPS faster, or 25% faster, than the 120 GB SSD220S.

The 256 GB SSD230S drive is 25,000 IOPS faster, or 62.5% faster, than the 240 GB SSD220S drive.

The 512 GB SSD230S drive is 30,000 IOPS faster, or 60% faster, than the 480 GB SSD220S drive.

The 1 TB SSD230S drive is 20,000 IOPS faster, or 30.77% faster, than the 960 GB SSD220S drive.

You can find the maximum random read speeds below:

  • 120 GB SSD220S: Up to 28,000 IOPS
  • 240 GB SSD220S: Up to 40,000 IOPS
  • 480 GB SSD220S: Up to 50,000 IOPS
  • 960 GB SSD220S: Up to 65,000 IOPS
  • 128 GB SSD230S: Up to 35,000 IOPS
  • 256 GB SSD230S: Up to 65,000 IOPS
  • 512 GB SSD230S: Up to 80,000 IOPS
  • 1 TB SSD230S: Up to 85,000 IOPS
  • 2 TB SSD230S: Up to 85,000 IOPS

Maximum Random Write Speed

As for maximum random writing, the 120 GB SSD220S is 5,000 IOPS faster, or 7.14% faster, than the 128 GB SSD230S.

On the other hand, the 256 GB, 512 GB and 1 TB capacities of the SSD230S are 10,000 IOPS faster, or 13.33% faster, than the 240 GB, 480 GB and 960 GB capacities of the SSD220S.

You can check out the random write speeds below:

  • 120 GB SSD220S: Up to 75,000 IOPS
  • 240 GB SSD220S: Up to 75,000 IOPS
  • 480 GB SSD220S: Up to 75,000 IOPS
  • 960 GB SSD220S: Up to 75,000 IOPS
  • 128 GB SSD230S: Up to 70,000 IOPS
  • 256 GB SSD230S: Up to 85,000 IOPS
  • 512 GB SSD230S: Up to 85,000 IOPS
  • 1 TB SSD230S: Up to 85,000 IOPS
  • 2 TB SSD230S: Up to 89,000 IOPS

Endurance (TBW)

The SSD230S model has better endurance when compared to the SSD220S model.

When comparing similar capacities, you should be able to write 30 TB more data with the 128 GB SSD230S than the 120 GB SSD220S.

You should also be able to write 60 TB more data with the 256 GB SSD230S than the 240 GB SSD220S.

Furthermore, you can write 120 TB more data with the 512 GB SSD230S than the 480 GB SSD220S.

Last but not least, you can write 240 TB more data with the 2 TB SSD230S than the 960 GB SSD220S.

You can find the endurance specs below:

  • 120 GB SSD220S: 40 TB
  • 240 GB SSD220S: 80 TB
  • 480 GB SSD220S: 160 TB
  • 960 GB SSD220S: 320 TB
  • 128 GB SSD230S: 70 TB
  • 256 GB SSD230S: 140 TB
  • 512 GB SSD230S: 280 TB
  • 1 TB SSD230S: 560 TB
  • 2 TB SSD230S: 1120 TB

Reliability (MTBF)

The SSD220S and SSD230S have the same Mean Time Between Failures reliability rating of 2,000,000 hours.

General Features

When it comes to general features, the SSD230S is the only model to come with DDR3 DRAM Cache. Otherwise, the two products have identical features.

You can find the full feature lists below:

Transcend SSD220S:

  • Advanced Garbage Collection
  • DevSleep Mode
  • LDPC Coding
  • RAID Engine
  • S.M.A.R.T.
  • TRIM and NCQ Command

Transcend SSD230S:

  • Advanced Garbage Collection
  • DDR3 DRAM Cache
  • DevSleep Mode
  • LDPC Coding
  • RAID Engine
  • S.M.A.R.T.
  • TRIM and NCQ Command

Operating Temperature Range

The Transcend internal storage drives have the same operating temperature range of 0°C (32°F) to 70°C (158°F).

Operating Voltage

The operation voltage for these devices is identical at 5V±5%.

Operating System Requirements

Both of the SSDs are compatible with the following operating systems:

  • Microsoft Windows 7
  • Microsoft Windows 8
  • Microsoft Windows 10
  • Linux Kernel 2.6.31 or later

Certifications

The two solid state drives in this comparison received the following certifications:

  • CE
  • FCC
  • BSMIKC
  • RCM

Warranty

The Transcend SSD220S SATA III 6Gb/s Solid State Drive includes a 3-year Limited Warranty while the Transcend SSD230S SATA III 6Gb/s Solid State Drive with a longer 5-year Limited Warranty.

Resources: