Support for the M.2 solid state drive was finally added to the PlayStation 5 thanks to a firmware update. The internal SSD add-on will allow you to store and play PS5 games.
The list of compatible M.2 storage drives includes the AORUS Gen. 4 7000s as well as the heatsink-equipped versions of the FireCuda 530 and WD_BLACK SN850.
You can check out this guide at Seeking Tech to see how you can install these three SSDs to your PlayStation 5 or PlayStation 5 Digital Edition system.
PS5 Compatible M.2 SSDs
This tutorial should be covering the following M.2 solid state drives that have been confirmed to be compatible with the PlayStation 5:
- 1 TB GIGABYTE AORUS Gen. 4 7000s with Heatsink (GP-AG70S1TB)
- 2 TB GIGABYTE AORUS Gen. 4 7000s with Heatsink (GP-AG70S2TB)
- 500 GB Seagate FireCuda 530 with Heatsink (ZP500GM30023)
- 1 TB Seagate FireCuda 530 with Heatsink (ZP1000GM30023)
- 2 TB Seagate FireCuda 530 with Heatsink (ZP2000GM30023)
- 4 TB Seagate FireCuda 530 with Heatsink (ZP4000GM30023)
- 500 GB Western Digital WD_BLACK SN850 with Heatsink (WDS500G1XHE-00AFY0)
- 1 TB Western Digital WD_BLACK SN850 with Heatsink (WDS100T1XHE-00AFY0)
- 2 TB Western Digital WD_BLACK SN850 with Heatsink (WDS200T1XHE-00AFY0)
Updating to the latest PS5 firmware
Since M.2 solid state drive support was added to the latest firmware update, the first step is to make sure that your PlayStation 5 system is running the latest software version.
To update to the latest PS5 firmware, you can do the following:
1. Turn on the PlayStation 5. If the system is connected to the Internet and detects a firmware update, then you should get a pop-up when you arrive at the Home Screen (which is the main menu where you can select a game to play).
2. If you don’t see a pop-up message, you can force a manual update by going to Settings, which is located at the upper right corner in the Home Screen.
3. In the Settings menu, head to System.
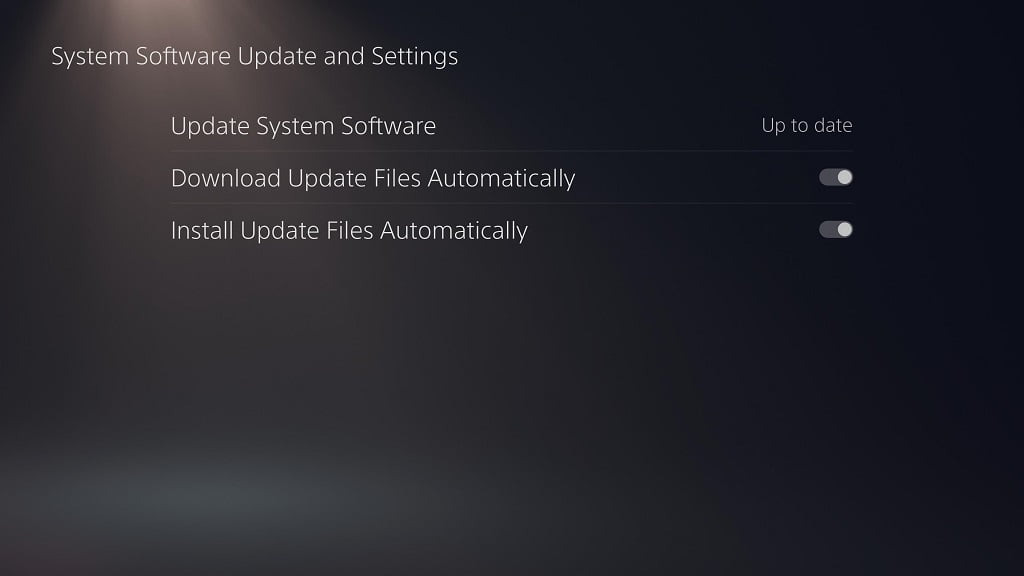
4. In the System menu, select System Software on the left side and then System Software Update and Settings on the right side.
5. In the System Software Update and Settings menu, select Update System Software.
6. In the System Software Update menu, select Update Using Internet.
How to insert FireCuda 530, WD_BLACK SN850 and AORUS 7000S to PS5
After updating the firmware, the next step is to physically insert your FireCuda 530, WD_BLACK SN850 or AORUS 7000S SSD to the PlayStation 5.
To do so, you need to do the following:
1. Turn off the PlayStation 5.
2. Wait until the system is no longer displaying any lights to confirm that the system is completely powered down. Afterwards, unplug any cables you have connected to your PS5.
3. You should also remove the stand from the console if you have it installed.
4. Next, you need to lay the PlayStation 5 down. The side with the PlayStation logo should be underneath. The base of the system, which is where you connect the included stand to if you were to put your PS5 vertical position, should be facing you.
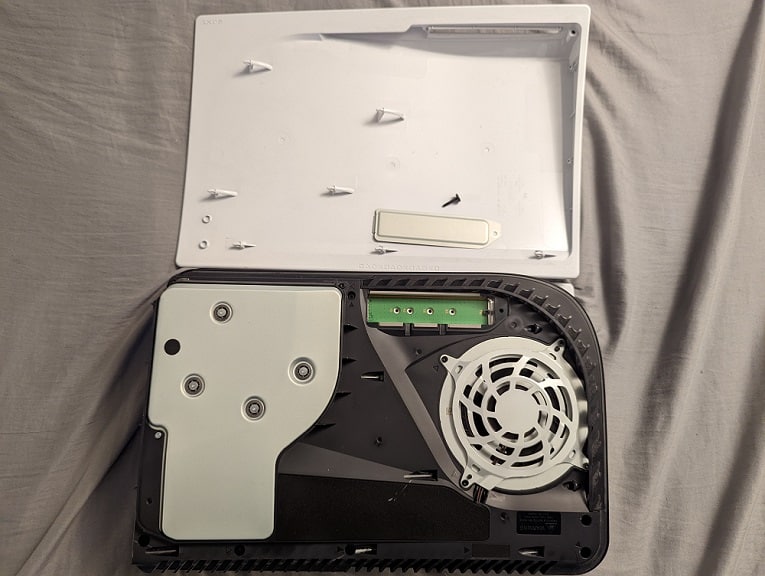
5. From your vantage point, grab the top right corner of the system. Afterwards, gently pull the cover up and then towards you to remove the cover from the system.
6. With the cover off, you should see the long rectangular M.2 slot. Using a #1 Phillips or cross-head screwdriver, you need to unscrew the screw holding the slot cover and then remove the cover.
7. Next, you need to unscrew and remove the screw and spacer from inside the M.2 slot.
8. Place the spacer into the 80 screw hole in the M.2 slot.
9. You can now insert your FireCuda 530, WD_BLACK SN850 or AORUS 7000S solid state drive.
To do so, you need to first make sure that the connectors of your SSD is aligned to the connectors of the M.2 slot on the PlayStation 5 system.
You can then insert the connector side of your drive to the M.2 slot from a diagonally upwards position. This means that the other end should be pointing upwards when you connect the drive to the system.
10. After connecting the drive to the slot, push the other end of the FireCuda 530, WD_BLACK SN850 or AORUS 7000S downwards. You then need to use the screw you previously removed from inside the M.2 slot on the end of the SSD to keep it fastened to the motherboard of the PS5.
11. Afterwards, put the cover of the M.2 slot back on. Make sure you use the screw you previously removed from the cover to fasten the slot cover.
12. Slide the previously removed outer cover of the PlayStation 5 system right back into place.
How to format FireCuda 530, WD_BLACK SN850 and AORUS 7000S for PS5
After you physically insert your FireCuda 530, WD_BLACK SN850 or AORUS 7000S to the PlayStation 5, it’s time to format it.
To do so, you need to do the following:
1. Plug in the power cable of your PlayStation 5 and then turn the system on.
2. You should get a message about the newly installed M.2 SSD Storage.
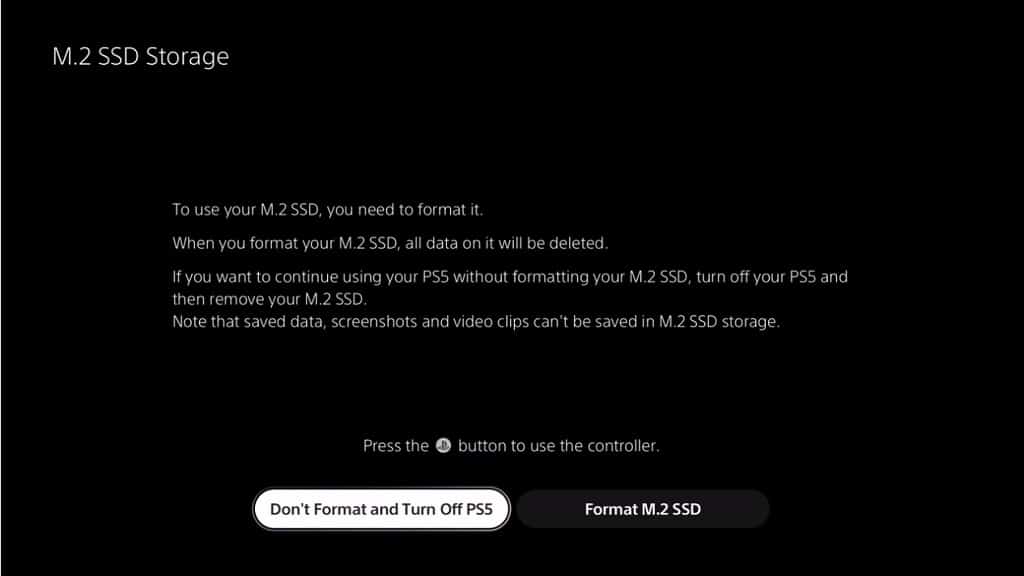
Here, you need to select the Format M2. SSD option.
Keep in mind that formatting will delete all data from your FireCuda 530, WD_BLACK SN850 or AORUS 7000S. So, if you have any important data stored on the solid state drive, make sure you copy the file to somewhere else before formatting the drive for use with the PlayStation 5.
3. After the formatting has been completed, you will see the sequential read speed of the M.2 drive. Here, you need to select the OK option to continue.
Where to find FireCuda 530, WD_BLACK SN850 and AORUS 7000S in the PS5 menu
To find your newly formatted solid state drive, you need to take the following steps:
1. From the Home Screen, go into Settings.
2. In the Settings menu, you need to select the Storage option.
3. In the Storage menu, you need to select the M.2 SSD Storage option on the left side.
4. On the right side of the same Storage menu, you should find your FireCuda 530, WD_BLACK SN850 or AORUS 7000S.
You should be able to see the amount of free space available overall. Furthermore, you will also find how much space is being used by “Games and Apps” as well as “Other” files.
Lastly, you can also reformat the drive in this menu.