How to switch between dark and light themes on the Pixel 6a

With the Google Pixel 6a, you can use a dark theme or light theme. To see how you are able to switch between these two display options, you can take a look at this tutorial from Seeking Tech.

Why you should use a dark theme with Pixel 6a

A dark theme for the Google Pixel 6a is considered to be better in terms of eye comfort due to the reduction in blue light output. As a result, you will get less eye strain when looking at a light-colored text on a black background.

Since the phone doesn’t need to output in high brightness in order to light up a white background, you should also be able to save a little bit of battery life as well.

How to enable dark theme for the Pixel 6a

In order to enable the dark theme for the Google Pixel 6a, you need to take the following steps:

1. Turn on your Pixel phone if you haven’t done so already.

2. Next, you need to open the Settings App.

If you can’t find it, then you can swipe upwards from an empty space of the home menu. If done correctly, you should be able to see a list of installed applications on your Pixel 6a, which should include Settings.

3. From the Settings menu, you can either select Display or Accessibility.

4. In the Display or Accessibility menu, you then need to make sure that the Dark Theme setting is turned on.

The display theme should immediately switch over to a dark background with light-colored text.

Why you should use a light theme for Pixel 6a

A light theme generally provides a clearer image on your Google Pixel 6a when compared to a dark theme. As a result, you should able to get better readability.

How to enable light theme for the Pixel 6a

In order to activate the light theme for the Google Pixel 6a, you need to do the following:

1. Turn on the smartphone and then open the Settings App.

2. Once you get into the Settings menu, you can select either the Display or Accessibility settings.

3. From the Display or Accessibility menu, you need to make sure that the Dark Theme setting is turned off.

The display theme should immediately switch over to a light background with dark-colored text.

How to enable one-handed mode to Google Pixel 6a

Although the Google Pixel 6a features a smaller screen size when compared to the Pixel 6 and Pixel 6 Pro, you may still have a hard time using the smartphone with just one hand. Fortunately, the device does come with a one-handed mode.

To see how you can turn on this setting in order to make the phone easier to use without two hands, you can take a look at this tutorial from Seeking Tech.

1. To begin, turn on your Google Pixel 6a if you haven’t done so already.

2. Next, you need to open the Settings App of the phone.

If you can’t find Settings on the home screen, then you can swipe upwards from a vacant area to open an overview of installed applications on your smartphone. From there, you should be able to locate the Settings App.

3. Once you arrive in the Settings menu, you first need to scroll down near the bottom of the list and then select System.

4. From the System sub-menu, you then need to select Gestures.

5. After arriving at the Gestures sub-menu, we recommend that you go to System Navigation first.

6. In the System Navigation menu, make sure that the Gesture Navigation is selected. This setting is needed in order to enable one-handed mode on your Pixel 6a.

After activating gestures, makes sure you read the description to see how you can navigate the system menus of your smartphone by using swiping gestures. You can also tap the gear cog icon located to the right for additional customization options.

7. After making sure that Gesture Navigation has been turned on, go back to the Gestures sub-menu.

8. From the Gestures sub-menu, you need to select the One-Handed Mode option.

9. In the One-Handed Mode sub-menu, make sure that the Use One-Handed Mode setting located at the top is turned on.

10. In the same sub-menu, you can also customize the swipe down gesture where you can either pull the top of the screen within the reach of your thumb or use the gesture to show notifications and settings.

11. In the One-Handed Mode sub-menu, you can also add an icon that will act as a shortcut for the one-handed mode.

12. To disable the one-handed mode, you can turn off the Use One-Handed Mode setting located at the top of the aforementioned One-Handed Mode sub-menu. Alternatively, you can switch the system navigation to 3-button navigation in the System Navigation menu.

How to add button navigation to Google Pixel 6a

By default, you need to use swiping gestures in order to navigate the system menus of the Google Pixel 6a. To see who you can add a go back, home and app overview buttons for this smartphone, you can take a look at this tutorial from Seeking Tech.

How to navigate the Google Pixel 6a system menu by using gestures

Without any customizations, you need to use swiping gestures to move around the system menu.

In order to go back to the previous screen or page, for instance, you need to swipe to the left from either the left or right edge of the screen.

If you want to open the home screen, then you need to swipe up from the bottom of the screen.

To see an overview of currently opened applications, you need to swipe up from the bottom of the screen and then hold for a little bit before releasing.

When compared to tapping buttons on the screen, using swiping gestures can be more finnicky and not as accurate. Therefore, you may want to consider using button navigation instead in order to move around the Pixel 6a user interface.

How to add a go back, home and switch app buttons to the Pixel 6a

If you want to add the go back, home and switch app buttons to your Google Pixel 6a, then you need to take the following steps:

Before we begin, it is important to note that these steps are based on the Android 12 operation system. A new version of the Pixel 6a OS may end up having slightly different menus.

1. Start off by turning on your smartphone if it is not currently powered on.

2. Next, you need to make your way to the phone’s Setting App.

If you can’t find the Settings application, you can go to the home screen. From there, swipe upwards from an empty spot to open a list of installed apps. You should be able to find Settings on the listing.

3. Once you get to the first page of Settings, scroll down and then select System.

4. Inside of the Settings sub-menu, you should then select Gestures.

5. In the Gestures sub-menu, select the System Navigation option.

6. After you get to the System Navigation menu, make sure you select the 3-Button Navigation setting.

7. After making the change, you should see three new buttons added to the bottom of the screen.

With the triangle button, you will be able to go back to the previous page or screen.

You can use the circle button to bring up the home screen.

The square button is used to bring up a list of applications that are currently opened.

8. If you want to switch back to Gesture Navigation, then you need to open the Settings App. From there, go to System > Gestures > System Navigation and then select Gesture Navigation.

How to make the Google Pixel 6a power button open the power menu

When you press and hold the power button on your Google Pixel 6a, you may not be able to open up the power menu where you can restart or shut down your smartphone. To see how can change this button assignment, you can take a look at this tutorial from Seeking Tech.

Where is the Google Pixel 6a power button located?

You can find the power button of the Pixel 6 a on the top right side when you are holding your phone upright with the camera lens at the top.

The power button is the top most button on the right side.

What is the default way to open the power menu of the Pixel 6a?

The default method of opening the power menu is by pressing and holding both the power button and volume up button at the same time.

Alternatively, you can swipe down from the top of the screen in order to open the Quick Settings menu. You then need to swipe down from the top again in order to expand the menu. From the expanded Quick Settings menu, you should be able to select the power icon in order to open the power menu.

What is the default function when pressing and holding the Pixel 6a power button

Pressing and holding the power button of your Pixel 6a will activate the Assistant feature where you can use your voice to control the smartphone.

How to make the Pixel 6a power button open the power menu

If you want to change the button configuration so that pressing and holding the power button will open the power menu on your Google Pixel 6a, then you need to take the following steps:

Before we start, it is important to note that these steps are based on the Android 12 operating system. So, there may be slight variations if you are using a newer version of the Android OS that may have changed the user interface.

1. To start off, turn on your Pixel 6a if you haven’t done so already.

2. Next, you need to open the Settings App.

If you can’t locate it from the home screen, then you can swipe upwards to find a list of installed applications on your 6a phone. You should be able to find the Settings App from there.

3. With the Settings App opened, scroll down to the bottom of the menu and the select System.

4. Once you arrive at the System menu, select Gestures from the list of available options.

5. Inside of the Gestures menu, select the “Press and hold power button” option.

6. In the “Press and hold power button” menu, make sure that the “Hold for Assistant” option is disabled.

By disabling the “Hold for Assistant” option, the power button can now be used to open the power menu where you can power off the device, restart the device, put the device on lockdown or put the device in emergency mode.

You can test out the button configuration by holding the power button. If you follow the previous steps correctly, you should be able to bring up the power menu.

How to clean the Google Pixel 6a

If you want to clean your Google Pixel 6a without damaging it, then you can take a look at this guide from Seeking Tech to see how you can properly do so.

What cleaning solution can you use for Pixel 6a?

For the cleaning solution, we recommend using a liquid that contains at least 70% isopropyl alcohol. By doing so, you will be able to disinfect your Pixel 6a in addition to cleaning it at the same time. Not to mention that isopropyl alcohol will be able to dry out a lot of quicker when compared to plain water and other liquids.

If you are looking for a specific product recommended for cleaning this Google device, then we suggest picking up the MG Chemicals 99.9% Isopropyl Alcohol Electronics Cleaner on Amazon with this link. (#CommissionsEarned).

As for other solutions, you can use also plain water. To clean the clean specifically, you can use an eyeglass cleaning solution. For the non-screen parts, you can use household soap as well as a bleach-free liquid.

What cleaning cloth you can use for the Pixel 6a?

When it comes to the type of cleaning cloth you can use with your Google Pixel 6a, a soft cloth that is free of lint should work best.

If you don’t have one lying around to use, then we recommend picking up the Magic Fiber Microfiber Cleaning Cloths, which you can find on Amazon with this link. (#CommissionsEarned).

How to clean the Pixel 6a

In order to clean the Google Pixel 6a, you can take the following steps:

1. Turn off your Pixel smartphone if you haven’t done so already. Make sure you shut down the entire device and not just turn off the screen.

2. Remove any cables or accessories you have attached.

3. If you are using a case, then make sure you remove it as well.

4. Next, you need to apply the cleaning solution directly to a soft-lint free cloth. Do not put any liquid directly on your Pixel 6 as the excess liquid could end up seeping inside any openings and cause liquid damage.

When applying the cleaning solution to the cloth, try not to make it too damp. If it is, then you can squeeze out the excess solution before continuing to the next step.

5. You can then start wiping your Pixel 6a. We suggest using a circular motion for efficient cleaning.

If your cloth gets dirty during the cleaning process, then you can try cleaning the cloth before continuing or use a new one.

6. Once you are done with wiping your Google Pixel 6a clean, you should then let the smartphone sit until it dries up at room temperature.

To make this step go by faster, you can put the phone near a fan as doing so will provide better air circulation. Avoid using a heat source like a hair blow dryer as you may end up damaging your phone in the process.

7. Once you Pixel 6a phone has dried, you should be able to start using it again.

How to avoid liquid damage when using your Google Pixel 6a

If you want to avoid getting your Google Pixel 6a wet, as well as how you can properly dry the smartphone when it gets exposed to liquid, then you can take a look at this guide from Seeking Tech.

What is the ingress protection of the Pixel 6a?

The Google Pixel 6a has an ingress protection rating of IP67. In terms of water resistance, it has been rated to protect being submerged underwater at a depth of 1 meter for a maximum of 30 minutes.

As for dust protection, the smartphone should be dust tight.

Keep in mind that this Google device will lose its resistance to dust and water over time due to general wear and tear. Damaging and/or opening your phone will also affect its ability to block out liquid or solids.

Is liquid damage covered under warranty for the Pixel 6a?

Unfortunately, liquid damage will void your warranty. Therefore, it is important that you avoid causing any hardware damage due to exposing your phone to water.

How to prevent water damage to the Google Pixel 6a

To avoid causing liquid damage to your Pixel 6a, you can try taking the following precautionary steps:

1. Do not intentionally drop your phone in a body or water or expose it to high pressure water.

2. Avoid using or placing the device in an environment that has extreme humidity such as a bath, shower or sauna.

3. Try not to damage your phone as a visible crack or chip may be enough to break its water resistance.

4. Get a case for your Google Pixel 6a. By doing so, you will add another layer of protection against water exposure. Furthermore, the case will also protect against small bumps and drops that may have otherwise cause cracks and other types of damages that could weaken the phone’s water protection capabilities.

How to dry a wet Google Pixel 6a

If your Google Pixel 6a managed to get wet, then you can do the following to properly dry the smartphone in order to prevent any potential permanent hardware damage:

1. If you drop your Pixel 6 phone in a body of water, then you should take it out as soon as possible.

Keep in mind that the device has been rated to protect against being submerged at up to 1 meter in depth for half an hour. Therefore, the longer you wait, the more likely that the phone could end up suffering from hardware damage.

2. Next, you need to turn off your phone. Make sure you fully shut it down and not just turn off its screen.

3. With the phone turned off, we recommend that you gently shake the phone to remove any liquid that may have seeped inside the phone.

4. You should then use a dry, soft cloth to wipe the remaining wet spots dry.

5. Afterwards, lay the Pixel 6 phone over another dry cloth and then let it dry out at room temperature. You can speed up the drying process by putting the Google device near a fan for better air circulation.

6. Once you believe that your smartphone has completely dried, you can try turning it back on again. Afterwards, you can test it out to see if there are any problems.

How to fix INZONE H7 and INZONE H9 audio skipping issues when using USB transceiver

The audio may occasionally skip or dropout when you are using your INZONE H7 Wireless Gaming Headset or INZONE H9 Wireless Noise Canceling Gaming Headset with the included USB transceiver.

To see how you can smooth out the sound output, you can check out this troubleshooting guide from Seeking Tech.

1. The first step you can take is to try moving the headset closer to the USB transceiver.

While the listed maximum wireless range is 10 meters (or 30 feet), the actual effective range depends on the surrounding environment.

2. You should also make sure that there aren’t anything blocking the line of sight in between the transceiver and your headphones. Metals, walls and even your own body could weaken the wireless signal if it gets in the way.

If you are using the INZONE H7 or INZONE H9 on a PlayStation 5 or PlayStation 5 Digital Edition console, for example, we recommend plugging the USB transceiver to the USB port located at the front side of the system so that the signal won’t have to go through the PS5 to reach the headset.

3. Other wireless devices that are near the USB transceiver or headset may cause interference due to the electromagnetic waves being generated. These may include Wi-Fi routers and microwave ovens.

In these cases, you can try turning off the other wireless devices or moving the headset and the USB transceiver to somewhere else.

4. If you are connecting your INZONE H7 or INZONE H9 to a computer, then you can try closing any opened apps to see if the audio playback is smoother.

5. Furthermore, you can try restarting the app, media file or video game to see if doing so will fix your issues.

6. You can also try restarting the connected device.

7. Reconnecting the headset to the USB transceiver may help fix the audio skipping or dropout problems as well.

8. You can also try resetting and factory resetting the INZONE H7 or INZONE H9. To do so, you can view these steps.

If you are still getting skipping and/or dropouts when using these headsets, then we recommend that you contact Sony in order to get additional help. There is also a possibility that your problem may be hardware related.

How to test the Alienware AW3423DW for defects

If you think that there may be something wrong with the display of your Alienware AW3423DW Curved QD-OLED Gaming Monitor, then you can use its diagnostic tool. To find out how to do so, you can take a look at this tutorial from Seeking Tech.

1. Before you being, make sure that the display screen of your Alienware AW3423DW is clean. Otherwise, you could end up making a misdiagnosis due to a dirty display area.

To see how you can properly clean the Curved QD-OLED Gaming Monitor, you can take a look at this tutorial.

2. Next, you need to move and then hold the joystick located below the monitor to the left side for around five seconds.

3. You should now see a gray screen appear on the monitor. Here, you can look at the display area to see if you notice any potential defects.

4. If you don’t notice anything unusual when the Alienware AW3423DW is displaying a gray screen, then you can press the monitor’s joystick to switch to the next color, which is red.

5. If the screen shows that there is nothing working when showing a red color, then you can press the joystick again to go to the green color.

6. Once you get to the green screen, you can start looking for defects. If you don’t see any, then you can press the joystick once again to head to the next display color.

7. On the blue screen, look for any abnormalities. If you don’t see any, then you can press the joystick to switch the screen to black.

8. If you don’t see any problems when the monitor is displaying a black screen, then you can press the joystick again to switch to a white display.

9. The white display is the final diagnostic color. If you don’t see any problems here either, then you can exit out of the diagnostic tool by press the joystick beneath the monitor.

10. If you are seeing problems when using the Alienware AW3423DW normally but the diagnostic tool shows that everything is displaying normally, then your issue could be related to the cable connection, video card, connected hardware and/or other problems that are not necessarily related to the monitor.

How to hide and unhide games on the Steam Deck

With the Steam Deck, you are able to hide games that you don’t want to show up in your main game library. To find out how to do so with this portable gaming system, you can take a look at this tutorial from Seeking Tech.

How to hide games on the Steam Deck

In order to hide games on your Steam Deck, you need to take the following steps:

1. If you haven’t done so already, make sure to turn on your portable system.

2. With your Steam Deck turned on, go to the Library section.

In order to do so, press the Steam button to bring up the Steam menu, where you can then select Library.

3. In the Library section, you will see a list of games that are tied to your Steam account.

You can press the L1 and R1 buttons to switch between different categories. There are also multiple sorting and filter options you can used in order to find the game that you are trying to hide.

4. Hover over the game that you are trying to hide in the Library menu.

5. With the game highlighted, press the button that has the three horizontal lines on your Steam Deck.

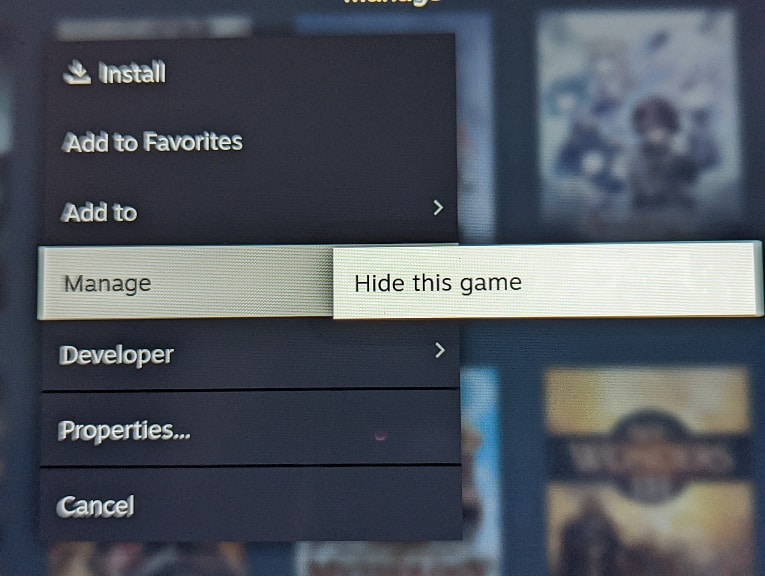
6. In the pop-up menu, you should then select Manage.

7. Finally, select the “Hide this game” option.

How to view hidden games on the Steam Deck

If you want to view games you previously hidden on the Steam Deck, then you need to do the following:

1. Press the Steam button on your portable system to open the Steam menu.

2. Once inside the Steam menu, select the Settings option from the list.

3. After opening the Settings menu, scroll down the left column and then select Home.

4. In the Home section you should see “X games are hidden.” Select the Manage option next to it.

5. You should now be able to see a list of games that you have hidden from your main game library.

You can use the L1 and R1 buttons on the Steam Deck to change categories. You can also use sorting and filtering options on these hidden games.

How to unhide games on the Steam Deck

If you changed you mind and want to unhide games on the Steam Deck, then you need to take the following steps:

1. Open the Steam menu and then go to Settings.

2. Inside of Settings, go to Home.

3. In the Home menu, select the Manage option next to the “X games are hidden” section.

4. Hover over the game that you want to unhide in the hidden games menu.

5. With the aforementioned game highlighted, press the button that has the three horizontal lines icon.

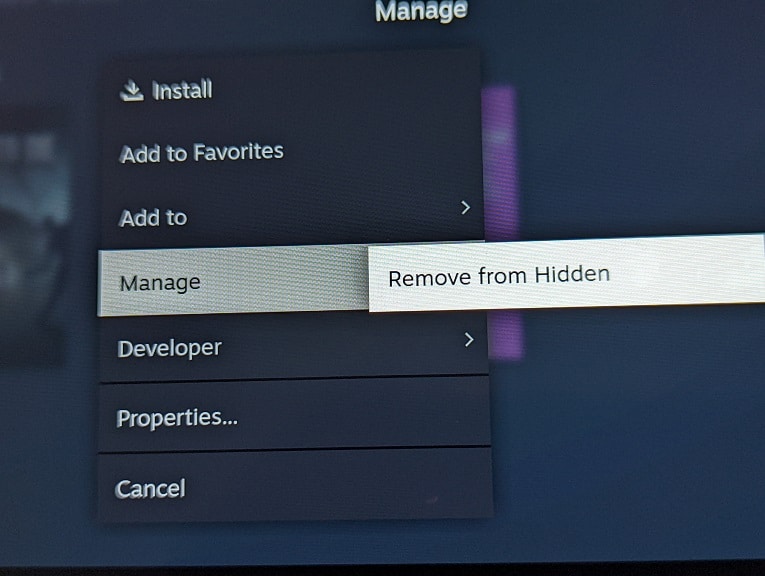
6. In the pop-up menu, you first need to select Hidden.

7. You then need to select the Remove from Hidden option.

8. The game should now appear in the main game library.

How to fix INZONE H9 ambient sound mode problems

The Sony INZONE H9 comes with an ambient sound mode that makes it easier to hear external noises while also listening to the audio playback of the headset at the same time.

With this feature, you will be able to pay attention to your surrounding environment. This is helpful if you are need to be alerted for some sort of public announcement or need to be more cautious in situations (such as crossing a busy street).

If you are having problems trying to get this mode to work effectively, or at all, then you can take a look at this troubleshooting article from Seeking Tech.

1. To start off, make sure that you are enabling the ambient sound mode correctly. In order to do so, you need to take the following steps:

  • Turn on the Sony INZONE H9 Wireless Noise Canceling Gaming Headset if you haven’t done so already. You can do so by pressing and holding the power button located on the right ear cup for 2 seconds on more. If done correctly, the left and right ring indicators should light up a blue or right light for around 5 seconds.
  • With the headset turned on, you then need to press the NC/AMB button to switch to the ambient sound mode. You may need to press this button a few times to cycle trough the noise cancellation mode as well as the off mode before you get to the ambient sound mode.
  • If done correctly, you should be able to hear a sound notification being played in the headset.

2. If you are able to set up the ambient sound mode correctly but you still aren’t able to clearly hear the external noises, then make sure that you are wearing your INZONE H9 correctly.

The headset should fit securely on the top of your head with the ear cups completely covering your ears.

3. You should also avoid covering the left and right ear cups as it may end up blocking out the ambient sound.

4. Using the ambient sound mode of the INZONE H9 is not effective when it comes to wind noises. In fact, this mode may amplify the wind noises in the headset.

In this case, you can turn off the Ambient Sound Mode. Alternatively, you can disable the voice focus by doing the following:

  • Download and install the INZONE Hub on a computer.
  • Open the INZONE Hub.
  • Connect your INZONE H9 to the same computer.
  • With the headset connected, you need to disable the voice focus setting.

5. You can also try turning down the volume of the audio playback to make sure that you are able to hear the ambient sound more clearly.

6. In some situations, the ambient sound mode may not work at all. In these cases, we recommend that you simply turn off the headset if you need to pay attention to the external noises.