Where to find free games, demos and trials on Xbox Series X and Xbox Series S

The Xbox Series X and Xbox Series S come with plenty of free-to-play games, demos and trial versions. Finding these software products can be a little tricky, however.

If you have a hard time searching for these titles, then you can check out this step-by-step guide at Seeking Tech.

How to get to the Microsoft Store on Xbox Series X and Xbox Series S

To get to the Microsoft Store from your Xbox Series X and Xbox Series S, you can take the following steps:

1. First off, you need to press the Xbox button on your Xbox Series controller.

This button has the Xbox symbol, which will light up when the gamepad is turned on.

If done correctly, this will bring up the Guide menu.

2. On the Guide menu, navigate all the way down and then select the shopping bag icon, which will bring you to the Microsoft Store.

Where to find free-to-play games on Xbox Series X and Xbox Series S

In order to find free to play games on the Xbox Series X and Xbox Series S, you need to do the following:

1. In the Microsoft Store, navigate to the left to bring up the vertical menu.

2. Scroll down until you get to the Games category and then go right.

3. In the Games category, navigate down and then select the “Top free” option.

4. In the “Top free games” menu, you will find a list of free-to-play games currently available on the Xbox Series X and Xbox Series S.

Where to find demos on Xbox Series X and Xbox Series S

To find demos that are playable on the Xbox Series X and Xbox Series S, you need to take the following steps:

1. Inside the Microsoft Store of the Xbox Series X and Xbox Series S, press the Y button of your controller. This will bring up the Search menu.

2. In the Search menu, use the on-screen keyboard to input the word Demo into the search bar.

3. Press the Menu button to start the search.

For the uninformed, the Search button is the small button with the three horizontal lines that is located to the left of the X button on your Xbox Series controller.

4. In the search results page, scroll down to the list of games.

5. We also recommend using the “Filter & sort” menu, which you can get to by pressing the X button on your controller.

6. In the “Filter & sort” menu, select Prices and set it to Free.

7. Also in the “Filter & sort” menu, you can press the RB button to get to the Sort tab.

8. In the Sort tab of the “Filter & sort” menu, you can sort the listing in descending or ascending alphabetical order.

Where to find trial versions on Xbox Series X and Xbox Series S

The find the trial versions of games that can be played on the Xbox Series X and Xbox Series S, you need to do the following:

1. Press the Y button on your controller while you are in the Microsoft Store to enter the Search menu.

2. You need to input the word Trial into the search field.

3. Afterwards, press the Menu button to get to the search results page.

4. In the search results page, press the X button on your controller to enter the “Filter & sort” menu.

5. Inside the “Filter & sort” menu, select Prices and then set it to free.

6. You can also press the RB button on your gamepad to enter the Sort tab.

7. In the Sort tab, you can choose to sort the list of trials in descending or ascending alphabetical order.

How to hard reset and power cycle your Xbox Series X and Xbox Series S

When using your Xbox Series S or Xbox Series X, you may run into crashes, glitches and issues. A common fix for these problems is to perform a hard reset or power cycle on the console.

To find out how to do so, you can check out this step-by-step tutorial from Seeking Tech.

How to hard reset your Xbox Series S or Xbox Series X using Power Center

To hard reset your Xbox Series S or Xbox Series X console by using the Power Center, you need to take the following steps:

1. First off, you need to press and hold the Xbox button on your controller. This button has the Xbox logo and will light up when pressed.

2. You should now be in the Power Center menu, which will ask what do you want to do.

Here, you need to select the “Restart console option.”

3. The next screen will ask if you want to restart your Xbox console.

Select the “RESTART” option to hard reset your Xbox Series S or Xbox Series X.

The console will then reboot itself.

How to hard reset your Xbox Series S or Xbox Series X using the Guide menu

You can also hard reset your Xbox Series S or Xbox Series X console by using the Guide menu although this will take longer than using the Power Center.

If you are still interested in this method, then you need to do the following:

1. Press the Xbox button on your controller to bring up the Guide menu.

2. Inside the Guide menu, navigate over to the Profile & system tab.

3. On the Profile & system tab, select Settings.

4. Once you are in the Settings menu, select General on the left side.

5. In the General Settings menu, select the “Power mode & startup” option.

6. Inside the General Power mode & startup menu, select the “Restart now” option.

7. You should get a message asking if you want to restart your Xbox console.

Select the “YES” option to reboot the system.

How to power cycle your Xbox Series S or Xbox Series X

In order to power cycle your Xbox Series S or Xbox Series X, you need to take the following steps:

1. Press and hold the Xbox button located on the console for around 10 seconds.

2. After you console has been shut down, you can press the Xbox button on either the console or your Xbox controller to turn the system back on again.

How to reset the power supply of your Xbox Series S or Xbox Series X

To reset the power supply of your Xbox Series S or Xbox Series X, you need to do the following:

1. Press and hold the Xbox button on your console for approximately 10 second to turn off its power.

2. Wait until the console completely shuts down and then unplug the power cable on the console.

3. Wait at least 30 seconds.

4. Once the time has passed, plugged the power cable back into the console.

5. Press the Xbox button on your Xbox Series S or Xbox Series X to turn it back on again.

How to disable quick resume on Xbox Series S and X

Quick resume is a new element introduced for the Xbox Series S and Xbox Series X.

This feature will allow you to quickly switch between multiple games by creating a temporary save state. As a result, there will be very little loading in between switch games as you will be able to bypass the start-up and save loading screens.

However, quick resume may cause bugs, glitches and other issues even for games that support the feature.

You can check out this tutorial at Seeking Tech to see how you can disable quick resume on the Xbox Series consoles.

Can you universally disable quick resume on Xbox Series S and X?

Unfortunately, you can’t universally disable quick resume on your Xbox Series S or Xbox Series X.

Instead, you need to manually disable this feature on a game-by-game basis.

How to manually disable quick resume on Xbox Series S and X

In order to manually disable quick resume for a game, you need to take the following steps:

1. Press the Xbox button (which is the top middle button with the Xbox icon that lights up when pressed) on the Xbox controller.

Doing so will open the Guide menu.

2. In the Guide menu, select the “My games & apps” option.

3. In the “My games & apps” section, you should find a list of games that you have currently using the quick resume feature.

The Xbox Series S and Xbox Series X can store the temporary save states of up to three games that have been built specifically for the Series S and X consoles.

Backwards compatible Xbox, Xbox 360 and Xbox One games that up less memory, which means that you can have more of these games stored via quick resume.

In “My games & apps”, you need to navigate to the game with a quick resume save state that you want to remove.

4. With the game highlighted, press the Menu button (which is the small button that has the three horizontal lines icon) on your controller to bring up a pop-up menu.

5. In the pop-up menu, you need to select the “Remove from Quick Resume” option.

6. Afterwards, you will be back at the “My games & apps” section of the Guide menu.

If you want to disable the quick resume feature for another game, then you can repeat steps 3 through 5.

What happens when you disable quick resume on Xbox Series S and X

By disabling quick resume on a videogame running on the Xbox Series S or Xbox Series X console, you will close the game and delete its temporary save state that was previously created. There’s no way to recover this save state data, which means that you will lose any unsaved progress in the game.

Furthermore, you have to go through the startup loading sequence when you open the game again.

Quick resume will automatically be enabled when you open the game as well, which means you need to manually remove this feature again to disable it.

Do quick resume take up SSD space on Xbox Series S and X?

The quick resume feature should not take up any additional space on your Xbox Series S or Xbox Series X console.

Does using quick resume affect the performance of your Xbox Series S and X console?

The quick resume feature use temporary save states. Therefore, it should not lower the performance of your Xbox Series S or Xbox Series X console.

How to format SSD-PG, SSD-PUT and MiniStations for Xbox Series X and S

The Buffalo MiniStation, MiniStation Extreme NFC, MiniStation Thunderbolt, SSD-PG and SSD-PUT can be used as external storage drives for both the new Xbox Series X and Xbox Series S consoles.

You can check out this guide at Seeking Tech to see how you can format these hard disk drives and solid state drives for your Xbox.

Xbox Series X and S Compatible Buffalo External HDDs and SSDs

This guide will cover the following compatible external HDDs and SSDs from Buffalo:

  • 1 TB Buffalo MiniStation Portable Hard Disk Drive (Model Number: HD-PCF1.0U3BB)
  • 2 TB Buffalo MiniStation Portable Hard Disk Drive (Model Number: HD-PCF2.0U3GB)
  • 1 TB Buffalo MiniStation Extreme NFC Portable Hard Disk Drive (Model Number: HD-PZN1.0U3B)
  • 2 TB Buffalo MiniStation Extreme NFC Portable Hard Disk Drive (Model Number: HD-PZN2.0U3B)
  • 1 TB Buffalo MiniStation Thunderbolt Portable Hard Disk Drive (Model Number: HD-PA1.0TU3)
  • 2 TB Buffalo MiniStation Thunderbolt Portable Hard Disk Drive (Model Number: HD-PA2.0TU3)
  • 500 GB Buffalo SSD-PG Rugged and Portable Solid State Drive (Model Number: SSD-PG500U3B)
  • 1 TB Buffalo SSD-PG Rugged and Portable Solid State Drive (Model Number: SSD-PG1.0U3B)
  • 500 GB Buffalo SSD-PUT Rugged and Portable Solid State Drive Stick (Model Number: SSD-PUT500U3B)
  • 1 TB: Buffalo SSD-PUT Rugged and Portable Solid State Drive Stick (Model Number: SSD-PUT1.0U3B)

What types of Xbox games can you store on SSD-PG, SSD-PUT and MiniStations?

You can store backwards compatible Xbox, Xbox 360 and Xbox One games, in addition to the native Xbox Series X and Xbox Series S games, on all of the aforementioned Buffalo external storage drives.

What types of Xbox games can you play on SSD-PG, SSD-PUT and MiniStations?

You should be able to play backwards compatible Xbox, Xbox 360 and Xbox One games directly from the MiniStation, MiniStation Extreme NFC, MiniStation Thunderbolt, SSD-PG and SSD-PUT on both the Xbox Series S and Xbox Series X consoles.

These external drives are too slow to play native Xbox Series X and Xbox Series S games. Instead, you will need to move the game files from the external storage into either the internal storage or the Seagate Storage Expansion Card.

Do you need to format your Buffalo drive for Xbox Series X and S?

If you already format your external Buffalo drive on the Xbox One, Xbox One S or Xbox One X, then you won’t need to format it again for use with the Xbox Series X or Xbox Series S.

If your external Buffalo drive is brand new, or used for something else other than a console from the Xbox One or Xbox Series brands, then you will need to format.

How to format Buffalo SSD-PG, SSD-PUT and MiniStations for Xbox Series X and S

In order to properly format the MiniStation, MiniStation Extreme NFC, MiniStation Thunderbolt, SSD-PG or SSD-PUT for the Xbox Series X and S, you need to take the following steps:

1. Before we begin, make sure you backup any important files you have on the Buffalo drive. This is because reformatting will delete everything off of it.

2. Now that you make sure you won’t lose any important files, connect your external Buffalo storage drive to one of the USB ports on your Xbox Series X or Xbox Series S consoles.

3. Turn on your Xbox Series X or Xbox Series S console.

4. You should get a massage that will ask you to format your storage drive. Select the FORMAT STORAGE DEVICE option.

5. Set up a name for your external Buffalo drive.

6. You should then get a message that asks whether or not you want to set your external drive as the default location for installation.

If you are interested in doing so, select INSTALL NEW THINGS HERE option.

If you want to keep the default installation to the same location as before, you should select the KEEP CURRENT LOCATION option.

7. In the next screen, select the FORMAT STORAGE DEVICE option to begin the formatting process.

Where to find your Buffalo drive from the Xbox Series X and S system menu

After being formatted, you can find out Buffalo storage drive by going to Settings from the Home Screen menu.

In Settings, go to System.

In System, select Storage devices.

In the Storage devices menu, you will find your newly formatted external drive, which should have been labeled for “Games and apps.”

You can also use the Storage devices menu to move files in between the different storage drives that are connected to your console.

WD_BLACK P10 vs. WD_BLACK P10 for Xbox

Western Digital has a regular edition and Xbox edition of the WD_BLACK P10. So, what are the main differences between these gaming hard drives?

You can find out in this comparison guide between the WD_BLACK P10 and WD_BLACK P10 for Xbox.

Quick Summary

The WD_BLACK P10 Game Drive is slightly faster than the WD_BLACK P10 Game Drive for Xbox at maximum sequential reading, which may lead to faster loading and quicker transfers.

On the other hand, the WD_BLACK P10 Game Drive for Xbox comes with a 1-month trial for new Xbox Game Pass Ultimate members.

So, if you want the best speeds, then we recommend getting the regular WD_BLACK P10. If you want to try out the Xbox Game Pass Ultimate service, then you might want to get Xbox edition instead.

WD_BLACK P10 vs. WD_BLACK P10 for Xbox Comparison Chart

You can take a look at Seeking Tech’s comparison table for the regular and Xbox editions of the P10 below.

Western Digital WD_BLACK P10 Game DriveWestern Digital WD_BLACK P10 Game Drive for Xbox
Capacity Options2TB

4TB

5TB
1TB

2TB

3TB

4TB

5TB
Model Numbers2TB WD_BLACK P10 Game Drive: WDBA2W0020BBK-WESN

4TB WD_BLACK P10 Game Drive: WDBA3A0040BBK-WESN

5TB WD_BLACK P10 Game Drive: WDBA3A0050BBK-WESN
1TB WD_BLACK P10 Game Drive for Xbox: WDBA6U0010BBK-WESN

2TB WD_BLACK P10 Game Drive for Xbox: WDBA6U0020BBK-WESN

3TB WD_BLACK P10 Game Drive for Xbox: WDBA5G0030BBK-WESN

4TB WD_BLACK P10 Game Drive for Xbox: WDBA5G0040BBK-WESN

5TB WD_BLACK P10 Game Drive for Xbox: WDBA5G0050BBK-WESN
What’s in the BoxWD_BLACK P10 Game Drive

USB Type-A to Micro-B Cable

Quick Install Guide
WD_BLACK P10 Game Drive for Xbox

USB Type-A to Micro-B Cable

Quick Install Guide

1-month trial offer for Xbox Game Pass Ultimate (new members only)
Dimensions2TB WD_BLACK P10 Game Drive: 118 mm x 88 mm x 12.8 mm (or 4.65 in x 3.46 in x 0.50 in)

4TB WD_BLACK P10 Game Drive: 118 mm x 88 mm x 20.8 mm (or 4.65 in x 3.46 in x 0.82 in)

5TB WD_BLACK P10 Game Drive: 118 mm x 88 mm x 20.8 mm (or 4.65 in x 3.46 in x 0.82 in)
1TB WD_BLACK P10 Game Drive for Xbox: 118 mm x 88 mm x 12.8 mm (or 4.65 in x 3.46 in x 0.50 in)

2TB WD_BLACK P10 Game Drive for Xbox: 118 mm x 88 mm x 12.8 mm (or 4.65 in x 3.46 in x 0.50 in)

3TB WD_BLACK P10 Game Drive for Xbox: 118 mm x 88 mm x 20.8 mm (or 4.65 in x 3.46 in x 0.82 in)

4TB WD_BLACK P10 Game Drive for Xbox: 118 mm x 88 mm x 20.8 mm (or 4.65 in x 3.46 in x 0.82 in)

5TB WD_BLACK P10 Game Drive for Xbox: 118 mm x 88 mm x 20.8 mm (or 4.65 in x 3.46 in x 0.82 in)
Weight2TB WD_BLACK P10 Game Drive: 0.31 lb.

4TB WD_BLACK P10 Game Drive: 0.52 lb.

5TB WD_BLACK P10 Game Drive: 0.52 lb.
1TB WD_BLACK P10 Game Drive for Xbox: 0.31 lb.

2TB WD_BLACK P10 Game Drive for Xbox: 0.31 lb.

3TB WD_BLACK P10 Game Drive for Xbox: 0.52 lb.

4TB WD_BLACK P10 Game Drive for Xbox: 0.52 lb.

5TB WD_BLACK P10 Game Drive for Xbox: 0.52 lb.
InterfaceUSB 3.2 Gen 1 (5 Gbps)USB 3.2 Gen 1 (5 Gbps)
Maximum Sequential Read Speed2TB WD_BLACK P10 Game Drive: Up to 140 MB per second

4TB WD_BLACK P10 Game Drive: Up to 140 MB per second

5TB WD_BLACK P10 Game Drive: Up to 140 MB per second
1TB WD_BLACK P10 Game Drive for Xbox: Up to 130 MB per second

2TB WD_BLACK P10 Game Drive for Xbox: Up to 130 MB per second

3TB WD_BLACK P10 Game Drive for Xbox: Up to 130 MB per second

4TB WD_BLACK P10 Game Drive for Xbox: Up to 130 MB per second

5TB WD_BLACK P10 Game Drive for Xbox: Up to 130 MB per second
Operating Temperature Range5°C to 35°C5°C to 35°C
Storage Temperature Range-20°C to 65°C-20°C to 65°C
Warranty3-year limited warranty3-year limited warranty
PricingCheck price on Amazon.(#CommissionsEarned)Check price on Amazon.(#CommissionsEarned)

Capacity Options

When it comes to capacity options, the Xbox Edition is the only one of the two products to offer a 1TB and 3TB version.

You can find a breakdown of the available capacities’ for both hard disk drives below:

WD_BLACK P10 Game Drive:

  • 2TB
  • 4TB
  • 5TB

WD_BLACK P10 Game Drive for Xbox:

  • 1TB
  • 2TB
  • 3TB
  • 4TB
  • 5TB

Model Numbers

You can also check out the model number attached to each capacity of these two gaming HDDs below:

  • 2TB WD_BLACK P10 Game Drive: WDBA2W0020BBK-WESN
  • 4TB WD_BLACK P10 Game Drive: WDBA3A0040BBK-WESN
  • 5TB WD_BLACK P10 Game Drive: WDBA3A0050BBK-WESN
  • 1TB WD_BLACK P10 Game Drive for Xbox: WDBA6U0010BBK-WESN
  • 2TB WD_BLACK P10 Game Drive for Xbox: WDBA6U0020BBK-WESN
  • 3TB WD_BLACK P10 Game Drive for Xbox: WDBA5G0030BBK-WESN
  • 4TB WD_BLACK P10 Game Drive for Xbox: WDBA5G0040BBK-WESN
  • 5TB WD_BLACK P10 Game Drive for Xbox: WDBA5G0050BBK-WESN

What’s in the Box

The WD_BLACK P10 Game Drive for Xbox is the only product to come with a 1-month trial offer for Xbox Game Pass Ultimate.

This service lets you play a large selection of videogames, which includes new first-party Xbox games, for a monthly fee. The trial offer included with the Xbox edition of the P10 is only for new members of the Xbox Game Pass Ultimate service.

Aside from the trial, the two products come with the same parts.

You can find the full list of content included inside each new retail box below:

Western Digital WD_BLACK P10 Game Drive:

  • WD_BLACK P10 Game Drive
  • USB Type-A to Micro-B Cable
  • Quick Install Guide

Western Digital WD_BLACK P10 Game Drive for Xbox:

  • WD_BLACK P10 Game Drive for Xbox
  • USB Type-A to Micro-B Cable
  • Quick Install Guide
  • 1-month trial offer for Xbox Game Pass Ultimate (new members only)

Dimensions

When you compare the same capacities, the WD_BLACK P10 and WD_BLACK P10 for Xbox are identical when it comes to physical size.

You can find the measurements below:

  • 2TB WD_BLACK P10 Game Drive: 118 mm x 88 mm x 12.8 mm (or 4.65 in x 3.46 in x 0.50 in)
  • 4TB WD_BLACK P10 Game Drive: 118 mm x 88 mm x 20.8 mm (or 4.65 in x 3.46 in x 0.82 in)
  • 5TB WD_BLACK P10 Game Drive: 118 mm x 88 mm x 20.8 mm (or 4.65 in x 3.46 in x 0.82 in)
  • 1TB WD_BLACK P10 Game Drive for Xbox: 118 mm x 88 mm x 12.8 mm (or 4.65 in x 3.46 in x 0.50 in)
  • 2TB WD_BLACK P10 Game Drive for Xbox: 118 mm x 88 mm x 12.8 mm (or 4.65 in x 3.46 in x 0.50 in)
  • 3TB WD_BLACK P10 Game Drive for Xbox: 118 mm x 88 mm x 20.8 mm (or 4.65 in x 3.46 in x 0.82 in)
  • 4TB WD_BLACK P10 Game Drive for Xbox: 118 mm x 88 mm x 20.8 mm (or 4.65 in x 3.46 in x 0.82 in)
  • 5TB WD_BLACK P10 Game Drive for Xbox: 118 mm x 88 mm x 20.8 mm (or 4.65 in x 3.46 in x 0.82 in)

Weight

The regular and Xbox versions of the P10 should also weigh the same when you compare the same capacities.

You can check out the weight specifications below:

  • 2TB WD_BLACK P10 Game Drive: 0.31 lb.
  • 4TB WD_BLACK P10 Game Drive: 0.52 lb.
  • 5TB WD_BLACK P10 Game Drive: 0.52 lb.
  • 1TB WD_BLACK P10 Game Drive for Xbox: 0.31 lb.
  • 2TB WD_BLACK P10 Game Drive for Xbox: 0.31 lb.
  • 3TB WD_BLACK P10 Game Drive for Xbox: 0.52 lb.
  • 4TB WD_BLACK P10 Game Drive for Xbox: 0.52 lb.
  • 5TB WD_BLACK P10 Game Drive for Xbox: 0.52 lb.

Interface

The two portable hard drives in this versus guide utilize the USB 3.2 Gen 1 interface, which provides up to 5 Gbps in transfer speeds.

Maximum Sequential Read Speed

The WD_BLACK P10 is 10 MB per second faster, or 7.69% faster, than the WD_BLACK P10 for Xbox at maximum sequential reading.

You can check out the sequential read speed specs below:

  • 2TB WD_BLACK P10 Game Drive: Up to 140 MB per second
  • 4TB WD_BLACK P10 Game Drive: Up to 140 MB per second
  • 5TB WD_BLACK P10 Game Drive: Up to 140 MB per second
  • 1TB WD_BLACK P10 Game Drive for Xbox: Up to 130 MB per second
  • 2TB WD_BLACK P10 Game Drive for Xbox: Up to 130 MB per second
  • 3TB WD_BLACK P10 Game Drive for Xbox: Up to 130 MB per second
  • 4TB WD_BLACK P10 Game Drive for Xbox: Up to 130 MB per second
  • 5TB WD_BLACK P10 Game Drive for Xbox: Up to 130 MB per second

Operating Temperature Range

The regular and Xbox versions of the WD_BLACK P10 have the same recommended operating temperature range of 5°C to 35°C.

Storage Temperature Range

The two Game Drives also have the same recommended storage temperature range, which is from -20°C to 65°C.

Warranty

The Western Digital WD_BLACK P10 Game Drive and Western Digital WD_BLACK P10 Game Drive for Xbox each includes a 3-year limited warranty.

Resources:

How to pair DualShock 4, DualSense and Xbox controllers with 2021 Apple TV

With the 2021 Apple TV, you will be able to connect to PlayStation and Xbox wireless controller. You can follow this guide from Seeking Tech to see how you can connect these gamepads to your media player.

Supported 2021 Apple TV Models

This guide will cover the following models of the Apple TV:

  • 2021 32GB Apple TV HD (MHY93LL/A)
  • 2021 32GB Apple TV 4K (MXGY2LL/A)
  • 2021 64GB Apple TV 4K (MXH02LL/A)

How to pair DualShock 4 to 2021 Apple TV

In order to pair the DualShock 4, which is the official controller of the PlayStation 4, to a 2021 Apple TV, you need to do the following:

1. Turn on your 2021 Apple TV.

2. Press the PS and Share button at the same time until the light bar of the controller begins to flash.

3. Follow the on-screen instructions on the Apple TV to pair the DualShock 4 to media device.

How to pair DualSense to 2021 Apple TV

To pair the DualSense, which is the official controller of the PlayStation 5, you need to do the following:

1. Make sure that your 2021 Aple TV is turned on.

2. Press and hold the PS and Create button at the same time until the light indicator of the DualSense beings to flash.

3. Follow the on-screen instructions on your Apple TV to pair the DualSense.

How to pair Xbox controllers to 2021 Apple TV

You will be able to pair the following Xbox controllers to your 2021 Apple TV:

  • Xbox Wireless Controller with Bluetooth (Model Number: 1708) for Xbox One, Xbox One S and Xbox One X
  • Xbox Elite Wireless Controller Series 2
  • Xbox Adaptive Controller
  • Xbox Wireless Controller for Xbox Series S and Xbox Series X

To pair any of these Xbox controllers, you need to take the following steps:

1. Turn the Apple TV on if you haven’t done so already.

2. Press the Xbox button on the controller to turn the gamepad on.

3. With the Xbox controller turned on, press and hold the Pairing button on the gamepad for a few seconds.

4. Follow the on-screen instructions on your 2021 Apple TV to pair your Xbox controller.

How to fix PS and Xbox controller pairing issues with 2021 Apple TV

If you are experiencing issues with connecting, pairing or using a PlayStation and/or Xbox controller on your 2021 Apple TV, then you can find some possible fixes below:

1. First off, we recommend checking to see if your controller still have any battery life.

2. You should also check to see if your gamepad and 2021 Apple TV have been updated to the latest firmware.

3. Next, you can try moving your controller closer to your Apple TV.

4. You should also make sure that there aren’t any physical obstructions that may be interfering with the Bluetooth signals.

The list of objects that may weakened the signal that connects your gamepad to your media player include bricks, bulletproof glass, concrete, glass, marble, metal, plaster, water, wood as well as synthetic materials.

5. You should also avoid using your Apple TV nearby any of the following objects: cordless phones, fluorescent lights, microwave ovens, Wi-Fi router and wireless video cameras.

6. Turn off other Bluetooth or Wi-Fi devices that you aren’t using.

Both Bluetooth and Wi-Fi utilize the 2.4 GHz band. If your Wi-Fi router supports 5.0 GHz band as well, you can try moving some of your Wi-Fi connected devices from the 2.4 GHz band to the 5.0 GHz band so that you can get a better Bluetooth connection.

How to unpair PS and Xbox controllers on 2021 Apple TV

If you are still experiencing problems with connecting and/or using your PlayStation and/or Xbox controllers with your 2021 Apple TV, you can try unpairing the controller and then pairing it back again.

In order to unpair the controller, you need to do the following:

1. On your 2021 Apple TV, go to Settings.

2. Next, you should select Remotes and Devices.

3. Afterwards, select Bluetooth.

4. Select the controller you want to unpair from your 2021 Apple TV.

5. Select Unpair Device.

To pair your controller to your Apple TV again, you can follow the aforementioned instructions earlier in this guide.

How to enable 120 FPS on PS5 and Xbox Series X/S for EX2510, EX2710 and EX2780Q

In addition to several Zowie monitors, BenQ has several other screens that are capable of displaying PS5, Xbox Series X and Xbox Series S games at 120 frames per second.

You can check out this Seeking Tech tutorial to see how you can enable 120 Hz support.

PS5 and Xbox Series X/S Compatible BenQ Monitors

The BenQ MOBIUZ EX2510 Gaming Monitor, BenQ MOBIUZ EX2710 Gaming Monitor and BenQ EX2780Q Gaming Monitor can play consoles games at 120 FPS. You can take a look at the specifications for each of the three below:

BenQ MOBIUZ EX2510 Gaming Monitor

  • Screen Size: 24.5”
  • Panel Type: IPS
  • Aspect Ratio: 16:9
  • Display Screen Coating: Anti-Glare
  • L/R Viewing Angles: 178/178
  • Maximum Resolution: 1080p
  • Maximum Refresh Rate: 144 Hz
  • Supported PS5 Resolution at 120 Hz: 1080p
  • Supported Xbox One Resolutions at 120 Hz: 1080p
  • Response Time: 2 ms GtG
  • Native Contrast: 1000:1
  • Gamma: 1.8 to 2.6
  • Backlight Technology: LED backlight
  • Typical Brightness: 350 nits
  • Supported HDR: HDR10
  • HDR Peak Brightness: 400 nits
  • Display Colors: 16.7 million colors
  • Color Gamut: 99% sRGB
  • AMA: Supported
  • HDCP: 2.2

BenQ MOBIUZ EX2710 Gaming Monitor

  • Screen Size: 27”
  • Panel Type: IPS
  • Aspect Ratio: 16:9
  • Display Screen Coating: Anti-Glare
  • L/R Viewing Angles: 178/178
  • Maximum Resolution: 1080p
  • Maximum Refresh Rate: 144 Hz
  • Supported PS5 Resolution at 120 Hz: 1080p
  • Supported Xbox One Resolutions at 120 Hz: 1080p
  • Response Time: 2 ms GtG
  • Native Contrast: 1000:1
  • Gamma: 1.8 to 2.6
  • Backlight Technology: LED backlight
  • Typical Brightness: 350 nits
  • Supported HDR: HDR10
  • HDR Peak Brightness: 400 nits
  • Display Colors: 16.7 million colors
  • Color Gamut: 99% sRGB
  • AMA: Supported
  • HDCP: 2.2

BenQ EX2780Q Gaming Monitor

  • Screen Size: 27”
  • Panel Type: IPS
  • Aspect Ratio: 16:9
  • Display Screen Coating: Anti-Glare
  • L/R Viewing Angles: 178/178
  • Maximum Resolution: 1440p
  • Maximum Refresh Rate: 144 Hz
  • Supported PS5 Resolution at 120 Hz: 1080p
  • Supported Xbox One Resolutions at 120 Hz:
  • Response Time: 5 ms GtG
  • Native Contrast: 1000:1
  • Gamma: 1.8 to 2.6
  • Backlight Technology: LED backlight
  • Typical Brightness: 350 nits
  • Supported HDR: HDR10
  • HDR Peak Brightness: 400 nits
  • Display Colors: 1.07 billion colors
  • Color Gamut: 95% P3
  • AMA: Supported
  • HDCP: 2.2

How to play PS5 games at 120 FPS on EX2510, EX2710 and EX2780Q

In order to play PlayStation 5 games at 120 frames per second with the EX2510, EX2710 and EX2780Q, you need to take the following steps:

1. Turn on the system while it is connected to your EX2510, EX2710 or EX2780Q.

2. Select your user profile on the PS5 to enter the Home Screen main menu.

3. In the main menu, locate and enter “Settings.” This is located on the upper right corner of the screen right next to your user profile picture.

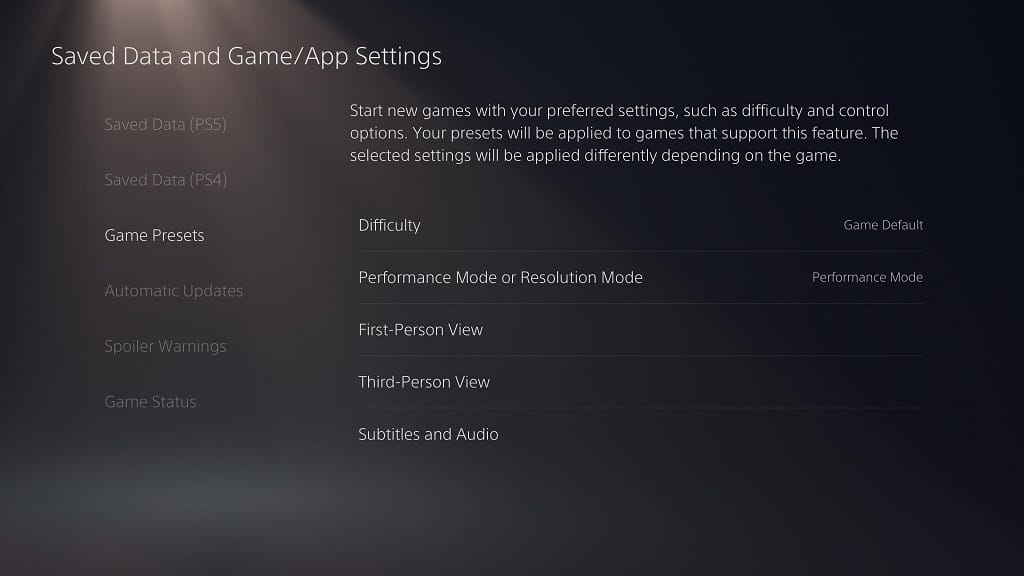
4. In the new “Settings” menu, scroll down until you find “Saved Data and Game/App Settings” and enter it.

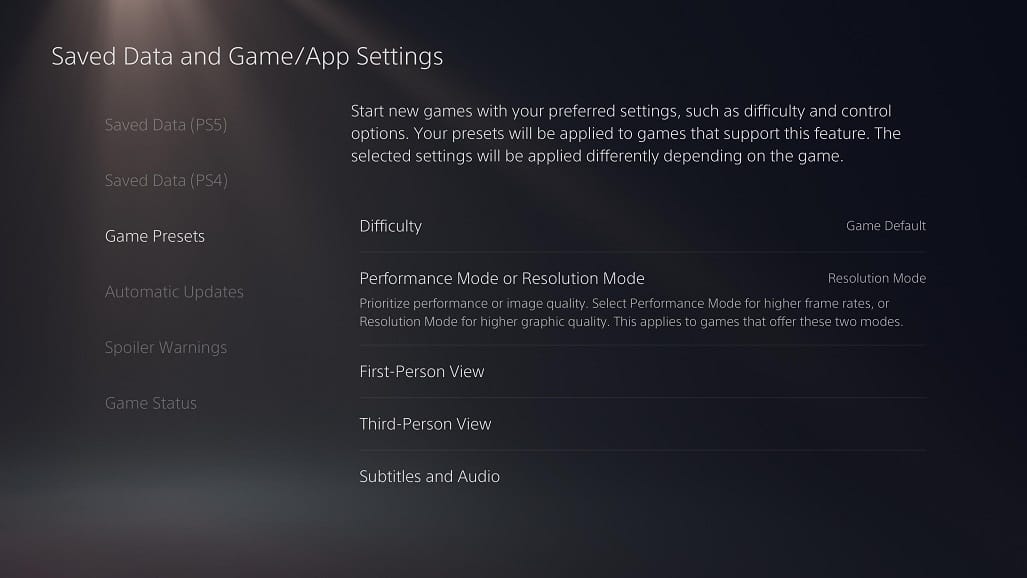
5. In the new “Saved Data and Game/App Settings” menu, select the “Game Presets” setting on the left side of the screen and then “Performance Mode or Resolution Mode” on the left side of the screen.

6. After selecting “Performance Mode or Resolution Mode,” you will be given three options “Game Default,” “Performance Mode” and “Resolution Mode.” Select “Performance Mode,” to make sure all games will run at the visual setting with the highest frame rate possible, which should include 120 FPS.

How to play Xbox Series X/S games at 120 FPS on EX2510 and EX2710

To play Xbox Series X and Xbox Series S games at 120 frames per second with the EX2510 and EX2710, you need to take the following steps:

1. Connect your game console to the EX2510 or EX2710 monitor and then turn both on.

2. From the main menu of your Xbox Series X or Xbox Series S, enter “Setting,” which has a gear icon.

3. Under the “Settings” menu, select the “General” options on the left side of the menu screen and then the “TV & display options” on the right side of the same menu screen.

4. Under the “General TV & display options” menu, first you have to make sure that the resolution is set to 1080p. If it is not, select the “Resolution” setting under Display to change it.

5. With the “Resolution” setting set to “1080p.” Select the “Refresh rate” and then change it to “120 Hz.”

How to play Xbox Series X/S games at 120 FPS on EX2780Q

To play Xbox Series X and Xbox Series S games at 120 frames per second with the BenQ EX2780Q Gaming Monitor, you need to do the following:

1. Connect your Xbox game console to the monitor and then turn both devices on.

2. In the main menu on the game console, go to “Settings.”

3. In “Settings,” first select “General” on the left side of the menu and then “TV & display options” on the right side of the menu.

4. In the new “General TV & display options” menu, select “Resolution” under Display.

5. Change “Resolution” to either 1080p or 1440p. Some games can only be played at 120 FPS in 1080p while others support 120 FPS in 1440p.

6. In the same “General TV & display options” menu, select “Refresh rate.”

7. Change the “Refresh rate” to 120 Hz.

8. As we stated above, some games will only support 120 frames per second at 1080p. So, you might have to change the resolution if you are having any issues with getting 120 FPS to work at 1440p on a specific video game.

Resources:

Which BenQ Zowie Monitor supports 120 FPS for Xbox Series S and X?

The new Xbox Series S and Xbox Series X consoles can play games at up to 120 frames per second. To do so, you need a compatible screen that has a refresh rate of 120 Hz. BenQ has several Zowie gaming monitors that support 120 FPS for the Xbox Series consoles.

You can find the compatible displays, as well as how to enable support for 120fps, in this Seeking Tech guide.

120Hz BenQ Zowie Gaming Monitors Compatible with Xbox Series S and X

The following BenQ Zowie monitors are compatible with the 120 FPS mode of the Xbox Series S and Xbox Series X consoles:

  • BenQ Zowie XL2411K Gaming Monitor
  • BenQ Zowie XL2540 Gaming Monitor
  • BenQ Zowie XL2540K Gaming Monitor
  • BenQ Zowie XL2546 Gaming Monitor
  • BenQ Zowie XL2546K Gaming Monitor
  • BenQ Zowie XL2546S Gaming Monitor
  • BenQ Zowie XL2731 Gaming Monitor
  • BenQ Zowie XL2740 Gaming Monitor
  • BenQ Zowie XL2746S Gaming Monitor

How to play 120 FPS Xbox Series S and X games on BenQ Zowie Gaming Monitors

In order to play an Xbox Series S or Xbox Series X game at 120 frames per second, you first need to make sure that the game actually supports the high frame rate mode. As of this writing, the following games have been confirmed to have a 120 FPS mode:

  • Borderlands 3
  • Call of Duty: Warzone
  • Call of Duty: Black Ops Cold War
  • CrossCode
  • Destiny 2
  • Devil May Cry 5 Special Edition
  • Dirt 5
  • ExoMecha
  • Fortnite
  • Gears 5
  • Halo Infinite
  • Halo: The Master Chief Collection
  • JYDGE
  • King Oddball
  • Metal: Hellsinger
  • Monster Boy and the Cursed Kingdom
  • Ori and the Will of the Wisps
  • Orphan of the Machine
  • Rainbow Six Siege
  • Rocket League
  • Rogue Company
  • Samurai Shodown
  • Second Extinction
  • Star Wars Squadrons
  • The Falconeer
  • The Touryst
  • Undead Horde
  • WRC 9

If your game supports 120fps, then you have to enable the 120Hz refresh rate through the system menu of the Xbox Series S or Xbox Series S. The process is a little different depending on the model of the BenQ Zowie monitor.

Enabling Xbox Series X/S 120Hz support for XL2411K, XL2540K, XL2546K and XL2546S

You need to take the following steps in order to enable 120 Hz support on the Xbox Series X and Xbox Series S for the XL2411K, XL2540K, XL2546K and XL2546S:

On the main system menu, go to “Settings,” which has the gear icon.

In the “Settings” menu, select “General” on the left side of the screen and then the “TV & display options” on the right side.

In the new “General TV & display options” menu, select the “Refresh rate” setting under Display.

You should be able to change the refresh rate from 60 Hz to 120 Hz.

The screen will then refresh itself and then display the “Keep this refresh rate?” message. Choose “Yes” before the timer runs out to confirm the change.

Enabling Xbox Series X/S 120Hz support for XL2540, XL2546, XL2731, XL2740 and XL2746S

You need to take the following steps in order to enable 120 Hz on the Xbox Series X and Xbox Series S for the XL2540, XL2546, XL2731, XL2740 and XL2746S:

1. Go to “Settings” from the main system menu.

2. Under the “Settings” menu, head to “General” on the left side and then “TV & display options” on the right side of the screen.

3. Under the “General TV & display options” menu, head to “Video fidelity and overscan” under Advanced.

4. In the “General Video fidelity and overscan” menu, change “Display” to “HDMI.”

5. In the new “Override your TV’s recommend settings?” message, select “Use Manual Settings.” The screen will then refresh itself.

6. Go back to the aforementioned “General TV & display options” menu and change the “Resolution” setting under Display to 1080p.

7. The screen will refresh itself and then display the “Keep this resolution?” message. Choose the “Yes” option to confirm the resolution change.

8. Afterwards, change the “Refresh Rate” setting under Display to 120 Hz.

9. The monitor will then refresh itself and display the “Keep this refresh rate?” message. Select the “Yes” option before the timer runs out to confirm the change.

How to check if the Xbox Series S/X game is running at 120 FPS on a Zowie Monitor

To check if your Xbox Series S or Xbox Series X game is running at 120 frames per second on a BenQ Zowie Monitor, you need to use the buttons on the monitor to open the on-screen display menu. If you don’t see the refresh rate right away, you may need to find the information section of the menu to see it.

Does the BenQ Zowie Monitors Support 1440p/120fps or 4K/120fps on Xbox Series S and X?

The BenQ Zowie Gaming Monitors that are compatible with 120 fps Xbox Series S and Xbox Series X games all have a maximum resolution of 1080p. In other words, you can’t play Xbox Series S games or Xbox Series X games at 1440p/120fps or 4K/120fps with the BenQ Zowie monitors.

Resource:

How to play Xbox Series X games with HDR on Samsung Odyssey G7

With a recent firmware update for the Samsung Odyssey G7, you can now play Xbox Series X games with HDR on the gaming monitor. If you are interested in doing so, you can follow this Seeking Tech tutorial.

Updating the Firmware for Samsung Odyssey G7

The first step you should take is to make sure the firmware for your Samsung Odyssey G7 is up-to-date. If you haven’t updated your monitor yet, then you can take the following steps:

1. First off, you need a USB storage device that have been formatted to FAT32. If you need to reformat the drive, you should backup any important data you have previously on it as the reformatting process will delete everything.

2. Plug the USB storage device into your PC.

3. Download the firmware update from the Odyssey Gaming Monitor (G75 Series) Manuals and Downloads page. As of this posting, the software version available to download is 1009.3 (released on Nov. 2, 2020), which adds 4K resolution support in addition to improving the overall image quality.

4. Open the zip folder from the downloaded location on your PC.

5. Copy the bin file from the zip folder and then put it on the root directory of your USB storage drive. Make sure that there is no other bin file on the root directory.

6. Disconnect the USB storage drive from your PC once the copy process has been completed.

7. Plug in the same USB storage drive into the USB-1 Service port on your Samsung Odyssey G7. This should be the front-most USB port.

8. Go to “Menu” by using the Function Key Guide on your G7. It is the top option.

9. Under “Menu,” select “Support” from the options available on the left side and then “Software Update” from the options on the right side of the same screen.

10. The gaming monitor should then look for the update file from your USB storage drive. If it finds the new software version, it will ask you to perform the installation. Choose the “Yes” option to being the process.

11. During installation, the screen will turn off, then turn on and, finally, turn off again. At this point, you have to unplug the G7 from your power outlet and then plug it back in to complete the firmware update.

About HDR Support for Xbox Series X and Odyssey G7

The Xbox Series X can only support HDR when it is outputting a 4K signal. If the console is outputting at 1080p or 1440p instead, then you will get a non-HDR (also known as SDR) image.

The aforementioned new firmware for the Odyssey G7 adds support for 4K as the monitor will convert the 4K signal and convert it to a 1440p image.

Thus, in order to play Xbox Series X games in HDR with the G7, the console will need to output a 4K signal to the monitor.

How to enable HDR for Xbox Series X on Samsung Odyssey G7

Now that your Odyssey G7 is updated to the latest firmware, you can now play Xbox Series X games with HDR. To do so, you need to take the following steps:

1. Select “Menu” from the on-screen display using the Function Key Guide on your G7.

2. In “Menu,” select “Game” form the left side and then “FreeSync” on the right side.

3. Set “FreeSync” to “Off” to disable this feature.

4. On your Xbox Series X, go to the “Settings” from the main system menu.

5. Under “Settings,” select the “General” option on the left side and then select the “TV & display options” to the right.

6. Under the “General TV & display options” menu, head to “Video modes” under Advanced.

7. In the new menu, make sure that the “Allow 4K” and “Allow HDR10” options are enabled, which is displayed with a check mark. You may also want to enable the “Auto HDR” option, which will convert non-HDR (otherwise known as SDR) games to a HDR image.

8. Once you are done, head back to the “General TV & display options” menu. Under Display, you will see the resolution setting. If it isn’t already set to 4K UHD, you need to change it to that resolution to ensure the Xbox Series X will be outputting a 4K HDR signal to your Odyssey G7.

Can you play Xbox Series X games at 120 FPS and HDR with Odyssey G7?

Unfortunately, you can’t play games with 120 Hz and HDR both enabled on the Samsung Odyssey G7. You will have to choose between 1440p with 120Hz or 1440p (downscaled from 4K) with 60Hz and HDR.

PS5, Xbox Series X and Xbox Series S Compatible MSI 1080p/120Hz Monitors

MSI has revealed a long list of monitors that support 1080p and 120 frames per second for the new PlayStation 5, Xbox Series X and Xbox Series S consoles.

These compatible displays are from the Creator, MPG, MAG, Optix and Oculux series.

You can check out full lists below:

MSI Curved Monitors That Support 1080p/120Hz on PS5 and Xbox Series X/S

  • MPG ARTYMIS 343CQR
  • MPG ARTYMIS 323CQR
  • MPG ARTYMIS 273CQRX
  • MPG ARTYMIS 273CQR
  • MAG ARTYMIS 324CP
  • MAG ARTYMIS 274CP
  • Optix MPG341CQR
  • Optix MPG341CQRV
  • Optix MPG27CQ2
  • Optix MAG322CQR
  • Optix MAG322CQRV
  • Optix MAG322CR
  • Optix MAG321CQR
  • Optix MAG272CRX
  • Optix MAG272CQR
  • Optix MAG272CR
  • Optix MAG272C
  • Optix MAG271CQR
  • Optix MAG271CR
  • Optix MAG240CR
  • Optix AG321CQR
  • Optix AG321CR
  • Optix G32CQ4
  • Optix G32C4
  • Optix G27CQ4
  • Optix G27C6P
  • Optix G27C6
  • Optix G27C5
  • Optix G27C4
  • Optix G24C6P
  • Optix G24C6
  • Optix G24C4

MSI Curved Monitors That Support 1080p/120Hz on Xbox Series X/S

The following curved monitors from MSI support supports 1080p/120Hz for the Xbox series X and S but not the PS5:

  • Optix MPG27C
  • Optix MAG271C
  • Optix MAG241CR
  • Optix MAG241C
  • Optix MAG24C
  • Optix G27C2

MSI Flat Monitors That Support 1080p/120Hz on PS5 and Xbox Series X/S

  • Creator PS321QR
  • Oculux NXG253R
  • Optix MPG341QR
  • Optix MPG321UR
  • Optix MPG321QRF
  • Optix MAG274QRF-QD
  • Optix MAG274QRF
  • Optix MAG274R
  • Optix MAG273R
  • Optix MAG273
  • Optix MAG272QP
  • Optix MAG272QP
  • Optix MAG272QR
  • Optix MAG272R
  • Optix MAG271R
  • Optix MAG271V
  • Optix MAG251RX
  • Optix G273QPF
  • Optix G272
  • Optix G271
  • Optix G242
  • Optix G241

How to enable 1080p/120Hz support for MSI Monitors on PS5

If you have a compatible MSI monitor and want to enable 120 frames per second on your PlayStation 5/PlayStation 5 Digital Edition system, you can take the following steps:

1. From the Home Screen main menu, go to “Settings.” This option is located on the top right side of the screen with a gear symbol.

2. In the “Settings” menu, select the “Saved Data and Game/App Settings” option.

3. In the “Saved Data and Game/App Settings” menu, select “Game Presets” from the tab of the left side.

4. In “Game Presets,” select “Performance Mode or Resolution Mode.”

5. Change the “Performance Mode or Resolution Mode” setting to “Performance” mode.

6. If you already have the game that supports 120 frames per second currently running, you may have to close the game and then relaunch it for the new graphics settings to take effect. You can find out how to manually close a PS5 game with this guide.

How to enable 1080p/120Hz support for MSI Monitors on Xbox Series X and S

If you have a compatible MSI monitor and want to enable 120 frames per second on your Xbox Series X/Xbox Series S, you can take the following steps:

1. From the main system menu, select “Settings,” which uses the gear symbol.

2. In the “Settings” menu, select “General” on the left tab and then “TV & display options.”

3. On the “Display” column, select “Resolution” to bring up a drop-down menu. From there, select “1080p.”

4. Afterwards, select “Refresh rate” from the “Display” column to open a drop-down menu. From there, select “120 Hz.”

5. If you already have the game that supports 120 frames per second currently running, you may have to close and restart the software for the new visual settings to take into effect.

How to setup 1080p/120Hz support for PS5 and Xbox Series X/S on MSI Monitor

Your compatible MSI Monitor will automatically detect the PlayStation 5, Xbox Series X or Xbox Series S when the console is connected to the display. It will then use console mode without any manual input on your end.

Keep in mind that the PlayStation 5, Xbox Series X and Xbox Series S do not support the 21:9 display ratio. So, you will end up with black borders on the left and right side of the screen for ultra-wide MSI monitors.

Resource: