How to extend the DualSense’s battery life

Although the DualSense contains a bigger battery capacity than the DualShock 4, the PlayStation 5 controller can still drain pretty fast due to the new features that were added. Fortunately, there are a few ways you can extend the battery life of the game pad, which you can find out in this guide at Seeking Tech.

How to automatically turn off your DualSense after set amount of time

The first setting you can change is the automatic shut off for your PS5 controller. This setting will turn your PS5 controller off after a set amount of time of inactivity.

If you are interested in doing so, you can take the following steps:

1. After selecting which user profile to use, you will be at the main system menu.

2. From the main menu, navigate upwards and then go right until you see “Settings” (which has a gear logo). Enter the “Settings” menu.

3. In “Settings,” scroll down and select “System.”

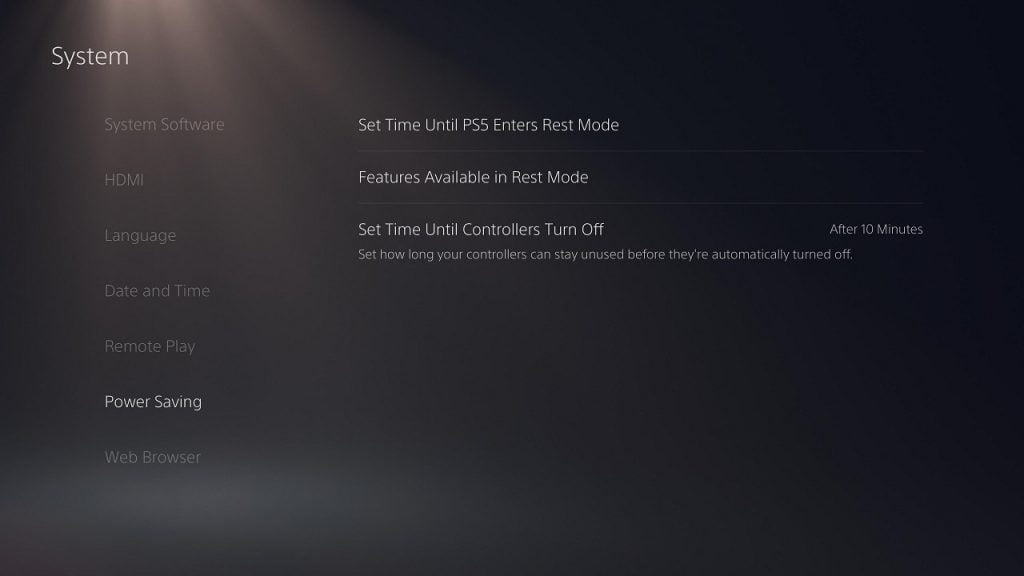
4. In the “System” menu, scroll down and select “Power Saving.”

5. In the “Power Saving” sub-menu, select “Set Time Until Controllers Turn Off.” This setting lets you set how long of a period your DualSense can stay unused before it automatically shuts off. The default option is “Don’t Turn Off” while the other options are “After 10 Minutes,” “After 30 Minutes” and “After 60 Minutes.” To get the best battery life, you should select the “After 10 Minutes” option.
How to lower the volume of the DualSense speaker

To extend the DualSense battery life, you can also try lowering the volume of the controller’s built-in speaker with the following steps:

1. From the aforementioned “Settings” menu, scroll down and select “Accessories.”

2. In the “Accessories” menu, select “Controllers.”

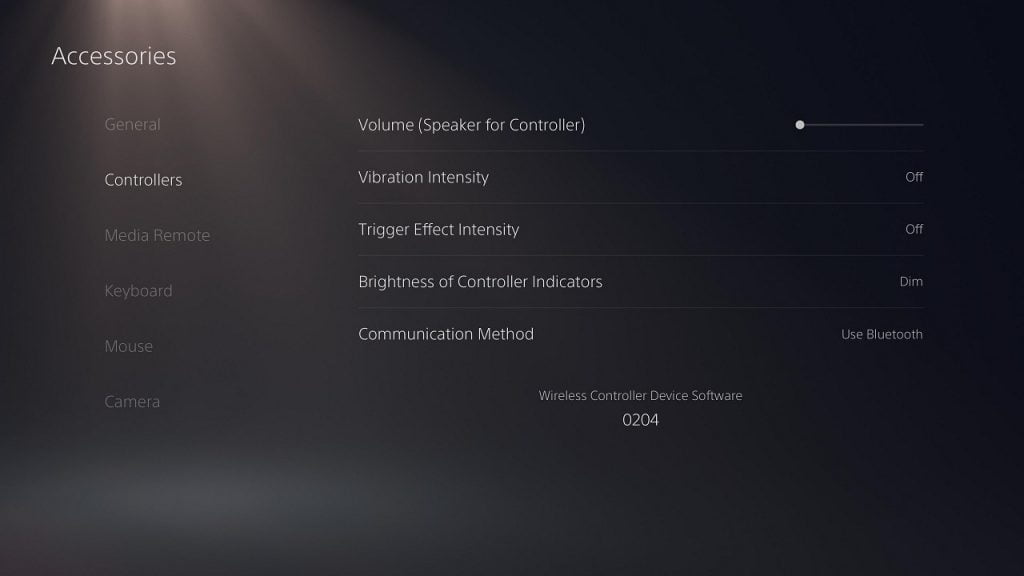
3. In the “Controllers” sub-menu, select “Volume (Speaker for Controller).” With this option, you can lower the sound output volume of the controller’s speakers. For the best energy saving, we recommend moving the meter all the way to the left to mute it. If you would like to maintain this functionality, you can try one of the lower volume settings instead.
How to lower DualSense vibration intensity

You can also try lowering the strength of the DualSense haptic feedback vibration to increase the battery life of your controller.

If you are interested in doing so, you can take the following step:

In the aforementioned “Controllers” sub-menu, select “Vibration Intensity.” The default option for this feature is “Strong” with the other options being “Medium,” “Weak” and “Off.” To use the least amount of power, you should set the vibration intensity to “Off.” If you would like to still feel vibrations, you can choose “Weak” or “Medium” instead.

How to lower DualSense trigger effect intensity

You can also reduce the intensity of the impulse triggers to save power.

To do so, you can take this step:

In the aforesaid “Controllers” sub-menu, select “Trigger Intensity.” The default option for this is also “Strong” with alternatives being “Medium,” “Weak” and “Off.” To get the best power saving for your controller, set the trigger effect intensity to “Off.” If you would like to keep using impulse triggers, you can try the “Weak” or “Medium” setting instead.

How to lower DualSense indicators brightness levels

You can also lower the brightness levels of the DualSense indicators in an effort to reduce the gamepad’s battery usage.

To do so, you need to do the following:

In the aforementioned “Controllers” sub-menu, select “Brightness of Controller Indicators.” The standard option here is “Bright” with the other options being “Medium” and “Dim.” To get the most efficient power usage, set the brightness to “Dim.”

Keep in mind that lowering the brightness of the indicators may hinder your experience on games and apps that use these indicators of the DualSense. If you are experiencing issues, you can set the brightness back to the “Bright” option.

About using earphones, headphones and headsets

Just like the DualShock 4, you can connect your earphones, headphones and/or headsets to your DaulSense via the 3.5 mm audio port. Doing so will drain the battery life of the PS5 controller, however. In order to extend the battery life of your gamepad, we recommend using another method of sound output (such as television speakers, headsets with USB cables or transmitters, sound bars and more).

About Recharging Your DualSense

Just like other rechargeable batteries, the DualSense batteries will lose their capacity and efficiency every time you recharge. So, it is best that you wait until the battery indicator gets down to one of zero bars before recharging. You should also make sure that the controller’s battery is fully charged before using it again.

Using DualSense as a wired controller for PS5

Even if the internal battery of your DualSense can no longer hold a charge, you can still use your gamepad on the PlayStation 5 as a wired connection. To do so, you need to head to the aforementioned “Controllers” sub-menu and select “Communication Method.”

The default connection method is “Use Bluetooth.” Connect the Dualsense to your PlayStation 5 via an USB cable and then select “Use USB Cable” in order to use your gamepad as a wired controller.


What media discs and game discs can be played on PS5?

The PlayStation 5 is compatible with 4K Ultra HD Blu-Ray, which is a first for Sony gaming systems. The new console also supports a lot more other media discs as well, according to its safety guide.

You can take a look at the list in this guide at Seeking Tech.

Compatible Media Discs

In addition to the aforementioned 4K UHD, the PS5 can also play Blu-Rays and DVDs. You can find a list of compatible media discs below:

  • 4K Ultra HD Blu-Ray
  • Blu-Ray
  • BD-ROM
  • BD-R
  • BD-RE 2.0 or later
  • DVD-ROM
  • DVD+R
  • DVD+RW
  • DVD-R
  • DVD-RW
  • AVCHD

Compatible Game Discs

With the PlayStation 5, you will be able to play PS5 Format Ultra HD Blu-Ray game discs and PS4 Format Blu-Ray game discs. In order to play physical PlayStation 4 videogames on the PlayStation 5, the PS4 games need to be compatible with the PS5.

Region Codes for U.S. PS5

You can find the region codes for the supported Blu-Ray media discs, DVD media discs and PS4 Blu-Ray discs for the U.S. region of the PlayStation 5 below:

  • Blu-Ray Disc: A
  • DVD: 1 and All
  • PlayStation 4 Blu-Ray Disc: 1 and All
  • Incompatible Media Discs

There are also a sizeable lists of incompatible media discs, the biggest of which is CD-ROM. You can take a look at the list below:

  • BD-RE 1.0
  • CD-ROM
  • DVD-A
  • SACD
  • 8cm discs
  • Cracked discs
  • Deformed discs
  • Repaired discs
  • Discs with stickers attached
  • Discs with paper attached
  • Non-circular discs

If you have a DualDisc, the PlayStation 5 can only play the DVD video side and not the CD audio side.

Incompatible Game Discs

The PlayStation 5 is not backwards compatible with PS1, PS2 and PS3 games. So, the fifth Sony home console won’t be able to play the following discs from previous generations:

  • PlayStation Format CDs
  • PlayStation 2 Format CDs
  • PlayStation 2 Format DVDs
  • PlayStation 3 Format Blu-Ray Discs

We should also note that the PlayStation 5 Digital Edition Is not compatible with any media discs or game discs as it does not come with a disc drive. Furthermore, discs that have scratches, dust particles and/or incompatible recording process may not play on the PS5.

How to fix unresponsive microphone input in Astro’s Playroom

Astro’s Playroom is a videogame that is pre-installed with every PlayStation 5 and PlayStation 5 Digital Edition. When playing, you may eventually come up to a section where the game will tell you to blow into the microphone input of your DualSense controller.

If you are having issues in this section, you can follow this guide at Seeking Tech for some potential fixes.

Why the DualSense mic is unresponsive in Astro’s Playroom

Based on our tests, this issue mainly occurs when you are using a headphone or headset with your PlayStation 5. Once the system detects your headphone or headset, it will automatically switch the microphone input device from the microphone on the DualSense controller to the microphone on your headphone or headset. Keep in mind that not all headphones will have this issue.

You can check the microphone input device in the Settings section of the system menu. From there, select “Sound” and then “Microphone.”

Solution for Headphone

If you running into issues with unresponsive microphone input when using a headphone (which don’t have a microphone), then an easy way to get past these sections that require you to blow on a mic is by pressing the mic mute button. The button is located below the “PS” button on your DualSense controller. You can tell the microphone Is muted when it displays an orange light.

Once the Astro’s Playroom game detects that your microphone has been muted, it will move you through the problematic section without any inputs.

Solution for Headset

If you have a headset, you need to blow directly into the mic on your headset.

If you are still having issues, you can try going to “Settings” from the main system menu and then select “Sound.” From there, select “Microphone” and then “Adjust Microphone Level.” In this section, you can test out the sensitivity of your headset microphone and adjust the microphone level. If your input level is too low, try increasing the microphone level.

If blowing into your headset microphone still does not work, you can try muting your microphone on your headset during the mic-blowing sections in Astro’s Playroom and see if the game will move you through without any inputs.

If none of the above works, simply disconnect your headset from the PlayStation 5. The system will automatically revert the microphone input to your DualSense controller. So, you should now be able to blow on it. Once again, you can check your mic status from the main system menu by going to “Settings,” then “Sound” and then “Microphone.”

How to disable PS5 trophy screenshot capture and video clip recording

The PlayStation 5 and PlayStation 5 Digital Edition automatically enable screenshot and video clip recording every time you earn a trophy. This can be troublesome as these media will take up space on the internal solid state drive on your system.

Fortunately, you can disable trophy screenshot capture and video clip recording.

To do so, you can take the following steps in this guide at Seeking Tech:

1. After turning on your PlayStation 5 or PlayStation 5 Digital Edition, select a user to bring up the system menu.

2. In the system menu, navigate upwards and then scroll right until you see “Settings” (which has a gear symbol) and the X button on your DualSense to enter it.

3. Under the “Settings” menu, scroll down to “Captures and Broadcasts” and select it.

4. In the “Captures and Broadcasts” menu, scroll down and select the “Trophies” section.

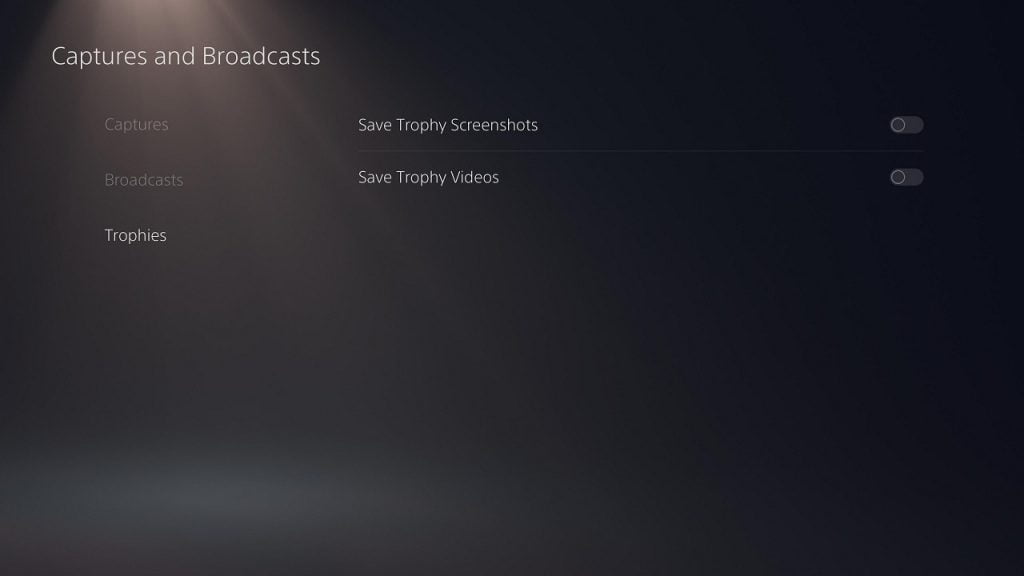
5. In the “Trophies” submenu, you have three options: “Save Trophy Screenshots” (automatically take a screenshot when you earn a trophy), “Save Trophy Videos” (automatically record a video clip when you earn a trophy) and “Trophy Video Duration” (which lets you record videos in duration of 15 seconds or 30 seconds).

6. To disable “Save Trophy Screenshots”, press the X button with that option highlighted. To disable “Save Trophy Videos,” press the X button with that option highlighted. You will know if these options are disabled when the white circle next to them become transparent and move from right to left. When you disable “Save Trophy Videos,” the “Trophy Video Duration” option will also disappear.

How to delete PS5 trophy screenshots and video clips

1. You can also delete your existing trophy screenshots and video clips. To do so, you can take the following steps:

2. In the “Settings” menu, scroll down to the “Storage” option and select it.

3. In the “Storage” menu, select “Console Storage” and then down until you see “Media Gallery.” Press X to enter it.

4. In “Media Gallery,” scroll right to the “Trophies” tab.

5. You can now select any individual screenshot or video clip you want to delete.

6. With the screenshot or video clip highlighted, you can then press the “Options” button on your DualSense (the button with the three horizontal lines directly to the left of the Triangle button). You then select the option to delete that file from the storage drive.

7. Alternatively, you can scroll to the left to the “Select Multiple” (which has a check symbol) to select multiple media files simultaneously. You can scroll all the way right to the “Select All” option. After making you selection, scroll right to the menu and then down to “Delete” in order to remove the media files.

How to turn off PlayStation Plus Auto-Renew on PS5

If you want to turn off automatic renewal for your PlayStation Plus service directly on your PlayStation 5, you can follow this guide at Seeking Tech.

About PlayStation Plus

The PlayStation Plus is a subscription service for the PlayStation 4, PlayStation 4 Pro, PlayStation 5 and PlayStation 5 Digital Edition.

You need to be a member in order to play most multiplayer games online. You will also get access to select games, which are added on a monthly basis, in addition to exclusive discounts and other benefits.

About PlayStation Plus Auto-Renew

Automatic renewal is enabled by default. Even if you turn off auto-renew, PlayStation will turn it back on every time you decide to re-subscribe or extend your subscription.

Turning Off PlayStation Plus Auto-Renew on PS5

To turn off the auto-renew option of the PlayStation Plus on PlayStation 5 or PlayStation 5 Digital Edition, you can take the following steps:

1. After powering on your PS5 or PS5 Digital, select the user that has an active PlayStation Plus subscription (the profile image will be have a yellow plus sign).

2. On the main system menu, press up or the directional pad or left analog stick. This will give you access to the options on the upper tab. From there, press right on the D-pad or left analog stick until you get to “Settings” (which has a gear symbol). Press the X button with “Settings” highlighted to bring up the “Settings” menu.

3. In “Settings,” scroll select “Users and Accounts.”

4. In “Users and Accounts,” press right on the D-Pad and left analog stick and then select “Payment and Subscriptions.”

5. In “Payment and Subscriptions,” scroll down and select “Subscriptions.”

6. In “Subscriptions,” select “PlayStation Plus.”

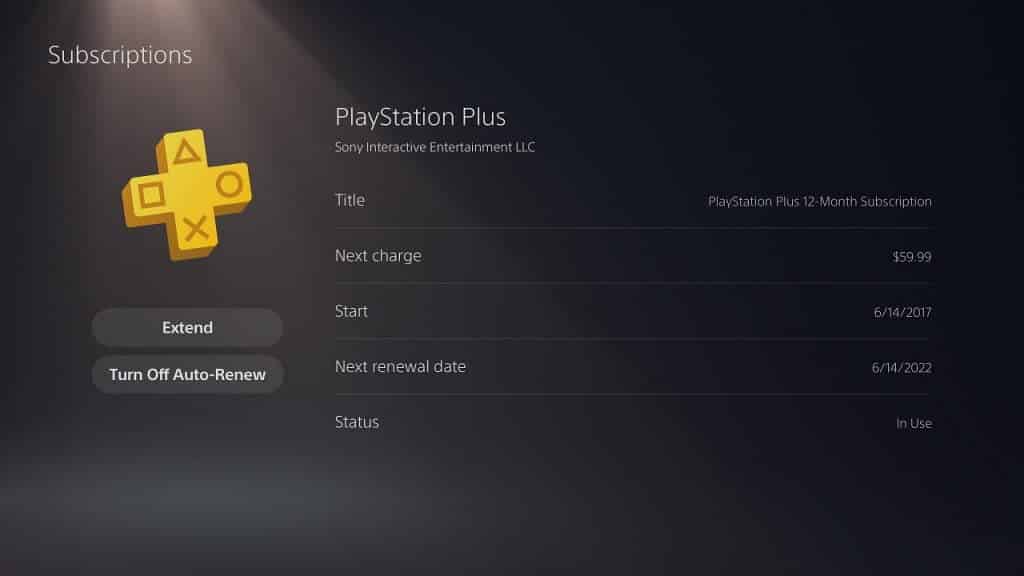
7. In the PlayStation Plus menu, you get to see the current membership status, including the start date, next charge date and next renewal date. In the same menu, you also have two options: “Extend” and either “Turn-Off Auto-Renew” or “Turn-On Auto-Renew.”

8. If you see “Turn-On Auto-Renew,” then you don’t have to do anything as your PlayStation Plus subscription is already set to disable automatic renewal.

9. If you see “Turn-Off Auto-Renew,” then you should select that option. You will then be prompted to confirm your action, which you can do by selecting “Yes.”

10. Afterwards, you will see a feedback page where you can give a reason as to why you want to disable automatic renewal. You can choose a reason or simply skip it. Either way, you need to select “OK” for the final confirmation.

11. If done correctly, you will be right back at the PlayStation Plus menu and you will see “Turn-On Auto-Renew” as an option.

12. If you want to turn automatic renewal back on, you simply select the “Turn-On Auto-Renew” option from the PlayStation Plus menu.

WD_BLACK P10 Game Drive vs. WD_BLACK P50 Game Drive

Western Digital currently has two external portable storage drives made specifically for videogames with the P10 and P50. So, what are the differences between these two products?

You can find out in this comparison guide.

Quick Summary

When compared to the WD_BLACK P10 Game Drive, the WD_BLACK P50 Game Drive is more than 13 times faster when it comes to top performance speed, which will lead to better transfer and load times.

The P50 can also tolerate colder operating temperatures and have a longer warranty coverage period.

The only advantage the P10 has over the competition is that it offers bigger capacity options.

You can see how the P50 stacks up against the Samsung T7 with this article.

WD_BLACK P10 vs. WD_BLACK P50 Comparison Guide

You can take a look at Seeking Tech’s comparison table between the P10 and P50 below.

WD_BLACK P10 Game DriveWD_BLACK P50 Game Drive
Capacity Options2 TB: WDBA2W0020BBK-WESN

4 TB: WDBA3A0040BBK-WESN

5 TB: WDBA3A0050BBK-WESN
500 GB: WDBA3S5000ABK-WESN

1 TB: WDBA3S0010BBK-WESN

2 TB: WDBA3S0020BBK-WESN
Weight2TB P10: 140 grams (or 0.31 lb.)

4TB P10: 230 grams (or 0.52 lb.)

5B P10: 230 grams (or 0.52 lb.)
500GB P50: 115 grams (or 0.25 lb.)

1TB P50: 115 grams (or 0.25 lb.)

2TB P50: 115 grams (or 0.25 lb.)
Dimensions2TB P10: 4.65" x 3.46" x 0.50"

4TB P10: 4.65" x 3.46" x 0.82"

5B P10: 4.65" x 3.46" x 0.82"
500GB P50: 4.65" x 2.44" x 0.55"

1TB P50: 4.65" x 2.44" x 0.55"

2TB P50: 4.65" x 2.44" x 0.55"
What in the BoxWD_BLACK P10 Game Drive

USB Type-A to Micro-B Cable

Quick Install Guide
WD_BLACK P50 Game Drive  

USB Type-C to Type-C Cable 

USB Type-C to Type-A Cable 

Quick Install Guide 
PS4, PS4 Pro, Xbox One, Xbox One S and Xbox One X CompatibilityYesYes
PS5, Xbox Series S and Xbox Series X CompatibilityYesYes
PC and Mac CompatibilitymacOS 10.11+

Windows 8.1

Windows 10
macOS 10.11+

Windows 8.1

Windows 10
Storage Drive TypeExternal portable hard disk driveExternal portable solid state drive
InterfaceUSB 3.2 Gen 1USB 3.2 Gen 2x2
SpeedUp to 140 MB per secondUp to 2000 MB per second
Operating Temperature5°C to 35°C0°C to 35°C
Warranty-20°C to 65°C-20°C to 70°C
PricingCheck price on Amazon.(#CommissionsEarned)Check price on Amazon.(#CommissionsEarned)

Capacity Options

The WD_BLACK P10 is available in three capacities: 2 TB, 4 TB and 5 TB. The WD_BLACK P50 also comes in three capacity options as you can pick between 500 GB, 1 TB and 2 TB.

You can check out the model number for each size below:

Western Digital BLACK P10:

  • 2 TB: WDBA2W0020BBK-WESN
  • 4 TB: WDBA3A0040BBK-WESN
  • 5 TB: WDBA3A0050BBK-WESN

Western Digital BLACK P50:

  • 500 GB: WDBA3S5000ABK-WESN
  • 1 TB: WDBA3S0010BBK-WESN
  • 2 TB: WDBA3S0020BBK-WESN

Weight

You can check out the weight for the available capacities of both game drives in this versus guide below:

  • 2TB P10: 140 grams (or 0.31 lb.)
  • 4TB P10: 230 grams (or 0.52 lb.)
  • 5B P10: 230 grams (or 0.52 lb.)
  • 500GB P50: 115 grams (or 0.25 lb.)
  • 1TB P50: 115 grams (or 0.25 lb.)
  • 2TB P50: 115 grams (or 0.25 lb.)

Dimensions

You can also take a look at the dimensions for each capacity (measured in length by width by height) below:

  • 2TB P10: 4.65″ x 3.46″ x 0.50″
  • 4TB P10: 4.65″ x 3.46″ x 0.82″
  • 5B P10: 4.65″ x 3.46″ x 0.82″
  • 500GB P50: 4.65″ x 2.44″ x 0.55″
  • 1TB P50: 4.65″ x 2.44″ x 0.55″
  • 2TB P50: 4.65″ x 2.44″ x 0.55″

What in the Box

In addition to the storage drive, the P10 also comes with an USB Type-A to Micro-B cable and quick installation guide. Along with the storage drive, the P50 includes an USB Type-C to Type-C cable, USB Type-C to Type-A cable and quick installation guide.

You can find the full breakdown below:

WD_BLACK P10:

  • WD_BLACK P10 Game Drive
  • USB Type-A to Micro-B Cable
  • Quick Install Guide

WD_BLACK P50:

  • WD_BLACK P50 Game Drive
  • USB Type-C to Type-C Cable
  • USB Type-C to Type-A Cable
  • Quick Install Guide

PS4, PS4 Pro, Xbox One, Xbox One S and Xbox One X Compatibility

Both the WD_BLACK P10 Game Drive and WD_BLACK P50 Game Drive are compatible with the PlayStation 4, PlayStation 4 Pro, Xbox One, Xbox One S and Xbox One X. You will be able to play games directly on these external storage drives.

PS5, Xbox Series S and Xbox Series X Compatibility

The P10 and P50 are also compatible with the PlayStation 5, Xbox Series S and Xbox Series X. For the PS5, you will be able to play backwards compatible PlayStation 4 games directly on the external drive.

For the Xbox Series X and Xbox Series S, you will be able to play backwards compatible Xbox, Xbox 360 and Xbox One games directly on the external drive. You can also use the same drive as a cold storage for Xbox Series S and Xbox Series X games.

PC and Mac Compatibility

Of course, you can also use the WD_BLACK P10 and WD_BLACK P50 on a PC and Mac.

You will require the following operating systems:

  • macOS 10.11+
  • Windows 8.1
  • Windows 10

Storage Drive Type

The Western Digital BLACK P10 is an external portable hard disk drive while the Western Digital BLACK P50 is an external portable solid state drive.

Interface

The WD_BLACK P10 uses the USB 3.2 Gen 1 interface while the WD_BLACK P50 uses the newer and faster USB 3.2 Gen 2×2 interface.

Speed

When it comes to speed, the WD_BLACK P50 has a major advantage over the WD_BLACK P10. The P50 has a top performance speed that is 1328.57 percent more than the P10.

You can check out the specifications below:

  • WD_BLACK P10: Up to 140 MB per second
  • WD_BLACK P50: Up to 2000 MB per second

The faster speed will lead be better transfer speed when moving data away from and into the external drive. You will also get better load times if you are playing games directly on the storage drive.

Operating Temperature

The WD_BLACK P50 can tolerate colder operating temperatures when compared to the WD_BLACK P10. You can find the ranges below:

  • WD_BLACK P10: 5°C to 35°C
  • WD_BLACK P50: 0°C to 35°C

Storage Temperature

The P50 can also tolerate hotter non-operating temperatures than the P10.

You can find the storage temperature ranges below:

  • WD_BLACK P10: -20°C to 65°C
  • WD_BLACK P50: -20°C to 70°C

Warranty

The WD_BLACK P10 Game Drive comes with a 3-year warranty while the WD_BLACK P50 Game Drive comes with a longer 5-year warranty.

Resources:

Compatible HDMI Cables for the PS5, Xbox Series X and Xbox Series S

Although the PlayStation 5, Xbox Series X and Xbox Series S come with HDMI cables, these connectors may be too short in length to fit your setup in your entertainment center.

You can follow this guide to find compatible extra long HDMI cables for these videogame systems.

Quick Summary 

The PlayStation 5 comes with a 5.5 feet HDMI 2.1 cable, the Xbox Series X comes with a 6.5 feet HDMI 2.1 cable and the Xbox Series S comes with a 6.5 HDMI 2.0 cable.

If you want to use a longer cable that can take full advantage of these game consoles, then we recommend picking up either the 10-foot Zeskit 8K Ultra HD High Speed 48 Gpbs HDMI 2.1 Cable or 16-foot Zeskit 8K Ultra HD High Speed 48 Gpbs HDMI 2.1 Cable. 

HDMI Version Included with PS5, Xbox Series X and Xbox Series S

Both the PlayStation 5 and Xbox Series X come with a HDMI 2.1 cable.

The Xbox Series S comes with a HDMI 2.0 cable.

With HDMI 2.1, you will be able to play games in the following refresh rates and resolutions:

  • 30Hz at 1080p
  • 60Hz at 1080p
  • 120Hz at 1080p
  • 30Hz at 1440p
  • 60Hz at 1440p
  • 120Hz at 1440p
  • 30Hz at 4K
  • 60Hz at 4K
  • 120Hz at 4K
  • 30Hz at 10K
  • 60Hz at 10K

The HDMI 2.0 supports the following refresh rates and resolutions:

  • 30Hz at 1080p
  • 60Hz at 1080p
  • 120Hz at 1080p
  • 30Hz at 1440p
  • 60Hz at 1440p
  • 120Hz at 1440p
  • 30Hz at 4K
  • 60Hz at 4K

HDMI 2.1 also come with extra features not found in HDMI 2.0 such as Auto Low Latency Mode (ALLM) Display Stream Compression (DSC), Dolby TrueHD, DTS-HD Master Audio and Variable Refresh Rate (VRR).

In order to use HDMI 2.1 features, you need to connect your videogame system to a TV with HDMI 2.1 ports.

If you connect your console to a HDMI 2.0 port using a HDMI 2.1 cable, your video output will be limited to the HDMI 2.0 supported refresh rates, resolutions and features.

What all of this mean is that you need to know what version is the long HDMI cable you are buying.

Otherwise, you could end up missing out on some display features.

In general, we recommend getting a HDMI 2.1 cable over HDMI 2.0 cable as the newer version is future-proof. Even if your current television set don’t have any HDMI 2.1 ports, any new TV models will most likely have them in the future. Not to mention that HDMI 2.1 cables are backwards compatible with HDMI 2.0 ports.

PS5, Xbox Series X and Xbox Series S HDMI Cable Lengths

The HDMI 2.1 cable that comes with the PlayStation 5 is around 5.5 feet long.

The HDMI 2.1 cable that is included with the Xbox Series X is around 6.5 feet long.

Last but not least, the HDMI 2.0 cable that comes with the Xbox Series S is around 5.5 feet long.

Compatible Extra Long HDMI 2.1 Cable for PS5, Xbox Series X and Xbox Series S

The best long HDMI 2.1 cable we recommend is the Zeskit 8K Ultra HD High Speed 48 Gpbs HDMI Cable.

The product supports all of the refresh rates, resolutions and features from HDMI 2.1.

It comes in lengths of 3 feet, 6.5 feet, 10 feet and 16 feet.

If you are interested, you can purchase the longer versions with the following links from Amazon:

Compatible Extra Long HDMI 2.0 Cable for PS5, Xbox Series X and Xbox Series S

If you still want to get a long HDMI 2.0 cable instead, then we suggest buying the Zeskit Cinema Plus High Speed HDMI 2.0b Cable as it supports all the HDMI 2.0 refresh rates, resolutions and features.

This cable is available in six different lengths: 1.5 foot, 3 feet, 6.5 feet, 10 feet, 16 feet and 29 feet.

You can buy the longer lengths, if you are interested, on Amazon with the following links:

Razer Xbox Series X|S Wireless Gaming Headset: Kaira vs. Kaira Pro

Razer released two new Xbox Series X|S Wireless Gaming Headsets with the Kaira and Kaira Pro. So, what are the differences between these officially licensed headsets?

You can find out in this comparison guide.

Quick Summary

When compared to the Razer Kaira, the Razer Kaira Pro comes with support for Bluetooth 5.0 as well as a dedicated mobile microphone.

If you are planning to stream videogames from Xbox Game Pass on a mobile device via xCloud, then you should get the pro version.

The Razer Kaira Pro also comes RGB lighting as well as a longer battery life (although the battery life is the same as the regular version if you decide to use the aforementioned RGB lighting).

If you don’t mind missing out on the above-mentioned features, then the Razer Kaira is the more affordable option that provides the same sound output and microphone quality as the pro version on the Xbox Series X and Xbox Series S.

Razer Kaira vs. Razer Kaira Pro Comparison Chart

You can check out Seeking Tech’s comparison table for the two gaming headsets below.

Razer Kaira Wireless Gaming HeadsetRazer Kaira Pro Wireless Gaming Headset
Weight0.73 lb. or 332 grams0.80 lb. or 365 grams
Frequency Response20 Hz to 20 kHz20 Hz to 20 kHz
Impedance at 1 kHz32 ohms32 ohms
Headphone Sensitivity108 dB108 dB
Driver TypeRazer TriForce TitaniumRazer TriForce Titanium
Driver Size50 mm50 mm
Earcups MaterialFlowKnit breathable memory foam cushionsFlowKnit breathable memory foam cushions
Inner Earcup Diameter2.2" x 2.64" (or 56 mm x 67 mm)2.2" x 2.64" (or 56 mm x 67 mm)
Windows Sonic Support?YesYes
Headphone Noise Cancelling Support?NoNo
Wireless Connection TypesDirect to Xbox Series X|S

Xbox Wireless Adapter for Windows 10
Direct to Xbox Series X|S

Xbox Wireless Adapter for Windows 10

Bluetooth 5.0
On-Earcup ControlsEQ/Xbox Pairing Button

Game/Chat Balance Wheel

Mic Mute Switch

Power Button

Volume Wheel
Bluetooth/Multi-Function Button

EQ / Xbox Pairing Button

Game/Chat Balance Wheel

Mic Mute Switch

Power Button

Volume Wheel
Wireless Frequency2.4 GHz and 5 GHz2.4 GHz and 5 GHz
Wireless Range30 feet (or 10 meters)30 feet (or 10 meters)
Microphone TypesBendable Razer HyperClear Cardioid MicrophoneDetachable Razer HyperClear Cardioid Microphone

Dedicated Mobile Microphone
Microphone Frequency Response100 Hz to 10,000 Hz100 Hz to 10,000 Hz
Microphone Sensitivity at 1 kHz54 ± 3 dB at 1 kHz54 ± 3 dB at 1 kHz
LightingNoneRazer Chroma RGB underglow lighting
Battery LifeUp to 15 hoursUp to 15 hours with RGN lighting

Up to 20 hours without RGB lighting
Warranty2-year warranty2-year warranty
PricingCheck price on Amazon.(#CommissionsEarned)Check price on Amazon.(#CommissionsEarned)

Weight

The Pro version of the Razer Kaira Wireless Gaming Headset is around 10 percent heavier when compared to the regular version.

You can check out the weight specifications for both below:

  • Razer Kaira: 0.73 lbs. or 332 grams
  • Razer Kaira Pro: 0.80 lbs. or 365 grams

Frequency Response

The two gaming headsets have a frequency response range of 20 Hz to 20 kHz.

Impedance at 1 kHz

Both Xbox Series S and X headsets also has an impedance of 32 ohms at 1 kHz.

Headphone Sensitivity

The Razer Kaira Wireless Gaming Headset and Razer Kaira Pro Wireless Gaming Headset have identical headphone sensitivity ratings of 108 dB.

Driver Type

The two products in this versus guide are built with Razer TriForce Titanium, which features custom-tuned drivers for bass, mid and treble sound output.

The titanium diaphragms also add vocal clarity.

Driver Size

The Razer Kaira and Razer Kaira Pro are both equipped with 50 mm drivers.

Earcups Material

The ear cups for the Pro and standard versions are built with FlowKnit breathable memory foam cushions.

This material is designed to minimize sweating, heat buildup and soften the headset’s clamp force.

Inner Earcup Diameter

The Kaira and Kaira Pro have the same inner ear cup diameter at 2.2″ x 2.64″ (or 56 mm x 67 mm).

Windows Sonic

Both products also support Windows Sonic, which provides surround sound when playing videogames on your Xbox Series S and/or Xbox Series X.

Headphone Noise Cancelling

None of the headsets support headphone noise cancellation.

Wireless Connection Types

In terms of wireless connections, both gaming headsets can connect directly to the Xbox Series X and Xbox Series.

The two products can also connect to Windows 10 PCs and other devices via the Xbox Wireless Adapter.

The Razer Kaira Pro is the only one of the two headsets to support Bluetooth 5.0, which means you can connect it to smartphones and other mobile devices to play games on the Xbox Game Pass via the xCloud streaming service.

You can find a full breakdown of the available connection types below:

Razer Kaira:

  • Direct to Xbox Series X|S
  • Xbox Wireless Adapter for Windows 10

Razer Kaira Pro:

  • Direct to Xbox Series X|S
  • Xbox Wireless Adapter for Windows 10
  • Bluetooth 5.0

On-Earcup Controls

The Pro version has a Bluetooth/Multi-Function button while the standard version does not.

Otherwise, the two Xbox Series gaming headsets have the same on-earcup controls.

You can check out the control options for each headset below:

Razer Kaira Wireless Gaming Headset:

  • EQ/Xbox Pairing Button
  • Game/Chat Balance Wheel
  • Mic Mute Switch
  • Power Button
  • Volume Wheel

Razer Kaira Pro Wireless Gaming Headset:

  • Bluetooth/Multi-Function Button
  • EQ / Xbox Pairing Button
  • Game/Chat Balance Wheel
  • Mic Mute Switch
  • Power Button
  • Volume Wheel

Wireless Frequency

The two gaming headsets use the 2.4 GHz and 5 GHz frequency for wireless connection.

Wireless Range

The wireless range for both is 30 feet (or 10 meters).

Microphone Types

Both headphones come with a Razer HyperClear Cardioid Microphone, which features noise cancellation and an open housing that minimize obstruction.

The Pro version also includes a dedicated mobile microphone.

You can take a look at the microphone types included in each product below:

Razer Kaira Wireless Gaming Headset:

  • Bendable Razer HyperClear Cardioid Microphone

Razer Kaira Pro Wireless Gaming Headset:

  • Detachable Razer HyperClear Cardioid Microphone
  • Dedicated Mobile Microphone

Microphone Frequency Response

The two Kaira headsets have the same microphone frequency response range of 100 Hz to 10,000 Hz.

Microphone Sensitivity at 1 kHz

The microphones of both products also have identical microphone sensitivity of 54 ± 3 dB at 1 kHz.

Lighting

The Razer Kaira Pro is the only wireless gaming headset in this comparison guide to feature Razer Chroma RGB underglow lighting.

Battery Life

The Razer Kaira has a battery life of up to 15 hours.

The Razer Kaira Pro has a battery life of up to 15 hours if you are using the aforementioned Razer Chroma RGB underglow lighting. Without the use of RGB lighting, the pro version has a battery life of up to 20 hours.

Warranty

The Razer Kaira Wireless Gaming Headset for Xbox Series X|S and Razer Kaira Pro Wireless Gaming Headset for Xbox Series X|S each come with a 2-year warranty.

Resources:

SanDisk Nintendo Switch microSDXC Card vs. Ultra vs. Extreme vs. Extreme Pro

In addition to an officially licensed microSD card, SanDisk has several memory cards that are compatible with the Nintendo Switch and Nintendo Switch Lite with the SanDisk Ultra, SanDisk Extreme and SanDisk Extreme Pro. So, which one of these is best suited for the gaming systems?

You can find out in this comparison guide.

Quick Summary

Although the SanDisk Extreme Pro has the fastest read speed out of this group, the performance for all four cards should be the same as the Nintendo Switch and Nintendo Switch Lite can only support read/transfer speeds of up to 95 MB per second.

We recommend picking up either the officially licensed SanDisk Nintendo Switch microSDXC Card or the SanDisk Extreme Card as these two are more affordable than the SanDisk Extreme Pro while offering the same performance at loading games on the Switch and Switch Lite.

The writing speeds between the official Switch microSDXC Card, SanDisk Extreme and SanDisk Extreme Pro are also identical at capacities of at least 128GB.

Although the SanDisk Ultra is the cheapest out of this group, the card has unknown writing speeds, which could lead to slower performance when it comes to certain actions, in addition to having a shorter warranty coverage period when compared to the other three memory cards.

SanDisk Nintendo microSDXC vs. Ultra vs. Extreme vs. Extreme Pro Comparison Chart

You can check out Seeking Tech’s comparison table between the Nintendo Switch cards below.

SanDisk Nintendo Switch microSDXC CardSanDisk Ultra microSDHC/microSDXC CardSanDisk Extreme microSDHC/microSDXC CardSanDisk Extreme Pro microSDHC/microSDXC Card
Capacity Options64 GB: SDSQXBO-064G-ANCZA

128 GB: SDSQXBO-128G-ANCZA

256 GB: SDSQXAO-256G-GNCZN

512 GB: SDSQXAO-512G-ANCZN
16 GB: SDSQUNC-016G-AN6MA

32 GB: SDSQUNC-032G-AN6MA

64 GB: SDSQUNC-064G-AN6MA

128 GB: SDSQUNC-128G-AN6MA

200 GB: SDSQUAR-200G-GN6MA

256 GB: SDSQUNI-256G-AN6MA

400 GB: SDSQUAR-400G-GN6MA

512 GB: SDSQUAR-512G-AN6MA
32 GB: SDSQXVF-032G-AN6MA

64 GB: SDSQXA2-064G-AN6MA

128 GB: SDSQXA1-128G-AN6MA

256 GB: SDSQXA1-256G-GN6MA

400 GB: SDSQXA1-400G-AN6MA

512 GB: SDSQXA1-512G-AN6MA

1 TB: SDSQXA1-1T00-AN6MA
32 GB: SDSQXCG-032G-GN6MA

64 GB: SDSQXCY-064G-GN6MA

128 GB: SDSQXCY-128G-GN6MA

256 GB: SDSQXCZ-256G-GN6MA

400 GB: SDSQXCZ-400G-GN6MA

512 GB: SDSQXCZ-512G-GN6MA

1 TB: SDSQXCZ-1T00-GN6MA
Form Factor64GB: microSDXC

128GB: microSDXC

256GB: microSDXC

512GB: microSDXC
16GB: microSDHC

32GB: microSDHC

64GB: microSDXC

128GB: microSDXC

200GB: microSDXC

256GB: microSDXC

400GB: microSDXC

512GB: microSDXC
32GB: microSDHC

64GB: microSDXC

128GB: microSDXC

200GB: microSDXC

256GB: microSDXC

400GB: microSDXC

512GB: microSDXC

1TB: microSDXC
32GB: microSDHC

64GB: microSDXC

128GB: microSDXC

200GB: microSDXC

256GB: microSDXC

400GB: microSDXC

512GB: microSDXC

1TB: microSDXC
Bus InterfaceUHS-IUHS-IUHS-IUHS-I
Sequential Read/Transfer Performance64GB: Up to 100 MB per second

128GB: Up to 100 MB per second

256GB: Up to 100 MB per second

512GB: Up to 100 MB per second
16GB: Up to 98 MB per second

32GB: Up to 98 MB per second

64GB: Up to 100 MB per second

128GB: Up to 100 MB per second

200GB: Up to 100 MB per second

256GB: Up to 100 MB per second

400GB: Up to 100 MB per second

512GB: Up to 100 MB per second
32GB: Up to 100 MB per second

64GB: Up to 160 MB per second

128GB: Up to 160 MB per second

256GB: Up to 160 MB per second

400GB: Up to 160 MB per second

512GB: Up to 160 MB per second

1TB: Up to 160 MB per second
32GB SanDisk Extreme Pro: Up to 170 MB per second

64GB: Up to 170 MB per second

128GB: Up to 170 MB per second

256GB: Up to 170 MB per second

400GB: Up to 170 MB per second

512GB: Up to 170 MB per second

1TB: Up to 170 MB per second
Sequential Write Performance64GB: Up to 60 MB per second

128GB: Up to 90 MB per second

256GB: Up to 90 MB per second

512GB: Up to 90 MB per second
N/A32GB: Up to 60 MB per second

64GB: Up to 60 MB per second

128GB: Up to 90 MB per second

256GB: Up to 90 MB per second

400GB: Up to 90 MB per second

512GB: Up to 90 MB per second

1TB: Up to 90 MB per second
32GB: Up to 90 MB per second

64GB: Up to 90 MB per second

128GB: Up to 90 MB per second

256GB: Up to 90 MB per second

400GB: Up to 90 MB per second

512GB: Up to 90 MB per second

1TB: Up to 90 MB per second
Operating Temperature Range-13°F to 185°F (or -25°C to 85°C)-13°F to 185°F (or -25°C to 85°C)-13°F to 185°F (or -25°C to 85°C)-13°F to 185°F (or -25°C to 85°C)
Storage Temperature Range-40°F to 185°F (or -40°C to 85°C)-40°F to 185°F (or -40°C to 85°C)-40°F to 185°F (or -40°C to 85°C)-40°F to 185°F (or -40°C to 85°C)
WarrantyLifetime Limited Warranty10-Year Limited WarrantyLifetime Limited WarrantyLifetime Limited Warranty
PricingCheck price on Amazon.(#CommissionsEarned)Check price on Amazon.(#CommissionsEarned)Check price on Amazon.(#CommissionsEarned)Check price on Amazon.(#CommissionsEarned)

Supported Nintendo Switch Memory Cards

The Nintendo Switch and Nintendo Switch Lite supports the following form factors:

  • microSD
  • microSDHC
  • microSDXC

Nintendo Switch Memory Card Recommend Specs

Nintendo recommends that you use a memory card that has a bus interface of UHS-I.

Although you can also use UHS-II memory cards with your Switch and/or Switch Lite, your speeds will be limited to the UHS-I specifications. Thus, there is no reason to get an UHS-II memory card over an UHS-I memory card for your Switch system.

The other recommend specification is the read/transfer speed as Nintendo suggests the specs to be at least 60 MB per second. You will get a better gameplay experience, such as better load times, with higher read speeds.

However, both the Switch and Switch Lite only supports a maximum reading speed of up to 95 megabytes per second. So, even if you have a memory card with a much faster speed, you will be bottlenecked to 95 MB/s.

Thus, there is no point in getting a memory card that has a read/transfer speed that is significantly above 98 MB.

Capacity Options

All four of the Switch compatible memory cards in this versus guide are available in capacities of 64GB, 128GB, 256GB and 512GB. The SanDisk Ultra also offers 16GB and 32GB options.

The SanDisk Extreme and SanDisk Extreme Pro are available in 32GB as well as 1TB.

If you download a lot of games and/or downloadable content, then we recommend getting the biggest capacity you can afford for the extra convenience of not having to delete anything and/or swap out cards if you ran out of free space.

You can find the model number for the capacity options of each product below:

SanDisk Nintendo Switch Card:

  • 64 GB: SDSQXBO-064G-ANCZA
  • 128 GB: SDSQXBO-128G-ANCZA
  • 256 GB: SDSQXAO-256G-GNCZN
  • 512 GB: SDSQXAO-512G-ANCZN

SanDisk Ultra:

  • 16 GB: SDSQUNC-016G-AN6MA
  • 32 GB: SDSQUNC-032G-AN6MA
  • 64 GB: SDSQUNC-064G-AN6MA
  • 128 GB: SDSQUNC-128G-AN6MA
  • 200 GB: SDSQUAR-200G-GN6MA
  • 256 GB: SDSQUNI-256G-AN6MA
  • 400 GB: SDSQUAR-400G-GN6MA
  • 512 GB: SDSQUAR-512G-AN6MA

SanDisk Extreme:

  • 32 GB: SDSQXVF-032G-AN6MA
  • 64 GB: SDSQXA2-064G-AN6MA
  • 128 GB: SDSQXA1-128G-AN6MA
  • 256 GB: SDSQXA1-256G-GN6MA
  • 400 GB: SDSQXA1-400G-AN6MA
  • 512 GB: SDSQXA1-512G-AN6MA
  • 1 TB: SDSQXA1-1T00-AN6MA

SanDisk Extreme Pro:

  • 32 GB: SDSQXCG-032G-GN6MA
  • 64 GB: SDSQXCY-064G-GN6MA
  • 128 GB: SDSQXCY-128G-GN6MA
  • 256 GB: SDSQXCZ-256G-GN6MA
  • 400 GB: SDSQXCZ-400G-GN6MA
  • 512 GB: SDSQXCZ-512G-GN6MA
  • 1 TB: SDSQXCZ-1T00-GN6MA

Form Factor

The 32 GB version SanDisk Extreme, 32 GB version of SanDisk Extreme as well as the 16 GB and 32 GB versions of the SanDisk Ultra use microSDHC as the form factor.

The rest of the cards, which are at least 64 GB, use microSDXC.

You can find the full breakdown of the form factors for each capacity below:

  • 64GB SanDisk Nintendo Switch Card: microSDXC
  • 128GB SanDisk Nintendo Switch Card: microSDXC
  • 256GB SanDisk Nintendo Switch Card: microSDXC
  • 512GB SanDisk Nintendo Switch Card: microSDXC
  • 16GB SanDisk Ultra: microSDHC
  • 32GB SanDisk Ultra: microSDHC
  • 64GB SanDisk Ultra: microSDXC
  • 128GB SanDisk Ultra: microSDXC
  • 200GB SanDisk Ultra: microSDXC
  • 256GB SanDisk Ultra: microSDXC
  • 400GB SanDisk Ultra: microSDXC
  • 512GB SanDisk Ultra: microSDXC
  • 32GB SanDisk Extreme: microSDHC
  • 64GB SanDisk Extreme: microSDXC
  • 128GB SanDisk Extreme: microSDXC
  • 256GB SanDisk Extreme: microSDXC
  • 400GB SanDisk Extreme: microSDXC
  • 512GB SanDisk Extreme: microSDXC
  • 1TB SanDisk Extreme: microSDXC
  • 32GB SanDisk Extreme Pro: microSDHC
  • 64GB SanDisk Extreme Pro: microSDXC
  • 128GB SanDisk Extreme Pro: microSDXC
  • 256GB SanDisk Extreme Pro: microSDXC
  • 400GB SanDisk Extreme Pro: microSDXC
  • 512GB SanDisk Extreme Pro: microSDXC
  • 1TB SanDisk Extreme Pro: microSDXC

Bus Interface

The SanDisk Nintendo Switch microSDXC Card, SanDisk Ultra microSDXC Card, SanDisk Extreme microSDXC Card and SanDisk Extreme Pro microSDXC Card utilize UHS-I as the bus interface.

Sequential Read/Transfer Performance

When it comes to the sequential read/transfer performance, all capacities of four memory cards in this comparison are faster than the aforementioned recommend speed of 95 MB per second.

Although the SanDisk Extreme Pro is the fastest of the group, it doesn’t matter when it comes to the loading Nintendo Switch and Nintendo Switch Lite games as the speed will top out at 95MB/s.

You can check out the sequential read/transfer speed specifications below:

  • 64GB SanDisk Nintendo Switch Card: Up to 100 MB per second
  • 128GB SanDisk Nintendo Switch Card: Up to 100 MB per second
  • 256GB SanDisk Nintendo Switch Card: Up to 100 MB per second
  • 512GB SanDisk Nintendo Switch Card: Up to 100 MB per second
  • 16GB SanDisk Ultra: Up to 98 MB per second
  • 32GB SanDisk Ultra: Up to 98 MB per second
  • 64GB SanDisk Ultra: Up to 100 MB per second
  • 128GB SanDisk Ultra: Up to 100 MB per second
  • 200GB SanDisk Ultra: Up to 100 MB per second
  • 256GB SanDisk Ultra: Up to 100 MB per second
  • 400GB SanDisk Ultra: Up to 100 MB per second
  • 512GB SanDisk Ultra: Up to 100 MB per second
  • 32GB SanDisk Extreme: Up to 100 MB per second
  • 64GB SanDisk Extreme: Up to 160 MB per second
  • 128GB SanDisk Extreme: Up to 160 MB per second
  • 256GB SanDisk Extreme: Up to 160 MB per second
  • 400GB SanDisk Extreme: Up to 160 MB per second
  • 512GB SanDisk Extreme: Up to 160 MB per second
  • 1TB SanDisk Extreme: Up to 160 MB per second
  • 32GB SanDisk Extreme Pro: Up to 170 MB per second
  • 64GB SanDisk Extreme Pro: Up to 170 MB per second
  • 128GB SanDisk Extreme Pro: Up to 170 MB per second
  • 256GB SanDisk Extreme Pro: Up to 170 MB per second
  • 400GB SanDisk Extreme Pro: Up to 170 MB per second
  • 512GB SanDisk Extreme Pro: Up to 170 MB per second
  • 1TB SanDisk Extreme Pro: Up to 170 MB per second

Sequential Write Performance

With the Nintendo Switch and Nintendo Switch Lite, you can save downloadable games and other software, patches and title updates, DLC and expansions in addition to screenshots and videos on a memory card.

The sequential write speed determines how fast data are saved to the storage.

The 32GB SanDisk Extreme, 64GB SanDisk Extreme and 64GB SanDisk Nintendo Switch Card have sequential write speeds of up to 60 MB per second while the other cards come with write speeds of up to 90 MB per second.

Unfortunately, the writing specs were not listed for any of the capacities of the SanDisk Ultra.

You can take a look at the writing speed specifications below:

  • 64GB SanDisk Nintendo Switch Card: Up to 60 MB per second
  • 128GB SanDisk Nintendo Switch Card: Up to 90 MB per second
  • 256GB SanDisk Nintendo Switch Card: Up to 90 MB per second
  • 512GB SanDisk Nintendo Switch Card: Up to 90 MB per second
  • 16GB SanDisk Ultra: N/A
  • 32GB SanDisk Ultra: N/A
  • 64GB SanDisk Ultra: N/A
  • 128GB SanDisk Ultra: N/A
  • 200GB SanDisk Ultra: N/A
  • 256GB SanDisk Ultra: N/A
  • 400GB SanDisk Ultra: N/A
  • 512GB SanDisk Ultra: N/A
  • 32GB SanDisk Extreme: Up to 60 MB per second
  • 64GB SanDisk Extreme: Up to 60 MB per second
  • 128GB SanDisk Extreme: Up to 90 MB per second
  • 256GB SanDisk Extreme: Up to 90 MB per second
  • 400GB SanDisk Extreme: Up to 90 MB per second
  • 512GB SanDisk Extreme: Up to 90 MB per second
  • 1TB SanDisk Extreme: Up to 90 MB per second
  • 32GB SanDisk Extreme Pro: Up to 90 MB per second
  • 64GB SanDisk Extreme Pro: Up to 90 MB per second
  • 128GB SanDisk Extreme Pro: Up to 90 MB per second
  • 256GB SanDisk Extreme Pro: Up to 90 MB per second
  • 400GB SanDisk Extreme Pro: Up to 90 MB per second
  • 512GB SanDisk Extreme Pro: Up to 90 MB per second
  • 1TB SanDisk Extreme Pro: Up to 90 MB per second

Operating Temperature Range

The SanDisk memory cards have the same operating temperature ranges of -13°F to 185°F (or -25°C to 85°C).

Storage Temperature Range

The four products also have identical storage temperature ranges of -40°F to 185°F (or -40°C to 85°C).

Warranty

The SanDisk Ultra microSDXC Card comes with a 10-Year Limited Warranty. The SanDisk Nintendo Switch microSDXC Card, SanDisk Extreme microSDXC Card and SanDisk Extreme Pro microSDXC each come with a Lifetime Limited Warranty.

Resources:

Is the TCL 5 S535 a suitable TV for the PS5, Xbox Series X and other consoles?

The TCL 5 S535 is one of several new budget-friendly 2020 television sets. So, how good is this TV for gaming on the PlayStation 5, Xbox Series S, Xbox Series X as well as other consoles?

You can find out in this Seeking Tech guide for the 2020 version of the TCL 5 Series.

Quick Summary

We don’t recommend getting the TCL 5 S535 for the PS5, Xbox Series S or Xbox One X due to the lack of HDMI 2.1 ports, which means that you will be missing out on 120 frames per second as well as variable refresh rate.

The TV also has poor HDR brightness levels.

With that said, the new TCL 5 has exceptional input lag reduction when you enabled its game mode. So, it is a pretty good television to play non-HDR games on the older HDMI consoles like the PS4, Switch and Xbox One.

As for legacy consoles, the TCL 5 S535 includes a RF adapter as well as a singular composite cable, which you need to purchase a separate adapter for if you want to plug in systems that uses the yellow, white and red composite plugs.

Does TCL 5 S535 have HDMI 2.1 ports?

The TCL 5 S535 has four HDMI 2.0 ports but zero HDMI 2.1 ports. As a result, this television set is not capable of playing PS5, Xbox Series S or Xbox Series X videogames at 120 frames per second.

The TV also won’t take advantage of variable refresh rate, a new feature that help smooth out inconsistent frame rate and screen tearing.

TCL 5 S535’s HDR Capabilities

In terms of high dynamic range features, the S535 version of the TCL 5 supports a wide color gamut, HDR10 as well as Dolby Vision (both the Xbox Series S and Xbox Series X will be using Dolby Vision).

The TV is not compatible with HDR10.

As for brightness levels in HDR, the TCL 5 S535 is unfortunately too dim to take advantage of high-dynamic range.

We recommend TVs that have at least 500 nits of brightness in HDR. According to RTINGS, the S535 model can only reach 247 nits at HDR Real Scene Peak Brightness, 337 nits at HDR Peak 100% Window and 335 nits at HDR Sustained 100% Window.

You can take a look the HDR test results for the new TCL 5 below (via RTINGS):

  • HDR Real Scene Peak Brightness: 247 cd/m²
  • HDR Peak 2% Window: 214 cd/m²
  • HDR Peak 10% Window: 376 cd/m²
  • HDR Peak 25% Window: 432 cd/m²
  • HDR Peak 50% Window: 358 cd/m²
  • HDR Peak 100% Window: 337 cd/m²
  • HDR Sustained 2% Window: 213 cd/m²
  • HDR Sustained 10% Window: 375 cd/m²
  • HDR Sustained 25% Window: 429 cd/m²
  • HDR Sustained 50% Window: 356 cd/m²
  • HDR Sustained 100% Window: 335 cd/m²
  • HDR ABL: 0.040

TCL 5 S535’s Input Lag

The TCL 5 S535 has excellent input lag reduction when you used its game mode.

According to RTINGS.com, the lag is just 11.2 ms at 1080p/60Hz, 10.9 at 1440p/60Hz in addition to 10.8 ms at 4K/60Hz and 4K/60hz/HDR.

If you want to use the S535 as a computer monitor, the latency is 10.9 ms at 4K/60Hz/4:4:4. This TV can’t use the FreeSync feature from AMD video cards or the GSYNC feature from the GSYNC video cards.

You can take a look at the input lag tests for the TCL 5 S535 below (via RTINGS):

  • 1080p resolution and 60 Hz refresh rate (Game Mode Enabled): 11.2 ms
  • 1080p resolution and 60 Hz refresh rate (Game Mode Disabled): 111.1 ms
  • 1440p resolution and 60 Hz refresh rate (Game Mode Enabled): 10.9 ms
  • 4K resolution and 60 Hz refresh rate (Game Mode Enabled): 10.8 ms
  • 4K resolution and 60 Hz refresh rate + 10-bit HDR (Game Mode Enabled): 10.8 ms
  • 4K resolution and 60 Hz refresh rate (Game Mode Disabled): 110.9 ms
  • 4K resolution and 60 Hz refresh rate With Interpolation: 111.0 ms
  • 4K resolution, 60 Hz refresh rate and 4:4:4: 10.9 ms

Is the TCL 5 S535 good for PS5, Xbox Series S and Xbox Series X?

The TCL 5 S535 is a poor choice from playing PlayStation 5, Xbox Series S and Xbox Series X videogames due to the lack of HDMI 2.1 ports in addition to the poor HDR brightness levels.

Is the TCL 5 S535 good for Switch, PS4, PS4 Pro, Xbox One, Xbox One S and Xbox One X?

The TV does have stellar input lag reduction when you used its game mode, however. So, it is more than capable enough at providing a great experience when playing older HDMI consoles like the Nintendo Switch, Nintendo Wii U, PlayStation 3, PlayStation 4, Xbox 360 and Xbox One.

Like we stated above, the HDR brightness performance is poor so you won’t get a quality picture with HDR-supported games on the PS4, PS4 Pro, Xbox One S and Xbox One X.

Legacy Consoles Support

If you are looking to connect older consoles that use a composite input, you need to purchase an adapter that covers the yellow, white and red plugs into a singular yellow composite plug.

The TCL 5 S535 does come with a RF input, so you will be able to simply connect retro systems, which include the NES, Super NES and Sega Genesis.