How to insert, format and force format a microSD card for Steam Deck

Depending on the model, your Steam Deck could come with 64 GB, 256 GB or 512 GB of internal storage. All models of the portable system also come with a microSD card slot where you can add more storage.

You can check out this tutorial at Seeking Tech to see how you can insert, format and force format a microSD card for your Steam Deck.

What memory cards are compatible with the Steam Deck?

According to Valve, the Steam Deck supports SD, SDXC and SDHC cards that use the UHS-I bus interface with a class 3 rating or better.

For this guide, we will be using the SAMSUNG EVO Select microSD card. If you are interested, you can purchase the same card on Amazon with this link. (#CommissionsEarned).

How to insert a microSD card to the Steam Deck

In order to insert a microSD card into the Steam Deck, you can try taking the following steps:

1. First off, locate the microSD card expansion slot, which should be on the below the left corner of the screen.

2. When inserting the microSD card, make sure that its label is facing upwards.

3. You should also make sure that the metal connectors are going into the slot first. If you try to insert the card using the other way, then it won’t fit into the slot.
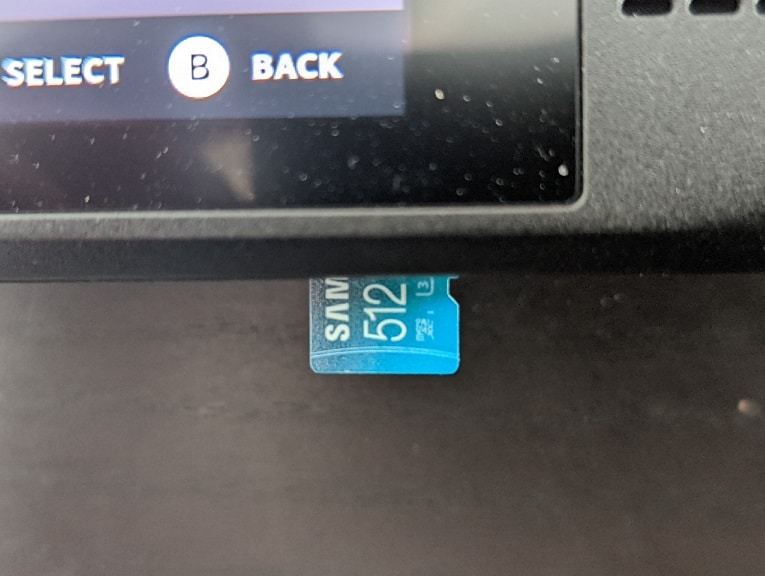
4. Push the card inwards until it clicks in to the slot. You may have to use your finger nail to push it fully in.

How manually format a microSD card for Steam Deck

If the microSD card isn’t automatically formatted for your Steam Deck, then you can manually do so by doing the following:

1. Press the Steam button to open the Steam menu.

2. With the Steam menu opened, select Settings.

3. After arriving in the Settings menu, select System on the left side.

4. On the System section on the right side of the same screen, select Format.
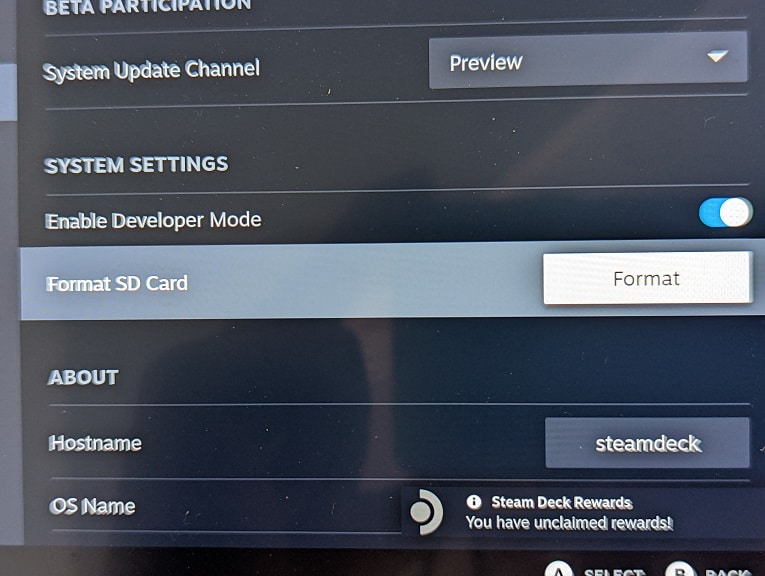
5. You should get a notification saying that formatting will erase all the data currently stored on the microSD card. Furthermore, the deleted data won’t be recovered.

6. Once you are ready, select Confirm to start the formatting process.

How to force format a microSD card for Steam Deck

If you can’t get your microSD card to be formatted for the Steam Deck through the normal methods, then you can try to do a force format. In order to do so, you need to take the following steps:

1. First off, make sure you enable the Developer menu. If you haven’t, then you need to go to Settings > System and then make sure that the Enable Developer Mode setting is turned on.

2. In the Settings menu, you need to select Developer, which is located at the very bottom of the left column.

3. In the Developer section, you then need to select Format.
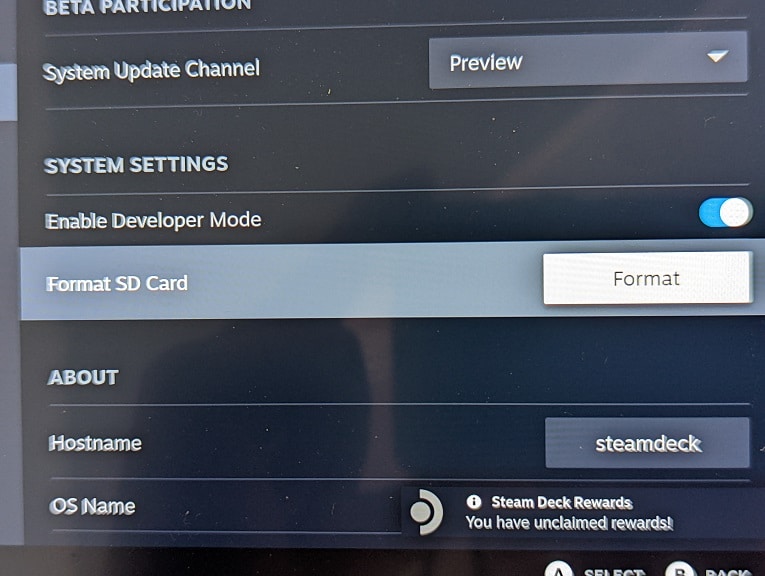
4. In the pop-up notification, select Confirm in order to start the formatting process.

How to insert, format and remove memory cards for Panasonic LUMIX GH6

The LUMIX GH6 is a new flagship mirrorless camera released by Panasonic.

You can check out this guide at Seeking Tech to see how you can insert, format and remove compatible memory cards for this device.

What memory cards are compatible with the Panasonic LUMIX GH6?

When it comes to memory cards, the Panasonic LUMIX GH6 comes with a double card slot.

One of the slots support the CFexpress Type B format from 64 GB to 512 GB while the other slot support the microSD UHS-II format. For the microSD card, the U3 speed rating, as well as a video speed rating of at least V30, are recommended by Panasonic if you want the best performance. The maximum supported capacity for microSD cards are 256 GB.

If you are looking for a specific microSD card recommendation, then we suggest picking up the Sony TOUGH-G microSDXC UHS-II Card as it features the U3 and V90 speed ratings. It also comes with a read speed of up to 300 MB per second along with a write speed of up to 299 MB per second.

If you are interested, you can purchase our recommended microSD card on Amazon with the following link:

If you are looking for a compatible CFexpress Type B card, then we recommend picking up the Sony CFexpress Tough Memory Card. This memory card has a reading speed of up to 1,700 MB per second and a writing speed of up to 1,480 MB per second.

If you are interested, you can find the recommended CFexpress Type B card on Amazon via the following link:

How to insert a memory card into the Panasonic LUMIX GH6

In order to insert a memory card into the Panasonic LUMIX GH6, you need to take the following steps:

1. Open the card door located on the side of the camera.

2. You should see two slots as the #1 slot is made for CFexpress Type B while the #2 slot is made for microSD.

3. Insert your memory card into the correct slot and then push down. If done correctly, you should hear a click, which indicates that the card is securely inserted into the slot.

4. Close the card door.

How to format a memory card for the Panasonic LUMIX GH6

In order to format your CFexpress Type B or microSD card for the LUMIX GH6, you need to take the following steps:

1. Before you begin, make sure you transfer any important files off of the CFexpress Type B or microSD card as the formatting process will delete all previous data stored on the memory card.

2. Next, insert the card into the LUMIX GH6 camera if you haven’t done so already.

3. Press the Menu button on the camera.

4. Next, go to Setup.

5. You then need to select Card/File.

6. Finally select Card Format.

After formatting your memory card, you should be able to start using it to store videos and photos.

How to safely remove memory card from Panasonic LUMIX GH6

In order to safely remove a memory card from the Panasonic LUMIX GH6, you can take the following steps:

1. Open the card door on your camera.

2. Check to see if the light indicator next to the memory card slot of your CFexpress Type B or microSD card is turned on.

If the light indicator is turned on, then it indicates that the memory card is currently being accessed. In this case, we recommend waiting until the light turns off before continuing; otherwise, you will risk damaging the memory card and camera.

3. Once you no longer see the light next to the memory card slot turned on, we recommend waiting for several minutes if you were using the camera beforehand. This is because the memory card may still be hot.

Fortunately, the LUMIX GH6 will display a high temperature caution message on its screen. Once this message disappears, you should be able to safely proceed without causing any potential injury.

4. To remove the memory card, press down on it until you hear a click.

5. Let go once you hear a click and the memory card should pop out of the memory card slot.

6. Slide the card out to remove your CFexpress Type B or microSD card from the camera.

7. Close the card door after you remove the memory card.

How to insert and format a microSD card for Xperia PRO-I

You are able to expand the local storage capacity of the Sony Xperia PRO-I by using a microSD card.

You can check out this step-by-step tutorial at Seeking Tech to see how you can insert and format a microSD card with this smartphone.

What microSD card is compatible with the Sony Xperia PRO-I?

The Sony Xperia PRO-I support microSD cards of up to 1 TB in terms of capacity. This phone doesn’t have any speed requirements when it comes to using external memory cards.

If you are looking for a compatible card, then we recommend picking up the SanDisk Ultra MicroSDXC UHS-I Memory Card,. You can find this memory card on Amazon with this link. (#CommissionsEarned).

How to insert a microSD card to the Sony Xperia PRO-I

In order to insert a microSD card into the Sony Xperia PRO-I, you can take the following steps:

1. Turn off your smartphone.

2. Remove the SIM card tray from the Xperia PRO-I.

3. Place the microSD card in its designated slot.

Keep in mind that the microSD card slot and SIM 2 card slot occupy the same space. As a result, you can use the slot to either expand your local storage or add a second SIM card.

4. Once you place the microSD card it its slot, you can re-insert the SIM card tray back into the Xperia PRO-I.

5. Turn back on your phone.

How to format a microSD card for the Sony Xperia PRO-I

Before being able to use a microSD card, you may need to format it. In order to do so, you can do the following:

1. If you have any important files stored on the microSD card you are trying to format, then you should move them to other storage.

This is because formatting the memory card for the Sony Xperia PRO-I will delete all existing files you have stored on it.

2. If you haven’t done so already, make sure you insert the microSD card you are trying to format into the SIM card tray of the Xperia PRO-I.

3. With the memory card inserted, turn on your phone and then go to the Settings app.

If you can’t find Settings, it should be located in the list of installed applications you can view by swiping upwards from the bottom of the home screen.

4. After getting to the Settings app, select Storage.

5. From the Storage menu, select SD card.

6. Next, select the “More” icon, which is represented as the three bullet points.

7. You then need to select Storage settings.

8. Finally, select Format and then confirm your selection in the pop-up dialogue to starting the memory card formatting process.

How to change data storage to microSD card on Xperia PRO-I

If you want to change to storage location for your captured images and videos, then you can take the following steps:

1. Open the Photo Pro app.

2. Inside the Photo Pro app, select Menu.

3. Next, you need to select Data storage.

4. Select the storage location for your captured images and videos.

5. Close the Menu to save any changes.

What’s the difference between the old and new Samsung EVO Select microSD Cards?

Samsung has released a new version of the EVO Select microSD Memory Card. So, how does it compare to the older version?

You can find out in this comparison guide between these two memory cards.

Quick Summary

The New Samsung EVO Select microSD Card is 30% faster than the Old Samsung EVO Select microSD Card.

The newer version is also better equipped at recording high-resolution videos as well as loading apps.

Last but not least, Samsung added drop protection in addition to insert/eject durability to the new memory cards.

New Samsung EVO Select microSD vs. Old Samsung EVO Select microSD Comparison Chart

You can check out Seeking Tech’s comparison table for the new and old versions of the Samsung EVO Select below.

New Samsung EVO Select microSD Memory CardOld Samsung EVO Select microSD Memory Card
Capacity Options64 GB

128 GB

256 GB

512 GB
32 GB

64 GB

128 GB

256 GB

512 GB
Model Numbers64 GB New Samsung EVO Select microSD: MB-ME64KA

128 GB New Samsung EVO Select microSD: MB-ME64KA

256 GB New Samsung EVO Select microSD: MB-ME256KA

512 GB New Samsung EVO Select microSD: MB-ME512KA
32 GB Old Samsung EVO Select microSD: MB-ME32GA

64 GB Old Samsung EVO Select microSD: MB-ME64HA

128 GB Old Samsung EVO Select microSD: MB-ME128HA

256 GB Old Samsung EVO Select microSD: MB-ME256HA

512 GB Old Samsung EVO Select microSD: MB-ME512HA
Ultra High-Speed Bus InterfaceUHS-IUHS-I
File System64 GB New Samsung EVO Select microSD: SDXC

128 GB New Samsung EVO Select microSD: SDXC

256 GB New Samsung EVO Select microSD: SDXC

512 GB New Samsung EVO Select microSD: SDXC
32 GB Old Samsung EVO Select microSD: SDHC

64 GB Old Samsung EVO Select microSD: SDXC

128 GB Old Samsung EVO Select microSD: SDXC

256 GB Old Samsung EVO Select microSD: SDXC

512 GB Old Samsung EVO Select microSD: SDXC
Speed ClassClass 10Class 10
UHS Speed Class64 GB New Samsung EVO Select microSD: U1

128 GB New Samsung EVO Select microSD: U3

256 GB New Samsung EVO Select microSD: U3

512 GB New Samsung EVO Select microSD: U3
32 GB Old Samsung EVO Select microSD: U1

64 GB Old Samsung EVO Select microSD: U1

128 GB Old Samsung EVO Select microSD: U3

256 GB Old Samsung EVO Select microSD: U3

512 GB Old Samsung EVO Select microSD: U3
Video Speed Class64 GB New Samsung EVO Select microSD: V10

128 GB New Samsung EVO Select microSD: V30

256 GB New Samsung EVO Select microSD: V30

512 GB New Samsung EVO Select microSD: V30
N/A
Application Speed Class64 GB New Samsung EVO Select microSD: A1

128 GB New Samsung EVO Select microSD: A2

256 GB New Samsung EVO Select microSD: A2

512 GB New Samsung EVO Select microSD: A2
N/A
Maximum Transfer SpeedUp to 130 MB per secondUp to 100 MB per second
WaterproofUp to 72 hours in seawaterUp to 72 hours in seawater
X-Ray ProofUp to 100mGyUp to 100mGy
Magnetic-ProofUp to 15,000 gaussUp to 15,000 gauss
Drop ProofUp to 5 meters (or 16.4 feet)Up to 5 meters (or 16.4 feet)
Durability ProofUp to 10,000 slot insertions sand ejectionsUp to 10,000 slot insertions sand ejections
Operating Temperature-25℃ to 85℃-25℃ to 85℃
Storage Temperature-40℃ to 85℃-40℃ to 85℃
WarrantyLimited 10-year warrantyLimited 10-year warranty
PricingCheck price on Amazon.(#CommissionsEarned)Check price on Amazon.(#CommissionsEarned)

Capacity Options

With the newer version, Samsung decided to drop the 32 GB capacity.

You can check out a breakdown of the available capacities for both products below:

New Samsung EVO Select microSD:

  • 64 GB
  • 128 GB
  • 256 GB
  • 512 GB

Old Samsung EVO Select microSD:

  • 32 GB
  • 64 GB
  • 128 GB
  • 256 GB
  • 512 GB

Model Numbers

You can also find the model number for each capacity of the new and old EVO Selects microSD cards below:

  • 64 GB New Samsung EVO Select microSD: MB-ME64KA
  • 128 GB New Samsung EVO Select microSD: MB-ME64KA
  • 256 GB New Samsung EVO Select microSD: MB-ME256KA
  • 512 GB New Samsung EVO Select microSD: MB-ME512KA
  • 32 GB Old Samsung EVO Select microSD: MB-ME32GA
  • 64 GB Old Samsung EVO Select microSD: MB-ME64HA
  • 128 GB Old Samsung EVO Select microSD: MB-ME128HA
  • 256 GB Old Samsung EVO Select microSD: MB-ME256HA
  • 512 GB Old Samsung EVO Select microSD: MB-ME512HA

Ultra High-Speed Bus Interface

As for the Ultra High-Speed Interface, both versions utilize UHS-I.

File System

When it comes to the file system, the 32 GB Old Samsung EVO Select use SDHC while the higher capacity microSD cards from both the newer and older versions use SDXC.

You can find a breakdown of the file system by capacity below:

  • 64 GB New Samsung EVO Select microSD: SDXC
  • 128 GB New Samsung EVO Select microSD: SDXC
  • 256 GB New Samsung EVO Select microSD: SDXC
  • 512 GB New Samsung EVO Select microSD: SDXC
  • 32 GB Old Samsung EVO Select microSD: SDHC
  • 64 GB Old Samsung EVO Select microSD: SDXC
  • 128 GB Old Samsung EVO Select microSD: SDXC
  • 256 GB Old Samsung EVO Select microSD: SDXC
  • 512 GB Old Samsung EVO Select microSD: SDXC

Speed Class

All the capacities of the new and old Samsung EVO Select have a speed class rating of Class 10.

UHS Speed Class

When it comes to the UHS speed class rating, the 64 GB New Samsung EVO Select microSD, 32 GB Old Samsung EVO Select microSD and 64 GB Old Samsung EVO Select microSD have an U1 rating while the bigger capacities of both versions have an U3 rating.

You can find a breakdown of the UHS rating by capacity below:

  • 64 GB New Samsung EVO Select microSD: U1
  • 128 GB New Samsung EVO Select microSD: U3
  • 256 GB New Samsung EVO Select microSD: U3
  • 512 GB New Samsung EVO Select microSD: U3
  • 32 GB Old Samsung EVO Select microSD: U1
  • 64 GB Old Samsung EVO Select microSD: U1
  • 128 GB Old Samsung EVO Select microSD: U3
  • 256 GB Old Samsung EVO Select microSD: U3
  • 512 GB Old Samsung EVO Select microSD: U3

Video Speed Class

Only the new version of the Samsung EVO Select have gotten a video speed class rating.

You can find the ratings below:

  • 64 GB New Samsung EVO Select microSD: V10
  • 128 GB New Samsung EVO Select microSD: V30
  • 256 GB New Samsung EVO Select microSD: V30
  • 512 GB New Samsung EVO Select microSD: V30

V10 means that a memory card has a minimum sequential write speed of 10 MB per second.

V30 means that a card has a minimum sequential write speed of 30 MB per second, which makes it more suitable for capturing videos at 4K or 8K resolution.

Application Speed Class

The new version is also the only one to come with Application Speed Class rating, which you can find below:

  • 64 GB New Samsung EVO Select microSD: A1
  • 128 GB New Samsung EVO Select microSD: A2
  • 256 GB New Samsung EVO Select microSD: A2
  • 512 GB New Samsung EVO Select microSD: A2

The 64 GB New Samsung EVO Select’s A1 rating means that it has a minimum sustained sequential write speed of 10 MB per second, minimum random read speed of 1500 IOPS as well as a minimum random write speed of 500 IOPS.

The A2 rating for the 128 GB, 256 GB and 512 GB versions of the new Samsung EVO Select means that these cards have a minimum sustained sequential write speed of 10 MB per second, minimum random read speed of 4000 IOPS in addition to minimum random write speed of 2000 IOPS.

Maximum Transfer Speed

The newer Samsung EVO Select has a maximum transfer speed that is 30% faster than the older version.

You can find the speed specs for both below:

  • New Samsung EVO Select microSD: Up to 130 MB per second
  • Old Samsung EVO Select microSD: Up to 100 MB per second

Waterproof

In terms of water protection, both of these memory cards can withstand being in seawater for up to 72 hours.

X-Ray Proof

Both versions are also protected from x-ray radiation at up to 100mGy.

Magnetic-Proof

The new and old cards can also withstand magnetic fields of up to 15,000 gauss.

Drop Proof

The New Samsung EVO Select microSD is the only product in this comparison to have a drop-proof rating as it can withstand being dropped at a height of up to 5 meters (or 16.4 feet).

Durability Proof

The newer Samsung EVO Selects also have a durability rating as these cars can withstand up to 10,000 slot insertions sand ejections.

Operating Temperature

Both the new and old versions have an operating temperature range of -25℃ to 85℃.

Storage Temperature

The two products also have the same non-operating storage temperature range of -40℃ to 85℃.

Warranty

A limited 10-year warranty is included with the New Samsung EVO Select microSD Memory Card and Old Samsung EVO Select microSD Memory Card.

Resources:

How to fix Nintendo Switch OLED microSD card recognition issues

You can add extra storage to your Nintendo Switch OLED via the microSD card slot. If your system can’t recognize your card, then you can check out this troubleshooting guide at Seeking Tech to find some potential solutions.

1. The first step we recommend taking is to make sure your microSD card is compatible with the Switch OLED system.

For the uninformed, game console supports microSD, microSDHC and microSDXC. The Nintendo Switch OLED should also be compatible with both the UHS-I and UHS-II Ultra High Speed formats. Finally, the card needs to have a minimum read or transfer speed of 60 MB per second.

2. If you are sure that your microSD card is compatible, then we recommend re-inserting the card once again.

In order to do so, you can take the following steps:

Turn off your Nintendo Switch OLED by pressing and holding the power button for at least 3 seconds.

Next, select Power Options and then Turn Off.

With your system powered down, lay it down so that the back of the console is facing upwards.

Open the adjustable stand to access the microSD slot.

Press down on the microSD card to loosen it and then slide it out of the slot.

Look at the connectors on the cards as well as the microSD card slot to see if there are any potential damages. If you see damage on the connectors on your card, then you will need to send it in for repair if possible. If you see that the microSD card slot on your system has been damaged, then you need to send in your Switch OLED for repair.

If both the connectors and slot look normal, then you can re-insert the microSD card back into the microSD slot.

Afterwards, turn on your Nintendo Switch OLED again and then test to see if your system can recognize the card.

3. If your microSD still can’t be recognized, then you and try reformatting it. Keep in mind that this procedure will erase everything stored on the memory card. So, if possible, you may want to move any important files you have on the card before continuing.

To reformat, you need to do the following:

With the microSD card inserted into the microSD slot of your Switch OLED, turn on the system.

In the Home menu, select System Settings from the bottom.

On the left side of the next screen, scroll down to select System.

On the right side of the same screen, select Formatting Options.

You may be asked to enter the Parental Controls PIN, if you previously set one up, to continue.

Afterwards, select Format microSD Card.

You can then select Continue.

Finally, select Format.

Your Nintendo Switch OLED system will automatically reset once the formatting has completed.

4. If your console still can’t detect the reformatted microSD card, then you can try to use another microSD card.

If the new microSD card works, then the recognition issues may be related to the older microSD card.

If the new microSD card still can’t be recognized, then the issues may be related to the Nintendo Switch OLED. If that is the case, then you should consider contacting Nintendo about possibly sending your console in for repair.

How to insert, format and remove the microSD card on Nintendo Switch OLED

Like the other Nintendo Switch systems, the new OLED model supports expanded storage through the use of microSD cards.

You can check out this step-by-step guide from Seeking Tech to see how you can insert, format and remove a microSD card into the Nintendo Switch OLED system.

Nintendo Switch OLED microSD card Requirements

Before we begin, it is important to note that the Nintendo Switch OLED only supports microSD cards. The bigger SD cards, as well as other types of memory cards, won’t work with this system.

As for the microSD card formats, the following are supported:

  • microSD (for microSD cards up to 2 GB in capacity)
  • microSDHC (for microSD cards between 4 GB to 32 GB in capacity)
  • microSDXC (for microSD cards of at least 64 GB in capacity)

When it comes to the Ultra High Speed rating, the Nintendo Switch OLED system is designed to work with UHS-I. Although you can also use UHS-II cards, the Switch OLED won’t take advantage of the excess speed.

The system also requires a microSD card with a read or transfer speed between 60 MB per second to 95 MB per second. While there are cards that exceed 95 MB per second, the OLED model won’t take advantage of the extra speed.

If you are looking for a compatible microSD card, then you can check out this guide.

How to insert microSD card to Nintendo Switch OLED

In order to insert the microSD card to your Nintendo Switch OLED system, then you need to take the following steps:

1. Before inserting the microSD into the game console, we recommend moving any important files you have stored on the card.

This is because the microSD will need to be formatted, which will erase all the data that was previously store on it.

2. Once you are ready, turn off the Switch OLED system.

You can do so by pressing and holding the power button on the system for at least three seconds. Afterwards, select Power Options and then Turn Off.

3. Next, you need to lay the Nintendo Switch OLED system down on a soft surface with the screen at the bottom.

3. On the back of the system, swing the adjustable stand open. You should see the microSD slot at the bottom left corner.

4. You can now insert the microSD card into the slot. Make sure that the label on the microSD card is facing away from the system.

5. After the insertion, carefully push down on the card until it clicks into place.

How to format microSD card for Nintendo Switch OLED

In order to format a microSD card for the Nintendo Switch OLED console, you can do the following:

1. With the microSD card inserted, turn on your Switch OLED.

2. In the Home menu, go to System Settings.

3. In System Settings, scroll down and then select System.

4. On the right side of the same screen, scroll down and then select Formatting Options.

5. If you previously set up a Parental Controls PIN, then you have to enter it to continue to the next step. If you don’t have a PIN set up, then you can skip to the next step.

6. Afterwards, select Format microSD Card.

7. Select Continue.

8. Finally, select Format.

After the formatting is completed, the Nintendo Switch OLED system will restart.

How to remove the microSD card from Nintendo Switch OLED

To remove the microSD card from your Nintendo Switch OLED system, you need to do the following:

1. Turn off your Switch OLED.

2. Lay your Switch down with the OLED screen at the bottom.

3. On the backside of the system, open the adjustable stand.

4. Locate the microSD card slot, which should be on the bottom left.

5. Press down on the microSD card to loosen it from the slot.

6. Finally, slide the microSD card out from the microSD card slot of the Switch OLED system.

Compatible microSD cards for Nintendo Switch OLED

The Switch OLED is a new premium model of the Nintendo Switch. If you are looking for the best compatible microSD cards to use with this new console, then you can check out this guide at Seeking Tech.

How much internal storage memory does the Nintendo Switch OLED comes with?

The Switch OLED comes with 64 GB of internal storage memory, which is twice as much as the original Nintendo Switch model as well as the portable-only Nintendo Switch Lite.

What memory cards are compatible with Nintendo Switch OLED?

The Switch OLED only supports microSD cards. Other types of cards, such as SD cards, won’t fit into this system.

What microSD card formats and capacity are supported by Nintendo Switch OLED?

The following microSD cards format are compatible with the OLED model of the Nintendo Switch:

  • microSD (capacity: up to 2 GB)
  • microSDHC (capacity: 4 GB to 32 GB)
  • microSDXC (capacity: 64 GB or more)

What are the microSD card speed requirements of Nintendo Switch OLED?

When it comes to the speed requirements, your microsSD card must be using the UHS-I (also known as the Ultra High-Speed Phase I).

Furthermore, your card must have a read/transfer speed of at least 60 MB per second.

The maximum read/transfer speed is 95 MB per second, which Nintendo recommends as it will lead to faster loading and game transfer speeds.

While there are microSD cards that have faster speeds than 95 MB per second, the Switch OLED won’t take advantage of the excess speed due to other bottlenecks on the game system.

What data can be saved on the microSD card of Switch OLED?

The following file types can be stored on a microSD card of the Nintendo Switch OLED Model:

  • Downloadable games
  • Game update data
  • Downloadable content (DLC)
  • Captured screenshots
  • Captured videos

What data can’t be saved on the microSD card of Switch OLED?

You can’t store any saved data on the microSD card of the Nintendo Switch OLED. Instead, the save files can only be stored on the 64 GB internal storage of the system and backup over the cloud storage.

The cloud storage requires a Nintendo Online subscription. Furthermore, not all games support cloud backups for saved data.

Can you use multiple microSD cards with Switch OELD?

While the Switch OLED only comes with one microSD card slot, you can alternate using different microSD cards with the console.

The only limitation is that you won’t be able to combined the games you have stored on a microSD card with the games you have stored on another microSD card without transferring all the data from one card to another.

For that reason, Nintendo recommends using a single microSD card, preferable one that has a big capacity so that you won’t run out of space.

What is the officially licensed microSD card for Switch OELD?

Nintendo does have a officially licensed microSD card for the Nintendo Switch OLED with the SanDisk Nintendo Switch microSDXC Card.

This memory card features a read/transfer speed of up to 100 MB per second along with a write speed of up to 90 MB per second.

This official card can also tolerate operating temperatures from -13°F to 185°F (or -25°C to 85°C) when in use as well as non-operating temperatures from -40°F to 185°F (or -40°C to 85°C) when not in use.

Last but not least, a lifetime limited warranty is also included.

This microSD card is available in the following capacities:

  • 64 GB (Model Number: SDSQXBO-064G-ANCZA)
  • 128 GB (Model Number: SDSQXBO-128G-ANCZA)
  • 256 GB (Model Number: SDSQXAO-256G-GNCZN)
  • 512 GB (Model Number: SDSQXAO-512G-ANCZN)

You can purchase the officially licensed Switch OLED memory card on Amazon via the following link:

What is the best microSD card for Switch OELD?

The best microSD card we recommend getting for the Switch OLED is the SanDisk Extreme microSDHC/microSDXC Card.

The SanDisk Extreme offers read/transfer speeds of up to 160 MB per second along with a write speed of to 90 MB per second.

It also has the same temperature tolerance and warranty coverage as the aforementioned officially licensed SanDisk Nintendo Switch microSDXC Card.

The most important factor that puts the SanDisk Extreme over the top is that it can be bought at the 1 TB capacity, which is twice the amount of space than the maximum capacity of the officially licensed card.

You can find a list of available capacities for this product below:

  • 32 GB (Model Number: SDSQXVF-032G-AN6MA)
  • 64 GB (Model Number: SDSQXA2-064G-AN6MA)
  • 128 GB (Model Number: SDSQXA1-128G-AN6MA)
  • 256 GB (Model Number: SDSQXA1-256G-GN6MA)
  • 400 GB (Model Number: SDSQXA1-400G-AN6MA)
  • 512 GB (Model Number: SDSQXA1-512G-AN6MA)
  • 1 TB (Model Number: SDSQXA1-1T00-AN6MA)

If you are interested, you can purchase our recommend Switch OLED memory card on Amazon with the following link:

You can also see how the SanDisk Nintendo Switch microSDXC Card and SanDisk Extreme microSDHC/microSDXC Card compares to other Switch-compatible SanDisk microSD cards with this article.

Compatible microSD cards for Samsung Galaxy Tab S7 FE

The new Samsung Galaxy Tab S7 FE supports expandable storage as you can add more space to your tablet with a microSD card.

You can check out this guide at Seeking Tech to find the most suitable memory cards for the Galaxy Tab S7 FE.

Galaxy Tab S7 FE Internal Storage

When it comes to the internal storage, the Samsung Galaxy Tab S7 FE comes with the following capacities:

  • 64 GB
  • 128 GB
  • 256 GB

The actual amount of usable free space is smaller as the system files of the operating system will take up a big chunk of the capacity.

Supported memory card type for Galaxy Tab S7 FE

The Samsung Galaxy Tab S7 FE supports microSD cards of up to 1 TB in capacity.

What can you store on the microSD card with Galaxy Tab S7 FE

The external memory card can only be used to store media files, which include audio, photos and videos.

You won’t be able to store any applications on the microSD card.

Best value microSD card for Galaxy Tab S7 FE

If you are looking for the best value when it comes to expanding the storage for the Samsung Galaxy Tab S7 FE, then we recommend getting the SanDisk Ultra MicroSD UHS-I Memory Card.

This compatible microSD card has a maximum transfer speed of up to 120 MB per second in addition to a minimum random reading speed of 1500 IOPS, minimum random writing speed of 500 IOPS and minimum sustained sequential writing speed of 10 MB per second.

The SanDisk Ultra is available in the following capacities:

  • 32 GB
  • 64 GB
  • 128 GB
  • 200 GB
  • 256 GB
  • 400 GB
  • 512 GB
  • 1 TB

If you are interested, you can purchase the microSD card on Amazon with the following link:

Best video recording microSD card for Galaxy Tab S7 FE

The Samsung Galaxy Tab S7 FE comes with a main camera as well as a selfie camera. Both cameras are capable of recoding videos at 30 frames per second in 1080p.

If you are looking for the most suitable memory card when it comes to video recording for the Galaxy Tab S7 FE, then we suggest getting the SanDisk Extreme microSD UHS-I Memory Card.

The SanDisk Extreme has a video speed class rating of V30, which means that it has a minimum sequential writing speed of 30 MB per second. This is good enough to record 1080p videos with the Galaxy Tab S7 FE.

Furthermore, the Extereme SD card has a transfer speed of up to 160 MB per second, minimum random reading speed of 4000 IOPS, minimum random writing speed of 2000 IOPS.

This memory card offers the following capacity options:

  • 32 GB
  • 64 GB
  • 128 GB
  • 256 GB
  • 400 GB
  • 512 GB
  • 1 TB

If you are interested, you can purchase our recommend microSD card on Amazon with the following link:

How to install a microSDXC card to the Samsung Galaxy Tab S7 FE

To install a microSD card to your Samsung Galaxy Tab S7 FE, you need to take the following steps:

1. Locate the memory card tray on the side of the tablet.

2. Use the ejection pin, which came with your tablet, on the hole of the memory card tray to loosen it.

3. Pull out the tray out.

4. Put the microSD card into the memory card tray. Make sure that the card fits firmly into the tray. The connectors of the memory card should be facing downwards.

5. With the microSD card installed into the memory card tray, carefully insert the tray back into the Galaxy Tab S7 FE.

You should make sure that the microSD card doesn’t dislodge during this process. You should also make sure that the tray is firmly fitted into the tablet so that it won’t come loose.

6. If your memory card has not already been formatted to the FAT or the exFAT file systems, then the Galaxy Tab S7 FE will ask you to reformat before you can use the card.

Reformatting a microSD card will delete all the data on it. So, if you have any important files stored on the card, make sure you move them over to a different storage device before starting the formatting process.

7. Once the Galaxy Tab S7 FE recognize your microSD card, you will be able to find the card’s file directory at My Files > SD card folder.

What’s the difference between the Sony SF-E and SF-MUHS-II SD Cards?

Sony has two similar UHS-II SD Memory Cards. So, what are the main differences between the SF-E and SF-M?

You can find out in this comparison guide.

Quick Summary

When used under the HD312 mode, the Sony SF-M Series UHS-II SD Memory Card is slightly faster at maximum reading and quite a bit faster at maximum writing when compared to the Sony SF-E Series UHS-II SD Memory Card.

When used under the SDR104 mode, the 64GB SF-M is faster than the 64GB SF-E at maximum write speeds. Otherwise, the two cards are identical when it comes to maximum reading and writing in SDR104.

Overall, we recommend getting the SF-M over the SF-E, especially if you want to film the best quality 4K videos.

SF-E vs. SF-M Comparison Chart

You can check out a comparison table for the two Sony SD cards below.

Sony SF-E Series UHS-II SD Memory CardSony SF-M Series UHS-II SD Memory Card
Dimensions1.26 in x 0.94 in x 0.08 in1.26 in x 0.94 in x 0.08 in
Capacity Option64 GB

128 GB

256 GB
64 GB

128 GB

256 GB
Model Numbers64 GB SF-E: SF-E64

128 GB SF-E: SF-E128

256 GB SF-E: SF-E256
64 GB SF-M: SF-M64

128 GB SF-M: SF-M128

256 GB SF-M: SF-M256
Usable Capacity64 GB: 57.6 GB

128 GB: 115.2 GB

256 GB: 230.4 GB
64 GB: 57.6 GB

128 GB: 115.2 GB

256 GB: 230.4 GB
InterfaceUHS-IIUHS-II
SD Speed ClassClass 10Class 10
UHS Speed ClassU3U3
Video Speed Class64 GB: V30

128 GB: V60

256 GB: V60
64 GB: V60

128 GB: V60

256 GB: V60
HD312 Read SpeedUp to 270 MB per secondUp to 277 MB per second
SDR104 Read SpeedUp to 95 MB per secondUp to 95 MB per second
HD312 Write Speed64 GB SF-E: Up to 70 MB per second

128 GB SF-E: Up to 120 MB per second

256 GB SF-E: Up to 120 MB per second
64 GB SF-M: Up to 150 MB per second

128 GB SF-M: Up to 150 MB per second

256 GB SF-M: Up to 150 MB per second
SDR104 Write Speed64 GB SF-E: Up to 70 MB per second

128 GB SF-E: Up to 90 MB per second

256 GB SF-E: Up to 90 MB per second
64 GB SF-M: Up to 90 MB per second

128 GB SF-M: Up to 90 MB per second

256 GB SF-M: Up to 90 MB per second
SoftwareFile RescueFile Rescue

SD Scan Utility
Operating Temperature Range-13℉ to 185℉ (Non-Condensing)-13℉ to 185℉ (Non-Condensing)
Dust and Water ProtectionIP57IP57
PricingCheck price on Amazon.(#CommissionsEarned)Check price on Amazon.(#CommissionsEarned)

Dimensions

The SF-E and SF-M are identical when it comes to physical size.

You can find the full measurements for the cards below:

  • 1.26 in x 0.94 in x 0.08 in

Capacity Option

Both the Sony SF-E and Sony SF-M are currently available in the following capacity options:

  • 64 GB
  • 128 GB
  • 256 GB

Model Numbers

You can also take a look at the model numbers for each capacity of both products below:

  • 64 GB SF-E: SF-E64
  • 128 GB SF-E: SF-E128
  • 256 GB SF-E: SF-E256
  • 64 GB SF-M: SF-M64
  • 128 GB SF-M: SF-M128
  • 256 GB SF-M: SF-M256

Usable Capacity

The Sony SF-E Series SD and Sony SF-M Series SD have the same amount of usable capacity.

You can check out the maximum amount of free space available for each capacity option below:

  • 64 GB: 57.6 GB
  • 128 GB: 115.2 GB
  • 256 GB: 230.4 GB

Interface

The SF-E and SF-M both use the UHS-II interface.

SD Speed Class

The two SD cards in this comparison guide have been rated at Class 10. This means that the SD write speed is 10 MB per second at the minimum.

UHS Speed Class

For UHS, both the SF-E and SF-M have received the U3 rating, which means that both memory cards have a UHS write speed of at least 30 MB per second.

Video Speed Class

The 64 GB version of the Sony SF-E Series UHS-II SD Card has a video speed class rating of V30, which means that it has a minimum sustained video write speed of 30 MB per second. This speed is enough for filming 4K videos in good quality.

The 64 GB version of the SF-M, along with the 128 GB and 256 GB versions of the SF-E and SF-M, have a video speed class rating of V60. As a result, these cards have a minimum sustained video writing speed of 60 MB per second, good enough for filming 4K videos at the best quality.

HD312 Read Speed

The SF-M Series SD Card has a slightly faster maximum reading speed in HD312 mode when compared to the SF-E Series SD Card.

According to internal tests done by Sony, the SF-E is 7 MB per second faster, which translates to a 2.59% advantage.

You can find the HD312 read speeds below:

  • Sony SF-E Series SD Card: Up to 270 MB per second
  • Sony SF-M Series SD Card: Up to 277 MB per second

SDR104 Read Speed

If you are using the SDR104 mode, the maximum reading speeds identical for both versions.

You can check out the SDR104 read speed specifications below:

  • Sony SF-E Series SD Card: Up to 95 MB per second
  • Sony SF-M Series SD Card: Up to 95 MB per second

HD312 Write Speed

The SF-M is quite a bit faster than the SF-E when it comes to maximum writing speed in HD312 mode.

When you compare the same capacities, the 64GB SF-M is 80 MB per second faster (or 114.29% faster) than the 64GB SF-E.

The 128GB and 256GB capacity options of the SF-M are also 30 MB per second faster (or 25% faster) than the 128GB and 256GB capacity options of the SF-E.

You can check out the HD312 write speeds below:

  • 64 GB Sony SF-E Series SD Card: Up to 70 MB per second
  • 128 GB Sony SF-E Series SD Card: Up to 120 MB per second
  • 256 GB Sony SF-E Series SD Card: Up to 120 MB per second
  • 64 GB Sony SF-M Series SD Card: Up to 150 MB per second
  • 128 GB Sony SF-M Series SD Card: Up to 150 MB per second
  • 256 GB Sony SF-M Series SD Card: Up to 150 MB per second

SDR104 Write Speed

When it comes to maximum writing speeds in SDR104 mode, the 64GB SF-M is 20 MB per second faster (or 28.57% faster) than the 64GB SF-E.

Otherwise, the max write speeds when using SDR104 for the 128GB and 256GB are identical.

You can take a look at the SDR104 write speed below:

  • 64 GB Sony SF-E Series SD Card: Up to 70 MB per second
  • 128 GB Sony SF-E Series SD Card: Up to 90 MB per second
  • 256 GB Sony SF-E Series SD Card: Up to 90 MB per second
  • 64 GB Sony SF-M Series SD Card: Up to 90 MB per second
  • 128 GB Sony SF-M Series SD Card: Up to 90 MB per second
  • 256 GB Sony SF-M Series SD Card: Up to 90 MB per second

Software

For software, both SD cards use File Rescue, a program that helps you recover deleted files.

The SF-M also supports the SD Scan Utility, a software that helps you monitor the current health of your memory card.

Operating Temperature Range

The Sony SF-E Series UHS-II SD Memory Card and Sony SF-M Series UHS-II SD Memory Card have the same operating temperature range of -13℉ to 185℉ (Non-Condensing).

Dust and Water Protection

The two cards have been rated IP57.

For dust, some particles may get through the insides of the product but the amount won’t be enough to damage the cards.

For water, these SD cards can be submerged underwater at a depth of up to 1 meter for a maximum duration of 30 minutes.

Resources:

What’s the difference between the TOUGH-G and TOUGH-M?

Sony currently has two types of TOUGH SD Cards. So, what are the main differences between the TOUGH-G and TOUGH-M?

You can find out in this comparison guide for the two series.

Quick Summary

When compared to the Sony TOUGH-M Series UHS-II SD Card, the Sony TOUGH-G Series UHS-II SD Card has a slightly faster maximum reading speed in HD312 mode. The TOUGH-G is also nearly twice as fast at maximum writing speed in HD312 mode.

If you are using these cards with the SDR104 mode, then both have identical read and write speeds.

Furthermore, the G series has been rated at V90 while the M series has a rating of V60. This means that the G cards are more suitable for up to 8K for filming while the M cards are more suitable for up to 4K capture.

When it comes to capacity options, both versions offer 64 GB and 128 GB. The 32 GB option is limited to the TOUGH-G while the 256 GB option is only available for the TOUGH-M.

The two memory cards are identical when it comes to operating temperature range in addition to protections against dust and water.

SF-G vs. SF-M Comparison Chart

You can check out Seeking Tech’s comparison table for the UHS-II SD Cards below.

Sony TOUGH-G Series UHS-II SD CardSony TOUGH-M Series UHS-II SD Card
Capacity Options32 GB

64 GB

128 GB
64 GB

128 GB

256 GB
Model Numbers32 GB TOUGH-G: SF-G32T

64 GB TOUGH-G: SF-G64T

128 GB TOUGH-G: SF-G128T
64 GB TOUGH-M: SF-M64T

128 GB TOUGH-M: SF-M128T

256 GB TOUGH-M: SF-M256T
Usable Capacity32 GB TOUGH-G: 28.8 GB

64 GB TOUGH-G: 57.6 GB

128 GB TOUGH-G: 115.2 GB
64 GB TOUGH-M: 57.6 GB

128 GB TOUGH-M: 115.2 GB

256 GB TOUGH-M: 230.4 GB
InterfaceUHS-IIUHS-II
Format32 GB TOUGH-G: SDHC

64 GB TOUGH-G: SDXC

128 GB TOUGH-G: SDXC
64 GB TOUGH-M: SDXC

128 GB TOUGH-M: SDXC

256 GB TOUGH-M: SDXC
SD Speed ClassClass 10Class 10
UHS Speed ClassU3U3
Video Speed ClassV90V60
Read/Transfer Speed in HD312 modeUp to 300 MB per secondUp to 277 MB per second
Read/Transfer Speed in SDR104 modeUp to 95 MB per secondUp to 95 MB per second
Write Speed in HD312 modeUp to 299 MB per secondUp to 150 MB per second
Write Speed in SDR104 modeUp to 90 MB per secondUp to 90 MB per second
Supported SoftwareFile Rescue

SD Scan Utility
File Rescue

SD Scan Utility
Operating Temperature Range-13℉ to 185℉ (Non-Condensing)-13℉ to 185℉ (Non-Condensing)
Dust and WaterproofingIP68IP68
PricingCheck price on Amazon.(#CommissionsEarned)Check price on Amazon.(#CommissionsEarned)

Capacity Options

The TOUGH-G is the only one of the two to offer a 32 GB capacity option while the TOUGH-M is the only one to offer a 256 GB capacity option.

You can get the 64 GB and 128 GB capacities for both series.

You can check out a breakdown of the available capacity options for the two products below:

Sony TOUGH-G series SD UHS-II Card:

  • 32 GB
  • 64 GB
  • 128 GB

Sony TOUGH-M series SD UHS-II Card

  • 64 GB
  • 128 GB
  • 256 GB

Model Numbers

You can also take a look at the model numbers for each SD card below:

  • 32 GB TOUGH-G: SF-G32T
  • 64 GB TOUGH-G: SF-G64T
  • 128 GB TOUGH-G: SF-G128T
  • 64 GB TOUGH-M: SF-M64T
  • 128 GB TOUGH-M: SF-M128T
  • 256 GB TOUGH-M: SF-M256T

Usable Capacity

When you compared the same capacities, the 64 GB and 128 GB versions of the TOUGH-G and TOUGH-M have identical usable capacity.

You can check out the amount of free space available for all of the SD cards below:

  • 32 GB TOUGH-G: 28.8 GB
  • 64 GB TOUGH-G: 57.6 GB
  • 128 GB TOUGH-G: 115.2 GB
  • 64 GB TOUGH-M: 57.6 GB
  • 128 GB TOUGH-M: 115.2 GB
  • 256 GB TOUGH-M: 230.4 GB

Interface

Both the TOUGH-G and TOUGH-M utilize the UHS-II interface.

Format

The 32 GB TOUGH-G uses SDHC as the format.

The 64 GB and 128 GB versions of the TOUGH-G and TOUGH-M, as well as the 256 GB TOUGH-M, use the SDXC format.

SD Speed Class

All the SD cards in this comparison guide have a Class 10 rating, which means that these devices have a minimum SD write speed of 10 MB per second.

UHS Speed Class

The Sony TOUGH-G and TOUGH-M have the same U3 rating. This means that both have a minimum UHS speed of 30 MB per second.

Video Speed Class

The TOUGH-G Series UHS-II SD Card has a V90 video speed class rating as it is able to achieve a minimum sustained write speed of 90 MB per second. This makes the card suitable for filming 8K videos.

The TOUGH-M Series UHS-II SD Card has a V60 video speed class rating, which means that it has a minimum sustained write speed of 60 MB per second. So, the M card is used mainly for capturing 4K videos.

Read/Transfer Speed in HD312 mode

The TOUGH-G has a higher maximum read/transfer speed than the TOUGH-M when using the HD312 mode.

According to Sony’s internal testing, the G card is 23 MB per second faster than the M card. This translates to an 8.30% advantage.

You can check out the HD312 read/transfer speeds below:

  • Sony TOUGH-G series SD UHS-II Card: Up to 300 MB per second
  • Sony TOUGH-M series SD UHS-II Card: Up to 277 MB per second

Read/Transfer Speed in SDR104 mode

The two SD cards in this versus guide have the same read/transfer speed when using the SDR104 mode.

You can check out the SDR104 reading/transferring speed specifications below:

  • Sony TOUGH-G series SD UHS-II Card: Up to 95 MB per second
  • Sony TOUGH-M series SD UHS-II Card: Up to 95 MB per second

Write Speed in HD312 mode

When it comes to maximum writing speeds in HD312 mode, the TOUGH G is 149 MB per second faster than the TOUGH M. Thus, the G series has a 99.33% advantage in this category.

You can check out the HD312 write speeds for both below:

  • Sony TOUGH-G series SD UHS-II Card: Up to 299 MB per second
  • Sony TOUGH-M series SD UHS-II Card: Up to 150 MB per second

Write Speed in SDR104 mode

The TOUGH-G and TOUGH-M have identical maximum writing speeds when SDR104 mode is used.

You can find the SDR104 write speeds below:

  • Sony TOUGH-G series SD UHS-II Card: Up to 90 MB per second
  • Sony TOUGH-M series SD UHS-II Card: Up to 90 MB per second

Supported Software

Both products support the following software:

  • File Rescue
  • SD Scan Utility

File Rescue will help you recover accidentally deleted files while the SD Scan Utility will help you check on the health status of your SD card.

Operating Temperature Range

The TOUGH-G and TOUGH-M have the same recommended operating temperature range of -13℉ to 185℉ (Non-Condensing).

Dust and Waterproofing

Both of the TOUGH SD cards in this comparison have been rated IP68. This mean that the cards are completely protected against dust particles as well as being able to withstand being dropped underwater at a depth of up to 16 feet for a maximum of 72 hours.

Resources: