How to check if a PS1 or PSP game supports trophies on PS5

With the introduction of the PlayStation Plus Deluxe and PlayStation Plus Premium subscriptions, select emulated PS1 and PSP games are now officially playable on the PlayStation 5.

When it comes to these classic titles, Sony has made trophy support optional. To see how you can check if a PS1 or PSP game supports trophies on your PlayStation 5 or PlayStation 5 Digital Edition console, you can take a look at this tutorial from Seeking Tech.

How to check if a PS1 or PSP game have a trophy list on PS5

In order to check if a PSOne or PSP game comes with a trophy list on your PS5 console, then you can take the following steps:

1. If you haven’t done so already, make sure you have already downloaded, installed and played the PSOne or PSP game.

If you have a PlayStation Plus Deluxe or PlayStation Plus Premium subscription, then you can download select PS1 and PSP games at no additional costs.

If you bought a PS1 or PSP game, such as Wild Arms, previously on a PS3, PSP or PS Vita, then you may be able to download it for free on the PlayStation Store of your PlayStation 5 console.

2. After you played the PS1 or PSP game, then you can go to the Trophies menu of your PS5.

One of the methods to do so is to use the quick menu by doing the following:

  • Press the PS button.
  • In the quick menu, select your profile picture, which should be next to the power icon at the bottom of the screen.
  • You then need to select Trophies from the pop-up menu.

For the second method, you can use the home screen by taking the following steps:

  • First off, make sure you are in the home screen, which is the main navigation menu where you can select a game to launch. If you are somewhere else, then you can press the PS button and then select the home icon at the bottom of the screen. Alternatively, you can press and hold the PS button until the home menu shows up.
  • From the home screen, select your profile picture, which is located on the top right corner next to the clock display.
  • In the pop-up menu, select Trophies.

3. After getting to the Trophies menu, you will set trophy lists for the games you have played. The screen will list the most recently play titles on top.
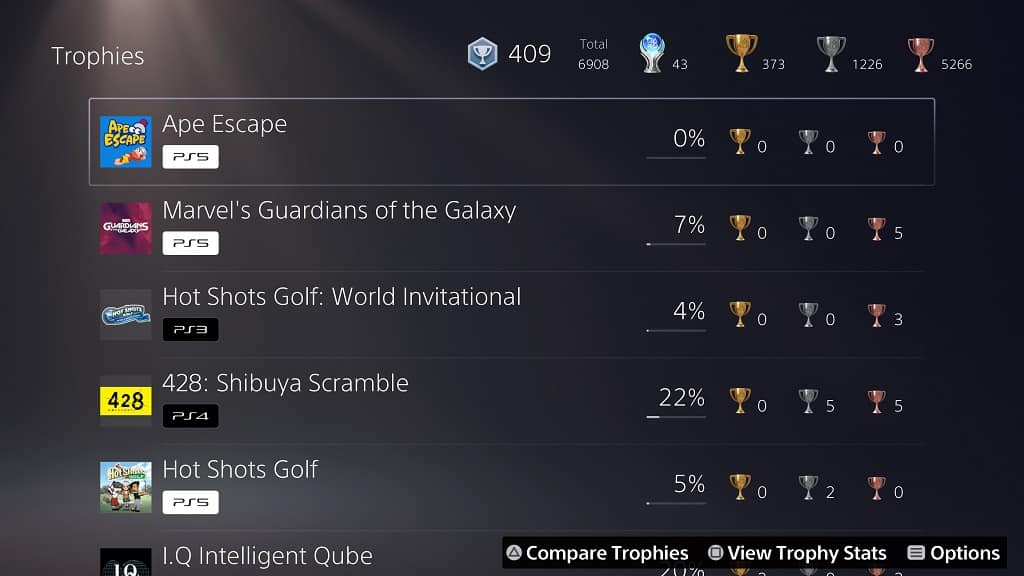
If you don’t see a trophy list for the PS1 or PSP game that you were playing, then this indicates that the game does not come with trophy support.

How to check if a PS1 or PSP game supports trophies before playing it

If you want to check if a PS1 or PSP game supports trophies before you play it, then we recommend searching for the game at Exophase. If you don’t see a trophy list for the game on PS5, then it means that you won’t be able to earn any trophies when playing it.

How to sync PS3 trophies on PlayStation 5

The PlayStation Plus Premium is a new plan that will let you play select PlayStation 3 games on your PlayStation 5 or PlayStation 5 Digital Edition system over the cloud via streaming. Some of these classic titles come with trophy support.

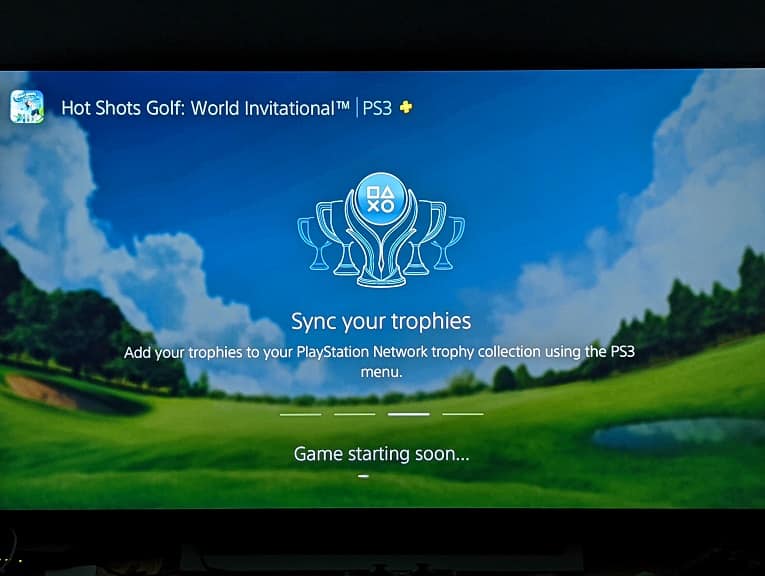
If you don’t sync the PlayStation 3 trophies, however, then they won’t show up in your PlayStation Network account.

To see how you can properly sync the trophy list for these classic releases, you can take a look at this article from Seeking Tech.

1. If you haven’t done so already, make sure you are currently streaming the game that has the trophies that you are trying to sync.

For the uninformed, you need a PlayStation Plus Premium subscription in order to play PlayStation 3 games over the cloud.

If you have a PlayStation Plus Essential or PlayStation Plus Extra plan instead, then we recommend that you check out this article to see how can upgrade to Premium on your PS5 console.

2. Once you are able to play the PS3 game over streaming, press the PS button on your DualSense controller. Doing so should bring up the quick menu.

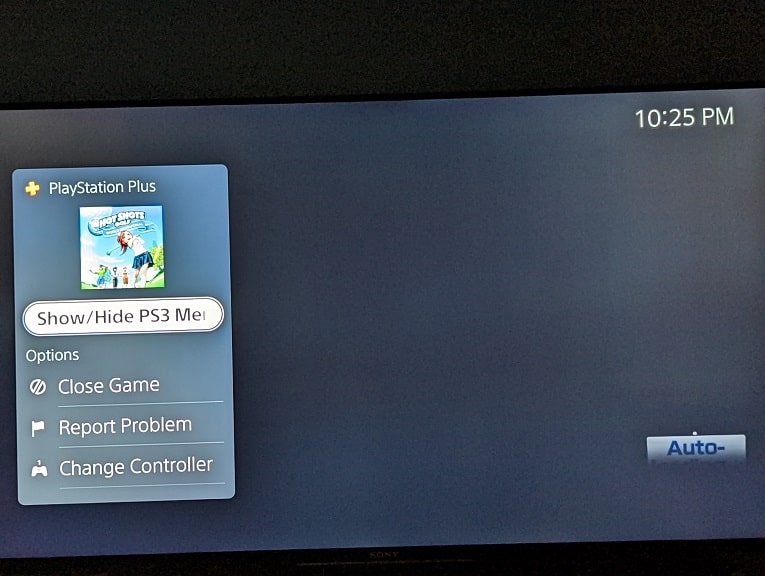
3. In the quick menu, select the “Now streaming” card that contains the name of the PS3 game that you are currently playing.

4. In the next menu, select the “Show/Hide PS3 Menu” option.

5. You should now be in the abbreviated cross media bar (also known as XMB) menu of the remote PS3 system.

Here, you need to scroll right in order to get to the PlayStation Network column.

6. After getting to the PlayStation Network column, select Trophy Collection.

7. The sync operation will then start. This process make take some time to reach 100%.

8. Once the PS3 trophies have been synced online, you should see a list of all the trophies you have earned on your PS3, PS4 and PS Vita.

You aren’t able to view trophies you earned from PS5 games in the cross media bar of the remote PS3 system.

How to view PS3 trophies on PS5

Once you have synced your PS3 trophies, they should appear on the PlayStation 5 menu. To find where the trophy list is located, you need to take the following steps:

1. To start off, head to the home screen. You can do so by pressing the PS button on the DualSense and then selecting the home icon.

2. In the home screen, select your avatar or profile picture located on the top right side of the menu.

3. Next, you need to select Trophies from the pop-up menu.

4. In the Trophies menu, you will find the trophies you earned for PS3 games in addition to titles that were plated on your PS5, PS4 and PS Vita.

The trophy list is sorted by the most recently played. Therefore, you should be able to find the trophies for your PS3 game near the top of the list.

How to find PS3 games on the PS5

PlayStation 3 games can be played on your PlayStation 5 or PlayStation 5 Digital Edition via cloud streaming. If have a hard time trying to find the location for these PS3 titles, then you can take a look at this tutorial from Seeking Tech.

Method #1

For the first method you can use in order to find PlayStation 3 games on your PS5 or PS5 Digital Edition system, you can try doing the following:

1. First off, you need to open the PlayStation Plus App from the home menu.

For the uninformed, the home menu is where you can pick out which game to open. If you aren’t there, then you can head over to it by pressing the PS button on your DualSense controller and then selecting the house icon located at the bottom of the screen.

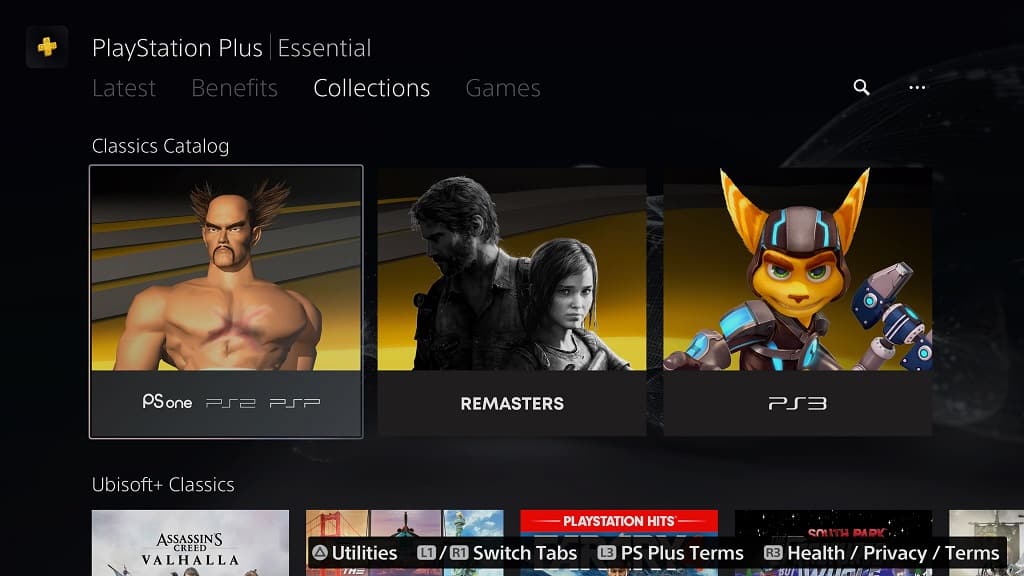
2. After opening the PlayStation Plus App, press the R1 button several times until you switch over to the Collections tab.

3. In the Collections tab, scroll down until you see the Classic Catalog section.

4. From the Classic Catalog section, select PS3.

5. You should now be in the PlayStation Plus Classics Catalog – PS3 menu.

Here, you can sort the listing by selecting the Sort and Filter icon, which has a down-pointing arrow and three horizontal lines, located on the left side of the screen. You can then select the “Sort by” option, which will give you the following sorting setups:

  • Default
  • Name (A to Z)
  • Name (Z to A)
  • Release Date (Old to New)
  • Release Date (New to Old)
  • Recently Added to PS Plus

In the Sort and Filter menu, you can also filter the PS3 games listing by game genres as you can change it to only show shooters, role-playing games, fighters, sports, horror and more.

Method #2

You can also take the following steps in order to find PS3 games that can be streamed on your PlayStation 5 or PlayStation 5 Digital Edition console:

1. To begin, open the PlayStation Plus App on your PS5.

2. With the application opened, press the R1 button a few times until you get to the Games tab.

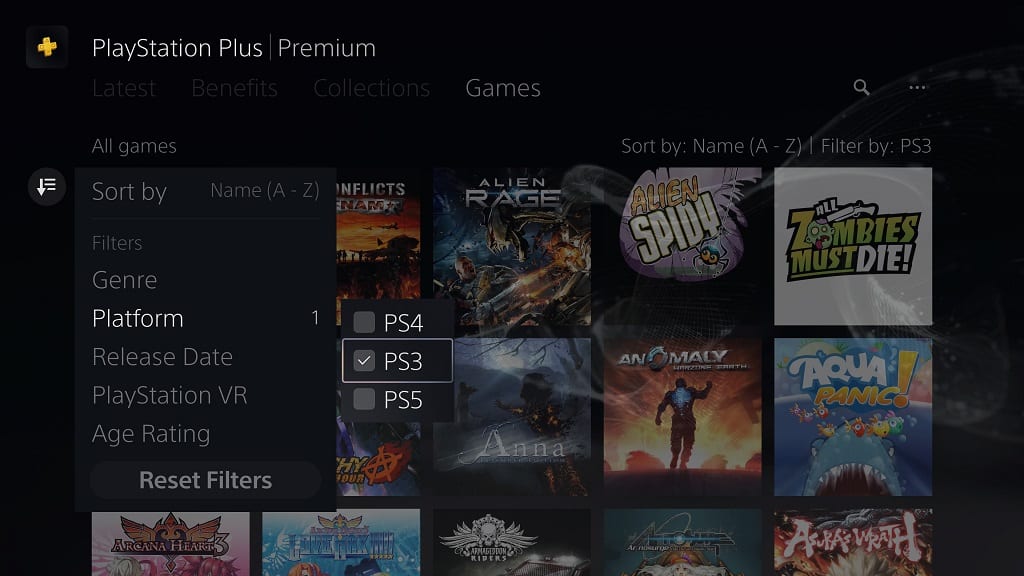
3. After getting to the Games tab, select the Sort and Filter option located on the left side.

4. In the pop-up menu, select Platform.

5. Next, make sure that only the PS3 option is selected.

6. You should now be able to see a list of PlayStation 3 games that can be streamed on your PS5.

7. You can also use the Sort and Filter menu to change the PS3 video games listing to your liking.

In order to be able to stream PS3 games on your PlayStation 5 or PlayStation 5 Digital Edition system, you need to subscribe to the PlayStation Plus Premium service.

Keep in mind that not all regions support the Premium tier. With that said, Sony is planning to add more regions for game streaming in the future.

How to change graphical settings for PS1/PSP games on the PS4 and PS5 consoles

Emulated PS1 and PSP video games were recently added to the PlayStation 4, PlayStation 4 Pro, PlayStation 5 and PlayStation 5 Digital Edition consoles. These classic releases come with multiple graphical settings.

To see how you can customize the filters and aspect ratios for the PS1 and PSP games running on the modern PlayStation systems, you can take a look at this tutorial from Seeking Tech.

How to change filters for PS1 and PSP games on PS4 and PS5 consoles

In order to change filters for the PS1 and PSP games running on the PlayStation 4 or PlayStation 5, you need to take the following steps:

1. To start off, make sure that you are currently playing a PS1 or PSP emulated game on your PlayStation 4, PlayStation 4 Pro, PlayStation 5 or PlayStation 5 Digital Edition console.

2. While playing a classic game, press the Options button on your DualShock 4 or DualSense to bring up the emulation menu.

3. Inside of the emulation menu, scroll down and then select Settings.

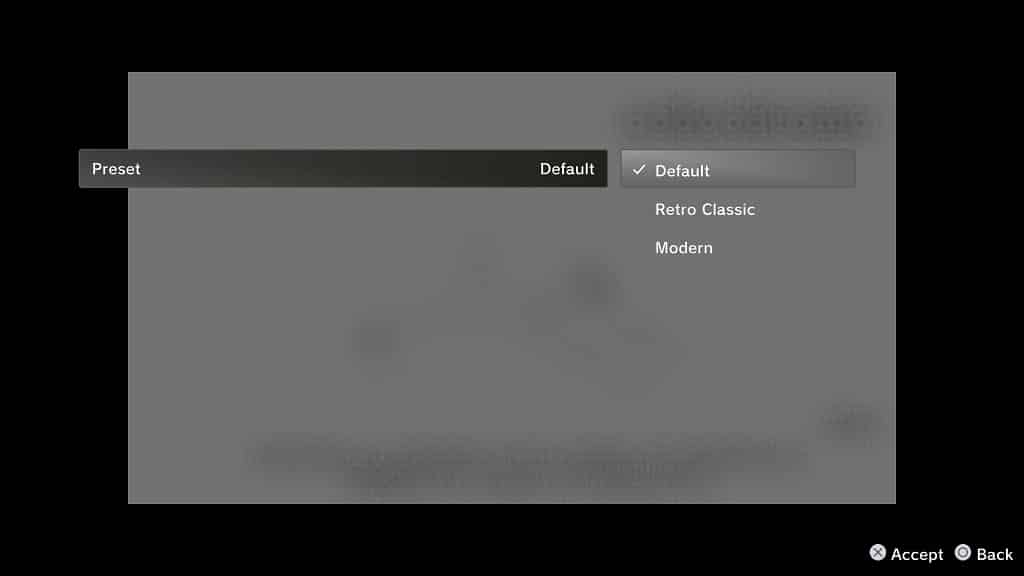
4. After getting to the Settings menu, select Preset.

5. In the next screen, press the X button to bring up a list of Preset settings.

6. When it comes to filters, you can choose between Default, Retro Classic or Modern.

Retro Classic is designed to mimic the visual effects of CRT television sets while Modern will give the game a similar look to what you may expect from newer games when it comes to color.

7. After making your choice of filter, you can press the Options button to return to the game and see the change implemented.

How to change the aspect ratio for PS1 and PSP games on PS4 and PS5 consoles

To change the aspect ratio for the emulated PS1 and PSP games running on the PS4 and PS5 consoles, you need to do the following:

1. While playing the classic game, press the Options button on your controller to bring up the emulation menu.

2. From the emulation menu, select Settings.

3. In the Settings menu, scroll down and then select Video.

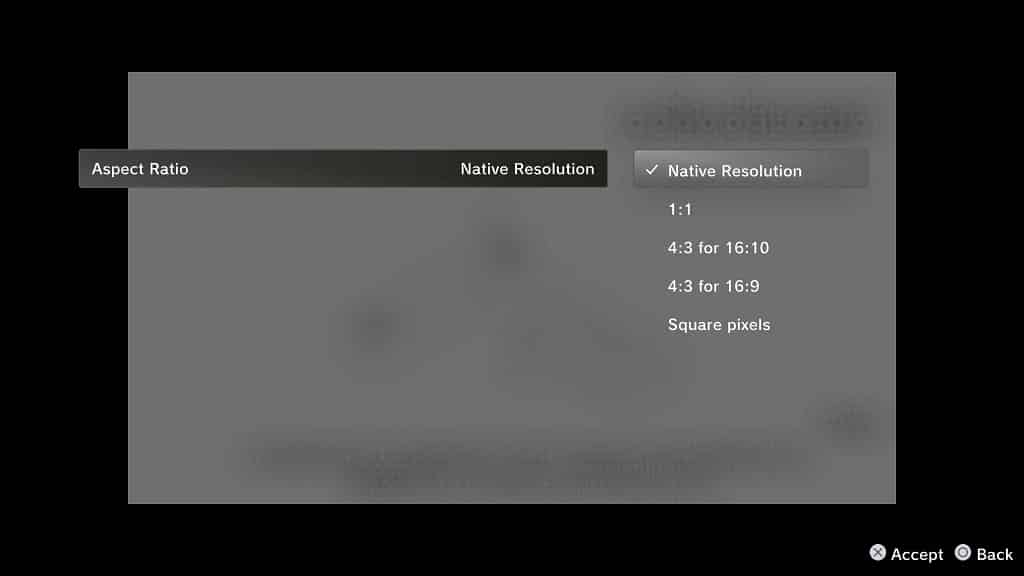
4. Next, you need to select Aspect Ratio.

5. Press the X button on the controller to bring up a list of aspect ratio options.

6. You can choose between the following:

  • Native Resolution
  • 1:1
  • 4:3 for 16:10
  • 4:3 for 16:9
  • Square Pixels
  • Wide Zoom (Stretched)

The Native Resolution option will display the game at its original resolution, which means that the display area will be extremely small if you are using a 4K television set.

The 4:3 for 16:9 option is the most accurate if you have a normal 4K television set. The 4:3 for 16:10 option is for slightly wider screens.

If you don’t want any black bars, then we you might want to consider using the Wide Zoom (Stretched) option.

Both the 1:1 and Square Pixels options makes the display area look squish. Therefore, we recommend using the 4:3 for 16:9 option instead.

7. Once you are done making your selection, you can press the Options button to return to the game and view the new aspect ratio.

How to rewind and quick save PS1/PSP games on the PS4 and PS5 consoles

With the PlayStation Plus service being expanded to PlayStation Plus Essential, PlayStation Plus Extra, PlayStation Plus Deluxe and PlayStation Plus Premium, emulated PS1 and PSP games are now playable on modern PlayStation consoles.

These classic titles come with rewind and quick save features. To see how you can properly use both of these functions when playing emulated PS1 and PSP games on your PlayStation 4, PlayStation 4 Pro, PlayStation 5 or PlayStation 5 Digital Edition system, you can take a look at this guide at Seeking Tech.

How to rewind PS1 and PSP games when playing on PS4 and PS5

In order to rewind an emulated PS1 or PSP game when playing on your PlayStation 4 or PlayStation 5 console, you need to take the following steps:

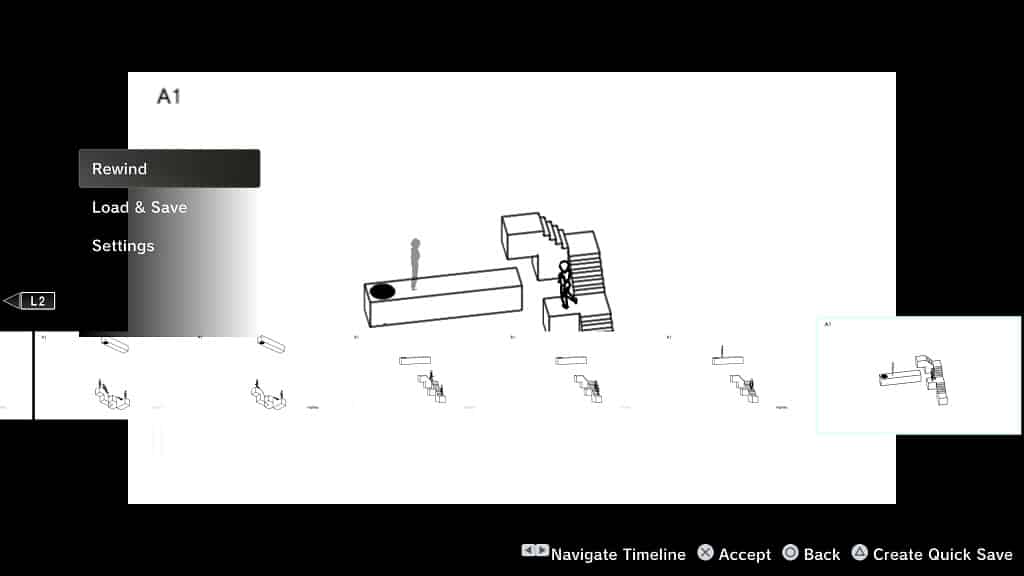
1. When playing an emulated PS1 or PSP game, press the Options button on your DualShock 4 or DualSense controller.

2. If done correctly, you should open up the rewind menu.

3. In the rewind menu, you can navigate by using moving the left analog stick of your controller to the left or right. You can use also the left and right directional pad, as well as the L2 and R2 buttons, to navigate the timeline.

4. Once you get to your preferred time period that you want to rewind back to, press the X button to accept your choice.

5. You should now be bought back to an earlier section of the game you are currently playing.

6. If you want to go further back, then you need to press the Options button again to open the Rewind menu.

Keep in mind that you can’t go forward to any point in the timeline.

How to quick save PS1 and PSP games when playing on PS4 and PS5

In order to use the quick save feature when playing emulated PS1 or PSP games on your PlayStation 4 or PlayStation 5, you need to do the following:

1. Press the Options button on the DualShock 4 or DualSense when playing the game.

2. Next, you can navigate the timeline to highlight where you want to create the quick save file.

3. With the time period highlighted, press the triangle button.

4. In the next screen, select a save slot.

If you are overwriting an old save, then you will get a message asking if you really want to overwrite your save. Press the X button to confirm the overwrite.

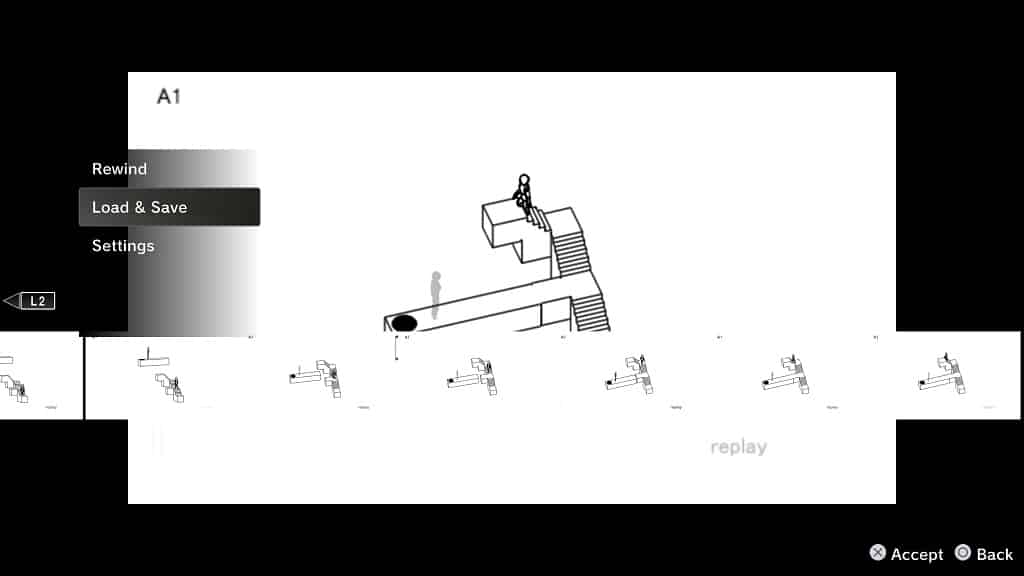
5. You can also create a save without using the timeline by moving down to the Load & Save section in the rewind menu and then pressing the X button. In the Load & Save menu, you need to select the Save option and then pick your save slot.

How to load a quick save for PS1 and PSP games when playing on PS4 and PS5

If you want to load a quick save that you previously created from an emulated PS1 or PSP game on your PlayStation 4 or PlayStation 5 system, then you need to take the following steps:

1. When you are playing the emulated PS1 or PSP game, press the Options button on your controller.

2. Next, scroll down and then select the Load & Save option.

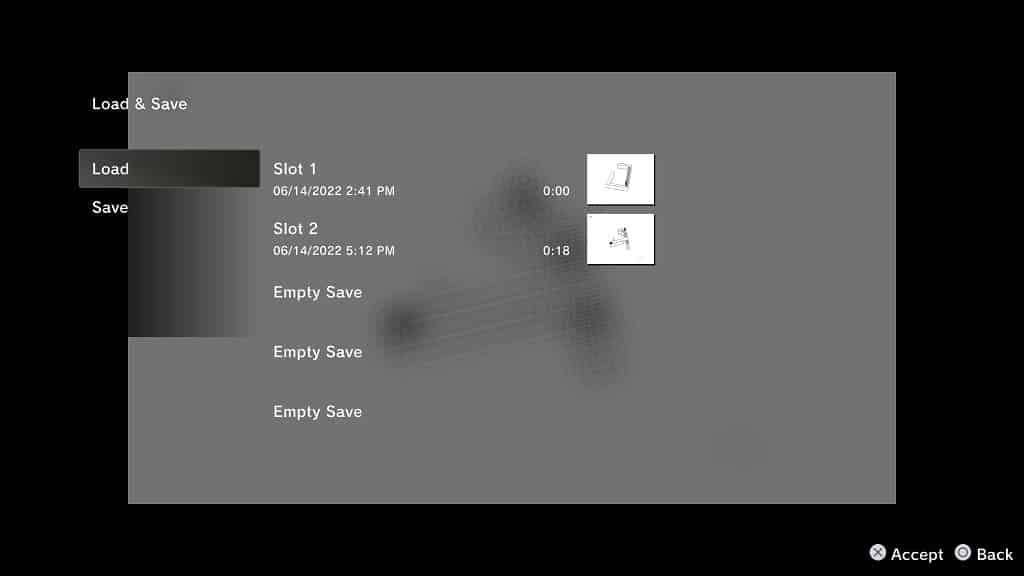
3. In the Load & Save menu, select Load.

4. Next, you can select the save file that you want to load into.

5. In the Load Save pop-up notification, press the X button to confirm the quick save file that you want to load into.

How to disable auto-renew for PlayStation Plus Essential, Extra, Deluxe or Premium on PS5

With the launch of the expanded PlayStation Plus service, Sony has changed the process when it comes to disabling the auto-renew feature.

To see how you can stop the PlayStation Store from charging you when your Plus subscription expires on the PlayStation 5 or PlayStation 5 Digital Edition system, you can take a look at this guide at Seeking Tech.

About the Auto-Renew feature for PlayStation Plus Essential, Extra, Deluxe and Premium

With the re-launch of the PlayStation Plus, Sony has changed the auto-renew feature. In order to disable auto- renew, you now need to cancel your subscription instead.

When you cancel your Essential, Extra, Deluxe or Premium plan, you don’t get a refund. Instead, your subscription won’t be renewed once it expires.

Keep in mind that, even if you cancelled the plan, you will still get all the benefits for the remaining length of time that you previously paid for.

It is important to note that the auto-renew feature will automatically turn on when you reactivated your PlayStation Plus subscription or change your plan.

Method #1: PlayStation Store App

In order to disable auto-renew for your PlayStation Plus Essential, Extra, Deluxe or Premium plan via the PlayStation Store App on the PS5, you need to take the following steps:

1. From the home menu of your PlayStation 5 or PlayStation 5 Digital Edition console, go to the PlayStation Store App, which you can do by selecting the shopping bag icon.

2. Inside of the shopping application, select the More option. You can find its icon, which has three dots, on the top right corner of the screen.

3. In the pop-up menu, you need to select the Subscription options.

4. After getting to the Subscription menu, you then need to select PlayStation Plus.

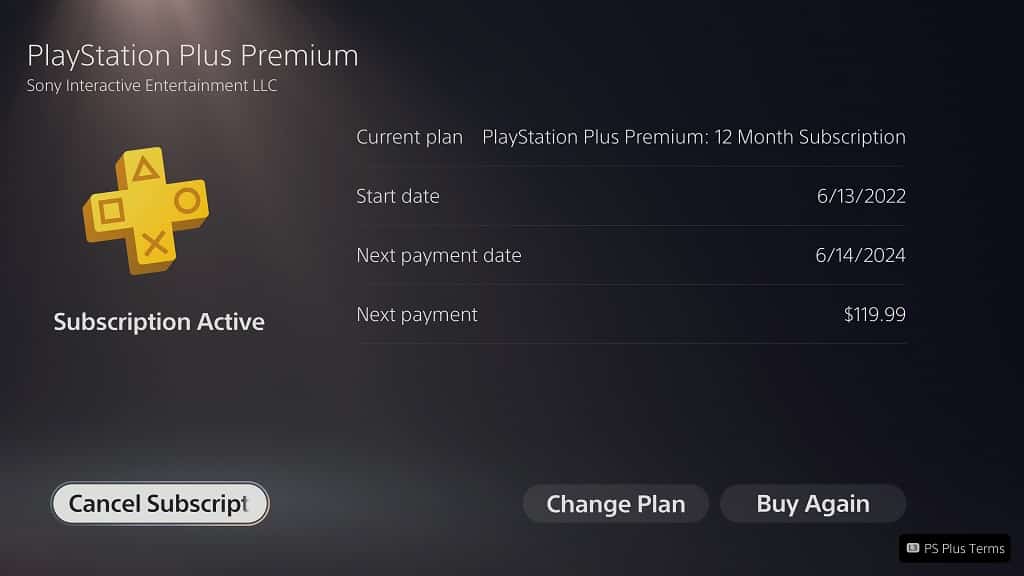
5. In the next screen, you should see your current PlayStation Plus plan as well as its start date, next payment date and next payment amount.

Here, you need to select the Cancel Subscription option located on the bottom left corner.

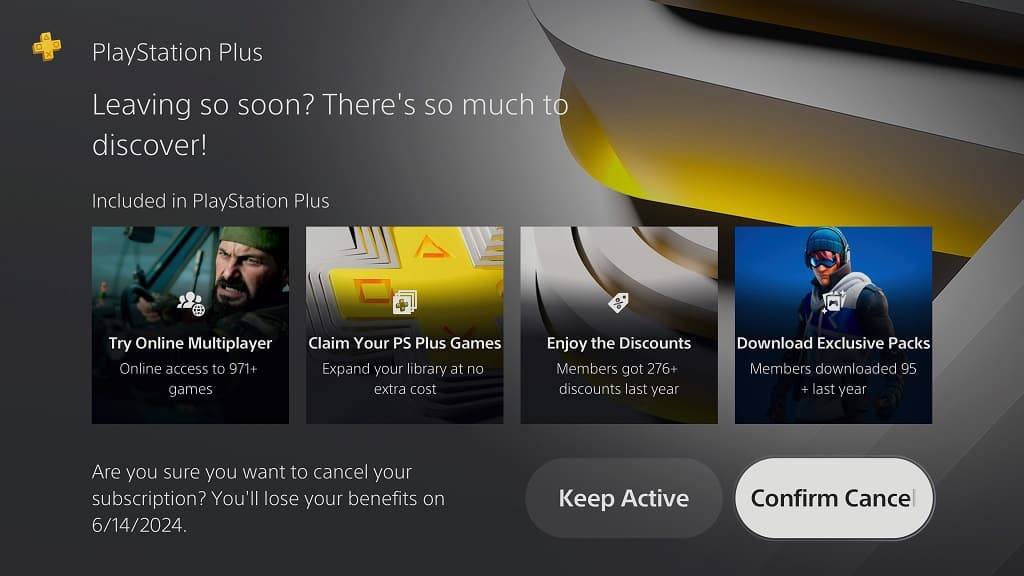
6. On the “Leaving so soon? There’s so much to discover!” screen, select Confirm Cancellation.

7. In the Confirm Cancellation screen, you can provide feedback as to why you are cancelling your PlayStation Plus plan. Otherwise, you can select the Continue option to disable your subscription from auto-renewing.

Method #2: PlayStation Plus App

If you want to disable auto-renew for the PlayStation Plus Essential, Extra, Deluxe or Premium subscription via the PlayStation Plus App on your PlayStation 5 console, then you need to do the following:

1. Open the PlayStation Plus App from the home menu of your PS5.

2. In the PlayStation Plus App, select the More option located on the top right corner.

3. Next, you need to select Manage Subscription from the pop-up menu.

4. You then need to select the Cancel Subscription option.

5. Afterwards, select Confirm Cancellation in the “Leaving so soon? There’s so much to discover!” menu.

6. On the next page, you can tell Sony why you are cancelling your plan.

To continue with the cancellation, and therefore disabling auto-renew, you need to select Confirm Cancellation.

How to find PS1, PS2, PSP and PS3 games via the PS Plus App on PlayStation 5

The PlayStation Plus App on the PlayStation 5 and PlayStation 5 Digital Editions systems has been updated with a new look to reflect the changes to the subscription service.

To see how you can find the PS1, PS2, PSP and PS3 games with the revamped application, you can take a look at this guide from Seeking Tech.

How to access to PlayStation Plus App on PS5

In order to access the PlayStation Plus App on your PlayStation 5 or PlayStation 5 Digital Edition system, you can take the following steps:

1. Turn on your PS5.

2. Make sure that your console is connected to the internet.

3. You should also make sure that you are signed into your PlayStation Network account.

4. Next, you should go to the home screen, which is the main menu where you can select which game you want to play.

If you aren’t in the home screen, then you need to press the PS button to open the quick menu. Inside of the quick menu, select the house icon that is located on the bottom left side to return home.

5. In the home screen, select the PlayStation Plus app to access it.

Method #1 to finding PS1, PS2, PSP and PS3 games via the PS Plus App

There are multiple ways you can find PS1, PS2, PSP and PS3 games in the PlayStation App of your PlayStation 5 system.

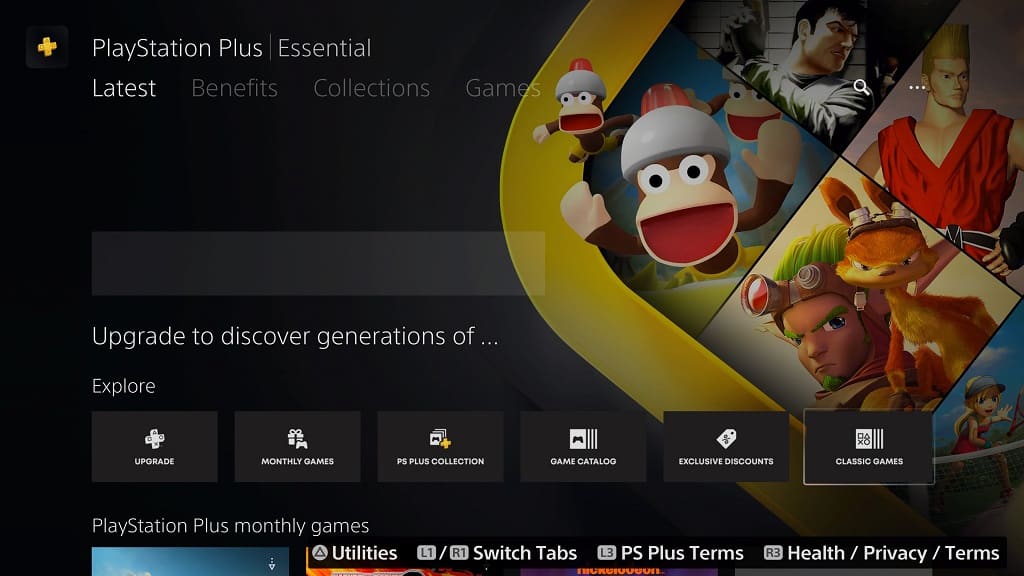
The first method is to select the Classic Games option. You can find this option in the Latest tab in the application.

After arriving at the Classic Catalog section of the PlayStation Plus App, you can select View Games to see all of the PS1, PS2, PSP and PS3 games available for the subscription service.

Alternatively, you can scroll down to view the following categories:

  • PlayStation Plus Classics Catalog – PSP, PlayStation and PS2
  • PS3

You can scroll all the way to the right end of the row of these sections and then select the View All option to see the full list of the games in both of these categories.

Method #2 to finding PS1, PS2, PSP and PS3 games via the PS Plus App

For the second method, you need to switch to the Collections tab in the PlayStation Plus App. Next, scroll down until you see the Classics Catalog, which offers the following categories:

  • PSone, PS2 and PSP
  • Remasters
  • PS3

Select one of these to view the full list of games based on the aforementioned categories.

Keep in mind that you will need a PlayStation Plus Premium subscription to be able to access these PS1, PS2, PS3, PSP games, as well as the remastered titles, at no additional costs.

If you region does not support game streaming, then you can only upgrade to PlayStation Plus Deluxe, which will give you access to PS1, PS2, PSP in addition to the remastered releases. The streaming-only PS3 games aren’t included in the Deluxe plan.

How to upgrade your PlayStation Plus subscription on PS5

The new multi-tiered PlayStation Plus service is now available. To see how you can upgrade your membership to a higher tier on your PlayStation 5 or PlayStation 5 Digital Edition system, you can take a look at this tutorial from Seeking Tech.

How to upgrade your PlayStation Plus subscription on PS5 via the PlayStation Store

To upgrade your PlayStation Plus subscription via the PlayStation Store app on your PS5 console, you can take the following steps:

1. To start off, turn on your game console if you haven’t done so already.

2. You should also make sure that you are signed into the PlayStation Network account that contain your PlayStation Plus membership.

3. You should be in the Home menu, which is where you can open the PlayStation Store App as well as select which game to play. If you aren’t in this menu, then you can press the PS button to bring up the Quick Menu and then select the house icon located on the bottom left of the screen.

4. From the Home menu, go to the PlayStation Store.

5. Inside of the PlayStation Store, select the More option, which is associated with the three dots icon located on the top right side.

6. In the pop-up menu, select Subscriptions.

7. After getting to the Subscriptions menu, select PlayStation Plus.

8. On the next screen, you should see your current PlayStation Plus tier. Here, you need to select the Change Plan option.

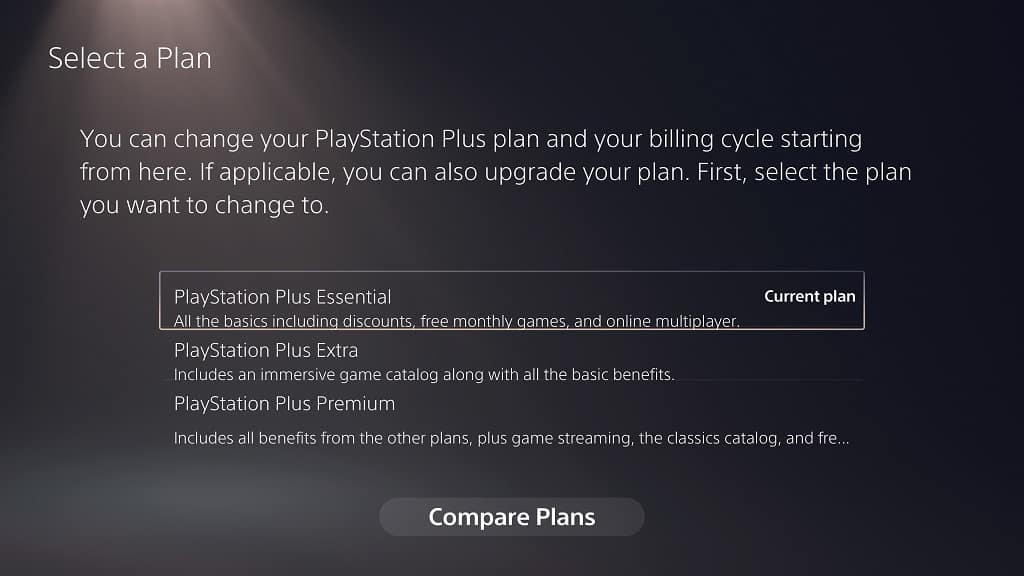
9. From the Select A Plan menu, you will see a list of plans that are currently available in your region.

If you are a little bit confused about the benefits being offered by the new plans, then you can take a look at this comparison.

10. Select the PlayStation Plus tier that you want to upgrade to.

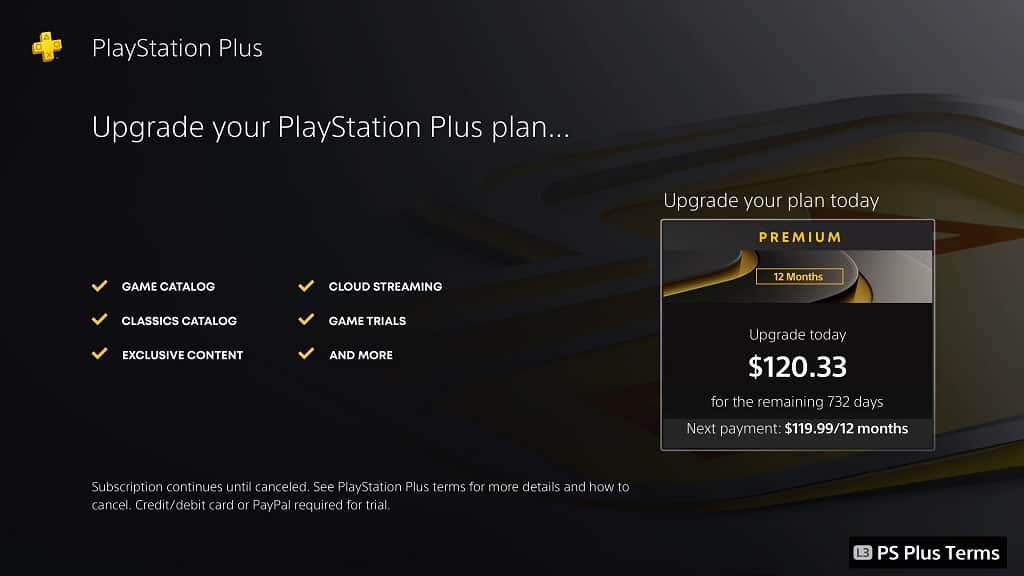
11. In the next screen, you should see the Upgrade Your Plan Today section on the right side.

The section shows how much it will cost to convert the remaining days of your current subscription to the new tier. It will also show the next payment day.

12. Select the Upgrade Your Plan Today option to start the upgrade process.

How to upgrade your Plus subscription on PS5 via the PlayStation Plus App

If you want to upgrade your PlayStation Plus subscription by using the PlayStation Plus App on your PlayStation 5 or PlayStation 5 Digital Edition system, then you need to do the following:

1. If you haven’t done so already, turn on your PS5 and then make sure you are signed into your PSN account that contain the PlayStation Plus subscription.

2. After signing in, select the PlayStation Plus icon in the home menu.

3. Once you are in the PlayStation Plus App, select the More option, which has the three dots icon. You can find it on the top right side next to the search icon.

4. In the pop-up menu, select Manage subscription.

5. You then need to select Change Plan.

6. Afterwards, select the new PlayStation Plus plan that you want to subscribe to.

7. Finally, select the Upgrade Your Plan Today card to start the upgrade process.

How to install and format the Nextorage PS5 SSD

Nextorage has released a M.2 solid state drive, with built-in heat sink, that is compatible with the PlayStation 5 and PlayStation 5 Digital Edition systems. You can check out this tutorial from Seeking Tech to see how you can install and format this SSD for your Sony game console.

Before we start, it should be noted that this guide is going to be based on the following internal storage drives:

  • 1 TB Nextorage PCIe Gen 4.0 NVMe M.2 2280 PS5 SSD with Heatsink (NEM-PA1TB/N SYM)
  • 2 TB Nextorage PCIe Gen 4.0 NVMe M.2 2280 PS5 SSD with Heatsink (NEM-PA2TB/N SYM)

How to insert the Nextorage PS5 SSD

You can take the following steps in order to insert the Nextorage PS5 SSD:

1. If you have any important files currently stored on your Nextorage SSD, then we recommend that you transfer it over to another storage before doing anything else.

This is because you will need to format the drive before you can use it on your PS5 or PS5 Digital Edition console. The formatting process will delete all data you have on the Nextorage SSD.

2. Once you are ready, start by turning off your game console.

3. With the system powered down, remove the stand, cables as well as other accessories you have connected.

4. Next, you need to lay your console down, preferably over a soft surface like a bed or sofa, with the side that has the PS logo facing down.

5. The back side of the PS5 system, which has the HDMI and power ports should be facing you.

6. From your point of view, position your right hand on the bottom right corner of the outer case and then your left hand on the top left corner of the outer case.

7. With your right hand, lift the bottom right corner of the outer case up and then slide it to the left. You may have to use a little force. Make sure you keep your left hand on the top left corner of the outer cover as it may otherwise fly straight off, potentially hurting others or causing damage to other objects.

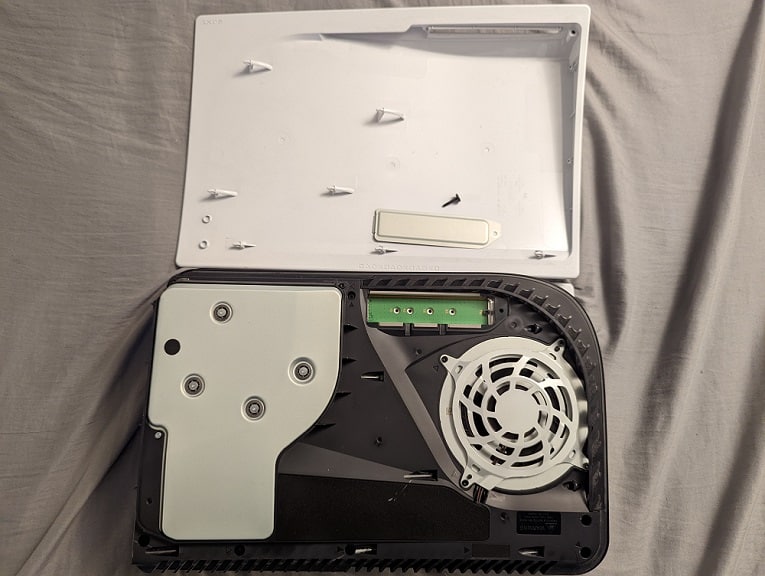
8. With the outer case removed, you should see a rectangular metal cover for the M.2 docking bay of your PlayStation 5 or PlayStation 5 Digital Edition system. Here, you need a cross-head screwdriver to remove the screw and then the metal cover.

9. Now that docking bay is fully accessible, you need to use the cross-head screwdriver to remove the screw and space inside of it.

10. Take the spacer you removed in the previous step and place it into the hole that has been marked with “80.”

11. Afterwards, insert the Nextorage SSD into the M.2 slot starting from a diagonally upwards position.

12. After inserting the storage drive, gently push the other end of it down and then screw it in place in the “80” hole.

13. Once you are done with the installation, you can screw back in the metal cover of the M.2 docking back and then slide the outer case back into place (starting from the left side).

14. Re-attach the stand, cables and any other accessories you previously removed.

How to format the Nextorage PS5 SSD

After inserting the Nextorage PS5 SSD, you can format it for use with your PlayStation 5 or PlayStation 5 Digital Edition by doing the following:

1. Turn on your game system.

2. You should eventually arrive at the M.2 SSD Storage notification screen. Here, you need to press the PS button on the DualSense controller to be able to use it.

3. After gaining control, you need to select Format M.2 SSD.

4. Wait until the formatting process is completed.

5. Once the formatting has completed, you should see the sequential reading speed of your 1 TB or 2 TB Nextorage PCIe Gen 4.0 NVMe M.2 2280 PS5 SSD.

6. Afterwards, select OK to continue to the home screen.

Where to find Nextorage PS5 SSD in the system menus

After formatting the Nextorage PS5 SSD, you can find it in the system menus by taking the following steps:

1. Inside the home screen menu, select the gear symbol located on the top right side to enter into Settings.

2. In Settings, you need to go to Storage.

3. From the Storage menu, you then need to select M.2 SSD Storage from the left column.

4. On the right side, you should find your Nextorage PS5 SSD.

5. With the Storage menu, you can also reformat your Nextorage PS5 SSD, delete game data and move game data between different storage options.

Is there a shortcut for turning off the PS5?

Turning off your PlayStation 5 or PlayStation 5 Digital Edition is helpful if you want to save energy consumption. Not to mention that using the console’s Rest Mode can lead to several issues with some games.

Shutting down the PS5 can be somewhat cumbersome, however, as you have to go through multiple steps. So, is there a shortcut to turning off your console? You can find out in this article at Seeking Tech.

What is the fastest way to shut down the PS5?

Currently, there is no shortcut when it comes to turning off your PlayStation 5 or PlayStation 5 Digital Edition system. While you can unplug the power cord from the system, you will end up potentially damaging it.

Instead, the fastest way to shut down is by doing the following:

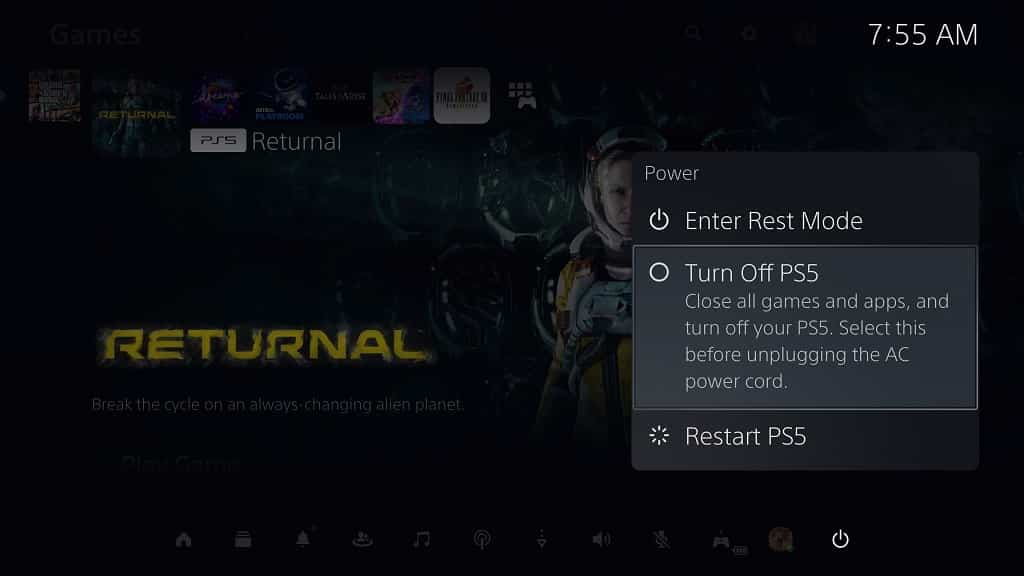
  • Press the PS button on the DualSense in order to bring up the Command Center quick menu.
  • From the Command Center, navigate to the bottom row and then all the way to the right in order to select the Power option.
  • Inside the Power menu, you then need to select Turn Off PS5.

Is there another way to turn off the PS5?

The only other safe method to turn off your PlayStation 5 or PlayStation 5 Digital Edition system is by pressing and holding the power button located directly on the console for around three seconds.

Make sure you hold the buttons for at least three seconds; otherwise, the console will be put in to Rest Mode instead.

Keep in mind that Sony could always add a shutdown shortcut for the PS5 and PS5 Digital Edition in the future to make it faster to turn off the systems. Therefore, we recommend that you keep you console up-to-date by doing the latest firmware. In addition to potentially adding new feature, new firmware versions may also help fix any system-related bugs and/or improve its performance.

If your PlayStation 5 or PlayStation 5 Digital Edition has completely crashed and isn’t responsive, then you won’t be able to turn it off using any of the aforementioned normal methods. Instead, you can take a look at this tutorial to see how you can properly shut down your frozen console.