How to fix issues with PS5 padlocked games

When selecting a game to play on your PlayStation 5 or PlayStation 5 Digital Edition, you may run into a game that has been locked, which is indicated with a white padlock icon on its image.

If you have this problem, then you can follow this guide from Seeking Tech for some potential fixes.

Why games are padlocked on PS5

When a game has a padlock, it means that you don’t have permission to launch and play the software.

This is due to several potential factors:

1. If you played a game via a physical disk on your PlayStation 4 (or PlayStation 4 Pro), the same game will show up as locked on your PlayStation 5 in your Games Library.

2. If you played a game that was purchased on a different user account, then the same game will show up as locked on your PlayStation 5 if you don’t enable “Console Sharing and Offline Play” on your system using the user account that is tied to the purchased game.

3. If you acquired a game through PlayStation Plus on a different user account, the same game will show up as locked on your PlayStation 5 if the account tied to the PS Plus game is no longer subscribed to the PlayStation Plus service.

4. If your PlayStation 5 has parental controls enabled, your parent or guardian may have put an age restriction on the game.

How to restore game license on PS5

The first step we recommend taking is restoring the game license on the PlayStation 5.

To do so, you can take the following steps:

1. Power on your PlayStation 5 or PlayStation 5 Digital Edition and then log in with the user account that was used to purchase the locked games.

2. From the Home Screen main menu, go to the “Settings” option. This is located on the upper tab on the right side of the screen. It is the gear symbol located to the left of your profile image.

3. In the “Settings” menu, select “Users and Accounts.”

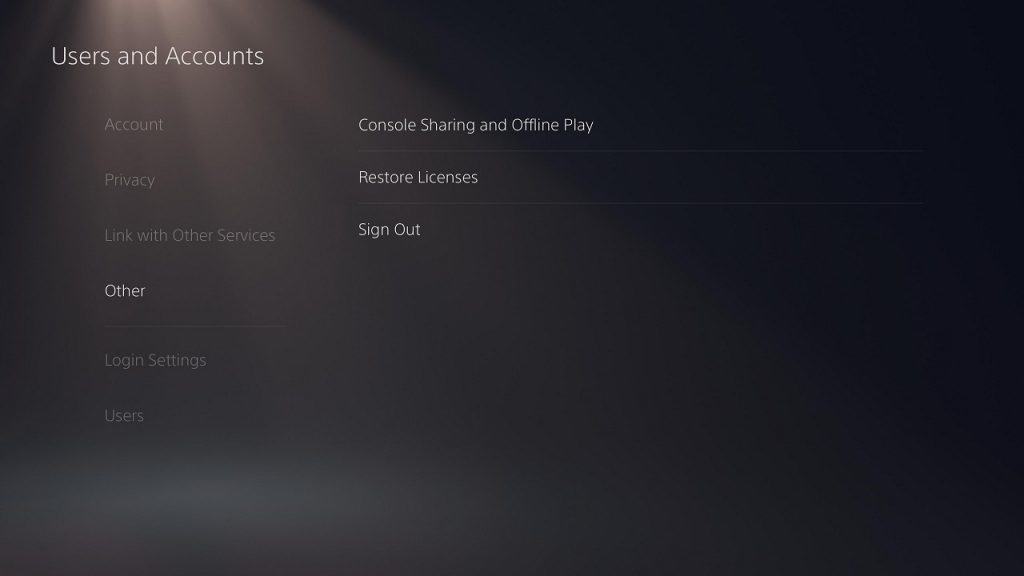
4. In the “Users and Accounts” menu, select “Other” on the left tab and then “Restore Licenses.”

5. Afterwards, select “Restore” to restore the game licenses.

How to enable console sharing on PS5

Other option you can take to fixing the locked game issues is to enable console sharing.

You can do so with the following steps:

1. Turn on your PlayStation 5 or PlayStation 5 Digital Edition and then log in with the user account that was used to purchase the locked games.

2. From the Home Screen main menu, go to the aforementioned “Settings” menu.

3. In “Settings,” go to “Users and Accounts.”

4. In “Users and Accounts,” go to “Other” in the left tab and then select “Console Sharing and Offline Play.”

5. If the top message shows the following message: “You don’t have a PS5 with [Console Sharing and Offline Play] enabled,” then you need to select the “Enable” to turn this feature on.

You can find out more about PS5 game sharing with this tutorial.

Other Potential Fixes

If you believed that you are getting a locked game because you previously play the game on a physical disc on another system, you can try deleting the game data from storage (you can do so by going to the “Storage” menu from “Settings”) and then reinstall the same game (rather if you are using a physical disc or downloading from the PlayStation Store).

If you believed that you are getting a padlocked PlayStation Plus game, you need to resubscribe to the service using the same account that was used originally acquired the game through PS Plus.

If you believed that you are getting unintentionally locked out due to parental controls, then you can go to the “Family and Parental Controls” menu in “Settings” and change some of the settings there.

How to fix the DualSense input lag issues on PS5

When playing your PlayStation 5 or PlayStation 5 Digital Edition, you may get noticeable input lag with the DualSense controller.

If you are experiencing latency issues, then you can follow this guide at Seeking Tech to find some potential fixes.

Potential Fix #1: Enable Game Mode on TV

The first step we recommend taking is to check if your television set has a game mode that is designed to reduce input lag.

Thus, you need to make sure you look in the menus of the TV to see if there is a game mode or something similar to it.

If there is one, then you need to enable it to reduce the input lag of your PlayStation 5 controller.

Potential Fix #2: Remove HDMI Passthrough

The latency you are experiencing with your DualSense may be due to the HDMI passthrough.

If you connect your PlayStation 5 to another device (like a sound system or video capture device) before connecting it you’re your television set, then that may be causing the input lag.

So, if you haven’t done so already, you should try connecting your PlayStation 5 system directly to your television set.

Potential Fix #3: Update the Firmware of TV, PS5 and DualSense

We also recommend updating the firmware of your television set. To do so, make sure you follow the steps provided to you by the TV’s manufacturer.

Furthermore, you should make sure the firmware of your PlayStation 5 and DualSense is up to date. Both the system and controller will automatically download and install updates when your PS5 logged into the PlayStation Network.

Potential Fix #4: Download Latest Patch for Affected Game

If your input lag issues are related to a single game, then you can also try downloading the latest patch for the software. If your PlayStation 5 console is already connected to the network, then it should automatically download the latest patch for the game.

You can also manually force a patch to download by first heading to the game from the Home Screen main menu.

Instead of launching it with the X button, press the Options button (which has three horizontal lines) on your DualSense instead. This will bring up a sub-menu where you can select the “Check for Update” option to see if you have the latest version of the game and will download the title update if you don’t.

Potential Fix #5: Enable Performance Mode

Furthermore, you may try enabling the performance/high frame rate mode from the in-game menu. Higher frame rates will usually reduce input lag by sacrificing visual fidelity.

You can also set up your performance mode preferences to be system wide. To do so, head to “Settings” from the Home Screen main menu (it is located on the upper tab with a gear icon).

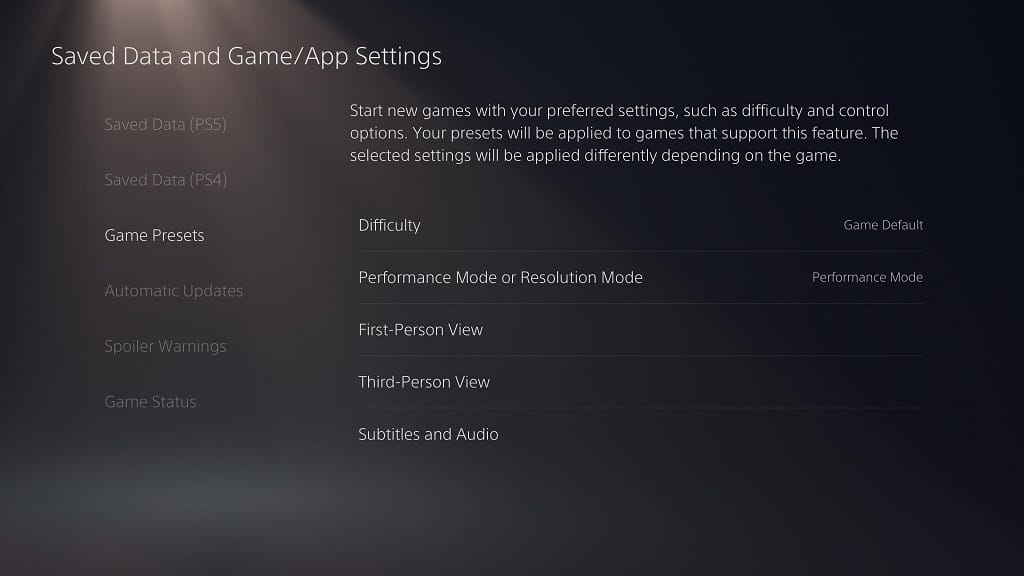
In the “Settings” menu, select “Saved Data and Game/App Settings” and then “Game Presets.”

In the new menu, select “Performance Mode or Resolution Mode” and change that setting to “Performance Mode.”

Potential Fix #6: Restart PS5 and DualSense

If none of the aforementioned fixes do not work, then you can try restarting your PlayStation 5 system and DualSense controller.

To restart the system, press the PS button to bring up the Controls menu. Navigate down and then to the right until you see the “Power” option. Select “Power” and then “Restart PS5” to reboot the system.

To restart your DualSense, press the PS button to bring up the Controls menu. Afterwards, navigate down and then to the right until you see the “Acessories” option. Select “Accessories” and then “Wireless Controller.” In the new sub-menu, select “Turn Off.” After your controller is turned off, press the PS button to turn it back on.

Potential Fix #7: Use Wired Connection for DualSense

You can also try using your DualSense as a wired controller. Your PS5 controller normally uses Bluetooth for connection, which can result in input lag if the signal is hindered in any way.

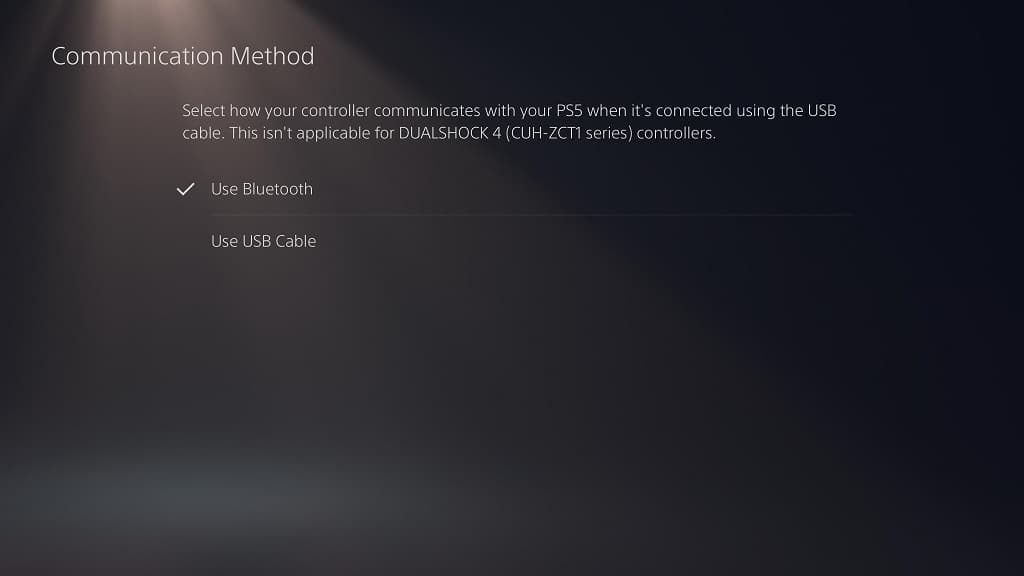
If you are interested in using the wired method, go to “Settings” from the Home Screen. In the “Settings” menu, select “Accessories” and then “Controllers” on the left tab. Afterwards, select “Communication Method” and change it to “Use USB Cable.”

Potential Fix #8: Disable PS4 Tone Mapping

If your input lag is only occurring when you are playing PS4 games on a PlayStation 5 system, you can try disabling HDR tone mapping. This features automatically converts non-HDR games to HDR,which may cause issues with latency.

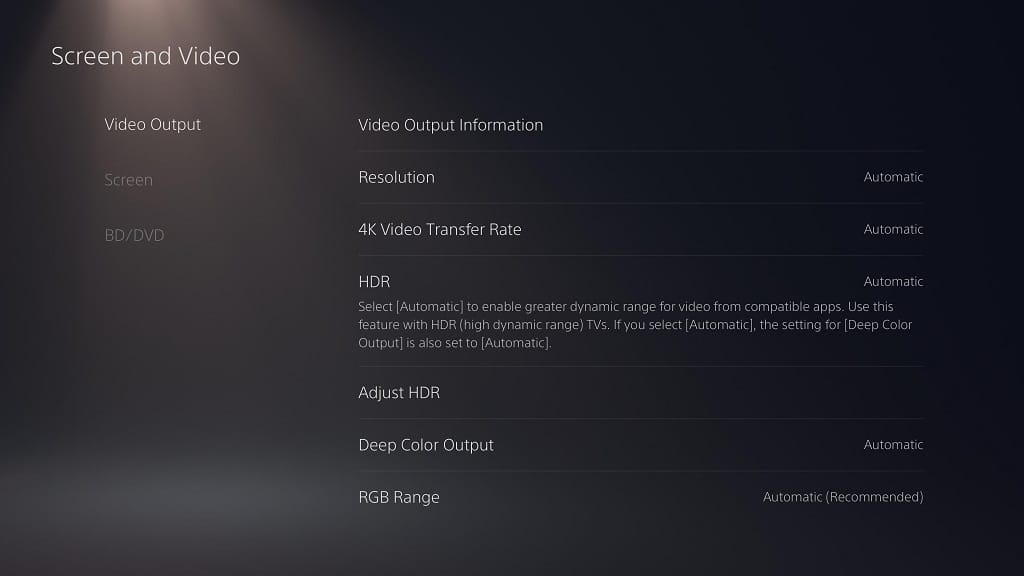
To disable tone mapping, you need to go to “Settings” and then “Screen and Video.” From there, select “Video Output” on the left tab and then “HDR.” In the submenu, select “Off.”

Potential Fix #9: Use DualShock 4 for PS4 Games

If changing the HDR settings did not help reduce the input lag while playing PS4 games on the PlayStation 5, you can try using a DualShock 4 controller with the system to see if it helps.

You can sync your DualShock 4 to the PS5 system by using the USB cable that came with the PS4 console. Once everything is connected, you can press the PS button on the DualShock 4 to sync.

Keep in mind that you can only use the DualShock 4 to play PS4 games on the PS5 system. You will need the DualSense to play PS5 games.

Demon’s Souls not loading on PS5? Here’s how you can fix this error

When you try to launch the Demon’s Souls remake on the PlayStation 5, you may run into an error in which the game may be stuck in the starting screen.

If you are encountering this issue, you can check out this guide at Seeking Tech to find some potential fixes.

How to safely close Demon’s Souls when it isn’t launching

Before trying to shut down or reset your PlayStation 5 due to Demon’s Souls freezing at startup, we recommend manually closing the game as a safety precaution so that you won’t damage your system as Sony doesn’t recommend turning off the console when the internal storage drive is either loading or saving data.

To manually close the game, hold the PS button on your DualSense to bring up the Home Screen main menu.

From there, navigate to the Demon’s Souls icon and then press the Options button on your controller to bring up a sub-menu.

The first option available should be “Close Game.”

Once you manually closed Demon’s Souls, you can check out the following potential fixes.

Potential Fix #1: Resetting the PlayStation 5

The most successful fix for this issue is by simply restarting your PS5 system.

To do it with your controller, press the PS button on your DualSense to bring up the Control Center quick menu.

From here, navigate down to the Controls section at the bottom and then go right to the “Power” option. Select “Power” and then “Restart PS5” to reset the PS5.

Afterwards, try launching the game to see if it will go past the initial splash screen.

Potential Fix #2: Resuming via Activities Card

If the aforementioned fix did not work, try rebooting your PS5 again.

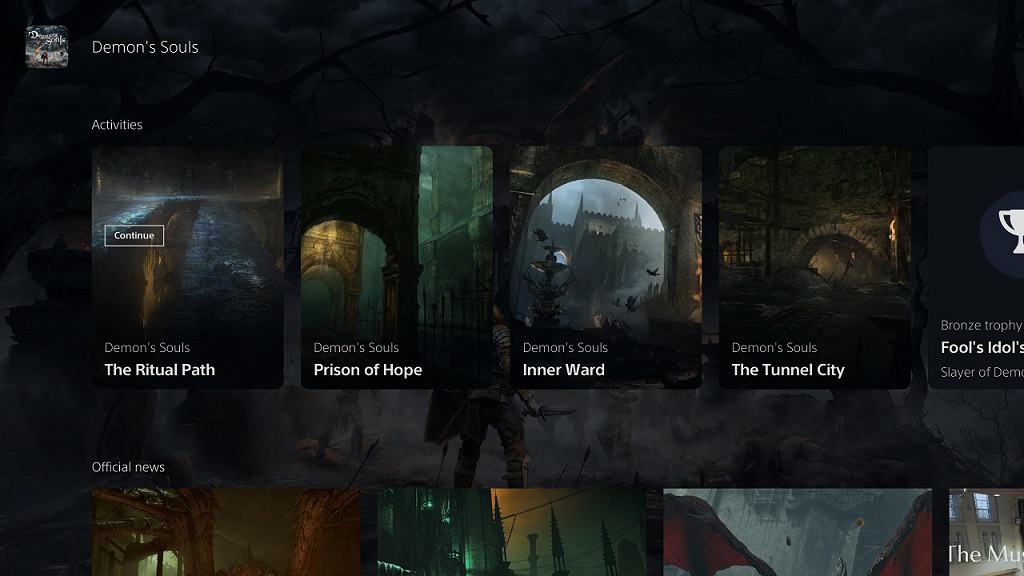
Instead of launching Demon’s Souls from the main menu, press down twice to access the activities cards.

Choose one the cards and then press the square button on your PS5 controller to launch the game.

Potential Fix #3

If you have another game aside from Demon’s Souls in your Game Library, you can also try launching that game to see if it boots up correctly.

If it does, you can manually close the other game and then try launching Demon’s Souls again to see if that works.

Potential Fix #4

If none of the above fixes work, you can try completely shutting down the PlayStation 5 system.

To do so with your game controller, press the PS button to bring up the Control Center quick menu and then press down to go to the Controls section.

From there, go right until you see the “Power” option. Select “Power” and then “Turn Off PS5” to power down the system.

If you are playing Demon’s Souls on disc, you might want to eject it from the disc drive before powering the system off. You can then put the disc back into the system when turning it back on.

Once you power your PS5 back on, you can try testing to see if Demon’s Souls will load past the starting screen.

Potential Fix #5

If the game still won’t start up properly, then you can try deleting and reinstalling the game.

To delete, go to the game from the Home Screen main menu and then press the options button on your DualSense.

Doing so will bring up a sub-menu where one of the options is to delete the game.

After deletion, you can insert the game disc to start the installation process. If you have a digital copy, you can re-download the game from your Game Library menu.

After the game is done installing, press the option button to being up the aforementioned sub-menu and then select “Check for Update” to download the latest patch if there is any available.

Once all of the above is accomplished, try relaunching the game to see if it still flocks up during the initial boot up.

If none of the solutions work, you can try contacting Sony about a potential hardware issue with your PlayStation 5 system.

Compatible desk and wall mounts for Samsung G5

The G5 Odyssey is a new curved gaming monitor from Samsung. You can follow this guide at Seeking Tech if you want to find the most suitable desk mount or wall mount for this computer screen.

Mounting Specs

The Samsung G5 Odyssey Gaming Monitor is available in two screen sizes as you can pick between 27 inches or 32 inches.

You can find the model number, as well as the mounting specifications, for each size below:

Screen Size Options and Model Numbers

  • 27-inch: LC27G55TQWNXZA
  • 32-inch: LC32G57TQWNXDC

Dimensions Without Stand

  • 27” G5 Odyssey Gaming Monitor: 24.20 in. x 15.07 in. x 4.72 in.
  • 32” G5 Odyssey Gaming Monitor: 27.96 in. x 17.30 in. x 5.35 in.

Weight Without Stand

  • 27” G5 Odyssey Gaming Monitor: 9.0 lbs
  • 32” G5 Odyssey Gaming Monitor: 11.7 lbs

VESA Pattern

  • 27” G5 Odyssey Gaming Monitor: 75 mm x 75 mm
  • 32” G5 Odyssey Gaming Monitor: 75 mm x 75 mm

For the uninformed, the VESA Pattern measures the horizontal and vertical distances between the four mounting holes located on the back of a PC monitor.

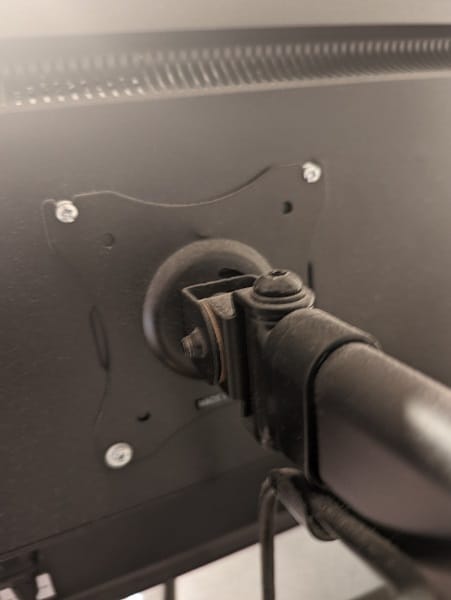
Desk mount example.

Compatible desk mount

If you want to mount the G5 to your computer desk, then we recommend checking out the WALI GSDM001 Premium Single LCD Monitor Desk Mount.

The product will allow you to tilt up to 35 degrees upwards or downwards, swivel up to 90 degrees to the left or right and rotate at up 360 degrees. The maximum height is 23.62 inches while the maximum extension is up to 18.34 inches. Needless to say, you will be able to maneuver your PC display in numerous ways.

The WALI GSDM001 has a weight limit of 17.6 pounds and supports the 75 mm x 75 mm VESA pattern. Thus, it is compatible with both the 27-inch and 32-inch G5 Odyssey Gaming Monitor.

For installation, you can pick between c-clamp or grommet hole. The c-clamp installation supports a 3.1-inch thick desk. The grommet hole supports a 2.75-inch diameter desktop cable grommet hole along with a 1.6-inch thick desk.

The mount comes with a mounting hardware kit as well as 10-year warranty. It is available in black, gray and black/red colors. In addition to a single arm, you can also buy a dual arm or triple arm version.

If you are interested, you can purchase the desk mount on Amazon with the following link:

Compatible free-standing mount

If you don’t want or aren’t able to clamp your G5 screen to a desk, then we recommending getting a free-standing mount like the MF001.

This product comes with a freestanding V-shaped base that will keep your computer monitor stable. You can also adjust the height and be able to rotate the screen at up to 360 degrees using the included 18-inch pole. Furthermore, you can tilt up to 45 degrees upwards or downwards and swivel up to 90 degrees to the left or right.

With support for the 75 mm x 75 mm VESA spacing and a weight capacity of 17.6 pounds, this mount is compatible with both screen sizes of the Samsung G5 Odyssey Gaming Monitor.

In addition to a single arm version, the Free Standing LCD Monitor Fully Adjustable Desk Mount is also available in double arm and triple arm variants.

You can buy the free-standing mount, if you are interested, with the following Amazon link:

Compatible wall mount

If your desk is right up against a wall, then you might want to consider getting a wall mount for your Samsung G5.

If you are interested in doing so, we recommend picking up the VideoSecu ML12B as you will be able to tilt up to 5 degrees upwards or downwards, swivel up to 90 degrees to the left or right and rotate up to 360 degrees. The arm can retract to 2.4 inches from the wall and be extended up to 15 inches from the wall.

The ML12B supports the 75 mm x 75 mm VESA patters. It also has a weight limit of 44 pounds. So, the product should easily hold both versions of the Samsung G5 Odyssey Gaming Monitor.

The VideoSecu ML12B TV LCD Monitor Wall Mount comes with a mounting kit that you can use to install on a wood stud on your wall.

If you are interested, you can purchase the monitor wall mount on Amazon with the following link:

How to stop PS5 from turning on by itself

If you have a PlayStation 5 or PlayStation 5 Digital Edition, you may run into to an issue where the system will seemingly turn on by itself.

You can follow this guide at Seeking Tech to find some potential fixes.

Why your PS5 is turning on by itself

Your PlayStation 5 or PlayStation 5 Digital Edition is turning off by itself due to several reasons.

The first potential reason is that HDMI-CEC is enabled. HDMI Consumer Electronics Control lets you control your PlayStation 5 with a different device.

If your PS5 is connected directly to your TV, you could be accidentally turning on your video game console anytime you turn on your television set.

If your system is connected to your TV via a passthrough device (such as a speaker system), then it could be the other device.

Another reason that your PS5 is powering on by itself is rest mode. For the uninformed, your game system is in rest mode when the light is displaying an orange glow. In this low-powered state, you can turn on the system over the Internet by using the PlayStation App or Remote Play.

The PS5 can also turn itself on to download update files in addition to uploading saved data to the cloud storage in rest mode.

How to disable HDMI-CEC on PS5

If you believed that your PlayStation 5 system is turning on by itself due to HDMI-CEC, you can try disabling that feature on the system.

To do so, you can take the following steps:

1. Turn on the PlayStation 5 and the select a user profile to go to the Home Screen main menu.

2. Once you are there, select “Settings.” You can find this option on the upper tab with the gear icon (it is located to the left of your user profile picture).

3. In the “Settings” menu, select “System.”

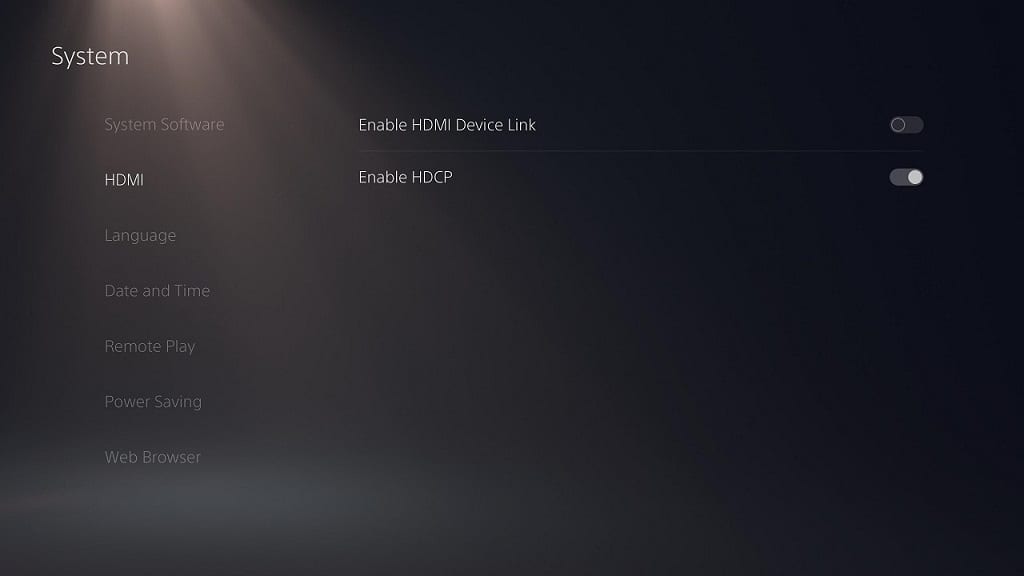
4. In the “System” menu select “HDMI” on the left tab.

5. Here, you will see the “Enable HDMI Device Link” option. This option is enabled if you see the circle to the right of the wording is solid white.

If it is, select “Enable HDMI Device Link” to make the circle transparent and, thus, disabling this feature.

Update: In a recent firmware update, Sony added the One-Touch Play and Power Off Link features under “Enable HDMI Device Link.” To see what these features are, you can check out this tutorial at Seeking Tech.

How to turn off Remote Play on PS5

If you think a device is powering your PlayStation 5 on via the Remote Play, you can try disabling that feature.

You can take the following steps if you are interested in doing so:

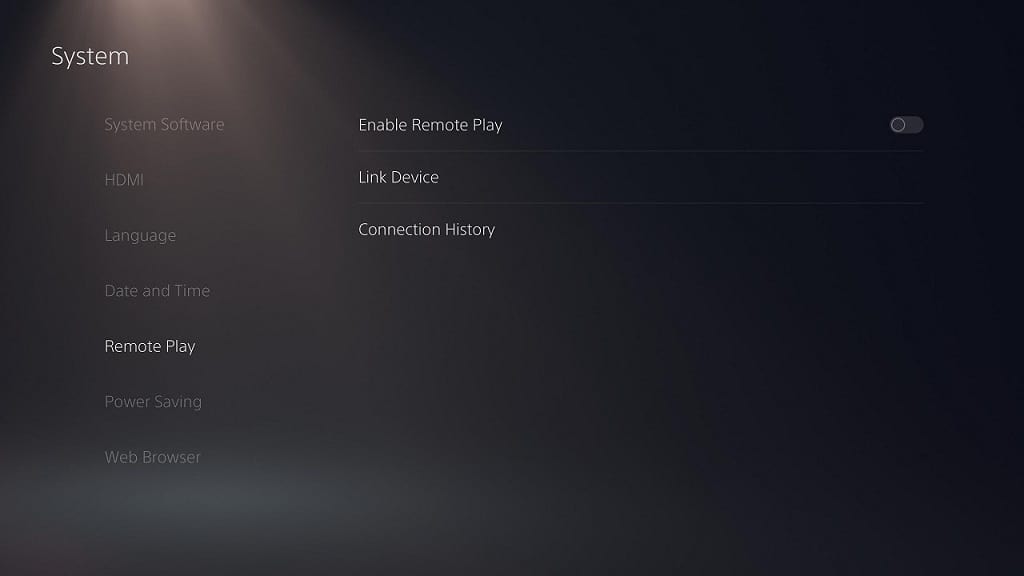
1. From the aforementioned “System” menu in “Settings,” select “Remote Play” on the left tab.

2. From there, you will see the “Enable Remote Play” option. If the circle to the right of the wording is solid white, it means that this featured is enabled.

If it is, you need to select “Enable Remote Play” to turn the circle transparent and disable this feature.

How to disable turning on your PS5 over the Internet

You can also disable turning on your PlayStation 5 over the Internet, whether by the aforementioned Remote Play feature or with the PlayStation App.

If you are interested in doing so, you can take the following steps:

1. From the aforementioned “System” menu in “Settings,” select “Power Saving” on the left tab.

2. From there, you need to select “Features Available in Rest Mode.”

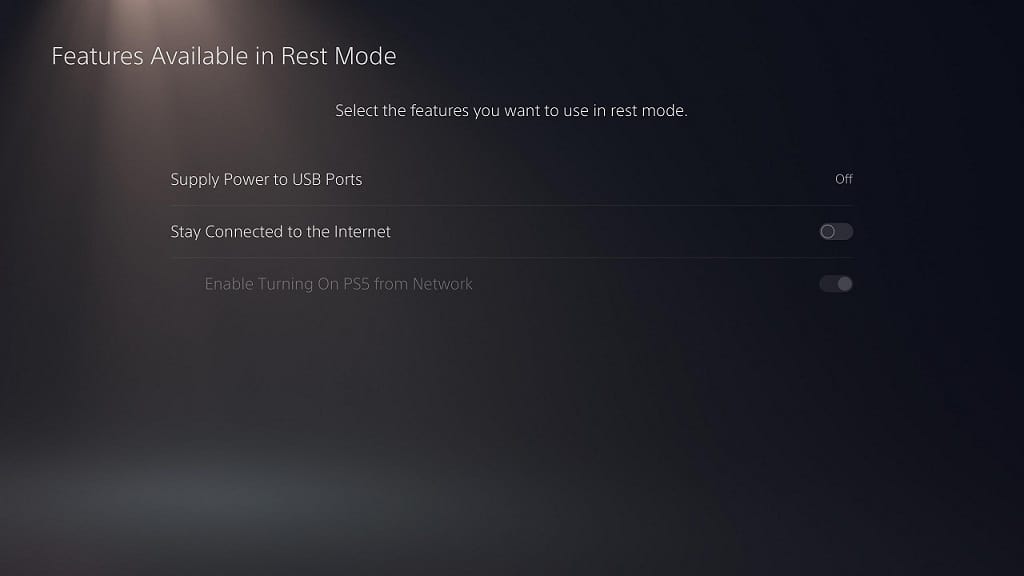
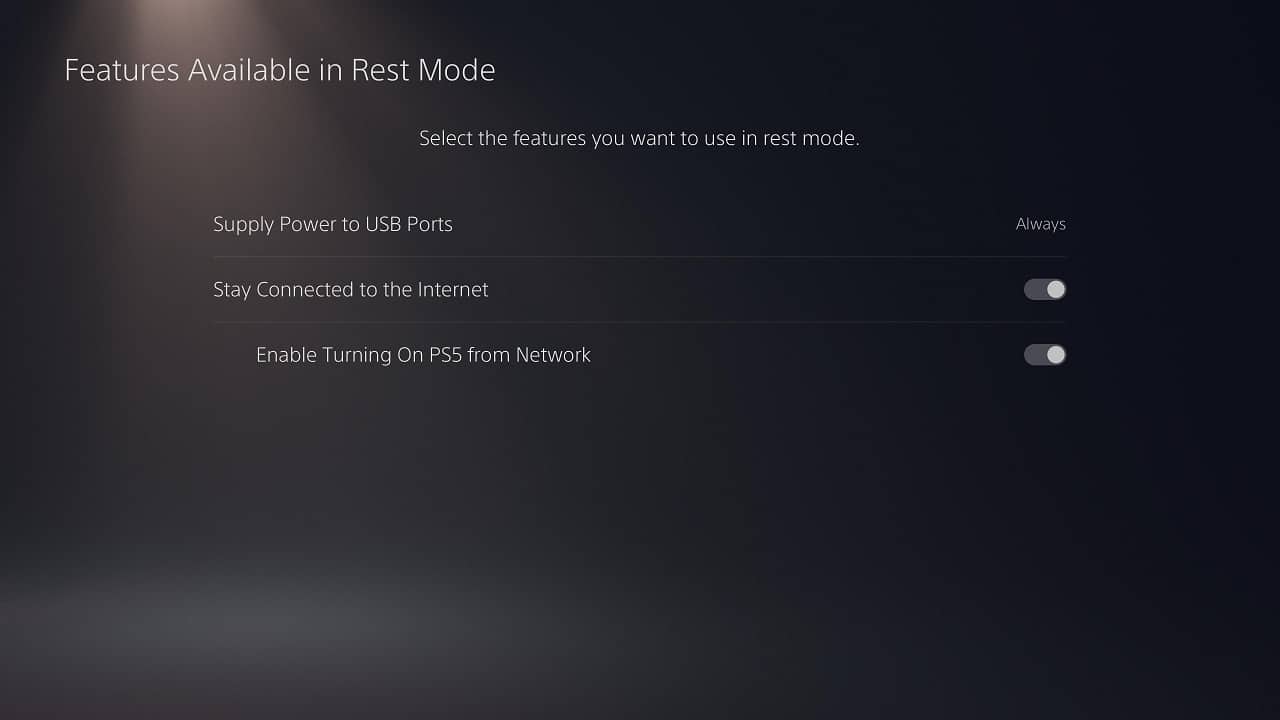
3. In the “Features Available in Rest Mode” menu, you have two relevant options: “Stay Connected to the Internet” and “Enable Turning On PS5 from Network.”

4. “Stay Connected to the Internet” is a Rest Mode feature that allows the PS5 to turn itself on to download updates or upload saved data to the cloud. If you see a white circle to the right of the wording, you need to select this feature to disable it (the white circle will then turn transparent).

5. “Enable Turning On PS5 from Network” is a Rest Mode feature that allows you to power on your PlayStation 5 via the PlayStation App or Remote Play. This is enabled if you see a white circle located to the right of the wording.

To disable the “Enable Turning On PS5 from Network” feature, select that option (the circle will turn transparent, indicating that the feature has been disabled).

6. If you already disabled the aforementioned “Stay Connected to the Internet” feature, then the “Enable Turning On PS5 from Network” should automatically be disabled as well.

DualSense not recharging? Here are some potential fixes

The DualSense is a new controller made specifically for the PlayStation 5 and PlayStation 5 Digital Edition.

If you are having issues trying to recharge the battery of this gamepad, you can follow this guide at Seeking Tech for some potential fixes.

How to tell if your DualSense battery is charging

There are two ways to tell if your DualSense is currently charging.

The first of which is by simply looking at the controller.

If the light bar is blinking orange, this indicates that the gamepad is correctly recharging its battery.

Once the battery is full, the light bar of the controller will turn off.

How to find the DualSense battery indicator on PS5

The other way is by looking in the menu on your PS5.

If you are recharging your controller with the PlayStation 5 console while it its powered on, you can press the PS button on the controller.

If done correctly, this will bring up the Control Center quick menu.

In the quick menu, navigate downwards to the Controls section that contains various symbols. You should see the controller symbol, which represents “Accessories” and shows the battery life for the current DualSense controller.

The battery symbol will also become animated when the gamepad is being recharged.

If you have more than one DualSense, you can select “Accessories” to show the battery life of other connected controllers. You can connect up to four DaulSense gamepads to the PlayStation 5 at the same time.

You can identify which controller is which by looking at the white LED light on your DualSense. Controller #1 will have one light, Controller #2 will have two lights, Controller #3 will have three lights and Controller #4 will have four lights.

Potential Fix #1

If your DualSense is not recharging, the first step you can try is by using a different USB port.

There have been some reports that the front-facing USB port of the PlayStation 5 and PlayStation 5 Digital Edition is having issues with recharging the internal battery of the PS5 controller.

So, you should try one of the two USB ports located on the back of the system.

If the USB ports in the back aren’t recharging the DualSense’s battery either, then you may try using a USB charger or other USB charging devices you may have lying around your house.

Potential Fix #2

If the DualSense recharging problems are still occurring after using different USB ports, you can try using a different USB Type-C to USB Type-A cable.

The controller is compatible with USB cables that are either “charge and sync” or “charging and data.” It is not compatible with “charge only” cables.

Potential Fix #3

If you are charging your DualSense while the PlayStation 5 is in rest mode, there are also a few potential fixes that you can try.

The first is to make sure that your system is actually in rest mode. You can tell that your PS5 is in a low powered state when the console’s lighting is displaying orange.

Even if your console is in rest mode, it may not be recharging the internal battery of your DualSense.

To make sure it is, first head to the “Settings” menu from the Home Screen, which is the main menu you see when booting up the system. If you are having a hard time finding it, “Settings” is the gear symbol located to the left of your profile picture in the upper section of the menu.

In “Settings,” select “System,” the “Power Saving” and finally “Features Available in Rest Mode.”

In the “Features Available in Rest Mode” menu, select “Supply Power to USB ports.” Doing so will give your three options “Always,” “After 3 Hours” or “Off.” If the setting has already been set to “Off,” you need to change it to either “Always” or “After 3 Hours.”

If none of the aforementioned solutions fix your DualSense recharging issues, then you can try contacting PlayStation Support about a potential faulty PS5 controller.

How to fix the PS5 flickering issues

When you are using the PlayStation 5 or PlayStation 5 Digital Edition with your television set, you may encounter flickering issues.

If you are experiencing these problems, you can follow this guide at Seeking Tech for some potential fixes.

Potential Fix #1

The first step you can take is to see if your HDMI cable is connected securely on your PlayStation 5 console as well as the HDMI port on your television. If both ends are connected, then you can try using a different HDMI port on your TV to see if the flicker problems persist.

You can also try using a different HDMI cable. If you don’t have another one lying around in your house, then you can check out our guide for HDMI cables that are compatible with the PlayStation 5 (as well as the Xbox Series X and Xbox Series S).

Potential Fix #2

Another potential fix is to try updating the firmware on your television set. TV manufactures will sometime release new firmware updates to fix issues in addition improve compatibility with new connected hardware such as the PlayStation 5.

The process of updating the firmware of your television set depends on your TV model. It is best that you visit the website of your TV manufacture to find out more on how to update to the latest firmware of your TV.

Potential Fix #3

If the aforementioned fixes did not solve the flickering issues, you can try adjusting the video transfer rate of your PlayStation 5 system. To do so, you can take the following steps:

From the Home Screen main menu, navigate upward and then right until you see “Settings,” which has a gear symbol. Press the X button on your DualSense to bring up the “Settings” menu.

In “Settings,” select “Screen and Video.”

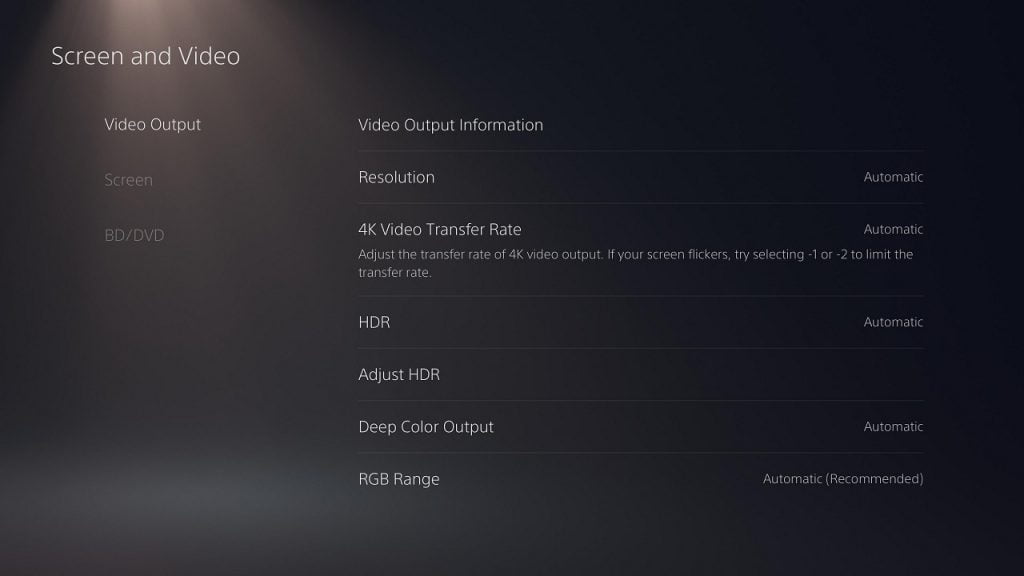
In the “Screen and Video” menu select “Video Output” on the left tab and then “4K Video Transfer Rate” to the right.

The “4K Video Transfer Rate” is set to “Automatic” be default. You can try changing this to “-1” or “-2” in order to limit transfer rate to potentially stop your display from flickering when playing PS5 games.

Potential Fix #4

If none of the above solutions fix the screen flickers, you can try changing other display settings.

To do so, head back to the aforementioned “Video Output” section of the “Screen and Video.” In here, you can change the resolution of your display, enable/disable HDR and more. Try to change these settings and then test your TV to see if changing any of them will get rid of the flickering.

If none of the above fixes stop your TV from flickering when playing PlayStation 5 games, then you may have to contact PlayStation Support about a potential faulty system.

What’s the difference between the Elgato HD60 Pro and 4K60 Pro?

Elgato currently has two PCIe capture cards on the market with the HD60 Pro and 4K60 Pro. So, what are the main differences between these two internal game capture cards?

You can find out in this comparison guide.

Quick Summary

When compared to the Elgato HD60 Pro, the Elgato 4K60 Pro is able to capture gameplay videos at up to 4K and 60 frames per second. You can also play games, via HDMI passthrough, at higher quality with the 4K60 Pro thanks to support of up to 4K/60fps, 1080p/240fps and 1440p/144fps.

The only advantage the Elgato HD60 Pro has is that it comes with a built-in H.264 encoder that you can use to produce H.264 master copies of captured gameplay videos.

We recommend picking up the Elgato 4K60 Pro PCIe Capture Card if you want to capture and play games at 4K, especially if you want to use it with the PlayStation 4 Pro, PlayStation 5, Xbox One X and/or Xbox Series X.

If you don’t mind capturing and playing games at 1080p, then the Elgato HD60 Pro PCIe Capture Card is the more affordable option.

HD60 Pro vs. 4K60 Pro Comparison Chart

You can check out Seeking Tech’s comparison table for these PCIe capture cards below.

Elgato HD60 Pro PCIe Capture CardElgato 4K60 Pro PCIe Capture Card
What’s in the BoxHD60 Pro PCIe Capture Card

High and low profile bracket

HDMI cable
4K60 Pro PCIe Capture Card

High and low profile bracket

HDMI cable
Weight120 grams270 grams
Dimensions122 mm x 56 mm x 14 mm178 mm x 121 mm x 21 mm
Supported Capture Resolutions and Frame Rates480p (720 x 480)

576i (720 x 576)

576p (720 x 576)

720p (1280 x 720) at 30 FPS

720p (1280 x 720) at 60 FPS

1080i (1920 x 1080)

1080p (1920 x 1080) at 30 FPS

1080p (1920 x 1080) at 60 FPS
480p (720 x 480)

576i (720 x 576)

576p (720 x 576)

720p (1280 x 720) at 30 FPS

720p (1280 x 720) at 60 FPS

1080i (1920 x 1080)

1080p (1920 x 1080) at 30 FPS

1080p (1920 x 1080) at 60 FPS

1080p (1920 x 1080) at 120 FPS

1080p (1920 x 1080) at 240 FPS

1440p (2560 x 1440) at 30 FPS

1440p (2560 x 1440) at 60 FPS

1440p (2560 x 1440) at 120 FPS

1440p (2560 x 1440) at 144 FPS

4K (3840 by 2160) at 30 FPS

4K (3840 by 2160) at 60 FPS
Supported Game SystemsPS3

Xbox 360

Nintendo Wii U

PS4

Xbox One

Nintendo Switch

PS4 Pro

Xbox One S

Xbox One X

PS5

Xbox Series S

Xbox Series X
PS3

Xbox 360

Nintendo Wii U

PS4

Xbox One

Nintendo Switch

PS4 Pro

Xbox One S

Xbox One X

PS5

Xbox Series S

Xbox Series X
Game Passthrough1080p and 60fps4K and 60fps

1440p and 144fps

1080p and 240fps
Built-In H.264 Encoder SupportYesNo
Master Copy (H.264) SupportYesNo
Instant Gameview SupportYesYes
Unlimited CaptureYesYes
Flashback RecordingYesYes
Stream CommandYesYes
Maximum Bitrate60 Mbps140 Mbps
InterfacePCIe x1PCIe x4
Supported PCIe SlotsPCIe x1

PCIe x4

PCIe x8

PCIe x16
PCIe x4

PCIe x8

PCIe x16
Operating System Requirements64-bit Windows 1064-bit Windows 10
CPU Requirements4th Gen Intel quad-core i5 CPU (i5-4xxx or comparable)AMD Ryzen 7 (or better) or 6th Gen Intel core i7 CPU (i7-6xxx or comparable)
GPU RequirementsIntel HD or NVIDIA GeForce GTX 600 (or better)NVIDIA GeForce GTX 10xx (or better)
PricingCheck price on Amazon.(#CommissionsEarned)Check price on Amazon.(#CommissionsEarned)

What’s in the Box

In addition to the main capture card unit, both products also come with a high and low profile bracket along with a HDMI cable.

You can check out the full breakdown of what’s included in each box below:

Elgato HD60 Pro:

  • HD60 Pro PCIe Capture Card
  • High and low profile bracket
  • HDMI cable

Elgato 4K60 Pro:

  • 4K60 Pro PCIe Capture Card
  • High and low profile bracket
  • HDMI cable

Weight

The Elgato 4K60 Pro weighs more than twice as much as the HD60 Pro.

You can take a look at the weight specifications below:

  • HD60 Pro: 120 grams
  • 4K60 Pro: 270 grams

Dimensions

The Elgato 4K60 Pro is also a bit bulkier than the HD60 Pro.

You can check out the full measurements for both internal game capture cards below:

  • HD60 Pro: 122 mm x 56 mm x 14 mm
  • 4K60 Pro: 178 mm x 121 mm x 21 mm

Supported Capture Resolutions and Framerates

The 4K60 Pro can capture gameplay footage at up to 4K resolution and 60 frames per second in addition to higher frame rates at lower resolutions. On the other hand, the HD60 Pro can capture gameplay videos at up to 1080 resolution and 60 frames per second.

You can take a look at the supported capture resolutions and frame rates below:

Elgato HD60 Pro:

  • 480p (720 x 480)
  • 576i (720 x 576)
  • 576p (720 x 576)
  • 720p (1280 x 720) at 30 FPS
  • 720p (1280 x 720) at 60 FPS
  • 1080i (1920 x 1080)
  • 1080p (1920 x 1080) at 30 FPS
  • 1080p (1920 x 1080) at 60 FPS

Elgato 4K60 Pro:

  • 480p (720 x 480)
  • 576i (720 x 576)
  • 576p (720 x 576)
  • 720p (1280 x 720) at 30 FPS
  • 720p (1280 x 720) at 60 FPS
  • 1080i (1920 x 1080)
  • 1080p (1920 x 1080) at 30 FPS
  • 1080p (1920 x 1080) at 60 FPS
  • 1080p (1920 x 1080) at 120 FPS
  • 1080p (1920 x 1080) at 240 FPS
  • 1440p (2560 x 1440) at 30 FPS
  • 1440p (2560 x 1440) at 60 FPS
  • 1440p (2560 x 1440) at 120 FPS
  • 1440p (2560 x 1440) at 144 FPS
  • 4K (3840 by 2160) at 30 FPS
  • 4K (3840 by 2160) at 60 FPS

Supported Game Systems

The two PCIe capture cards can capture videos from videogame systems that use the HDMI output.

These consoles include the following:

  • PS3
  • Xbox 360
  • Nintendo Wii U
  • PS4
  • Xbox One
  • Nintendo Switch
  • PS4 Pro
  • Xbox One S
  • Xbox One X
  • PS5
  • Xbox Series S
  • Xbox Series X

Game Passthrough

While capturing videos, you can play games at 1080p and 60 frames per second with the HD60 Pro.

On the other hand, you can play games, while capturing gameplay footage, at up to 4K resolution and 60 frames per second with the 4K60 Pro. You can also play games at up to 240 frames per second in 1080p in addition to up to 144 frames per second in 1440p.

Built-In H.264 Encoder

The Elgato HD60 Pro is the only PCIe capture card in this comparison guide to come with a built-in encoder.

Master Copy (H.264)

The HD60 Pro is also the only one of the two that can produce H.264 master copies of captured gameplay videos.

Instant Gameview

Both capture cards support Instant Gameview, a feature that provides an instant view of your captured footage along with your audio commentary and webcam reaction.

Unlimited Capture

The two Elgato products also feature unlimited capture as you can capture gameplay footage for an uncapped amount of time as long as you have enough free space available.

Flashback Recording

Both also come with flashback recording, a feature that lets you rewind captured gameplay videos and then retroactively record from that point onwards.

Stream Command

The two products also feature stream command, which lets you customize the layout when streaming your gameplay. The options include alerts, overlays, webcam position and more.

Maximum Bitrate

The HD60 Pro has a maximum bitrate of 60 Mbps. The 4K60 Pro has a much higher max bitrate of 140 Mbps.

Interface

The Elgato HD60 Pro PCIe Capture Card uses the PCIe x1 interface while the Elgato 4K60 Pro PCIe Capture Card uses the PCIe x4 interface.

Supported PCIe Slots

You can take a look at the supported PCIe slots below:

Elgato HD60 Pro:

  • PCIe x1
  • PCIe x4
  • PCIe x8
  • PCIe x16

Elgato 4K60 Pro:

  • PCIe x4
  • PCIe x8
  • PCIe x16

Operating System Requirements

Both capture cards require the 64-bit Windows 10 operating system.

CPU Requirements

The 4K60 Pro has higher CPU requirements than the HD60 Pro.

You can check out the prerequisites below:

  • Elgato HD60 Pro: 4th Gen Intel quad-core i5 CPU (i5-4xxx or comparable)
  • Elgato 4K60 Pro: AMD Ryzen 7 (or better) or 6th Gen Intel core i7 CPU (i7-6xxx or comparable)

GPU Requirements

The 4K60 Pro also has higher graphics cards requirements than the HD60 Pro.

You can take a look below:

  • Elgato HD60 Pro: Intel HD or NVIDIA GeForce GTX 600 (or better)
  • Elgato 4K60 Pro: NVIDIA GeForce GTX 10xx (or better)

AmazonBasics Rechargeable Batteries vs. High-Capacity Rechargeable Batteries

Amazon Basics have two types of rechargeable batteries with the standard version and a high-capacity version. So, what are the differences between these?

You can find out in this comparison guide.

Quick Summary

When compared to the regular versions, the high-capacity AmazonBasics AA and AAA Rechargeable Batteries will last longer before needing to be recharged.

On the other hand, the standard versions of the AA and AAA Rechargeable Batteries can be recharged more times with minimal loss in performance in addition to having less self-discharge losses.

Comparison Charts

You can check out Seeking Tech’s comparison tables for the batteries below.

AmazonBasics AA Rechargeable Batteries vs. AA High-Capacity Rechargeable Batteries

AmazonBasics AA Rechargeable BatteriesAmazonBasics AA High-Capacity Rechargeable Batteries
Battery Cell TypeNiMHNiMH
Available Packs4 Pack

8 Pack

12 Pack

16 Pack

24 Pack
4 Pack

8 Pack

24 Pack
mAh2000 mAh2400 mAh
Pre-Charged?YesYes
AmazonBasics Ni-MH AA & AAA Battery Charger Support?YesYes
Recharge Endurance1000 times with minimal power and capacity losses100s of times with minimal power and capacity losses
Self-DischargeMaintains 80% capacity for 24 monthsMaintains 70% capacity for 6 months and 50% capacity for 12 months
Certified Frustration-Free Packaging?YesYes
Recyclable?YesYes
Warranty1-year limited warranty1-year limited warranty
PricingCheck price on Amazon.(#CommissionsEarned)Check price on Amazon.(#CommissionsEarned)

AmazonBasics AAA Rechargeable Batteries vs. AAA High-Capacity Rechargeable Batteries

AmazonBasics AAA Rechargeable BatteriesAmazonBasics AAA High-Capacity Rechargeable Batteries
Battery Cell TypeNiMHNiMH
Available Packs4 Pack

8 Pack

12 Pack

24 Pack
4 Pack

8 Pack
mAh800 mAh850 mAh
Pre-Charged?YesYes
AmazonBasics Ni-MH AA & AAA Battery Charger Support?YesYes
Recharge Endurance1000 times with minimal power and capacity losses100s of times with minimal power and capacity losses
Self-DischargeMaintains 80% capacity for 24 monthsMaintains 80% capacity for 12 months
Certified Frustration-Free Packaging?YesYes
Recyclable?YesYes
Warranty1-year limited warranty1-year limited warranty
PricingCheck price on Amazon.(#CommissionsEarned)Check price on Amazon.v

Battery Cell Type

The regular and high capacity versions of the AmazonBasics AA and AAA rechargeable batteries use the NiMH cell.

Available Packs

You can buy the AmazonBasics AA/AAA Rechargeable Batteries in different number of packs.

You can take a look at the available configurations below:

AmazonBasics AA Rechargeable Batteries:

  • 4 Pack
  • 8 Pack
  • 12 Pack
  • 16 Pack
  • 24 Pack

AmazonBasics AA High-Capacity Rechargeable Batteries:

  • 4 Pack
  • 8 Pack
  • 24 Pack

AmazonBasics AAA Rechargeable Batteries:

  • 4 Pack
  • 8 Pack
  • 12 Pack
  • 24 Pack

AmazonBasics AAA High-Capacity Rechargeable Batteries:

  • 4 Pack
  • 8 Pack

mAh

Milliampere-hours, or mAh, measure the amount of milliamperes that a battery is capable of providing on a per hour basis. The high-capacity version of the Amazon Basics AA Rechargeable Battery has 20 percent more mAh than the standard version. The high-capacity version of the AmazonBasics AAA Rechargeable Battery has 6.25 percent more mAh than the standard version.

As a result, the Amazon Basics High-Capacity Batteries will last longer without having to recharge when compared to the regular versions.

You can take a look at the mAh for each product below:

  • Amazon Basics AA Rechargeable Batteries: 2000 mAh
  • Amazon Basics AA High-Capacity Rechargeable Batteries: 2400 mAh
  • Amazon Basics AAA Rechargeable Batteries: 800 mAh
  • Amazon Basics AAA High-Capacity Rechargeable Batteries: 850 mAh

Pre-Charged

All of Amazon Basics Rechargeable Batteries in this versus guide have already been pre-charge. Thus, you will be able to use them right away.

AmazonBasics Ni-MH AA & AAA Battery Charger

The batteries in this comparison can be recharged using the AmazonBasics Ni-MH AA & AAA Battery Charger. With this product, you will be able to recharge up to four AA or AAA batteries at the same time via the retractable AC plug or through the USB charge port. The recharging time from completely depleted batteries is 4 hours.

The Ni-MH AA & AAA Battery Charger also features a built-in power switch technology (100-240 V AC) so that you can use the charger from anywhere the world. If you are interested, you can purchase the product on Amazon with the following link:

Recharge Endurance

The regular versions of the AA/AAA Rechargeable Batteries can be recharged 1,000 of times with minimal power and capacity losses. The high-capacity options can be recharged hundreds of times with minimal power and capacity losses.

So, we can infer that the standard versions can be recharged more than the high-capacity versions.

You can find the recharge endurance specifications below:

  • AmazonBasics AA Rechargeable Batteries: can be recharged 1000 times with minimal power and capacity losses.
  • AmazonBasics AA High-Capacity Rechargeable Batteries: can be recharged 100s of times with minimal power and capacity losses.
  • AmazonBasics AAA Rechargeable Batteries: can be recharged 1000 times with minimal power and capacity losses.
  • AmazonBasics AAA High-Capacity Rechargeable Batteries: can be recharged 100s of times with minimal power and capacity losses.

Self-Discharge

The regular AmazonBasics AA and AAA Rechargeable Batteries also have better self-discharge specs as both can maintain an 80 percent capacity after 24 mounts. The high-capacity AA can maintain 50 percent capacity after 12 months while the high-capacity AAA can maintain 80 percent capacity after 12 months.

You can find the self-discharge specifications below:

  • AmazonBasics AA Rechargeable Batteries: maintains 80% capacity for 24 months
  • AmazonBasics AA High-Capacity Rechargeable Batteries: maintains 70% capacity for 6 months and 50% capacity for 12 months
  • AmazonBasics AAA Rechargeable Batteries: maintains 80% capacity for 24 months
  • AmazonBasics AAA High-Capacity Rechargeable Batteries: maintains 80% capacity for 12 months

Certified Frustration-Free Packaging

The products are packaged in what Amazon called “frustration-free” packaging. So, you shouldn’t have any trouble opening the box.

Recyclable

Once the batteries in this comparison guide run out of charge, and thus can no longer be recharged, you will be able to recycle them.

Warranty

The AmazonBasics AA Rechargeable Batteries, AA High-Capacity Rechargeable Batteries, AAA Rechargeable Batteries and AAA High-Capacity Rechargeable Batteries each come with a 1-year limited warranty.

PS5 firmware update, HD camera and PSN error codes guide

Sony has revealed a long list of potential error codes and error messages that you may encounter when using the PlayStation 5 or PlayStation 5 Digital Edition.

You can find a list of these issues, as well as potential fixes, in this guide at Seeking Tech.

PS5 Error Message: A communication error has occurred.

PS5 Error Codes: NW-102308-4, NW-102307-3, NW-102311-8, NW-102314-1 and NW-102315-2.

Description: This error message and accompanying error codes occur when there is an issue connecting to the PlayStation Network.

Solution: There are several steps you can take, which includes checking the current status of the PlayStation Network. If the PSN is function properly, you can try using a wired connection, making sure there’s no obstructions if you are using a wireless connection, power cycling your router and modem, updating your router’s firmware, opening ports on your router, using a static IP address in addition changing DNS settings.

You can find Sony’s instructions on fixes for each of the error codes below:

PS5 Error Message: Access from your PlayStation 5 may be prohibited or temporarily unavailable.

PS5 Error Code: WS-116332-6

Description: Your access from your PS5 to the PlayStation Network is prohibited. This may be due to you violating the PSN Terms of Service.

Solution: If you believe that you didn’t violate any ToS, you can check the PSN status page and the server status page of the game you were playing when you receive the error to see if both are running. There is a possibility that this error is due to heavy network load.

You can find more details with the following link: WS-116332-6.

PS5 Error Message: An error has occurred on PlayStation Now streaming connection.

PS5 Error Code: CE-117722-0

Description: You will get this error when trying to connect to the PlayStation Now streaming service.

Solution: The first thing you can do is to test your Internet connection for PS Now to see if you have enough bandwidth to stream games. If you do, you can try using a wired connection, making sure that there isn’t anything interfering with your Wi-Fi connection if you decide to use wireless, power cycle your modem and router in addition to update your router’s firmware.

Some of the games on PlayStation Now can be downloaded and played directly on your PS5. So, you may want to try that option if you are running into streaming issues.

You can find more information of the potential fixes for this code with the following link: CE-117722-0.

PS5 Error Message: PlayStation Network function is temporarily suspended.

PS5 Error Code: WS-116331-5

Description: This error code means that your account has been temporarily suspended using the PlayStation Network, possibly due to violating its Terms of Service. You will get an email explaining the suspension in the e-mail address tied to your PSN account.

Solution: The solution for this depends on the contents in the aforementioned email.

You can find more details on this error on the official PlayStation Support website: WS-116331-5.

PS5 Error Message: Please check the connection status of HD Camera and PlayStation Camera.

PS5 Error Codes: CE-108360-8 and CE-111161-1

Description: You will get these errors when there is an issue using the PS4’s HD Camera with your PS5.

Solution: Make sure you are using the HD Camera PS5 adapter provided by Sony. If you are, then you should try to use the camera in a bright room in addition to adjusting the camera’s angle and distance. You should also take a look at the camera settings on your PlayStation 5 console.

For more details, you can take a look at the error code pages from PS Support:

PS5 Error Message: Please install the latest system software.

PS5 Error Codes: CE-107520-5, CE-108889-4, NP-102944-0, NP-102945-1 and WS-116328-1

Description: These error codes will appear when you need to update the firmware of your PlayStation 5 console. You may get these during a firmware update.

Solution: If you get any of the aforementioned error codes during a firmware update, you should restart your networking equipment and PS5 and try updating again. You can also try updating via a USB drive or game disc containing the latest firmware.

You can take a look at the solutions for the individual codes below:

PS5 Error Message: Please install the latest update file.

PS5 Error Code: NP-102946-2

Description: This error will pop up when you need to install the latest update file. You may encounter this during an update.

Solution: If you encounter this error using an update, you can check if you have enough free space in the default solid state drive. If you don’t, then you need to delete something to free up some space and try updating again.

If you get the error while the update is in process, then you should wait for it to be completed.

You can find more details on this error with the following link: NP-102946-2.

PS5 Error Message: The account information is incorrect.

PS5 Error Code: NP-102955-2

Description: This error will appear when your login information does not match what the PlayStation Network has stored.

Solution: Check to see if your sign-in ID and password are correct and try logging in again.

You can take a look at the page for this error via the following link: NP-102955-2.

PS5 Error Message: The connection to the network has timed out.

PS5 Error Codes: NW-102417-5 and WV-109153-9

Description: You will get these errors code when you can’t connect to PSN.

Solution: First, you need to check the status page of the PlayStation Network to see if it is down. If it isn’t, you can try using a wired Internet connection or remove any potential obstructions if you are using Wi-Fi.

You can also try power cycling your modem and router as well as updating the firmware of your router. Furthermore, you can try opening ports, setting a static IP address and changing the DNS.

You can find the instructions for these error codes with the following links:

PS5 Error Message: The connection to the PlayStation Network has timed out.

PS5 Error Code: NW-102636-8

Description: This error occurs when your PSN connection has timed out.

Solution: You can first try checking the servers of PSN and the game to see if there are any outages. Afterwards, you can take a look at your Internet connection settings.

If all of the above seem normal, you can try power cycling your modem and router. You can also see if there are anything that could hindering your wireless connection if you are using Wi-Fi.

You can find more details on the following PlayStation Support page: NW-102636-8.

PS5 Error Message: This feature is not available due to age restrictions.

PS5 Error Code: NP-102942-8

Description: You can’t use this feature due to your user account not meeting the age requirement.

Solution: If you believe that you are old enough, you can check the age you have listed in your user account. You can also take a look at the parental control settings.

You can find the error listing from PS support via the following link: NP-102942-8.

PS5 Error Message: The Internet connection may be unstable, and the latest update file for the application cannot be found.

PS5 Error Code: NP-102947-3

Description: You get this error when you Internet connection is too unstable to download the update file.

Solution: Sony recommends restarting your PS5 and using a wired connection if possible (you should also reconfigure the network settings). You may also try testing to see if there is anything obstructing your WI-Fi signal if you want to stick with using wireless.

If the above don’t work, you may have to power cycle your router and modem. You may also want to update the firmware of your router.

You can find more details on these fixes with the following link: NP-102947-3.

PS5 Error Message: This service is currently under maintenance.

PS5 Error Codes: NP-103107-2, NP-103117-3, NP-103111-7, NP-103105-0, NP-103109-4, WS-116521-6 and WS-116449-5.

Description: These error codes mean that the service is down due to maintenance.

Solution: Check the server status page to see if it is actually undergoing maintenance. If the servers are functioning normally, you can try power cycling your router and modem as well as resetting the internet connecting settings on PS5. You can also simply wait and try again later.

For more details of each individual error code, you can check out the following pages:

PS5 Error Message: The system software in the update failed.

PS5 Error Code: WS-116522-7

Description: This error message and code mean that your PS5 can’t recognize the latest firmware version, causing the update to fail.

Solution: You need to try updating the firmware of your PlayStation 5 again. You can do this over the Internet using a wired (preferred) or wireless connection, USB storage device or game disc.

You can find out the steps to updating your PS5’s firmware via the following link: WS-116522-7.

PS5 Error Message: Unable to connect to the Internet.

PS5 Error Codes: WV-109145-0, WV-109166-3 and WV-109168-5

Description: These errors will occur when you try to connect to the PlayStation Network service.

Solution: You can first check if the PSN is experiencing any issues in its status page. If it isn’t you can try using a wired connection. If you prefer using Wi-Fi, make sure that there aren’t any object interrupting the wireless signal.

You can also try adjusting your home network, which includes power cycling the modem/router, updating the router’s firmware, opening ports, setting up static IP and changing DNS.

You can find the individual error code pages below:

PS5 Error Message: Unable to connect to the server.

PS5 Error Codes: CE-105799-1, CE-108862-5, CE-113212-0, NW-102254-4, NW-102261-2, NW-102265-6, NW-102633-5, NW-102650-4, WS-115019-7, WS-115195-2, WS-115338-1, WS-116420-4, WS-116439-4, WV-109168-5, WV-109144-9 and WV-109146-1

Description: You will get these errors when you can connect to PSN.

Solution: You can first try checking the PlayStation Network status page to see if the online service is experiencing any issues and/or in maintenance.

If PSN is functioning normally, you can try switch to a wired Internet connection if you were using Wi-Fi. If you want to keep using Wi-Fi, you should check your signal to see if there are any hindrance.

If none of the above works, you can try tinkering with your network setup. The first option is to turn off your modem and router, wait five minutes, and then turn the devices back on again. You can also try updating the firmware of your router, open specific ports, setting a static IP address and changing the DNS settings.

For more details, you can check out the individual error code support pages below:

PS5 Error Message: Use of PlayStation Network feature is temporarily suspended.

PS5 Error Codes: WS-116330-4

Description: Your user account has been temporarily suspended from PSN. This may be because you violate its Terms of Service.

Solution: Unfortunately, there is no solution for this. You can try contacting Sony for a resolution.

You can find out more details on this error message with the following page: WS-116330-4.

PS5 Error Message: Your account has been suspended.

PS5 Error Codes: WS-116367-4

Description: Your user account has been suspended from using the PlayStation Network, possibly due to violating its Terms of Service.

Solution: Unfortunately, there doesn’t appear to be any way to get unsuspended. You can try contacting Sony to see if anything can be done.

You can take a look at the error page via the following link: WS-116367-4.