How to fix Sony A80K, A90K, A95K, X80K, X85K, X90K, X95K and Z9K remote issues

The Sony A80K, A90K, A95K, X80K, X85K, X90K, X95K and Z9K comes with a remote controller included. If you are experiencing issues with the remote working too slowly, or not working at all, then you can take a look at this troubleshooting guide from Seeking Tech.

1. The first step we recommend taking is to try moving the remote controller closer to your television set as it may have been out of range.

2. You should also make sure that there are any objects that may be blocking the direct line of sight between your Sony television screen and its remote.

3. Furthermore, other nearby wireless devices may interfere with the communication between your remote and TV. These devices may include a Wi-Fi device, Bluetooth device or microwave.

If you have any of these nearby, then you can try turning them off or moving them to a new location.

4. We also recommend checking the LED light underneath your A80K, A90K, A95K, X80K, X85K, X90K, X95K or Z9K. The color and blinking pattern of the light may indicate something has changed with the status of your television set.

To find out more information on the LED light indicators, you can take a look at this tutorial.

5. If you think that the remote issues are related to your Sony television, then we recommend pressing the power button that is directly on the TV set to turn it off.

Afterwards, unplug television from the power outlet and then wait for at least 2 minutes.

After at least two minutes have passed, plug the TV back into the power outlet. You then need to press the power button located directly on the television set to turn it on.

6. If the TV turns on normally after pressing its power button but your remote control is still not working correctly, then the next step you can take is to reset the remote.

In order to do so, you first need to remove batteries from the remote. Afterwards, press and hold the power button on the remote for 3 seconds. Finally, place the batteries back into the remote and then try to use it to control your Sony TV once again to see if the issues have gone away.

7. If you are still experiencing issues with the remote for your A80K, A90K, A95K, X80K, X85K, X90K, X95K or Z9K, then you can try replacing both batteries.

When adding the new batteries, make sure that they are aligned with the + and – symbols in the battery compartment.

8. You can also try cleaning the battery compartment of your remote.

In order to do so, you first need to take out the batteries. We then recommend using an electronic cleaning solution and Q-tip.

For the cleaning solution, we suggest using MG Chemicals 824-1L 99.9% Isopropyl Alcohol Electronics Cleaner Liquid Bottle, which you can buy on Amazon with this link. (#CommissionsEarned).

Dip the Q-tip cotton swab in the cleaning solution and then clean the battery compartment of your Sony remote.

After cleaning, wait until the battery compartment complete dries before re-inserting the battery.

9. If the remote is still not working as intended even after trying all of the aforementioned potential solutions, then we recommend contacting Sony for additional support.

How to fix Samsung Galaxy Tab S8, S8+ and S8 Ultra crashing issues

When using your Samsung Galaxy Tab S8, Samsung Galaxy Tab S8+ or Samsung Galaxy Tab S8 Ultra, you may experience freezing, random restarts and/or random shutdowns.

To see how you can resolve these crashing issues with this tablet series, you can take a look at this troubleshooting article from Seeking Tech.

1. The first step we recommend taking is to restart your Galaxy Tab S8, Galaxy Tab S8 Plus or Galaxy Tab S8 Ultra as it may help get rid of any temporary conflicts, glitches and other software-related errors.

If your tablet is completely frozen and isn’t responsive to your touchscreen inputs, then you can force a restart by holding the Side key and Volume Down key at the same time for at least 7 seconds.

If you can’t force your device to shut down, then you need to wait for its battery to completely deplete. Once the tablet no longer has any battery life, recharge it again before trying to turn it back on.

2. If restarting the S8, S8+ or S8 Ultra did not stop it from crashing, then the next step you can take is to make sure the device doesn’t feel too hot when you are touching it.

If it does feel warmer than usual, then the heat may be reason that your tablet is crashing.

In this case, we recommend turning off your tablet. After the device has cooled off, you can then turn it back on again and test to see if the freezing, random restarts and/or random shutdowns have stopped.

3. Furthermore, we recommend that you update the tablet to the latest available firmware if you haven’t done so already.

4. You should also make sure that all of your apps have been properly updated to the latest software versions.

5. If the internal storage of your tablet gets too full, then it may cause performance problems. Ideally, you should have at least 25% of unoccupied space.

If you have less than 25%, then you can delete or transfer any images, videos and/or other files. The Samsung Galaxy Tab S8, Samsung Galaxy Tab S8+ and Samsung Galaxy Tab S8 Ultra support microSD cards if you want to expand the storage capacity.

To see how you can insert, format and use microSD cards with your tablet, you can take a look at this tutorial.

You can also uninstall any apps that you don’t use often in order to free up more space.

6. You can use the Clean Now feature by doing the following:

  • Launch the Settings App on your S8, S8+ or S8 Ultra.
  • Head over to Battery and Device Care.
  • Select Memory
  • Finally, select Clean Now.

With this feature, you will be able to free up as much as the system memory as possible.

7. Moreover, you can use the Optimize Now feature by taking the following steps:

  • Open the Settings App on your S8 series tablet.
  • Next, you need to select Battery and Device Care.
  • Afterwards, select Optimize Now.

By using this feature, you will free up the system memory, close background apps and delete unneeded files. Furthermore, it will also scan of excessive battery usage from apps as well as any potential malware attacks.

8. If you are still experiencing crashing issues with your Samsung Galaxy Tab S8, Samsung Galaxy Tab S8+ or Samsung Galaxy Tab S8 Ultra, then you can try factory resetting your tablet.

By doing so, you will delete all the data, settings and updates on your tablet. As a result, this action may help resolve the freezing, random restarts and/or random shutdowns.

If you are interested in factory resetting your Galaxy Tab S8, then we recommend taking a look at this article.

How to clean the Sony A80K, A90K, A95K, X80K, X85K, X90K, X95K and Z9K

The A80K, A90K, A95K, X80K, X85K, X90K, X95K and Z9K are the latest television models from Sony. If you want to properly clean these TVs, then you can take a look at this tutorial from Seeking Tech.

What cleaning solution can you use for A80K, A90K, A95K, X80K, X85K, X90K, X95K and Z9K?

When it comes to cleaning solution, Sony recommends using a non-soap synthetic cleanser solution that has been diluted with less than 1% of water.

If you are looking for a specific recommendation for cleaning your 2022 Sony television, then we suggest picking up the MG Chemicals 824-1L 99.9% Isopropyl Alcohol Electronics Cleaner Liquid Bottle, which you can find on Amazon with this link. (#CommissionsEarned).

While you can also use plain water, the aforementioned isopropyl alcohol is safer as it will dry much quicker.

You should avoid using bleach, soap and other household cleaning solutions as these may damage the coating and painting of your TV set. Insecticides, benzene, thinners and other solutions may also damage the screen as well as the internal components of your device.

What cleaning cloth can you use for A80K, A90K, A95K, X80K, X85K, X90K, X95K and Z9K?

As for the cleaning cloth type, Sony suggest that you use a soft cloth. Otherwise, an abrasive, rubber or vinyl material could end up scratching the screen and other areas of the television set.

If you need a specific product recommendation, then we suggest picking up a batch of MagicFiber Microfiber Cleaning Cloths, which you can purchase on Amazon via this link. (#CommissionsEarned).

How to clean the A80K, A90K, A95K, X80K, X85K, X90K, X95K and Z9K

In order to clean these 2022 Sony televisions, we recommend taking the following steps:

1. Turn off your TV if you haven’t done so already.

2. Unplug the power cord of your TV from the power outlet.

3. Remove any HDMI cable, USB cable as well as any other devices you have attached to your television set.

4. Once you are ready, damp a cleaning cloth with the cleaning solution.

Do not spray or apply the cleaning solution directly to your Sony TV. Otherwise, the liquid may end up getting inside of the set and cause water damage.

You should also make sure that the cloth isn’t too wet as it shouldn’t be dripping any of the liquid. If it is, then you need to squeeze out any of the excess solution before moving on to the next step.

5. Start carefully wiping your A80K, A90K, A95K, X80K, X85K, X90K, X95K or Z9K clean.

For the HDMI, USB and other connection ports, we recommend using a dry cloth to wipe in order to avoid any potential water damage.

You may also want to use a dry cloth for any labels as these may come off if you are using a wet cloth instead.

If you have a thick layer of dust blocking the vents, then we recommend using a vacuum first to suck out as must of the dust particles as possible. You can then use a dry cloth to wipe the vents as clean as possible.

6. After wiping, we recommend letting your TV air dry for a few minutes.

7. After waiting for several minutes, observe your TV set.

If you see smudges or streaks, then we recommend wiping your television again. This time, we recommend using a brand-new soft cloth as the original cloth may be too dirty.

You can repeat these steps over and over again until your TV looks completely clean.

8. Once you are sure that your television is dry, you should be able to plug it back into the power outlet, we reconnect it to other devices and turn it back on.

How to remove no signal message and screen saver on A1, B1, C1 and G1

When the LG A1, B1, C1 and G1 can’t detect a video input signal, then these television sets will display a no signal message and screen saver. To remove, both of these, you can check out this step-by-step guide at Seeking Tech.

Updating the firmware of LG A1, B1, C1 and G1

The ability to remove the no signal messages from the A1, B1, C1 and G1 was added to a recent firmware update for these television sets. In order to download and install it, you need to take the following steps:

1. Before we begin, you need make sure that the A1, B1, C1 or G1 is already connected to the internet.

2. To start, press the gear button on your Magic Remote to bring up the Quick Settings menu.

3. Inside Quick Settings, select All Settings.

4. Next, you should select Support.

5. Afterwards, select Software Update.

6. In the Software Update menu, you will see the current software version of your A1, B1, C1 or G1.

7. In this same menu, you can also manually check for a new firmware update. Furthermore, you can also turn on automatic updates.

How to disable no signal messages on LG A1, B1, C1 and G1

With your LG 2021 OLED updated, you simply have to press the red button on the TV remote to hide the no signal message.

The message will stay hidden unless you press the red button again or you decide to power off and then power on your television set again.

How to turn off screen saver on LG A1, B1, C1 and G1

Along with the no signal message, the A1, B1, C1 and G1 will also display a wallpaper screen saver when no video signal is detected. To remove these series of images, you need to do the following:

1. On the Magic Remote of your LG television, press the mute button three times in quick succession. If done successfully, this should bring up the “Select a menu item” display on the right side of the screen.

2. In “Select a menu item,” make sure that the “No signal image” setting is disabled.

While this setting will disable the wallpaper screen saver, a different “no signal” message will appear on the screen again. You won’t be able to remove this message unless you enable the aforementioned “No signal image” setting.

How to use navigation bar and gestures with Samsung Galaxy Tab S8/S8+/S8 Ultra

On your Samsung Galaxy Tab S8, Samsung Galaxy Tab S8+ or Samsung Galaxy Tab S8 Ultra, you can use either the navigation bar or navigation gestures in order to move around the system menu.

To see how you can switch between these two navigation types for your tablet, you can take a look at this tutorial from Seeking Tech.

How to enable navigation bar with Samsung Galaxy Tab S8, S8+ and S8 Ultra

In order to enable the navigation bar on your Galaxy Tab S8, Galaxy Tab S8+ or Galaxy Tab S8 Ultra, you need to take the following steps:

1. On your tablet, you need to open the Settings App.

2. Inside of the Settings App, go to Display.

3. In the Display menu, you then need to go to Navigation Bar.

4. Finally, you need to select Buttons.

5. With the Navigation Bar enabled, the following icons will now appear as the bottom of the screen:

  • The icon with the three vertical lines will show a list of recent apps you opened.
  • The squared circle icon is a shortcut for the home screen menu.
  • The left-pointing arrow will let you go back to the previous screen.

6. If you want to change the alignment of the buttons, then you need to select Button Order and/or Button Position from the Buttons menu.

How to enable navigation gestures with Samsung Galaxy Tab S8, S8+ and S8 Ultra

If you want to use touchscreen gestures instead for navigation, then you need to take the following steps to enable this feature:

1. Launch the Settings App on your S8, S8 Plus or S8 Ultra.

2. After getting to the Settings App, select Display.

3. From the Display menu, select Navigation Bar.

4. In the Navigation Bar screen, make sure that the Swipe Gestures setting is turned on.

5. You can also customize Swipe Gestures with the following options:

  • With More Options, you can customize the gestures and their touch screen sensitivity.
  • With Gestures Hints, you can choose whether or not your tablet will display hints when it comes to swipe gestures.
  • With the Show Button to Hide Keyboard, you can choose whether or not to show an icon that will hide the on-screen keyboard.
  • With Block Gestures with S Pen, you can stop your tablet from registering gestures made by the digital pen accessory.

How to fix Samsung Galaxy Tab S8, S8+ and S8 Ultra S Pen and touchscreen issues

The Samsung Galaxy Tab S8, Samsung Galaxy Tab S8+ and Samsung Galaxy Tab S8 Ultra all come with a touchscreen that you can interact with by using your fingers and the included S Pen accessory.

If the touchscreen isn’t responding accurately, or at all, to your inputs, then you can take a look at this troubleshooting article from Seeking Tech.

1. The first step we recommend taking is to check if your tablet feels hot. If it does, then we recommend turning the device off, if possible, and then let it cool down.

2. You should also make sure that the touchscreen of your Galaxy Tab S8, Galaxy Tab S8+ or Galaxy Tab S8 Ultra is not wet. Otherwise, it may not function properly.

3. Having any magnets nearby your tablet may also cause issues with its touch screen.

4. A dirty screen may also be the cause of your issues.

To see how you can properly clean these tablets, you can take a look at this article.

5. If you are experiencing issues with your S Pen, make sure that it still has battery life. If it doesn’t place it back into its compartment on your tablet in order to recharge it.

6. You should also make sure that the S Pen hasn’t been damaged.

7. Furthermore, the S Pen has a limited range when it comes to communicating with your S8, S8 Plus or S8 Ultra. Therefore, the accessory should remain close to the tablet.

8. Avoid placing any objects in between the S Pen and your tablet.

9. You should also avoid having any other active wireless device nearby as these may cause interference with the Bluetooth communication between the S Pen and tablet.

10. If the touchscreen and/or S Pen is still not working properly after taking the aforementioned steps, then we recommend restarting the tablet. Doing so should help clear out any temporary software bugs and/or conflicts.

11. Of course, it is also a good idea to keep the software versions of your apps, as well as the firmware versions of your tablet, updated.

12. If you are using a screen protector on your Samsung Galaxy Tab S8, Samsung Galaxy Tab S8+ or Samsung Galaxy Tab S8 Ultra, then we recommend increasing the touch screen sensitivity by taking the following steps:

  • To start off, you need to open the Settings App on your tablet.
  • Inside of Settings, you need to tap Display.
  • In the Display menu, make sure that the Touch Sensitivity feature is enabled.
  • 13. For issues related to the S Pen, we recommend checking out the settings for the accessory to see if you have configured it correctly.
  • To do so, you need to do the following:
  • Open the Settings App on your S8, S8 Plus or S8 Ultra.
  • In Settings, go to Advanced Features.
  • In Advanced Features, select S Pen.
  • In the S Pen menu, make sure you are using the correct S Pen configurations as you may have accidentally disabled some of its features previously.

14. You can also try resetting the settings on your tablet. In order to do so, you can follow the steps in this guide.

If the touchscreen and/or S Pen aren’t still working correctly, then we recommend contacting the support team at Samsung for additional support.

How to record screen activities with the Samsung Galaxy Tab S8, S8+ and S8 Ultra

With the Samsung Galaxy Tab S8, Samsung Galaxy Tab S8+ and Samsung Galaxy Tab S8 Ultra, you are able to record your screen activities.

To find out how you can use this screen recording feature for your tablet, you can take a look at this tutorial from Seeking Tech.

How to change the screen recorder settings for the Galaxy Tab S8, S8+ and S8 Ultra

Before you start recording your screen, we recommend taking a look at the settings of this feature. In order to do so, you need to take the following steps:

  • On your Samsung S8 series tablet, you need to open the Settings App.
  • Inside the Settings App, you then need to head over to Advanced Features.
  • Afterwards, go to Screenshots and Screen Recorder.

In the Screenshots and Screen Recorder menu, you will get the following options:

  • With the Sound option, you can choose the source of the sound being recorded.
  • With Video Quality, you can pick the captured resolution. While higher resolutions will provide better clarity, the better-looking videos will also take up more space on the internal storage of your S8, S8 Plus or S8 Ultra.
  • With the Selfie Video Size slider, you can change the size of the selfie capture video if you want to film yourself as well as your screen activities at the same time.
  • With the Show Taps and Touches option, you can choose whether or not you want to show the taps and swipes you make on the screen when it is being recorded.

How to screen record on the Galaxy Tab S8, S8+ and S8 Ultra

Now that you customize the screen recording settings to your liking, you can do the following in order to record your screen activities on the Galaxy Tab S8, Galaxy Tab S8+ and Galaxy Tab S8 Ultra:

  • Swipe down from the top of your tablet screen to drag down the Notification Panel.
  • Swipe down from the Notification Panel to bring up the Quick Settings menu.
  • Tap the Screen Recorder icon.
  • Select the sound setting.
  • Tap Start Recording.
  • A short 3-second countdown will start before the automatic recording starts. Instead of waiting, you can select the “Skip Countdown” option to manually start recording immediately.
  • During the recording process, you can draw on the screen, add a pointer when using the S Pen and/or add a selfie video.
  • Once you are done with recording the screen, tap the Stop option.
  • The recorded video file can be found in the Screen Recording album inside of the Gallery App.

It is important to note certain apps on your Samsung Galaxy Tab S8, Samsung Galaxy Tab S8+ or Samsung Galaxy Tab S8 Ultra may prohibit screen recording when copyrighted content or sensitive content are being shown.

How to install and format the Kingston FURY Renegade SSD to PS5

The Kingston FURY Renegade solid state drive is compatible with the PlayStation 5 as it offers a PCIe 4.0 NVMe interface, sequential reading speed of up to 7,300 MB per second in addition to a low-profile graphene aluminum heat spreader that fits into the docking bay of the game console.

You can take a look at this step-by-step guide to see how you can install this M.2 SSD to your PS5 or PS5 Digital Edition system.

Compatible Kingston FURY Renegade Capacities

All available capacity options of the FURY Renegade will work with the PlayStation 5. Of course, the bigger sizes provide more storage for your games.

You can find the PS5 compatible capacities, as well as the associated mode numbers, of the product below:

  • 500 GB Kingston FURY Renegade PCIe 4.0 NVMe M.2 SSD (SFYRD/500G)
  • 1 TB Kingston FURY Renegade PCIe 4.0 NVMe M.2 SSD (SFYRD/1000G)
  • 2 TB Kingston FURY Renegade PCIe 4.0 NVMe M.2 SSD (SFYRD/2000G)
  • 4 TB Kingston FURY Renegade PCIe 4.0 NVMe M.2 SSD (SFYRD/4000G)

Updating to the latest PS5 firmware

If you haven’t updated the firmware of your PlayStation 5 in a long time, then the Kingston FURY Renegade may not work even if you correctly inserted in the M.2 SSD expansion bay.

So, if you haven’t done so already, make sure you update to the latest available firmware of your system.

How to insert Kingston FURY Renegade SSD to PS5

With your game console updated to the latest firmware version, you can now start the process of inserting the FURY Renegade.

To insert, you need to take the following steps:

1. If you haven’t done so already, you need to shut down your PlayStation 5 as you will need to unplug and open it.

2. After turning off your system, the next step is to disconnect the power cord, HDMI cable as well as other cables and accessories you have plugged into your PS5.

3. If you have the stand attached as well, then you also need to remove it to continue.

4. With nothing attached to the system, lay it down so that the side with big PS logo is underneath. You should probably find a soft surface (for this process, we used a bed).

5. Next, position the system so that its back side, where the HDMI and power ports are located, is facing you.

6. Now, from your vantage point, put your right hand on the bottom right corner of the outer case and you left hand on the upper left corner of the outer case.

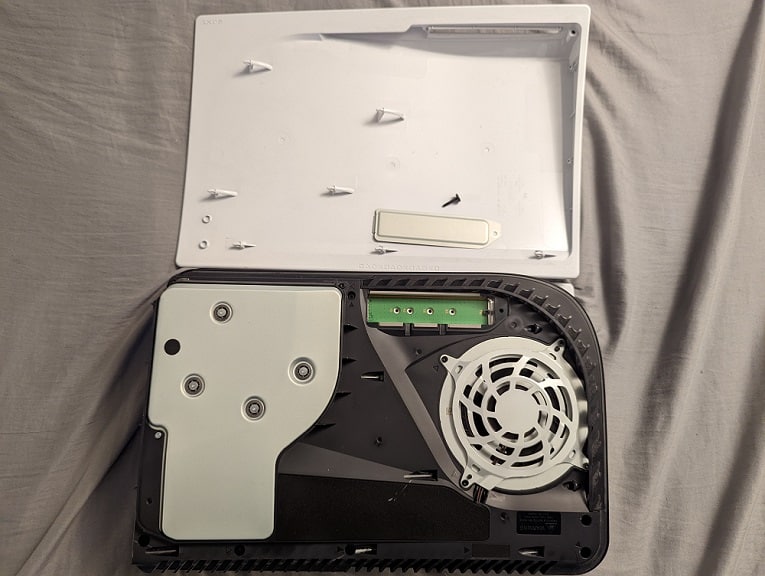
7. Lift up the bottom right corner of the outer case and then gently slide the outer case off to the left side with your left hand.

8. With the outer case removed, you should see a rectangular metal plate covering the m2 expansion bay.

9. Use a cross-head screwdriver to remove the screw holding the metal plate in place and then remove plate to access M.2 expansion bay.

10. Inside of the bay, you need to remove the screw and spacer.

11. Place the spacer you removed from the previous step into the “80” hole in the bay.

12. Next, insert your Kingston FURY Renegade into the M.2 slot on your PS5 from a diagonally upwards position.

13. With your SSD inserted, press down on the other end of the drive and then use the screw you previously removed from the bay to secure the drive into the “80” hole.

With the Kingston FURY Renegade inserted and secured into place, screw back in the metal cover you previously removed for the M.2 SSD bay.

14. You then need to slide the outer cover back into place starting from the left side.

How to format Kingston FURY Renegade for PS5

With the FURY Renegade inserted, you can now format the solid state drive for use with your PlayStation 5.

To do so, you need to do the following:

1. Reattach the HDMI cable, power cord as well as any other cables and accessories into your system.

2. Turn on your PS5.

3. Before getting to the home screen, you should see a M.2 SSD Storage notification.

4. To format, first press the PS button on your DualSense to use it.

5. Next, you need to select Format M.2 SSD.

6. After the formatting is done, you will see a speed test of the sequential read speed for the Kingston FURY Renegade.

7. Select OK to complete the formatting in order to boot to the home screen.

Where to find Kingston FURY Renegade in the PS5 menus

To find the location of your newly installed Kingston FURY Renegade within the menus of your PlayStation 5 system, you can take the following steps:

1. In the home screen, go to Settings, which you can find on the upper right corner.

2. After getting to Settings, you then need to select Storage from the list of available options.

3. Inside of the Storage menu, select M.2 SSD Storage from the left side.

4. On the right side, you should see information on your Kingston FURY Renegade.

5. You can also use this same menu to move games between the FURY Renegade and the internal SSD storage, reformat the FURY Renegade as well as change the default location for installing a game.

LG C2 wall mount specs

In 2022, LG released the new C2 television model. If you want to put this new OLED TV directly on a wall, then you can take a look at this wall mount compatible guide.

What is the LG C2?

Unlike 2021’s C1, the LG C2 comes with an OLED evo panel that provide higher peak brightness levels in addition to offering better protection against screen burn-in. By using a new processor, the new TV model should also do a better job at upscaling video when compared to its predecessor. Furthermore, it is capable of outputting virtual 7.1.2 surround sound through the TV speakers.

With the C2, LG also introduced the new 42” screen size, which is a great alternative if you don’t have a lot of space in your room and/or want to use the television set as a computer monitor.

LG C2 Screen Sizes

Along with the 42-inch model, the LG C2 can also be bought in the 48-inch, 55-inch, 65-inch, 77-inch and 83-inch screen sizes.

You can find the model number for each available size for this television series below:

  • 42” LG C2 4K Smart OLED TV (OLED42C2)
  • 48” LG C2 4K Smart OLED TV (OLED48C2)
  • 55” LG C2 4K Smart OLED TV (OLED55C2)
  • 65” LG C2 4K Smart OLED TV (OLED65C2)
  • 77” LG C2 4K Smart OLED TV (OLED77C2)
  • 83” LG C2 4K Smart OLED TV (OLED83C2)

LG C2 Dimensions without Stand

Dimensions without Stand (in millimeters):

  • 42” LG C2: 932 mm x 540 mm x 41.1 mm
  • 48” LG C2: 1071 mm x 618 mm x 46.9 mm
  • 55” LG C2: 1222 mm x 703 mm x 45.1 mm
  • 65” LG C2: 1441 mm x 826 mm x 45.1 mm
  • 77” LG C2: 1711 mm x 982 mm x 47.1 mm
  • 83” LG C2: 1851 mm x 1062 mm x 55.3 mm

Dimensions without Stand (in centimeters):

  • 42” LG C2: 93.2 cm x 54 cm x 4.11 cm
  • 48” LG C2: 107.1 cm x 61.8 cm x 4.69 cm
  • 55” LG C2: 122.2 cm x 70.3 cm x 4.51 cm
  • 65” LG C2: 144.1 cm x 82.6 cm x 4.51 cm
  • 77” LG C2: 171.1 cm x 98.2 cm x 4.71 cm
  • 83” LG C2: 185.1 cm x 106.2 cm x 5.53 cm

Dimensions without Stand (in inches):

  • 42” LG C2: 36.69 inches x 21.26 inches x 1.62 inch
  • 48” LG C2: 42.17 inches x 24.33 inches x 1.85 inch
  • 55” LG C2: 48.11 inches x 27.68 inches x 1.78 inch
  • 65” LG C2: 56.73 inches x 32.52 inches x 1.78 inch
  • 77” LG C2: 67.36 inches x 38.66 inches x 1.85 inch
  • 83” LG C2: 72.88 inches x 41.81 inches x 2.18 inches

LG C2 Weight without Stand

Weight without Stand (in pounds):

  • 42” LG C2: 19.84 lbs.
  • 48” LG C2: 32.85 lbs.
  • 55” LG C2: 28 lbs.
  • 65” LG C2: 32.63 lbs.
  • 77” LG C2: 45.86 lbs.
  • 83” LG C2: 71.21 lbs.

Weight without Stand (in kilograms):

  • 42” LG C2: 9 kg
  • 48” LG C2: 14.9 kg
  • 55” LG C2: 12.7 kg
  • 65” LG C2: 14.8 kg
  • 77” LG C2: 20.8 kg
  • 83” LG C2: 32.3 kg

LG C2 VESA Mounting Pattern

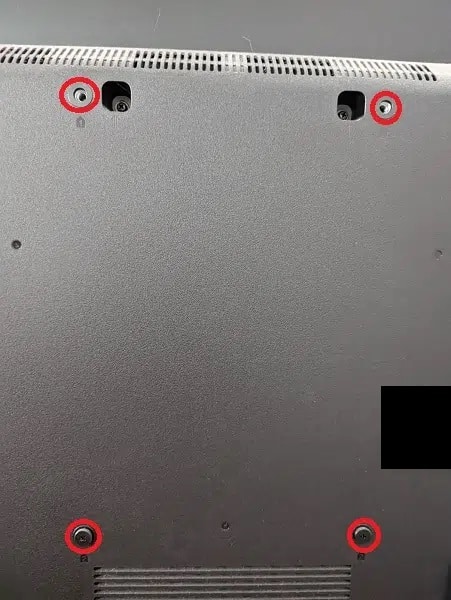
One last specification you need to pay attention for is the VESA Mounting Pattern. This spec measures the horizontal and vertical distances in between the four mounting screw holes that are located on the backside of your LG C2.

The wall mount needs to support the VESA Mounting Pattern. Otherwise, it won’t be compatible with your television set.

The VESA patterns for the 42-inch, 48-inch, 55-inch- 65-inch and 77-inch screen sizes are the same. For the 83-inch version, the distances are a lot longer.

You can find the distances for all the screen sizes of the C2 below:

  • 42” LG C2: 300 mm x 200 mm
  • 48” LG C2: 300 mm x 200 mm
  • 55” LG C2: 300 mm x 200 mm
  • 65” LG C2: 300 mm x 200 mm
  • 77” LG C2: 300 mm x 200 mm
  • 83” LG C2: 400 mm x 400 mm
VESA Mounting Pattern (example from different TV).

What third-party wall mounts are compatible with the LG C2?

As long as a wall mount fits into the VESA Mounting Pattern and is able to hold the television weight, then it should be compatible with your LG C2 TV.

Fixed mounts are usually the most affordable in addition to providing the slimmest distance between the wall and the screen when compared to the other mounting types.

With tilting mount, you can avoid screen glares and get better viewing angles if you decide to mount your C2 higher up on the wall.

The full motion mount provides the most customization options as you will be able to extend, swivel and tilt your LG OLED.

If you are looking for a specific wall mount product that supports the C2, as well as other helpful mounting tools, then you can take a look at our recommendation guide.

Resource:

How to capture screenshots with Galaxy Tab S8, S8+ and S8 Ultra

You can take a screenshot of the content currently being shown on the display screen of the Samsung Galaxy Tab S8, Samsung Galaxy Tab S8+ and Samsung Galaxy Tab S8 Ultra.

To find out how you can properly do so on your tablet, you can take a look at this tutorial from Seeking Tech.

How to capture a screenshot with Galaxy Tab S8, S8+ and S8 Ultra

In order to capture a screenshot with your Galaxy Tab S8, Galaxy Tab S8+ or Galaxy Tab S8 Ultra, you need have to press both the Side Key and Volume Down Key at the same time.

How to capture a screenshot with a gesture

You can also take a screenshot by using a touchscreen on your Samsung tablet.

In order to do so, you need to enable palm swipe by taking the following steps:

  • On your S8 series tablet, you need to open the Settings App.
  • In the Settings App, head over to Advanced Features.
  • You then need to go to Motions and Gestures.
  • Afterwards, head to Palm Swipe to Capture.
  • Finally, make sure that the Palm Swipe to Capture is enabled.
  • To capture a screenshot with the palm swipe, you need to swipe the edge of your hand from one side of the screen to the other.

How to change screenshot capture settings

In order to change the settings of screenshot captures on your S8, S8 Plus or S8 Ultra, you need to do the following:

Open the Settings App once again and then go to Advanced Features.

In the Advanced Features menu, select Screenshots and Screen Recorder.

Inside of the Screenshots and Screen Recorder menu, you have the following options:

  • You can enable the Screenshot Toolbar, which will bring up a toolbar after taking a screenshot where you can quickly edit and share the image.
  • With Hide Status and Navigation Bars, you can make the status and navigation icons invisible in the when capturing a screenshot.
  • By using the Delete Shared Screenshots option, the tablet will automatically delete any screenshots that has been shared through the aforementioned Screenshot Toolbar.
  • With the Screenshot Format option, you can choose between saving the image file as JPG of PNG. For screens with a lot of images, we recommend going with JPG if you want to save space. For screens that are made of mainly texts, you should go with PNG instead.

It is important to note that some apps on your Samsung Galaxy Tab S8, Samsung Galaxy Tab S8+ or Samsung Galaxy Tab S8 Ultra may block the ability to capture any screenshot due to copyrighted content or sensitive information being shown.