The Kingston FURY Renegade solid state drive is compatible with the PlayStation 5 as it offers a PCIe 4.0 NVMe interface, sequential reading speed of up to 7,300 MB per second in addition to a low-profile graphene aluminum heat spreader that fits into the docking bay of the game console.
You can take a look at this step-by-step guide to see how you can install this M.2 SSD to your PS5 or PS5 Digital Edition system.
Compatible Kingston FURY Renegade Capacities
All available capacity options of the FURY Renegade will work with the PlayStation 5. Of course, the bigger sizes provide more storage for your games.
You can find the PS5 compatible capacities, as well as the associated mode numbers, of the product below:
- 500 GB Kingston FURY Renegade PCIe 4.0 NVMe M.2 SSD (SFYRD/500G)
- 1 TB Kingston FURY Renegade PCIe 4.0 NVMe M.2 SSD (SFYRD/1000G)
- 2 TB Kingston FURY Renegade PCIe 4.0 NVMe M.2 SSD (SFYRD/2000G)
- 4 TB Kingston FURY Renegade PCIe 4.0 NVMe M.2 SSD (SFYRD/4000G)
Updating to the latest PS5 firmware
If you haven’t updated the firmware of your PlayStation 5 in a long time, then the Kingston FURY Renegade may not work even if you correctly inserted in the M.2 SSD expansion bay.
So, if you haven’t done so already, make sure you update to the latest available firmware of your system.
How to insert Kingston FURY Renegade SSD to PS5
With your game console updated to the latest firmware version, you can now start the process of inserting the FURY Renegade.
To insert, you need to take the following steps:
1. If you haven’t done so already, you need to shut down your PlayStation 5 as you will need to unplug and open it.
2. After turning off your system, the next step is to disconnect the power cord, HDMI cable as well as other cables and accessories you have plugged into your PS5.
3. If you have the stand attached as well, then you also need to remove it to continue.
4. With nothing attached to the system, lay it down so that the side with big PS logo is underneath. You should probably find a soft surface (for this process, we used a bed).
5. Next, position the system so that its back side, where the HDMI and power ports are located, is facing you.
6. Now, from your vantage point, put your right hand on the bottom right corner of the outer case and you left hand on the upper left corner of the outer case.
7. Lift up the bottom right corner of the outer case and then gently slide the outer case off to the left side with your left hand.
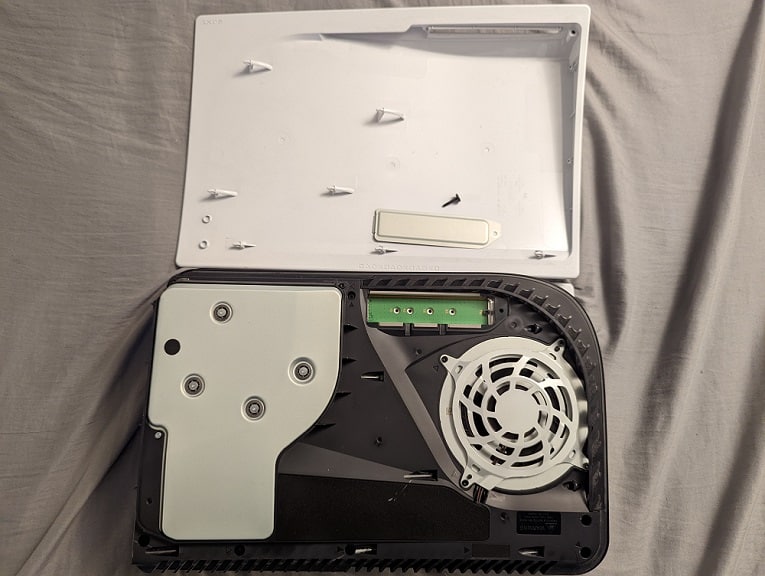
8. With the outer case removed, you should see a rectangular metal plate covering the m2 expansion bay.
9. Use a cross-head screwdriver to remove the screw holding the metal plate in place and then remove plate to access M.2 expansion bay.
10. Inside of the bay, you need to remove the screw and spacer.
11. Place the spacer you removed from the previous step into the “80” hole in the bay.
12. Next, insert your Kingston FURY Renegade into the M.2 slot on your PS5 from a diagonally upwards position.
13. With your SSD inserted, press down on the other end of the drive and then use the screw you previously removed from the bay to secure the drive into the “80” hole.
With the Kingston FURY Renegade inserted and secured into place, screw back in the metal cover you previously removed for the M.2 SSD bay.
14. You then need to slide the outer cover back into place starting from the left side.
How to format Kingston FURY Renegade for PS5
With the FURY Renegade inserted, you can now format the solid state drive for use with your PlayStation 5.
To do so, you need to do the following:
1. Reattach the HDMI cable, power cord as well as any other cables and accessories into your system.
2. Turn on your PS5.
3. Before getting to the home screen, you should see a M.2 SSD Storage notification.
4. To format, first press the PS button on your DualSense to use it.
5. Next, you need to select Format M.2 SSD.
6. After the formatting is done, you will see a speed test of the sequential read speed for the Kingston FURY Renegade.
7. Select OK to complete the formatting in order to boot to the home screen.
Where to find Kingston FURY Renegade in the PS5 menus
To find the location of your newly installed Kingston FURY Renegade within the menus of your PlayStation 5 system, you can take the following steps:
1. In the home screen, go to Settings, which you can find on the upper right corner.
2. After getting to Settings, you then need to select Storage from the list of available options.
3. Inside of the Storage menu, select M.2 SSD Storage from the left side.
4. On the right side, you should see information on your Kingston FURY Renegade.
5. You can also use this same menu to move games between the FURY Renegade and the internal SSD storage, reformat the FURY Renegade as well as change the default location for installing a game.