How to enable and disable PS5 motion and touchpad typing

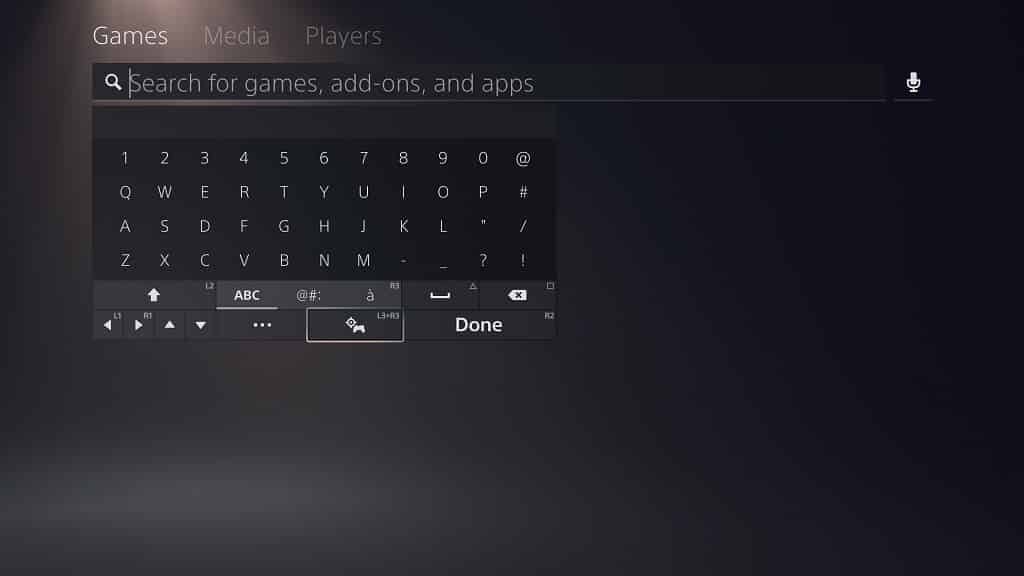
In order to look for games, apps, users and other stuff on the PlayStation 5 and PlayStation 5 Digital Edition system, you need to use the search function by selecting the magnifying glass icon. By utilizing search, you will bring up a virtual keyboard where you can input the search term.

The same keyboard will appear any time you need to input any specific details, such as your name, address, user name and more.

You can take a look at this tutorial at Seeking Tech to see how you can enable, as well as disable, motion typing and touchpad typing on your PS5 console.

How to enable motion and touchpad typing on PS5

In order to enable motion or touchpad typing when using the virtual keyboard on your PlayStation 5 and PlayStation 5 Digital Edition system, you need to take the following steps:

1. With the virtual keyboard on screen, you should see a symbol that looks like a controller with a target sight. It is located in between the “…” and Done options.

2. Select that symbol to enable motion typing and touchpad typing.

Alternatively, you can simply press the L3 and R3 buttons at the same to turn on this feature. For the uninformed, the L3 and R3 buttons can be pressed by pushing down on the analog sticks of the controller until you hear a click.

3. With motion and touchpad typing enabled, you should see a circle appear on the screen. You can use the touchpad or the gyro motion of your controller in order to move the circle around and then select any of the keys on the virtual keyboard.

4. Once you finished typing, you can select the Done option on the virtual keyboard or press the R2 button on the controller.

How to disable motion and touchpad typing on PS5

If you don’t want to use motion typing and/or touchpad typing anymore, then you can disable this function by doing any of the following:

  • Select the symbol that has the controller and target sight on the virtual keyboard.
  • Press both the L3 and R3 buttons on your controller at the same time.
  • Press any of the four directional buttons on the directional pad of your controller.
  • Move the left analog stick of your controller in any direction.

How to fix slow read, transfer and write speeds of Samsung T5, T7 and T7 Touch

When using the Samsung T5 Portable Solid State Drive, Samsung T7 Portable Solid State Drive or Samsung T7 Touch Portable Solid State Drive, you may experience slow speeds.

If you think your external SSD is too slow when it comes to reading, transfer and writing, then you can check out this tutorial at Seeking Tech for some potential fixes.

Before we being, we should note that this guide is intended for all capacity versions of the Samsung T5, T7 and T7 Touch. The list should include the following model numbers:

Samsung T5:

  • MU-PA250B
  • MU-PA500B
  • MU-PA1T0B
  • MU-PA2T0B

Samsung T7:

  • MU-PC500H
  • MU-PC500R
  • MU-PC500T
  • MU-PC1T0H
  • MU-PC1T0R
  • MU-PC1T0T
  • MU-PC2T0H
  • MU-PC2T0R
  • MU-PC2T0T

Samsung T7:

  • MU-PC500
  • MU-PC500S
  • MU-PC1T0
  • MU-PC1T0S
  • MU-PC2T0
  • MU-PC2T0S

Potential Solution #1: Using a Different USB Cable and/or USB Port.

The slowdown issues with your T5, T7 or T7 Touch could be related to the USB cable and/or USB port.

For the USB cable, we recommend that you use the same cable that came packed into the retail box of your external solid state drive.

If you don’t have the USB cable that came with your Samsung SSD, then you need to find one that is compatible with USB 3.1 Gen2 interface of the Samsung T5 Portable Solid State Drive or the USB 3.2 Gen2 interface of the Samsung T7 Portable Solid State Drive and Samsung T7 Touch Portable Solid State Drive.

You should also try using another USB port on the connected device. This is because the USB port that you are currently using may be a lower USB specification (which will result in slower speed) or potentially damaged. The USB port should match the aforementioned USB interfaces, which is USB 3.2 Gen2 for the T5 or USB 3.2 Gen2 for the T7 and T7 Touch.

If using a different USB cable or USB port does not make your SSD faster, you can try using your external drive with another device as the current device you are connecting your solid state drive to may have speed bottlenecks that prevent your external SSD from reaching its full performance potential.

Potential Solution #2: Freeing Up Space

Your Samsung T5 Portable Solid State Drive, Samsung T7 Portable Solid State Drive or Samsung T7 Touch Portable Solid State Drive will perform slower if they are near full capacity due to how solid state drives access data. Therefore, we recommend leaving at least 15% of free space on your SSD.

Thus, you need to delete or transfer any of the files you don’t plan on using on your external storage drive until you meet our recommended percentage of free space.

Afterwards, you can try testing the speed of your SSD again to see if it is no longer slow during reading, transferring and/or writing.

Potential Solution #3: Enabling Write Cache on Windows 10

If you are experience slow writing speeds when you connect your external Samsung storage drive on a Windows 10 computer, then you can try enabling Write Cache.

In order to enable write cache, you need to do the following:

1. Locate the icon that represents your Samsung solid state drive in Windows 10.

2. Right click the icon.

3. In the pop-up menu, select Properties.

4. Next, you need to select the Policies tab.

5. Check the box right next to Enable write caching on the device.

6. Select OK to confirm the change.

Enabling write caching should help speed up the performance of your SSD when it comes to writing data. However, you may experience corrupted and/or loss data if the writing process gets interrupted (such as during a power outage or USB cable being disconnected).

Potential Solution #4: Updating the Firmware for T5, T7 or T7 Touch

Updating the firmware for your T5, T7 or T7 Touch may also help improve performance.

You can only update the firmware of your Samsung external storage drive through the Samsung Portable SSD Software. When updating, you should make sure that your SSD isn’t busy reading, writing or transferring data.

To find out how you can upgrade the firmware for the Samsung T5 Portable Solid State Drive, Samsung T7 Portable Solid State Drive or Samsung T7 Touch Portable Solid State Drive, you can check out this guide.

Potential Solution #5: Contacting Samsung

If you are still having speed issues even after trying all of the aforementioned fixes and your Samsung external drive, and you are still covered under warranty, then you can try contacting Samsung to see if they are willing to fix your problems.
How to set up stereo and party modes for JBL Flip 6

The Flip 6 is the latest wireless portable speaker from JBL.

You can check out this step-by-step tutorial at Seeking Tech to see how you can set up stereo or party modes for this product.

What JBL speaker can you connect with the Flip 6?

The Flip 6 is able to connect with the following compatible PartyBoost speakers from JBL:

  • JBL Boombox 2 Portable Bluetooth Speaker
  • JBL Charge 5 Portable Bluetooth Speaker
  • JBL Flip 5 Portable Bluetooth Speaker
  • JBL Flip 6 Portable Bluetooth Speaker
  • JBL Pulse 4 Portable Bluetooth Speaker
  • JBL Xtreme 3 Portable Bluetooth Speaker

To set up stereo mode with the JBL Flip 6, you will need at least one more of the aforementioned PartyBoost speakers.

To set up party mode with the Flip 6, you need at least two more of these PartyBoost speakers.

How to activate stereo and party modes for JBL Flip 6

In order to set up stereo and party modes for the JBL Flip 6, you can take the following steps:

1. First off, make sure that your Flip 6 has been paired to an Android or iOS device.

If it hasn’t, turn on the speaker and then press the Bluetooth button. On the Bluetooth menu of your Android or iOS device, tap the speaker to pair the Flip 6.

2. You should also have the JBL Portable app installed on your Android or iOS device.

You can download this program from the Google Play Store on Android or the Apple App Store on iOS.

3. If you haven’t done so already, turn on the JBL Flip 6.

4. Turn on the rest of the PartyBoost speakers that you are trying to connect with the Flip 6.

5. Connect the Flip 6 to your Android or iOS device.

6. Start playing music on your Android or iOS device.

7. Next, you need to open the JBL Portable app.

8. The application should be able to detect the Flip 6 speaker, which should be playing music.

9. Next, you need to press the Connect/PartyBoost button on the Flip 6 speaker.

For the uninformed, this button looks somewhat like the infinite symbol.

10. Press the Connect/PartyBoost button on the other PartyBoost speakers.

11. The JBL Portable app should now be able to detect the rest of your speakers.

12. Tap the Partymode option that should appear in the application.

13. Finally, you can select Stereo if you have two PartyBoost speakers connected and you want to use one as the left audio output channel and the other as the right audio output channel.

If you have three or more PartyBoost speakers connected, you can also select party mode to so that the audio will output on all the speakers.

What to do when Samsung QN85B or QN90B isn’t turning on

The QN85B and QN90B are the latest Neo QLED Television Sets released by Samsung in 2022. If your TV isn’t turning on, then you can take a look at this troubleshooting guide from Seeking Tech to see what you can do in order to potentially fix your problem.

Before we start, it should be noted that this article is going to be based on the following screen sizes of the QN85B and QN90B series:

  • 55” QN85B Neo QLED 4K UHD TV(QN55QN85BAFXZA)
  • 65” QN85B Neo QLED 4K UHD TV (QN65QN85BAFXZA)
  • 75” QN85B Neo QLED 4K UHD TV (QN75QN85BAFXZA)
  • 85” QN85B Neo QLED 4K UHD TV (QN85QN85BAFXZA)
  • 55” QN90B Neo QLED 4K UHD TV (QN55QN90BAFXZA)
  • 65” QN90B Neo QLED 4K UHD TV (QN65QN90BAFXZA)
  • 75” QN90B Neo QLED 4K UHD TV (QN75QN90BAFXZA)
  • 85” QN90B Neo QLED 4K UHD TV (QN85QN90BAFXZA)

1. The first step that you may want to take is to make sure that your Samsung QN85B or Samsung QN90B is securely plugged into the power outlet as a loose connection may not be enough to power your Neo QLED.

2. You should also check for any potential damage on the power cable.

3. Furthermore, there is a possibility that the power outlet you are using may be damaged. In this case, you can try using a different power outlet.

4. If your TV still isn’t turning on after you make sure that it is connected properly to the power outlet, then the next step you can take is to try to press the power button that is located directly on the screen.

If the TV turns on, then you issue may be related to the TV remote. In this case, make sure that the remote has power and is able to communicate with your QN85B or QN90B. We recommend that you remove any physical objects that may be blocking the line of sight between the remote and television screen.

5. If you are trying to watch something or play a videogame from a connected device, then you should make sure that the device is turned on.

6. If you are using the One Connect Box, then make sure that it is properly connected to your QN85B or QN90B.

7. You can also try disconnecting any HDMI cables and then try to turn on your TV.

8. If none of the aforementioned potential solutions helped with powering on your QN85B or QN90B, then we recommend contacting Samsung for additional support.

If your TV is not powering on due to a hardware issue, then you may need to send it in to get repaired or replaced.

How to fix no sound issues when watching PS5 store videos and trailers

When looking at videos and trailers on the PlayStation Store of your PlayStation 5 or PlayStation 5 Digital Edition system, you may notice that there isn’t any sound. To see how you can fix these issues, you can check out this troubleshooting article from Seeking Tech.

1. The first step we recommend taking is to make sure that the video is actually selected in the store page of the game. If you simply highlighted the video, then it will automatically start playing in the background with muted sound.

To select the video, you simply press the X button on your DualSense controller while it is highlighted. This should make the video full screen and unmute its sound.

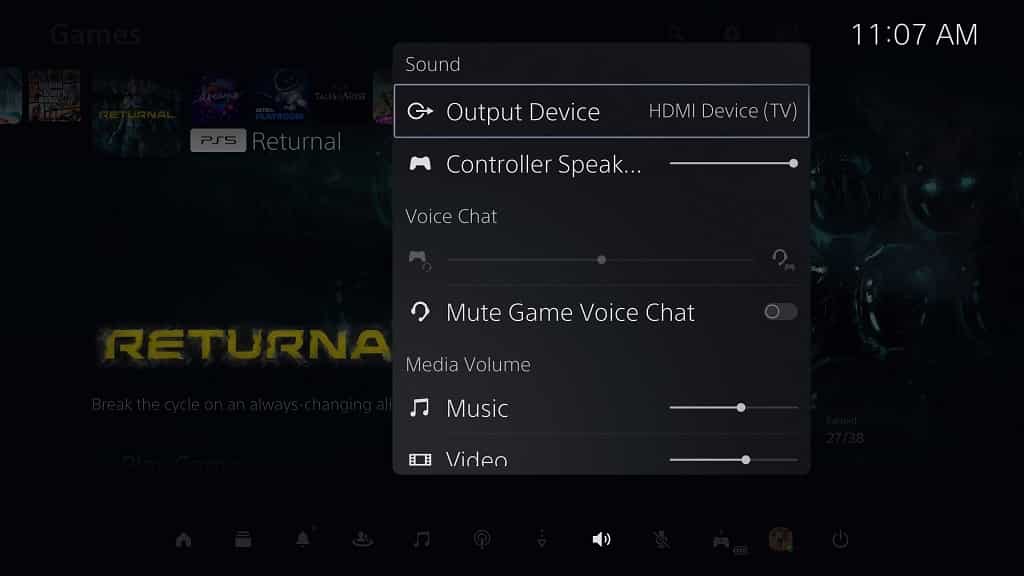
2. If the PlayStation Store video or trailer still has no sound even in full screen mode, then we recommend that you check the Output Device setting by taking the following steps:

  • Press the PS button on your controller to open the Command Center quick menu.
  • Inside the quick menu, select the Sound option located at the bottom row.
  • After getting to the Sound menu, select Output Device.
  • Finally, select your preferred listening device.

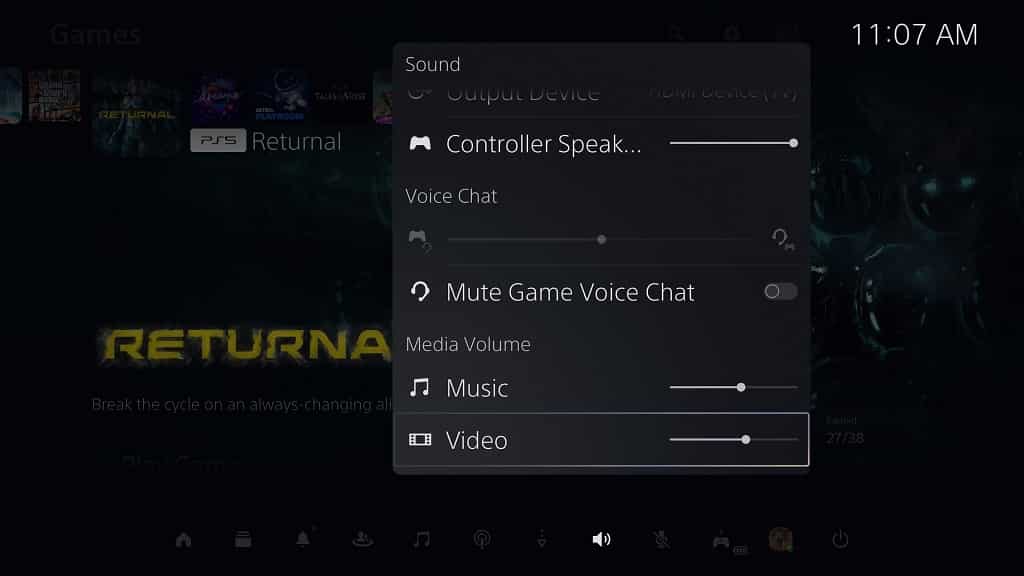
3. If the PlayStation Store videos are still muted, then you can also try adjusting the volume for videos on your PlayStation 5 or PlayStation 5 Digital Edition system.

In order to do so, you need to take the following steps:

  • Open the Command Center quick menu by pressing the PS button on your controller.
  • In the Command Center screen, you then need to select the Sound option.
  • From the Sound menu, select the Video option under the Media Volume section.
  • Next, you need to adjust the volume for videos on your PS5. To make it louder, move the slider to the right.
  • Once you are done adjusting the volume, press the X button on your controller to confirm your choice.

4. You can also try clearing the cache. To find out how to do so on your system, you can take a look at this tutorial.

5. If you still aren’t getting any sound from the trailers or videos from the PlayStation Store, then we recommend that you power cycle your console.

In order to do so, you need to turn off your PS5, unplug it from the power outlet, wait at least 20 minutes, plug the console back into the power source and turn it back on again.

6. There may also be an issue with the PlayStation Store or the PlayStation Network.

In these cases, we recommend that you simply wait and try again at a different time to see whether or not the videos will have sound.

How to fix JBL PartyBox 110 audio quality and Bluetooth issues

When operating the PartyBox 110, you may experience issues with the sound quality as well as Bluetooth connection.

You can take a look at this guide from Seeking Tech to see how you can resolve these issues with the portable wireless speaker.

How to fix Bluetooth connection issues with JBL PartyBox 110

In order to fix any Bluetooth connection problems you may have with the JBL PartyBox 110, you can try taking the following steps:

1. First off, you can try moving the source device (which could your smartphone tablet, and other products that support Bluetooth audio connection) closer to the speaker.

2. If you are using the speaker outdoors, then we recommend moving the source device as close as possible to your speaker as Bluetooth signals tend to get weaker in an open-air space.

3. You should also avoid any solid objects that may be blocking the line of sight between the source device and the PartyBox 110.

4. Other wireless devices may hinder the Bluetooth connection between the source device and the portable speaker. These devices include a Wi-Fi router, microwave, cordless phone and more.

So, if you are any of other devices using wireless communications, we recommend moving the source device and PartyBox 110 in another area.

5. If you are still experiencing Bluetooth connection issues, then you can try to pair the speaker again to your device.

In order to do so, you can take the following steps:

Press and hold the Bluetooth button on the speaker for at least 10 seconds.

On your source device, go to the Bluetooth menu and then forget the connection to the JBL PartyBox 110.

Next press the Bluetooth button on the speaker again.

On the Bluetooth menu of your source device, tap JBL PartyBox 110 to pair it.

If none of the aforementioned solutions help fix your Bluetooth problems, and your product is still covered under warranty, then you can try contacting JBL.

How to fix audio quality issues with JBL PartyBox 110

To fix audio quality issues with the PartyBox 110, you can try doing the following:

1. If your speaker is wet, try to let it completely air dry.

2. If your speaker is dusty, use a dry cloth to remove the dust buildup.

3. If you are using the Bass Boost feature, you can try adjusting it to Level 1, Level 2 or Off.

If the light on the button is a dim white than it indicates that you are using Level 1 of Bass Boost. A solid bright light indicates that you are on Level 2. Finally, if there isn’t any light at all, then it means that this feature is currently disabled.

4. If you are using a Bluetooth connection, then make sure you follow the first guide in this article as the audio quality could be related to having a weak Bluetooth signal.

5. If you are using an AUX input, then you can try using another AUX cable.

6. You can also try playing another audio file on your source device.

7. Moreover, you can try using another source device as the audio quality issues may not be related to your speaker at all.

If the aforementioned potential solutions did not resolve the sound issues, and your PartyBox 110 is still under warranty, then we recommend contacting JBL.

LG B2 wall mount specs

The B2 is part of a new line of OLEDs released by LG in 2022. If you want to mount this TV on a wall, then you can take a look at this wall mount bracket compatibility guide from Seeking Tech.

What is the LG B2?

The B2 series comes with a self-lit OLED screen that should display perfect black levels in addition to an infinite contrast ratio. It will also convert videos to HDR by using Dynamic Tone Mapping.

As for sound, this LG television is also capable of outputting 5.1.2 channel sound trough the built-in speakers. Furthermore, Dolby Atmos is supported.

For gaming, the B2 supports GSYNC, FreeSync and a 120 Hz refresh rate. Not to mention that GeForce Now and Stadia apps come pre-installed with this television set if you want to play games over a streaming service.

LG B2 Screen Sizes

Currently, the B2 series is available in 55-inch, 65-inch and 77-inch screen sizes. You can find the model number for each version below:

  • 55-inch LG B2 4K Smart OLED TV (OLED55B2PUA)
  • 65-inch LG B2 4K Smart OLED TV (OLED65B2PUA)
  • 77-inch LG B2 4K Smart OLED TV (OLED77B2PUA)

LG B2 Dimensions without Stand

Dimensions without Stand (in inches):

  • 55″ LG B2 4K Smart OLED TV: 48.3 inches x 27.9 inches x 1.8 inch
  • 65″ LG B2 4K Smart OLED TV: 57 inches x 32.8 inches x 1.8 inch
  • 77″ LG B2 4K Smart OLED TV: 67.8 inches x 39.1 inches x 2.2 inches

Dimensions without Stand (in millimeters):

  • 55″ LG B2 4K Smart OLED TV: 1228 mm x 708 mm x 46.9 mm
  • 65″ LG B2 4K Smart OLED TV: 1449 mm x 832 mm x 46.9 mm
  • 77″ LG B2 4K Smart OLED TV: 1723 mm x 992 mm x 55.3 mm

LG B2 Weight without Stand

Weight without Stand (in pounds):

  • 55″ LG B2 4K Smart OLED TV: 18.9 lbs.
  • 65″ LG B2 4K Smart OLED TV: 24 lbs.
  • 77″ LG B2 4K Smart OLED TV: 26.7 lbs.

Weight without Stand (in kilograms):

  • 55″ LG B2 4K Smart OLED TV: 8.6 kg
  • 65″ LG B2 4K Smart OLED TV: 10.9 kg
  • 77″ LG B2 4K Smart OLED TV: 12.1 kg

LG B2 VESA Mounting Pattern

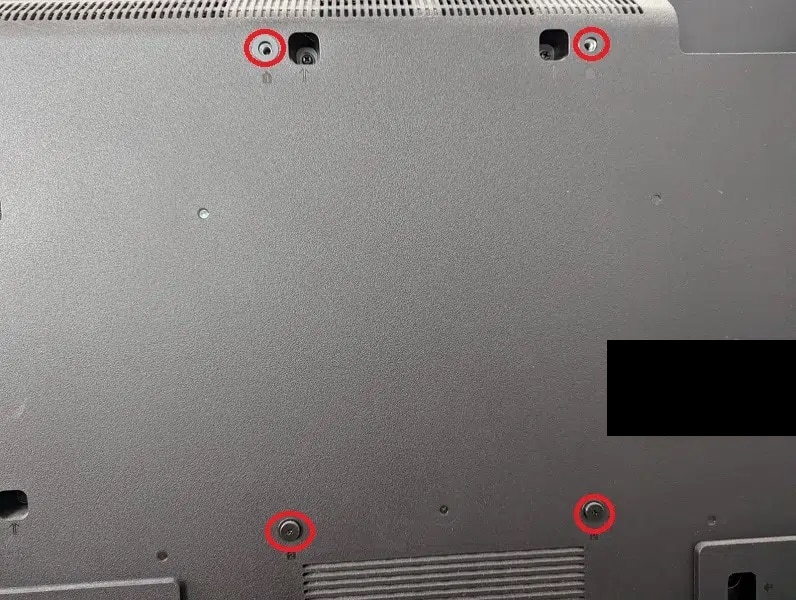
In order for your B2 television set to be installed on a wall mount bracket, the VESA Mounting Patterns need to match. For the uninformed, this specification measures the horizontal and vertical distances of the four screw holes on the back of the television that you need in order to install the screen to a mounting bracket.

The 55” and 65” screen sizes use the same patterns while the 77” screen size use a wider pattern.

You can find the measurements for all screen size options of the B2 below:

  • 55″ LG B2 4K Smart OLED TV: 300 mm x 200 mm
  • 65″ LG B2 4K Smart OLED TV: 300 mm x 200 mm
  • 77″ LG B2 4K Smart OLED TV: 400 mm x 200 mm
VESA Mounting Pattern (example from different TV).

What third-party wall mounts are compatible with the LG B2?

When looking for a third-party mount, you need to make sure that it supports the 300 mm x 200 mm VESA Mounting Pattern of the 55-inch or 65-inch LG B2 4K Smart OLED TVs. For the 77-inch version, the mount needs to support the 400 mm x 200 mm VESA Mounting Pattern.

Furthermore, the mounting bracket needs to have a weight capacity limit that exceeds 18.9 pounds for the 55” version, 24 pounds for the 65” version and 26.7 pounds for the 77” version of the B2.

As for the wall mount type, a fixed mount is the most affordable option as it is designed to simply hold your B2 up on a wall in a fixed position. With a tilt mount, you can tilt the OLED screen up or down for better viewing angles and to eliminate glares. Last but not least, a full motion mount will let you extend, tilt and swivel your LG television.

If you are looking for specific product recommendations, then you can check out this guide to find what are the most suitable options for the LG B2.

Resource:

How to eject a disc stuck inside the PS5

With the standard PlayStation 5 system, you should be able to easily eject the disc from the disc slot. If your game or media disc gets stuck, then you can take a look at this troubleshooting guide from Seeking Tech to see how you can free it.

Before we being, it is important to note that this guide is based on the regular PlayStation 5. The PlayStation 5 Digital Edition does not have a disc drive; therefore, a disc can’t get stuck in it as there is no way to put the media in the digital-only system to begin with.

How to normally eject a disc from inside

There are two ways that you can normally get a disc out of your PlayStation 5 system.

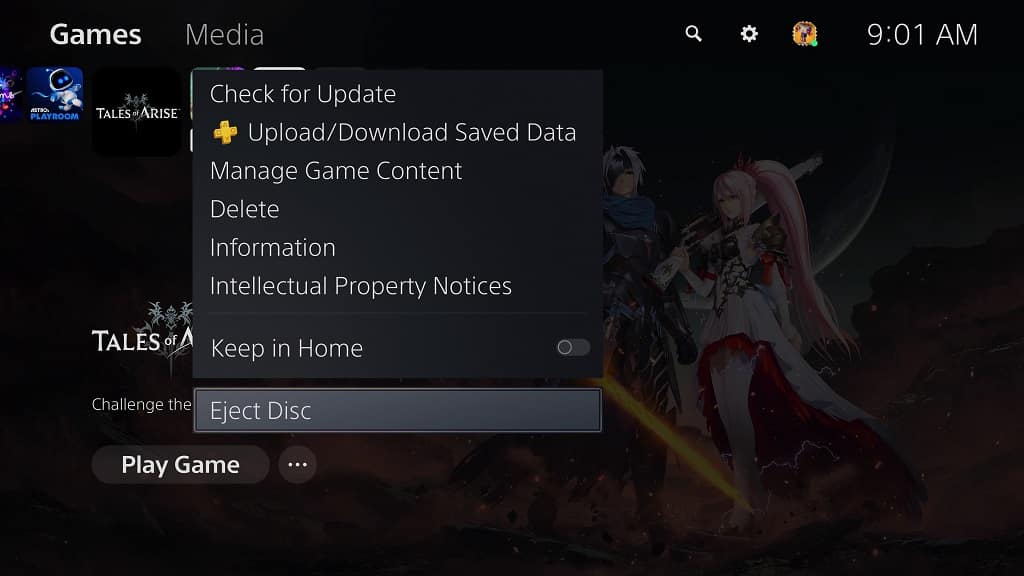
The first is to go to the Home Screen, which is the main system menu where you can select which game to play. From there, hover over the disc game icon. With the videogame highlighted, press the Options button (which has the three horizontal lines) on the DualSense. Finally, select the Eject Disc option, which should be at the very bottom of the pop-up menu.

The second method is to simply press the eject button located directly on the PlayStation 5 system.

How to eject a disc stuck that is inside the PlayStation 5

If the disc is not ejecting all the way out (or not at all) when using either of the aforementioned methods, then we recommend that you try taking the following steps:

1. Turn off your PS5 system if you haven’t done so already.

2. After the system has shut down, unplug the cables and other accessories you have connected.

3. You also need to remove the stand.

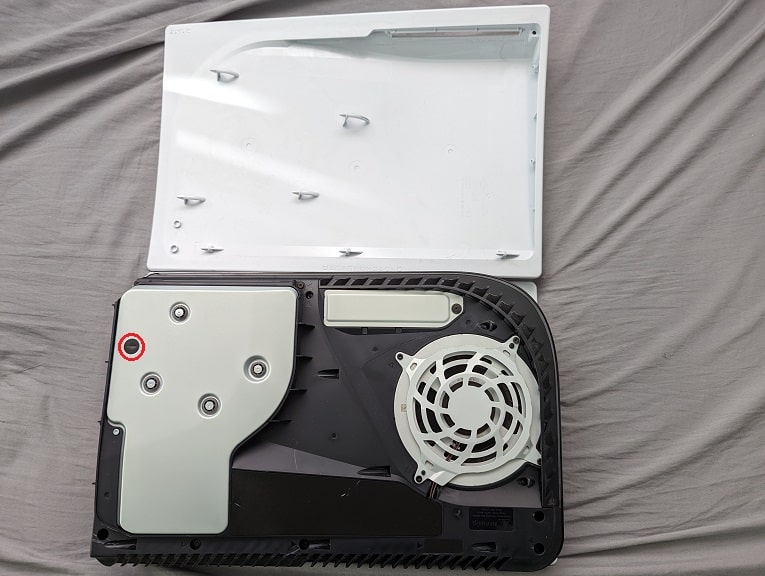
4. Afterwards, lay down your PlayStation 5 so that the PS logo side of the console is facing downwards. The back of the system, which has the HDMI and power ports, should be facing towards you.

5. Now, from your vantage point, you need to put your left hand on the top left corner of the outer case and then your right hand on the bottom right corner of the outer case.

6. Use you right hand to lift up the bottom right corner upwards and the slide the outer case off to the left.

7. With the outer case removed, you should see a black circular film located on the top left side.

Keep in mind that some of the newer revisions of the PS5 may not contain this film. With that said the location should still be the same.

8. Remove the black circular film if you have it to gain access to the screw hole.

9. Use a crosshead screwdriver clockwise on the screw to slowly eject the stuck disc.

10. Once you see a vast majority of the disc is completely out of the PS5’s disc slot, you can safely use your hand to full remove the disc media.

11. With the disc ejected, you can put back in the outer case by sliding it in starting from the left.

12. You can then reinstall the stand.

13. Finally, plug back in all the cables and accessories you previously removed.

If the disc keeps getting stuck in your PlayStation 5, then you might want to contact Sony about potentially getting your system repaired.

How to fix Samsung QN85B and QN90B inaccurate color issues

When watching videos and/or playing games on your Samsung QN85B or QN90B Neo QLED 4K TV, you may notice that the colors may look off.

You can take a look at this troubleshooting article from Seeking Tech to see how you can potentially fix inaccurate display colors with both of these television sets.

Before we begin, it should be noted that this guide is going to be based on the following model numbers:

  • 55” Samsung QN85B Neo QLED (QN55QN85BAFXZA)
  • 65” Samsung QN85B Neo QLED (QN65QN85BAFXZA)
  • 75” Samsung QN85B Neo QLED (QN75QN85BAFXZA)
  • 85” Samsung QN85B Neo QLED (QN85QN85BAFXZA)
  • 55” Samsung QN90B Neo QLED (QN55QN90BAFXZA)
  • 65” Samsung QN90B Neo QLED (QN65QN90BAFXZA)
  • 75” Samsung QN90B Neo QLED (QN75QN90BAFXZA)
  • 85” Samsung QN90B Neo QLED (QN85QN90BAFXZA)

1. The first step you can take is to try resetting the picture settings.

In order to do so, you need to press the home button on the remote controller and then head to Menu > Settings > All Settings > Picture > Expert Settings > Reset Picture.

2. You can also try disabling the Brightness Optimization setting by first pressing the home button on the QN85B or QN90B remote and then selecting Menu > Settings > All Settings > General & Privacy > Power and Energy Saving > Brightness Optimization.

Afterwards, make sure that Brightness Optimization is currently turned off.

3. We also recommend that you disable Brightness Reduction, which you can do by pressing the home button on the remote and then going to Menu > Settings > All Settings > General & Privacy > Power and Energy Saving > Brightness Reduction.

You should then make sure that Brightness Reduction is turned off.

4. If the colors still do not look right, then you may want to change the picture mode of your Samsung QN85B or QN90B.

In order to do so, you need to press the home button and then go to Menu > Settings > All Settings > Picture > Picture Mode.

5. You can also try manually adjusting several expert picture settings.

To do so, you need to press the home button on the remote and then head to Menu > Settings > All Settings > Picture > Expert Settings.

You can then try changing the following from the Expert Settings menu in order to get more accurate colors:

  • Contrast
  • Brightness
  • Sharpness
  • Color
  • Tint (G/R)

6. We also suggest that you perform a picture test by first pressing the home button on the remote control and then going to Menu > Settings > Support > Device Care > Self Diagnosis Picture Test.

If the test shows that there is nothing wrong with your QN85B or QN90B screen, then the inaccurate colors may be caused by the device that is connected to your TV.

In this case, you should refer to the instruction’s manual of the connected device to see what you can do in order to get better colors.

How to prevent Samsung QN85B or QN90B from turning off by itself

When using your QN85B or QN90B, you may notice that the Samsung Neo QLED 4K Television Set may randomly turn off by itself.

To see how you can stop this phenomenon from happening, you can take a look at this troubleshooting guide from Seeking Tech.

To begin, we should note that this article is based on the following versions of the QN85B and QN90B:

  • 55” QN85B Neo QLED (QN55QN85BAFXZA)
  • 65” QN85B Neo QLED (QN65QN85BAFXZA)
  • 75” QN85B Neo QLED (QN75QN85BAFXZA)
  • 85” QN85B Neo QLED (QN85QN85BAFXZA)
  • 55” QN90B Neo QLED (QN55QN90BAFXZA)
  • 65” QN90B Neo QLED (QN65QN90BAFXZA)
  • 75” QN90B Neo QLED (QN75QN90BAFXZA)
  • 85” QN90B Neo QLED (QN85QN90BAFXZA)

1. The first step we recommend taking is to make sure that your QN85B or QN90B is properly plugged into the power outlet.

2. You can also try using a different power outlet to see if the random shut downs are still occurring.

3. Moreover, you need to make sure that Sleep Timer isn’t being used. This feature will automatically shut down your QN85B or QN90B at a set time of the day.

In order to disable it, you need to take the following steps:

  • Press the home button on the remote for your television set.
  • Select Menu.
  • Select Settings.
  • Select All Settings.
  • Select General & Privacy.
  • Select System Manager.
  • Select Time.
  • Select Sleep Timer.
  • Lastly, make sure that Sleep Timer is turned off.

4. Auto Power Off may also be causing your Samsung Neo QLED to turn off.

To remove this feature, you need to do the following:

  • Press the home button on the remote controller of your TV set.
  • Next, you need to go to Menu.
  • Go to Settings.
  • Go to All Settings.
  • Go to General & Privacy.
  • Got to Power and Energy Saving.
  • Go to Auto Power Off.
  • Finally, you need to make sure that Auto Power Off is disabled.

5. The Off Timer may also be causing your Samsung QN85B or QN90B to seemingly shut down at random.

In order to stop this from happening, you need to take the following steps:

  • Start by pressing the home button on the remote of your Samsung TV.
  • Next, you need to head to Settings.
  • Head to All Settings.
  • Head to General & Privacy.
  • Head to System Manager.
  • Head to Time.
  • Head to Off Timer.
  • Lastly, make sure that the Off Timer has been disabled.

6. If your QN85B or QN90B is still randomly shutting down after you try all of the aforementioned potential solutions, then we recommend contacting Samsung for additional support.