How to remove black bars and dotted lines for Samsung QN85B or QN90B

With the Samsung QN85B and QN90B Neo QLED 4K Television Sets, you are able to watch videos and play videogames with different aspect ratios. By doing so however, you may see black bars and dotted lines.

You can check out this guide from Seeking Tech to see how you can get rid of the black bars and dotted lines when using your TV.

Before we begin, we would like to note that this article is going to be based on the following screen size options of the QN85B and QN90B series:

  • 55” QN85B Neo QLED 4K TV (QN55QN85BAFXZA)
  • 65” QN85B Neo QLED 4K TV (QN65QN85BAFXZA)
  • 75” QN85B Neo QLED 4K TV (QN75QN85BAFXZA)
  • 85” QN85B Neo QLED 4K TV (QN85QN85BAFXZA)
  • 55” QN90B Neo QLED 4K TV (QN55QN90BAFXZA)
  • 65” QN90B Neo QLED 4K TV (QN65QN90BAFXZA)
  • 75” QN90B Neo QLED 4K TV (QN75QN90BAFXZA)
  • 85” QN90B Neo QLED 4K TV (QN85QN90BAFXZA)

How to remove black bars QN85B and QN90B

If you are seeing black bars on the edge of your Samsung QN85B or Samsung QN90B, then it is due to the content being displayed in a different aspect ratio.

Both of these television series have a native 16:9 aspect ratio. So, if you are watching or playing something that is 4:3 then the TV will end up displaying black bars.

In order to remove black bars, you can change the display size of the external device if you are using one to watch a video or play a game.

You can also change the picture size on your QN85B or QN90B by taking the following steps:

1. Press the home button located on your remote controller.

2. Next, you need to go to Menu.

3. You then need to go to Settings.

4. Afterwards, go to All Settings.

5. You then need to go to Picture

6. You should then go to Picture Size Settings.

7. Go to Picture Size.

8. Set Picture Size to full screen.

How to remove dotted lines QN85B and QN90B

Your Samsung QN85B or Samsung QN90B may display dotted lines when it is too zoomed into a video or videogame, resulting in the edges being cut off.

In order to remove the dotted lines, you can try changing the display size through the external device if you are using one.

Otherwise, you can adjust the picture size of the Samsung Neo QLED 4K TV by doing the following:

1. Start by pressing the home button on the remote.

2. Next, you need to select Menu.

3. You then need to select Settings.

4. In Settings, select All Settings.

5. From the All Settings menu, select Picture.

6. You then need to select Picture Size Settings.

7. Afterwards, select Picture Size.

8. Finally, set Picture Size to 16:9 Standard.

Can you reset trophies on PS5?

You can earn trophies when play PS4 or PS5 videogames on your PlayStation 5 and PlayStation 5 Digital Edition system. These will mark your achievements when accomplishing certain tasks in a game.

So, is it possible to reset your trophy progress on the PS5 console? You can find out in this article from Seeking Tech.

Is it possible to reset trophies on the PS5?

There is currently no way you can reset your trophy progress on your PlayStation 5. What you can do is delete the trophy lists for games where you haven’t earned a single trophy yet. You can also create a brand-new PlayStation Network account so that you can re-earn the trophies.

How to delete trophies on PS5

In order to delete trophies on your PlayStation 5 and PlayStation 5 Digital Edition system, you need to take the following steps:

1. First off, make sure you go to the Home Screen of your console, which is where you can select which game or media app to open.

If you aren’t there, you can press and hold the PS button on your DualSense to open it.

2. In the Home Screen, select your profile picture, which should be on the top right corner in between the Settings and Clock.

3. In the pop-up menu, select Trophies.

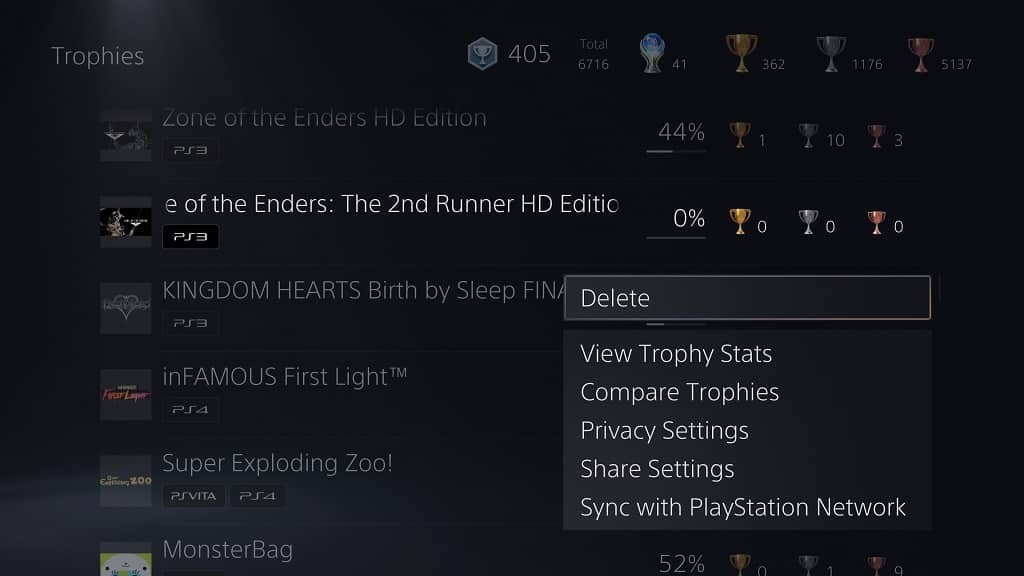
4. Inside the Trophies, select the game that has 0% trophy progress.

5. In the pop-up menu, select Delete to remove the trophy list from that particular game off from your account.

If you decided to play the game again, then its trophy list will reappear on your account.

How to create a new PSN account to re-earn trophies on PS5

In order to create a new PlayStation Network account so that you can re-earn trophies on your PlayStation 5 and PlayStation 5 Digital Edition console, you can try taking the following steps:

1. From the Home Screen, select your profile picture.

2. In the pop-up menu, you need to select Switch User.

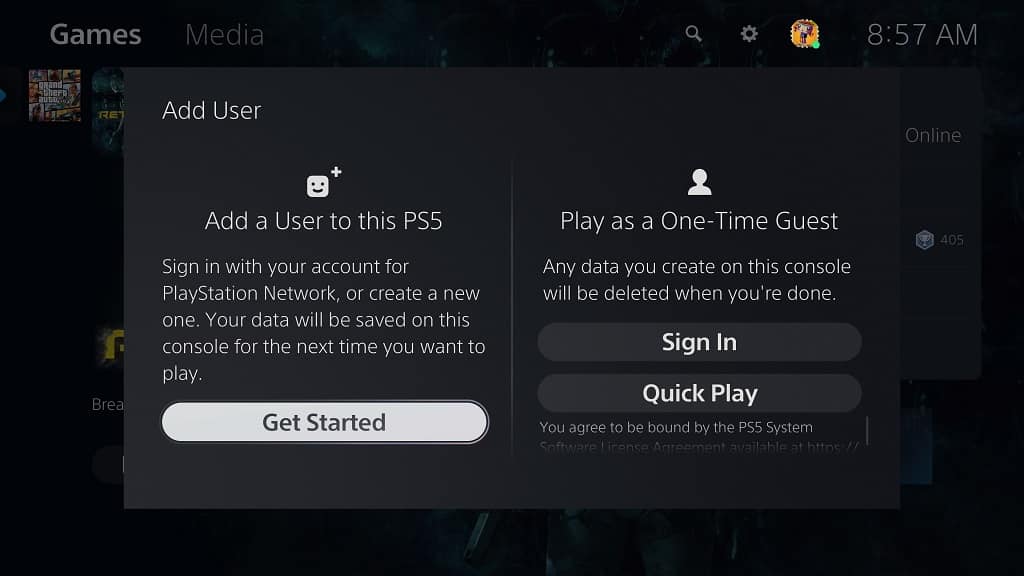
3. Inside the Switch User menu, you then need to select Add User.

4. In the Add User menu, select Get Started.

5. Follow the on-screen instructions to create your new account.

Anytime you want to re-earn trophies for a game, you need to switch over to the new PSN account. To do so quickly, press the PS button on your DualSense to bring up the Command Center quick menu. From there, select your profile picture on the bottom row. In the pop-up menu, select Switch User. Finally, you need to select your new PlayStation Network account.

LG G2 wall mount specs

The new G2 television series from LG is designed to be wall mounted. You can take a look at this guide from Seeking Tech to see how you can make sure that a wall mount bracket is compatible with this OLED TV set.

What is the LG G2?

The G2 is a television set released by LG in 2022. It comes equipped with the evo OLED panel, which will provide higher peak brightness and reduce the risk of burn-in when compared to a regular OLED screen.

This TV also uses a α9 Gen 5 processor that will enhance upscaling and sound output (as the speakers are capable of outputting virtual 7.1.2 surround sound).

When it comes to gaming, the G2 features multiple HDMI 2.1 ports in addition to support all three adaptative sync modes (GSYNC, FreeSync and Variable Refresh Rate).

LG G2 Screen Sizes

You can find a list of currently available screen sizes, as well as the model numbers, for the G2 series below:

  • LG G2 55-inch evo Gallery Edition OLED TV (OLED55G2PUA)
  • LG G2 65-inch evo Gallery Edition OLED TV (OLED65G2PUA)
  • LG G2 77-inch evo Gallery Edition OLED TV (OLED77G2PUA)
  • LG G2 83-inch evo Gallery Edition OLED TV (OLED83G2PUA)

LG G2 Dimensions without Stand

Dimensions without Stand (in inches):

  • 55” LG G2 evo Gallery Edition OLED TV: 48.1 inches x 27.5 inches x 1.1 inch
  • 65” LG G2 evo Gallery Edition OLED TV: 56.7 inches x 32.3 inches x 1.0 inch
  • 77” LG G2 evo Gallery Edition OLED TV: 67.4 inches x 38.4 inches x 1.0 inch
  • 83” LG G2 evo Gallery Edition OLED TV: 72.7 inches x 41.4 inches x 1.1 inch

Dimensions without Stand (in millimeters):

  • 55” LG G2 evo Gallery Edition OLED TV: 1221.7 mm x 698.5 mm x 27.9 mm
  • 65” LG G2 evo Gallery Edition OLED TV: 1440.2 mm x 820.4 mm x 25.4 mm
  • 77” LG G2 evo Gallery Edition OLED TV: 1712 mm x 975.4 mm x 25.4 mm
  • 83” LG G2 evo Gallery Edition OLED TV: 1846.6 mm x 1051.6 mm x 27.9 mm

LG G2 Weight without Stand

Weight without Stand (in pounds):

  • 55” LG G2 evo Gallery Edition OLED TV: 37.7 lbs.
  • 65” LG G2 evo Gallery Edition OLED TV: 50.3 lbs.
  • 77” LG G2 evo Gallery Edition OLED TV: 77.4 lbs.
  • 83” LG G2 evo Gallery Edition OLED TV: 90.2 lbs.

Weight without Stand (in kilograms):

  • 55” LG G2 evo Gallery Edition OLED TV: 17.1 kg
  • 65” LG G2 evo Gallery Edition OLED TV: 22.8 kg
  • 77” LG G2 evo Gallery Edition OLED TV: 35.1 kg
  • 83” LG G2 evo Gallery Edition OLED TV: 40.9 kg

LG G2 VESA Mounting Pattern

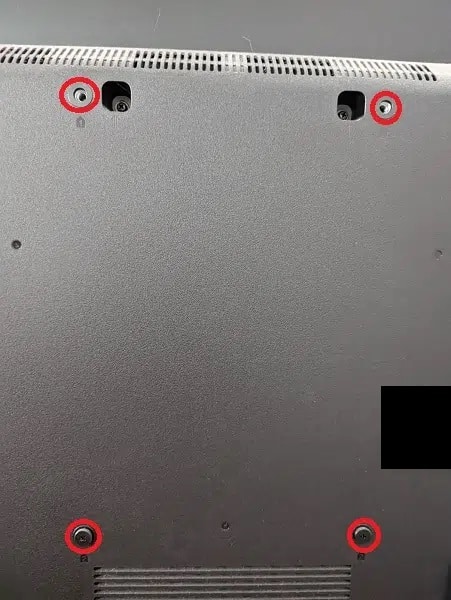
For a wall mount to be compatible with the LG G2 evo Gallery Edition, it will need to fit the TV’s VESA Mounting Pattern. This specification measures the horizontal and vertical distances of the four mounting screw holes located on the back of the OLED screen.

You can find the measurements below:

  • 55” LG G2 evo Gallery Edition OLED TV: 300 mm x 200 mm
  • 65” LG G2 evo Gallery Edition OLED TV: 300 mm x 300 mm
  • 77” LG G2 evo Gallery Edition OLED TV: 300 mm x 300 mm
  • 83” LG G2 evo Gallery Edition OLED TV: 400 mm x 400 mm

What wall mounts are compatible with the LG G2?

To support the LG G2, a wall mount needs to match the VESA Mounting Pattern and be able to hold the weight of the television set.

For the 55” LG G2, the mount needs to support the 300 mm x 200 mm VESA Mounting Pattern and be able to hold at least 37.7 pounds.

With the 65” version, the mounting bracket must fit into the 300 mm x 300 mm VESA Mounting Pattern and support at least 50.3 pounds.

For the 77” screen size, the mount needs to support the 300 mm x 300 mm VESA Mounting Pattern and hold at least 77.4 pounds.

When it comes to the 83” G2, the wall mount must support the 400 mm x 400 mm VESA Mounting Pattern in addition to being able to hold up to 90.2 pounds.

As for mounting types, fixed mounts will simply hold your LG G2 in a fixed position. With a tilting mount, you can tilt the screen up or down. Last but not least, a full motion mount will let you extend, tilt and swivel this OLED TV.

If you are looking for specific recommendations, then you can take a look at this guide to find the most suitable wall mount options.

What’s the difference between the 2020 Tile Pro and 2022 Tile Pro?

Tile released a new Pro version of their Bluetooth tracking device.

You can take a look at this comparison guide to see what are the major differences between the 2020 and 2022 versions of the Tile Pro.

Quick Summary

When compared to the 2020 Tile Pro, the 2022 version is heavier, longer and thicker but is not as wide. Furthermore, the newer model also come with a QR code along with offering better protection against dust buildup and water.

Aside from the aforementioned differences, the 2020 and 2022 Tile Pros have identical maximum Bluetooth ranges, features, battery life, recommended temperature range and warranty length.

The added QR code, as well as improved protection against dust and water, makes the 2022 Tile Pro a better lost item finder than the 2020 Tile Pro.

2020 Tile Pro vs. 2022 Tile Pro Comparison Chart

You can take a look at Seeking Tech’s comparison table for the 2020 and 2022 versions of the Tile Pro below.

2020 Tile Pro2022 Tile Pro
Dimensions42 mm x 42 mm x 6.5 mm58 mm x 32 mm x 7.5 mm
Weight12 grams14 grams
Keychain Hole?YesYes
Color OptionsBlack

White
Black

White
Bluetooth RangeUp to 400 feetUp to 400 feet
QR Code?NoYes
Features with No SubscriptionsFind Nearby

Find Far Away

Find Your Phone
Find Nearby

Find Far Away

Find Your Phone
Tile Premium FeaturesFind Far Away

Find Your Phone

Smart Alerts Notifications

Unlimited Sharing

30-Day Location History

Premium Customer Care

Worry-Free Warranty

Up to $100 Item Reimbursement
Find Far Away

Find Your Phone

Smart Alerts Notifications

Unlimited Sharing

30-Day Location History

Premium Customer Care

Worry-Free Warranty

Up to $100 Item Reimbursement
Tile Premium Protect FeaturesFind Nearby

Find Far Away

Find Your Phone

Smart Alerts Notifications

Unlimited Sharing

30-Day Location History

Premium Customer Care

Worry-Free Warranty

Up to $1000 Item Reimbursement
Find Nearby

Find Far Away

Find Your Phone

Smart Alerts Notifications

Unlimited Sharing

30-Day Location History

Premium Customer Care

Worry-Free Warranty

Up to $1000 Item Reimbursement
Battery TypeReplaceable batteryReplaceable battery
Battery LifeUp to 1 yearUp to 1 year
Recommended Temperature Range-10°C to 60°C (or 14°F to 140°F)-10°C to 60°C (or 14°F to 140°F)
IP RatingIP55IP67
Warranty1-year manufacturer’s warranty1-year manufacturer’s warranty
PricingCheck price on Amazon.(#CommissionsEarned)Check price on Amazon.(#CommissionsEarned)

Dimensions

When it comes to the physical size, the 2020 tracker is wider. On the other hand, the 2022 version is more elongated and is slightly thicker.

You can find the measurements for these devices below:

  • 2020 Tile Pro: 42 mm x 42 mm x 6.5 mm
  • 2022 Tile Pro: 58 mm x 32 mm x 7.5 mm

Weight

The 2020 Tile Pro weighs in at 12 grams, which is a little less that the 2022 model’s weight of 14 grams.

Keychain Hole

Both of these devices come with a keychain hole that you can use to easily attach the trackers to an item that you want to track.

Color Options

When it comes to color variations, you can pick between black or white for both of these products.

Bluetooth Range

The 2020 and 2022 versions of the Tile Pro have the same maximum Bluetooth range of 400 feet.

The longer the range, the easier it is for you to locate your missing item.

QR Code

With the 2022 version of the Pro, Tile added a QR code at the back of the device. If a stranger happens to find the tracker with your missing item, then they can scan the code to view your contact information (if you previously set one up).

Features

These two trackers come with basic features that you get at no additional costs as you will be able to find your phone, find your lost item from a nearby distance as well as find your lost item from a faraway distance.

You can subscribe to Tile Premium, which offers the following features:

  • Find Far Away
  • Find Your Phone
  • Smart Alerts Notifications
  • Unlimited Sharing
  • 30-Day Location History
  • Premium Customer Care
  • Worry-Free Warranty
  • Up to $100 Item Reimbursement

The Tile Premium costs $2.99 per month or $29.99 per year.

You can also subscribe to the Tile Premium Protect, which includes the following features:

  • Find Nearby
  • Find Far Away
  • Find Your Phone
  • Smart Alerts Notifications
  • Unlimited Sharing
  • 30-Day Location History
  • Premium Customer Care
  • Worry-Free Warranty
  • Up to $1000 Item Reimbursement

The Tile Premium Protect costs $99.99 per year. There is no monthly payment option with this plan.

Battery Type

The 2020 and 2021 Tile Pro Bluetooth trackers come with a replaceable battery.

Battery Life

The batteries that come with these trackers are expected to last one year. You will then need to replace them in order to keep using the devices.

Recommended Temperature Range

Tile recommends that both the 2020 and 2022 versions of the Pro finder should be used within a temperature range of 10°C to 60°C (which translates to 14°F to 140°F).

Ingress Protection

In terms of ingress protection, the 2020 Tile Pro has an IP55 rating. This means that the tracker is protected against any major dust buildup. It should also withstand against high pressure water contact.

The 2022 version has a better IP67 rating as it is completely dust tight. Furthermore, the newer model should be able to withstand being submerged at a maximum depth of 1 meter for up to 30 minutes.

Warranty

The 2020 Tile Pro and 2022 Tile Pro each comes with a 1-year manufacturer’s warranty.

Resource:

How to fix sound clarity issues with Samsung QN85B and QN90B

If you are using your Samsung QN85B or QN90B Neo QLED TV to watch videos and/or play videogames, then you may notice that the sound output may not as sound clear as you may have expected.

To see how you can mark the sound output of your television set clearer, you can check out this tutorial at Seeking Tech.

Before we go on, it is important that this article is based on the following model numbers for the 2022 QN85B and QN90B television series:

  • 55” Samsung QN85B Neo QLED (QN55QN85BAFXZA)
  • 65” Samsung QN85B Neo QLED (QN65QN85BAFXZA)
  • 75” Samsung QN85B Neo QLED (QN75QN85BAFXZA)
  • 85” Samsung QN85B Neo QLED (QN85QN85BAFXZA)
  • 55” Samsung QN90B Neo QLED (QN55QN90BAFXZA)
  • 65” Samsung QN90B Neo QLED (QN65QN90BAFXZA)
  • 75” Samsung QN90B Neo QLED (QN75QN90BAFXZA)
  • 85” Samsung QN90B Neo QLED (QN85QN90BAFXZA)

1. The first step we recommend taking is to make sure that you aren’t accidentally blocking the speakers of your Samsung QN85B or QN90B. Otherwise, the blockage may have reduced some of the clarity of the sound output.

2. You can also try changing the Sound Mode of your television, by taking the following steps:

  • To begin, press the home button on the TV’s remote.
  • Next, head to Menu.
  • From the Menu, go to Settings.
  • In Settings, select All Settings.
  • You then need to go to Sound.
  • Select Sound Mode.
  • Next, you can try changing to a different mode and then test it out to see if the sound clarity is better.

2. If the audio still does not sound clear after you changed the Sound Mode, then the next step you can take is to enable Intelligent Mode, which will automatically adjust the sound output based on your surroundings.

In turn it on, you need to do the following:

  • Start by pushing the home button from the remote of your QN85B or QN90B.
  • You then need to have over to the Menu.
  • Inside of the Menu, select Settings.
  • You then have to select All Settings.
  • Next, go to General & Privacy.
  • Select Intelligent Mode Settings.
  • Go to Intelligent Mode.
  • Finally, make sure that Intelligent Mode is enabled.

3. If you enable Adaptive Sound+, your Samsung television will also optimize the sound output based on your surrounds.

In order to do so, you need to take the following steps:

  • To start off, push the home button on the remote controller.
  • Afterwards, you need to select Menu.
  • You then need to head over to Settings.
  • Next, go to All Settings.
  • In the next step, head over to General & Privacy.
  • You then have to select Intelligent Mode Settings.
  • Select Adaptive Sound+.
  • Lastly, make sure that Adaptive Sound+ is turned on.

If the sound output from your QN85B or QN90B still does not sound clear, then we recommend contacting the support team from Samsung for additional support.

How to fix firmware update issues with the eero 6+ and eero Pro 6E

When trying to update the firmware of your eero 6+ or eero Pro 6E, the process may take longer than what you may expected. The update may even fail.

To see how you can fix these problems, you can take a look at this troubleshooting guide from Seeking Tech.

1. If you can afford to be patient, then the first step we recommend taking is to simply wait for the firmware update to complete if it is still ongoing.

You can let the device try to update overnight, when you go to school, when you need to work or when you have to run errands.

2. If the firmware update keeps failing, then you can try power cycling your modem and eero 6+ or eero Pro 6E. By doing so, you should reset your internet connection that may help speed up the process.

To power cycle, unplug the devices from the power outlets. Make sure you don’t unplug your eero 6+ or eero Pro 6E while the update is still in progress. Instead, we recommend waiting until the update fails before you continue.

3. You can also try changing the Wi-Fi name in the eero App. By doing so, you will disconnect the eero network, which may end up speeding up the update process.

In order to do so, you need to take the following steps:

  • Before we begin, make sure you already installed and set up the eero App on your smartphone or mobile device. You can find the application on the Google Play Store if you have an Android device, Apple App store if you have an Apple device and Amazon app store if you have an Amazon device.
  • To start off, open the eero App on your smartphone or mobile device.
  • Next, you need to make sure that you are logged into your eero account.
  • From the first page of the application, tap Settings.
  • You then need to tap the “Wifi name” option.
  • Change the Wi-Fi name to something that you haven’t used before.
  • Tap the Save option. This will disconnect the devices in your eero network.
  • Go back to the Settings menu in the eero App.
  • This time, you need to tap the “Software updates” option.
  • If the firmware update isn’t already in progress, then you need to tap the download option to start it.
  • Once the eero 6+ or eero Pro 6E has been updated to the latest software version, go back to the Settings menu of the application.
  • From Settings, tap the “Wifi name” option.
  • Change the Wi-Fi name to what it was previously.

Once you updated the firmware, future software updates for your eero 6+ or eero Pro 6E should go through more smoothly.

If you are still experiencing firmware update issues after trying all of the aforementioned steps, then we recommend contacting eero in order to get additional support. You might also want to consider contacting your internet service provider (also known as ISP) as the software update problems may be due to an unstable internet connection coming into your home.

How to fix Samsung X5’s disabled write access error

When using the Samsung X5, you may encounter an issue where you can no longer write data on the solid state drive. Instead, you can only read data off of the external storage drive.

If you are encountering this type of issue, then you can follow this troubleshooting guide.

Before we being, we should note that this guide will be covering the 500 GB Samsung X5 Portable Solid State Drive (Model Number: MU-PB500B), 1 TB Samsung X5 Portable Solid State Drive (Model Number: MU-PB1T0B) and 2 TB Samsung X5 Portable Solid State Drive (Model Number: MU-PB2T0B).

How to fix Samsung X5’s disabled write access error on Mac and PC

If you use the exFAT format with the Samsung X5, you could run into write access issues if you are switching between connecting the SSD to a Mac and a Windows PC.

To fix this issue, you can take the following steps:

1. Connect your Samsung X5 Portable Solid State Drive to your Mac.

2. Make sure that the LED on your X5 is displaying a solid white color. If the LED is blinking, then it means that the SSD is busy currently reading or writing data.

3. Once the LED on the X5 is solid white, you need to eject the external drive from your Mac. You can do so with the following methods:

Locate the X5 icon from the desktop and then drag it over to the Trash.

Click on the X5 icon from the desktop. Select File and then Disconnect.

Click on the Finder sidebar, select your X5 storage drive and then Eject.

4. With your X5 SSD disconnected from your Mac, you can safely unplug the drive.

5. Plug your X5 into your Windows PC computer.

6. You may get a dialogue box stating that write access has been disabled. Click on the “Scan and fix” option, which will let your Windows PC perform the Check Disk (CHKDSK) fix.

7. If you don’t see a pop-up dialogue box, you can manually enable Check Disk by first locating your X5 either on the desktop or though File Explorer.

Next, you need to right click on the icon of your X5. Select Properties, then Tools and, finally, Check.

8. Once the Check Disk process has been completed, re-test your X% on your Windows PC and Mac to see if the write access issues have been fixed.

Using the right file format

If the aforementioned solution that not fix the write access errors, the next step we recommend taking is to make sure you are using the correct format.

By default, the Samsung X5 uses exFAT, which is compatible with both the Windows and Mac operating systems. With exFat, you should be able to read and write data on the two OS platforms.

If your external drive uses NTFS, then you can read and write with Windows. For Mac, however, you can only read off of the SSD.

If the X5 is using HFS, then you can read and write with Mac. However, the Windows operating system won’t be able to recognize the external SSD at all.

If your Samsung X5 is not compatible with your operating systems when it comes to writing data, then you might want to consider reformatting your external solid state drive to a compatible format.

However, it is important to note that reformatting will erase all the data you have stored on the drive. So, you should backup any important files you have on the SSD before changing the format.

Contacting Samsung

If none of the fixes worked, then you might want to consider contacting Samsung for additional support.

If your X5 is still covered under warranty, then you might be able to get a replacement if the write access error ended up being a hardware issue.

How to fix cut off and distorted sound issues with Samsung QN85B and QN90B

If you are using a wired or wireless speaker/soundbar with your Samsung QN85B or QN90B Neo QLED TV, then you may notice that the sound may get cut off. You may also notice that the output may sound distorted.

To see how you can fix these particular sound problems, you can check out this troubleshooting article from Seeking Tech.

How to fix cut off sound with QN85B and QN90B

If your speaker or soundbar keeps getting cut off when connected to your Samsung television, then you can try taking the following steps:

1. If you are using a wireless speaker or soundbar, then you need to make sure that there aren’t any physical objects that may be blocking the direct line of sight between your sound device and your television set.

2. You should also make sure that you don’t have any wireless devices nearby. A Wi-Fi router, for example, will cause interference with the sound output.

In this case, you can either reposition the Wi-Fi router, soundbar and/or speaker.

3. You can also try moving the wireless soundbar or speaker closer to the television set as the distance may be too long to establish a stable connection.

4. If possible, you can also try changing the Wi-Fi connection of your router to the 5 GHz frequency.

5. You can also simply try using a wired connection when connecting the speaker or sound as doing so should be more reliable than a wireless connection.

6. If using a wired connection is still causing issues, then you should make sure that the cable is correctly connected. You should also make sure that the cable hasn’t been damaged.

How to fix distorted sound issues with Samsung QN85B and QN90B

If your speaker or soundbar is outputting distorted sounds when connected to your QN85B or QN90B, then you can try doing the following:

1. If you are using a wireless sound device, then you can try moving it closer to the TV. You should also make sure that there aren’t any physical objects or other wireless devices that may cause interference with the connection.

2. If you are using a wired sound device, then make sure that it is properly connected to the television set. You should also check to see if the cable has any damaged.

3. If you are only getting distorted sound output when watching a television channel, then it may due to a weak broadcast signal.

To check the signal level, you need to press the home button on the remote control of your QN85B or QN90B and then select Menu > Settings > Support > Device Care > Self Diagnosis > Signal Information.

If the signal is weak, then you can try reposition the antenna.

4. You can also perform a sound test.

In order to do so, start by pressing the home button on the remote and then go to Menu > Settings > Support > Device Care > Self Diagnosis > Sound Test.

PS Now vs. PS Plus Essential vs. PS Plus Extra vs. PS Plus Deluxe vs. PS Plus Premium

Sony is folding PlayStation Now into multiple versions of PlayStation Plus.

You can take a look at this comparison guide at Seeking Tech to see what the major differences are between the original Now plan and the new Plus tiers.

Quick Summary

With PlayStation Now going away, you will need to get PlayStation Plus Extra, PlayStation Plus Deluxe or PlayStation Plus Premium if you want access to a curated list of downloadable PS4 games. These new Plus tiers will also add downloadable PS5 games.

For downloadable PS2 games, you will need either PlayStation Plus Deluxe or PlayStation Plus Premium in the future. These two versions of Plus are also the only subscription to offer downloadable PS1 and PSP games as well.

When it comes to streaming, you will need to get PlayStation Plus Premium if you would like to continue using this feature from PlayStation Now. With streaming, the library for Plus Premium should be expanded over to the PS1 and PSP games to go along with Now’s offering of streamable PS2, PS3 and PS4 games.

Keep in mind that, when PlayStation Now ceases to exist, your remaining Now subscription length will be converted over to PlayStation Plus Premium.

PlayStation Now vs. PlayStation Plus Essential vs. PlayStation Plus Extra vs. PlayStation Plus Deluxe vs. PlayStation Plus Premium Comparison Chart

You can take a look at our comparison table for Now, Plus Essential, Plus Extra, Plus Deluxe and Plus Premium below.

PlayStation NowPlayStation Plus EssentialPlayStation Plus ExtraPlayStation Plus DeluxePlayStation Plus Premium
Online multiplayer accessNoYesYesYesYes
Cloud storage for PS5 save filesNoYesYesYesYes
Monthly downloadable gamesNoYesYesYesYes
Time-limited game trialsNoNoNoYesYes
Curated PS1 downloadable games catalogNoNoNoYesYes
Curated PS2 downloadable games catalogYesNoNoYesYes
Curated PS3 downloadable games catalogNoNoNoNoNo
Curated PSP downloadable games catalogNoNoNoYesYes
Curated PS4 downloadable games catalogYesNoYesYesYes
Curated PS5 downloadable games catalogNoNoYesYesYes
Curated PS1 cloud streaming games catalogNoNoNoNoYes
Curated PS2 cloud streaming games catalogYesNoNoNoYes
Curated PS3 cloud streaming games catalogYesNoNoNoYes
Curated PSP cloud streaming games catalogNoNoNoNoYes
Curated PS4 cloud streaming games catalogYesNoNoNoYes
Curated PS5 cloud streaming games catalogNoNoNoNoNo

PlayStation Plus Benefits

PlayStation Now doesn’t get any of the benefits from the original PlayStation Plus while the new Plus tiers do.

With PlayStation Plus Essential, PlayStation Plus Extra, PlayStation Plus Deluxe and PlayStation Plus Premium, you will get the following:

  • At least two downloadable monthly games
  • Online multiplayer access
  • Cloud storage for PS5 save files

Downloadable Games Catalog

When it comes to games that you can download and play, PlayStation Now offers both PS4 and PS2 games. PlayStation Plus Extra, PlayStation Plus Deluxe and PlayStation Plus Premium also offers PS4 downloads.

The Extra, Deluxe and Premium versions are the only subscriptions to offer PS5 downloadable games.

With the Deluxe and Premium tiers, you will get downloadable PS2 games to go along with downloadable PS1 and PSP games.

You can find a breakdown of the downloadable games catalog below:

PlayStation Now:

  • Downloadable PS2 Games
  • Downloadable PS4 Games

PlayStation Plus Extra:

  • Downloadable PS4 Games
  • Downloadable PS5 Games

PlayStation Plus Deluxe:

  • Downloadable PS1 Games
  • Downloadable PS2 Games
  • Downloadable PSP Games
  • Downloadable PS4 Games
  • Downloadable PS5 Games

PlayStation Plus Premium:

  • Downloadable PS1 Games
  • Downloadable PS2 Games
  • Downloadable PSP Games
  • Downloadable PS4 Games
  • Downloadable PS5 Games

Cloud Streaming Games Catalog

PS Now and PlayStation Plus Premium both offer streamable PS2 and PS3 games. On the other hand, Premium is the only subscription to also offer PS1, PSP and PSP streaming.

You can find a breakdown of the streaming games catalog for both subscriptions below:

PlayStation Now:

  • Streamable PS2 Games
  • Streamable PS3 Games
  • Streamable PS4 Games

PlayStation Plus Premium:

  • Streamable PS1 Games
  • Streamable PS2 Games
  • Streamable PS3 Games
  • Streamable PSP Games
  • Streamable PS4 Games

Sony currently does not offer streaming options for PlayStation 5 games.

What will happen to PlayStation Now?

Sony will be ending support for PlayStation Now in June 2022. If your Now subscription goes past that expiration date, then it will be converted over to PlayStation Plus Premium.

How to fix muted or no sound issues with Samsung QN85B and QN90B

When using your Samsung QN85B or QN90B Neo QLED television set, you may not hear any sound. To see how you can fix this issue, you can check out this troubleshooting guide from Seeking Tech.

1. The first step we recommend taking is to try changing the channel, watching another video or playing another game as the muted audio may be related to the content instead of your television screen.

2. If you have an external box, like a streaming box or game console, connected to your television set, then make sure that you didn’t accidentally mute the volume of these devices.

3. Of course, you should also make sure that you didn’t mute the sound of your QN85B or QN90B.

4. You can also try disconnecting and then reconnecting any video cables you have on your Samsung television set. When reconnecting, make sure that the connection is tight and secure.

5. You can try rebooting the connected device, as well as you television set, as doing so will reset the connection and potentially fix any temporary bugs that may have been causing the muted audio.

6. Furthermore, make sure that nothing is plugged into the headphone jack of your TV.

7. If you are using your QN85B or QN90B as a computer monitor, then make sure you set up the audio output settings of your computer correctly.

8. You should also check out the Sound Output settings of your Samsung television set to see if you have it set up correctly.

In order to do so, you need to press the home button on the remote controller and then head to Menu > Settings > All Settings > Sound > Sound Output.

9. If you are using the HDMI eARC, then we recommend that you try changing the Digital Output Audio Format to Pass-Through.

To find the menu, you need to press the home button on the remote controller and then select Menu > Settings > All Settings > Sound > Expert Settings > Digital Output Audio Format.

10. If your soundbar or A/V receiver supports HDMI eARC but not Dolby Digital+, then the sound will be muted.

In this case, you need to press the home button of the remote for your QN85B or QN90B and then go to Menu > Settings > All Settings > Sound > Expert Settings > Digital Output Audio Format. Afterwards, select Auto.

11. If you are still getting no sound when using your QN85B or QN90B after trying all of the aforementioned steps, then we recommend contacting Samsung for additional support.