Recommended LG B2 and G2 TV settings for PS5, Xbox Series X and S

The B2 and G2 are both 4K OLED television sets that were released in 2022. These two TVs support all of the advanced display features set of the new PlayStation 5, PlayStation 5 Digital Edition, Xbox Series X and Xbox Series S consoles. These benefits include 120 frames per second, Variable Refresh Rate and Dolby Vision.

To see how you can properly set up your LG B2 or G2 for these gaming systems, you can take a look at this tutorial from Seeking Tech.

1. To start off, make sure you plug the console to your LG OLED.

For the uninformed, only the HDMI 3 and HDMI 4 ports of the B2 support HDMI 2.1. Therefore, you need to plug your PS5, Xbox Series X or Xbox Series S to those two ports.

All four HDMI ports of the LG G2 are HDMI 2.1; thus, you can connect your console to any of these ports.

2. Once you connected your console, you then need to change the HDMI bandwidth on your television set. In order to do so, you need to take the following steps:

  • Open the Home Dashboard menu on your B2 or G2.
  • Select the icon that has three vertical dots.
  • You then need to select Edit Inputs.
  • Next, you need to select the HDMI port that is currently connected to your PS5, Xbox Series X or Xbox Series S.
  • Finally, you need to select PC to unlock the full HDMI bandwidth.

3. You should then make sure that the Game Optimizer mode has been turned on. In order to do so, go to Settings > All Settings > Picture > HDR Select Mode > Game Optimizer.

4. Next, there are several Brightness settings that you might need to change. To do so, head over to Settings > All Settings > Picture > Advanced Settings > Brightness.

Afterwards, make sure that you match the following settings for HDR games:

  • OLED Pixel Brightness: 100
  • Adjust Contrast: 100
  • Black Level: 50
  • Auto Dynamic Contrast: Off
  • Dynamic Tone Mapping: HGiG
  • Peak Brightness: High
  • Gamma (Adjust Brightness): 2.2
  • Video Range: Auto
  • Motion Eye Care: Off

For SDR games, you can change OLED Pixel Brightness to 70, Adjust Contrast to 85 and then disable Dynamic Tone Mapping. You can leave the rest of the Brightness settings to the same values as you did for HDR games.

5. You can then adjust the color settings of your B2 or G2 by going to Settings > All Settings > Picture > Advanced Settings > Color.

From there, make sure you that you set Color Depth to 55 for HDR games or 50 for SDR games. For both HDR and SDR set Tint to 0. You should then select White Balance and then make sure that the Color Temperature, Red, Green and Blue settings are all set to 0.

6. You should also make sure that you are using any of the Clarity features from your LG B2 or G2. To start off, go to Settings > All Settings > Picture > Advanced Settings > Clarity.

From there, make sure that the Adjust Sharpness setting is set to 0. You should also disable the following features:

  • Super Resolution
  • Noise Reduction
  • MPEG Noise Reduction
  • Smooth Gradation
  • Real Cinema
  • TruMotion

7. Moreover, you need to disable any AI-enhanced picture settings. Start by going to Settings > All Settings > General > AI Service. You should then turn off all of the settings from this menu, including the following:

  • AI Picture Pro
  • AI Brightness Settings
  • AI Genre Selection

8. You should then disable the Energy Saving Step setting by going to Settings > All Settings > General > OLED Care > Device Self Care > Energy Saving.

9. Next, head over to Settings > All Settings > General > OLED Care > Device Self Care > OLED Panel Care. From there, make sure you turn on Screen Move and then set Adjust Logo Brightness to Low.

10. Now you need to open the Game Optimizer menu and then make sure you match the following settings:

  • Game Genre: Standard
  • Reduce Blue Light: Off
  • Dark Room Mode: Off
  • Prevent Input Delay (Input Lag): Boost
  • VRR & G-Sync: On
  • Fine Tune Dark Area: 0

11. You should be done setting up your LG B2 or G2 TV for your console. With that said, you may still need to change a few settings on the console side.

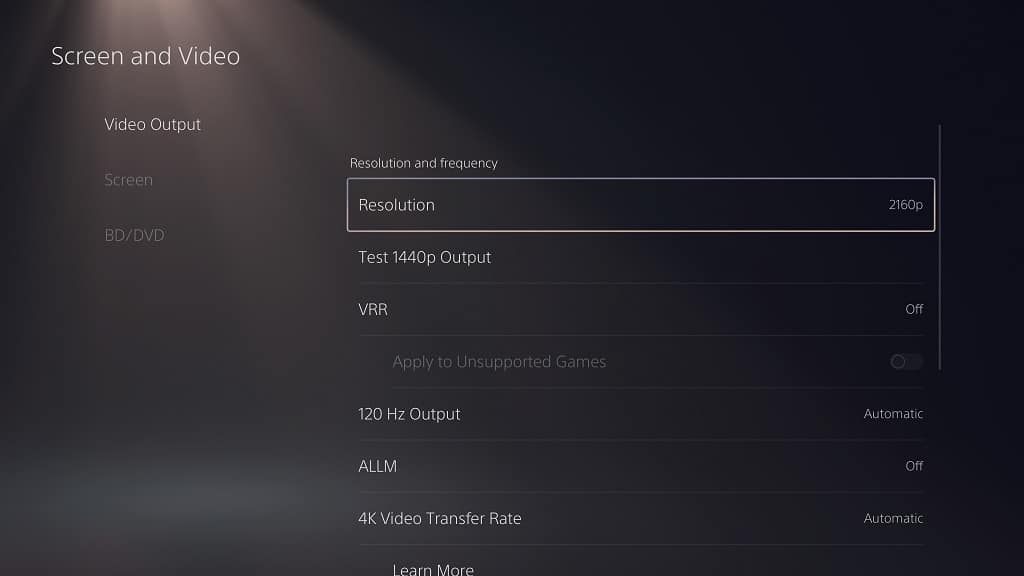
If you have a PS5 or PS5 Digital Edition, then you need to go to Settings > Screen and Video > Video Output. Afterwards, you need to make sure your settings are the same as the following:

  • Resolution: 2160p
  • VRR: Automatic
  • 120 Hz Output: Automatic
  • ALLM: Automatic
  • 4K Transfer Rate: Automatic
  • HDR: On When Supported
  • Deep Color Output: Automatic
  • RGB Range: Automatic (Recommended)

Select the Adjust HDR option from the Video Output menu. You then need to follow the on-screen instructions to properly calibrate the HDR brightness output.

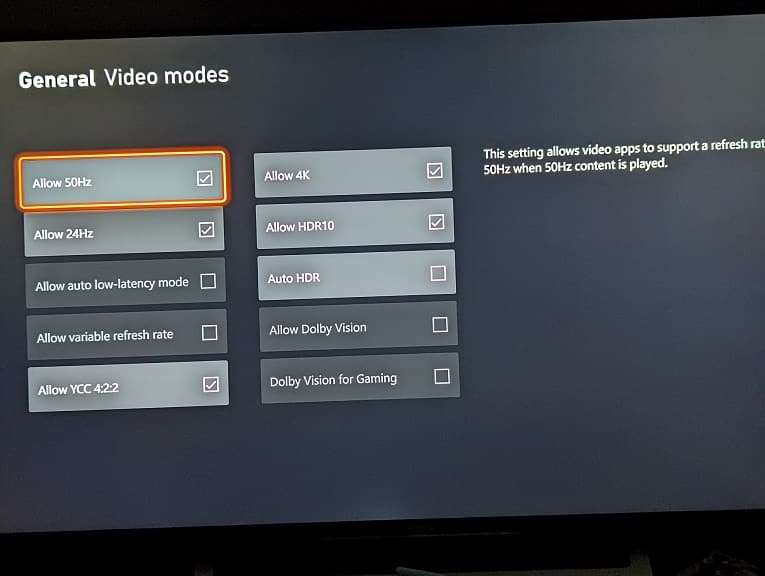
On the Xbox Series X or Xbox Series S, you first need to head over to Settings > General > TV & display options > Video modes. You can then enable the following:

  • Allow auto-low latency mode
  • Allow variable refresh rate
  • Allow 4K
  • Allow HDR10
  • Allow Dolby Vision
  • Dolby Vision for Gaming

From the same Video modes menu, you should also disable Auto HDR.
Head back to Settings > General > TV & display options and then make sure that Resolution is set to 4K. Afterwards, select Calibrate HDR and then follow the on-screen steps in order to calibrate the HDR brightness output.

How to fix LG B1, C1, G1, B2, C2 and G2 audio delay issues when using game optimizer

The LG B1, C1, G1, B2, C2 and G2 comes with the game optimizer mode that features the best display settings when it comes to playing video games. If you use this mode while also utilizing an external sound output device on your television set, then you may experience audio delay.

In order to get the audio sync to be more accurate, you can take a look at this troubleshooting guide from Seeking Tech.

Before we start, it is important to note that this guide is based on all screen sizes of the B1, C1, G1, B2, C2 and G2 television sets, which should include the following model numbers:

LG B1:

  • OLED55B1PUA
  • OLED65B1PUA
  • OLED77B1PUA

LG C1:

  • OLED48C1PUB
  • OLED55C1PUB
  • OLED65C1PUB
  • OLED77C1PUB
  • OLED83C1PUA

LG G1:

  • OLED55G1PUA
  • OLED65G1PUA
  • OLED77G1PUA

LG B2:

  • OLED55B2PUA
  • OLED65B2PUA
  • OLED77B2PUA

LG C2:

  • OLED42C2AUA
  • OLED42C2PUA
  • OLED48C2AUA
  • OLED48C2PUA
  • OLED55C2AUA
  • OLED55C2PUA
  • OLED65C2AUA
  • OLED65C2PUA
  • OLED77C2AUA
  • OLED77C2PUA
  • OLED83C2AUA
  • OLED83C2PUA

LG G2:

  • OLED55G2PUA
  • OLED65G2PUA
  • OLED77G2PUA
  • OLED77Z2PUA
  • OLED83G2PUA

How to fix audio delay issues when using LG’s game optimizer mode

Switching the audio output to the TV speaker should help fix the audio delays when you are using the game optimizer mode on your LG B1, C1, G1, B2, C2 or G2.

In order to switch audio output, you can try doing the following:

1. Head to the Settings menu of your LG OLED television set.

2. You then need to go to the Sound sub-menu.

3. Next, you need to select Sound Out.

4. Finally, set Sound Out to Use TV Speaker.

How to fix audio delay issues for external audio device when using LG’s game optimizer mode

If you want to keep using your earphones, headphones, speaker or soundbar with the game optimizer mode turned on for your LG television set, then you can try taking the following steps:

1. Go to the Settings menu of your B1, C1, G1, B2, C2 or G2.

2. In the Settings menu, go to the Sound sub-menu.

3. Inside the Sound sub-menu, select Advanced Settings.

4. Next, you need to go to the “Select HDMI Input Audio Format” option.

5. Make sure you set “Select HDMI Input Audio Format” to PCM.

If you are still experiencing audio delays while using an external audio device even after switching to the PCM format in the game optimizer mode, then you can try the following potential solutions:

  • If you are using a wireless sound output device, then you need to make sure that there aren’t any physical objects, as well as other wireless devices, that may be weakening the signal.
  • If you are using a wired sound output device, then you should make sure that you are using the recommended HDMI or optical cable for the device and your television set.
  • If you are using HDMI to connect your external sound output device, then you need to make sure that the HDMI connection is passing through correctly, especially if you are connecting it to a splitter or another pass-through device, as each junction may introduce audio delay.
  • Keep in mind that wireless listening devices will introduce more audio lag when compared to wired listening devices.

How to enable PS5, Xbox Series X and S VRR support for LG B2, C2 and G2

Variable Refresh Rate is a helpful feature for the LG B2, C2 and G2 as it will make most video games that have frame rate issues look smoother in addition to getting rid of screen tearing. Currently, the PlayStation 5, PlayStation 5 Digital Edition, Xbox Series S and Xbox Series X consoles use VRR.

To see how you can turn on Variable Refresh Rate for the B2, C2 and G2, you can take a look at this tutorial at Seeking Tech.

Before we begin, it should be noted that this guide is based on the following television sets:

  • 55”, 65” and 77” screen sizes of the LG B2
  • 42”, 48”, 55” 65”, 77” and 83” screen sizes of the LG C2
  • 55” 65”, 77” and 83” screen sizes of the LG G2

This article should cover the following model numbers:

  • OLED55B2PUA
  • OLED65B2PUA
  • OLED77B2PUA
  • OLED42C2AUA
  • OLED42C2PUA
  • OLED48C2AUA
  • OLED48C2PUA
  • OLED55C2AUA
  • OLED55C2PUA
  • OLED65C2AUA
  • OLED65C2PUA
  • OLED77C2AUA
  • OLED77C2PUA
  • OLED83C2AUA
  • OLED83C2PUA
  • OLED55G2PUA
  • OLED65G2PUA
  • OLED77G2PUA
  • OLED83G2PUA

1. If you haven’t done so already, you should update the firmware of your B2, C2 or G2 television set.

2. You should also update the firmware of your PlayStation 5, PlayStation 5 Digital Edition, Xbox Series X or Xbox Series S console.

This is especially important for the PS5 consoles as support for Variable Refresh Rate was only added through a firmware update.

3. Make sure you are using the HDMI cable that came with your system to connect to your television set.

For the uninformed, the PlayStation 5, PlayStation 5 Digital Edition and Xbox Series X come with a HDMI 2.1 cable while the Xbox Series S came with a HDMI 2.0 cable.

You can also use other HDMI cables as long as it is HDMI 2.1 for the PS5 consoles and at least HDMI 2.0 for the Xbox Series consoles (although HDMI 2.1 is highly recommended for the Series X if you want to get the most out of its graphical features).

4. Once you are ready, turn on your television set and game console.

5. Make sure your TV is displaying the HDMI input source of your PS5, PS5 Digital Edition, Xbox Series X or Xbox Series S.

6. Press the gear icon to open the Game Dashboard.

If pressing the gear icon menu opened the regular TV settings menu instead, then you need to select General > Game Optimizer. You then need to set Game Optimizer to On.

You may also need to go to Picture > Select Mode in order to change the picture mode to Game Optimizer in order to use the Game Dashboard.

7. From the Game Dashboard, you should see whether or not VRR has been turned on.

8. If the dashboard shows that Variable Refresh Rate is currently turned off, then we recommend checking to see if you enabled VRR support on your game console.

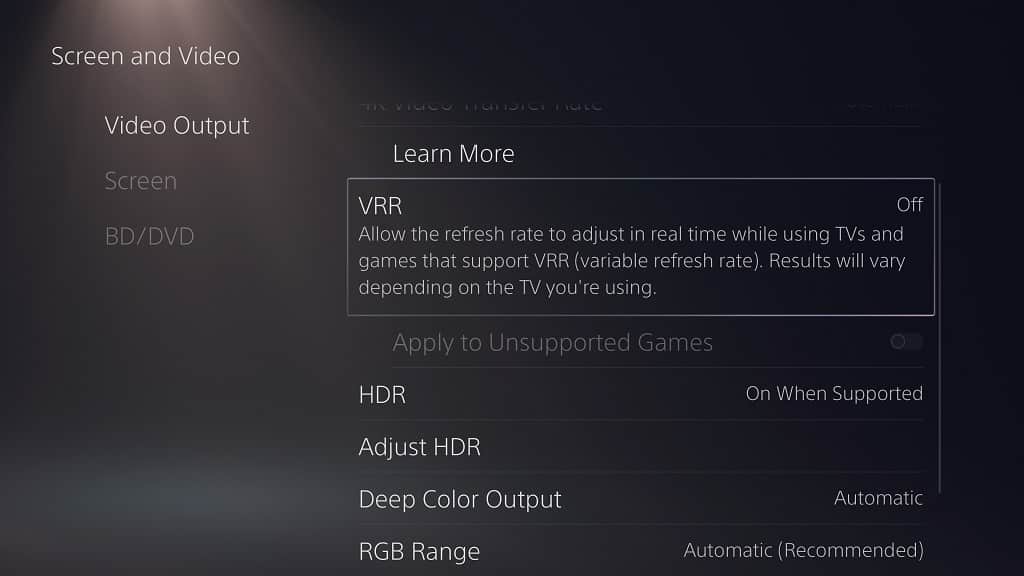
For the PlayStation 5 and PlayStation 5 Digital Edition, go to the home screen menu and then select the gear icon on the top right side to head into settings. From there, you need to select Screen and Video > Video Output > VRR. Finally, set VRR to Automatic. You may also want to enable the Apply to Unsupported Games setting in order to force Variable Refresh Rate on games that don’t natively support it.

For the Xbox Series X and Xbox Series S, you need to go to Settings, which you can do by pressing the Xbox button to bring up the guide menu. From the guide menu, go to the “Profile & system” tab and then select Settings. In Settings, go to General > TV & display options > Video modes. Finally, make sure that the “Allow variable refresh rate” setting is enabled.

8. If the Game Dashboard still isn’t showing any that VRR has been enabled, then you need to select the Game Optimizer option located on the dashboard. In the Game Optimizer menu, make sure that the “VRR & Gsync” setting is enabled.

LG G2 wall mount specs

The new G2 television series from LG is designed to be wall mounted. You can take a look at this guide from Seeking Tech to see how you can make sure that a wall mount bracket is compatible with this OLED TV set.

What is the LG G2?

The G2 is a television set released by LG in 2022. It comes equipped with the evo OLED panel, which will provide higher peak brightness and reduce the risk of burn-in when compared to a regular OLED screen.

This TV also uses a α9 Gen 5 processor that will enhance upscaling and sound output (as the speakers are capable of outputting virtual 7.1.2 surround sound).

When it comes to gaming, the G2 features multiple HDMI 2.1 ports in addition to support all three adaptative sync modes (GSYNC, FreeSync and Variable Refresh Rate).

LG G2 Screen Sizes

You can find a list of currently available screen sizes, as well as the model numbers, for the G2 series below:

  • LG G2 55-inch evo Gallery Edition OLED TV (OLED55G2PUA)
  • LG G2 65-inch evo Gallery Edition OLED TV (OLED65G2PUA)
  • LG G2 77-inch evo Gallery Edition OLED TV (OLED77G2PUA)
  • LG G2 83-inch evo Gallery Edition OLED TV (OLED83G2PUA)

LG G2 Dimensions without Stand

Dimensions without Stand (in inches):

  • 55” LG G2 evo Gallery Edition OLED TV: 48.1 inches x 27.5 inches x 1.1 inch
  • 65” LG G2 evo Gallery Edition OLED TV: 56.7 inches x 32.3 inches x 1.0 inch
  • 77” LG G2 evo Gallery Edition OLED TV: 67.4 inches x 38.4 inches x 1.0 inch
  • 83” LG G2 evo Gallery Edition OLED TV: 72.7 inches x 41.4 inches x 1.1 inch

Dimensions without Stand (in millimeters):

  • 55” LG G2 evo Gallery Edition OLED TV: 1221.7 mm x 698.5 mm x 27.9 mm
  • 65” LG G2 evo Gallery Edition OLED TV: 1440.2 mm x 820.4 mm x 25.4 mm
  • 77” LG G2 evo Gallery Edition OLED TV: 1712 mm x 975.4 mm x 25.4 mm
  • 83” LG G2 evo Gallery Edition OLED TV: 1846.6 mm x 1051.6 mm x 27.9 mm

LG G2 Weight without Stand

Weight without Stand (in pounds):

  • 55” LG G2 evo Gallery Edition OLED TV: 37.7 lbs.
  • 65” LG G2 evo Gallery Edition OLED TV: 50.3 lbs.
  • 77” LG G2 evo Gallery Edition OLED TV: 77.4 lbs.
  • 83” LG G2 evo Gallery Edition OLED TV: 90.2 lbs.

Weight without Stand (in kilograms):

  • 55” LG G2 evo Gallery Edition OLED TV: 17.1 kg
  • 65” LG G2 evo Gallery Edition OLED TV: 22.8 kg
  • 77” LG G2 evo Gallery Edition OLED TV: 35.1 kg
  • 83” LG G2 evo Gallery Edition OLED TV: 40.9 kg

LG G2 VESA Mounting Pattern

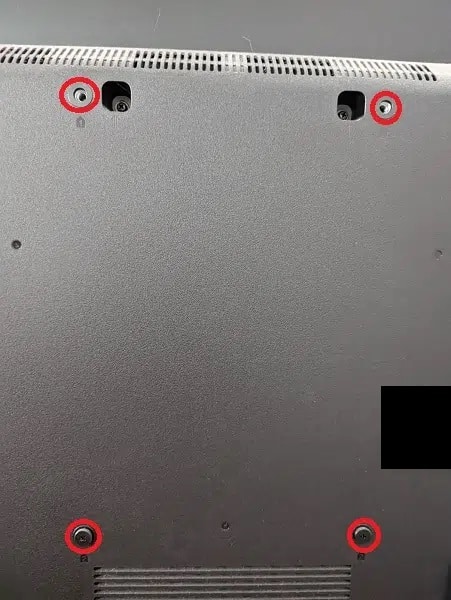
For a wall mount to be compatible with the LG G2 evo Gallery Edition, it will need to fit the TV’s VESA Mounting Pattern. This specification measures the horizontal and vertical distances of the four mounting screw holes located on the back of the OLED screen.

You can find the measurements below:

  • 55” LG G2 evo Gallery Edition OLED TV: 300 mm x 200 mm
  • 65” LG G2 evo Gallery Edition OLED TV: 300 mm x 300 mm
  • 77” LG G2 evo Gallery Edition OLED TV: 300 mm x 300 mm
  • 83” LG G2 evo Gallery Edition OLED TV: 400 mm x 400 mm

What wall mounts are compatible with the LG G2?

To support the LG G2, a wall mount needs to match the VESA Mounting Pattern and be able to hold the weight of the television set.

For the 55” LG G2, the mount needs to support the 300 mm x 200 mm VESA Mounting Pattern and be able to hold at least 37.7 pounds.

With the 65” version, the mounting bracket must fit into the 300 mm x 300 mm VESA Mounting Pattern and support at least 50.3 pounds.

For the 77” screen size, the mount needs to support the 300 mm x 300 mm VESA Mounting Pattern and hold at least 77.4 pounds.

When it comes to the 83” G2, the wall mount must support the 400 mm x 400 mm VESA Mounting Pattern in addition to being able to hold up to 90.2 pounds.

As for mounting types, fixed mounts will simply hold your LG G2 in a fixed position. With a tilting mount, you can tilt the screen up or down. Last but not least, a full motion mount will let you extend, tilt and swivel this OLED TV.

If you are looking for specific recommendations, then you can take a look at this guide to find the most suitable wall mount options.

How to prevent LG A2, B2, C2 and G2 OLED burn-in issues

The A2, B2, C2 and G2 are the latest OLED television sets released by LG. You can take a look at this guide from Seeking Tech to see how you can prevent your screen from getting image retention, ghosting and burn-in issues.

This article should apply to all the available screen sizes of the LG A2, B2, C2 and G2 series, which include the following model numbers:

  • OLED48A2AUA
  • OLED48A2PUA
  • OLED55A2AUA
  • OLED55A2PUA
  • OLED65A2AUA
  • OLED65A2PUA
  • OLED77A2AUA
  • OLED77A2PUA
  • OLED55B2PUA
  • OLED65B2PUA
  • OLED77B2PUA
  • OLED42C2AUA
  • OLED42C2PUA
  • OLED48C2AUA
  • OLED48C2PUA
  • OLED55C2AUA
  • OLED55C2PUA
  • OLED65C2AUA
  • OLED65C2PUA
  • OLED77C2AUA
  • OLED77C2PUA
  • OLED83C2AUA
  • OLED83C2PUA
  • OLED55G2PUA
  • OLED65G2PUA
  • OLED77G2PUA
  • OLED77Z2PUA
  • OLED83G2PUA

How to prevent LG A2, B2, C2 and G2 burn-in issues

In order to prevent image retention issues when watching TV and playing games with your A2, B2, C2 or G2, you can try taking the following precautionary steps:

1. First off, it is important to note that black bars could cause image retention.

So, if you are watching a video or playing a game that have black bars, then you can try doing the following:

  • Press the gear button on the remote control of your television set.
  • Next, select the icon with the three dots.
  • After arriving in the Settings menu, select Picture.
  • You then need to select Aspect Ratio.
  • Afterwards, select User Selection.
  • Next, you can either select Vertical Zoom or 4-Way Zoom so that you can zoom into the video in order for it to completely fill the screen. Keep in mind that this will either cut out the outer edges of the video or stretch out the image.

2. Logos that stay on the screen can also cause burn-in on your A2, B2, C2 or G2. To prevent this from happening, you can do the following:

  • Press the gear button on the remote.
  • Select the three dots icon.
  • From the Settings menu, go to General.
  • Head over to OLED Care.
  • You then need to go to OLED Panel Care.
  • Select Adjust Logo Brightness.
  • Make sure that you set the Adjust Logo Brightness to High.

3. If you are planning to leave your television on for a long time, especially if you are watching or playing something that have a fixed graphic, then we recommend dimming the brightness of your OLED screen.

To do so, you need to take the following steps:

  • Press the gear button on your TV remote.
  • Select the icon that has three dots.
  • Inside the Settings menu, select Picture.
  • In the Picture menu, go to Select Mode and then set it to APS.
  • Afterwards, go to Advanced Settings.
  • In Advanced Settings, select Brightness.
  • You then need to select OLED Pixel Brightness.
  • Finally, lower the screen brightness.

4. You can also enable the Screen Move feature by doing the following:

  • Start by pressing the gear button on the remote control.
  • You then need to select the three dots icon.
  • Once you are in the Settings menu, go to General.
  • You should then go to OLED Care.
  • Afterwards, head over to OLED Panel Care.
  • In the OLED Panel Care menu, make sure that the Screen Move feature is turned on.

With Screen Move enabled, the image will move slightly at regular intervals so that the OLED screen won’t be stuck showing the same static image continuously.

5. Furthermore, we recommend using the Auto Power Off feature so that your 2022 LG OLED will turn off its own due to the lack of activity.

To use this feature, you need to take the following steps:

  • Begin by pressing the gear button on your remote controller and then selecting the icon with the three dots.
  • From the Settings screen, you need to go to General.
  • Next, head over to OLED Care.
  • You then need to go to Device Self Care.
  • From the Device Self Care menu, Energy Saving.
  • In the Energy Saving screen, make sure that the Auto Power Off setting has been turned on.

6. You can also try doing the following actions to prevent your LG A2, B2, C2 or G2 from getting image burn-in:

  • If you are playing a videogame, then most modern games come with a customizable heads-up display that you can change in order to decrease the chances of image retention.
  • Modern game consoles and media players should also have a setting that will automatically dim the screen after some time has passed due to the lack of activity.
  • If you can’t avoid having a static image displayed on the OLED screen, then we recommend that you either turn off your television set or switch to an entirely different image temporarily after around every hour or so of continuous usage.

How to fix LG A2, B2, C2 and G2 burn-in issues

If you see that your screen has some image retention, then you can try to fix it by doing the following:

  • To start off, press the gear button on your TV’s remote.
  • Next, you need to select the icon with the three dots.
  • From the Settings menu, head over to General.
  • Inside of General, select OLED Care.
  • Afterwards, you need to head over to OLED Panel Care.
  • In the OLED Panel Care menu, select Pixel Cleaning.

If the Pixel Cleaning function did not fix your screen burn-in, then the image retention may be permanent.

How to fix LG A2, B2, C2 and G2 random shutdown issues

Your LG A2, B2, C2 or G2 OLED television set may be randomly turning off. To see how you can fix these shutdown issues, you can check out this troubleshooting guide from Seeking Tech.

This article will be covering all the screen sizes from the 2022 A2, B2, C2 and G2 series, which should include the following model numbers:

  • OLED48A2AUA
  • OLED48A2PUA
  • OLED55A2AUA
  • OLED55A2PUA
  • OLED65A2AUA
  • OLED65A2PUA
  • OLED77A2AUA
  • OLED77A2PUA
  • OLED55B2PUA
  • OLED65B2PUA
  • OLED77B2PUA
  • OLED42C2AUA
  • OLED42C2PUA
  • OLED48C2AUA
  • OLED48C2PUA
  • OLED55C2AUA
  • OLED55C2PUA
  • OLED65C2AUA
  • OLED65C2PUA
  • OLED77C2AUA
  • OLED77C2PUA
  • OLED83C2AUA
  • OLED83C2PUA
  • OLED55G2PUA
  • OLED65G2PUA
  • OLED77G2PUA
  • OLED77Z2PUA
  • OLED83G2PUA

1. In order to stop your LG television set from randomly shutting down, the first step we recommend taking is to make sure that the TV isn’t using the Auto Power Off feature.

To disable it, you need to take the following steps:

  • Go to the Settings menu on your LG A2, B2, C2 or G2.
  • From the Settings menu, select General.
  • Next, go to OLED Care.
  • Afterwards, head to Device Self Care.
  • Inside the Device Self Care menu, go to Energy Saving.
  • You then need to select Auto Power Off.
  • Lastly, make sure that the Auto Power Off setting has been disabled.

2. We also recommend turning off the Screen Off feature, which you can do so by taking the following steps:

  • Open the Settings menu on your OLED television set.
  • Head to General from the Settings menu.
  • After getting to General, you then need to head to OLED Care.
  • You then need to select Device Self Care.
  • Afterwards, select Energy Saving.
  • Once you get to the Energy Saving menu, select Screen Off.
  • Finally, make sure that the Screen Off has been disabled.

3. Furthermore, you should make sure that you didn’t set any timers that will cause your A2, B2, C2 or G2 OLED to turn off at seemingly random times.

In order to check if you have a timer active, you need to take the following steps:

  • Launch the Settings menu on your TV.
  • Inside of Settings, head over to General.
  • In General, select System.
  • From the System menu, select Time and Timer.

4. If you have HDMI-CEC or SimpLink enabled on an HDMI device that is connected to your television set, then this feature may be causing you television set to shut down unintentionally.

To fix this particular issue, go to the settings menu on the connected HDMI device to see if there is an option to disable HDMI-CEC or a similar function.

5. You should also make sure that the power cable is securely connected to the back of your television set as well as the power outlet.

6. Moreover, you can try using a different power outlet as the current one your television set is connected to could be malfunctioning.

7. Make sure that the television isn’t overheating as hot temperatures may force it to shut down by itself.

To see how you can prevent your LG OLED from getting too hot, and cool it down when it does, you can take a look at this guide.

7. If your A2, B2, C2 or G2 OLED television set is still randomly turning off on its own, then we suggest contacting LG for additional support.

If your problems turn out to be hardware related, you may have to get your TV repaired or replaced.

How to fix LG A2, B2, C2 and G2 auto brightness issues

When watching a video or playing a videogame on your LG A2, B2, C2 or G2 OLED television set, you may notice that the screen brightness may seemingly change at random.

You can take a look at this troubleshooting article from Seeking Tech to see what steps you can take to potentially fix these auto brightness issues.

Before we start, we should note that this guide should be based on all screen sizes for the 2022 LG A2, B2, C2 and G2 OLED series, which include the following models:

  • OLED48A2AUA
  • OLED48A2PUA
  • OLED55A2AUA
  • OLED55A2PUA
  • OLED65A2AUA
  • OLED65A2PUA
  • OLED77A2AUA
  • OLED77A2PUA
  • OLED55B2PUA
  • OLED65B2PUA
  • OLED77B2PUA
  • OLED42C2AUA
  • OLED42C2PUA
  • OLED48C2AUA
  • OLED48C2PUA
  • OLED55C2AUA
  • OLED55C2PUA
  • OLED65C2AUA
  • OLED65C2PUA
  • OLED77C2AUA
  • OLED77C2PUA
  • OLED83C2AUA
  • OLED83C2PUA
  • OLED55G2PUA
  • OLED65G2PUA
  • OLED77G2PUA
  • OLED77Z2PUA
  • OLED83G2PUA

1. The first step we recommend taking is to make sure that you didn’t enable the Energy Saving Step feature. In order to see whether or not it has been turned off, you need to take the following steps:

  • Open the Settings menu on your A2, B2, C2 or G2.
  • From the Settings menu, select General.
  • In General, select OLED Care.
  • You then need to select Device Self Care.
  • Next, you need to select Energy Saving.
  • Afterwards, select Energy Saving Step.
  • In the Energy Saving Step menu, make sure that this setting is set to Off.

2. We also suggest disabling any AI video processing features of your LG OLED. In order to do turn off these functions, you need to do the following:

  • Head over to the Settings menu on your TV.
  • In Settings, go to General.
  • Next, head over to AI Service.
  • After getting to the AI Service menu, you need to make sure that AI Picture Pro, AI Brightness Settings and AI Genre Selection are all turned off.

3. You may also want to disable Adjust Logo Brightness, if you have this feature turned on.

To do so, you need to take the following steps:

  • Go to the Settings menu of your LG A2, B2, C2 or G2.
  • Next, head to General.
  • You then need to select OLED Care.
  • Afterwards, select OLED Panel Care.
  • In the OLED Panel Care, select Adjust Logo Brightness.
  • Lastly, make sure that the Adjust Logo Brightness is set to Off.

4. Furthermore, we recommend that you turn off Auto Dynamic Contrast as well if you have it enabled.

In order to do so, you need to do the following:

  • To start off, go to the Settings menu of your OLED TV.
  • Next, you need to head to Picture.
  • In the Picture menu, select Advanced Settings.
  • You then need to select Brightness.
  • From the Brightness menu, select Auto Dynamic Contrast.
  • Finally, make sure that the Auto Dynamic Contrast setting is set to Off.

How to fix LG A2, B2, C2 and G2 audio sync issues

When watching TV or playing games on your LG A2, B2, C2 or G2 OLED, you may notice that the sound is not syncing with the picture on the screen. To see how you can potentially fix these audio sync issues, you can take a look at this article from Seeking Tech.

Before we being, it is important to note that this guide should apply to the following model numbers of these 2022 television sets:

LG A2 OLED:

  • OLED48A2AUA
  • OLED48A2PUA
  • OLED55A2AUA
  • OLED55A2PUA
  • OLED65A2AUA
  • OLED65A2PUA
  • OLED77A2AUA
  • OLED77A2PUA

LG B2 OLED:

  • OLED55B2PUA
  • OLED65B2PUA
  • OLED77B2PUA

LG C2 OLED:

  • OLED42C2AUA
  • OLED42C2PUA
  • OLED48C2AUA
  • OLED48C2PUA
  • OLED55C2AUA
  • OLED55C2PUA
  • OLED65C2AUA
  • OLED65C2PUA
  • OLED77C2AUA
  • OLED77C2PUA
  • OLED83C2AUA
  • OLED83C2PUA

LG G2 OLED:

  • OLED55G2PUA
  • OLED65G2PUA
  • OLED77G2PUA
  • OLED77Z2PUA
  • OLED83G2PUA

1. If you are audio delay when you are using the television speakers, then the first step we recommend doing is to turn off the TV and then turn it back on again to see if the audio will sync.

2. You can also try unplugging the power cord of the OLED TV from the power outlet. You then need to wait for at least 10 seconds before you plug the TV back into the power source and turn it back on.

3. If your TV speaker is still not matching the mouth movements or other actions of what is being shown on the screen, then you can try using the Match Screen and Sound function by taking the following steps:

  • In the Settings menu, select Sound.
  • Next, select Advanced Settings.
  • In the Advanced Settings menu, select Match Screen and Sound.
  • Once you get to the Match Screen and Sound, you can select TV Speaker Delay.
  • Next, you can change the value of the TV Speaker Delay until the audio syncs perfectly to the content being shown on the screen of your LG A2, B2, C2 or G2.

4. If you are getting audio lag when using an external speaker, headphones or other listening devices, then you can try doing the following:

  • On your television set, go to the Settings menu.
  • Next, you need to head to Advanced Settings.
  • From the Advanced Settings menu, scroll down and then select Match Screen and Sound.
  • Finally, make sure that the Bypass feature is turned on.
  • With Bypass enabled, your TV will automatically attempt to sync audio to the actions being shown on its screen.

5. We also recommend turning off any AI processing that you may be currently using as these may cause audio sync issues. In order to do so, you can take the following steps:

  • Go to the Settings menu on your television set.
  • In Settings, you then need to select General.
  • From the General menu, you need to select AI Service.
  • Finally, make sure that AI Picture Pro, AI Brightness Settings, AI Genre Selection, AI Sound Pro AI and Acoustic Tuning are all disabled if they were previously turned on.

6. If you are getting audio delay when trying to watch a video from an external media player or playing a videogame from a game console, then you need to make sure that these are connected directly to your television.

If you are using a HDMI splitter and/or connecting to another external device instead of a direct connection, then these may introduce audio lag that otherwise wouldn’t occur.

7. If you are using wireless speakers, earphones, headphones or headsets, then it should be noted that you will get more lag when compared to wired listening devices or using the built-in speakers of your television.

To potentially reduce the audio lag, you can try moving your wireless listening device closer to your television. You can also avoid having any solid objects that may block the direct line of sight between your listening device and your TV. Finally, make sure that there aren’t any other wireless devices nearby as they can cause interference.

8. If you are using set-top box, media player and/or game console, then these input devices may also have audio settings where you hopefully change the audio timing in order to get better lip sync.

9. You can also try power cycling the external input device to see if the audio delay will go away.

What to do when your LG A2, B2, C2 or G2 is not turning on

When trying to use your LG A2, B2, C2 or G2 OLED, the television set may not be able turn on at all. To see how you can potentially fix this power issue, you can take a look at this troubleshooting article from Seeking Tech.

Before we begin, it should be noted that this guide will cover all screen size versions from the LG A2 OLED TV, LG B2 OLED TV, LG C2 evo OLED TV and LG G2 evo Gallery Edition OLED TV series that came out in the year of 2022.

This article should cover the following model numbers:

A2 Series:

  • OLED48A2AUA
  • OLED48A2PUA
  • OLED55A2AUA
  • OLED55A2PUA
  • OLED65A2AUA
  • OLED65A2PUA
  • OLED77A2AUA
  • OLED77A2PUA

B2 Series:

  • OLED55B2PUA
  • OLED65B2PUA
  • OLED77B2PUA

C2 Series:

  • OLED42C2AUA
  • OLED42C2PUA
  • OLED48C2AUA
  • OLED48C2PUA
  • OLED55C2AUA
  • OLED55C2PUA
  • OLED65C2AUA
  • OLED65C2PUA
  • OLED77C2AUA
  • OLED77C2PUA
  • OLED83C2AUA
  • OLED83C2PUA

G2 Series:

  • OLED55G2PUA
  • OLED65G2PUA
  • OLED77G2PUA
  • OLED77Z2PUA
  • OLED83G2PUA

1. The first step we recommend taking is to try pressing the power button directly on your TV if the power button on the remote control doesn’t seem to work.

If the TV turns on after pressing the power button directly on the screen, then your issues could be related to the A2, B2, C2 or G2 remote. To see how you can fix remote control problems for these LG television sets, you can check out this guide.

2. You can also try pressing other buttons on the remote to see if you can open the television menu, change channels and or switch HDMI input sources. There is a possibility that your OLED is actually turned on but isn’t displaying anything other than a blank screen.

3. If you still can’t turn on your LG TV by pressing the power buttons on your remote and directly on the screen, then you can check if the power cord of the television set properly inserted.

4. You can also try unplugging the power cord from the power outlet, wait at least 10 seconds and then plug it back into the power outlet.

5. Moreover, you can also try using a different power outlet if the TV isn’t powering on when it is plugged into the current one.

6. If your A2, B2, C2 or G2 still isn’t turning on after trying all of the aforementioned potential solutions, then we recommend contacting LG for additional. Your LG OLED television may need to be repaired or replaced.

How to prevent and fix LG A2, B2, C2 and G2 remote issues

The LG A2, B2, C2 and G2 OLED televisions come with a Magic Remote controller. If you hare having issues trying to use the remote that came with your TV, then you can take a look at this troubleshooting guide at Seeking Tech to see what actions you can take in order to resolve your issue.

1. The first step we recommend taking is to make sure that there aren’t any obstacles in between the remote and the sensor of your A2, B2, C2 or G2. Otherwise, the objects may interfere with the communication.

If you have a tape on your receiver, for example, then you need to remove it or the signal will be blocked.

2. You can also try moving the remote closer to your television set as the distance between the two devices may be too great for them to properly communicate.

3. Moreover, you need to make sure that the batteries are installed correctly as the positive and negative symbols of the batteries should match the connectors on your remote controller.

4. You can also try replacing the batteries in your remote as the ones you are using could have run out of charge or be damaged.

5. If your LG OLED isn’t currently turned on, then you can try pressing the power button located directly on the TV to see if it can be turned on without a remote.

6. With your TV turned on, you can try pressing various buttons on the remote to see if your A2, B2, C2 or G2 is responding to your inputs.

7. If your remote controller still isn’t working, then you can try pairing it to your television set.

In order to do so, point the remote directly at the TV screen.

Afterwards, press and hold both the Return (BACK) and Smart / Home buttons on the remote at the same time for at least 5 seconds. You should see a message on the TV screen stating that the Magic Remote has been registered for this specific television set.

If the aforementioned button combination does not work, then you can try pressing and holding the Exit button on the remote for at least 5 seconds. If done correctly, you should get a notification on screen saying that the Magic Remote registration has been completed.

8. If none of the aforementioned potential solutions help with your remote issues, then we recommend contacting LG for additional support. You may end up having to send your Magic Remote in to be repaired or replaced.