How to install ADATA XPG GAMMIX S70 BLADE to PS5

The BLADE version of the ADATA XPG GAMMIX S70 comes with a much smaller heatsink when compared to the regular version. The thinner size makes this PCIe Gen4x4 M.2 2280, which has a sequential read speed of up to 7,400 MB per second, compatible with the PlayStation 5 and PlayStation 5 Digital Edition.

If you want to install the XPG GAMMIX S70 BLADE, then you can check out this step-by-step guide from Seeking Tech.

Before we begin, it is important to note that we will be covering the following solid state drives:

  • 1 TB ADATA XPG GAMMIX S70 BLADE PCIe Gen4x4 M.2 2280 Solid State Drive (Model Number: AGAMMIXS70B-1T-CS)
  • 2 TB ADATA XPG GAMMIX S70 BLADE PCIe Gen4x4 M.2 2280 Solid State Drive (Model Number: AGAMMIXS70B-2T-CS)

Although these is a regular version of the ADATA XPG GAMMIX S70 available, its built-in heatsink is too tall to fit into the M.2 expansion docking bay of the PlayStation 5 system.

Moving important data off of ADATA XPG GAMMIX S70 BLADE to PS5

By formatting your XPG GAMMIX S70 BLADE SSD for the PlayStation 5, you will be deleting all the data you have previously stored on it.

So, if you have any important data on your S70 BLADE, then make sure you move the files over to somewhere else before installing the drive into your PS5.

Installing optional heatsink to ADATA XPG GAMMIX S70 BLADE

The PlayStation 5 requires a heatsink to go along with the M.2 solid state drive.

Fortunately, the XPG GAMMIX S70 BLADE comes with an optional aluminum heatsink that will fit into the M.2 docking bay of the PS5 system.

So, if you haven’t done so already, make sure you install the optional aluminum heatsink onto your SSD before proceeding.

Upgrading the PS5 firmware

M.2 SSD support was only added to the PlayStation 5 and PlayStation 5 Digital Edition through a recent firmware update.

Therefore, you need to update the firmware of your PS5 system.

To see if you PlayStation 5 has been updated to the latest available firmware, you can take the following steps:

1. Go to the Home Screen. This is the main menu where you select which game to open, go to the PlayStation Store, and take other actions.

2. From the Home Screen, go to the Settings menu, which you can find on the top right side of the menu.

3. Inside Settings, go to System.

4. In the System menu, first select the System Software option on the left side and then System Software Update and Settings option on the right side.

5. In the System Software Update and Settings menu, you should see the Update System Software setting.

If you see “Up to date” next to this setting, then the firmware of your PS5 is the latest one available.

If you see something else, then select the Update System Software option to update.

6. In the next screen, you can select to update the PS5 firmware over the Internet, which we recommend doing, or over a USB storage device.

How to insert ADATA XPG GAMMIX S70 BLADE to PS5

After meeting the aforementioned prerequisites, you can now insert the ADATA XPG GAMMIX S70 BLADE into your PlayStation 5 system.

In order to do so, you need to do the following:

1. Turn off your PS5.

2. Unplug the power cable, HDMI cable and any other cable you have plugged into the system.

3. Detach the stand from the PlayStation 5.

4. Next, lay your console down so that the side with the PS logo is facing downwards.

5. With the console laid down, make sure that the bottom of it, which contains the logo and screw hole for the stand, is facing you.

6. Next you need to detach the outer plate from your PlayStation 5.

To do so, lift the upper right corner of the outer plate and then slide it towards you.

7. With the outer plate off, you should see the metal cover for the M.2 expansion bay.

You need to use a cross-head screwdriver to remove the screw holding the metal cover into place for the M.2 expansion bay.
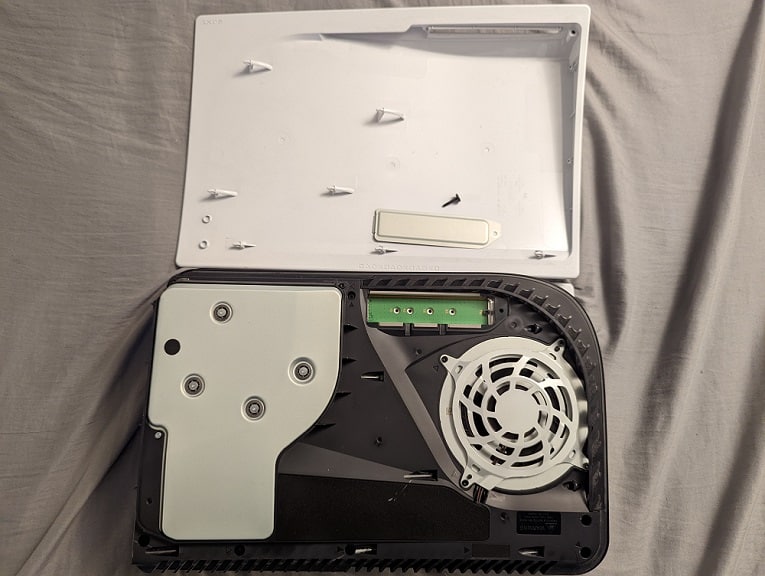
8. After removing the screw and the metal cover, you should have access to the M.2 bay of the PS5.

Here you need to remove the screw and spacer located inside the bay by using a cross-head screwdriver.

10. Place the spacer on the 80 screw hole of the bay.

10. Now you can insert the ADATA XPG GAMMIX S70 BLADE, with its aluminum heatsink installed, into the M.2 slot of the PlayStation 5.

Make sure that the connector for the solid state drive and M.2 slot of the PS5 are aligned. You can then insert the SSD into the slot from a diagonally upwards position.

11. The other end of the XPG GAMMIX S70 BLADE should be pointing upwards.

Push down on the other end and then use the screw you previously removed from the M.2 bay to hold the SSD down onto the motherboard of your PS5 system.

12. Afterwards, put the M.2 cover back on and screw it in place.

13. Next, slide the outer plate of your PlayStation 5 back into place to complete the installation.

How to format ADATA XPG GAMMIX S70 BLADE for PS5

After inserting the ADATA XPG GAMMIX S70 BLADE into your console, you then you need to format your solid state drive for the PlayStation 5.

In order to do so, you need to do the following:

1. Plug back in the HDMI cable, power cable and other cables you previously removed from your PS5 system.

2. Turn on your PlayStation 5.

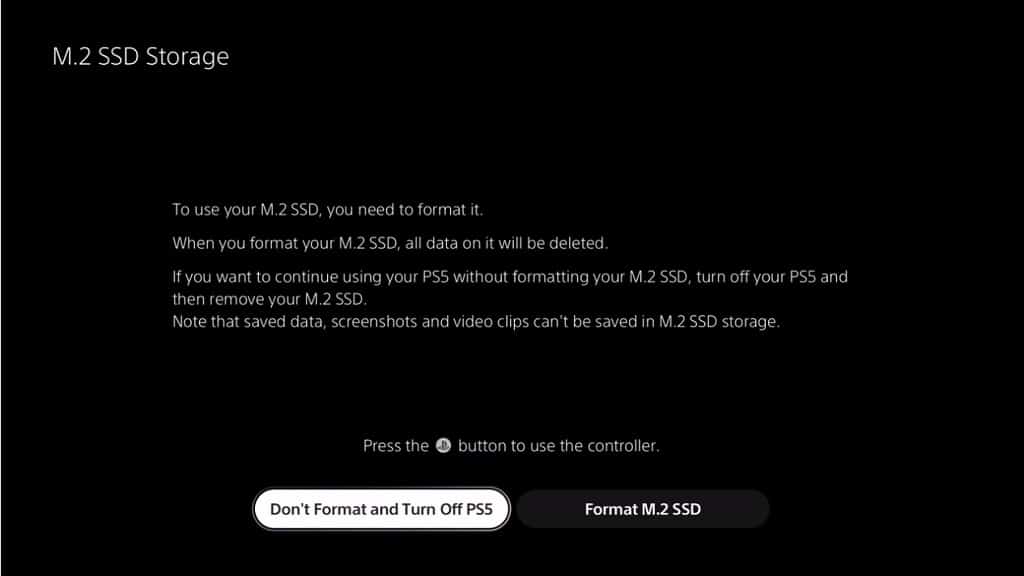
3. You should immediately get a screen asking you to format the ADATA XPG GAMMIX S70 BLADE.

Press the PS button on your DualSense to turn the controller back on again and then select the Format M.2 SSD option to continue.

4. After the formatting process in done, you should see a screen that shows off the sequential read speed of the ADATA XPG GAMMIX S70 BLADE as detected by your PlayStation 5 console.

Here, you need to select the OK option to go to the Home Screen menu.

Where to find ADATA XPG GAMMIX S7 in the PS5 menus

To find the ADATA XPG GAMMIX S7 in the menus of the PlayStation 5 after you have formatted the solid state drive, you need to take the following steps:

1. Go to the Settings menu from the Home Screen menu.

The Settings option is located on the top right corner of the Home Screen.

2. In the Settings menu, go to Storage.

3. From the Storage menu, select M.2 SSD Storage from the left side.

4. On the right side from the same Storage menu, you should see your XPG GAMMIX S70 BLADE.

You can also use this Storage menu to move games, delete games and set the installation location.

How to upgrade Death Stranding on PS4 to Death Stranding Director’s Cut on PS5

If you own the PlayStation 4 version of Death Stranding, then you can upgrade to the PlayStation 5 version of Death Stranding Director’s Cut for a small fee.

If you are interested in doing so, then you can check out this tutorial from Seeking Tech.

How to upgrade from PS4 disc version of Death Standing to Death Stranding Director’s Cut on PS5

In order to upgrade from the disc version of Death Stranding on the PlayStation 4 to Death Stranding Director’s Cut on the PlayStation 5, you need to do the following:

1. First off, you will need a PlayStation 5 system with a disk drive.

If you have the PlayStation 5 Digital Edition, then you won’t be able to upgrade from the PS4 disk version.

2. Insert the disc for the PS4 version of Death Stranding into the disk drive of the PlayStation 5.

3. Make sure you are in the Home Screen of the PlayStation 5.

If you are currently playing a game or using an app, you can get to the Home Screen main menu by pressing and holding the PS button on the DualSense controller.

4. In the Home Screen, you should see the PS4 version of Death Stranding.

Scroll over to the game and then press the down button on the directional pad (or push the left analog stick down) to get to the game’s dedicated menu.

4. You should see the option to upgrade to the director’s cut on the right side.

Scroll to the right and then select the upgrade option to go to the PlayStation Store.

5. Purchase the upgrade and you should see a message popping up saying that you will need to insert the disc for the PS4 version of Death Stranding every time you want to play Death Stranding Director’s Cut on the PlayStation 5.

6. After buying the upgrade, download the PS5 version of the game.

7. After the download and installation process is completed, you will be able to start playing Death Stranding Director’s Cut as long as the disc for the PS4 version of Death Stranding is inserted into the disc drive of your PlayStation 5 system.

How to upgrade from digital PS4 version of Death Standing to Death Stranding Director’s Cut on PS5

In order to upgrade from the digital version of Death Standing on the PlayStation 4 to Death Stranding Director’s Cut on the PlayStation 5, you need to take the following steps:

1. From the Home Screen, scroll over to the PS4 version of Death Stranding and then press down.

If you don’t see the game on the Home Screen, select the Game Library option. Afterwards, select the PS4 version of Death Stranding in the Game Library menu.

2. You should see the option to upgrade on the right side.

Navigate over and then select the upgrade option to go to the PlayStation Store.

3. Buy the upgrade and then download Death Stranding Director’s Cut on PS5.

4. Once the PlayStation 5 version of the game has been downloaded and installed, you should be able to play the game.

Since you previously own the digital version of Death Standing on the PlayStation 4, you don’t need the Death Stranding PS4 disc to play Death Stranding Director’s Cut on PS5.

How to transfer Death Standing PS4 save data to Death Stranding Director’s Cut on PS5

To continue your progress from the PlayStation 4 version of Death Stranding to Death Stranding Director’s Cut on the PlayStation 5, you need to do the following:

1. Make sure that the PS4 version has been updated to its latest software version. The ability to upload a save file was added to the 1.13 version of the game.

2. With the original game updated to the latest software version, open the PS4 version of Death Stranding.

3. In the main menu, select the continue option to resume your current save file.

4. In order to transfer your progress, you must not be taking on any active orders. If you are, make sure you finished all the active orders.

5. With your orders slate clean, head over to the nearest Delivery Terminal.

6. Once you get to a Delivery Terminal, press the Options button on the controller to use the System menu.

7. Next, you need to select Export Save Data.

8. You should get a notification explaining what type of progress will be carried over to Death Stranding Director’s Cut on the PlayStation 5.

9. Select OK to start the save file upload.

10. Once the save file has been uploaded, open Death Stranding Director’s Cut on the PlayStation 5.

11. In the main menu, select the Load Game (PlayStation 4 to PlayStation 5) option.

12. Afterwards, select the OK option to download the save data and complete the save transfer process.

How to disable screenshot notifications on PlayStation 5

The latest firmware update for the PlayStation 5, as well as the PlayStation 5 Digital Edition, added the ability to disable screenshot notifications.

If you are interested in turning off this feature, then you can check out this step-by-step tutorial from Seeking Tech.

Why you should disable screenshot notifications on PS5

Every time you press the Create button on the DualSense (or the Share button of the DualShock 4 if you are using the PS4 controller on the PS5), you will take a screenshot of what is currently being shown on screen.

You will see a pop-up screenshot notification display on the top right corner for at least five seconds. The icon that appears can be distracting.

Not to mention that the pop-up screenshot notification will stay on screen for the aforementioned length of time even if you decide to take another screenshot. As a result, the icon will appear on the captured screen.

Due to these issues, we recommend disabling screenshot notifications on your PlayStation 5 systems if you are capturing a lot of screens.

How to disable screenshot notifications on PS5

The setting to turn off the pop-up screenshot icon is somewhat hidden in the menus of the PlayStation 5 and PlayStation 5 Digital Edition.

To find it, you need to take the following steps:

1. First off, you should be in the Home Screen, which is the main menu where you can choose which game to play, enter the PlayStation Store and perform other actions.

If you are playing a game or using an app on the PlayStation 5 at this moment, you can get to the Home Screen quickly by pressing and holding the PS button on your DualSense or DualShock 4 controller.

2. Once you managed to get to the Home Screen, you need to go into Settings.

Settings can be found in the upper right corner of the screen in between the Search option and your profile picture.

3. After getting in Settings menu, navigate all the way down and then select the Captures and Broadcasts option.

4. Inside the Captures and Broadcasts menu, select the Captures options on the left side.

5. On the right side of the same Captures and Broadcasts menu, you then need to select the Shortcuts for Create Button option.

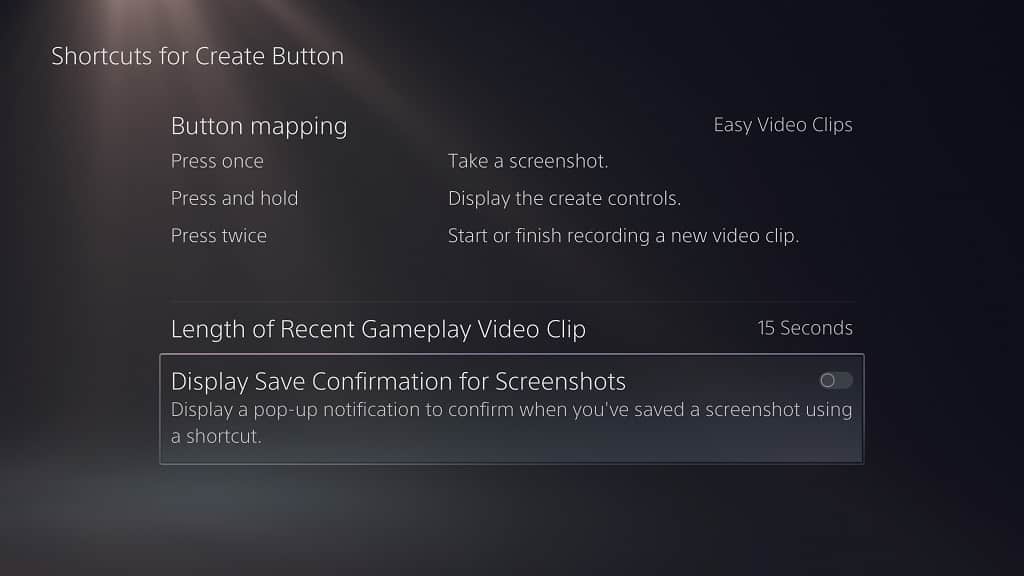
6. In the Shortcuts for Create Button, you should see the Display Save Confirmations for Screenshots setting.

If the switch to the right of the setting is white, then this indicates that the pop-up screenshot notifications are currently turned on.

To disable this feature, simply select the Display Save Confirmations for Screenshots setting to turn the switch to black.

With the screenshot notifications disabled, you will no longer see a pop-up icon appear when you press the capture button. However, you will still get an audio notification, which should sound like a photo camera shot, every time you capture a screenshot.

How to disable pop-up sound notifications on PS5

The latest firmware update for the PlayStation 5 and PlayStation 5 Digital Edition systems added the ability to disable the sound tone whenever a pop-up notification appears on screen.

So, if you would like to disable sound from being played when a pop-up notification is shown, you can check out this step-by-step tutorial from Seeking Tech.

1. First off, you need to get to the Home Screen, which is the main menu of your PlayStation 5 console where you can select which game to play, visit the PlayStation Store and more.

If you are current inside a game or app, you can get to the Home Screen by pressing and holding the PS button on your DualSense controller.

2. Now that you are in the Home Screen, you need to get to Settings.

You can find Settings, which has a gear cog icon, located of the top right corner of the Home Screen main menu.

3. After getting into Settings, navigate down and then select the Notifications option.

This should be the second to last option available in between the Saved Data and Game/App Settings option and the Captures and Broadcasts option.

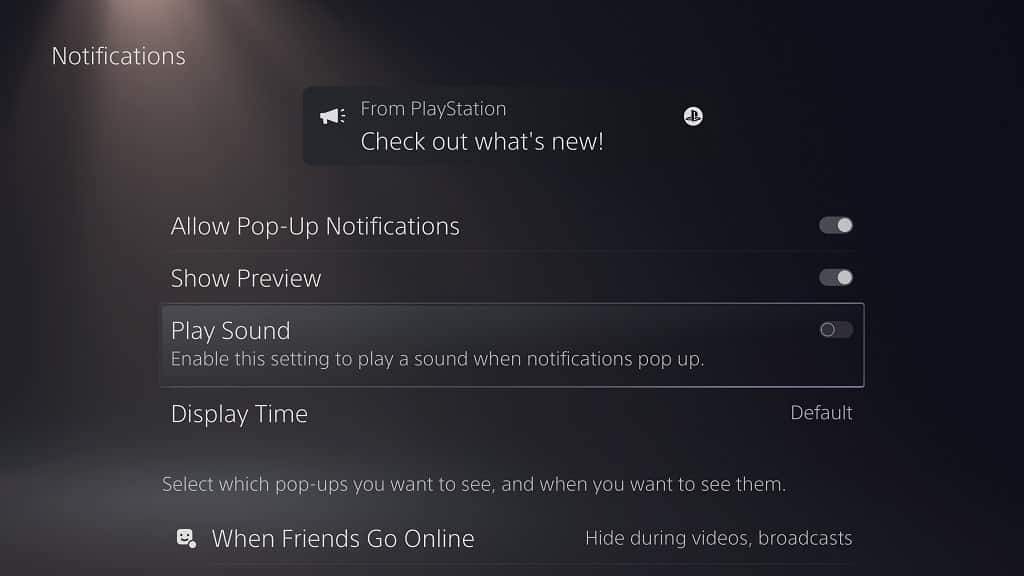
4. Once you are inside the Notifications menu, you should find the Play Sound option near the top.

If the switch to the right of the wording is white, then it indicates that the Play Sound option is currently enabled.

To disable it, simply select the Play Sound option to turn the switch black.

Keep in mind that pop-up notifications will still appear on the screen even if you disable the Play Sound option. To remove these pop-up notifications altogether, or limit the pop-up types, you can check out this guide.

How to enable pop-up sound notifications on PS5

If you want to enable sound notifications again after turning this feature off on your PS5 or PS5 Digital Edition console, you need to take the following steps:

1. From the Home Screen main menu, head over to Settings.

2. Inside the Settings menu, go the Notifications menu.

3. In the Notifications menu, you should see the Play Sound setting.

If the switch to the right of this setting is black, then it indicates that the sound tones for pop-up notifications are currently muted.

To enable this feature, you need to select the Play Sound setting in order to turn the switch white.

How to enable and optimize 3D Audio for TV speakers on PS5

Sony added 3D Audio support for TV Speakers on the PlayStation 5 and PlayStation 5 Digital Edition in a firmware update.

This feature is disabled by default. If you want to enable it, then you can check out this step-by-step tutorial from Seeking Tech.

Updating the firmware of the PS5

Before we being, it should be noted that you need the latest firmware on your PS5 system to use 3D Audio with your television speakers. If your console is connected online then you should get a notification to download and install the new software version of your system.

To manually update the firmware of your PlayStation 5, you can take the following steps:

1. You first need to be in the Home Screen, which is the main menu where you normally select which game to play, go to the PlayStation Store and perform other actions.

2. Inside the Home Screen, select Settings from the top right corner.

3. Once you are in Settings, select System from the list of options.

4. In the Settings menu, first select the System Software option on the left side.

5. On the right side of the same Settings menu, select System Software Update and Settings.

6. In the System Software Update and Settings, you should see the Update System Software option.

If the wording to the right shows that the software is “Up to date,” then your PS5 is already on the latest available firmware.

If not, then you need to select the Update System Software option to manually update.

7. On the System Software Update menu, you can select to update the firmware over the Internet or from an USB drive.

We recommend using the Internet if possible as the USB drive method is a lot more complicated.

How to enable 3D Audio for TV Speakers on PS5

With your PlayStation 5 or PlayStation 5 Digital Edition updated to the latest firmware version, you can now take the following steps to enable 3D Audio for your television speakers:

1. From the Home Screen, enter the Settings menu.

2. From the Settings menu, scroll down and then enter the Sound menu.

3. In the Sound menu, you need to first select the Audio Output option on the left side.

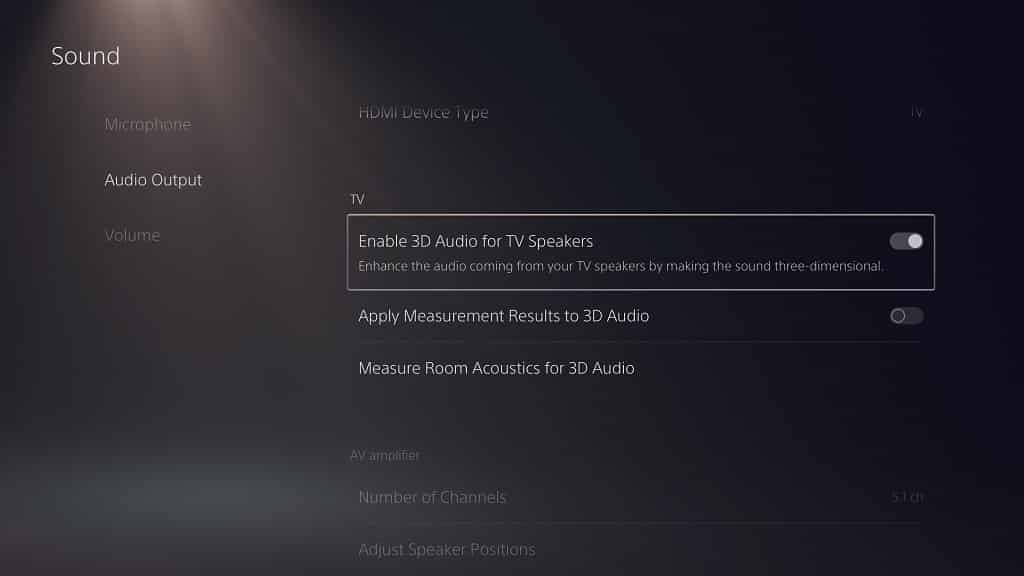
4. On the rights side in the same Sound menu, you then need to select Enable 3D Audio for TV Speakers.

How to optimize 3D Audio for TV Speakers on PS5

After enabling 3D Audio support for your TV speakers on the PlayStation 5, we highly recommend optimizing this feature. Otherwise, you may get a subpar 3D Audio experience.

To optimize 3D Audio for your TV speakers, you need to do the following:

1. From the Home Screen, go to Settings.

2. Inside Settings, go to Sound.

3. In Sound, select Audio Output on the left side.

4. In the same Sound menu, select Measure Room Acoustics for 3D Audio on the right side.

5. In the Measure Room Acoustics for 3D Audio menu, you will get a message that you need to be using a DualSense that is updated to the latest firmware version.

If you have having problems updating to the latest firmware of your DualSense, then you can check out this guide.

6. After updating your DualSense, you need to make sure that it is not connected to your PlayStation 5 system through a USB cable.

If it is, unplugged the USB cable from your controller.

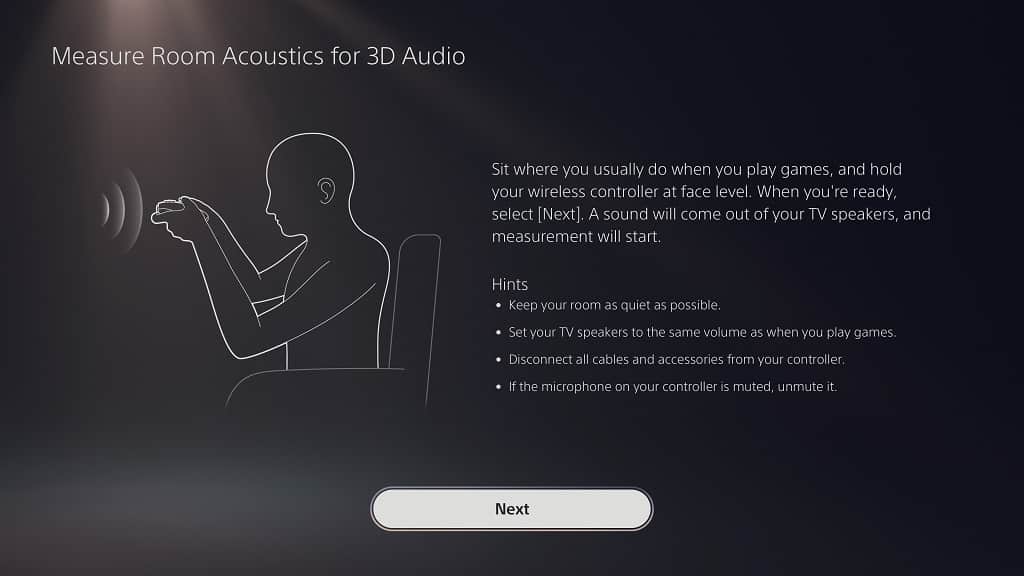
7. After meeting the aforementioned DualSense requirements, select the Next option in the Measure Room Acoustics for 3D Audio menu to continue.

8. On the next screen, you will see a list of “hints” for the measurement.

Before moving on, you need to meet the following requirements:

  • Make sure your room is as quiet as possible.
  • Make sure that the volume of your television is at the same level as when you are playing a game.
  • If you have any cables or accessories attached to your DualSense, make sure you disconnect them from your controller.
  • Make sure that your DualSense microphone is not muted. You can tell that the microphone muted if the mute button on your DualSense controller is displaying an orange light. If your controller is muted, simply press the mute button to turn off the orange light and unmute the microphone.

9. After meeting the aforementioned requirements from Step #8, hold the DualSense in front of your face and make sure to align it you’re your ear level.

10. Once you are ready, select the Next option.

11. The measurement will then start.

Afterwards, select the OK option.

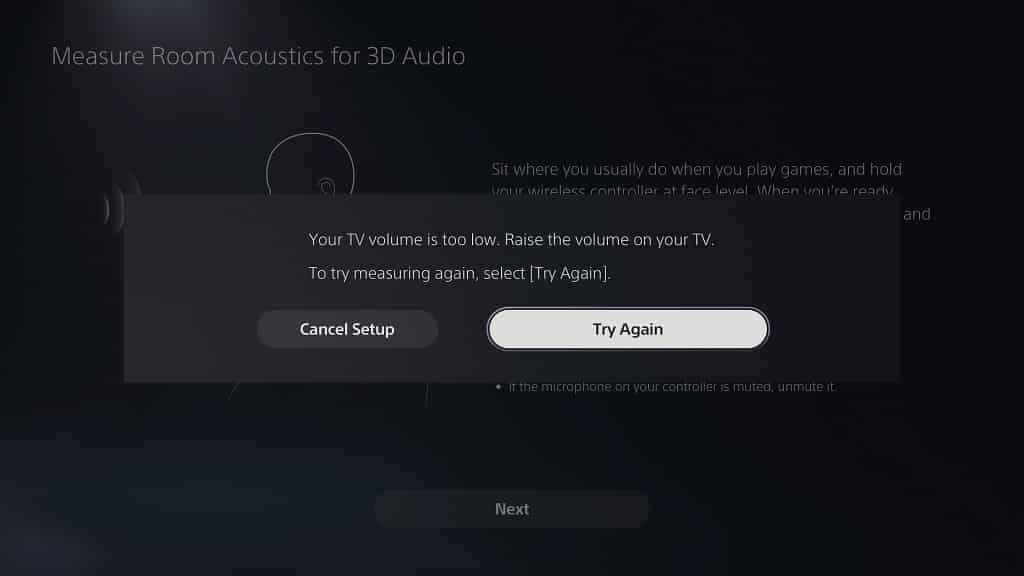
If you get an error message saying that your TV volume is too low, then you need to increase the volume of your television speakers and try the measurement again.

12. You should be back in the Sound menu.

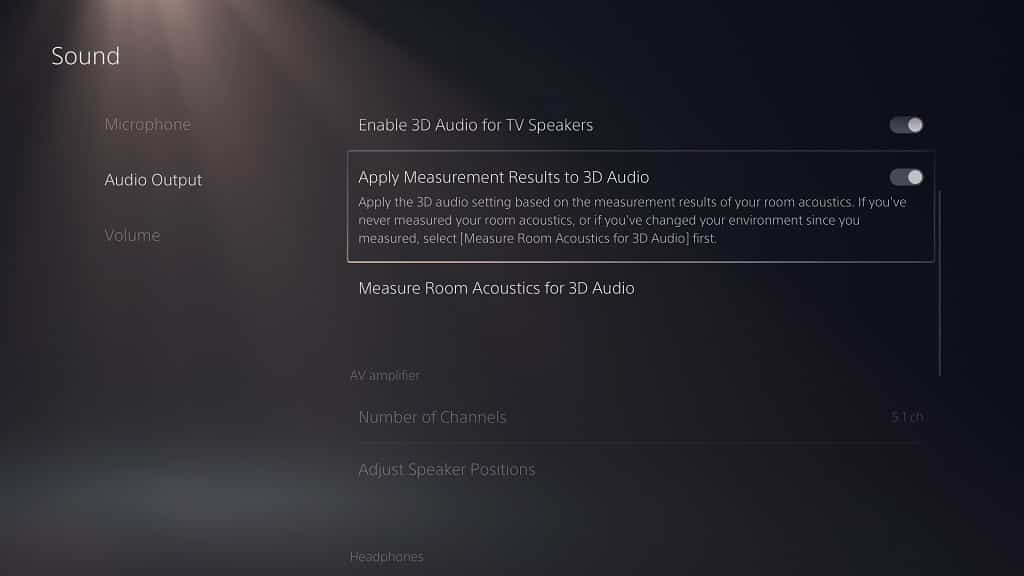
Here you need to make sure that the Apply Measurement Results to 3D Audio is enabled.

If the switch next to the Apply Measurement Results to 3D Audio setting is white, then this indicates that your TV speakers have been optimized for 3D Audio based on your current position.

If the switch is black, then you need to select the Apply Measurement Results to 3D Audio setting to turn the switch white to apply the optimizations.

We recommend remeasuring your room acoustics for 3D Audio if you change your typical viewing position from your television set or are switching TVs.

How to disable automatic video captures for challenges on PS5

The latest PlayStation 5 and PlayStation 5 Digital Edition firmware update added the ability to automatically capture gameplay videos of when you managed to achieve a personal best score.

While this may be a neat feature for some, it does take up space on the internal solid state drive. If you want to use the limited space of the SSD for something else, such as storing games, then we recommend disabling automatic video recordings for challenges.

If you are interested in doing so, then you can take the following steps from this Seeking Tech guide:

1. First off, you need to get to the Home Screen menu. This is where you can go to the PlayStation Store, pick which game to play and perform other tasks.

If you are playing a game or using an app on the PlayStation 5 at the moment, you can get to the Home Screen by pressing and holding the PS button on your DualSense.

2. Once you get to the Home Screen, head into Settings.

You can find Settings on the top right corner of the screen with the gear icon, which is in between the search and your profile picture.

3. After getting to the Settings menu, scroll down and then select the Captures and Broadcasts option.

4. After getting into the Captures and Broadcasts menu, select the Auto-Captures option on the left side.

5. On the right side of the same Captures and Broadcasts menu, select Challenges.

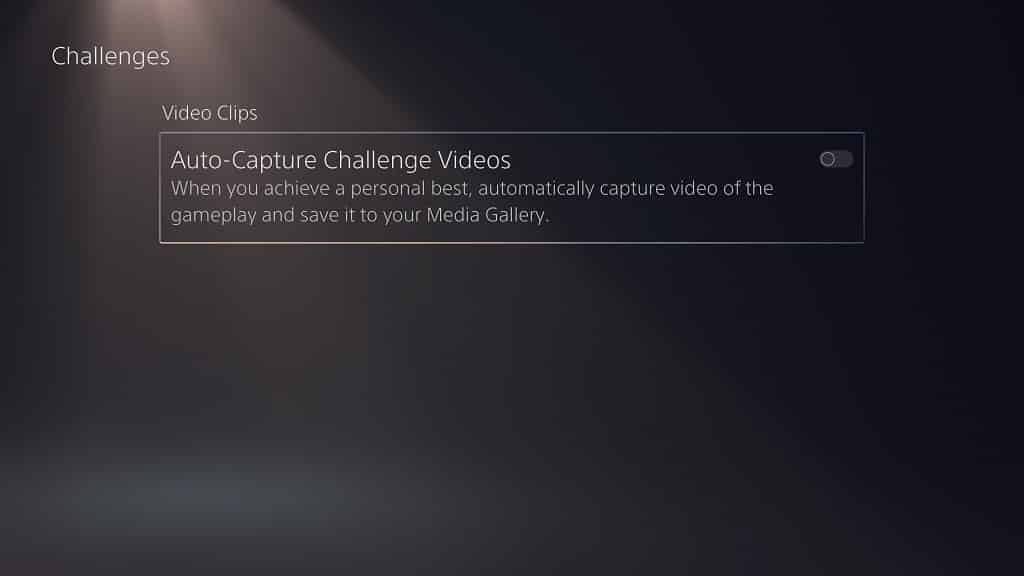
6. Now that you are in the Challenges menu, you will see the Auto-Capture Challenge Videos setting.

By default, this setting is enabled as the switch to the right of the wording should be white.

To disable this feature, you need to select the Auto-Capture Challenge Videos Setting to turn the switch to the right of the wording to black.

How to enable automatic video captures for challenges on PS5

If you want to enable automatic video captures for challenges after disabling this feature on your PS5 system, you need to do the following:

1. From the Home Screen, enter the Settings menu.

2. In Settings, scroll downwards and then enter the Captures and Broadcasts menu.

3. In Captures and Broadcasts, select Auto-Captures from the options available on the left side.

4. On the right side of the same Captures and Broadcasts menu, select Challenges.

5. Inside Challenges, you should see Auto-Capture Challenge Videos.

You need to make sure that the switch to the right of this setting is white, which will enable automatic video captures for challenges.

If the switch is black, select the Auto-Capture Challenge Videos setting to turn the switch to white.

To find out how you can disable screenshots and video captures for PlayStation 5 trophies, you can check out this tutorial.

PS5 Console Storage vs. M.2 SSD Storage vs. USB Extended Storage

With the PlayStation 5, as well as the PlayStation 5 Digital Edition, you can use up to three different storage types. So, what are the differences between the Console Storage, M.2 SSD Storage and USB Extended Storage?

You can find out in this comparison guide from Seeking Tech.

What is the Console Storage on PS5?

The Console Storage refers to the built-in solid state drive of the PlayStation 5 and PlayStation 5 Digital Edition.

What is the M.2 SSD Storage on PS5?

The M.2 SSD Storage refers to the solid state drive that is currently installed on the M.2 slot of the PlayStation 5 system.

What is the USB Extended Storage on PS5?

The USB Extended Storage refers to the external hard disk drive or external solid state drive that is connected to the USB Type-A port or USB Type-C port of the PlayStation 5 system.

Requirements

When it comes to requirements, the Console Storage is built right into the PS5. Thus, it doesn’t have any requirements.

The M.2 SSD Storage has the most complicated requirements as the PlayStation 5 only supports the PCIe Gen4 x4 interface with a maximum sequential reading speed of at least 5500 MB per second as well as a socket type of Socket 3 (Key M). Furthermore, a single-sided or double-sided heatsink is also recommended.

The overall size of the M.2 should be no more than 110 mm (or 4.33 in) in length and 25 mm (or 0.984 in) in width. Moreover, the SSD should be not taller than 11.25 mm (or 0.442 in) with 2.45 mm (0.096 in) of clearance below the SSD as well as 8 mm (0.314 in) clearance above the SSD.

For the USB Extended Storage, you need either a USB Type-A connector or USB Type-C connector with the SuperSpeed USB (5 Gbps) or later.

Capacity

The Console Storage of the PlayStation 5 has a capacity of 825 GB. However, a good chunk of the free space is reserved for the system files. Therefore, you have a very limited amount of space available.

With the M.2 SSD Storage, the capacity ranges from a required minimum of 250 GB to a maximum of 4 TB.

The USB Extended Storage offers the biggest capacities with a maximum of 8 TB. It also has a minimum capacity requirement of 250 GB.

Installation

The Console Storage doesn’t require any installation as the SSD is already soldered onto the motherboard of the PlayStation 5.

The M.2 SSD Storage easily has the most complicated process as it requires you to remove the outer case of the system. To find out how you can install the FireCuda 530, WD_BLACK SN850 and AORUS 7000S to your PS5, you can check out this tutorial.

The installation process for the USB Extended Storage is simpler although you do need to format the drive. To see how you can format the Samsung T5 and Samsung T7 for the PS5, you can check out this guide.

File Types

The Console Storage offers the best compatibility when it comes to storing different file types. With the internal solid state drive of the PlayStation 5, you can store PS5 games, PS4 games, saved data, screen shots and video clips.

With the M.2 SSD Storage and USB Extended Storage, you can only store PS5 and PS4 games.

Speed

The Console Storage and M.2 SSD Storage should be much faster than the USB Extended Storage when it comes to reading and writing speeds.

Playing Games

You can play both PS5 games as well as backwards compatible PS4 games directly on the Console Storage and M.2 SSD Storage.

With the USB Extended Storage, you can only play backwards compatible PS4 games.

Where to find the Console Storage, M.2 SSD Storage and USB Extended Storage?

To find the location of your Console Storage, M.2 SSD Storage and USB Extended Storage in the PlayStation 5 menus, you need to take the following steps:

1. You should be in the Home Screen on the PlayStation 5. This is the main system menu where you can go to the PlayStation Store, select which videogame to play and more.

If you are playing a game or using an application on the PS5, you can press and hold the PS button on your DualSense controller to bright up the Home Screen.

2. From the Home Screen, you need to get to Settings.

You can do so by selecting the “Settings” option, which has the gear icon, located on the top right corner of the Home Screen.

3. Inside the “Settings” menu, you need to select the “Storage” option.

4. Inside the “Storage” menu, you will find the Console Storage, M.2 SSD Storage and USB Extended Storage.

You can use this menu to reformat a drive, delete files and move files between the three storage types.

How to hard reset and power cycle your Xbox Series X and Xbox Series S

When using your Xbox Series S or Xbox Series X, you may run into crashes, glitches and issues. A common fix for these problems is to perform a hard reset or power cycle on the console.

To find out how to do so, you can check out this step-by-step tutorial from Seeking Tech.

How to hard reset your Xbox Series S or Xbox Series X using Power Center

To hard reset your Xbox Series S or Xbox Series X console by using the Power Center, you need to take the following steps:

1. First off, you need to press and hold the Xbox button on your controller. This button has the Xbox logo and will light up when pressed.

2. You should now be in the Power Center menu, which will ask what do you want to do.

Here, you need to select the “Restart console option.”

3. The next screen will ask if you want to restart your Xbox console.

Select the “RESTART” option to hard reset your Xbox Series S or Xbox Series X.

The console will then reboot itself.

How to hard reset your Xbox Series S or Xbox Series X using the Guide menu

You can also hard reset your Xbox Series S or Xbox Series X console by using the Guide menu although this will take longer than using the Power Center.

If you are still interested in this method, then you need to do the following:

1. Press the Xbox button on your controller to bring up the Guide menu.

2. Inside the Guide menu, navigate over to the Profile & system tab.

3. On the Profile & system tab, select Settings.

4. Once you are in the Settings menu, select General on the left side.

5. In the General Settings menu, select the “Power mode & startup” option.

6. Inside the General Power mode & startup menu, select the “Restart now” option.

7. You should get a message asking if you want to restart your Xbox console.

Select the “YES” option to reboot the system.

How to power cycle your Xbox Series S or Xbox Series X

In order to power cycle your Xbox Series S or Xbox Series X, you need to take the following steps:

1. Press and hold the Xbox button located on the console for around 10 seconds.

2. After you console has been shut down, you can press the Xbox button on either the console or your Xbox controller to turn the system back on again.

How to reset the power supply of your Xbox Series S or Xbox Series X

To reset the power supply of your Xbox Series S or Xbox Series X, you need to do the following:

1. Press and hold the Xbox button on your console for approximately 10 second to turn off its power.

2. Wait until the console completely shuts down and then unplug the power cable on the console.

3. Wait at least 30 seconds.

4. Once the time has passed, plugged the power cable back into the console.

5. Press the Xbox button on your Xbox Series S or Xbox Series X to turn it back on again.

How to disable quick resume on Xbox Series S and X

Quick resume is a new element introduced for the Xbox Series S and Xbox Series X.

This feature will allow you to quickly switch between multiple games by creating a temporary save state. As a result, there will be very little loading in between switch games as you will be able to bypass the start-up and save loading screens.

However, quick resume may cause bugs, glitches and other issues even for games that support the feature.

You can check out this tutorial at Seeking Tech to see how you can disable quick resume on the Xbox Series consoles.

Can you universally disable quick resume on Xbox Series S and X?

Unfortunately, you can’t universally disable quick resume on your Xbox Series S or Xbox Series X.

Instead, you need to manually disable this feature on a game-by-game basis.

How to manually disable quick resume on Xbox Series S and X

In order to manually disable quick resume for a game, you need to take the following steps:

1. Press the Xbox button (which is the top middle button with the Xbox icon that lights up when pressed) on the Xbox controller.

Doing so will open the Guide menu.

2. In the Guide menu, select the “My games & apps” option.

3. In the “My games & apps” section, you should find a list of games that you have currently using the quick resume feature.

The Xbox Series S and Xbox Series X can store the temporary save states of up to three games that have been built specifically for the Series S and X consoles.

Backwards compatible Xbox, Xbox 360 and Xbox One games that up less memory, which means that you can have more of these games stored via quick resume.

In “My games & apps”, you need to navigate to the game with a quick resume save state that you want to remove.

4. With the game highlighted, press the Menu button (which is the small button that has the three horizontal lines icon) on your controller to bring up a pop-up menu.

5. In the pop-up menu, you need to select the “Remove from Quick Resume” option.

6. Afterwards, you will be back at the “My games & apps” section of the Guide menu.

If you want to disable the quick resume feature for another game, then you can repeat steps 3 through 5.

What happens when you disable quick resume on Xbox Series S and X

By disabling quick resume on a videogame running on the Xbox Series S or Xbox Series X console, you will close the game and delete its temporary save state that was previously created. There’s no way to recover this save state data, which means that you will lose any unsaved progress in the game.

Furthermore, you have to go through the startup loading sequence when you open the game again.

Quick resume will automatically be enabled when you open the game as well, which means you need to manually remove this feature again to disable it.

Do quick resume take up SSD space on Xbox Series S and X?

The quick resume feature should not take up any additional space on your Xbox Series S or Xbox Series X console.

Does using quick resume affect the performance of your Xbox Series S and X console?

The quick resume feature use temporary save states. Therefore, it should not lower the performance of your Xbox Series S or Xbox Series X console.

How to install MSI SPATIUM M480 to PS5

The MSI SPATIUM M480 is a new solid state drive that meets the requirements to be compatible with the PlayStation 5 system as you will be able to play PS5 games directly off of this M.2 SSD.

You can check out this tutorial from Seeking Tech to see how you can install the SPATIUM M480 to the PS5.

Before we start, it should be noted that this guide will cover the following capacities:

  • 500 GB SPATIUM M480 PCIe 4.0 NVMe M.2 Solid State Drive
  • 1 TB SPATIUM M480 PCIe 4.0 NVMe M.2 Solid State Drive
  • 2 TB SPATIUM M480 PCIe 4.0 NVMe M.2 Solid State Drive

Heat Sink Recommendation

Although there is a heatsink version of this SSD available (the SPATIUM M480 PCIe 4.0 NVMe M.2 HS), it is too tall to fit into the docking bay of the PlayStation 5.

Therefore, we recommend getting the non-heatsink version of the SPATIUM M480 and then acquire a heatsink that will fit with the game console.

If you are looking for a PS5-compatible heatsink, then we recommend taking a look at the be quiet! MC1 M.2 SSD Cooler with this link. (#CommissionsEarned).

To see how to install the MSI SPATIUM M480 with the MC1 M.2 SSD Cooler, you can check out this video guide.

Moving important data off of MSI SPATIUM M480

You will need to format your MSI SPATIUM M480 in order to use it with the PlayStation 5.

Reformatting the drive will erase all data you previously stored on it.

Therefore, we recommend backing up any important data, if there is any, you have on the SPATIUM M480 before installing it on the PS5.

Upgrading to latest PlayStation 5 firmware

M.2 support for the PlayStation 5 was added through a firmware update on the system. Thus, you need to install the latest available firmware if you haven’t done so already.

In order to manually update the PS5 firmware, you need to do the following:

1. Go to the Home Screen, which is the main menu where you can pick which game to play.

If you are playing a game or using an app, you can get to the Home Screen by pressing and holding the PS button on your DualSense controller.

2. In the Home Screen, go to Settings, which you can find on the upper right corner of the main menu with the gear icon.

3. Inside Settings, go to System.

4. Inside the System menu, select the System Software option on the left side of the menu.

5. In the same System menu, select System Software Update and Settings on the right side.

6. Inside the System Software Update and Settings menu, go to Update System Software.

7. In the next screen, you can pick to update the firmware of the PlayStation 5 over the Internet or via a USB storage device.

How to insert MSI SPATIUM M480 to PS5

Once you are done with the aforementioned preparations, you can now insert the SPATIUM M480 to the M.2 docking bay of the PlayStation 5.

To do so, you need to take the following steps:

1. Turn off the PS5 console.

2. After making sure that the console has completely powered down, which you will know when it isn’t displaying any lights, unplug any cables that are attached to the PlayStation 5.

3. Detach the stand from the console as well.

4. Now, you need to place the console so that the outer cover side that contains PS logo side is facing downwards.

Furthermore, the bottom of the system, which shows various logos and contains the screw hole for the stand, should be facing you.

5. From your vantage point, grab the upper right corner of the outer cover.

6. Lift the cover up and then pull it towards you to remove the outer cover.

7. With the cover off, you should see a rectangle metal cover over the M.2 docking bay of the PlayStation 5.

Here, you need to use a cross-head screwdriver to remove the screw holding the M.2 dock cover in place and then remove the metal cover for the M.2 docking bay.

8. Once you are inside the docking bay, you should see another screw along with a spacer. Use a cross-head screwdriver to remove both of these.

9. Placed the previously removed spacer into the 80 screw hole of the bay.

10. You can then be able to insert the MSI SPATIUM M480, with a compatible heatsink attached, to the M.2 slot.

To do so, you need to align the connectors of your SSD with the M.2 slot of the PS5. You can then insert the SPATIUM M480 from a diagonally upwards position.

11. Once the solid state drive has been inserted into the M.2 slot of the PlayStation 5, hold the other end of the SSD, which should be floating up, down.

Use the screw you previously removed from the M.2 docking bay to screw the SPATIUM M480 down and keep it secure.

12. Put the previously removed metal cover of the M.2 dock back on and screw it in place again.

13. Slide the outer cover of the PlayStation 5 back into place.

How to format MSI SPATIUM M480 for PS5

After inserting the MSI SPATIUM M480 to your PlayStation 5 system, you then need to format the solid state drive before you can use it.

In order to do so, you need to do the following:

1. Plug the power cable and HDMI cable back into the PlayStation 5 console.

2. Turn on the PS5.

3. You should get a message talking about the M.2 SSD Storage.

4. Press the PS button on your DualSense to use your controller.

5. Select the Format M.2 SSD option to start the formatting process.

6. After the formatting procedure is completed, you should see the sequential read speed of the MSI SPATIUM M480 when it is being used by the PS5 system.

Here, you need to select the OK option to go to the Home Screen.

Where to find MSI SPATIUM M480 in the PS5 menu

Now that you have formatted the SPATIUM M480 on the PlayStation 5, you can begin using it.

To find this MSI solid state drive in the menus, you need to take the following steps:

1. In the Home Screen, go to Settings.

2. From the Settings menu, select Storage.

3. From the Storage menu, select M.2 SSD Storage on the left side.

4. On the right side of the same Storage menu, you should find your SPATIUM M480.

5. You can use the Storage menu to delete and move games from one storage to another. You can also reformat the SPATIUM M480.