How to disable 2-step verification when logging into your PS5

When signing into your PlayStation Network account, you may be required to enter an additional code, that will be sent to you via a text message, to go along with your password.

If you find this extra step inconvenient and would rather disable the two-step authentication process so that you can log into your PSN account straight away with just your password, then you can check out this tutorial from Seeking Tech to see how you can turn it off.

1. To start off, you need to turn on your PlayStation 5 or PlayStation 5 Digital Edition gaming system and then make sure that it is connected to the Internet if you haven’t done so already.

2. Next, you need to log into your PlayStation Network account.

3. After signing into your PSN account, you should be in the home screen of your system.

If you are in another area, then you can get to the home screen quickly by long pressing the PS logo button on the DualSense controller.

4. In the home screen, you need to navigate and then select the gear cog icon that is located on the top right corner. By doing so, you should be able to head to the Settings section.

5. After getting to Settings, you need to select the Users and Accounts option.

6. From the Users and Accounts section, you first need to select Account on the left column.

7. On the right side of the same screen, you then need to select Security.

8. Inside of the Security section, you need to select 2-Step Verification.

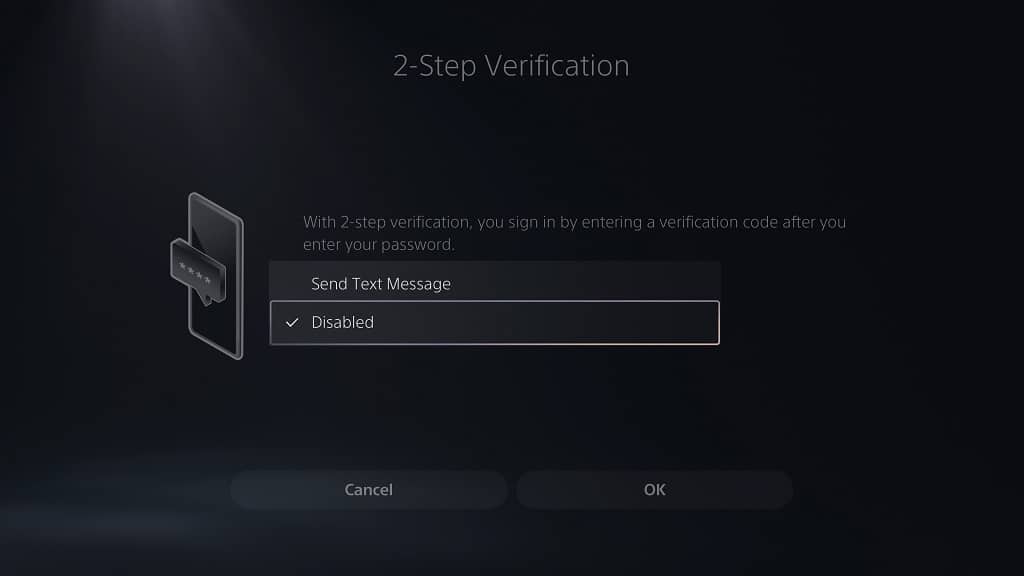
9. From the 2-Step Verification section, select the drop-down menu.

10. You should then select Disabled in the drop-down menu.

11. Back at the 2-Step Verification section, you need to select the OK option in order to confirm the change.

12. Next, you should be in the Enter Your Account Information section. Here, you should see the following message:

“For your security, use PlayStation App to sign in, or enter your password again.”

If you don’t have the PlayStation App installed on your smartphone or mobile device, then you can use your PS5 to enter your PSN password.

After you are done entering your password again, you need to select the OK option underneath in order to finally disable 2-step verification.

Recommended Sony X85K settings for PS5, Xbox Series X and Xbox Series S

With the Sony X85K 4K HDR LED TV, you can play PlayStation 5, Xbox Series X and Xbox Series S games at 120 frames per second and with Variable Refresh Rate enabled. This television set also supports Dolby Vision on the Xbox Series consoles.

You can take a look at this guide to see which settings you should use in order to take advantage of these new gaming systems.

Before we begin, it is important to note that this guide should cover all screen sizes of the X85K series, which should include the following model number.

  • KD-43X85K
  • KD-50X85K
  • KD-55X85K
  • KD-65X85K
  • KD-75X85K
  • KD-85X85K

1. Make sure you download the latest firmware for your Sony X85K. One of the newer updates improves the Peak Luminance output when the Variable Refresh Rate feature is used.

To see how you can update the firmware for this television set, you can follow the steps laid out in this tutorial.

2. Next, you need to use the HDMI cable that came with your PlayStation 5, PlayStation 5 Digital Edition, Xbox Series X or Xbox Series S to connect the console to your TV.

Keep in mind that only the HDMI 3 and HDMI 4 ports of the X85K support the full HDMI 2.1 bandwidth. Therefore, you need to connect your console to either of these ports.

3. Once you have connected your gaming system, you then need to change the HDMI format.

In order to do so, use the X85K TV remote and then go to Settings > Display & Sound > Picture > Video Signal. From there, select the HDMI port that is connected to your console.

In the HDMI Signal Format menu, you then need to select Enhanced Format (VRR). By doing so, you should enable the Variable Refresh Rate feature for your Sony 4K HDR LED TV.

If you want to play Xbox Series X or Xbox Series S games using the Dolby Vision HDR format, then you need to select Enhanced Format (Dolby Vision) in the HDMI Signal Format menu instead.

4. You then need to enable Auto Low Latency Mode.

In order to do so, use the remote control for the TV to head over to Settings > Display & Sound > Picture and then make sure that Auto Picture Mode is turned on.

5. In the same Picture menu, make sure you have the following features turned off:

  • Ambient Light Sensor
  • Light Sensor
  • CineMotion
  • Motionflow

If you leave Ambient Light Sensor and Light Sensor, then the X85K will automatically adjust its picture settings depending on your room lighting. The CineMotion and Motionflow may add input lag and visual artifacts that negatively affect the image quality.

6. Next, you need to set HDR to Auto. To do so, return to the Picture menu of your TV and then select Video Signal. Afterwards, make sure you set HDR Mode to Auto.

7. Your Sony X85K should now be optimized for your PS5, PS5 Digital Edition, Xbox Series X and Xbox Series S. With that said, there may some settings on the gaming console side that you may need to adjust in order to get the most out of this 4K LED television set.

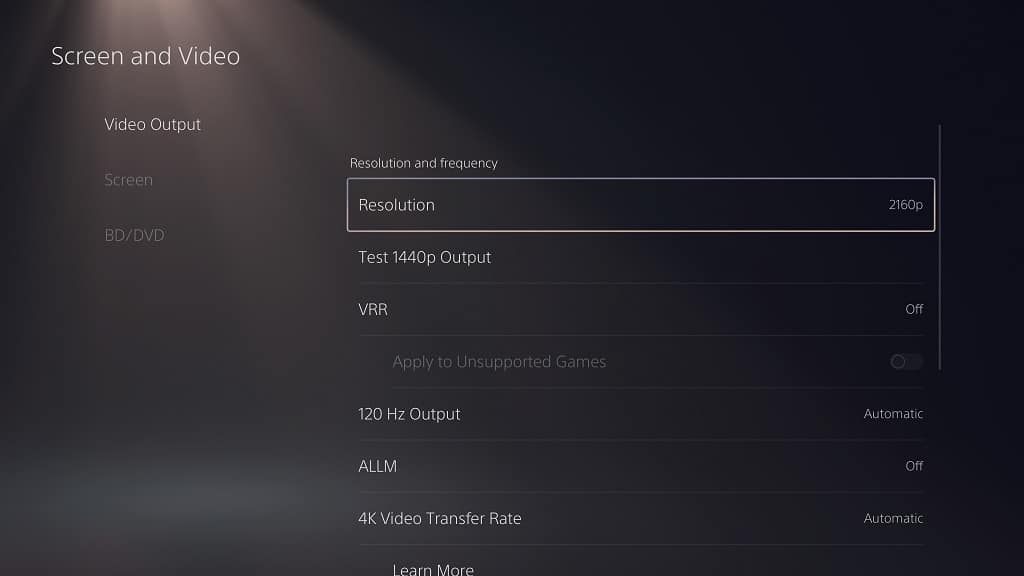
On the PS5 or PS5 Digital Edition system, you need to open the Settings menu and then head over to Screen and Video > Video Output. From there, you need to set Resolution to 2160p, HDR to On When Supported as well as the following settings to Automatic:

  • VRR
  • 120 Hz Output
  • ALLM
  • 4K Transfer Rate
  • Deep Color Output
  • RGB Range

In the same menu, you also need to select Adjust HDR option. You should then follow the steps that appear over the next several menus in order to optimize the HDR brightness output for your console.

On the Xbox Series X or Xbox Series S system, open the Settings menu and then head over to General > TV & display options > Video modes. From there, make sure that the following settings are checked:

  • Allow auto-low latency mode
  • Allow variable refresh rate
  • Allow 4K
  • Allow HDR10
  • Allow Dolby Vision
  • Dolby Vision for Gaming

In the same menu, make sure that the Auto HDR setting is unchecked.

Next, go to General > TV & display options and then set Resolution to 4K. Afterwards, select Calibrate HDR and then follow the steps that show up on the next several menus in order to optimize the HDR brightness output.

How to remove PlayStation Store personalized ads and recommendations on PS5

The PlayStation Store App on your PlayStation 5 or PlayStation 5 Digital Edition system may show you personalized ads and product recommendations. If you want to disable these types of advertisements, then you can check out this tutorial from Seeking Tech.

1. To start off, turn on your PS5 or PS5 Digital Edition system and then make sure that you are logged into your PlayStation Network account.

2. You should now be in the Home Screen of the system menus.

If you are somewhere else, then you can quickly head home by pressing and holding the PS logo button on your DualSense controller.

3. On the home screen, you first need to make sure that you are in the Games section. If you are in the Media section, then you need to press the L1 button on the game pad to switch over to the Games category.

4. Next, you need to select the blue PlayStation shopping bag icon, which should open the PlayStation Store App.

5. Inside of the shopping application, press the triangle button on the DualSense to quickly navigate to the top right corner of the screen.

6. From there, you need to select the icon that has three dots in order to open the More menu.

7. In the small pop-up menu, you then need to select Personalization Settings.

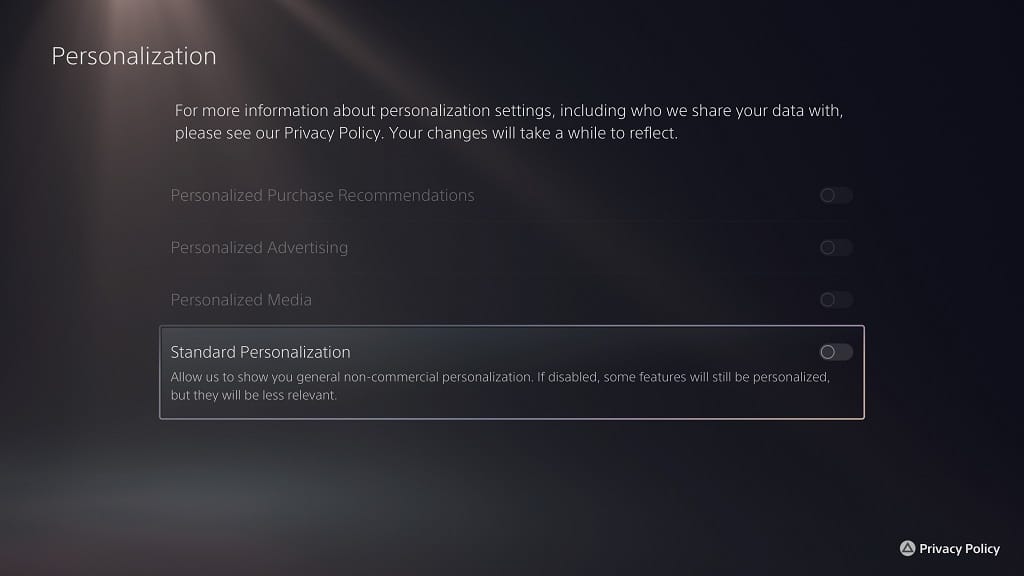
8. After getting to the Personalization Settings menu, you will be able to disable the following:

  • Personalized Purchase Recommendations will show personalized product and service recommendations based on your personal data collected by Sony and third-party companies. When you disable this setting, you will still see product and service recommendations on the PlayStation Store although these won’t be personalized.
  • Personalized Advertising will show personalized advertisements based on your personal data that has been collected by Sony and third-party companies. When disabled, you will still see ads although the sponsored content won’t be as relevant to your personal tastes.
  • Personalized Media will show music and video recommendations based on your personal data that has been collected by Sony-partnered media services and apps. Even when disabled, you may still see these recommendations appear although they won’t be as personal.
  • Standard Personalization will show non-commercial personalization when it comes to browsing the PlayStation Store. Even when disabled, some of the features on the shopping application may still be personalized although it may not be as relevant to your personal interests.

You can disable Personalized Purchase Recommendations, Personalized Advertising and Personalized Media separately on their own.

You can also disable all four of these settings by simply turning off Standard Personalization. By doing so, you will get the following message:

Are you sure you want to disable [Standard Personalization]? This will also disable all your other personalization settings. You’ll miss out on some game and console features.

Here, you need to select the Disable option in order to turn off all of the personalization settings.

Hisense U7H wall mount specs

For 2022, Hisense updated its U7 series with the new U7H model. If you would like to mount this 4K Quantum ULED TV to a wall, then you can check out this compatibility guide to see which mounting brackets are supported.

Screen Sizes

There are currently four size variants of the U7H brand as you should have a 55-inch, 65-inch, 75-inch or 85-inch screen. You can find the model number for each size below:

  • 55″ Hisense U7H 4K Quantum ULED TV (55U7H)
  • 65″ Hisense U7H 4K Quantum ULED TV (65U7H)
  • 75″ Hisense U7H 4K Quantum ULED TV (75U7H)
  • 85″ Hisense U7H 4K Quantum ULED TV (85U7H)

The aforementioned U7H model numbers are for the U.S. region and may be different if you purchased your television set from another region.

Dimensions

Dimensions without Stand (in inches):

  • 55″ Hisense U7H: 48.3 inches × 28.2 inches × 3.5 inches
  • 65″ Hisense U7H: 57.0 inches × 33.1 inches × 3.5 inches
  • 75″ Hisense U7H: 66.1 inches × 38.1 inches × 3.3 inches
  • 85″ Hisense U7H: 74.9 inches × 43.1 inches × 3.7 inches

Dimensions without Stand (in centimeters):

  • 55″ Hisense U7H: 122.7 cm x 71.6 cm x 8.9 cm
  • 65″ Hisense U7H: 144.8 cm x 84.1 cm x 8.9 cm
  • 75″ Hisense U7H: 167.9 cm x 96.8 cm x 8.4 cm
  • 85″ Hisense U7H: 190.3 cm x 109.5 cm x 9.4 cm

Dimensions without Stand (in millimeters):

  • 55″ Hisense U7H: 1226.8 mm x 716.3 mm x 88.9 mm
  • 65″ Hisense U7H: 1447.8 mm x 840.7 mm x 88.9 mm
  • 75″ Hisense U7H: 1678.9 mm x 967.7 mm x 83.8 mm
  • 85″ Hisense U7H: 1902.5 mm x 1094.7 mm x 94.0 mm

Weight (without Stand)

Weight without Stand (in pounds):

  • 55″ Hisense U7H: 32.4 lbs.
  • 65″ Hisense U7H: 43.0 lbs.
  • 75″ Hisense U7H: 76.3 lbs.
  • 85″ Hisense U7H: 90.4 lbs.

Weight without Stand (in kilograms):

  • 55″ Hisense U7H: 14.7 kg
  • 65″ Hisense U7H: 19.5 kg
  • 75″ Hisense U7H: 34.6 kg
  • 85″ Hisense U7H: 41.0 kg

VESA Mounting Pattern

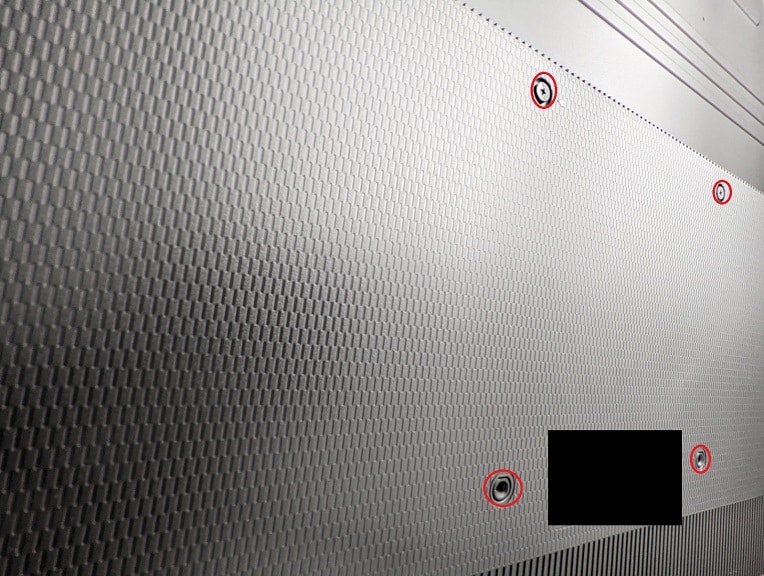
The screw holes of the wall mount must match with the four mounting screw holes located on the back of your U7H. The measurement of the horizonal and vertical distances of these screw holes are known as the Vesa Mounting Pattern or the VESA Hole Pitch.

The 55-inch and 65-inch variants have the same distances at 300 mm x 200 mm. The 75-inch and 86-inch versions have wider and taller patterns when compared to the smaller screen sizes, however.

You can find the VESA Mounting Patterns for all four screen sizes below:

  • 55″ Hisense U7H: 300 mm x 200 mm
  • 65″ Hisense U7H: 300 mm x 200 mm
  • 75″ Hisense U7H: 600 mm x 300 mm
  • 85″ Hisense U7H: 600 mm x 400 mm
VESA Mounting Pattern (example from different TV).

Screw Type

When installing the mounting bracket on your Hisense U7H, you need to use the M6 screw type if you have a 55-inch or 65-inch version. For the 75-inch and 85-inch versions, you need to use the M8 screw type instead.

What wall mounts are compatible with the Hisense U7H?

If you are looking for a compatible mounting bracket for your U7H, then it needs to support the VESA Mounting Pattern and weight of the television set. These factors will vary depending on the screen size of your Hisense Quantum ULED TV.

You should also make sure you are using the right screw type when screwing in the mounting bracket to the back of the screen.

If you are looking for specific recommendations when it comes to finding a compatible fixed, tilting or full motion wall mount for the Hisense U7H, then you can check out this article.

Resource:

How to check for PS5 system feature updates

Sony may occasionally add new features to the PlayStation 5 and PlayStation 5 Digital Edition system. The past additions include 1440p, Variable Refresh Rate, Auto-Low Latency Mode and more.

To see how you can check if there are any updates available when it comes to system features, you can follow the steps laid out in this article from Seeking Tech.

1. To begin, turn on your PS5 or PS5 Digital Edition console if you haven’t done so already.

2. Next, you need to make sure that your game system is connected to the PlayStation Network.

3. You should then go to the home screen, which is the main menu that should appear once you boot up your console and sign into your PSN account.

If you aren’t in the home menu at the moment, then you can bring up the Command Center quick menu by pressing the PS button on the DualSense controller. Afterwards, you can select the house icon at the bottom menu to go to the home menu.

Alternatively, you can long press the PS button until the home menu shows up.

4. In the home menu, press the triangle button on the controller to quickly navigate to the top right side of the screen. From there, you can select the gear icon so that you can go to the Settings menu.

5. Once you get inside the Settings menu of your PlayStation 5, you then need to select System from the list of options.

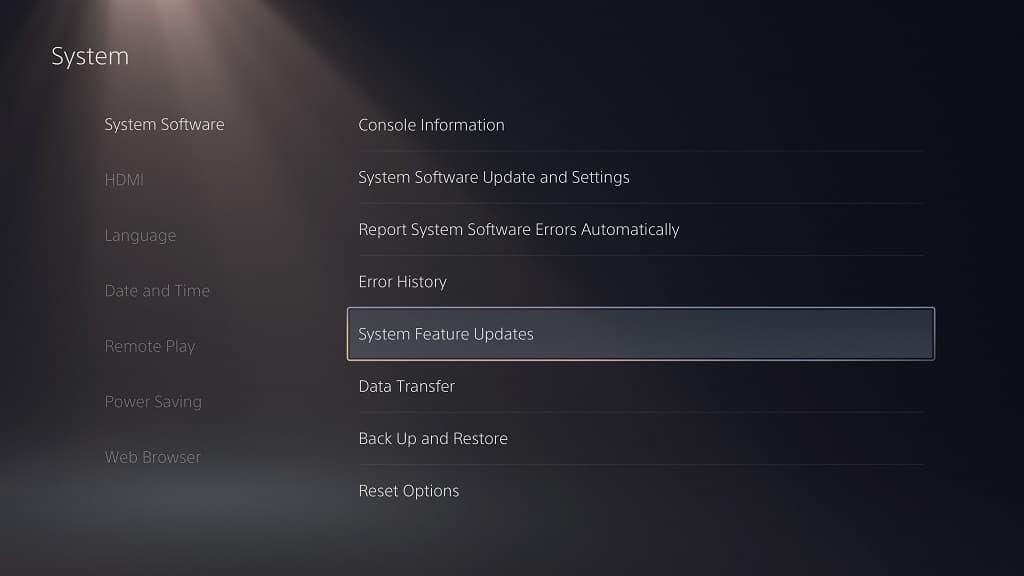
6. On the left column in the System menu, you need to select System Software.

7. On the right side of the same screen, you then need to select System Feature Updates.

8. Your PS5 will then start checking to see if there any new updates when it comes to system features. You should see a “Please wait…” message show up on the screen.

9. If you see that there are new versions available to download and install, then make sure you update the firmware of your PlayStation 5.

10. If there aren’t any updates available for PS5 system features, then you will get the following message:

“The latest versions of all system features are installed.”

As a result, you console should be up to date in terms of system features. If you get this message, select the OK option to return to the System menu.

Recommended LG B2 and G2 TV settings for PS5, Xbox Series X and S

The B2 and G2 are both 4K OLED television sets that were released in 2022. These two TVs support all of the advanced display features set of the new PlayStation 5, PlayStation 5 Digital Edition, Xbox Series X and Xbox Series S consoles. These benefits include 120 frames per second, Variable Refresh Rate and Dolby Vision.

To see how you can properly set up your LG B2 or G2 for these gaming systems, you can take a look at this tutorial from Seeking Tech.

1. To start off, make sure you plug the console to your LG OLED.

For the uninformed, only the HDMI 3 and HDMI 4 ports of the B2 support HDMI 2.1. Therefore, you need to plug your PS5, Xbox Series X or Xbox Series S to those two ports.

All four HDMI ports of the LG G2 are HDMI 2.1; thus, you can connect your console to any of these ports.

2. Once you connected your console, you then need to change the HDMI bandwidth on your television set. In order to do so, you need to take the following steps:

  • Open the Home Dashboard menu on your B2 or G2.
  • Select the icon that has three vertical dots.
  • You then need to select Edit Inputs.
  • Next, you need to select the HDMI port that is currently connected to your PS5, Xbox Series X or Xbox Series S.
  • Finally, you need to select PC to unlock the full HDMI bandwidth.

3. You should then make sure that the Game Optimizer mode has been turned on. In order to do so, go to Settings > All Settings > Picture > HDR Select Mode > Game Optimizer.

4. Next, there are several Brightness settings that you might need to change. To do so, head over to Settings > All Settings > Picture > Advanced Settings > Brightness.

Afterwards, make sure that you match the following settings for HDR games:

  • OLED Pixel Brightness: 100
  • Adjust Contrast: 100
  • Black Level: 50
  • Auto Dynamic Contrast: Off
  • Dynamic Tone Mapping: HGiG
  • Peak Brightness: High
  • Gamma (Adjust Brightness): 2.2
  • Video Range: Auto
  • Motion Eye Care: Off

For SDR games, you can change OLED Pixel Brightness to 70, Adjust Contrast to 85 and then disable Dynamic Tone Mapping. You can leave the rest of the Brightness settings to the same values as you did for HDR games.

5. You can then adjust the color settings of your B2 or G2 by going to Settings > All Settings > Picture > Advanced Settings > Color.

From there, make sure you that you set Color Depth to 55 for HDR games or 50 for SDR games. For both HDR and SDR set Tint to 0. You should then select White Balance and then make sure that the Color Temperature, Red, Green and Blue settings are all set to 0.

6. You should also make sure that you are using any of the Clarity features from your LG B2 or G2. To start off, go to Settings > All Settings > Picture > Advanced Settings > Clarity.

From there, make sure that the Adjust Sharpness setting is set to 0. You should also disable the following features:

  • Super Resolution
  • Noise Reduction
  • MPEG Noise Reduction
  • Smooth Gradation
  • Real Cinema
  • TruMotion

7. Moreover, you need to disable any AI-enhanced picture settings. Start by going to Settings > All Settings > General > AI Service. You should then turn off all of the settings from this menu, including the following:

  • AI Picture Pro
  • AI Brightness Settings
  • AI Genre Selection

8. You should then disable the Energy Saving Step setting by going to Settings > All Settings > General > OLED Care > Device Self Care > Energy Saving.

9. Next, head over to Settings > All Settings > General > OLED Care > Device Self Care > OLED Panel Care. From there, make sure you turn on Screen Move and then set Adjust Logo Brightness to Low.

10. Now you need to open the Game Optimizer menu and then make sure you match the following settings:

  • Game Genre: Standard
  • Reduce Blue Light: Off
  • Dark Room Mode: Off
  • Prevent Input Delay (Input Lag): Boost
  • VRR & G-Sync: On
  • Fine Tune Dark Area: 0

11. You should be done setting up your LG B2 or G2 TV for your console. With that said, you may still need to change a few settings on the console side.

If you have a PS5 or PS5 Digital Edition, then you need to go to Settings > Screen and Video > Video Output. Afterwards, you need to make sure your settings are the same as the following:

  • Resolution: 2160p
  • VRR: Automatic
  • 120 Hz Output: Automatic
  • ALLM: Automatic
  • 4K Transfer Rate: Automatic
  • HDR: On When Supported
  • Deep Color Output: Automatic
  • RGB Range: Automatic (Recommended)

Select the Adjust HDR option from the Video Output menu. You then need to follow the on-screen instructions to properly calibrate the HDR brightness output.

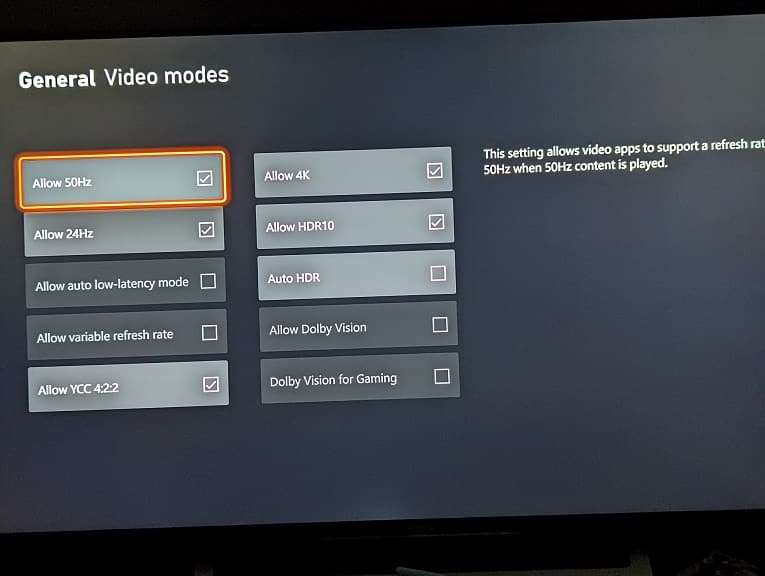
On the Xbox Series X or Xbox Series S, you first need to head over to Settings > General > TV & display options > Video modes. You can then enable the following:

  • Allow auto-low latency mode
  • Allow variable refresh rate
  • Allow 4K
  • Allow HDR10
  • Allow Dolby Vision
  • Dolby Vision for Gaming

From the same Video modes menu, you should also disable Auto HDR.
Head back to Settings > General > TV & display options and then make sure that Resolution is set to 4K. Afterwards, select Calibrate HDR and then follow the on-screen steps in order to calibrate the HDR brightness output.
How to create and edit game lists on PS5

You are now able to create and edit Gamelists on your PlayStation 5 or PlayStation 5 Digital Edition console. This feature will let you group games in a folder from the Game Library menu.

To find out how you can create and edit these lists, you can follow the steps laid out in this tutorial from Seeking Tech.

1. To start off, you need to update your PS5 to the latest firmware if you haven’t done so already; otherwise, you won’t be able to use the Gamelist feature.

To update, connect your PS5/PS5 Digital Edition to the internet and then go to Settings > System > System Software > System Software Update and Settings > Update System Software > Update Using Internet.

2. With your console update, you need to head over to the home screen menu. To get there, press the PS button to bring up the Command Center quick menu and then select the Home icon located on the bottom left side.

3. Next, you should make sure that you are in the Games section. If you are in the Media section instead, press the L1 button on your controller to switch over.

4. In the Game section, navigate all the way to the right and then select the Game Library card.

5. Inside the Game Library menu, press the R1 button on your DualSense to switch over to the Your Collection section.

6. From the Your Collection section, select the Create Gamelist option on the left side. It has a controller-themed folder icon with a plus sign.

7. In the Add to Gamelist menu, select the games that you want added to the folder.

8. Once you are done making your selection, you need to select the Add icon located at the bottom right side of the screen.

9. In the Edit Name menu, you can change the name of the Gamelist.

10. Once you are done editing the name of the folder, select the Continue option.

11. The game list should now appear at the top of the Your Collection section of the Game Library menu.

12. To add a game to the folder, to the game list menu.

Afterwards, select the Add More to Gamelist option on the left side, which is represented with the plus icon.

In the Add to Gamelist screen, select the game(s) you want to be added to the folder and then confirm your choices by selecting the Add option on the bottom right side of the screen.

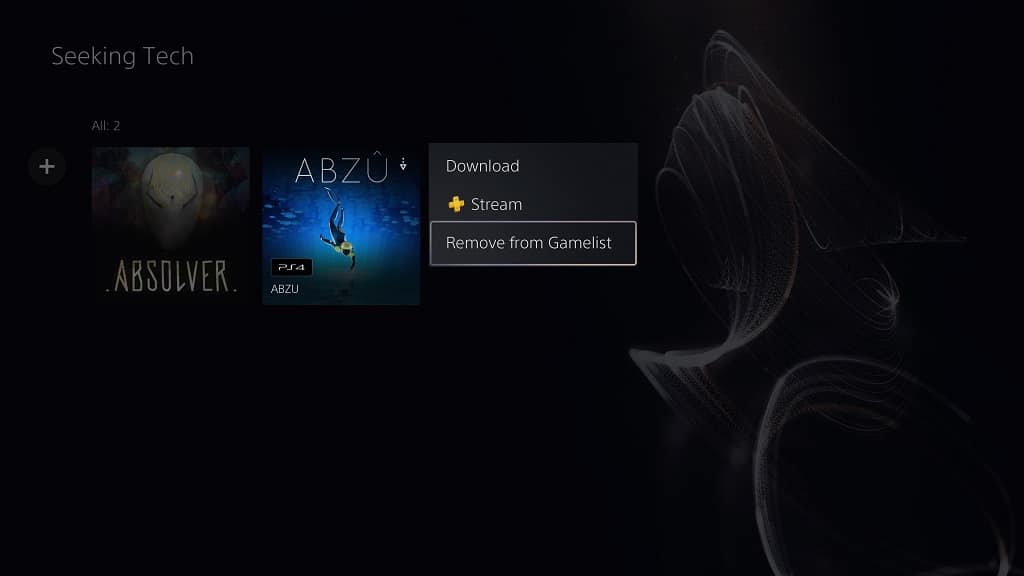
13. In order to remove a game from the list, go to the game list menu.

From there, hover over the game that you want to remove and then press the Options button (which has the three horizontal lines icon) on your controller.

In the pop-up menu, you need to select the Remove from Gamelist option.

14. To delete an entire Gamelist, hover over it from the Your Collection section in the Game Library menu.

Afterwards, press the Options button on your controller and then select the Delete Gamelist option.

How to delete DLC and language packs on PS5

If you need to free up some space on your PlayStation 5 or PlayStation 5 Digital Edition system, then you can delete the DLC and language packs for specific games. To find out the various methods of doing so, you can check out this tutorial from Seeking Tech.

Method #1

For the first method, you can use the Manage Game Content menu. In order to do so, you need to take the following steps:

1. Turn on your PS5 or PS5 Digital Edition console and then go to the home screen. For the uninformed, this is the main menu where you can select which game to play. You can get there by pressing and holding the PS button on your DualSense controller.

2. From the home screen, make sure that you are in the Games tab. If you are in the Media tab instead, then you need to press the L1 button to switch over.

3. Next, hover over the game that has the DLC and/or language packs that you want to delete. If the game isn’t on the home screen, then you can select the Game Library option in order to view the full list of installed games you have on your PlayStation 5.

4. With the game highlighted, press the Options button on the controller. This is the small button with three horizontal lines.

5. In the small pop-up menu, you then need to select Manage Game Content.

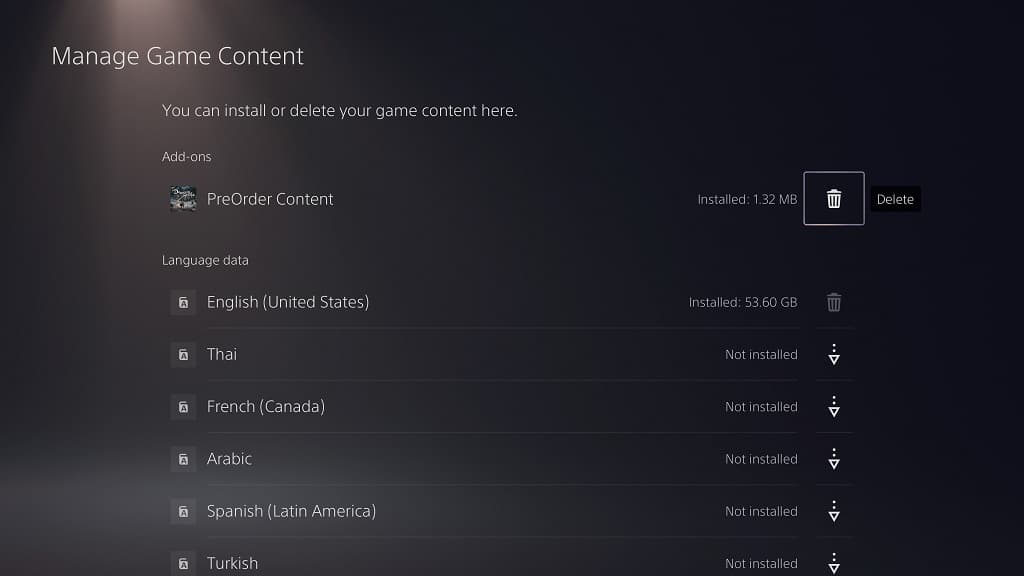
Inside of the Manage Game Content menu, you will see a list that is separated by Add-Ons and Language Data. To delete these, select the garbage icon next to the content and then select the Delete option in the pop-up menu.

Method #2

For the second method, you can use the Storage menu by doing the following:

1. On the home screen on your PS5, go to Settings by selecting the gear icon that is located on the top right side of the screen.

2. You should then head over to Storage from inside the Settings menu.

3. In the Storage menu, select the storage option on the left column. Make sure that it is where the game is installed.

4. Next, you need to select Games and Apps.

5. After getting to the Games and Apps menu, scroll down to the game that has the DLC and/or language packs that you want to be removed.

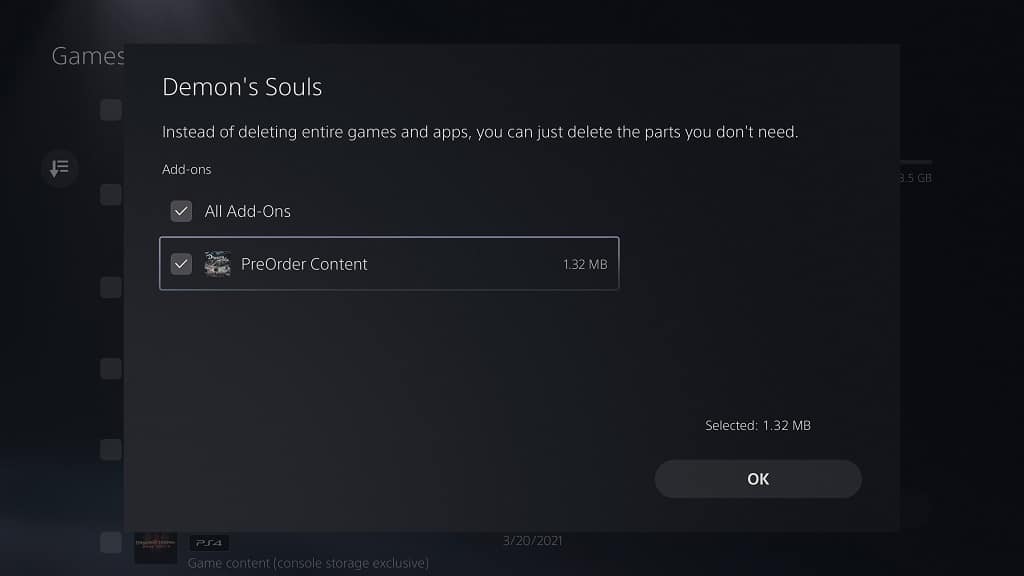
6. You should see an icon that features a pencil with three horizontal lines. Select it in order to head over to the next screen.

7. A pop-up window should show up with the following message:

“Instead of deleting entire games and apps, you can just delete the parts you don’t need.”

Here, you can select any of the add-on content that you want to be deleted.

8. After making your selection, you and then select the OK option to confirm your choice and start the deletion process.

How to voice search for YouTube videos on PS5

A recent firmware update added the ability to use your voice in order to search for YouTube videos on your PlayStation 5 or PlayStation 5 Digital Edition system. You can take a look at this step-by-step guide from Seeking Tech to see how you can use this new feature.

1. To start off, make sure that your system has been updated to the latest firmware. Otherwise, you won’t be able to use voice search for YouTube videos.

In order to manually update, make sure your PS5 is connected to the Internet and then select the following in order starting from the home menu:

Settings > System > System Software > System Software Update and Settings > Update System Software > Update Using Internet.

2. Next, you need to have the Voice Command feature enabled. In order to do so, you need to do the following:

  • Go to the Settings menu of your PlayStation 5 or PlayStation 5 Digital Edition system.
  • In Settings, you then need to scroll down and select Voice Command (this feature may not be available in region).
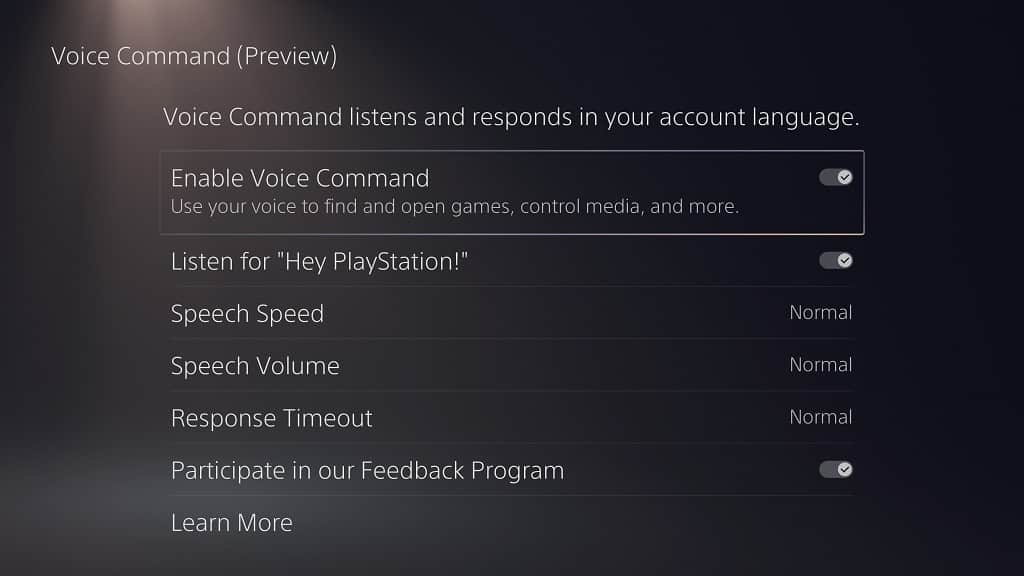
  • Inside the Voice Command menu, make sure that the Enable Voice Command setting is turned on.
  • From the same menu, we also recommend that you turn on the Listen for “Hey PlayStation!” setting so that you can search for YouTube videos hands-free. If you leave this setting disabled, then you need to press the PS button on your DualSense to bring up the Command Center quick menu and then select the Voice option.
  • Leave the rest of the settings in the Voice Command menu to the default for now. You can come back later to adjust these to your liking.

To learn more about activating and using voice commands, you can take a look at this article.

3. With the Voice Command feature turned, you should also make sure that the microphone on the DualSense controller is enabled.

If you see an orange light on top of the microphone icon of your controller, then it means that the mic is currently muted. To enable the microphone, press on the light button in order to turn off the orange light.

In addition to the mic on the controller, you can also use the mic from a headset or from another source for the voice command feature.

4. The last requirement is downloading the YouTube App on your PS5 or PS5 Digital Edition if you haven’t done so already.

To download this application, you need to do the following:

  • From the home screen menu, press the R1 button to switch over to the Media tab.
  • In the Media tab, you then need to select All Apps.
  • From the All Apps section, scroll down and then select YouTube.
  • In the next page, select Download.

5. Once you have everything set up, you can use the Voice Command feature by saying “Hey PlayStation.”

If you did not enable the “Hey PlayStation!” setting from the Voice Command menu, then you need to press the PS button on the DualSense and select the Voice option in the menu located at the bottom.

6. You should see a white circle appear on the top left side of the screen as well as hear a chime. This indicates that your PS5 is currently listening to your voice commands.

7. Next, you need to speak naturally. For example, if you want to search for YouTube videos for Spider-Man, then you can say any of the following into the microphone:

  • “Spider-Man on YouTube”
  • “Watch Spider-Man on YouTube”
  • “Search for Spider-Man on YouTube”

If done correctly, your PlayStation 5 should bring you to the correct search results page in the YouTube App.

Recommended LG C2 settings for PS5, Xbox Series X and Xbox Series S

The LG C2 is a popular choice when it comes to gaming, especially for the new PlayStation 5, PlayStation 5 Digital Edition, Xbox Series X and Xbox Series S consoles. You can take a look at this guide from Seeking Tech to see what are the best settings to use for this OLEDtelevision set when it comes to playing video games.

1. To start off, use the HDMI cables that came with your console to connect to one of the HDMI ports of the C2. For the uninformed, this television set comes with four HDMI 2.1 ports.

Make sure that the gaming systems are directly connected to the TV as you should avoid using splitters or pass-through devices as these may introduce input lag and cause other compatibility issues.

2. Next, go to the Home Dashboard menu of the C2 television set. From there, select the three vertical dots icon and then Edit Inputs.

Afterwards, select the HDMI input that is currently connected to your game console. In the Edit Icon menu, you then need to select PC. By doing so, you will unlock the full bandwidth for HDMI.

3. You then need to go to the All Settings menu and then go the Picture.

In the Picture menu, you first need to select HDR Select Mode and then set it to Game Optimizer.

Go back to the Picture menu and then make sure that you set Aspect Ratio to Original.

4. You should then head to the Advanced Settings section of the Picture menu and then select Brightness. From there, you need to do the following:

  • Set OLED Pixel Brightness to 100.
  • Set Adjust Contrast to 100.
  • Set Black Level to 50.
  • Set Auto Dynamic Contrast to Off.
  • Set Dynamic Tone Mapping to HGiG.
  • Set Peak Brightness to High.
  • Set Gamma (Adjust Brightness) to 2.2.
  • Set Video Range to Auto.
  • Set Motion Eye Care to Off.

The aforementioned settings are for playing HDR games. For SDR games, you can change the following settings:

  • Set OLED Pixel Brightness to 70.
  • Set Adjust Contrast to 85.
  • Set Dynamic Tone Mapping to Off.
  • You can leave the other settings the same when it comes to playing SDR games.

5. Head back to the Advanced Settings section of the Picture menu. This time, you need to select Color. You then need to do the following:

  • Set Color Depth to 55 (for SDR games, you can set this to 50).
  • Tint to 0.
  • Afterwards, select White Balance and then set Color Temperature, Red, Green and Blue to 0.

6. Go back to the Advanced Settings section of the Picture menu once again and then select Clarity.

In the Clarity section, you need to do the following:

  • Set Adjust Sharpness to 0.
  • Set Super Resolution to Off.
  • Set Noise Reduction to Off.
  • Set MPEG Noise Reduction to Off.
  • Set Smooth Gradation to Off.
  • Set Real Cinema to Off.
  • Set TruMotion to Off.

7. Go all the way back to the All Settings menu and then go to General. Afterwards, select AI Service and then make sure all of the settings (including AI Picture Pro, AI Brightness Settings and AI Genre Selection) are turned off.

8. Head back to the General section and then select OLED Care > Device Self Care > Energy Saving. Afterwards, you need to make sure that the Energy Saving Step is set to Off.

9. Go back to the Device Self Care menu and then select OLED Panel Care. Afterwards, make sure to enable Screen Move and set Adjust Logo Brightness to Low.

10. Open the Game Optimizer menu and then select All Settings.

You then need to make sure you are in the Game tab. Afterwards, you need to do the following:

  • Set Game Genre to Standard.
  • Set Reduce Blue Light to Off.
  • Set Dark Room Mode to Off.
  • Set Prevent Input Delay (Input Lag) to Boost.
  • Set VRR & G-Sync to On.
  • Set Fine Tune Dark Areas to 0 (you can change this later if some scenes get too dark to see when you are playing a specific game).

11. Your LG C2 should now be fully optimized for your PlayStation 5, PlayStation 5 Digital Edition, Xbox Series X and/or Xbox Series S. With that said, you still need to make sure that you set your console correctly for this OLED TV.

On the PS5 side, head over to Settings > Screen and Video > Video Output. From there, you need to do the following:

  • Set resolution to 2160p.
  • Set VRR to Automatic (we recommend leaving Apply to Unsupported Games disabled for now as it may cause issues for specific titles).
  • Set 120 Hz Output to Automatic.
  • Set ALLM to Automatic.
  • Set 4K Transfer Rate to Automatic.
  • Set HDR to On When Supported.
  • Set Deep Color Output to Automatic.
  • Set RGB Range to Automatic (Recommended).
  • Select Adjust HDR and then follow the on-screen instructions to calibrate the HDR brightness.

For the Xbox Series X and Xbox Series S, go to Settings > General > TV & display options > Video modes. Afterwards, make sure that the following boxes are checked:

  • Allow auto-low latency mode
  • Allow variable refresh rate
  • Allow 4K
  • Allow HDR10
  • Allow Dolby Vision
  • Dolby Vision for Gaming

We also recommend leaving Auto HDR disabled as it will convert SDR content to HDR, which may cause some games to look worse.

Next, head back to TV & display options menu and then select Calibrate HDR for games. Follow the on-screen instructions to set the HDR brightness output.