Hisense U6H wall mount specs

The U6H is the most affordable option out of the 2022 4K Hisense ULED television sets. If you would like to mount this TV model up on a wall, then you can check out this mounting bracket compatibility guide here at Seeking Tech.

Screen Size

The Hisense U6H currently has four screen size options as there are 50-inch, 55-inch, 65-inch and 75-inch variants. This article is based on the following model numbers from this 2022 television series:

  • 50″ Hisense Class U6H Series Quantum ULED 4K Smart Google TV (Model Number: 50U6H)
  • 55″ Hisense Class U6H Series Quantum ULED 4K Smart Google TV (Model Number: 55U6H)
  • 65″ Hisense Class U6H Series Quantum ULED 4K Smart Google TV (Model Number: 65U6H)
  • 75″ Hisense Class U6H Series Quantum ULED 4K Smart Google TV (Model Number: 75U6H)

Dimensions

Dimensions without Stand (in inches):

  • 50″ Hisense U6H: 43.9 inches × 25.7 inches × 3.0 inches
  • 55″ Hisense U6H: 48.4 inches × 28.1 inches × 3.0 inches
  • 65″ Hisense U6H: 57.0 inches × 33.0 inches × 3.0 inches
  • 75″ Hisense U6H: 65.9 inches × 37.8 inches × 3.1 inches

Dimensions without Stand (in centimeters):

  • 50″ Hisense U6H: 111.5 cm x 65.3 cm x 7.6 cm
  • 55″ Hisense U6H: 122.9 cm x 71.4 cm x 7.6 cm
  • 65″ Hisense U6H: 144.8 cm x 83.8 cm x 7.6 cm
  • 75″ Hisense U6H: 167.4 cm x 96.0 cm x 7.9 cm

Dimensions without Stand (in millimeters):

  • 50″ Hisense U6H: 1115.1 mm x 652.8 mm x 76.2 mm
  • 55″ Hisense U6H: 1229.4 mm x 713.7 mm x 76.2 mm
  • 65″ Hisense U6H: 1447.8 mm x 838.2 mm x 76.2 mm
  • 75″ Hisense U6H: 1673.9 mm x 960.1 mm x 78.7 mm

Weight (without Stand)

Weight without Stand (in pounds):

  • 50″ Hisense U6H: 24.5 lbs.
  • 55″ Hisense U6H: 30.6 lbs.
  • 65″ Hisense U6H: 41.2 lbs.
  • 75″ Hisense U6H: 61.5 lbs.

Weight without Stand (in kilograms):

  • 50″ Hisense U6H: 11.1 kg
  • 55″ Hisense U6H: 13.9 kg
  • 65″ Hisense U6H: 18.7 kg
  • 75″ Hisense U6H: 27.9 kg

VESA Mounting Pattern

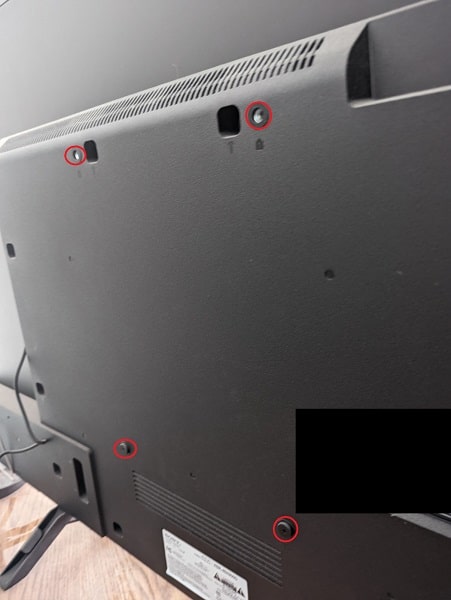
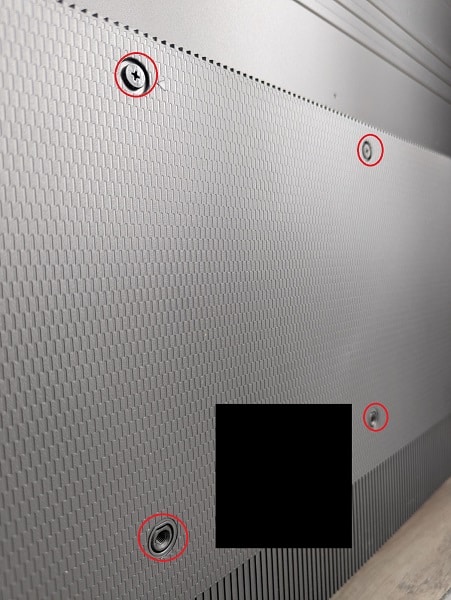
In order to install the mounting bracket to the back of your U6H, it needs to support the VESA Mounting Pattern of the television screen. This refers to the four mounting screw holes located on the backside of the TV.

The pattern measures the horizontal and vertical distances of these screw holes. The 50-inch, 55-inch and 65-inch versions have the same patterns while the pattern for the 75-inch variant is different than the smaller screen sizes.

You can find the patterns below:

  • 50″ Hisense U6H: 300 mm x 200 mm
  • 55″ Hisense U6H: 300 mm x 200 mm
  • 65″ Hisense U6H: 300 mm x 200 mm
  • 75″ Hisense U6H: 400 mm x 300 mm
VESA Mounting Pattern (example from different TV).

Screw Size

In order to attach the wall mount to the back of your Hisense ULED television set, you need to use the M6 screw type.

What wall mounts are compatible with the Hisense U6H?

If you are looking for a fixed, tilting or full motion mount that is compatible with the Hisense U6H, then it needs to support the VESA Mounting Pattern of your screen size.

If you have the 50”, 55” or 65” version, then the pattern is 300 mm x 200 mm. If you have the 75” variant, then you need to match the 400 mm x 300 mm pattern.

The mount should also be able to hold the weight of the U6H, which can weigh as much as 61.5 lbs. or 27.9 kg.

As long as you meet these two criteria, then the mounting bracket should be compatible with your Hisense television. If you are looking for specific fixed, tilting or full motion mount, then you can take a look at this recommendation article.

Resource:

How to manually and automatically change the audio output device on PS5

If you have multiple audio listening devices connected to your PlayStation 5 or PlayStation 5 Digital Edition console, then you can take a look at this tutorial from Seeking Tech to see how you can manually and automatically switch the audio output source.

How to manually change the audio output device on PS5

In order to manually change the audio output device on your PS5 or PS5 Digital Edition system, you need to take the following steps:

1. Before anything else, make sure that the audio listening device you are trying to switch over to is already connected to your console.

2. Next, you need to go to the home screen menu of your PlayStation 5.

To get there quickly, you can long press the PS logo button located on the DualSense controller.

3. Now that you are in the home screen, navigate upwards and then to the right side. From there, you need to select the gear cog icon to get to Settings.

4. From the Settings menu, you then need to head over to Sound.

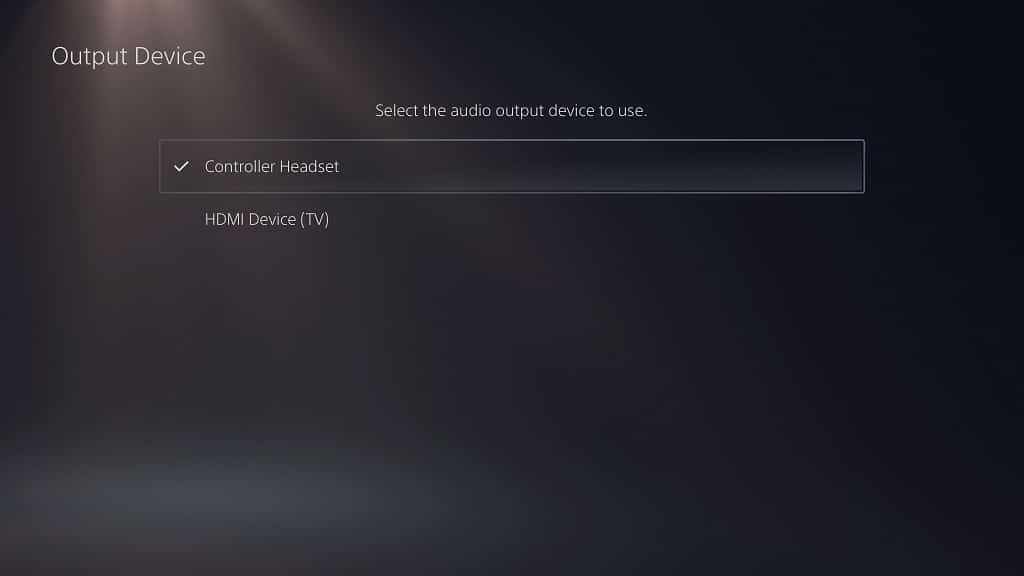
5. In the Sound section, you first need to select Audio Output on the left side and then Output Device on the right side.

6. After you get to the Output Device menu, you will be able to change the audio output device.

Keep in mind that only one output device can be selected when it comes to the PS5.

How to automatically change the audio output device on PS5

If you want the audio output to automatically switch to the listening device when it is connected to your PlayStation 5 or PlayStation 5 Digital Edition console, then you need to do the following:

1. From the home screen of your PS5, head into the Settings menu.

2. In Settings, make sure you select Sound.

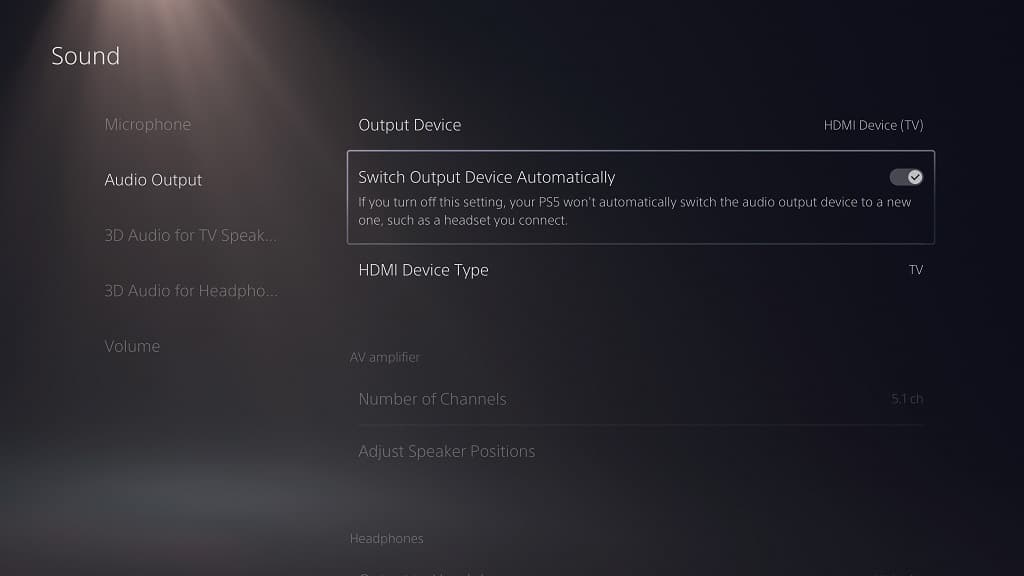
3. Inside the Sound menu, you need to select Audio Output from the left column.

4. On the right side of the same screen, make sure that the Switch Output Device Automatically setting is enabled.

By turning on this setting, your console should automatically switch over to the newest listening device when it is connected.

5. If you want to turn off this feature, then you need to go back to Settings > Sound > Audio Output. You then need to make sure that the Switch Output Device Automatically setting is disabled.

How to fix ‘1440p not supported’ issue on PS5

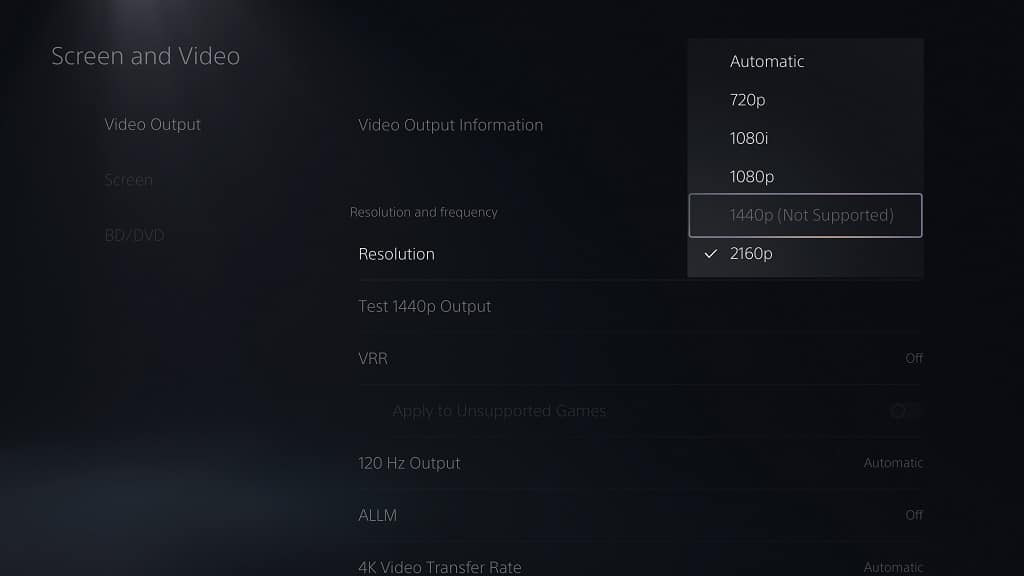
When trying to change the output resolution of your PS5 to 1440p, you may see the option greyed out and the following appear:

“1440p (Not Supported).”

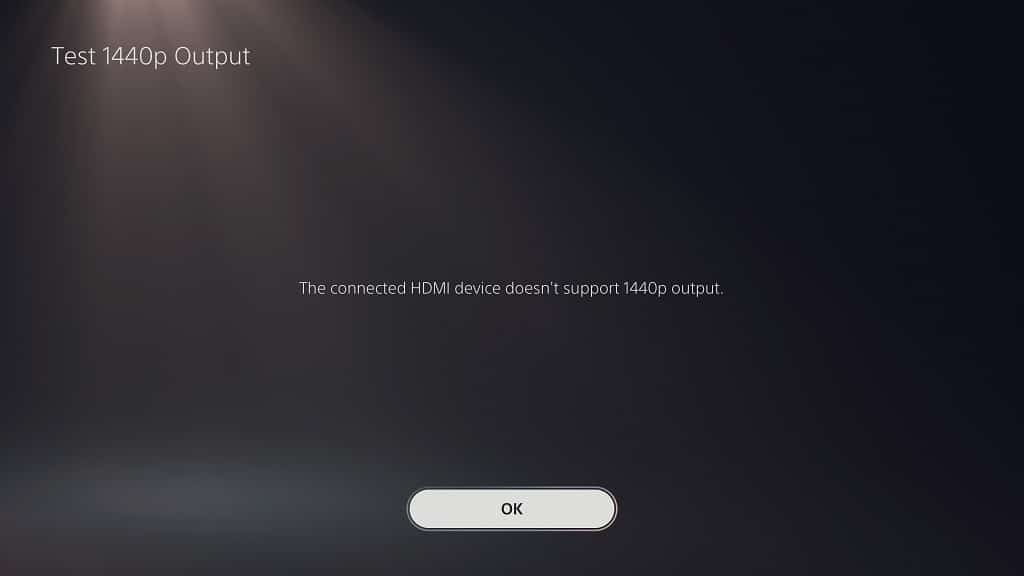
If you try to use the Test 1440p Output function from the Settings > Screen and Video > Video Output menu, then you may also get the following pop-up error message:

“The connected HDMI device doesn’t support 1440p output.”

To see how you can potentially fix these problems when trying to using your console at that particular resolution, you can check out this troubleshooting article here at Seeking Tech.

1. To start off, make sure that you are using the HDMI 2.1 cable that came with your PS5 or PS5 Digital Edition console for the best compatibility. Otherwise, you may end up running into issues by using a third-party cable.

2. You should also look at the HDMI cable to see if there are any visible signs of damage. If there are, then you might want to replace it.

3. If you have another HDMI cable available, then you can try using it as well for the connection to see if doing so will be able to unlock 1440p support.

4. Make sure that your PlayStation 5 or PlayStation 5 Digital Edition system is connected directly to your television set or monitor.

If you are using a HDMI splitter or HDMI pass-through device, then these may have been making the 1440p output incompatible.

5. You should also check your TV or monitor to see if it actually supports 1440p. Some Sony television sets, for instance, did not support that particular resolution until recently.

To find if your screen is compatible with this resolution, you can look up a specification sheet, which you should be able to find online or by looking through the user manual of your TV or monitor.

6. If possible, try to update the driver of your TV or monitor as a new version may have added 1440p support for PS5.

7. Some screens may not support the resolution if you have Variable Refresh Rate and/or 120 Hz Output enabled.

To disable both of these features on your PlayStation 5, you need to head over to the Settings > Screen and Video > Video Output menu. From there, make sure that the Variable Refresh Rate and/or 120 Hz Output options are set to Off.

8. Updating your PlayStation 5 or PlayStation 5 Digital Edition console may also improve 1440p compatibility for TVs and monitors.

To update to a new firmware for your gaming system, turn it on and then make sure you it is connected to the Internet. Afterwards, go to System > System Software > System Software Update and Settings > Update System Software > Update Using Internet to see if there is a new version to download.

If there is, then the download and installation process should automatically start.

How to customize PS5 keyboard settings

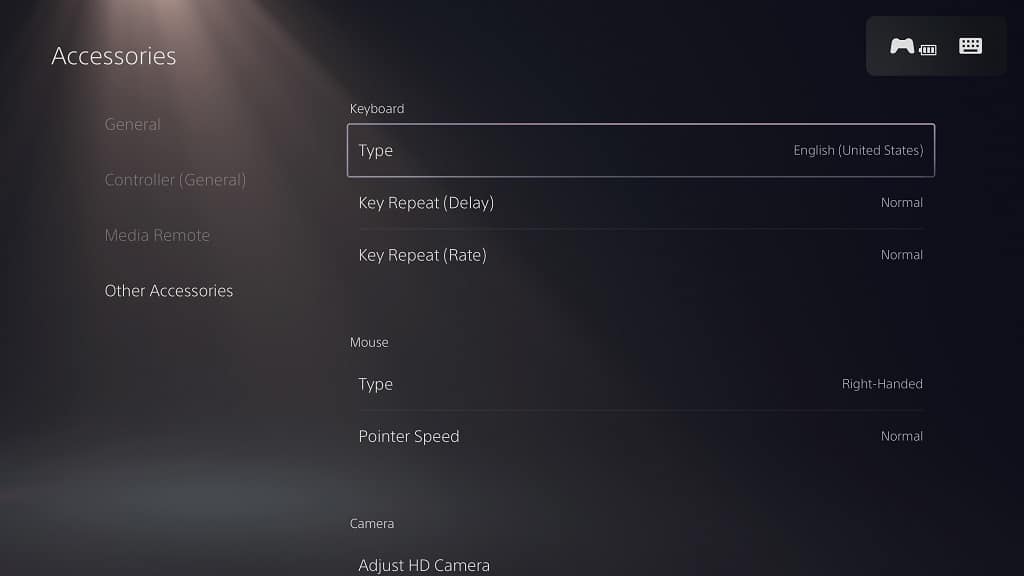
After connecting a physical keyboard to your PlayStation 5 or PlayStation 5 Digital Edition console, you will be able to change its language layout, key repeat delay length and key repeat rate.

To find out how you can customize these settings, you can check out this tutorial from Seeking Tech.

How to change the PS5 keyboard language

In order to change the language for the PlayStation 5 keyboard, you need to take the following steps:

1. To begin, you need to go to the Settings menu.

If you don’t know how to do so, then you need to head over to the home screen (which is the menu where you can pick which game to open) and then select the gear icon located on the top right corner.

2. After getting into Settings, you need navigate down the menu and then select Accessories.

3. You then need to select Other Accessoires from the left column of the Accessories menu.

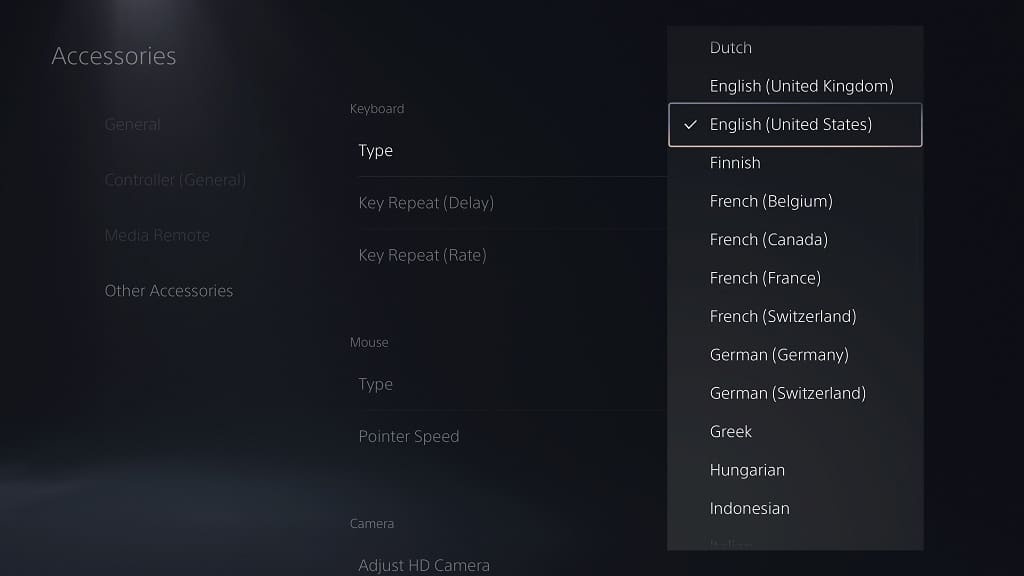
4. On the same screen, you need to select Type from underneath the Keyboard section.

5. In the pop-up menu, you can then change the language for the keyboard.

How to change the key repeat delay for the PS5 keyboard

The key repeat delay refers to how long will you need to press down on a key before the PlayStation 5 will register it as repeating inputs.

To change the delay length, you need to do the following:

1. Go to the Settings section on your PS5 console.

2. From the Settings menu, scroll downwards and then select Accessories.

3. Inside the Accessories menu, you first need to select Other Accessories on the left side.

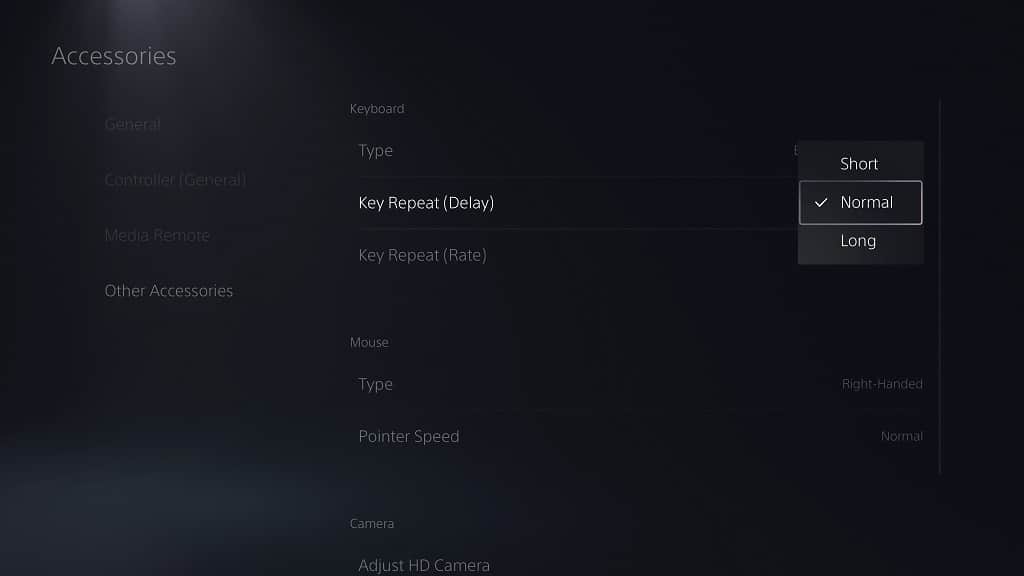
4. On the right side, you then need to select Key Repeat (Delay) underneath the Keyboard section.

5. In the pop-up menu, you can pick between any of the three following options:

  • The Short option will shorten the delay between registering the same repeating inputs when holding down a key.
  • The Normal option is the default speed.
  • The Long option will lengthen the delay before the PS5 starts registering the same repeating inputs.

How to change the key repeat rate for the PS5 keyboard

The key repeat rate refers to for fast a key input will repeat once you press and hold down the same key when you are using a physical keyboard with your PlayStation 5 console.

To change the speed for this input, you need to take the following steps:

1. Head back to the Settings menu on your PS5 and then go to the Accessories section

2. From the Accessories section, you need to first select Other Accessories from the list of available options on the left column.

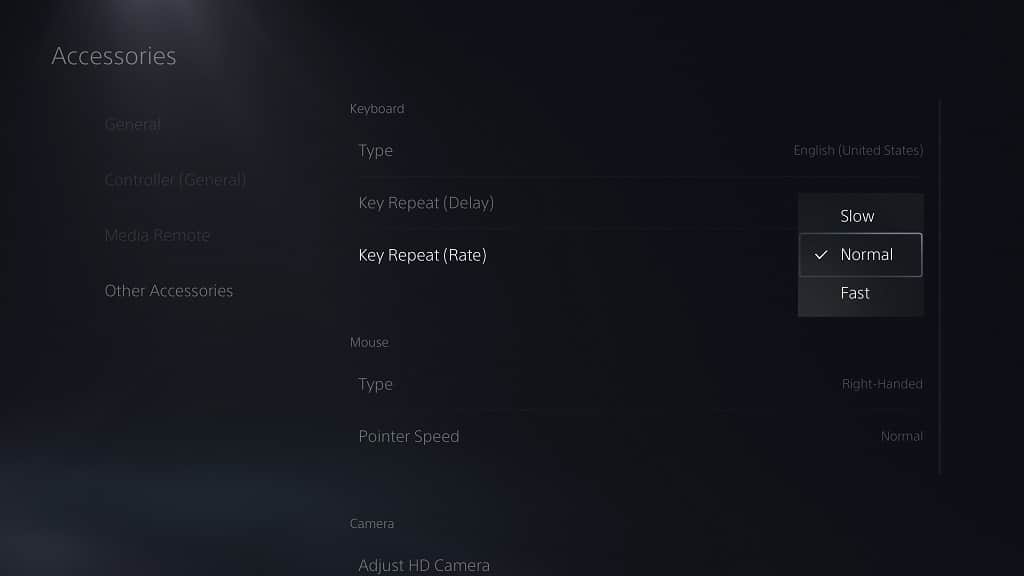
3. On the right side of the same screen, you then need to select the Key Repeat (Rate) option.

4. In the pop-up menu, you should see the following option:

  • The Slow option will make the repeating key inputs registered at a slower rate on your PlayStation 5.
  • Normal is the default repeating speed.
  • The Fast option will make the repeating key inputs register quicker.

LG QNED80 wall mount specs

The QNED80 is a new 4K LED television set that came out in 2022. If you have this LG TV and would like to put it on a wall, then you can check out this wall mount compatibility guide at Seeking Tech.

Screen Sizes

This guide will be based on the following screen sizes of the LG QNED80 UQA series (keep in mind that the model number may be slightly different depending on your region):

  • 50” LG QNED80 UQA series LED 4K UHD TV (50QNED80UQA)
  • 55” LG QNED80 UQA series LED 4K UHD TV (55QNED80UQA)
  • 65” LG QNED80 UQA series LED 4K UHD TV (65QNED80UQA)
  • 75” LG QNED80 UQA series LED 4K UHD TV (75QNED80UQA)
  • 86” LG QNED80 UQA series LED 4K UHD TV (86QNED80UQA)

Dimensions

Dimensions without Stand (in inches):

  • 50” LG QNED80: 44.1 inches x 25.7 inches x 1.9 inch
  • 55” LG QNED80: 48.5 inches x 28.2 inches x 1.7 inch
  • 65” LG QNED80: 57.2 inches x 33.0 inches x 1.7 inch
  • 75” LG QNED80: 65.9 inches x 38.0 inches x 1.8 inch
  • 86” LG QNED80: 75.8 inches x 43.5 inches x 1.8 inch

Dimensions without Stand (in centimeters):

  • 50” LG QNED80: 112.0 cm x 65.3 cm x 4.8 cm
  • 55” LG QNED80: 123.2 cm x 71.6 cm x 4.3 cm
  • 65” LG QNED80: 145.3 cm x 83.8 cm x 4.3 cm
  • 75” LG QNED80: 167.4 cm x 96.5 cm x 4.6 cm
  • 86” LG QNED80: 192.5 cm x 110.5 cm x 4.6 cm

Dimensions without Stand (in millimeters):

  • 50” LG QNED80: 1120.1 mm x 652.8 mm x 48.3 mm
  • 55” LG QNED80: 1232.0 mm x 716.3 mm x 43.2 mm
  • 65” LG QNED80: 1452.9 mm x 838.2 mm x 43.2 mm
  • 75” LG QNED80: 1673.86 mm x 965.2 mm x 45.72 mm
  • 86” LG QNED80: 1925.32 mm x 1104.9 mm x 45.72 mm

Weight (without Stand)

Weight without Stand (in pounds):

  • 50” LG QNED80: 30.9 lbs.
  • 55” LG QNED80: 35.9 lbs.
  • 65” LG QNED80: 54.0 lbs.
  • 75” LG QNED80: 79.1 lbs.
  • 86” LG QNED80: 120.2 lbs.

Weight without Stand (in kilograms):

  • 50” LG QNED80: 14.0 kg
  • 55” LG QNED80: 16.3 kg
  • 65” LG QNED80: 24.5 kg
  • 75” LG QNED80: 35.9 kg
  • 86” LG QNED80: 54.5 kg

VESA Mounting Pattern

Most importantly, the mounting bracket must support the VESA Mounting Pattern of your QNED80. For the uninitiated, this pattern refers to the horizontal and vertical distance in between the screw holes located at the back of your LG television. These screw holes are used to attach the screen to the bracket.

The 55-inch and 65-inch QNED80 TVs have the same pattern while the other sizes feature different patterns.

You can find the measurements for these mounting screw holes below:

  • 50” LG QNED80: 200 mm x 200 mm
  • 55” LG QNED80: 300 mm x 300 mm
  • 65” LG QNED80: 300 mm x 300 mm
  • 75” LG QNED80: 400 mm x 400 mm
  • 86” LG QNED80: 600 mm x 400 mm
VESA Mounting Pattern (example from different TV).

What wall mounts are compatible with the LG QNED80?

For a wall mount to be compatible with the LG QNED80, it needs to be able to support the television’s VESA Mounting Pattern.

Moreover, the mount needs to have a weight capacity limit that is above the TV weight. This is especially important for the larger screen sizes, especially the 86” LG QNED80 as it weighs in at 120.2 lbs. (or 54.5 kg).

If you need help finding specific recommendations when it comes to getting a fixed, tilting or full motion mount for the QNED80, then you can take a look at this article.

How to connect a keyboard to PS5

You can use a keyboard for your PlayStation 5 or PlayStation 5 Digital Edition gaming console. By doing so, you will be able to use the physical keyboard for text inputs instead of having to use the on-screen virtual keyboard. Furthermore, you can also use this accessory when playing certain games as well.

To see how you can connect a keyboard to your PS5, you can follow the steps laid out in this tutorial from Seeking Tech.

How to connect a USB keyboard to your PS5

In order to connect a wired keyboard to your PlayStation 5 or PlayStation 5 Digital Edition console, you need to take the following steps:

1. First off, make sure that your wired keyboard is using a USB connector. If your keyboard uses another connector type, such as PS/2, then you need to get an adapter in order to connect the accessory to the gaming system.

When it comes to the connection, you should be able to use any of the three USB Type-A ports on your PS5. The console features one of these ports on the front side as well as two others located at the back side.

2. Once you connected the keyboard, your PS5 or PS5 Digital Edition system should automatically detect the accessory as it should support plug and play without any additional configurations from the end user.

How to connect a Bluetooth keyboard to your PS5

If you are using a Bluetooth keyboard, then you can connect it to your PlayStation 5 or PlayStation 5 Digital Edition console by doing the following:

1. Start off be heading to the Settings menu from your PS5.

2. You then need to navigate downwards and then select Accessories.

3. Once you get to the Accessories menu, you need to select General from the left column and then Bluetooth Accessories on the right side. By doing so, your PS5 should now be showing the Bluetooth Accessories menu on the screen.

4. Next, you need to put your Bluetooth keyboard into pairing mode. If you don’t know how to do so, then you need to look at the user manual for the keyboard or search for the instructions online.

5. Once you put the keyboard into pairing mode, it should appear in the Accessories Found section in the Bluetooth Accessories menu of your PS5. Select it to bring up a message.

6. When asked if you want to register the Bluetooth keyboard for your PS5, select the Yes option.

7. Once the keyboard has been paired to your game console, you should be able to start using it.

How to connect a wireless keyboard to your PS5

If your keyboard uses a USB dongle to connect wirelessly, then you can take the following steps to connect it to your PlayStation 5.

1. To start off, connect the USB wireless dongle to one of the USB ports on your PS5.

2. Next, make sure that the keyboard is connected to the USB dongle. If you don’t know how to do so, you may need to look at the user manual of the accessory or search for the steps online.

3. Your PlayStation 5 should then be able to connect to the wireless keyboard.

How to tell a keyboard is connected to your PS5

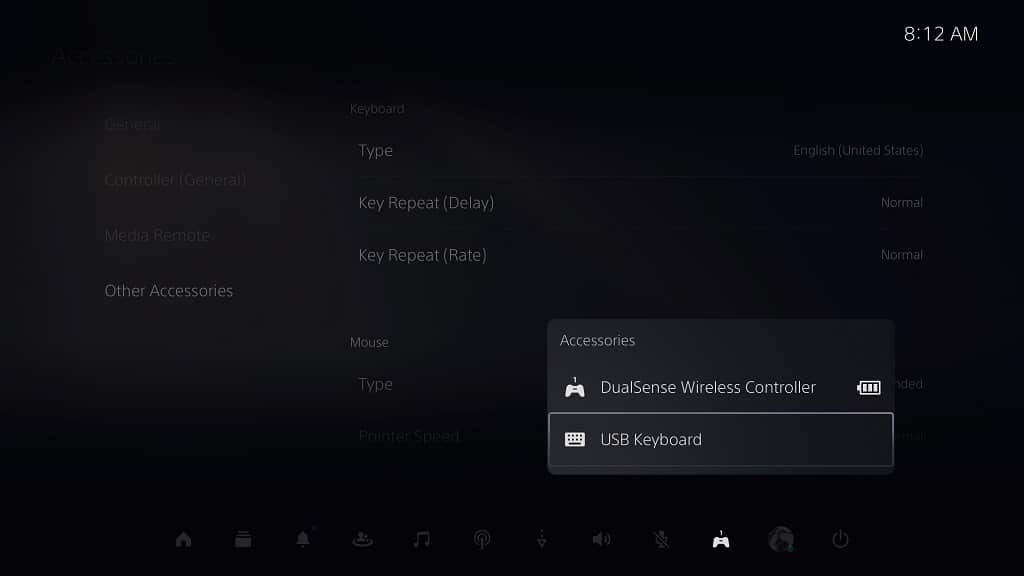
A few seconds after you connected your keyboard to the PlayStation 5, you should see a small keyboard symbol appear on the top right side of the screen momentarily.

If you missed this notification, then you can press the PS button on your DualSense to bring up the quick menu, where you can select the controller icon to find a list of connected accessories on your game system.

How to change PS5 mouse speed and primary mouse button

You are able to customize the mouse settings for your PlayStation 5 or PlayStation 5 Digital Edition console. To see how you can change the cursor speed, as well as switch the primary and secondary buttons, you can check out this tutorial at Seeking Tech.

Before you start, make sure that you properly connected a mouse to your PS5. To see how can connect this input device to your game console, you can follow the steps laid out in this guide.

How to change the mouse speed on PS5

In order to change the mouse speed on your PS5 or PS5 Digital Edition gaming system, you need to take the following steps:

1. To start off, make sure you are in the home screen, which is the main menu that you use to select which game to launch.

If you are someplace else, then you can return to the home screen by simply long pressing the PS button on your DualSense controller.

2. Once you are in the home screen, press the triangle button to instantly go to the top right corner section. From there, select the gear cog icon in order to open the Settings menu.

3. From the Settings menu, you need to select Accessories.

4. Once you arrived at the Accessories screen, you need to select Other Accessories on the left side.

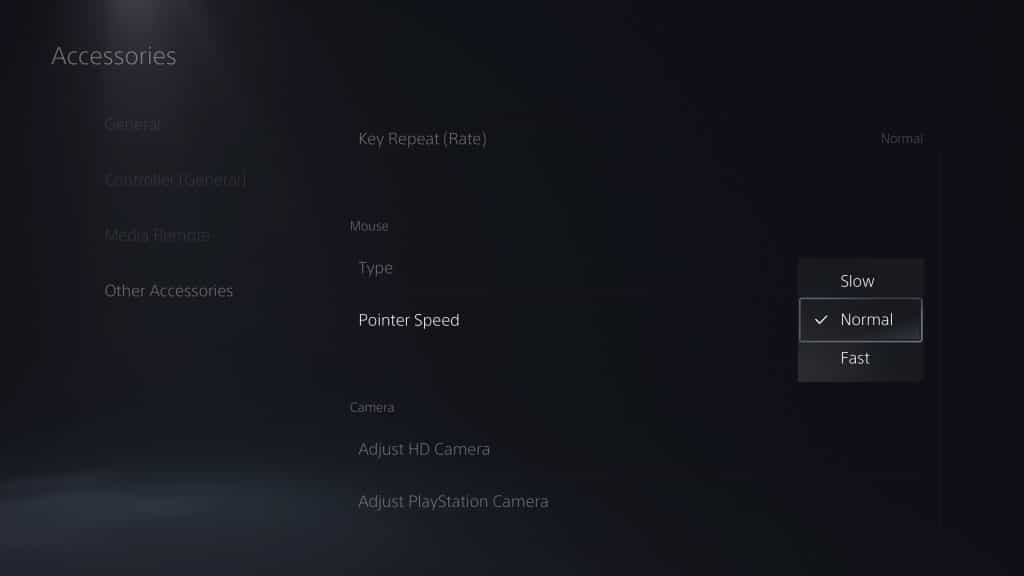
5. You the right side of the same screen, you then need to select Pointer Speed under the Mouse section.

6. By default, the Pointer Speed is set to Normal. In order to make it slower, you need to select the Slow option in the pop-up menu. To increase the cursor speed, you need to select the Fast option.

How to change the primary mouse button on PS5

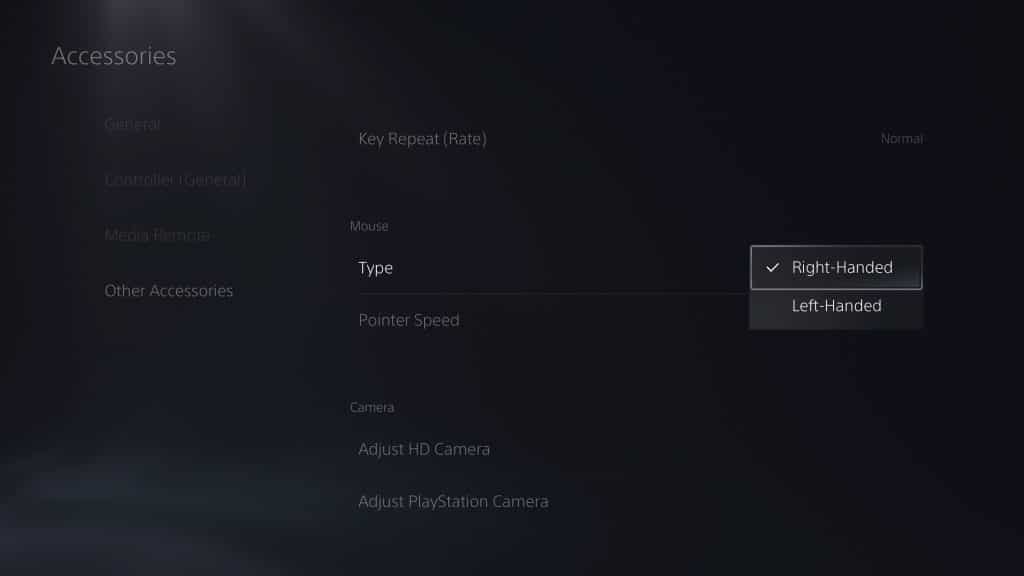
Be default, the PlayStation 5 expects you to use your right hand in order to control the mouse. As a result, the primary mouse button is set to the left button while the secondary mouse button is set to the right button.

If you want to set the primary mouse button to the right button and the secondary mouse button to the left button instead, then you need to do the following:

1. Go to the home screen menu on your PS5 or PS5 Digital Edition console.

2. Head into the Settings menu.

3. Scroll down in the Settings menu and then select Accessories.

4. In the Accessories menu, select the Other Accessories option on the left side and then the Type option under the Mouse section on the right side.

In the pop-up menu, you need to select Left-Handed.

The PlayStation 5 will now expect you to use your left hand when it comes to controlling the mouse. Therefore, the right button will become the primary mouse button while the left button will become the secondary mouse button.

If you want to switch these back to the original settings, then make sure you change the mouse type back to Right-Handed.

How to connect a mouse to your PlayStation 5

You can use a mouse to play select video games on your PlayStation 5 or PlayStation 5 Digital Edition system.

To see how you can connect this input device to your console, you can check out this tutorial at Seeking Tech.

How to connect a USB mouse to your PS5

In order to connect a wired mouse to your PlayStation 5 or PlayStation 5 Digital Edition gaming system, you need to take the following steps:

1. To start off, make sure that the mouse uses an USB connector. If it is using another connection type, such as PS/2, then you need to get an adapter that will convert it over to USB.

2. Next, you need to plug the mouse into one of the USB ports of your PlayStation 5.

For the uninformed, both the PS5 and PS5 Digital Edition systems come with three USB ports with one located at the front and two others places at the back.

For best compatibility, we suggest plugging the USB mouse directly to your gaming system. If you plug it into an USB Hub and then plug the USB hub to your PS5, then it may end up causing some problems.

3. After plugging the USB mouse to your PlayStation 5, the system should be able to automatically recognize the mouse as an input device.

How to connect a Bluetooth mouse to your PS5

In order to connect a Bluetooth mouse to your PlayStation 5 or PlayStation 5 Digital Edition, you need to do the following:

1. First off, you need to head to the Settings menu. You can get there by selecting the gear icon that appear on the top right side of the home screen. For the uninformed, the home screen is where you can pick out which game you want to play.

2. Inside of Settings, you need to navigate downwards and then select Accessories.

3. After getting to the Bluetooth menu, you first need to select General on the left column.

4. On the right side of the same menu, you then need to select Bluetooth Accessories.

5. Next, you need to put your mouse in to Bluetooth pairing mode. You may need to look at its user manual of the mouse to find out how to do so.

6. Your mouse should show up in the Accessories Found section of the Bluetooth Accessories menu. When it does, you need to select it.

7. A message show then show up asking the following:

  • “Do you want to register this Bluetooth accessory?”

Select the Yes option in order to start the pairing process.

8. Once the pairing process has been completed, your Bluetooth mouse should now be connected to the PS5.

How to connect a wireless mouse to your PS5

In order to connect a wireless mouse that uses a USB dongle to your PS5, you can take the following steps:

1. Connect the USB wireless dongle to one of the USB ports.

2. Next, make sure that your mouse is connected to the USB dongle. You may need to look at the instructions from the user manual if you don’t know how to set it up.

3. The PS5 should then be able to detect the wireless mouse.

How to tell if the mouse is connected to your PS5

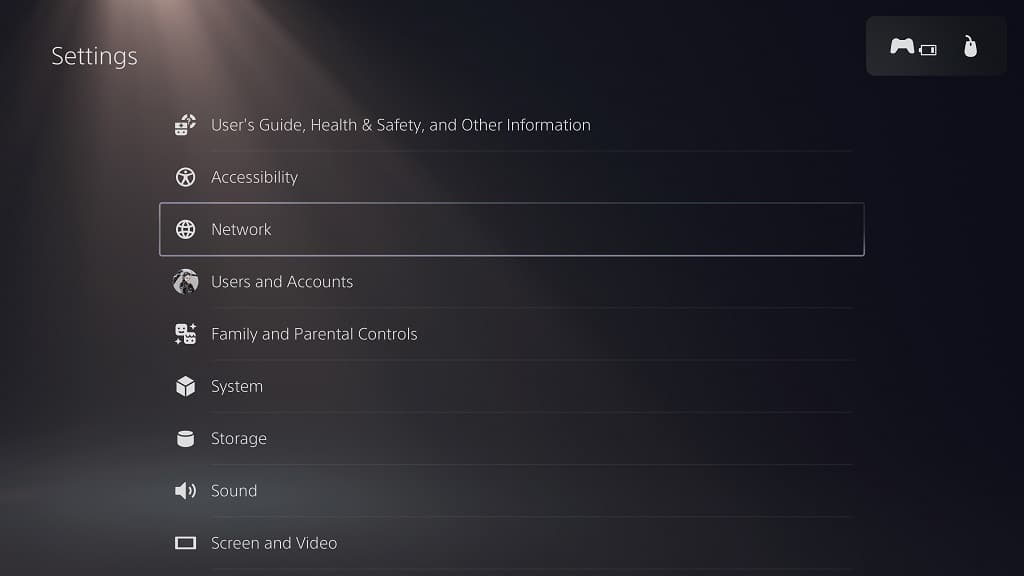
You should be able to see the mouse icon appear on the top right corner of the screen temporarily a few seconds after you connected your mouse.

There is also another method to check if a mouse has been connected as you need to do the following:

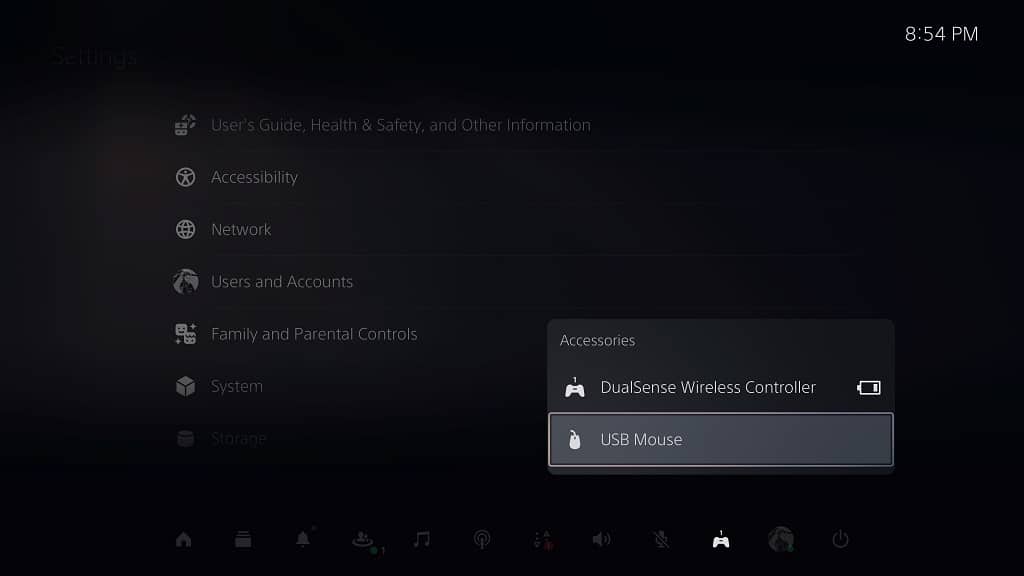
  • Press the PS button to bring up the Command Center quick menu.
  • From there, select the controller icon located at the bottom.
  • You should be able to find your connected mouse in the pop-up Accessories menu.

How to change PS5 Blu-ray and DVD media playback settings

With the PlayStation 5 system, you can watch videos from Blu-ray and DVD discs. You can take a look at this tutorial from Seeking Tech to see how you can change the default language, enable BD-Live as well as delete the Blu-ray disc data.

Before we begin, it is very important to note that this guide is for the standard PlayStation 5 console, which comes with a disc drive. Since the PlayStation 5 Digital Edition does not have a disc drive, it won’t be able to play Blu-ray or DVD discs.

How to change the Blu-ray and DVD default language

In order to change the language for the default language for Blu-rays and DVDs when being played on your PS5, you need to take the following steps:

1. To begin, turn on your gaming console if you haven’t done so already.

2. You should then go to the home screen, which should appear once you log into your account after you boot up your system.

You can also get there by pressing the PS button on your DualSense, which should bring up the Command Center quick menu. From there, select the house icon located on the left side on the bottom row.

You can also simply press and hold the same PS button on your controller to quickly head over to the home screen.

3. From the home screen, navigate to the top right side and then select the gear cog icon to go to Settings.

4. Inside of the Settings menu, scroll down and then select Screen and Video.

5. From the left column of the Screen and Video menu, you need to select BD/DVD.

6. On the right side, you then need to select Language.

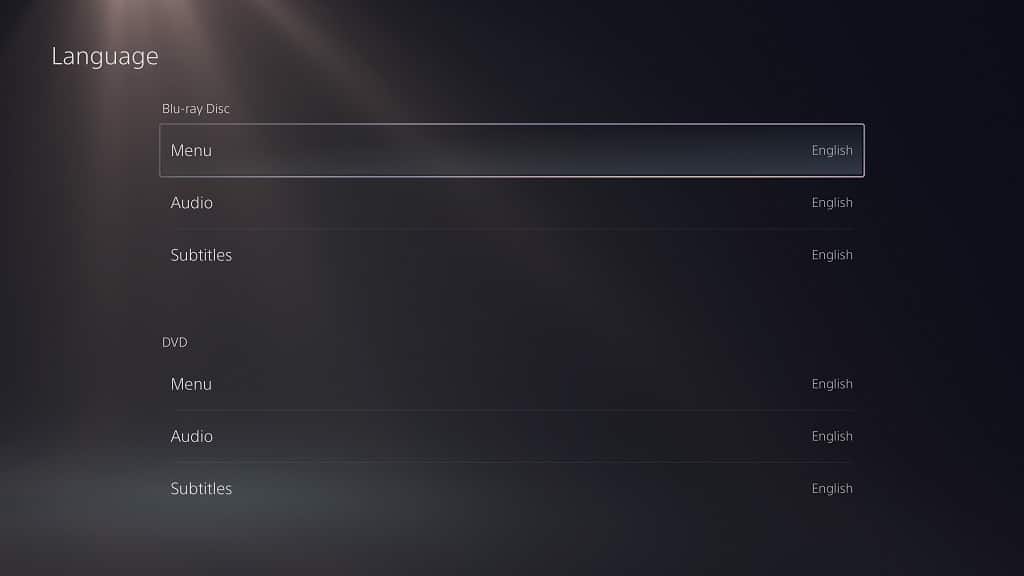
7. In the Language menu, you will be able to change the default menu, audio and subtitle languages for both Blu-Rays and DVD media playback.

How to enable BD-Live for Blu-ray playback on PS5

In order to enable the BD-Live feature when playing Blu-ray discs on your PlayStation 5 consoles, you need to do the following:

1. Start by heading over to the Settings menu.

2. Next, you need to select Screen and Video from the list of available options.

3. On the left side of the next screen, you then need to select BD/DVD.

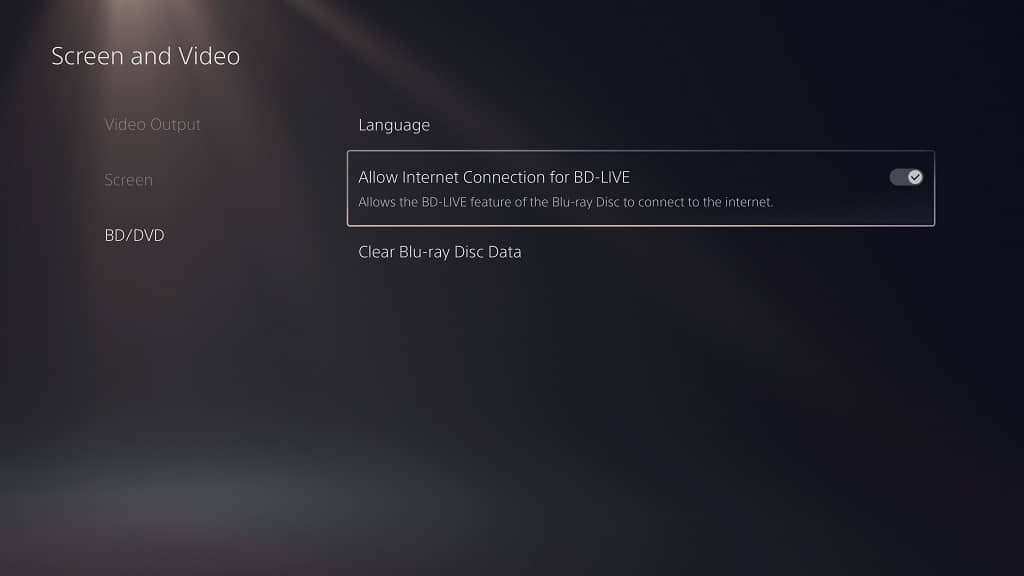
4. On the right side for the same screen, make sure that the Allow Internet Connection for BD-Live setting is turned on.

5. To disable BD-Live on your PS5, go to Settings > Screen and Video > BD/DVD. Afterwards, make sure to turn off the Allow Internet Connection for BD-Live setting.

How to delete Blu-ray disc data on your PS5

If you want to delete Blu-ray disc data from your PlayStation 5, you need to do the following:

1. Open the Settings menu and then head to Screen and Video.

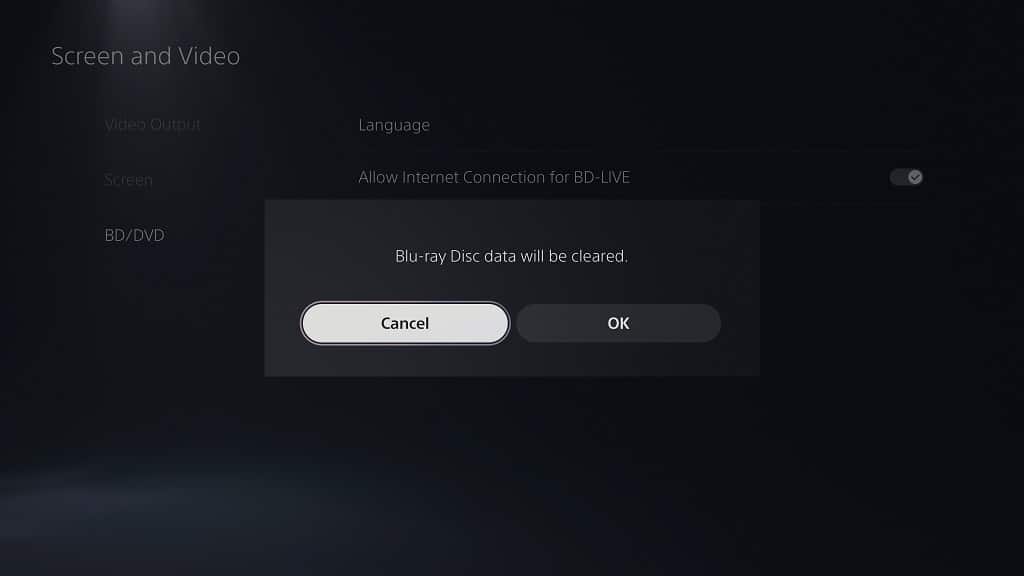
2. In the Screen and Video menu, select BD/DVD on the left column and then Clear Blur-ray Disc Data on the right side.

3. In the pop-up notification, you should get a message saying that “Blu-ray Disc data will be cleared.” Select OK to confirm the deletion.

How to disable 2-step verification when logging into your PS5

When signing into your PlayStation Network account, you may be required to enter an additional code, that will be sent to you via a text message, to go along with your password.

If you find this extra step inconvenient and would rather disable the two-step authentication process so that you can log into your PSN account straight away with just your password, then you can check out this tutorial from Seeking Tech to see how you can turn it off.

1. To start off, you need to turn on your PlayStation 5 or PlayStation 5 Digital Edition gaming system and then make sure that it is connected to the Internet if you haven’t done so already.

2. Next, you need to log into your PlayStation Network account.

3. After signing into your PSN account, you should be in the home screen of your system.

If you are in another area, then you can get to the home screen quickly by long pressing the PS logo button on the DualSense controller.

4. In the home screen, you need to navigate and then select the gear cog icon that is located on the top right corner. By doing so, you should be able to head to the Settings section.

5. After getting to Settings, you need to select the Users and Accounts option.

6. From the Users and Accounts section, you first need to select Account on the left column.

7. On the right side of the same screen, you then need to select Security.

8. Inside of the Security section, you need to select 2-Step Verification.

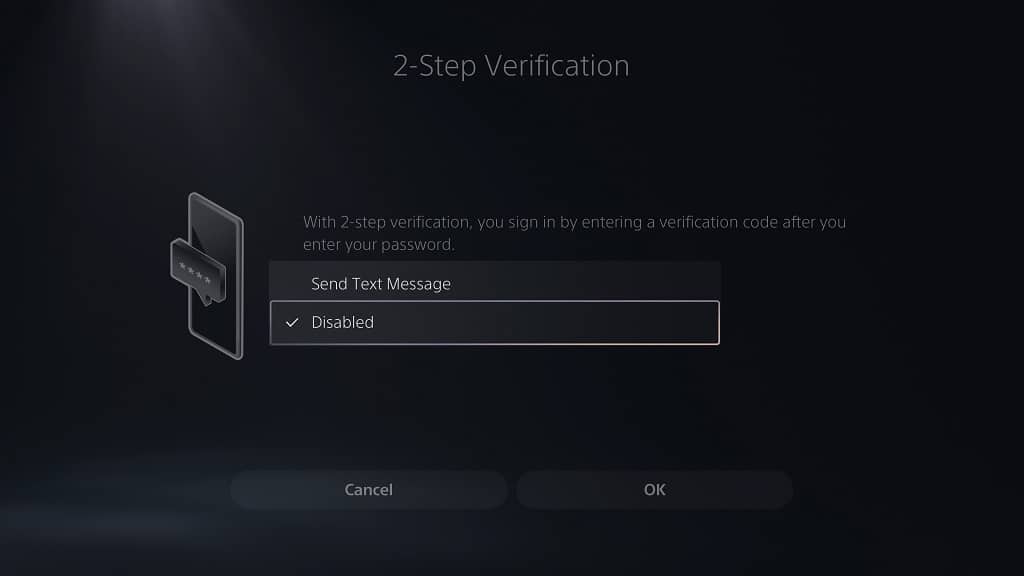
9. From the 2-Step Verification section, select the drop-down menu.

10. You should then select Disabled in the drop-down menu.

11. Back at the 2-Step Verification section, you need to select the OK option in order to confirm the change.

12. Next, you should be in the Enter Your Account Information section. Here, you should see the following message:

“For your security, use PlayStation App to sign in, or enter your password again.”

If you don’t have the PlayStation App installed on your smartphone or mobile device, then you can use your PS5 to enter your PSN password.

After you are done entering your password again, you need to select the OK option underneath in order to finally disable 2-step verification.