How to fix Atomic Heart frame rate issues on PS5, Xbox Series X and S

When playing Atomic Heart on the new consoles, you may notice some hitches and slowdowns. To see how you can potentially fix these frame rate problems on the PlayStation 5, PlayStation 5 Digitial Edition, Xbox Series X or Xbox Series S, you can take a look at this troubleshooting article from Seeking Tech.

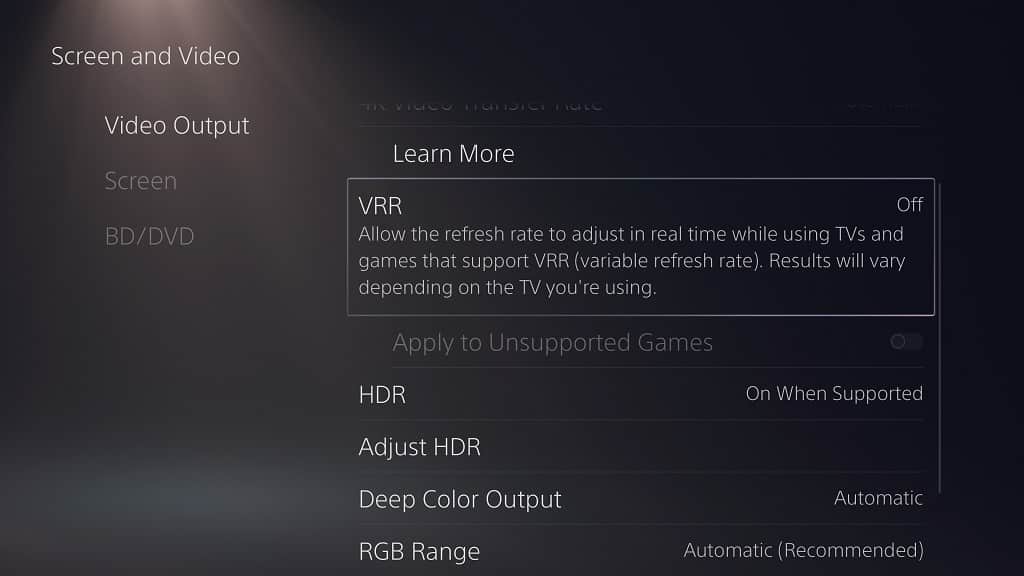
1. If your television set or monitor supports Variable Refresh Rate, then we recommend enabling it as this will help smooth out the smaller frame rate drops as well as any potential screen tearing. Once you enable VRR support on the screen, you need to do the same on your console.

For the PS5 or PS5 Digital Edition, you need to head over to the Settings menu of the console and then select Screen and Video > Video Output > VRR. Once you do, you need to select Automatic for the VRR setting.
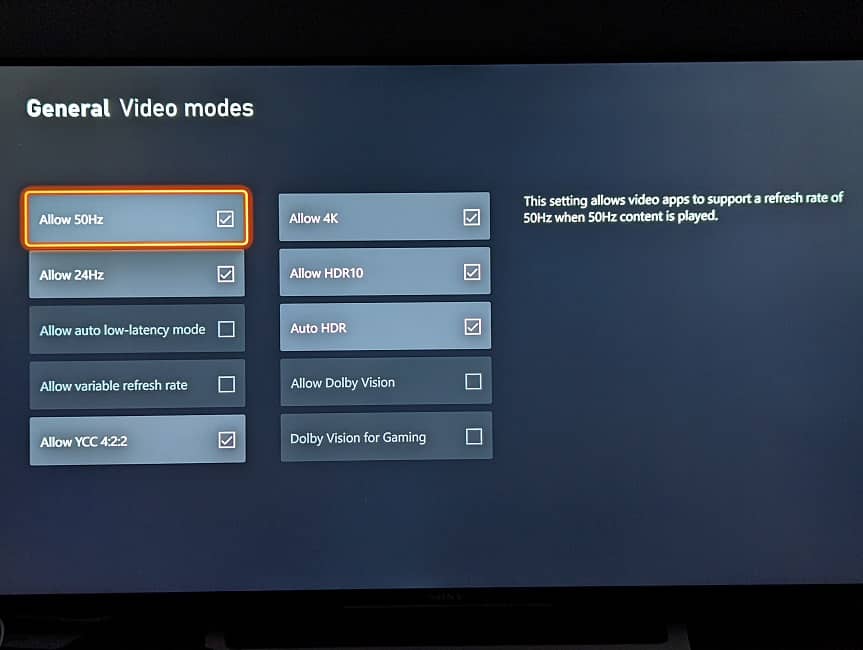
On the Xbox Series X or Xbox Series S, you need to go over to the system’s Settings menu. From there, you will need to select General > TV & display options > Video modes. From there, you need to make sure that there is a check mark in the “Allow variable refresh rate” box.
2. If you have been putting your console in Rest Mode/Sleep Mode, then it may be causing performance issues in Atomic Heart.

In this case, you can simply restart your PlayStation 5 or PlayStation 5 Digital Edition console.

On the Series X or Series S, we recommend that you first exit the game as the Quick Resume feature may be causing the frame rate drops. To do so, press the Xbox button on the controller to open the Guide menu. From there, move the cursor over to the Atomic Heart icon and then press the Menu button. Finally, select Quit.

After you close Atomic Heart on your Xbox Series X or Xbox Series S, you can restart your console.

3. You can also check to see if there is a new patch available to download for this first-person shooter. The new update may improve performance for the game along with adding additional features and providing bug fixes.

On the PlayStation 5 or PlayStation 5 Digital Edition, you need to go to the home screen. From there, move the cursor over to the Atomic Heart icon and then press the Options button on the DualSense. Afterwards, select the Check for Update option.

For the Xbox Series consoles, you can press the Xbox button to open the Guide menu. From there, move the cursor to highlight the Atomic Heart icon and then press the Menu button. In the pop-up menu, select “Manage game and add-ons.” Finally, select Updates from the Manage – Atomic Heart menu.

If there is a new patch available, the console should start to download and install it. Once the installation has been completed, you can try playing the game again to see if the frame rate issues have been fixed.

How to turn off storage on Xbox Series X and S

With the Xbox Series X and Xbox Series S, you are able to turn off the storage drives of these consoles when they are put into Sleep Mode. To see how you can do so, you can follow the steps laid out in this article from Seeking Tech.

Why use the “When console is turn off, turn off storage” feature?

By turning off the storage of your Xbox Series X or Xbox Series S in Sleep Mode, you can prevent the internal SSD or external USB storage drives from getting corrupted in case your console completely shuts down during the middle of a firmware and/or game patch update.

Furthermore, you should be able to safely unplug the external drive in Sleep Mode without any issues by enabling this setting.

This feature is also helpful if you want to save on your energy bill as your Xbox system should use less energy without having to power on its storage options.

How to disable storage on Xbox Series X and S

To stop your storage from being left powered on while you put your Series X or Series S console in Sleep Mode, you need to take the following steps:

1. To start off, you need to head over to the Settings menu of your gaming system. You can do so by selecting the gear cog icon in the home screen menu.

Alternatively, you can press the Xbox button in order to open the Guide menu, which is where you can then head over to the Profile & System tab by using the LB and RB buttons. Finally, select Settings from the Profile & System tab of the Guide menu.

2. Once you get to Settings, you need to first select General from the list of options available on the left column.

3. From the right side of the same screen, you then need to select “Power options.”

4. Inside the “General – Power Options” menu, make sure you select the Sleep option in the “Choose how this console turns off” section.

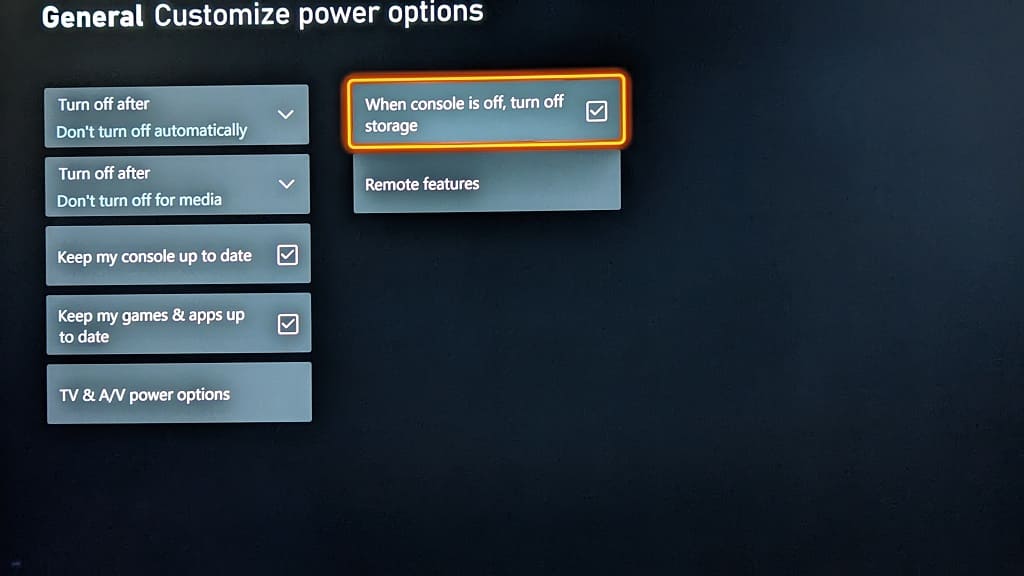
5. Afterwards, you need to select “Customize power options.”

6. In the “General – Customize Power Options” menu, make sure that the “When console is off, turn off storage” box is checked.

How to disable the game art home screen background on Xbox Series X and S

By default, the Xbox Series X and Xbox Series S home screen backgrounds will change when you move the cursor over to a game in the Recently Played section of the home screen. If you find that having the background changed to the home screen to the game art is too distracting and/or not aesthetically pleasing, then you can check out this guide to see how you can disable it.

1. To start off, make sure you updated your Series X or Series S to the latest available firmware if you haven’t done so already. This is because the ability to disable the game art background in the home screen was added through a system software update.

2. Once your console has been updated, you need to head back to the Settings menu. To get there, select the gear icon from the home screen.

You can also press the Xbox button on your Xbox game pad in order to bring up the Guide menu and then the RB button a few times to move over to the Profile and System section. From there, you can head into Settings.

3. In the Settings menu, the first thing you need to do is to select General from the list of available options in the left column.

4. On the right side of the same screen, you should then select Personalization.

5. After getting to the “General – Personalization” menu, head over to My Background.

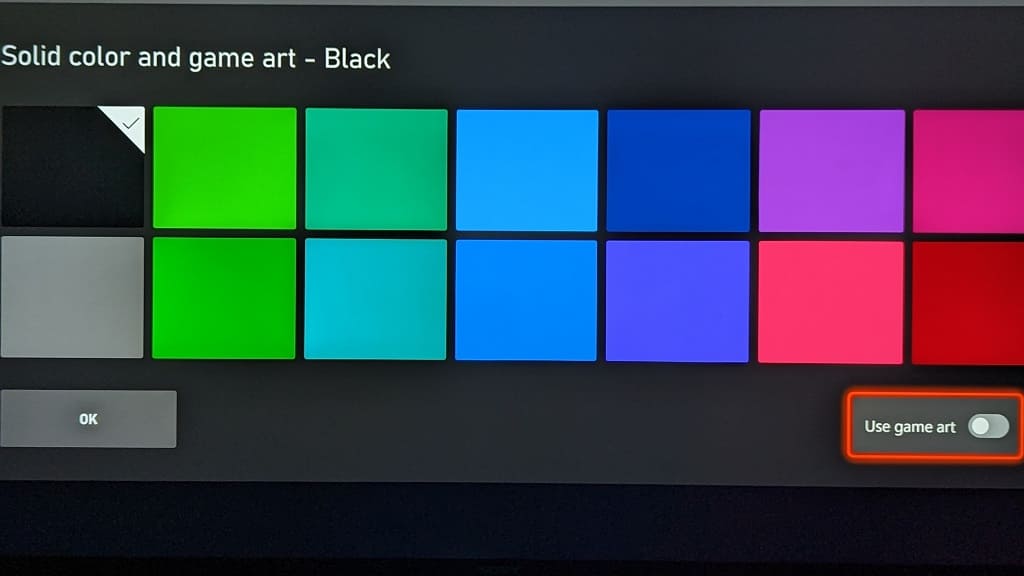
6. From the “Personalization – My Background” menu, you need to select Solid Color and Game Art.

7. On the next screen, make sure that the “Use Game Art” option located on the bottom right corner of the screen is deselected.

By doing so, you should be able to disable the game art from appearing in the home screen background when you move the cursor in the Recently Played section.

8. In the same screen as the “Use Game Art” option, you can also select a solid background color for your home screen.

9. Once you are done with making these changes, select the OK option to head back to the “Personalization – My Background” menu.

10. You can then press the B button several times in order to back out to the Xbox home screen menu.

How to download free PlayStation VR2 games

If you have a PlayStation VR2 headset but no money to spend on premium games, then there are a few free-to-play titles that you can try out. To see how you can download these free virtual reality games on your PlayStation 5 or PlayStation 5 Digital Edition system, you can follow the steps laid out in this tutorial at Seeking Tech.

1. To start off, you need to turn on your PS5 if you have it powered off or previously put in rest mode.

2. Next, you need to head over to the home menu, which you can do by pressing and holding the PS button on the DualSense or PlayStation VR 2 Sense Controller.

3. From the home menu, you then need to head over to the PlayStation Store, which you can do by selecting the blue shopping bag icon.

4. Inside the PlayStation Store, you then need to head over to the main PlayStation VR2 menu that shows a full list of games for the virtual reality headset.

In the Latest tab of the Store, you may see the PlayStation VR 2 option. If you do, you need to select it. Afterwards, you should select the “Buy PS VR2 games” option.

If you can’t find the PlayStation VR 2 option in the Latest tab, scroll all the way down to the “See More” section. From there, you need to select the PS VR2 option.

5. From the PlayStation VR 2 Games menu, scroll to the left and then select the Sort and Filter option. It is represented with the icon that features a down-pointing arrow with three horizontal lines.

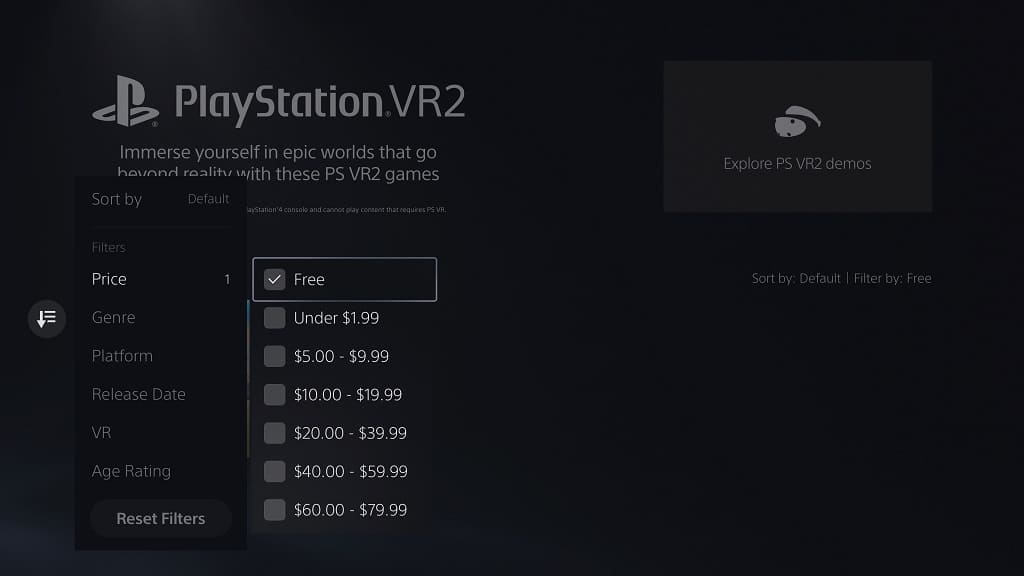
6. In the Sort and Filter pop-up menu, you need to select Price.

7. Afterwards, make sure that only the Free box is checked.

8. Press the circle button on the DualSense or PlayStation VR 2 Sense Controller two times back out into the PlayStation VR 2 Games menu.

9. The listing should now be filtered to only show free-to-play games for the PSVR 2.

10. If you want to sort this listing of free titles, select the Sort and Filter option again.

From the Sort and Filter menu, you then need to select the Sort By option at the top. Afterwards, you can pick between the following options:

  • Default
  • Best Selling
  • Most Downloaded
  • Name (A to Z)
  • Name (Z to A)
  • Release Date (Old to New)
  • Release Date (New to Old)
  • Price (Low to High)
  • Price (High to Low)

How to find PlayStation VR2 demos

The PlayStation VR 2 features a few playable demos. To see how you can find these downloads from the PlayStation Store on your PlayStation 5 or PlayStation 5 Digital Edition console, you can take a look at this tutorial from Seeking Tech.

Method #1

For the first method, you need to take the following steps:

1. Turn on the PS5 and then head over to the home screen.

If you are playing a game, using an app or doing something else at this moment, then you can press and hold the PS logo button on the controller in order to return home.

2. From the home screen, select the blue shopping bag icon to open the PlayStation Store.

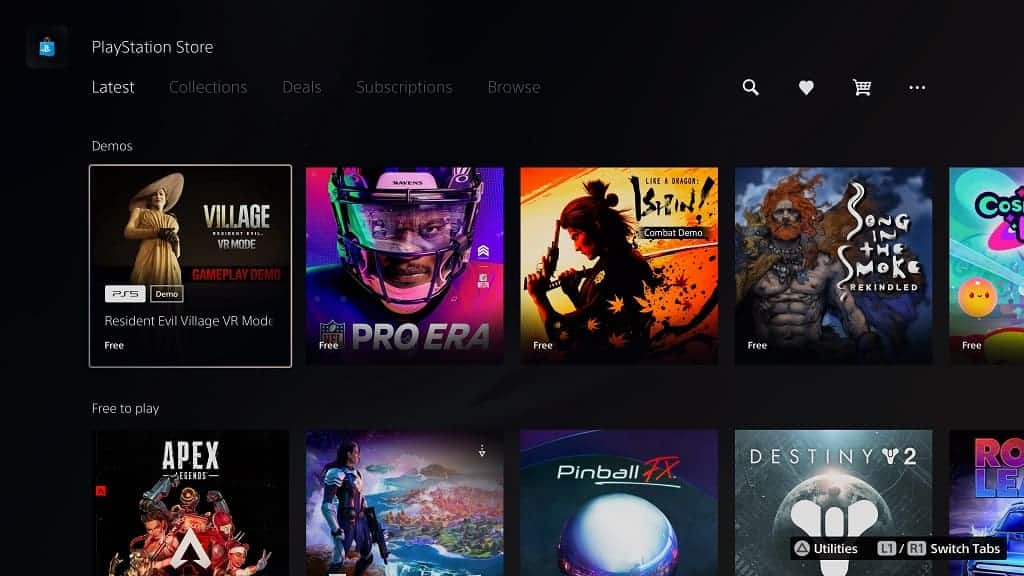
3. On the PlayStation Store, make sure that you are in the Latest tab.

You can switch tabs by using the L1 and R2 buttons on your controller.

4. Next, scroll all down until you see the Demos row.

5. You then need to scroll all the way to the right in the Demos row and then select View All.

6. Once you get inside the Demos menu, select the Sort and Filter icon, which is the down-pointing arrow with three horizontal lines graphic that is located to the left of the listing.

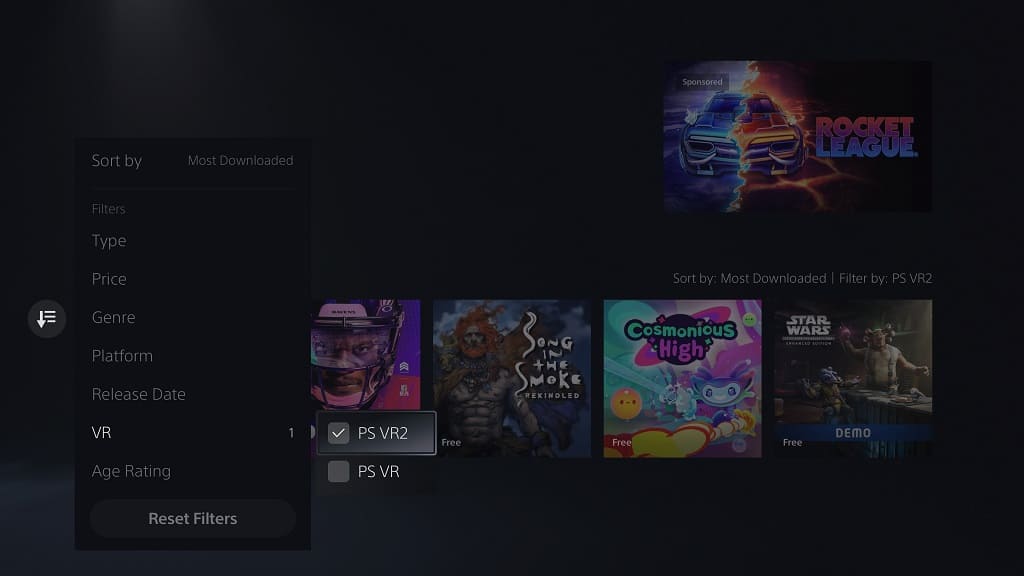
7. From the Sort and Filter menu, select VR.

8. Finally, make sure that only the PS VR2 box is checked.

9. Press the circle button on the controller two times to back out to the Demos menu.

10. You should now be able to find that the listing has been filtered to only show PlayStation VR 2 demos.

Method #2

For the second method, you can do the following:

1. Open the PlayStation Store on your PlayStation 5.

2. In the PlayStation Store, make sure you are in the Latest section.

3. Look for and select an option that says “PlayStation VR2” or “PlayStation VR2 (Out Now).”

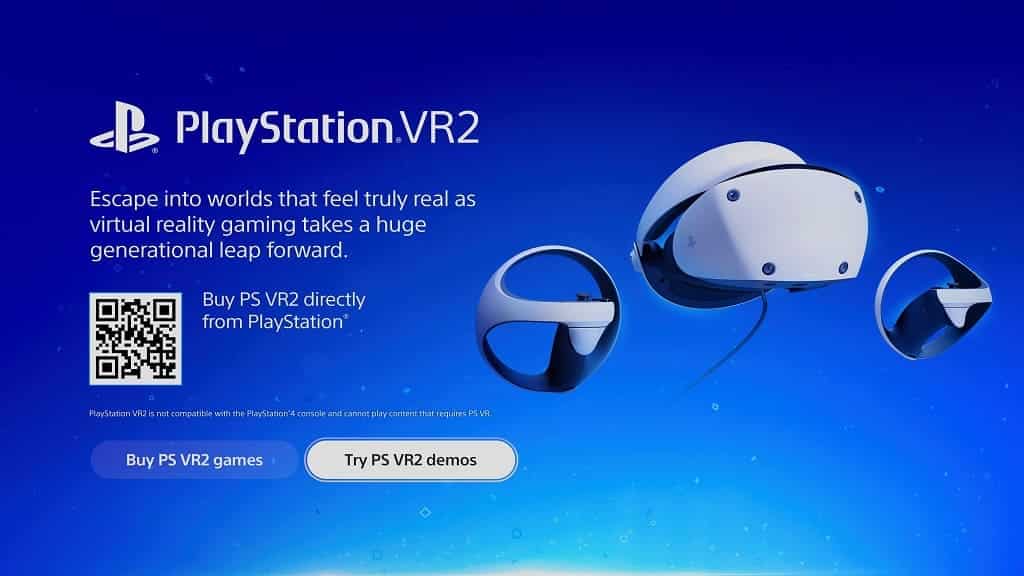
4. You should be in a PlayStation VR2 menu that features a QR Code. Here, you should select the “Try PS VR2 demos” option.

5. You should be brought over to the PlayStation VR2 demos menu.

Keep in mind that the Latest section may change over time. So, if you can’t find the “PlayStation VR2” or “PlayStation VR2 (Out Now)” option, then you can try the first method instead if you are looking for playable demos for this virtual reality headset.

How to fix PlayStation VR 2 cloudiness, graininess and Mura issues

When using the PlayStation VR 2 headset, you may see some cloudiness and/or graininess on the screen. These may be more noticeable during dark scenes and/or scenes that only show one primary color. This is technically known as the Mura issue.

To see how you can potentially fix these image quality problems, you can take a look at this troubleshooting article from Seeking Tech.

What is Mura?

Mura occurs due to how screens are manufactured as not all pixels end up having the exact color and brightness.

The PlayStation VR 2 uses an OLED screen, which is more prone to Mura when compared to virtual reality headsets that use LCD. With that said, OLED provides better colors (especially when it comes to the black level) in addition to higher brightness when compared to LCD.

Can Mura be fixed?

Unfortunately, there isn’t any way to fix Mura as it is a hardware defect that appears on all virtual reality headsets.

With that said, you can try changing the brightness of the PlayStation VR 2 headset to see if the cloudiness and/or graininess become less noticeable. In order to do so, you can try looking in the in-game settings for the PSVR 2 game you are playing to see if there is any way to adjust the brightness from there.

Alternatively, you can also lower the brightness output on a system level by doing the following:

1. Press the PS button on either the left or right PlayStation VR 2 Sense Controller.

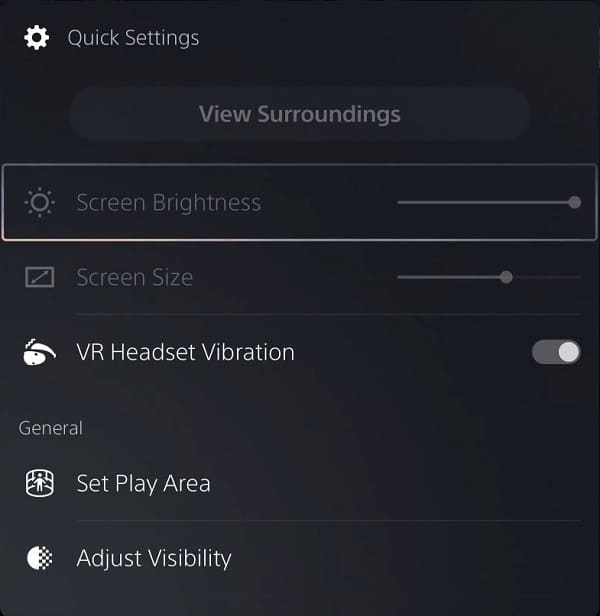
2. In the Control Center quick menu, select the Quick Settings card.

3. You should then be able to find the Screen Brightness slider.

4. If you are only seeing Mura in darker scenes, then you can try lowering the brightness output. If the cloudiness or graininess show up more in brighter scenes, then you can try increasing the brightness if possible.

You should make sure that you are getting a sharp image as well. To see how you can get more clarity when using the PSVR 2, you can check out this post.

The Mura effect may also become less prominent over time as the pixels of the OLED display age. You may eventually get used to the effects and simply start to ignore it as well when you become fully immersed when playing the game in virtual reality.

If the Mura effect is really noticeable on the lens, then you can try exchanging your PlayStation VR 2 headset to see if a new unit has less noticeable cloudiness and/or graininess.

How to fix unresponsive PlayStation VR 2 Sense Controllers

When playing a PlayStation VR 2 game, you may notice that the left, right or both PlayStation VR 2 Sense controllers being unresponsive. If the motion controllers aren’t working at all, then you can take at this troubleshooting article from Seeking Tech.

1. To start off, make sure that your PlayStation VR 2 Sense controller is actually turned on. You can do so by pressing the PS button on the gamepads.

If it is not powering on, then make sure that you charge it for at least 15 minutes before trying again.

2. We also recommend testing to see if the buttons work in the system menus of your PlayStation 5 or PlayStation 5 Digital Edition console.

If the console isn’t reading your inputs even in the system menus, then you may have a defective controller.

If your inputs are being read correctly in the system menus, then there may be nothing wrong with the controller from a hardware standpoint.

3. If the problematic Sense controller is powered on but the game you are playing is not responding to your button inputs, then you can try to turn the controller off and then turn it back on again with the game still open.

To turn off these motion controllers, you can simply press and hold the PS button. Afterwards, press the same button again to turn it on.

4. If you have a DualSense controller turned on at the same time, then you can try turning it off to see if the game you are playing will now be able to recognize your Sense controller inputs.

5. Other wireless devices in the same vicinity may also be causing interference. In this case, you can try turning off these wireless device to see if the PSVR2 Sense controller is working correctly.

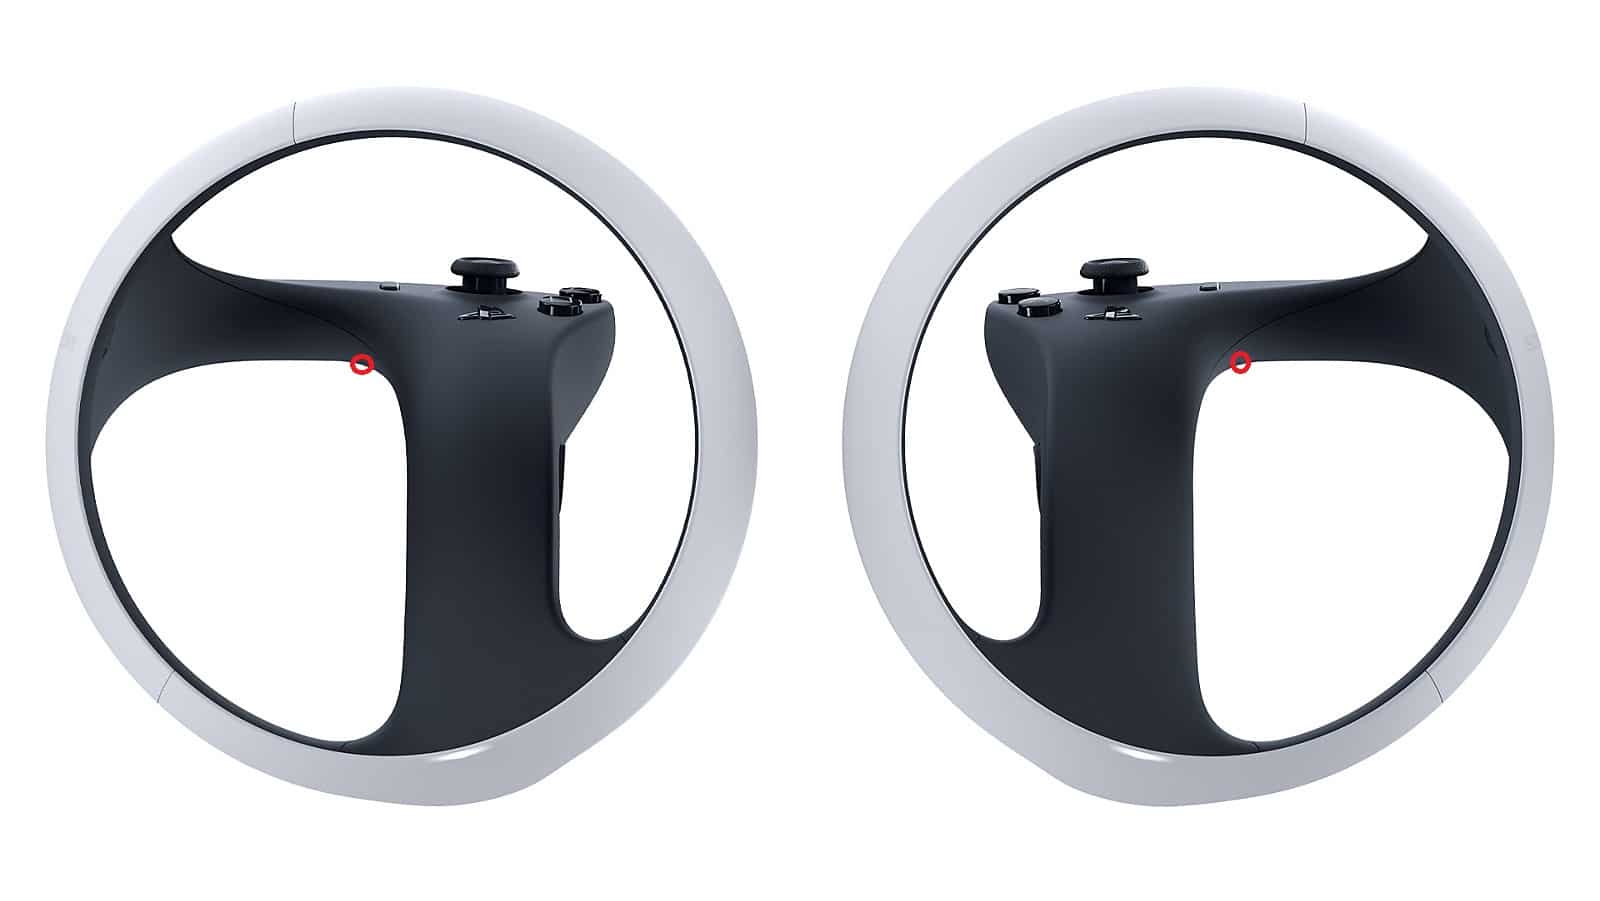
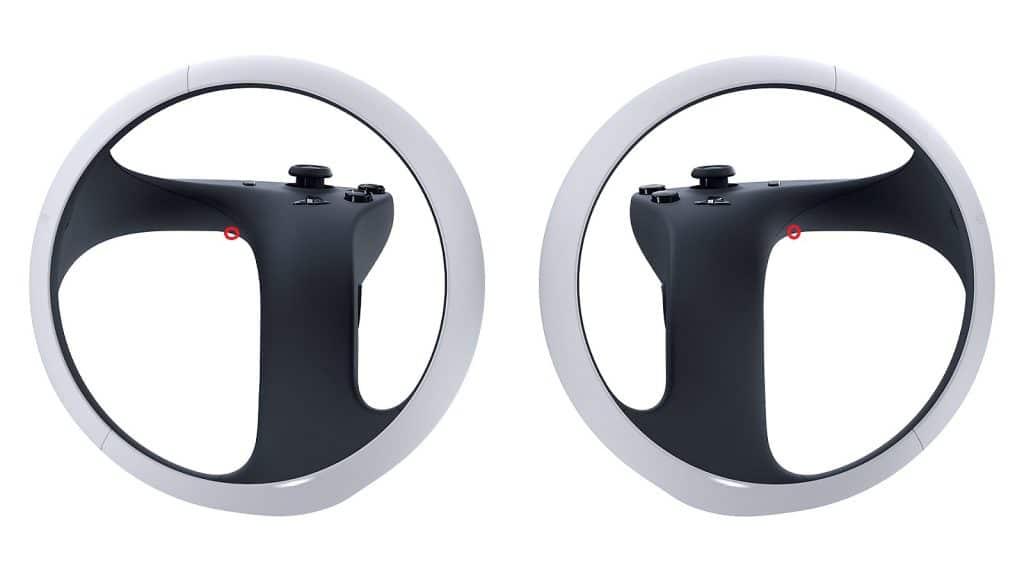
6. You can also try resetting your problematic PlayStation VR 2 Sense controller while the game is still open. In order to do so, you need to look for a small hole located on the gamepad.

You need to use a thin pin in order to push the button located at the bottom of the small hole.

After resetting the controller, you need to pair it to the console again. To do so, connect the controller to the PS5 via a USB cable and then press the PS button.

7. You can also try clearing the cache and/or rebuilding the database on your PlayStation 5.

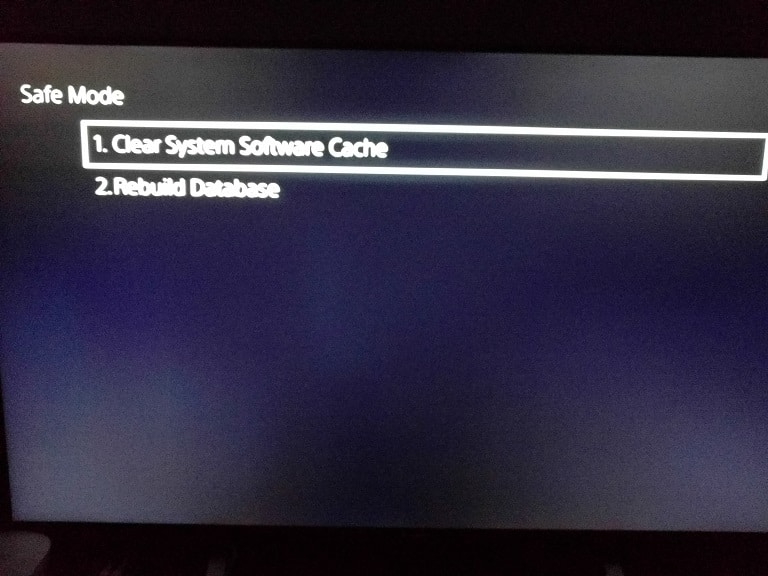
To do so, you need to head into Safe Mode by first turning off the PS5. Afterwards, hold the power button on the console until you hear a second beep. You are then asked to plug a controller into the PlayStation 5 and then press the PS button.

Once you do, you should be in Safe Mode, where you can go to the Clear Cache and Rebuild Database section.

8. You may also want to consider factory resetting the PlayStation 5.

To start off, back up your existing data by heading over to Settings > System > System Software > Back Up and Restore > Back Up Your PS5.

Next, you should go to Settings > System > System Software > Reset Options > Reset Your Console to factory reset the console.

Finally, head back to Settings > System > System Software > Back Up and Restore > Restore Your PS5 to get back your data.

9. You should also check if there are new firmware updates available for your PlayStation 5, PlayStation VR 2 as well as the PlayStation VR 2 Sense controllers.

If you still can’t get the motion controls to be responsive, then we suggest contacting PlayStation Support to get additional help.

How to reset the left and right PlayStation VR2 Sense Controllers

If you are experiencing issues when it comes to tracking and/or responsiveness of the PlayStation VR2 Sense Controllers, then you can try resetting these motion game pads. To find out how to do so, you can follow the steps laid out in this tutorial from Seeking Tech.

1. To start off, make sure that your PlayStation VR2 Sense Controller still has battery life. If it isn’t turning on, or turns off shortly after you turn it on, then we recommend that you try recharging it first before moving on to the next step.

2. Once your controller is ready to be reset, you need to turn off your PlayStation 5 or PlayStation 5 Digital Edition console.

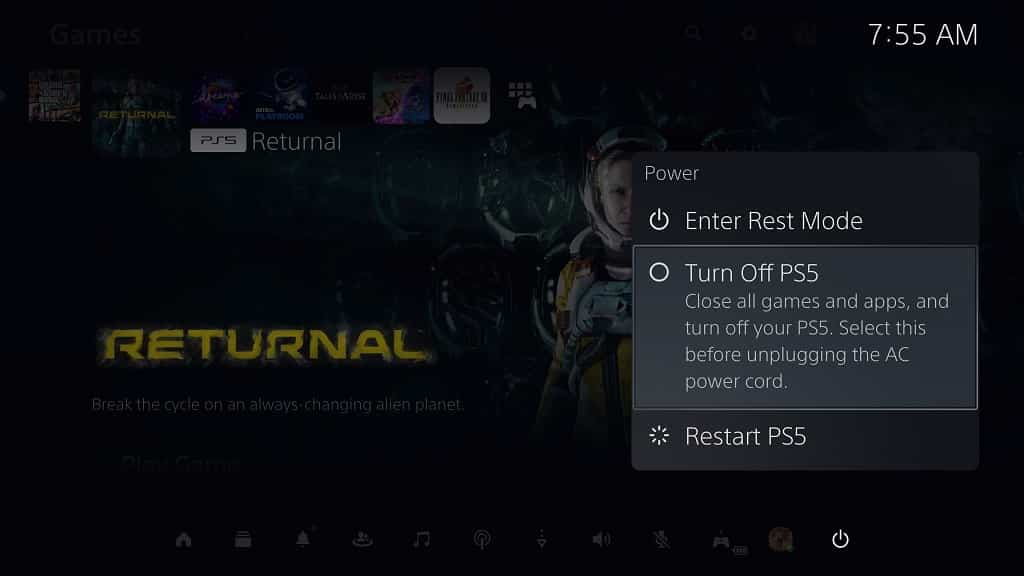
In order to do so, press the PS button on either your left or right PlayStation VR2 Sense Controller. You can also press the PS button on the DualSense game pad if you have it connected. In the quick menu, you can then select the Power option and then the Turn Off PS5 option.

2. You may also want to consider unplugging the power cord from the PlayStation 5. By doing so, you should be able to prevent accidentally turning on the console if you hit the PS logo button during the rest process.

3. With the PS5 turned off, look underneath the handle part of the left or right PlayStation VR2 Sense Controller. You should be able to find a small hole.

4. Use a pin that is thin enough to fit into a hole. You should eventually feel a button.

5. Press the button in the hole down in order to reset it.

6. If the other PlayStation VR2 Sense Controller is also having issues, then you should make sure that you reset it as well.

7. After you reset your controller, you will need to pair it again to your PlayStation 5. In order to do so, turn on your console.

8. Next, you need to use a USB cable to connect the VR2 Sense Controller you previously have to reset to the PlayStation 5.

9. Press the PS button on the Sense Controller in order to pair it to the console.

Once you have reset and paired the motion controller, try to test it in a PlayStation VR2 game to see if it is working normally.

How to access the PlayStation VR 2 volume control

The PlayStation VR 2 features a headphones jack that you can use to plug in wired earphones, headphones or headsets in order to listen to the sounds and music of a virtual reality game.

The default earphones piece that comes bundled with PSVR 2 does not feature in-line volume controls, however. There also aren’t any buttons you can use on the virtual reality headset to lower or increase the sound output.

So, if you are having a hard time trying to change the volume while wearing the PlayStation VR 2, then you can take a look at this tutorial from Seeking Tech to see how you can properly do so.

1. For the first step, we recommend that you pause the game if you are currently playing one. If you can’t pause the game, then you can head over to a safe area.

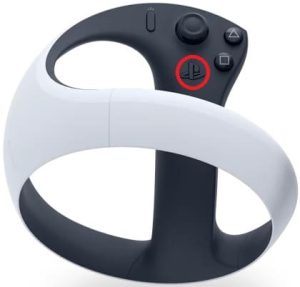
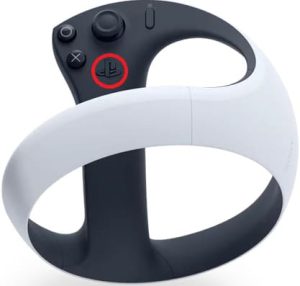
2. Next, you need to press the PS logo button located on either the left or right PlayStation VR Sense Controller to bring up a menu that should appear at the bottom of the screen.

3. From there, you need to select the Sound option, which has the speaker icon.

4. You should then be able to Sound menu, here you should see PlayStation VR 2 headphones as the Output Device. To change the volume, you need to select the Volume option.

5. You should then be able to adjust the volume for the earphones, headphones or headsets device that is connected to the PSVR 2.

To decrease the volume, move the slider to the left. In order to increase the volume, you need to move the slider to the right.

6. Once you are done, press the X button to confirm the change.

In addition to using the system menu, you can also check the in-game menus of the game you are currently playing. Most modern titles, including those created for the PlayStation VR2, come with adjustable Audio settings where you can change the level for the Master Volume. There may also be volume controls for the voice, sound effects and music components.

So, if some games sound fine while others sound either too loud or too quiet, then we recommend checking the Audio settings for the problematic game first before using the system menu of the PlayStation 5 for the volume control.

How to fix PlayStation VR 2 blurriness

When you put on the PlayStation VR 2 headset, you may notice that the graphics appear to be blurrier than what you are expecting. To see how you can get a sharper image quality, you can take a look at this troubleshooting article from Seeking Tech.

It is very likely that the blurry screen of the PSVR2 headset is due to incorrect positioning. When moving the headset around, you need to make sure that you hit the so-called “sweet spot” in order to get the sharpest image.

1. For the first step, we recommend that you look at a text in the PSVR 2 headset.

2. If the text appears to be blurry, then we suggest that you re-adjust the virtual reality headset’s position on your face.

Losen the headband and then make your adjustment. In most cases, most people were able to get a clearer image by moving the lens higher up on their face.

You can also try moving to the left or right, as well as diagonally, until the texts appear sharper on the VR screen.

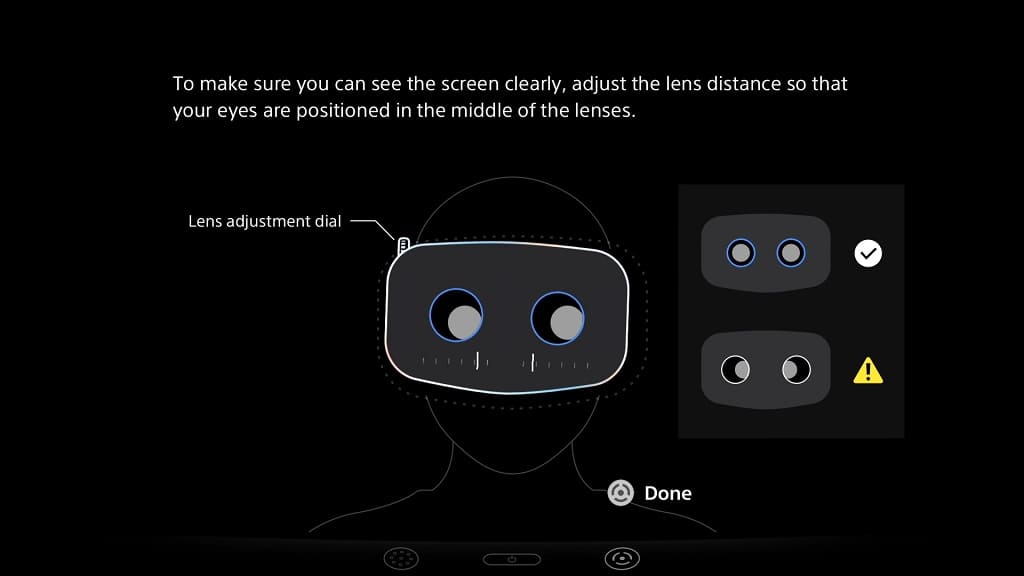
3. You may need to use the lens adjustment dial located on the headset as well if you still can’t get a sharper image.

If you need a visual guide, then you can head over to the Settings menu of your PlayStation 5 or PlayStation 5 Digital Edition console and then select Accessories > PlayStation VR2 > Adjust Lens and VR Headset Position menu.

You can also open the quick menu by quickly pressing the PS button button on the left or right PlayStation VR 2 Sense controller while wearing the virtual reality headset. You should then be able to select the Adjust Visibility option from there.

4. You should eventually reach the sweet spot with enough fiddling when it comes to finding the right placement. Once you do, make sure that you use the headband adjustment dial to secure the headset in place on your face.

If you move the VR screen higher up on your face, for instance, then you should lock in the headband on the lower half of the back of your head to make sure that it stays in place.

5. If you are able to see the texts more clearly on the VR screen, then you should get a sharper image when playing a game as well.

It is very important to note that the PlayStation VR 2 headset does not offer the same sharpness as a 4K television set. So, make sure that you have your expectations in check if you expect to see the same clarity as a 2160p TV.

The clarity also depends on the game you are playing. Some games may use image reconstruction from a lower native resolution, which will result in a softer look, especially in motion.

Other titles may feature re-projection, turning a 60 frames per second game into a 120 frames per second game when playing in virtual reality. This may add a ghosting effect in motion.

Another factor is the OLED panels used by the PlayStation VR 2, which aren’t as sharp as LCD panels when compared to other virtual reality headsets. With that said, OLED has the advantage when it comes to brightness and black levels.

So, if you are seeing a blurry image with one game, even after doing all the aforementioned steps, then we recommend trying another PSVR 2 title to see if you are encountering the same issue. If possible, try to play a game with a completely different visual style to see if you notice a difference in image quality.