How to enable BenQ MOBIUZ EX2710U and EX3210U VRR support for Xbox Series X and S

The BenQ MOBIUZ EX2710U and EX3210U gaming monitors are capable of displaying Xbox Series X and Xbox Series S with Variable Refresh Rate.

To find out how you can enable VRR for these game consoles, you can take a look at this tutorial from Seeking Tech.

This guide will be based on the following models:

  • 27″ BenQ MOBIUZ 4K True HDMI 2.1 Gaming Monitor (EX2710U)
  • 32″ BenQ MOBIUZ 4K True HDMI 2.1 Gaming Monitor (EX3210U)

1. To start off, we recommend that you update your MOBIUZ EX2710U or MOBIUZ EX3210U to the latest available firmware. This is because a new driver may improve the performance and compatibility of the monitor’s Variable Refresh Rate capabilities.

In order to update, you can visit the following links from the official BenQ website:

2. We also recommend that you update your Xbox Series X or Xbox Series S to the latest firmware too as doing so may help improve the console’s VRR feature.

3. If you haven’t done so already, connect your game console to the HDMI port of your monitor. Make sure you are using the HDMI cable than came with your system.

The Xbox Series X should come with a HDMI 2.1 cable while the less powerful Xbox Series S should come with a HDMI 2.0 cable. Both should work with Variable Refresh Rate.

4. Next, you need to power on your monitor and game console.

5. If your EX2710U or EX3210U isn’t showing the input source from your Xbox Series X or Xbox Series, then you need to switch over to the correct input before continuing.

6. Afterwards, you need to use the 5-way controller on your EX2710U or EX3210U to head to the Quick Menu.

7. In the Quick Menu of your monitor, head over to Menu.

8. Inside of Menu, select Input.

9. You then need to select the input source that is connected to your Xbox Series X or Xbox Series S.

10. Lastly, set the HDMI input to Game to get your EX2710U or EX3210U ready for Variable Refresh Rate.

11. In the menu of your Xbox Series X or Xbox Series S console, head over to Settings.

12. Inside the Settings menu of your game console, select General on the left column.

13. Afterwards, select “TV & display options” on the right portion of the same menu.

14. From the “General – TV & display options” menu, you then have to select “Video modes.”

15. Now that you arrive at the “General – Video modes” menu, make sure that the box next to the “Allow variable refresh rate” setting is checked.

You should now be able to play videogames on your Xbox Series X or Xbox Series S game console with Variable Refresh Rate enabled on your E 27″ BenQ MOBIUZ 4K True HDMI 2.1 Gaming Monitor (EX2710U) or 32″ BenQ MOBIUZ 4K True HDMI 2.1 Gaming Monitor (EX3210U).

If you also have a PlayStation 5 or PlayStation 5 Digital Edition, then you can take a look at this article to see how you can enable Variable Refresh Rate support for these consoles with the EX2710U or EX3210U.

How to fix charging issues with the LinkBuds S

The Sony LinkBuds S comes with a charging case that will recharge the internal batteries of the two ear phones.

If the ear buds are recharging slowly, or not at all, then you can check out this troubleshooting guide at Seeking Tech to see how you can potentially resolve your problem.

1. Before we begin, it is important to note that the ear buds will take up to 2 hours to fully charged. When it comes to the charging case, it can take up to 3 hours to recharge its battery.

2. To start off, make sure you are recharging the ear buds within a range of 59 °F to 95 °F (or 15 °C to 35 °C). Outside of this temperature range, the charging could slow down or even stop entirely.

3. Do not try to charge the ear buds or the charging case of the LinkBuds S if any of these parts are wet. Instead, you need to make sure that they are completely dry first.

4. Make sure that the charging ports of the ear phones and case aren’t dirty. If they are, then you can check out this guide to see how you can properly clean these ports.

5. You should also make sure that the ear phones are properly placed into their designated positions inside of the charging case.

The ear bud tips could end up preventing the charging ports from connecting to each other. In this case, you can try repositioning the tips are removing them from the ear buds.

6. When recharging the ear phones, make sure that you keep the top of the charging case closed in order to prevent wasted battery energy.

7. If you are recharging the Sony LinkBuds S case, then make sure you use the USB Type-C cable that came included in the box as another cable may not be compatible.

8. Furthermore, you should also make sure that the cable is firmly connected to the USB port of the charging case as well as its power source.

9. If you are connecting the other end of the USB Type-C cable to an USB AC adaptor, then then adaptor must have an output current of at least 0.5 A (or 500 mA).

10. If you are connecting the other end of the USB Type-C cable to a desktop computer, laptop, game console or any other device, then make sure that the power source is turned on.

Otherwise, a device in rest mode, sleep mode, hibernation mode or similarly named low-power state mode may not be able to supply power to the charging case.

11. You should also avoid connecting the other end of the USB Type-C cable to an USB hub or USB pass-through device. Instead, the cable should be directly connected to one of the USB ports on the power source.

12. If the power source has multiple USB ports, then you can try using a different one.

13. Moreover, you may want to consider resetting or factory resetting the Sony LinkBuds S as either of these actions may help the ear phones recharge normally again.

To see how you can do both, we recommend that you follow the steps laid out in this tutorial.

What to do if the Sony LinkBuds S can’t be turned on

If you have a hard time trying to power on the Sony LinkBuds S, then you can take a look at this troubleshooting guide to see how you can get the ear phones to turn on.

1. If your ear buds feel wet when touched, then we recommend that you let then completely air dry first before you do anything else.

To find about more information about how you can properly dry the LinkBuds S when it gets wet, you can take a look at this post.

2. The next step you can take is to try to recharge the wireless ear phones by placing them into their designated positions in the charging case.

If the indicator on the case isn’t showing any lights, then make sure you plug the case into a power source.

We recommend waiting for a minimum of 2 hours for the ear buds to be fully charged.

3. You should also make sure that the wireless ear phones are properly paired and connected to the other device.

4. Moreover, you can also try reconnecting the LinkBuds S to the other device via Bluetooth.

5. If reconnecting the Bluetooth communication does not turn the ear phones on, then you can try forgetting the connection on the Bluetooth menu of the other device.

Afterwards, pair the LinkBuds S again to the same device to see if you are able to get the ear phones to power on.

6. It is important to note that only the right ear bud will work when the Service Link feature is enabled in the “Sony | Headphones Connect” app.

In this case, you can try disabling this function from the mobile application.

7. If you are using the LinkBuds S with Amazon Alexa or Google Assistant, then the left ear bud will not work by default. Instead, you need to use the right ear bud when utilizing either of these two features.

If you would rather use the left ear bud instead for Amazon Alexa or Google Assistant, then you need to configure the Playback Control settings in the “Sony | Headphones Connect” mobile app.

Keep in mind that, even if you set Playback Control to both ear buds, only the right ear bud will offer the complete set of functions.

8. A reset may help fix to power issues with your ear phones. If a regular reset does not work, then you can try doing a factory reset.

You can check out this article to see how you can do both of these actions with this device.

9. If the LinkBuds S still does not turn on properly, then we recommend that you contact Sony for additional support.

How to view the digital manuals of PS3 games on PS5

If you have the PlayStation Plus Premium subscription, then you can play PS3 games via cloud streaming on your PlayStation 5 or PlayStation 5 Digital Edition system. These classic releases come with a digital manual, which can be very helpful if you want to look up the controls as well as learn about specific mechanics of the game.

To see how you can view the manual of a PlayStation 3 game you are streaming on your PS5, you can take a look at this tutorial from Seeking Tech.

1. To start off, turn on your console if you haven’t done so already.

2. Next, make sure you are signed into the same PlayStation Network account that is subscribed to PlayStation Plus Premium.

3. After signing in, you should be the home screen, which is where you can select which game or app to open.

If you aren’t in the home screen, then you can get there quickly by pressing and holding the PS button on your DualSense controller.

4. Next, select the PlayStation 3 game that you want to stream on your PlayStation 5 or PlayStation 5 Digital Edition console.

If the game isn’t showing up in the home screen, then you can take a look at this guide to see how you can find PS3 games on the PS5.

5. Once the connection has been established and the game has launched, press the PS button to bring up the quick menu.

6. In the quick menu, select the Now Streaming card that has the name of the current game you are playing.

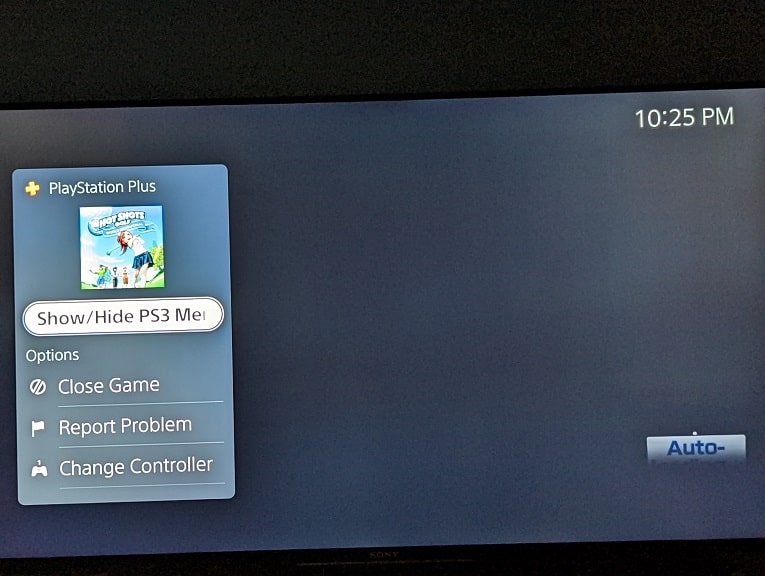
7. In the expanded Now Streaming card, you then need to select Show/Hide PS3 Menu, which should bring you to the limited version of the retro XMB menu.

8. From the XMB menu, select Software Manual under the Game column.

9. With the digital manual opened, you can use the right digital pad button or move the left analog stick to the right in order to go to the next page.

If you want to go back to the previous page, you can either press the left directional pad button or move the left analog stick to the left.

If the text or image is too small for you to see, then you can press the square button to zoom closer. When zoomed in, you can then use the directional pad or left analog stick to move to other areas of the enlarged page.

10. Once you are done with looking at the digital manual, you can press the circle button to back out to the XMB menu.

11. To return to your game from the XMB menu, press the PS button to bring up the quick menu.

12. Next, you need to select the Now Streaming card.

13. Finally, select the Show/Hide PS3 Menu option in order to close the XMB menu and return to the game.

How to enable MSI MPG321UR-QD VRR support for Xbox Series X and S

With the 32″ MSI Optix MPG321UR-QD 16:9 4K 144 Hz IPS Gaming Monitor, you can play games with Variable Refresh Rate on the Xbox Series X and Xbox Series S gaming consoles. To find out how you can properly enable this feature, you can take a look at this article from Seeking Tech.

Xbox Series X and Xbox Series S VRR benefits

By using Variable Refresh Rate, games running on the Xbox Series X or Xbox Series S that don’t originally run at a stable frame rate will look smoother. Furthermore, screen tearing should also be eliminated.

How to turn on MSI MPG321UR-QD VRR support for Xbox Series X and S

In order to use the Variable Refresh Rate feature of the 32″ MSI Optix MPG321UR-QD on your Xbox Series X or Xbox Series S system, you need to take the following steps:

1. Before everything else, we recommend that you update the firmware of your PG321UR-QD as a new version may help improve the VRR performance of the screen.

You can download the latest firmware for this product with the following link:

2. Furthermore, you should also keep your Xbox Series X or Xbox Series S updated to the newest firmware release as well. A new update may also help when it comes to using Variable Refresh Rate.

3. Next, you need to connect your Xbox game console to the HDMI 2.1 port of the MSI Optix MPG321UR-QD. We recommend that you use the HDMI cable that came with your console.

For the uninformed, the Xbox Series X comes with a HDMI 2.1 cable included in the box while the Xbox Series S comes with a HDMI 2.0 cable.

You should be able to still get Variable Refresh Rate support of MPG321UR-QD the monitor with a HDMI 2.0 cable for both of these consoles.

4. Turn on the screen and game console if you haven’t done so already.

5. Make sure that the MSI Optix MPG321UR-QD is displaying the correct input source for your Xbox console. If not, you need to switch over to the right input before continuing.

6. Next, use the Navi Key on your monitor to open the on-screen display (OSD) menu.

7. Inside the OSD menu, you first need to scroll down and then select Setting on the left column.

8. You then need to go to HDMI 2.1.

9. For the HDMI 2.1 setting, select 4K 120Hz – Console.

10. Head back to the OSD menu and then select Gaming.

11. You then need to select Adaptive-Sync.

12. In the Adaptive-Sync setting, make sure you select On.

13. On your Xbox Series X or Xbox Series S console, go to Settings.

14. From the Settings menu, go to General in the left column and then select “TV & display options” on the right side.

15. In the “General – TV & display options” menu, select “Video modes.”

16. From the “General – Video modes” menu, make sure that the “Allow variable refresh rate” setting is checked, which indicates that VRR has been enabled for your Xbox Series X or Xbox Series S game console.

To see how you can enable VRR support for the MSI Optix MPG321UR-QD when playing PS5 games, you can check out this article.

How to fix 2022 Roku Ultra (4802R) overheating issues

When using your 2022 Roku Ultra, which has a model number of 4802R, you may get the following error message on your television screen or computer monitor:

“Your device is overheating”

The media player may also show a solid red light on its indicator located on the front of the devie.

To see how you can potentially fix an overheating 2022 Roku Ultra, you can take a look at this troubleshooting article at Seeking Tech.

1. The first step we recommend taking it to unplug the power adapter from the power outlet.

You can also unplug the power adapter from the media player. If you decide to go this route, however, then you might want to consider wearing gloves as the 2022 Roku Ultra may be running hot enough that it may cause skin irritation or even injury when touched.

2. Afterwards, we recommend waiting for at least 10 minutes for the media player to cool down. Since the device isn’t getting any power, it should not be generating any additional heat.

To speed up the cool down process, you can put the 2022 Roku Ultra near a fan in order to get better air circulation. Keep in mind that the device could still be hot. Therefore, you should handle it with care.

3. After letting your 2022 Roku Ultra cool down, you should then try to diagnosis the reason why the streaming device was overheating in the first place.

The most common cause of 2022 Roku Ultra is sub-optimal placement. When it comes to positioning this media player, you should avoid the following places:

  • Inside an enclosed space such as a drawer or cabinet.
  • Directly on top or below another electronic device.
  • In an area that is constant exposed to direct sunlight.
  • Near a heater, fireplace as well as near any other heat sources.
  • On a sofa, cushion and other soft materials.

Therefore, you should put the 2022 Roku Ultra in an area with plenty of free air space, such as on top of a table, desk or cabinet. You should also avoid putting near direct sunlight as well as heat sources.

4. Once you re-positioned your streaming device, you can plug it back into the power outlet again and then try to use the device.

5. If the overheating issues still persist, then the next step you can take is to try plugging the 2022 Roku Ultra into a different outlet as the current one you are using could be damaged.

6. You can also try using a different power adapter, if possible, as the one you are currently using may be causing the media player to overheat.

7. If the 2022 Roku Ultra still overheats after you try all of the aforementioned steps, then we recommend that you unplug it from the power outlet.

If your device is still under warranty, then we recommend contacting Roku about getting a replacement. Otherwise, you should try another media player as the 2022 Roku Ultra may be damaged beyond repair.

If you can’t the remote control for this media player to work properly, then you can take a look at this guide.

How to fix frame rate issues when streaming PS3 games on PS5

When streaming a PS3 game on your PlayStation 5 or PlayStation 5 Digital Edition console, you may experience lower than expected frame rate.

To see how you can potentially make the game run smoother, you can take a look at this troubleshooting article from Seeking Tech.

1. The first step we recommend taking is to check to see if your internet connection is suitable for streaming PS3 games.

In order to test it out, you need to do the following:

  • From the home menu of your PS5 or PS5 Digital Edition, go to the PlayStation Plus App.
  • After getting to the PS Plus App, navigate up and then all the way to the right where you need to select the More option (it should have an icon that features three dots).
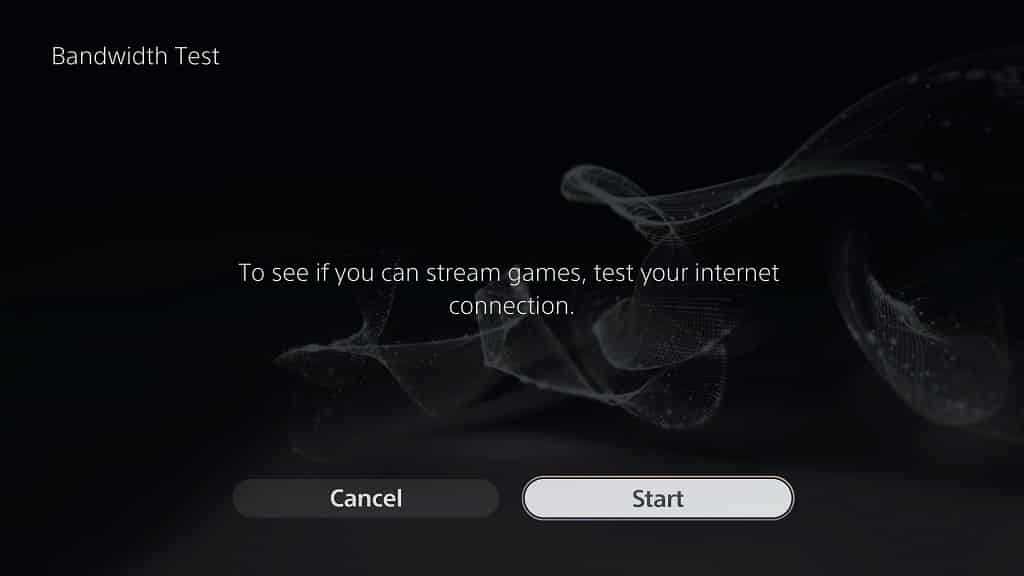
  • In the pop-up menu, select Bandwidth Test.
  • After getting to the Bandwidth Test screen, you then need to select Start.

2. Even if you connection support PS3 streaming, it may not be fast enough to help with the frame rate problems.

For optimal performance, we recommend that you have a download and upload speed of at least 15 Mbps.

In order to do a speed test on your PlayStation 5 console, you need to take the following steps:

  • From the home menu of your console, head into Settings.
  • In the Settings screen, you need to select Network.
  • After getting to the Network menu, select Connection Status in the left column.
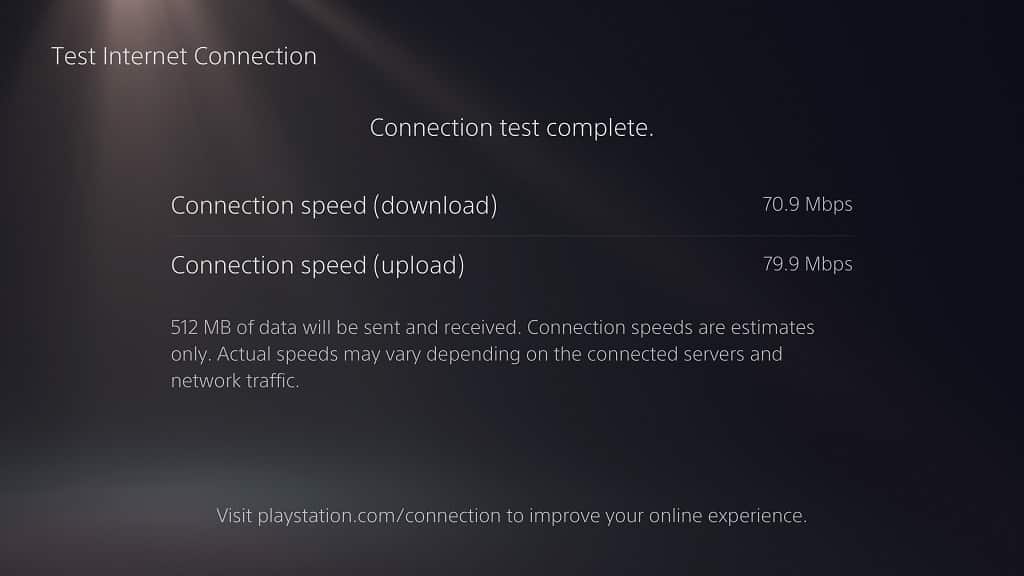
  • On the right side of the same screen, you then need to select Test Internet Connection.
  • Once the test has been completed, you will be able to view your download and upload speed.

3. In order to get a faster and/or more stable internet connection, then you can try using a wired Ethernet connection if possible.

4. The PlayStation 5 and PlayStation 5 Digital Edition system supports 2.4 GHz and 5 GHz. Depending on how close your Wi-Fi router is to your console, one frequency may be better than the other.

Therefore, we recommend trying out both the 2.4 GHz and 5 GHz frequencies, if your router supports them, to see if you can get a better internet connection.

To see how you can switch between 2.4 GHz and 5 GHz on your PS5 console, you can check out this post.

5. Resetting the game on the remote PS3 console may also help fix any stuttering when streaming.

In order to reset without having to exit the stream, you can do the following:

  • Press the PS button on the DualSense.
  • In the quick menu, select the Now Stream card.
  • Next, you need to select Show/Hide PS3 Menu.
  • You then need to select Saved Data Utility.
  • Select Yes to quit the game.
  • Next, press the O button on the controller.
  • Select Yes to return to the game.

6. It is important to note that the game you are streaming is running on a PlayStation 3. Video games from that generation tend to have lower frame rates.

Therefore, some titles may run choppier when compared to games that were released on the PlayStation 5.

How to fix input lag issues when streaming PS3 games on PS5

With PlayStation Plus Premium subscription, you can play PlayStation 3 games via cloud streaming on your PlayStation 5 or PlayStation 5 Digital Edition console.

If you are experiencing a lot of input lag when you play these classic titles, then you can take a look at this troubleshooting article from Seeking Tech to see how you can reduce the delay.

1. To start off, make sure you meet the minimum internet connect speed requirement for streaming PlayStation 3 games.

To avoid a laggy experience, you need at least 5 Mbps for both downloads and uploads. In order to stream games at 1080p on your PS5, you will need at least 15 Mbps for both downloads and uploads.

To check the internet connection speed on your console, you need to take the following steps:

  • Head into Settings from the home menu.
  • In the Settings, menu, go to Network.
  • From the Network menu, select Connection Status on the left side and then Test Internet Connection on the right side.
  • Wait for the test to complete to see the download and upload speeds of your current internet connection when you are using your PlayStation 5 or PlayStation 5 Digital Edition console.

You can also check if your connection is fast enough to stream games by doing the following:

  • Open the PS App from the home menu of your PlayStation 5.
  • Inside the application, select the More option, which has the three dots icon located on the top right side.
  • In the pop-up menu, select Bandwidth Test.
  • From the Bandwidth Test menu, select Start.

2. If possible, we recommend using a wired Ethernet connection to connect your system to the internet as it should be faster and more reliable when compared to Wi-Fi.

3. The PS5 supports both the 2.4 GHz and 5 GHz Wi-Fi bands. If your router also supports both frequencies, then you might want to consider switch one for the other to see if you can get a better internet connection.

To see how you can do so, you can follow the steps that are laid out in this article.

4. Most recent television sets come with a game mode or similar sounding picture setting that is designed to reduce input latency when playing video games.

If you think your TV supports this feature, then you can look at its settings to enable it while playing your PlayStation 5.

5. You might also want to consider using the DualSense as a wired controller as doing so should reduce input lag.

If you are interested, then you can take the following steps:

  • Go to Settings from the home menu of your PS5.
  • In Settings, scroll down and select Accessories.
  • After getting to the Accessories menu, select Controllers on the left side and then Communication Method on the right side.
  • Inside the Communication Method menu, you then need to select the Use USB Cable option.
  • Afterwards, connect your DualSense to the PS5 console by using an USB cable.

6. If you are still experiencing lag, then you might want to try closing the stream and then opening it again to see if the delay is reduced.

To close a PS3 game you are currently playing, press the PS button to open the quick menu. Afterwards, you need to select the Now Streaming card and then close game.

7. It is important to note that there will always be more input lag when streaming a game when compared to playing it natively on hardware.

Furthermore, if the streaming servers are far away from your PlayStation 5, then the lag will be worse when compared to consoles that are closer.

How to prevent the LinkBuds S from getting liquid damage

If your Sony LinkBuds S gets too wet, then its sound output and noise cancellation effects may weaken. Furthermore, you may hear unusual sound coming from the ear buds. In the worst-case scenario, the ear phones will suffer from permanent liquid damage.

To see how you can prevent the LinkBuds S from getting water damage, you can take a look at this guide from Seeking Tech.

What is the IP rating for the Sony LinkBuds S?

The LinkBuds S has an ingress protection rating of IPX4, which means that it should be shield against water splashes from any direction.

This rating only applies to fresh water, tap water and sweat. Any other types of liquid aren’t guaranteed to be shielded from the ear buds.

How to prevent the LinkBuds S from getting too wet

Although the Sony LinkBuds S offers some protection, it is not remotely waterproof. To prevent liquid damage, you can try taking the following precautionary steps:

1. Avoid touching the LinkBuds S if you have wet hands.

2. Be careful when wearing the ear phones near any body of water. Make sure that the buds don’t fall off your ears and into the liquid.

3. Avoid using the device in very humid environment.

4. Do not place the earphones in damp clothing.

5. Keep in mind that the charging case does not offer any water protection. Therefore, we recommend that you keep the case dry at all times.

6. If you decide to wear the earphones during a rainstorm or any other situations where it could be exposed to a significant amount of water splashes, then you can try wearing a hood or other similar water-resistant clothing to help keep LinkBuds as dry as possible.

How to properly dry the Sony LinkBuds S when it gets wet

If your LinkBuds S gets too wet, then we recommend taking the following steps in order to properly dry the device:

1. If you haven’t done so already, make sure you turn off your ear phones.

To see how to do so, you can take a look at this article.

2. If the ear buds are still in the charging case, then make sure disconnect the case from its power source and then take the buds out.

3. If the LinkBuds S has been exposed to liquid other than tap or fresh water, then we recommend that you clean all parts of the device.

To find out how you can properly do so, you can visit this tutorial.

4. To dry the ear phones and charging case, you need to shake them several times to get the liquid to drip out from the insides.

Make sure you remove the ear bud tips before shaking. Otherwise, the tips may block the liquid from dripping out.

Furthermore, we also recommend that you try to shake the ear phones and charging case at different angels.

5. Next, you need to use a dry soft cloth to wipe off any visible wet spots you see.

6. Once you are done with wiping the Sony LinkBuds S dry, we suggest that you let the earphones and charging case air dry at room temperature.

7. After waiting for the device to air dry, you can try turning it on and then testing it to see if there is any liquid damage.

How to fix Sony LinkBuds S touch control issues

You can use the touch sensors of the Sony LinkBuds S for several functions.

If you are having problems trying to get the touch inputs of the ear buds to work correctly, then you can take a look at this troubleshooting article at Seeking Tech.

1. The first step we recommend taking is to make sure that your ear buds aren’t overheating.

For the uninformed, these devices have a recommended operating temperature range of 32 °F to 104 °F or 0 °C to 40 °C.

If your ear phones feel hot, then you should turn them off and then remove them from your ears. Afterwards, wait for both to cool down before using the LinkBuds S again.

2. If your ear buds are wet, then you should turn them off. Afterwards, you should wait until the buds are completely dried before turning them back on again.

3. By default, you won’t be able to use touch controls if you aren’t currently wearing the LinkBuds S. In order to change this setting, you need to do the following:

  • First off, you need to download and install the “Sony | Headphones Connect” app on a smartphone or mobile device if you haven’t done so already.
  • With the application installed, open it and then link it to your Sony LinkBuds S.
  • After linking the earphones, you should be able to find the option to disable the automatic power off feature from the dashboard of the Sony LinkBuds S.

4. Make sure that your finger isn’t dirty when using the touch controls as the sensor may not be able to recognize your inputs.

5. You should also make sure that you aren’t earing any gloves as the sensor may not be able to detect your touch.

6. Keep in mind that both the left and right ear buds have touch sensors. The touch input functions could be different depending on which sensor you are using.

So, if the touch controls aren’t working as intended on one of the ear buds, then you can try using the touch sensor located on the other bud.

7. The earphones should also not be dirty. To find out how you can properly clean the Sony Link Buds S, you can take a look at this post.

8. If you are only experiencing issues with the double tap or triple tap functions, then you make sure you are tapping the touch sensor quickly enough. According to Sony, you should wait no more than around 0.3 seconds in between taps.

9. If you are using Amazon Alexa or Google Assistant on the connected device, then the touch controls for the Sony LinkBuds S may have changed. You may have made changes to the touch controls previously as well.

To view the touch controls, as well as customize its functions to suit your preferences, you need to use the “Sony | Headphones Connect” app.

10. You can also try resetting or factory resetting the Sony LinkBuds S. If you don’t know how to do either of these actions, then you can follow the steps laid out by this tutorial.