The PlayStation 5, as well as the PlayStation 5 Digital Edition, supports both the 2.4 Ghz and 5 Ghz Wi-Fi frequency bands.
You can follow this guide from Seeking Tech to find which of these band is the best. You will also learn how to switch between the two on the PS5.
Best PS5 Internet Connection Method: Ethernet LAN vs. 2.4 Ghz Wi-Fi vs. 5 Ghz Wi-Fi
If you are looking for the fastest and most consistent speed, then the best internet connection for your PlayStation 5 is Ethernet LAN. The only drawback is that you need a wired connection. If you can’t or simply don’t want to use an Ethernet capable, then you are limited to wireless Internet.
When compared to the 5 Ghz frequency band, the 2.4 Ghz frequency band has much wider Wi-Fi coverage range and will run into less interference.
On the other hand, the 5 Ghz Wi-Fi has better download and upload speeds than the 2.4 GHz Wi-Fi.
Overall, we recommend using Ethernet LAN if possible. If not, then we suggest using 5 GHz Wi-Fi over 2.4 Ghz Wi-Fi if you have the proper setup.
How to check what Wi-Fi frequency band the PS5 is using
To check what Wi-Fi frequency band your PlayStation 5 is currently using, you can take the following steps:
1. From the home screen of the system where you select games to play, go to “Settings” on the upper right corner.
2. From the “Settings” menu, go to “Network.”
3. From the “Network” menu, select “Connection Status” from the left tab and then the “View Connection Status” on the right side of the same screen.
4. In the “View Connection Status,” you will be able to see the “Wi-Fi frequency band in use.”
How to change Wi-Fi frequency bands on PS5
If you are experiencing issues with the wireless Internet connection on your PlayStation 5 (such as slow downloads/uploads, lag as well as disconnections), then you might want to consider changing the Wi-Fi frequency band from 2.4 GHz to 5 GHz or from 5 GHz to 2.4 Ghz.
To do so, you need to do the following:
1. From the aforementioned home screen, head to the “Settings.”
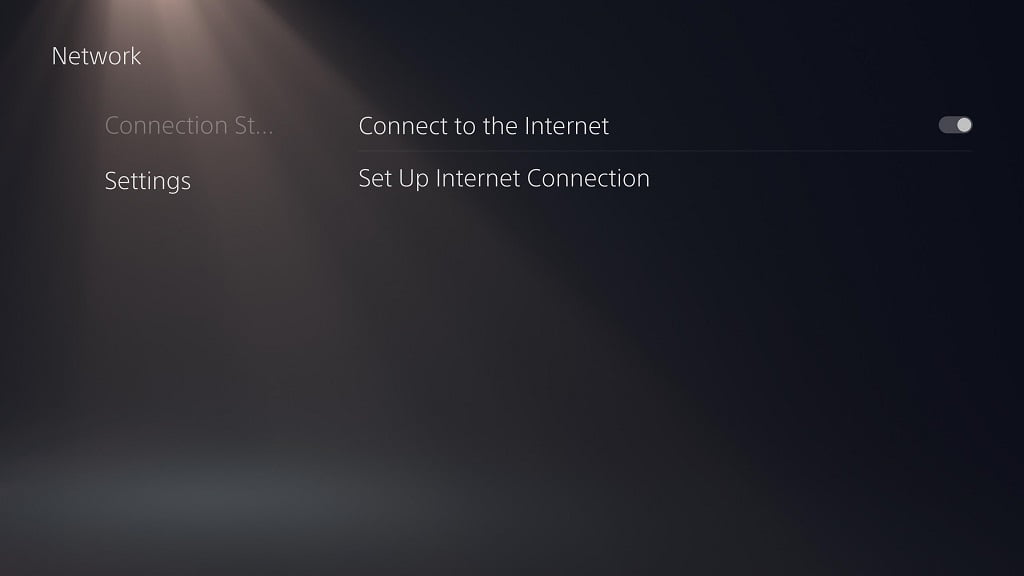
2. In the “Settings” menu, head to “Network.”
3. In the “Network” menu, select “Settings” from the left tab and then “Set Up Internet Connection” on the right side of the same screen.
4. In the “Set Up Internet Connection” menu, find your Wi-Fi network from the registered network list.
5. With your Wi-Fi network highlighted, press the Options button on your DualSense controller. This button is located directly to the left of the Triangle button and has three horizontal lines on top of it.
6. In the pop-up menu, select the “Wi-Fi Frequency bands” option.
7. In the next pop-up menu, you have the following options:
“Automatic”
“5 GHz”
“2.4 Ghz”
“Automatic” is the default option as the PlayStation 5 will automatically use what it detects to be the best wireless option. You can force your system to use 5 GHz Wi-Fi by selecting the “5 GHz” option or force it to use 2.4 Ghz Wi-Fi by selecting the “2.4 Ghz” option.
How to improve Wi-Fi connection on PS5
If you are still experience issues related to using Wi-Fi on the PlayStation 5, then we recommend repositioning your system and/or Wi-Fi router/satellite.
Your goal is to put your PS5 and your Wi-Fi router/satellite as close as possible without any obstructions in between. The obstructions include walls, microwaves as well as other wireless devices.
For 5 GHz Wi-Fi specifically, you need to make sure that there is a direct line of sight between the PlayStation 5 and the Wi-Fi router/satellite in order to prevent disconnects, latency, slow speeds as well as other Wi-Fi related issues.