How to download and update the YouTube PS5 App

Downloading and updating the official YouTube application on your PlayStation 5 or PlayStation 5 Digital Edition can be a little tricky if you aren’t familiar with how the console’s menus work. To find out how to properly do both of these actions, you can take a look at this tutorial from Seeking Tech. 

How to download YouTube on PS5 

In order to download YouTube for your PlayStation 5, you can take the following steps: 

1. To start off, you need to go to the home screen menu. If you aren’t there already, then you can press and hold the PS button on the controller to go home. 

2. From the home screen, press the R1 button to switch to the Media tab if you aren’t there already. From the Media tab, you need to select the All Apps option. You should then be able to find and select the YouTube App from there. 

Alternatively, you can press the triangle button and then select the Search option. Input “YouTube” in the search bar and then press R2 to start the search. In the search results page, you need to press the R1 button to switch over to the Media tab. You should then be able to get to the product page of the YouTube App from there.  

3. On the product page, you need to select the Download option. 
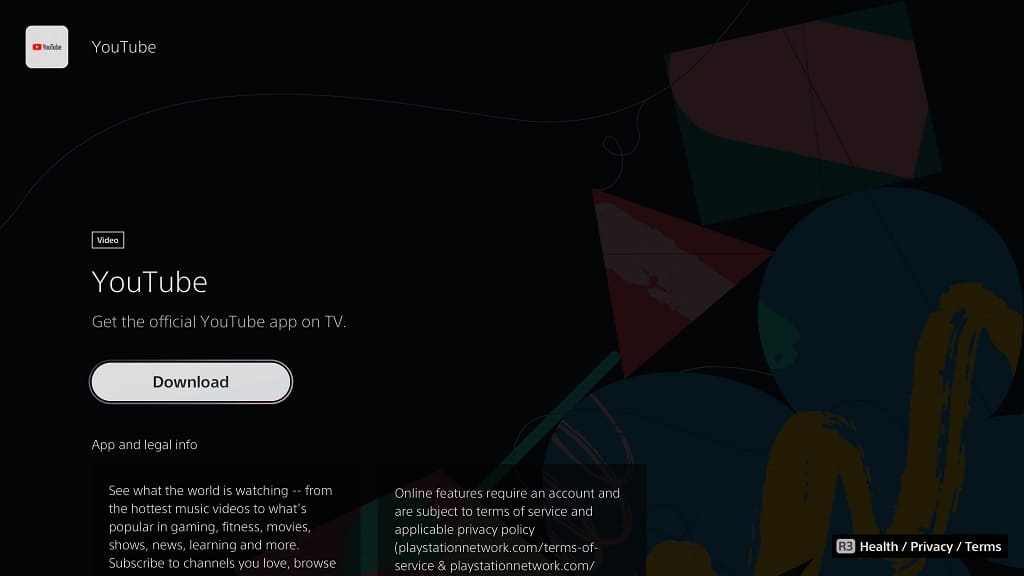
4. Once the download has been completed, you should be able to select the Start option from the same page.  

5. In the future, you should be able to open the same video streaming application from the Media tab of the home screen.  

How to update the YouTube PS5 App 

If you want to update the YouTube App to the latest version on your PS5 or PS5 Digital Edition system, then you need to do the following: 

1. To start off, you need to head to the home screen menu of your game console. 

2. If you aren’t in the Media tab of the home screen already, then you need to press the R1 button in order to switch over.  

3. In the Media tab, move the cursor to highlight the YouTube logo. 

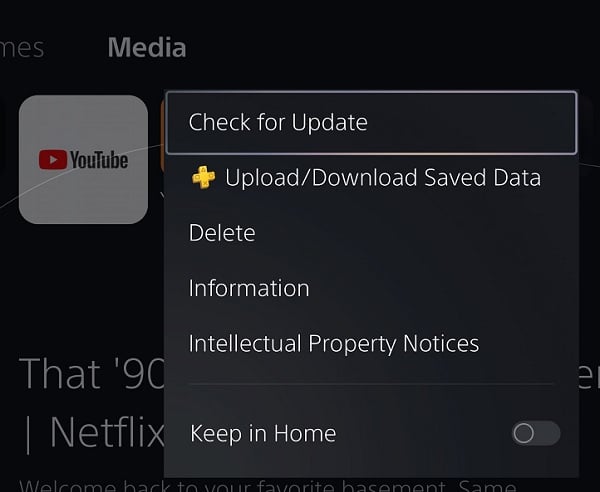
4. With the YouTube logo highlighted, press the Options button on the controller to bring up a small window. 

5. Finally, select the Check for Update option to see if there is a new patch available to download. 
How to get a discount for PlayStation Plus Essential, Extra, Deluxe and Premium 

In 2022, Sony expanded the PlayStation Plus service into four different tiers as you are able to pick between Essential, Extra, Deluxe or Premium. While the Essential plan remains the same price as the original, the other three versions are more expensive. 

To see how you can get a good deal on these subscriptions, you can take a look at this guide from Seeking Tech. 

Direct Deals 

If you are looking for direct deals for PlayStation Plus Essential, Extra, Deluxe or Premium, then the only way to do so is to wait for a sales promotion from the PlayStation Store. This is because you are no longer able to purchase a subscription from a third-party seller or retailer.  

In general, Sony will discount the PlayStation Plus plans during its Days of Play sale, which usually occurs during May or June. These subscriptions should also be on sale in November and December, during the Black Friday, Cyber Monday, Holiday and End of Year sales promotions.  

If you want the best discounts for the PS Plus Essential, Extra, Deluxe or Premium subscriptions, then you need to wait for these sales from the PlayStation Stores.  

To keep on updates as to when these discounts are available, we recommend that you occasionally check the official PlayStation blog during the aforementioned months. 

Indirect Deals 

If you are looking for an indirect way to get a discount for PlayStation Plus Essential, Extra, Deluxe or Premium, then the only way to do so is by getting discounted PlayStation Store Gift Cards and PlayStation Plus Wallet Funds. 

Both of these cards, which can be bought as digital voucher codes as well as physical forms, will add funds to the digital wallets of your PlayStation Network account. The added funds can then be used to purchase a PS Plus Essential, Extra, Deluxe or Premium plan. 

Therefore, if you can get PlayStation Store Gift Cards or PlayStation Plus Wallet Funds at lower than MSRP, then you should be able to purchase a subscription at an indirectly lowered price point.  

With that said, these cards rarely go on sale. Even if you find one discounted, it is usually not as much as the direct discounts for the PS Plus tiers you find during the aforementioned PlayStation Store sales. Therefore, you are better off waiting for the direct deals instead. 

What to do if the Disney Plus PS5 App isn’t showing any captions or subtitles

You are able to watch videos from the Disney Plus App with captions and subtitles on your PlayStation 5 or PlayStation 5 Digital Edition console. If these texts aren’t showing up at all, then you can take a look at this troubleshooting article from Seeking Tech. 

1. For the first step, make sure that you properly enable subtitles for the video you are currently watching. In order to do so, you can try taking the following steps: 

  • Open the Disney+ App on your PS5. 
  • Inside, the video streaming application, start playing a video that you want to watch subtitles with. 
  • While the video is playing, press the X button on the controller in order to pause it and bring up an overlay menu. 
  • In the overlay menu, move the cursor down and to the right.  
  • Afterwards, select the Settings option. 

  • You should now see a menu appear at the top that shows Audio and Subtitles. Here, you need to move to the Subtitles tab.  
  • On the Subtitles tab, select the language of the text that you want to appear in the video. 
  • By enabling subtitles on one video, the change should be applied to all the other videos on the Disney Plus PS5 App as well.  

2. If you are sure that you enabled captions and subtitles correctly but they are not showing up, then you can try exiting out of the video and then start playing it again. 

3. You can also try toggling the subtitles for the video on and off.  

4. Of course, you can also try restarting the application as a bug may be preventing the subs from showing.  

In order to do so, press and hold the PS button on the controller. Afterwards, move the cursor over to the Disney+ icon and then press the Options button on the gamepad. In the pop-up window, you then need to choose the Close App option. 

After closing the application, open it again and then try watching the same video to see if a restart fixes the subtitles. 

5. You can try updating the application as well to see if a new update will help with the caption glitches.  

To find out how to do so, you can follow the steps from this tutorial. 

6. If you haven’t done so already, try to watch other videos on Disney Plus to see if you can get subtitles to appear there. 

If the other videos are working correctly with captions, then you can try reporting the problematic video to Disney so that they may fix the subtitles in the future. 

It is important to note that not all videos from Disney Plus supports the same languages when it comes to captions and subtitles. Therefore, you may end up getting subtitles for one video but not the other. 

How to sign out of the Disney Plus PS5 App

By default, you will remain signed into your DIsney Plus account if you are using its official application on the PlayStation 5 or PlayStation 5 Digital Edition. If you need to log out of your account in this app for one reason or another, then you can take a look at this step-by-step article from Seeking Tech to see how you can properly do so. 

1. To start off, you need to head over to the Disney Plus App on your PS5. If you don’t know how to do so, then you can try taking the following steps: 

  • To begin, turn on your game console. 
  • Afterwards, you need to go to the home screen. If you aren’t there already, then you can press the PS button on the DualSense controller to bring up the control center overlay menu. From there, you can select the home icon located at the bottom menu.  
  • Once you get to the home menu, you need to be in the Media tab. If you are in the Games tab instead, then you can simply press R1 on the controller to switch over.  
  • Finally, open the Disney+ App from the Media tab. 

2. After opening the video streaming application, you may see a “Who’s Watching?” screen. Here, you can pick any of the available profiles to continue. 

3. Once the app has loaded to the main menu, press the circle button on the controller to open a menu that appears from the left side. 

4. From this side menu, you need to select Settings.  

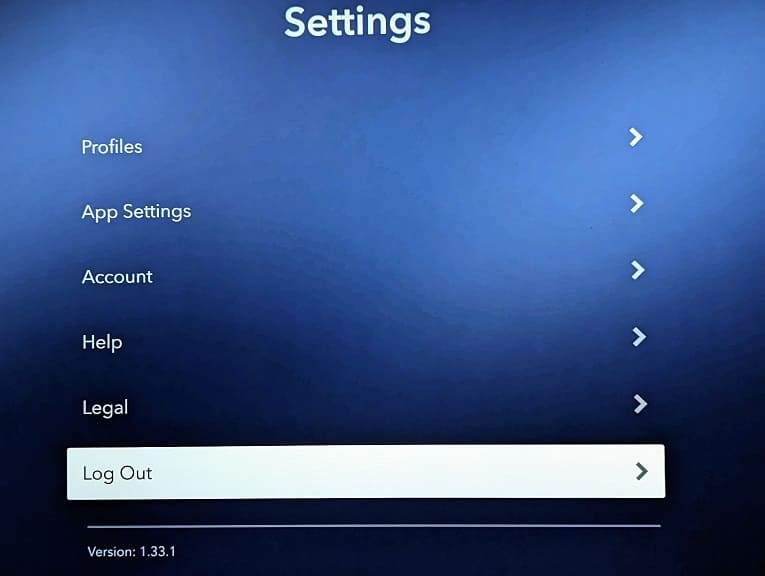
5. Inside of the Settings menu of the Disney Plus PS5 App, you then need to select the Log Out option located at the bottom of the screen. 

6. You should then see the following message: 

  • “Are you sure you want to log out?” 

Here, you need to select the Log Out option in order to sign out of your account. 

Alternate Method 

An alternate way to sign out of your Disney Plus account on your PlayStation 5 or PlayStation 5 Digital Edition is by simply deleting the application. You can do so by taking the following steps: 

1. Go back to the home screen menu of your PS5. 

2. Next, make sure you are in the Media tab. 

3. You then need to move the cursor over to the Disney+ icon.  

4. Afterwards, press the Options button on the controller. This button has the three horizontal lines symbol if you have a hard time finding it.  

5. You should then see a pop-up window menu, where you can select the Delete option. 

6. The following message should appear: 

  • “This item will be deleted from console storage.” 

Here, you need to select the OK option to continue. 

By deleting the app from your PS5, you should be signed out of your Disney Plus account. If you decide to download and install the same application again, you will need to log back in again as a result.

How to download and update the Disney Plus App on PS5

Disney Plus does not come pre-installed on your PlayStation 5 or PlayStation 5 Digital Edition console. Instead, you need to download it first before you are able to use this application.  

To see how you can download, as well as update, Disney+ on the PS5, you can take a look at this step-by-step tutorial.  

How to download Disney Plus on PS5 

In order to manually download Disney Plus on the PS5, you can take the following steps: 

1. For the first step, boot up your console and go to the home screen. If you are in another screen at the moment, then you can press and hold the PS logo button on the controller to go home.  

2. Next, you need to open the product page of the Disney Plus App. 

One of the ways you can do so is by pressing the triangle button while you are on the home screen. By doing so, you can then select the Search icon at the top right corner. You can then search for the Disney Plus App and then select it from the search results page. 

Alternatively, you can press the R1 button while in the home screen to switch over to the Media tab. From there, select the All Apps card. You should then be able to find Disney Plus from the listing.  

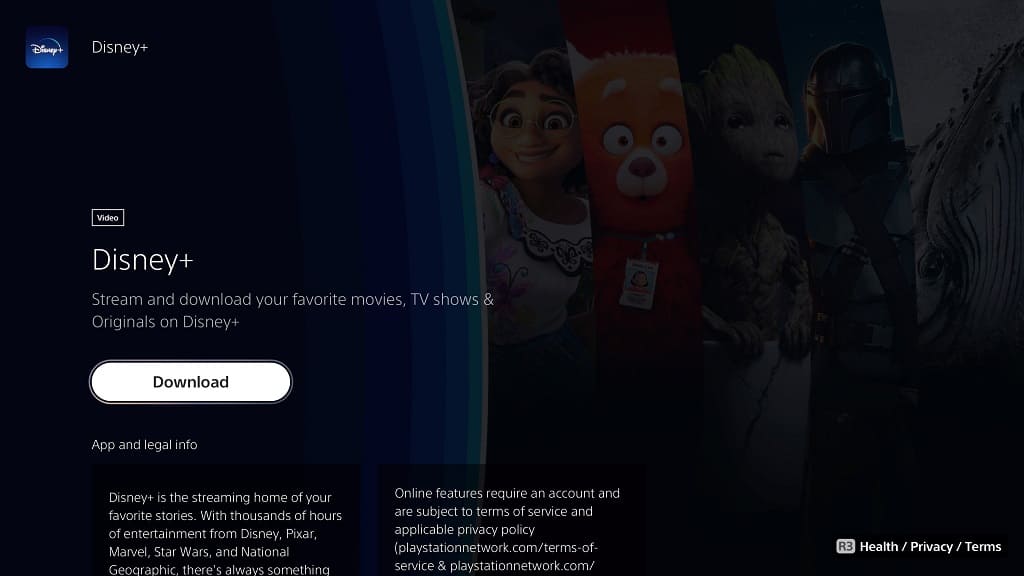
3. On the product page of the Disney+ App, select the Download option. 

4. Once the download has been completed, select the Start option from the same product page screen. 

5. In the future, you should be able to access this video streaming application from the aforementioned Media tab of the home screen menu.  

How to update Disney+ on PS5 

If you want the most stability, best performance and new features for the Disney Plus PS5 App, then you should make sure that it has been updated to the latest software version. 

In order to check to see if there is a new patch to download, you can try doing the following: 

1. Go back to the home screen menu of your PlayStation 5 or PlayStation 5 Digital Edition system. 

2. If you aren’t on the Media tab of the home screen, then you need to press R1 on the controller to switch over. 

3. In the Media tab, move the cursor over to the Disney+ icon. 

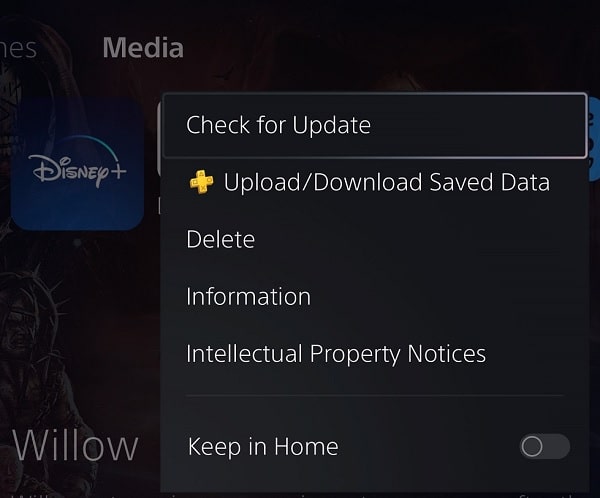
4. With the cursor on the app, press the Options button (which has the three horizontal lines icon on top of it) on the controller. 

5. In the small window menu that pops up, you should then select the Check for Update option.  

How to change audio and subtitle languages in the Disney Plus PS5 App

The Disney Plus App on the PlayStation 5 and PlayStation 5 Digital Edition supports multiple languages for both audio and subtitles. If you have a hard time figuring out how to change these settings for this video streaming application, then you can take a look at this step-by-step tutorial from Seeking Tech.  

1. To start off, you need to open the Disney Plus App if you haven’t done so already. 

You can find it in the home screen menu of your PS5. You may need to press the R1 button to switch from the Games section to the Media section in order to find it.  

If you still don’t see this application, then you may need to download it first, which you can do by selecting the All Apps option from the aforementioned Media section.  

2. Once you opened the application, make sure you are signed into your Disney+ account; otherwise, you won’t be able to stream any videos. 

3. Next, start playing the video that you want to change the audio and/or subtitle language for. 

4. While the video is playing, press the cross (X) button on the controller to pause the action and bring up an overlay menu. 

5. With the current video paused, you can use either use the directional pad or left analog stick to move the cursor down one time to the Play option and then to the right once to where you can then select Settings. 

6. You should then see two tabs on the screen, one for Audio and one for Subtitles. 

To change the audio language, select the Audio tab and then select the language that you want to be outputted. 

In order to change the subtitles language, select the Subtitles tab and then select the language of the text that you want to be displayed. 

7. Once you made the changes, press the X button to play the video so that you can being watching it again from where you left off with the new audio and/or subtitle language.  

If the video remains the same as before, then you can try backing out of the video and then playing it again to see if the changes are applied. You can also try closing the video streaming application and then restarting it again.

How to turn off DualSense while watching videos on your PS5

If you decide to leave your DualSense controller powered on while binge watching videos on your PlayStation 5 or PlayStation 5 Digital Edition system, then the battery of the controller will continue to drain. As a result, you may need to recharge the gamepad before the next time you use it to play games or watch more videos on the PS5.  

To see how you can save battery life while using the media apps on your console, you can take a look at this guide from Seeking Tech. 

How to manually turn off DualSense while watching videos on your PS5 

In order to manually turn off the DualSense controller while watching a video on your PlayStation 5, you need to take the following steps:  

1. To start off, open a media app on your PS5 console and then start playing a video. This guide should be applicable to the following:  

  • My Videos 
  • Spotify 
  • Apple Music  
  • Apple TV 
  • CBS News 
  • Crunchyroll 
  • DAZN 
  • Disney Plus 
  • ESRB 
  • Freevee 
  • Funimation 
  • HBO Max 
  • Hulu 
  • MLB 
  • NBA 
  • Netflix 
  • NHL 
  • NFL Sunday Ticket 
  • Paramount Plus 
  • Peacock Network 
  • Plex 
  • Pluto TV 
  • Prime Video 
  • Red Bull 
  • Redbox 
  • Showtime 
  • Showtime Anytime 
  • Tubi 
  • Twitch 
  • UEFA.tv 
  • UFC 
  • Fandango Vudu 
  • YouTube 
  • YouTube TV 

This guide should also be applicable to when you are watching DVD and Blu-Ray discs if you have the standard PlayStation 5 system.  

2. While watching a video, press the PS button to open the control center. 

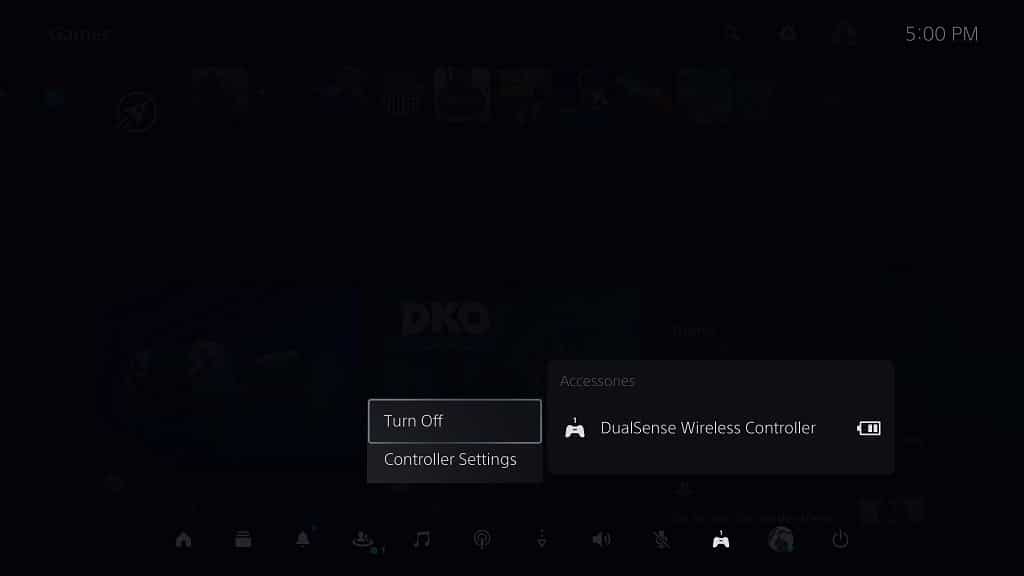
3. From there, select Acessories, which is represented by the controller icon, located at the bottom of the control center. 

4. Next, you need to select DualSense Wireless Controller.  

5. From the small window, you should then select Turn Off. 

How to automatically turn off DualSense while watching videos on your PS5 

If you want your controller to automatically turn itself off, then you need to do the following: 

1. To start off, head over to the Settings menu on your PlayStation 5 or PlayStation 5 console. 

2. From the front page of Settings, you need to select System. 

3. From the System menu, you first need to select Power Saving on the left column. 

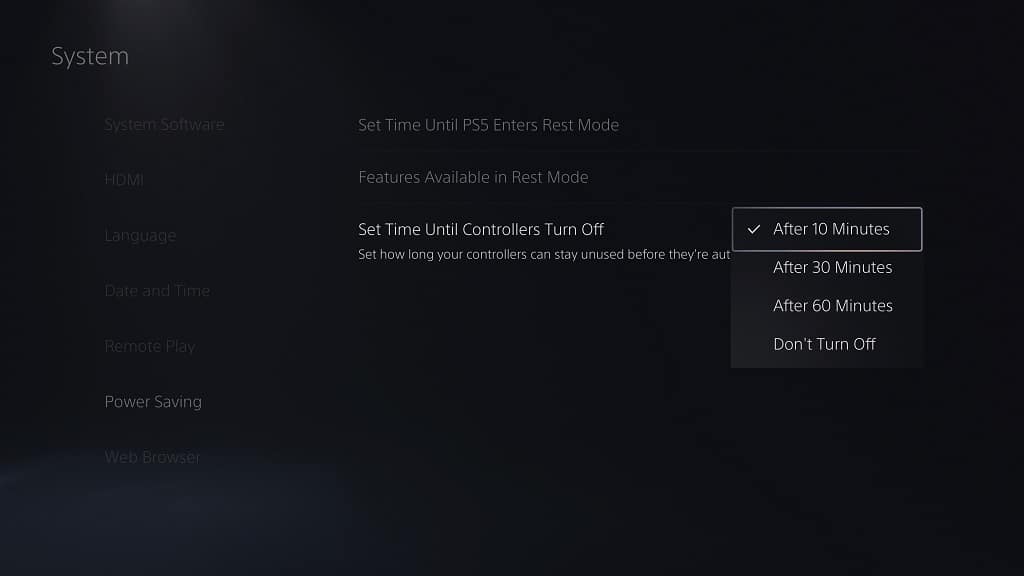
4. You should then select Set Time Until Controllers Turn Off. 

5. In the pop-up window, we recommend setting this feature to After 10 Minutes if you want to save as much battery life as possible for the gamepad. 

The DualSense should then turn itself off once it detects that 10 minutes have passed since there have been any inputs. This should be a very helpful feature if you end up forgetting to manually turn the gamepad off. 

If you need to control the video playback again, you can press the PS button to turn the controller back on.

How to view, sort and pin trophies on the control center menu of PS5

Thanks to recent firmware updates, it is now easier than ever to keep track of your trophy progress on the PlayStation 5 and PlayStation 5 Digital Edition system. To see how you can properly do so for your console, you can follow the steps laid out in this guide from Seeking Tech. 

1. To start off, you should make sure you have the latest system software installed on your PS5.  

You can check to see if there is a new firmware available by heading over to Settings > System > System Software > System Software Update and Settings > Update System Software > Update Using Internet.  

2. Once you are ready, open the game that you want to check out the trophy list for. 

3. After the game has booted up, press the PS button on the DualSense in order to bring up the control center quick menu.  

4. From there, you should be able to see the Trophies activity card.

Select it in order to bring up a small window menu that shows all of the trophies available for the game that you are currently playing. 

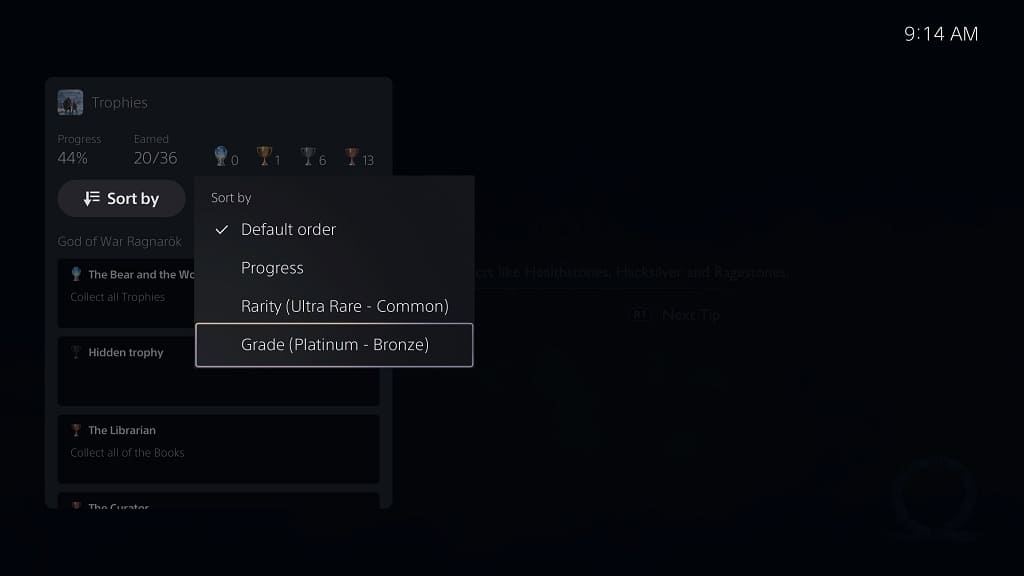
5. If you want to sort the list, then you can select the “Sort by” option located at the top. Afterwards, you will be able to pick between the following options: 

  • Default Order 
  • Progress 
  • Rarity (from Ultra Rare to Common) 
  • Grade (from Platinum to Bronze) 

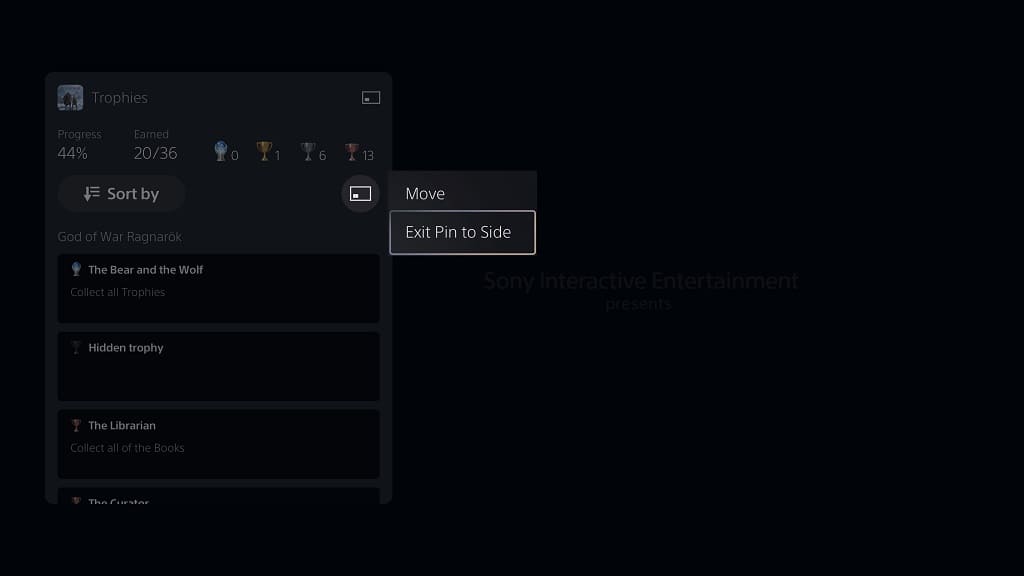
6. You can also select the Pin Side option located on the top right side of the small window. Once you do, you need to pick whether you want the trophy list to stay pinned to the left or right side of the screen while you are playing the game. 

To unpin the trophy list, press the PS button twice in quick succession and then select the Pin option on the top right side again. Afterwards, you can either choose to move the pinned window or remove it completely. 

7. You can also pin individual trophies so that they will appear at the top of the list. 

In order to do so, you need to move the cursor to the trophy that you want to pin. Afterwards, press the square button on your controller. Keep in mind that you can only pin up to five trophies at a time for a game. 

To unpin a specific trophy, move the cursor to it and then press the square button.  

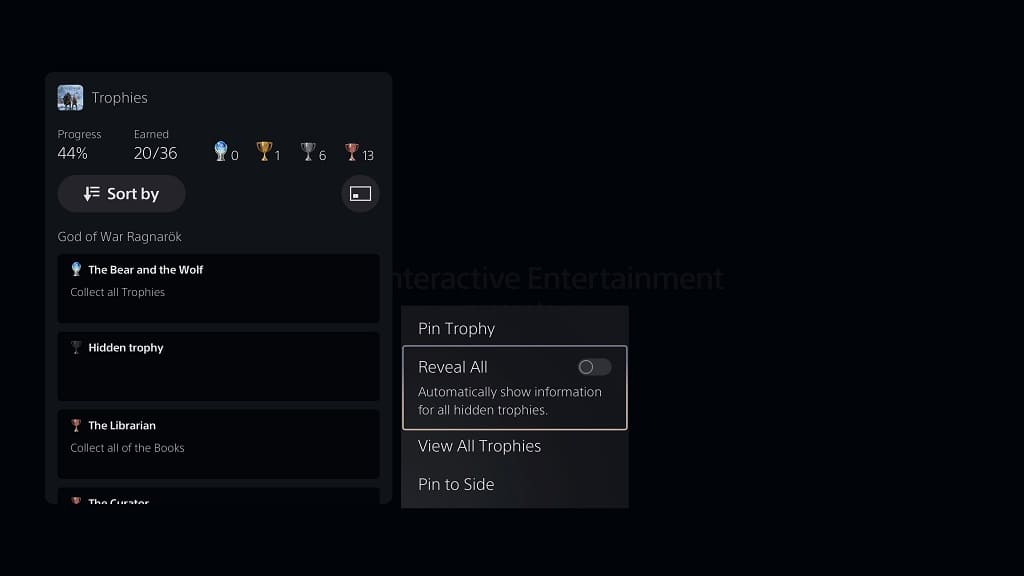
8. To view the full list of trophies, you need to press the Options button when the Trophies menu for the game you are playing is shown on screen. 

In the small window, you can then select the View All Trophies option. 

9. If you are seeing a lot of hidden trophies from the list, then you can move the cursor over one and then press the square button to reveal its details.  

You can also press the Options button and then enable the Reveal All options in order to show all the hidden trophies for the specific game. 

Keep in mind that these may contain spoilers, including those that may involve the story.

What’s the difference between PlayStation Plus monthly, quarterly and yearly payments?

When subscribing to PlayStation Plus Essential, Extra or Premium, you are able to pay on a monthly, quarterly and yearly basis. To see what the differences are between these different payment periods, you can take a look at this comparison article from Seeking Tech.  

Quick Summary 

With PlayStation Plus Essential, PlayStation Plus Extra and PlayStation Plus Premium, you will end up saving a lot more money when paying on a yearly basis as opposed to going with a monthly or quarterly payment schedule.  

So, while you have to pay more upfront, you end up paying a lot less in the long run. With that said, the monthly or quarterly plans may be more suitable if you don’t want to stay subscribed to the Essential, Extra or Premium tier for the entire year.  

PS Plus monthly vs. quarterly vs. yearly payments comparison charts  

You can take a look at our convenient comparison tables for the monthly, quarterly and yearly plans (which is based on the current U.S. standard pricing) below:  

PlayStation Plus Essential:

PlayStation Plus Essential Monthly Payment PlanPlayStation Plus Essential Quarterly Payment PlanPlayStation Plus Essential Yearly Payment Plan
U.S. Pricing$9.99 every month$24.99 every 3 months$59.99 every 12 months
Total costs when subscribed for 1 entire year$119.88$99.96$59.99
Monthly average if paying for 1 entire year$9.99 every month$8.33 every month$5.00 every month

PlayStation Plus Extra:

PlayStation Plus Extra Monthly Payment PlanPlayStation Plus Extra Quarterly Payment PlanPlayStation Plus Extra Yearly Payment Plan
U.S. Pricing$14.99 every month$39.99 every 3 months$99.99 every 12 months
Total costs when subscribed for 1 entire year$179.88$159.96$99.99
Monthly average if paying for 1 entire year$14.99 every month$13.33 every month$8.33 every month

PlayStation Plus Deluxe:

PlayStation Plus Premium Monthly Payment PlanPlayStation Plus Premium Quarterly Payment PlanPlayStation Plus Premium Yearly Payment Plan
U.S. Pricing$17.99 every month$49.99 every 3 months$119.99 every 12 months
Total costs when subscribed for 1 entire year$215.88$199.96$119.99
Monthly average if paying for 1 entire year$17.99 every month$16.66 every month $10.00 every month

PlayStation Plus Essential monthly plan 

If you decide to go with a monthly plan of PlayStation Plus Essential, then you will end up paying $9.99 a month. If you stay subscribed for three months, then this method will cost $29.97 every quarter. For the entire year, the monthly payment plan for Essential will accumulate to $119.88. 

PlayStation Plus Essential quarterly plan 

If you go with a quarterly plan instead, then you have to pay $24.99 every three months. When compared to monthly payments, you will pay $4.98 less.  

If you stretch this out to an entire year then you will end up paying $99.96, which is $19.92 less than the monthly payment plan.  

PlayStation Plus Essential yearly plan 

If you decide to pay for an entire year from the get go, then the standard price is $59.99, which is $59.89 less than the monthly plan as well as $39.97 less than the quarterly payment plan.  

PlayStation Plus Extra monthly plan 

If you subscribed to the monthly plan for the PS Plus Extra tier, then you need to pay $14.99, which converts over to $44.97 over a quarterly basis and $179.88 on a yearly basis.  

PlayStation Plus Extra quarterly plan 

If you decided to go with a quarterly payment schedule for Extra instead, then you will have to pay $39.99, which is $4.98 less than the monthly payment plan over the same length of time.  

If you extend the quarterly plan over the entire year, then you need to pay $159.96, which is $19.92 less as opposed to paying monthly. 

PlayStation Plus Extra yearly plan 

For the yearly plan of Extra, you need to pay $99.99, which is $79.89 less than the monthly plan in addition to $59.97 less than the quarterly payment schedule.  

PlayStation Plus Premium monthly plan 

If you want to get the highest PlayStation Plus tier in Premium, then you need to pay $17.99 monthly. If you decide to do so, then this amount will accumulate to $53.97 quarterly and a whopping $215.88 yearly.  

PlayStation Plus Premium quarterly plan 

If you go with a quarterly plan instead for PS Plus Premium, then you need to pay $49.99 every three months. When expanded to over a year, you will end up paying $199.96. 

This will save you $3.98 every three months or $15.92 every year when compared to the monthly plan. 

PlayStation Plus Premium yearly plan 

If you buy an entire year of the Premium tier, then you need to pay $119.99 upfront. This will save you $95.89 over the monthly plan as well as $79.97 over the quarterly plan.

How to fix Lego Star Wars: The Skywalker Saga frame rate issues on Xbox Series X and S

You may notice some slowdowns and stutters when playing the Xbox Series X or Xbox Series S version of Lego Star Wars: The Skywalker Saga. To see how you can make this action game run smoother, you can follow the steps laid out in this article from Seeking Tech. 

1. For the first step, we recommend playing Lego Star Wars: The Skywalker Saga in performance mode. In order to do so, you need to take the following steps: 

  • While playing the game, press the Menu button on your Xbox controller. 
  • In the Paused screen, you need to select Options from the bottom menu.  
  • From the next menu, you should then select Video Options.  
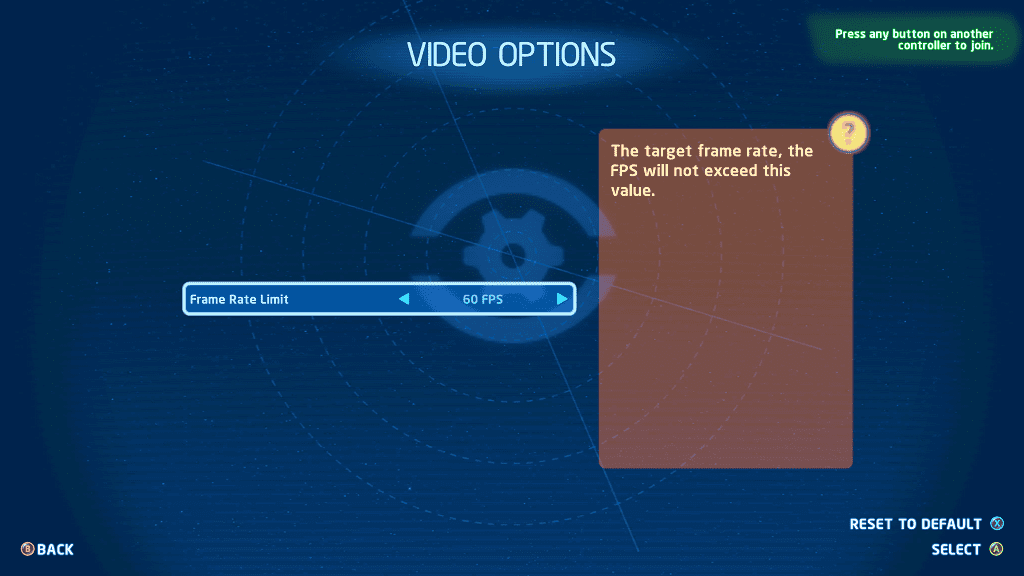
  • After getting to the Video Options menu, make sure the Frame Rate Limit setting is set to 60 FPS. 

By doing so, you should get a much smoother experience as opposed to playing the same game at 30 frames per second.  

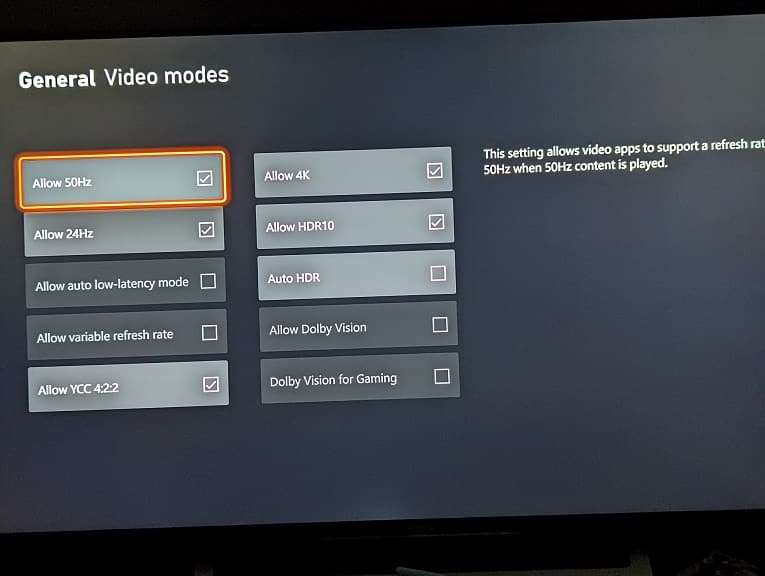
2. If your television set or gaming monitor support Variable Refresh Rate, then we recommend that you enable it from the screen’s menus as well.  

On your Series X or Series S, you should then head over to Settings > General > TV & display options > Video modes.

Afterwards, make sure that the box next to “Allow variable refresh rate” is checked in order to turn on VRR support on your console.  

3. If you have you game suspended in Quick Resume, then it may be causing issues with the frame rate.  

In this case, we recommend quitting the game, which you can do by first pressing the Xbox logo button to bring up the guide menu. From there, move the cursor over to Lego Star Wars: The Skywalker Saga and then press the Menu button. Finally, select Quit from the pop-up window to close the game before trying to open it again.  

4. If you have been putting your console to sleep instead of shutting it down completely, then that may also cause issues with its performance. To fix this particular problem, we recommend restarting the Series X or Series S.  

5. If the storage of where you have Lego Star Wars installed on is too full, then it may lead an unstable frame rate. 

For optimal performance, the internal solid state drive of your Xbox Series X or Xbox Series S should be filled up by no more than 90% of its capacity. Keep in mind that the Series X comes with a 1 TB internal SSD while the Series S only includes a 512 GB SSD. 

In order to check, go to the Settings menu of your console and then select System > Storage devices. You will be able to see how much the internal solid state drive has been filled up from the Manage – Storage devices menu.  

If it is over 90%, then you can use this same menu to clear some space to see if you can end up getting a smoother frame rate when playing Lego Star Wars: The Skywalker Saga.