What to do if the Disney Plus PS5 App can’t be opened

When trying to open the official Disney Plus streaming application on your PlayStation 5 or PlayStation 5 Digital Edition console, you may notice that it doesn’t get past the initial splash screen. To see how you can potentially get this app to open properly, you can take a look at this troubleshooting guide from Seeking Tech.

1. When we saw that the Disney+ logo stuck on the screen after trying to open the video streaming application, it was due to an Internet connection issue we have on our network.
So, for the first step, make sure that your home network is online. Furthermore, you should also make sure that your PS5 is connected to the Internet.

You can also try power cycling your modem and router by turning off both devices, waiting for at least two minutes and then turning them back on again.

2. Moreover, you may have to restart the app to get past the splash screen.

In order to do so, you first need to long press the PS button on the controller in order to get to the home screen of your PlayStation 5. From there, you then need to move the cursor over to the Disney+ logo. Afterwards, press the Options menu to open the pop-up window, which is where you can select the Close App option.
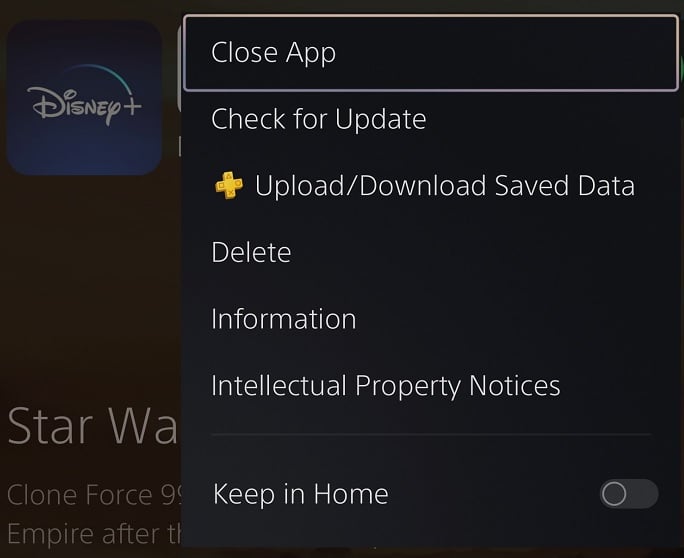
Once the app has completely close, try to open it again to see if it can launch normally this time.

3. Restarting your PS5 may also help as doing so will close the streaming application as well as refresh the connection from your home network to the console as well as from the console to the Disney+ servers.

To restart your system, quick press the PS button to Control Center. From there, select the Power option located on the right side of the bottom-side menu and then the Restart PS5 option.

4. Updating the application may also help as the new version may contain a fix for the hang-ups.

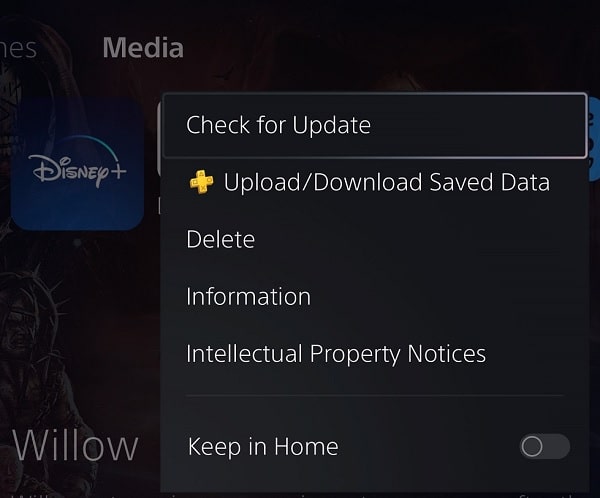
To update, move the cursor over to the Disney+ icon again and then select Check for Update. If there is a new version available, then make sure you have it downloaded and installed before you try to open the application.
How to enable Dolby Atmos in the Disney Plus PS5 App

Thanks to a recent update, the Disney Plus App on the PlayStation 5 and PlayStation 5 Digital Edition now supports Dolby Atmos. To see how you can take advantage of this audio format, you can follow the steps laid out in this article from Seeking Tech.

1. To start off, make sure that you have a Dolby Atmos listening device connected to your game console. Furthermore, you should also make sure that it is set up correctly.

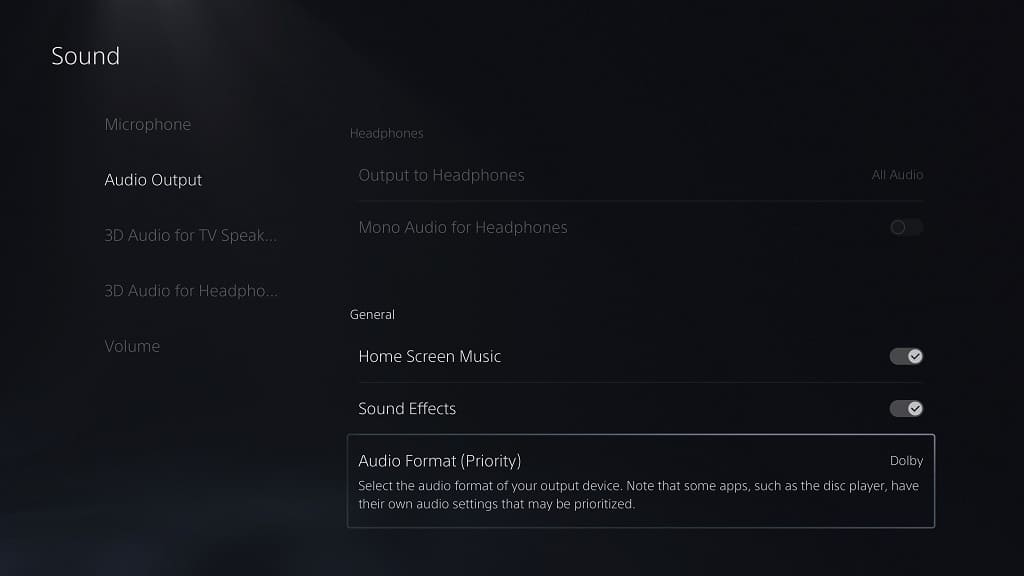
In order to check, you need to go to the home menu of your PS5, which you can do by pressing and holding the PS button on your controller. From there, go to Settings by selecting the gear icon located on the top right side of the screen. In Settings, select Sound and then Audio Output.

In the Audio Output menu, you will be able to change and adjust the sound output of your PlayStation 5. Depending on how the sound output device is connected to the console, you may need to change the Audio Format (Priority) setting in order to get Dolby Atmos.

2. Next, you need to make sure that you have the latest version of the Disney Plus App installed on your PS5.

In order to do so, you need to take the following steps:

  • Turn on your game console and make sure it is connected to the Internet.
  • In the home screen, switch over to the Media tab by pressing the R1 button.
  • From the Media tab, move the cursor over to the Disney+ App icon and then press the Options button.
  • Finally, select the Check for Update option in the pop-up menu for the streaming application.
  • With the newest version installed, you should be able to start using Dolby Atmos.

3. Of course, not all of the videos streaming on Disney Plus support this audio format. In order to find a movie or series that take advantage of Dolby Atmos, you need to do the following:

  • Open the Disney Plus App on your PS5.
  • Next, you need to select a video that you are interested in watching. Do not select a movie or episode from the Continue Watching section as this will load you starting into the video. Instead, you need to select it from a different section so that you will get to the product page instead.
  • On the video’s product page, move the cursor down once and then to the right until you can select Details.
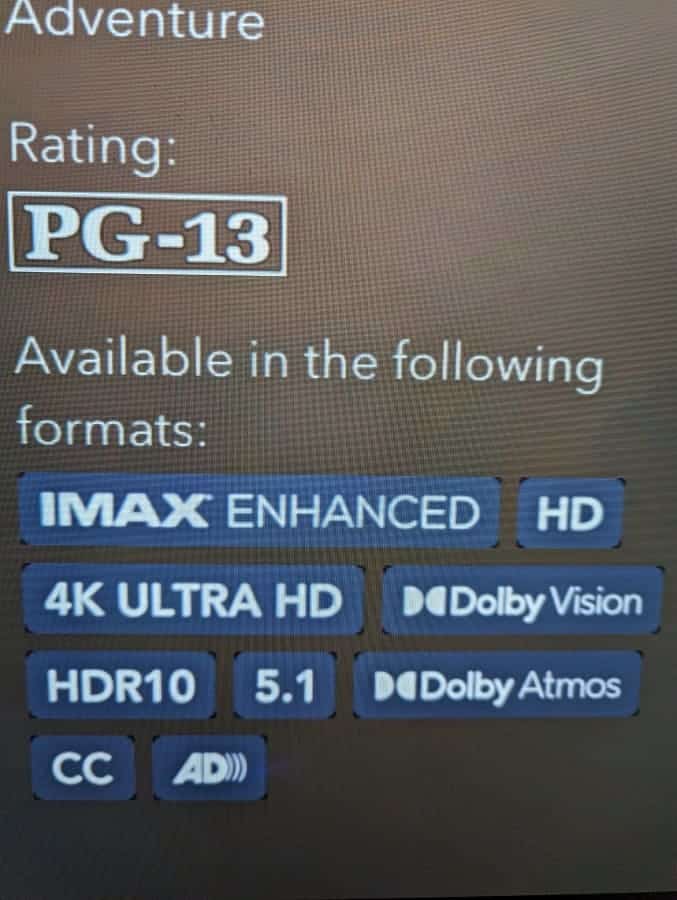
  • In the Details page, you can see a list of supported audio and video formats. If the movie or series supports Dolby Atmos, then you should find it listed in the “Available in the following formats” section on the lower right corner of the screen.
  • To watch the video, press the circle button to return on its product page. From there, you can simply select the Play option in order to open the stream.

What to do if the Disney Plus PS5 App is stuck on loading screen

When trying to watch videos using the official Disney Plus streaming application on your PlayStation 5 or PlayStation 5 Digital Edition console, you may notice that it may stay be stuck on a loading screen with an animated circle.

You can take a look at this troubleshooting guide at Seeking Tech to see how you can get this app to load normally.

1. For the first step, you can try restarting the Disney Plus App.

In order to do so, you need to go back to the home screen of your PS5, you can do so by long pressing the PS button on the controller. From there, you need to move the cursor in order to highlight the Disney Plus icon. Next, you need to press the Options button and then select the Close App option in order to exit out of the streaming application.

Once the application has been successfully closed, you can try opening it again to see if the infinite loading screen has gone away.

2. Restarting your PS5 may also help as this action will close the Disney application, refresh the console’s internet connection and clear up any potential bugs or conflicts that may have been causing the app to not load properly.

3. You should also make sure that you have a stable internet speed.

Disney Plus has a minimum download speed requirement of 5.0 Mbps. For 4K streaming, you will need at least 25.0 Mbps.

If possible, try to pause or cancel downloads and any other streams you have running concurrently. By doing so, you should able to free up bandwidth that may help fix the stuck loading screens in the Disney Plus PS5 App.

4. A new version of the application may resolve this particular issue.

To see if there is a patch to download and install, press the Options button while the Disney+ icon is highlighted on the home screen of your PS5. From there, you need to select Check for Update to get the console to check if there is a new version to download.

5. A fresh installation may help as well.

To do so, you need to press the Options button while the cursor is on the app’s icon on the PS5 home screen. Afterwards, select Delete.

Once the application has been deleted, you can download and install it again from the PlayStation Store.

How to fix Disney Plus PS5 App Error Code 42

When watching a video by using the official Disney Plus streaming application on your PlayStation 5 or PlayStation 5 Digital Edition console, you may see the following error message:

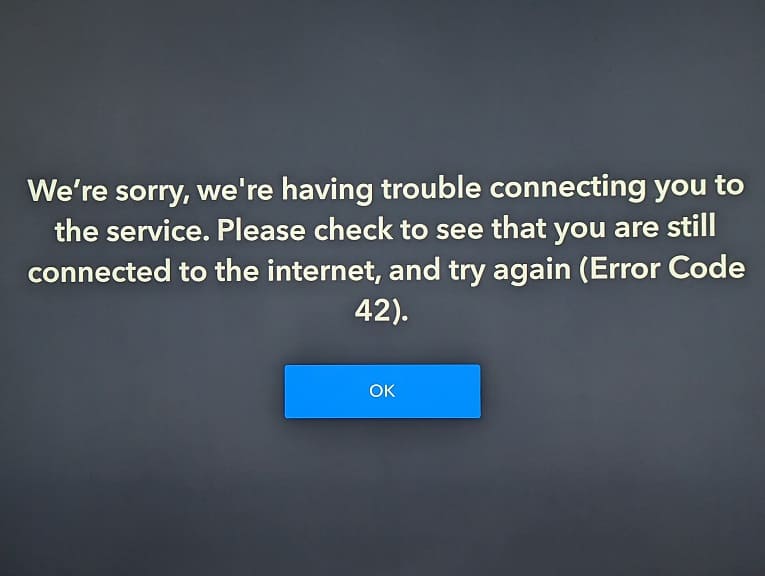
  • “We’re sorry, we’re having trouble connecting you to the service. Please check to see that you are still connected to the internet, and try again (Error Code 42).”

To see how you can potentially fix this problem, you can take a look at this troubleshooting article from Seeking Tech.

1. The Error Code 42 popped up when we left the video we were watching paused while we needed to do something else for a couple of minutes.

In our case, we select the OK option to exit the error message and then re-select the same video. By doing so, the video was able to play without any issues.

2. If you are still getting the same error after re-trying, then you can try restarting the application.

In order to do so, you need to press and hold the PS button on the controller to bring up the home screen of your PlayStation 5. From there, move the cursor over to the Disney+ app icon and then press the Options button on the controller. Finally, select Close App from the pop-up window.

After closing the Disney Plus PS5 App, you can try opening it again.

3. You can also try restarting your game console as doing so will close the application as well as refresh your internet connection.

4. If you are downloading and/or streaming at the same time you are watching a video on Disney Plus, then you may not have enough bandwidth.

In this case, you can try pausing or cancelling other downloads and streams to see if the Error Code 42 message goes away.

4. You may also want to consider power cycling your internet connection.

To do so, turn off your PS5 and then shut down/unplug the modems and routers from your home network. After waiting for at least two minutes, turn the modems and routers back on again.

Once your home network is back online, you can turn on your game console and then open the Disney Plus App.

5. There is a possibility that the issues may be related to the Disney Plus servers. In this case, there is nothing you can do aside from waiting until the servers are fixed before watching a video.

How to exit Disney Plus App on PS5

The PlayStation 5 and PlayStation 5 Digital Edition console is a multimedia machine as you can use it to stream videos, using apps such as Disney Plus, as well as play videogames. When using the Disney streaming application, you may notice that there isn’t an easy to exit out of it to go back to the operating system of the PS5.

To see how you can exit out of the Disney Plus PS5 App, you can take a look at this tutorial at Seeking Tech.

Method #1

If you want to keep using your gaming system after exiting out of the Disney App, then the fastest way to do so is to press and hold the PS button on the DualSense controller. After around 1 second, you should be bought back to the home screen of your console.

Method #2

For the second method, you can quick press the PS button on the game pad to bring up the Control Center menu. From there, select the home icon to go back to the home screen of the PS5’s OS.

For the first two methods, the Disney App will remain suspended until you open it again. Therefore, you will be able to return to the same screen where you left off.

If you want to close the video application completely, then you need to do the following:

  • Move the cursor over to the Disney+ icon in the Media section of the home screen.
  • With the icon for the streaming application highlighted, press the Options button on the controller.
  • Finally, select the Close App option in the pop-up menu for the Disney Plus App.

Method #3

You can also exit out of this streaming application by restarting your console.

In order to do so, quick press the PS button to open the Control Center menu. From there, select the Power option from the bottom menu. In the pop-up window, you then need to select the Restart PS5 option.

Method #4

You can also simply turn off your PS5 and then turn it back on again.

To shut down your console, open the aforementioned Control Center menu by quick pressing the PS button. Next, you need to select the Power option at the bottom right side. In the pop-up menu, select Turn Off PS5.

Once your console has turned off, you can turn it back on again.

What to do if there is no surround sound playback in the Disney Plus PS5 App

The Disney Plus streaming application supports surround sound playback on the PlayStation 5 and PlayStation 5 Digital Edition consoles. If this feature does not appear to be working, then you can check out this article from Seeking Tech.

1. Before we start with the troubleshooting, it is very important to note that the Disney+ PS5 App is only able to output 5.1 surround sound.

7.1 surround sound is not supported.

2. For the first step, we recommend making sure you have your surround sound speakers set up properly on your PlayStation 5 console. You can do so by taking the following steps:

  • Press and hold the PS button to open the home menu of your console.
  • Select the gear icon located on the upper right corner of the home menu to head into Settings.
  • In Settings, scroll down and then select Sound from the list.
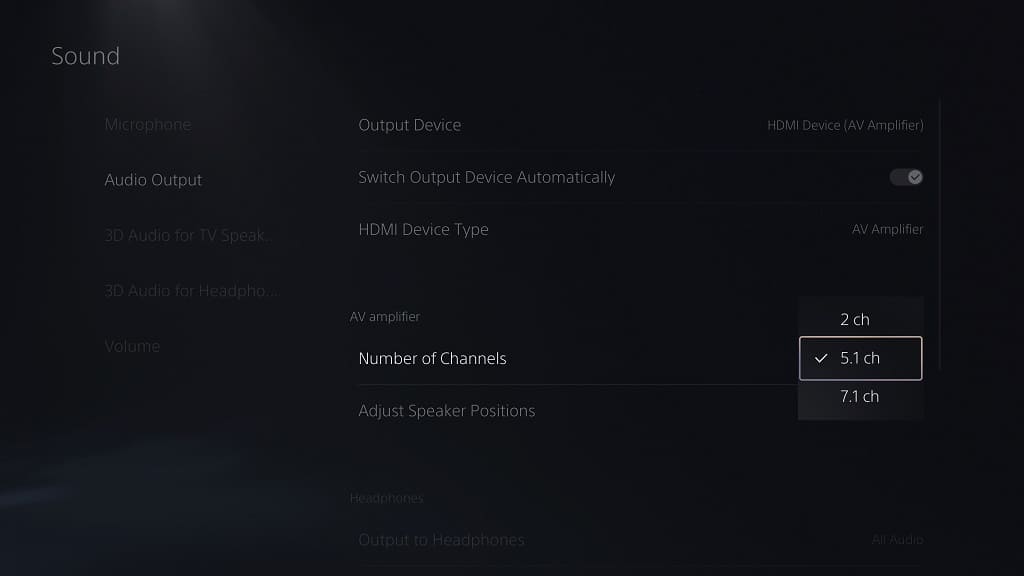
  • You should then select Audio Output from the Sound menu.
  • On the right side of the same screen, you may need to use the Output Device, HDMI Device Type, Number of Channels, Adjust Speaker Positions and/or Audio Format (Priority) Settings depending on your surround sound setup.

3. If you are sure that you have surround sound set up correctly, then you should make sure that the DIsney Plus video you are trying to watch actually supports that particular format.

To see how you can identify which movie or series utilizes 5.1 surround sound output, we recommend follow these steps.

4. You can also try exiting out of the video and then start to play it again as it may be helpful, especially if you made any changes to the sound output settings with the video playing or paused.

In order to do so, press the circle button on the controller to go back to the previous screen. You can then select the same video again to play it.

5. Closing and then re-opening the video streaming application may also help as well.

To do so, you need to take the following steps:

  • Press and hold the PS button to move to the home screen of your PS5.
  • From there, move the cursor over to the Disney+ icon.
  • With the icon highlighted, press the Options button on the controller. This button has the three horizontal lines on top.
  • In the pop-up menu, you need to select Close App.
  • Once the streaming application has closed, open it again and then try to play the same video to see if you are able to get surround sound output.

What to do if you can’t watch Disney Plus videos in HDR on PS5

You are able to watch Disney Plus videos in HDR format on your PlayStation 5 and PlayStation 5 Digital Edition console. If you aren’t getting HDR, then you can take a look at this troubleshooting article from Seeking Tech.

1. To start off, it should be noted that the Disney Plus PS5 App supports HDR10 but not Dolby Vision. This applies to all games and applications on the game console.

So, if you are able to change the HDR format of your monitor or television set, then make sure you switch it over to HDR10.

2. Next, you should make sure that you have HDR enabled on your PlayStation 5.

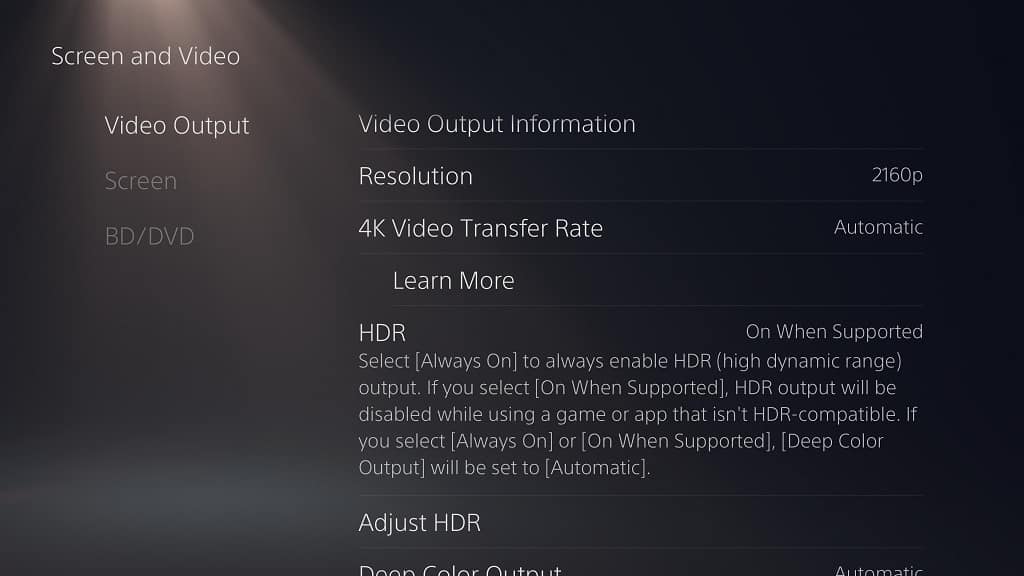
In order to do so, you need to head over to the Settings menu of the console and then select Screen and Video > Video Output. From there, make sure that the HDR setting is set to either Always On or On When Supported.

3. On the Disney Plus App, you should also make sure that the video you are watching actually supports HDR.

In order to do so, you need to take the following steps:

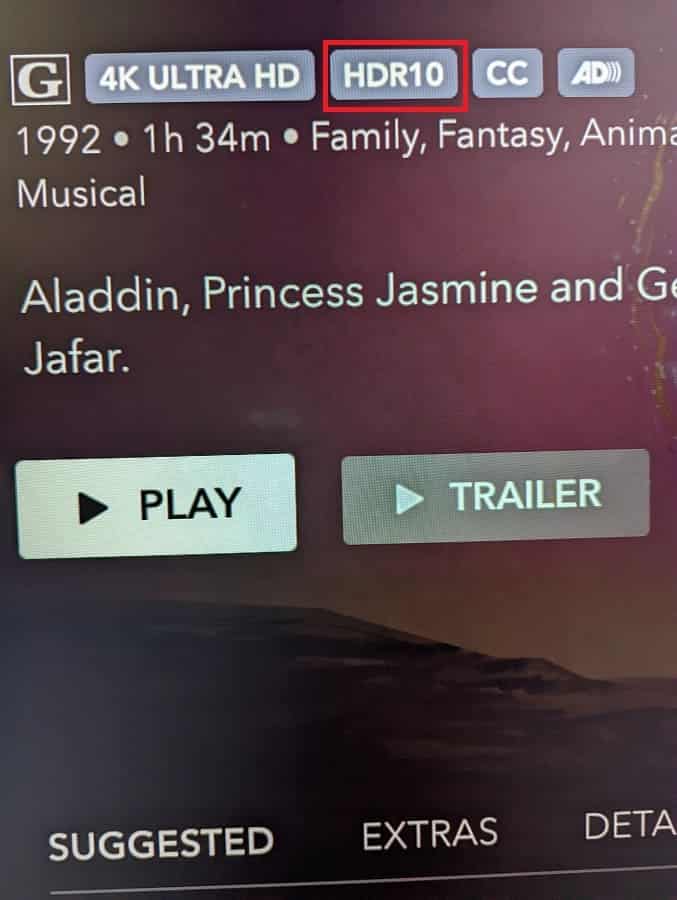
  • Select the video in the Disney Plus PS5 application. Make sure you don’t select it from the Continue Watching section as you will be sent directly to the video instead of the product page.
  • If you see HDR10, then it indicates that the video is able to play in that format on the PlayStation 5.

To see how you can find the full list of HDR movies and series on this service, you can check out this guide.

4. If you made any adjustments to HDR on your game console or screen, then you can try exiting the Disney Plus video and then opening it again to see if doing so is able to enable HDR10.

5. You can also try restarting the video streaming application by doing the following:

  • Press and hold the PS button to open the home screen of your PlayStation 5.
  • If you aren’t in the Media tab of the home screen, then you need to press R1 to get there.
  • From the Media section, move the cursor over to the Disney+ icon and then press the Options button on your controller.
  • If done correctly, a pop-up window will show up. You need to select the Close App option from there.
  • Once the Disney Plus App has closed, open it again and try playing the same video to see if you are able to get it to display in HDR10.

How to customize Disney Plus PS5 App subtitle styles  

If you don’t like the default look of subtitles in the Disney Plus application on your PlayStation 5 or PlayStation 5 Digital Edition console, then you can check out this guide at Seeking Tech to see how you can customize the look of the texts.  

1. You aren’t able to change how the subtitles look from within the Disney Plus PS5 App. Instead, you need to use the system menus of your game console.  

So, to start off, you need to return to the home screen menu of your PlayStation 5. To get there, you can press and hold the PS button on the controller.

2. After you get to the home screen, move the cursor to the upper right corner of the screen and then select the gear icon. 

3. If done correctly, you should now be in the Settings menu of your PS5. Here, you need to select Accessibility. 

4. From the Accessibility menu, you first need to select Closed Captions on the left column.  

5. On the right side of the same screen, make sure that the Display Closed Captions setting is enabled and then select Closed Caption Settings.  

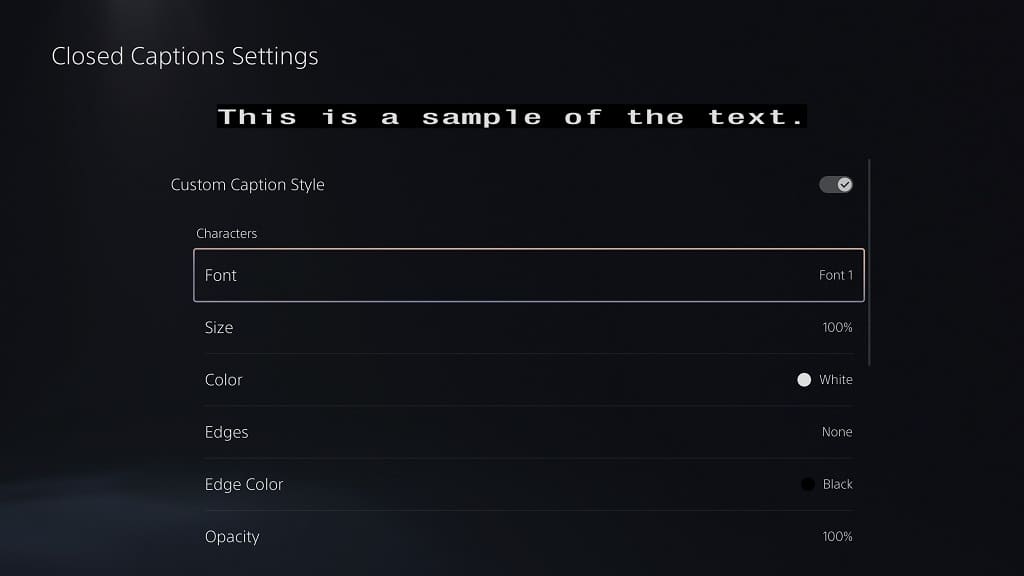
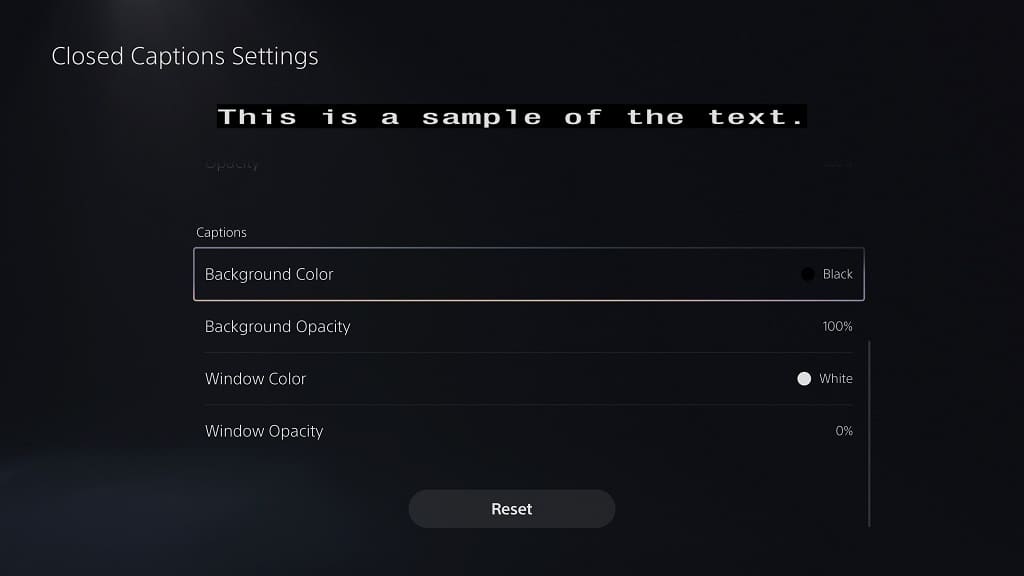
6. You should now be in the Closed Captions Settings menu.  

At the top of the screen, you should see a sample of the current subtitle style that will be shown when watching Disney Plus videos on your PlayStation 5. Any changes you make will be reflected in the sample as well. 

7. To start off, make sure that you enable the Custom Caption Style setting. 

8. Afterwards, you will be able to change the following Character settings: 

Font:  

  • Font 1  
  • Font 2 
  • Font 3 
  • Font 4 
  • Font 5 
  • Font 6 
  • Font 7 

Size: 

  • 50% 
  • 100% 
  • 200% 

Color: 

  • White 
  • Black 
  • Red 
  • Green  
  • Blue 
  • Yellow  
  • Magenta 
  • Cyan 

Edges:  

  • None 
  • Raised 
  • Depressed 
  • Uniform 
  • Drop Shadowed 

Edge Color:  

  • White 
  • Black 
  • Red 
  • Green  
  • Blue 
  • Yellow  
  • Magenta 
  • Cyan 

Opacity: 

  • 25% 
  • 50% 
  • 75% 
  • 100% 

9. You can also change the following Captions settings: 

Background Color: 

  • White 
  • Black 
  • Red 
  • Green  
  • Blue 
  • Yellow  
  • Magenta 
  • Cyan 

Background Opacity:  

  • 0% 
  • 25% 
  • 50% 
  • 75% 
  • 100% 

Window Color: 

  • White 
  • Black 
  • Red 
  • Green  
  • Blue 
  • Yellow  
  • Magenta 
  • Cyan 

Window Opacity: 

  • 0% 
  • 25% 
  • 50% 
  • 75% 
  • 100% 

10. After you are done making the changes, open the Disney Plus PS5 App again and then play a video.  

If the subtitles still look the same, then you need to back out the video and then play it again in order to get the new style to show up.

How to find Disney Plus surround sound movies and series on PS5

You will be able to watch videos from the Disney Plus PS5 App with surround sound. Not all movies or shows will support this sound output format, however.  

To find out how you can see which Disney+ video is compatible with surround sound on your PlayStation 5 or PlayStation 5 Digital Edition console, you can take a look at this article.  

1. For the first step, you should make sure you have surround sound set up correctly on your PlayStation 5.  

In order to do so, head over to the Settings menu of your game console and then select Sound > Audio Output. From the Audio Output menu, make sure you change the output device to your surround sound speakers by using the Output Device option.  

Depending on how the surround sound speakers are connected to your PS5, you may have to play around with the Output Device and HDMI Device Type settings to see if are able to get your speakers to output audio coming from the game console. 

In the AV Amplifier section of the same Audio Output menu, you can also change the number of channels and adjust the speaker positions. Keep in mind, however, that the Disney Plus App on the PlayStation currently only supports 5.1 surround sound.  

2. Once you have everything set up on the system-level, you next need to open the Disney Plus App.  

3. Inside of the streaming application, select a video that you want to watch. Do not pick any videos in the Continue Watching section as doing so will send you straight into the video instead of its product page. 

4. Once you get to the product page, scroll down to move the cursor to Suggested.  

5. Next, you need to move the cursor to the right in the same row and then select Details. 

6. In the Details screen of the movie or series you selected, you should see the “Available in the following formats” section located on the bottom right side of the screen.  

7. If the video supports 5.1 surround sound, then you should see “5.1” listed in this section. 

8. To play the video, move upwards and then select Play. 

You should now be able to watch the movie or series with 5.1 surround sound output enabled.

How to fix Disney Plus PS5 App error code 36

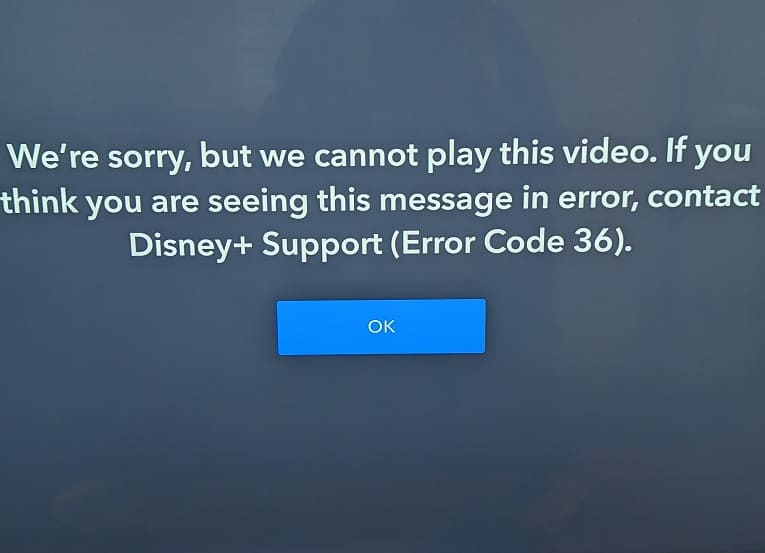
When using the Disney Plus application on your PlayStation 5 or PlayStation 5 Digital Edition console, you may run into the following error screen: 

  • “We’re sorry, but we cannot play this video. If you think you are seeing this message in error, contact Disney+ Support (Error Code 36).” 

To see how you can potentially fix this problem with the video streaming application, you can take a look at this troubleshooting article from Seeking Tech. 

1. Based on our experience, this is a temporary bug that can be fixed by simply restarting the video. 

If you are still viewing the Error Code 36 screen, then you need to select OK to go back to the home menu of the Disney Plus PS5 App.  

From there, select same video again in the Continue Watching section. 

2. If you are still getting the same error, then you can try restarting the application.  

To do so, press and hold the PS button on your controller to bring up the home menu of your PlayStation 5. From there, move the cursor to the Disney+ icon and then press the Options button on the controller to bring up the small window menu where you can then select Close App.  

Once the application has closed, open it again and then try playing the same video. 

3. It is a good idea to keep this streaming app updated as well since a new software version may improve its stability.  

To update manually, move the cursor to the Disney+ icon on the home screen of your PS5 and then press the Options button. Afterwards, select Check for Update in the small pop-up window. 

4. You can also try logging out and then logging back into your Disney+ account on the game console. To find out how to do so, you can follow the steps from this link.  

5. Restarting the console may help with this error code, especially if you have been putting it in rest mode instead of shutting it down completely. 

6. Creating a fresh install of the Disney Plus App on your PlayStation 5 may be helpful as well. 

In order to do so, you need to do the following: 

  • Delete the application first by pressing the Options button with the cursor over the Disney+ icon in the home screen.  
  • You then need to select the delete option in the pop-up menu.  
  • Once the application has been removed, you need to download and install it again from the PlayStation Store. 

6. You can also try clearing the cache of your PS5 by doing the following:  

  • Start by turning off your console completely.  
  • Afterwards, hold the power button on the console until you hear a second beep in order to boot it into Safe Mode.  
  • Next, you need to follow the instructions on screen to connect your controller.  
  • From the Safe Mode menu, you then need to select Clear Cache and Rebuild Database > Clear System Software Cache. 

If you are still getting the Error Code 36, then we recommend contacting the supporting team at Disney Plus in order to get additional help.