Recommended QN85B, QN90B and QN95B settings for PS5

The QN85B, QN90B and QN95B are Samsung’s 2022 4K Neo QLED TV models. You can check out this guide to find the recommended television settings you should be using in order to optimize your experience when playing games on the PlayStation 5 and PlayStation 5 Digital Edition consoles.

PS5 features supported by the QN85B, QN90B and QN95B

The QN85B, QN90B and QN95B all feature 120 Hz screen as you will be able to play games at up to 120 frames per second in 4K. These television sets also support HDR10, which is used by HDR-enabled games on the PS5, as well as Variable Refresh Rate.

How to optimize your TV for PS5

To optimize your QN85B, QN90B or QN95B for the PlayStation 5 and PlayStation 5 Digital Edition, we recommend taking the following steps:

1. To begin, connect your console to the Samsung Neo QLED if you haven’t done so already.

Make sure you are using the HDMI cable that comes with your PS5 or PS5 Digital Edition as it is version 2.1. Since all four of the HDMI ports of your QN85B, QN90B or QN95B are also 2.1, then you can use any one of them for the video connection.

2. Next, you need to make sure that the HDMI port that is connected to your console is using Input Signal Plus.

In order to check, use your Samsung TV remote and then select Menu > Settings > All Settings > Connection > External Device Manager > Input Signal Plus. If it is disabled, then you need to turn this setting on.

3. Afterwards, you should see if Game Mode has been enabled for your Neo QLED.

In order to do so, go to Menu > Settings > All Settings > Connection > Game Mode Settings > Game Mode. You then need to make sure that the Game Mode setting is set to Auto.

With Game Mode enabled, the Variable Refresh Rate feature of your television should automatically be turned on as well.

4. You should now be done setting up your QN85B, QN90B or QN95B for the PlayStation 5.

With that said, you may want to take a look at the Game Mode Settings if you need to make additional adjustments in the future on a game-by-game basis.

In order to get there, you need to head over to Menu > Settings > All Settings > Connection > Game Mode Settings. From there, you will have the following options:

  • Surround Sound
  • Game Motion Plus Settings (Game Motion Plus, Blur Reduction, Judder Reduction, LED Clear Motion and Clear Motion)
  • Game HDR
  • HDR Tone Mapping (HDR10+ Gaming and Game HDR)

For now, we recommend leaving the Game Motion Plus Settings and HDR Tone Mapping alone as these may cause your PS5 games to look weird in motion or look off when it comes to the color display. Of course, you can come back and change any of these settings later on.

5. With your QN85B, QN90B or QN95B now optimized, the next step you should take is to turn on your PS5 console and then go to its Setting menu. From there, head over to Screen and Video > Video Output.

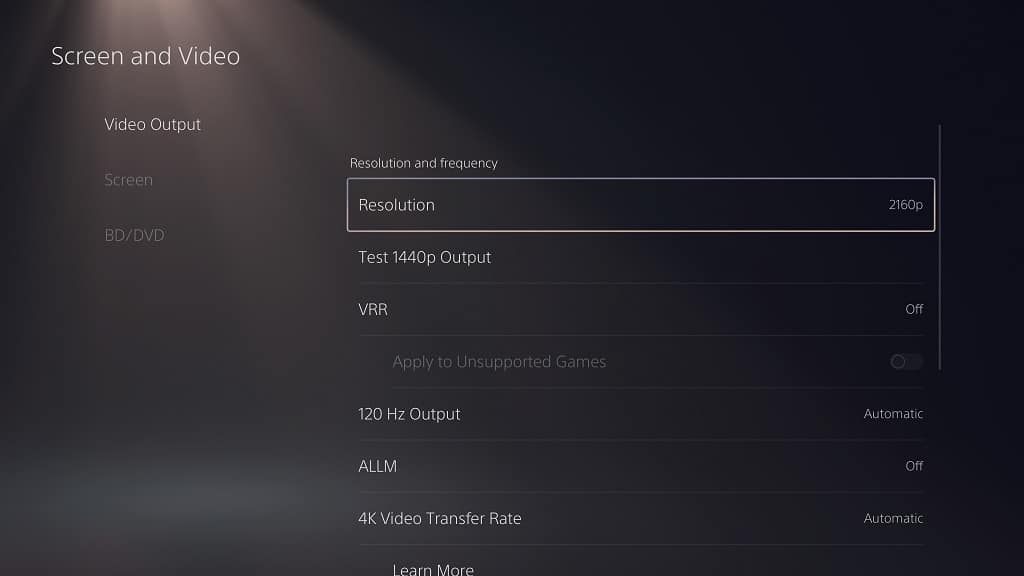
Afterwards, make sure that the Resolution is set to 2160p and HDR is set to On When Supported. The VRR, 120 Hz, ALLM, 4K Transfer Rate, Deep Color Output and RGB Range settings should all be set to Automatic as well.

6. One last step you need to take is to calibrate your PlayStation 5’s console HDR brightness output. In order to do so, select the Adjust HDR option from the Settings > Screen and Video > Video Output menu on your gaming system.

Afterwards, you need to follow the set of instructions that appear over the next three screens in order to optimized the HDR brightness output for your QN85B, QN90B or QN95B.
How to fix visible line issues with the A80K, A90K and A95K

When you turn on your Sony A80K, A90K or A95K, you may notice red, blue, green or white lines appearing on the OLED screen. To see how you can get rid of these distracting lines, you can take a look at this troubleshooting article from Seeking Tech.

This guide should cover the following screen sizes of Sony’s 2022 4K OLED TV models:

  • 55” BRAVIA XR A80K 4K HDR OLED TV (XR-55A80K)
  • 65” BRAVIA XR A80K 4K HDR OLED TV (XR-65A80K)
  • 77” BRAVIA XR A80K 4K HDR OLED TV (XR-77A80K)
  • 42” BRAVIA XR A90K 4K HDR OLED TV (XR-42A90K)
  • 48” BRAVIA XR A90K 4K HDR OLED TV (XR-48A90K)
  • 55” BRAVIA XR A95K 4K HDR OLED TV (XR-55A95K)
  • 65” BRAVIA XR A95K 4K HDR OLED TV (XR-65A95K)

1. If you are watching a TV channel, then the first step you can try is to switch over to another channel.

If you are using an antenna to receive your channels, then you can try moving it around to see if you can get the lines to go away.

2. If you are watching something through the HDMI port of your A80K, A90K or A95K, then you can try playing a different media.

You can also try using a different HDMI cable as the currently one you are using may be defective.

3. There may be a problem with the device that is connected to the HDMI port of your Sony OLED. In this scenario, you can try restarting the device, updating it to the latest firmware and/or factory resetting it.

4. If the TV channel and/or HDMI port does not appear to be the cause behind the red, blue, green or white lines showing up on the screen, then your problem may be related to the Panel Refresh feature.

For the uninformed, the function is designed to help remove any image retention that may have burn into the screen of your OLED. During this process, you should see red, blue, green or white lines appear on the TV.

In this case, we recommend that you leave your television set alone for at least 1 hour. If you still see the lines afterwards the aforementioned time length has passed, then you need to start the Panel Refresh feature again.

In order to do so, you need to go to the Settings menu of your OLED and then select Display & Sound > Expert Panel Settings > Panel Refresh.

5. If you are still seeing lines on the screen, then we recommend contacting Sony for additional support.

A95K recommended settings for playing PS5, Xbox Series X and S games

The A95K is Sony’s premium BRAVIA XR 4K OLED model for 2022. If you have this stellar television set, then you can take a look at this optimization guide at Seeking Tech to see what settings you should be using when it comes to playing games on your PlayStation 5, PlayStation 5 Digital Edition, Xbox Series X and/or Xbox Series S.

Model Numbers

The recommended settings should apply to the following model numbers from the A95K series:

  • 55” Sony BRAVIA XR A95K 4K HDR OLED TV (XR-55A95K)
  • 65” Sony BRAVIA XR A95K 4K HDR OLED TV (XR-65A95K)

Supported PS5 Features

With the A95K, you should be able to play games at 120 frames per second in 1080p and 4K. While the 1440p resolution is supported, you will be limited to playing games at 60 frames per second. This television set also supports HDR10 and Variable Refresh Rate with Sony’s latest gaming console.

Supported Xbox Series X and Xbox Series S Features

When it comes to both Xbox Series consoles, the A95K also supports 120 fps in the 1080p and 4K resolutions. As with the PS5, these Microsoft systems are limited to 60 fps at 1440p.

You can also play Series X and S games with HDR10 and VRR. While this TV supports Dolby Vision, the games will be limited to 60 fps when this HDR format is used.

Recommended Settings Guide

In order to optimize this OLED for the new consoles, you need to do the following:

1. To start off, make sure you connect to the correct HDMI port of your A95K.

The PlayStation 5, PlayStation 5 Digital Edition and Xbox Series X all come with a HDMI 2.1 cable. Therefore, these need to be plugged into either HDMI Port 3 or HDMI Port 4 of your OLED television set.

The Xbox Series S has a HDMI 2.0 cable included. In this case, you can plug it into any of the HDMI ports of the A95K. With that said, you can also use a HDMI 2.1 cable and connect the Series S to either the third or fourth numbered port of the TV.

2. Using the remote of your Sony BRAVIA XR, make sure that you have the latest firmware installed in order to get the best performance out of your A95K.

If you don’t know how to manually update this TV, then you can follow the steps from this tutorial.

3. For the next step, you need to check to see if you have the correct HDMI format set up. In order to do so, use the TV remote to bring up the Settings menu of the A95K and then go to Display & Sound > Picture > Video Signal.

From the Video Signal screen, select the HDMI port that is currently connected to your console. Afterwards, change the format to Enhanced Format (VRR).

If you want to use Dolby Vision on your Xbox Series X or Xbox Series S, then you can select Enhanced Format (Dolby Vision) instead.

4. Next, you need to make sure you have the right Picture settings enabled.

To do so, head back to the Display & Sound > Picture menu. From there, make sure you set the Auto Picture Mode of your A95K to On and then the HDR setting to Auto.

5. In the same Picture menu, you should also make sure that you disable the Ambient Light Sensor, Light Sensor, CineMotion and Motionflow settings if you have them enabled previously.

6. Afterwards, you need to protect your screen from image retention.

In order to do so, use your remote to go into the Settings menu and then select Display & Sound > Expert Panel Settings. You then need to enable the Pixel Shift setting if you haven’t done so already.

7. Your Sony A95K should now be fully optimized for the PlayStation 5, PlayStation 5 Digital Edition, Xbox Series X and/or Xbox Series S. With that said, you may still need to do more on the console side.

For the PS5 systems, you need to go to Settings and then select Screen and Video > Video Output.

Inside this menu, you need to set Resolution to 2160p and HDR to On When Supported to get the most out of the A95K features.

You then need to set the following to Automatic: VRR, 120 Hz, ALLM, 4K Transfer Rate, Deep Color Output and RGB Range.

In the same screen, you also need to select the Adjust HDR option. You should then follow the instructions that appear on the screen in order to calibrate your PS5’s HDR brightness for the A95K.

For the Xbox Series X and Xbox Series S systems, you need to go to the Settings menu as well. From there, you should head over to General > TV & Display Options > Video Modes.

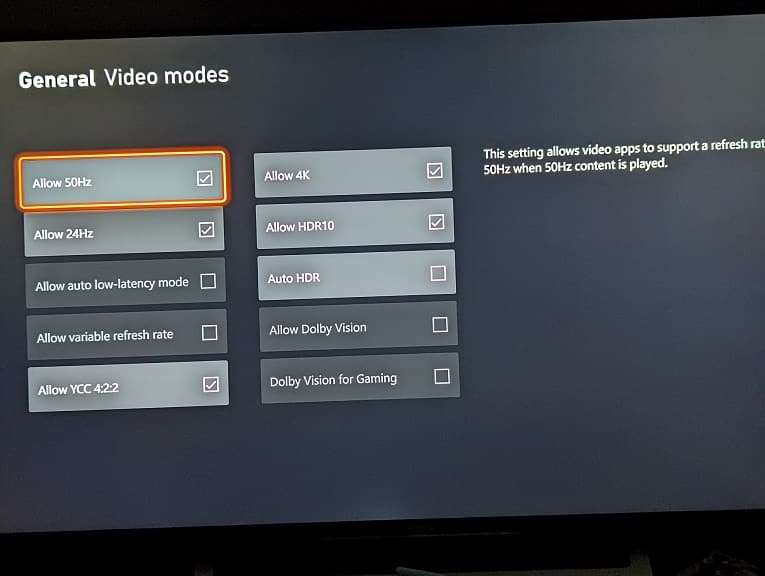
Next, you need to enable Allow Auto-Low Latency Mode, Allow Variable Refresh Rate, Allow 4K and Allow HDR10.

If you want to use Dolby Vision, then you can enable Allow Dolby Vision and Dolby Vision for Gaming from the same Video Modes menu as well.

Next, go back to the TV & Display Options menu and then make sure that Resolution is set to 4K in order to get the maximum pixel count. Afterwards, select Calibrate HDR for Games from the same menu and then follow the on-screen instructions to make sure that your console is optimized for A95K’s HDR brightness output.

How to prevent and fix image retention for the A80K, A90K and A95K

Sony released three BRAVIA XR 4K OLED television sets in 2022 with the A80K, A90K and A95K. To see how you can prevent, as well as fix, image retention for these screens, you can take a look at this troubleshooting article from Seeking Tech.

How to prevent image retention for A80K, A90K and A95K

In order to prevent your A80K, A90K or A95K from getting image retention, you can try taking the following precautionary steps:

1. To start off, make sure that you turn off the television screen for at least four consecutive hours on a daily basis. This will give the OLED pixels enough time to rest.

2. If possible, avoid watching long videos that have a watermark or logo that stays in the same place of the screen.

If you can’t avoid this situation, then we recommend turning off the television screen or switch to watch a different video, for a few minutes around every hour or so in order to avoid image retention.

3. If you are playing a game with static user interface elements, check to see the game’s setting offer a dynamic option so that the UI will only show up when needed.

Otherwise, you can turn off the screen or switch it to display something else after every hour or so of playing the same game.

4. Any time you aren’t planning to look at your television screen, we recommend that you turn it off.

If you fall asleep easily when watching TV, then you can set up a Sleep Timer by going to Settings > Timers & Clock > Sleep Timer.

5. If your computer, game console, streaming stick or any other connected device have an automatic screen dimming and/or screen saver feature, then we recommend turning these on as it should help prevent any image persistence.

6. Enabling Pixel Shift should also help prevent image retention as this feature will move the image around slightly at fixed intervals. As a result, the pixels won’t stay stuck displaying the same static colors.

As long as you don’t sit really close to the television set, you will most likely not notice any of the shifts.

To enable this feature, you need to go to Settings > Display & Sound > Expert Panel Settings > Pixel Shift.

How to fix image retention for A80K, A90K and A95K

If part of your A80K, A90K or A95K screen is showing image retention, then you can try doing the following in order to fix this problem:

1. The first step you can take is to avoid playing the same game or watching the same video that caused the image retention to appear.

By making the OLED screen display other content, the ghostly image may be able to go away on its own.

2. If the image retention still persists, then you can try turning off your Sony BRAVIA XR 4K OLED television and then leave it off for at least four hours.

3. If the image still hasn’t gone away, then you can try using the Panel Refresh feature. This feature should help refresh the pixels of the OLED.

With that said, Sony suggests that you don’t use it more than once a year as it may shorten the lifespan of your A80K, A90K or A95K. Therefore, we recommend only using Panel Refresh as a last resort if the previous two steps did not resolve your issue.

In order to use this feature, go to Settings > Display & Sound > Expert Panel Settings > Panel Refresh.

Recommended A90K settings you should use for PS5, Xbox Series X and S

In 2022, Sony released the 42” BRAVIA XR A90K 4K HDR OLED TV (XR-42A90K) and 48” BRAVIA XR A90K 4K HDR OLED TV (XR-48A90K). You can check out this optimization guide to see how you can set up this TV in order to get the most out of your PlayStation 5, PlayStation 5 Digital Edition, Xbox Series X and/or Xbox Series S.

1. To begin, make sure you connect your game console to your television set. The A90K features four HDMI ports, the first two feature HDMI 2.0 while the last two are HDMI 2.1.

For the PlayStation 5, PlayStation 5 Digital Edition and Xbox Series X, you need to use the HDMI cable that came with your system to connect to either HDMI Port #3 or HDMI Port #4.

The Xbox Series S only comes with a HDMI 2.0 cable. Therefore, you can connect it to any of the four ports on your Sony OLED. Alternatively, you can get a HDMI 2.1 cable for the Series S and then connect it to the third or fourth port.

2. Next, you can turn on your A90K and then make sure that you updated the television screen to the latest firmware.

If you don’t know how to update, then you can follow the steps laid out in this walkthrough.

3. After updating the BRAVIA XR A90K, you then need to head over to your TV’s Settings menu. From there, you first need to go to the Video Signal section by selecting Display & Sound > Picture > Video Signal.

From this section, select the HDMI port number that is currently connected to your console. You then need to change the format to Enhanced Format (VRR).

If you want to play games in Dolby Vision HDR on your Xbox Series X or Xbox Series S with the A90K, then you can select Enhanced Format (Dolby Vision) instead. By doing so, however, you will limit the refresh rate of the screen to 60 Hz as you won’t be able to play games at more than 60 frames per second. Therefore, we recommend setting the HDMI format to Enhanced Format (VRR) on your Xbox Series console as more games support 120 Hz unless you really want to try out Dolby Vision for a specific game.

4. You should then go back to the Picture menu. Here, make sure you enable Auto Picture Mode (which will turn on support for Auto Low Latency Mode) as well as set HDR to Auto.

In the same Picture menu, you also need to disable the following:

  • Ambient Light Sensor
  • Light Sensor
  • CineMotion
  • Motionflow

5. Afterwards, go back to the Display & Sound menu and then select Expert Panel Settings. From there, you need to enable Pixel Shift as it will help prevent image retention and screen burn in if you play a game with a lot of static images.

Your A90K should now be fully optimized for the PlayStation 5, PlayStation 5 Digital Edition, Xbox Series X and Xbox Series S.

6. Once you are done with setting up your BRAVIA XR, you should then make sure that you are using the right settings on your console.

If you have a PlayStation 5 or PlayStation 5 Digital Edition system, then you first need to go to the Settings menu. From there, select Screen and Video > Video Output. You then need to make sure you match the following settings:

  • Resolution: 4K
  • HDR: On When Supported
  • VRR: Automatic
  • 120 Hz Output: Automatic
  • ALLM: Automatic
  • 4K Transfer Rate: Automatic
  • Deep Color Output: Automatic
  • RGB Range: Automatic

Finally, select the Adjust HDR setting from the Video Output menu and then follow the steps that appear over the next several screens in order to optimize your PS5’s HDR output for the A90K.

If you have an Xbox Series X or Xbox Series S, then you need to open the Settings menu and then select General > TV & display options > Video modes. From there, make sure the following settings are turned on:

  • Allow auto-low latency mode
  • Allow variable refresh rate
  • Allow 4K
  • Allow HDR10

If you want to use Dolby Vision, then you can also enable the Allow Dolby Vision and Dolby Vision for Gaming from the Video modes menu as well.

Afterwards, head back to the TV & display options and make sure you have Resolution set to 4K. You then need to select the Calibrate HDR option from this menu and follow the instructions in the following pages in order to optimize the HDR output for the Xbox Series X or S console for your A90K.

How to prevent the A80K, A90K and A95K screen from auto dimming

If you are using a 2022 Sony 4K OLED, then you may have noticed that the screen is automatically dimming the image by itself. To see how you can potentially prevent this auto-darkening effect, you can take a look at this article from Seeking Tech.

Before we begin, it should be noted these steps will be based on the A80K, A90K and A95K, which include the following models:

  • 55” Sony BRAVIA XR A80K 4K HDR OLED TV (XR-55A80K)
  • 65” Sony BRAVIA XR A80K 4K HDR OLED TV (XR-65A80K)
  • 77” Sony BRAVIA XR A80K 4K HDR OLED TV (XR-77A80K)
  • 42” Sony BRAVIA XR A90K 4K HDR OLED TV (XR-42A90K)
  • 48” Sony BRAVIA XR A90K 4K HDR OLED TV (XR-48A90K)
  • 55” Sony BRAVIA XR A95K 4K HDR OLED TV (XR-55A95K)
  • 65” Sony BRAVIA XR A95K 4K HDR OLED TV (XR-65A95K)

1. It is important to state auto dimming is part of the features set for the A80K, A90K and A95K. This function will go into effect when your television detects the whole image, or part of an image, have remained in the same position of the screen.

Sony put this feature in place in order to prevent image retention and screen burn in.

With that said, you can still reduce the frequencies of auto dimming.

2. To stop your screen from darkening automatically, make sure that it isn’t display a static image.

If this can’t be avoided, whether if its due to a logo of a video or the heads-up-display of a videogame, then you can try playing a different content occasionally so that the image won’t stay in place. You can also try turning off your A80K, A90K or A95K for a couple of minutes, especially if you need to do something else and, thus, won’t be able to use the TV.

3. Enabling the Pixel Shift feature may also help. With this function turned on, your OLED will slightly shift the picture, which shouldn’t be noticeable to your naked eye unless you are sitting up close to the screen.

Be shifting the image, the pixels won’t be showing the same colors continuously for an extended length of time. As a result, the screen will be less likely to protect itself from image retention and screen burning by activating the auto dimming feature.

In order to enable Pixel Shift, use your A80K, A90K or A95K to go to Settings > Display & Sound > Expert Panel Settings. From there, make sure you set the Pixel Shift Setting to On.

4. The screen darkening may not be related to image retention and screen burn in protection of your Sony OLED at all.

Instead, you may have the Ambient Light Sensor and Light Sensor settings turned on. These will cause the brightness output of your television set to automatically lower if the light sensor detects that the room lighting has gotten darker.

To disable both of these, you need to use your TV remote and then go to Settings > Display & Sound > Picture. Afterwards, make sure you set the Ambient Light Sensor and Light Sensor settings to Off.

Recommended A80K settings for PS5, Xbox Series X and S

The A80K is an entry level BRAVIA XR 4K OLED television set. To optimize this 2022 Sony TV for the PlayStation 5, PlayStation 5 Digital Edition, Xbox Series X and/or Xbox Series S, you can take a look at this optimization guide from Seeking Tech.

This article will be covering the following variants of the A80K series:

  • 55” Sony BRAVIA XR A80K 4K HDR OLED TV (XR-55A80K)
  • 65” Sony BRAVIA XR A80K 4K HDR OLED TV (XR-65A80K)
  • 77” Sony BRAVIA XR A80K 4K HDR OLED TV (XR-77A80K)

1. To start off, you need to connect your console to the TV. When it comes to the A80K, HDMI Port #1 and #2 are HDMI 2.0 while Port #3 and #4 are HDMI 2.1.

The PlayStation 5 and Xbox Series X support HDMI 2.1 right out of the box as both of these systems come with a HDMI 2.1 cable. Therefore, you need to connect them to the third or fourth HDMI ports of this TV.

The Xbox Series S only comes with a HDMI 2.0 cable. So, you can either use the first or second HDMI ports for this console instead or use a HDMI 2.1 cable to connect the Series S to the third or fourth HDMI ports of the A80K.

2. If you haven’t done so already, make sure you updated the firmware of your BRAVIA XR A80K to get improvements and potentially new features.

You can learn how you can download and install a new version of this TV set with this tutorial.

3. Once your OLED has been updated, use the TV remote again and then go to Settings> Display & Sound > Picture > Video Signal. From there, select the HDMI port that is connected to your gaming console.

For PS5 consoles, make sure that the HDIM port is set to Enhanced Format (VRR).

For the Xbox Series X or Xbox Series S consoles, we recommended setting the HDMI port to Enhanced Format (VRR) as well. If you are planning to use the Dolby Vision HDR format for a supported game, then you can use the Enhanced Format (Dolby Vision) instead.

4. Now, you need to head over to the Settings > Display & Sound > Picture menu.

Here, you need to first enable Auto Picture Mode in order to enable Auto Low Latency Mode. You then need to select the Video Signal option and then set HDR mode to Auto.

5. Return to the Settings > Display & Sound > Picture menu. From there, make sure you disable the Ambient Light Sensor, Light Sensor, CineMotion and Motionflow settings.

6. From the Display & Sound menu, you then need to select Expert Panel Settings.

Afterwards, make sure you turn on the Pixel Shift feature as it helps you avoid any screen burn-in when playing games that have static display elements.

7. You should now be done with setting up the A80K side of the equation.

With that said, you still need to make sure you have the right settings on your console. To start off, update your system to the latest firmware if you haven’t done so already.

8. Next, you need to make sure you have the correct settings enabled and optimized.

If you have a PS5, the you need to go to Settings > Screen and Video > Video Output.

In this menu, you need do the following:

  • Set Resolution to 4K
  • Set HDR to On When Supported
  • Set VRR to Automatic
  • Set 120 Hz Output to Automatic
  • Set ALLM to Automatic
  • Set 4K Transfer Rate to Automatic
  • Set Deep Color Output to Automatic
  • Set RGB Range to Automatic

Select the Adjust HDR and then complete the on-screen steps to calibrate the HDR brightness output for your A80K.

If you have an Xbox Series X or Xbox Series S, then you need to head over to Settings > General > TV & display options > Video modes menu.

You then need to do the following:

  • Add a check mark to the “Allow auto-low latency mode” box
  • Add a check mark to the “Allow variable refresh rate” box
  • Add a check mark to the “Allow 4K” box
  • Add a check mark to the “Allow HDR10” box
  • If you are planning to use Dolby Vision, then you also need to add a check mark to the “Allow Dolby Vision” and “Dolby Vision for Gaming” boxes as well.

Now, you need to return to the Settings > General > TV & display options menu and then make sure Resolution is set to 4K. Afterwards, select the Calibrate HDR option and then follow the on-screen steps to optimize the HDR brightness output of the console with the A80K.

Sony X90K recommended PS5, Xbox Series X and Xbox Series S settings

The X90K is a full array 4K LED that came out in 2022. You can check out this guide at Seeking Tech to see what recommend settings for this Sony television set you should be using when it comes to playing games on your PlayStation 5, PlayStation 5 Digital Edition, Xbox Series X and/or Xbox Series S.

This article should cover all currently available screen size options of the X90K, which includes the following models:

  • 55″ Sony 4K Ultra HD TV X90K Series BRAVIA XR Full Array LED Smart Google TV (XR-55X90K)
  • 65″ Sony 4K Ultra HD TV X90K Series BRAVIA XR Full Array LED Smart Google TV (XR-65X90K)
  • 75″ Sony 4K Ultra HD TV X90K Series BRAVIA XR Full Array LED Smart Google TV (XR-75X90K)
  • 85″ Sony 4K Ultra HD TV X90K Series BRAVIA XR Full Array LED Smart Google TV (XR-85X90K)

1. To start off, we recommend checking to see if there is a new firmware update available for your television set. This is because a recent software helped improved the peak HDR brightness output when Variable Refresh Rate was enabled. There may be other improvements available as well as may optimize the display of PS5, Xbox Series X and Xbox Series S games.

If you don’t know how to update the firmware of your X90K, then you can follow the steps in this tutorial.

2. You should also check to see if there is a new firmware update on your console as well as it may come with enhancements and or improvements.

3. Once you are sure that both your TV and gaming system has been updated, make sure that you are using a HDMI 2.1 cable to connect your console to either the HDMI #3 or HDMI #4 ports of your X90K.

Keep in mind that the HDMI #1 and HDMI #2 ports are only HDMI 2.0. Therefore, you need to use the third and fourth numbered ports instead in order to take advantage of the extra video signal bandwidth.

4. Using the remote of your Sony LED television set, you need to head over to the Settings menu and then select Display & Sound > Picture > Video Signal. Afterwards, select the HDMI port that is currently connected to the gaming system.

Once you get to the HDMI Signal Format menu, make sure you select the Enhanced Format (VRR) option if you have a PlayStation 5 or PlayStation 5 Digital Edition console.

For the Xbox Series X or Xbox Series S, you can select Enhanced Format (Dolby Vision) if you are planning to play games that are compatible with the Dolby Vision format. If you don’t plan on using this feature, then you can choose Enhanced Format (VRR) instead.

5. Go back to the first page of Settings on your X90K and then go to Display & Sound > Picture. Afterwards, you need to enable Auto Picture Mode so that you can activate the Auto Low Latency Mode.

With this mode, the TV will automatically switch over to the game mode when you are playing your PS5, Xbox Series X or Xbox Series S.

6. From the same Picture menu, you need to disable the Ambient Light Sensor, Light Sensor, CineMotion and Motionflow features.

Ambient Light Sensor and Light Sensor may cause your X90K to look dimmer. CineMotion and Motionflow could add various visual artifacts and add input lag.

7. Also in the Picture menu, go to Video Signal and then select HDR Mode. Afterwards, you need to select Auto.

You should now be done with optimizing your X90K for the new consoles.

8. On the console side, you need to make sure that you are using the right settings as well.

On the PS5 or PS5 Digital Edition system, you need to open the Settings menu and then head over to Screen and Video > Video Output.

From there, you need to set Resolution to 2160p and then HDR to On When Supported. You also need to make sure that the VRR, 120 Hz Output, ALLM, 4K Transfer Rate, Deep Color Output and RGB Range settings are all set to Automatic.

Finally, select Adjust HDR from the Video Output menu. Afterwards, follow the instructions that appear on screen to match the HDR brightness output of your PlayStation 5 to your X90K.

On the Xbox Series X and Xbox Series S, go to the Settings menu. From there, head over to General > TV & display options > Video modes.

Inside the Video modes menu, you need to make sure that the following boxes are checked:

  • Allow auto-low latency mode
  • Allow variable refresh rate
  • Allow 4K
  • Allow HDR10
  • Allow Dolby Vision
  • Dolby Vision for Gaming (if you are planning to use this HDR format)

You should also make sure that Auto HDR is unchecked; otherwise, non-HDR games may end up looking a little off in some cases.

You then need to back out to the TV & display options menu. From there, make sure that Resolution is set to 4K. Furthermore, you need to select the Calibrate HDR option and then follow the on-screen instructions to optimize the HDR brightness output.

LG UQ8000 wall mount specs

In 2022, LG released the UQ8000 AUB series. If you have this 4K LED television screen, and would like to mount it to your wall, then we recommend that you first take a look at this mounting bracket guide at Seeking Tech.

Screen Sizes

All available screen sizes of this TV series can be mounted to a wall. You can find the model number for each size that this guide will be covering below:

  • 43” LG UQ8000 AUB series LED 4K UHD Smart webOS 22 with ThinQ AI TV (43UQ8000AUB)
  • 50” LG UQ8000 AUB series LED 4K UHD Smart webOS 22 with ThinQ AI TV (50UQ8000AUB)
  • 55” LG UQ8000 AUB series LED 4K UHD Smart webOS 22 with ThinQ AI TV (55UQ8000AUB)
  • 65” LG UQ8000 AUB series LED 4K UHD Smart webOS 22 with ThinQ AI TV (65UQ8000AUB)
  • 70” LG UQ8000 AUB series LED 4K UHD Smart webOS 22 with ThinQ AI TV (70UQ8000AUB)
  • 75” LG UQ8000 AUB series LED 4K UHD Smart webOS 22 with ThinQ AI TV (75UQ8000AUB)
  • 86” LG UQ8000 AUB series LED 4K UHD Smart webOS 22 with ThinQ AI TV (86UQ8000AUB)

The aforementioned model numbers may be a little different depending on your region.

Dimensions (without Stand)

Dimensions without Stand (in inches):

  • 43” LG UQ8000: 38.1 inches x 22.2 inches x 2.2 inches
  • 50” LG UQ8000: 44.1 inches x 25.6 inches x 2.2 inches
  • 55” LG UQ8000: 48.6 inches x 28.1 inches x 2.3 inches
  • 65” LG UQ8000: 57.2 inches x 33.0 inches x 2.3 inches
  • 70” LG UQ8000: 61.5 inches x 35.7 inches x 2.4 inches
  • 75” LG UQ8000: 66.1 inches x 38.0 inches x 2.4 inches
  • 86” LG UQ8000: 75.9 inches x 43.5 inches x 2.4 inches

Dimensions without Stand (in centimeters):

  • 43” LG UQ8000: 96.8 cm x 56.4 cm x 5.6 cm
  • 50” LG UQ8000: 112.0 cm x 65.0 cm x 5.6 cm
  • 55” LG UQ8000: 123.4 cm x 71.4 cm x 5.8 cm
  • 65” LG UQ8000: 145.3 cm x 83.8 cm x 5.8 cm
  • 70” LG UQ8000: 156.2 cm x 90.7 cm x 6.1 cm
  • 75” LG UQ8000: 167.9 cm x 96.5 cm x 6.1 cm
  • 86” LG UQ8000: 192.8 cm x 110.5 cm x 6.1 cm

Dimensions without Stand (in millimeters):

  • 43” LG UQ8000: 967.7 mm x 563.9 mm x 55.9 mm
  • 50” LG UQ8000: 1120.1 mm x 650.2 mm x 55.9 mm
  • 55” LG UQ8000: 1234.4 mm x 713.7 mm x 58.4 mm
  • 65” LG UQ8000: 1452.9 mm x 838.2 mm x 58.4 mm
  • 70” LG UQ8000: 1562.1 mm x 906.8 mm x 61.0 mm
  • 75” LG UQ8000: 1678.9 mm x 965.2 mm x 61.0 mm
  • 86” LG UQ8000: 1927.9 mm x 1104.9 mm x 61.0 mm

Weight (without Stand)

Weight without Stand (in pounds):

  • 43” LG UQ8000: 19.4 lbs.
  • 50” LG UQ8000: 25.8 lbs.
  • 55” LG UQ8000: 30.9 lbs.
  • 65” LG UQ8000: 47.4 lbs.
  • 70” LG UQ8000: 62.6 lbs.
  • 75” LG UQ8000: 69.2 lbs.
  • 86” LG UQ8000: 99.6 lbs.

Weight without Stand (in kilograms):

  • 43” LG UQ8000: 8.8 kg
  • 50” LG UQ8000: 11.7 kg
  • 55” LG UQ8000: 14.0 kg
  • 65” LG UQ8000: 21.5 kg
  • 70” LG UQ8000: 28.4 kg
  • 75” LG UQ8000: 31.4 kg
  • 86” LG UQ8000: 45.2 kg

VESA Mounting Pattern

The VESA Mounting Pattern, also known as the VESA Hole Pitch, refers to the horizontal and vertical dimensions of the four mounting screw holes located on the backside of your UQ8000. If you wall mount does not support this pattern, then it won’t be able to attach to the LED screen.

You can find the VESA Mounting Pattern for each screen size below:

VESA Mounting Pattern (in inches):

  • 43” LG UQ8000: 7.9 inches x 7.9 inches
  • 50” LG UQ8000: 7.9 inches x 7.9 inches
  • 55” LG UQ8000: 11.8 inches x 11.8 inches
  • 65” LG UQ8000: 11.8 inches x 11.8 inches
  • 70” LG UQ8000: 15.7 inches x 15.7 inches
  • 75” LG UQ8000: 15.7 inches x 15.7 inches
  • 86” LG UQ8000: 23.6 inches x 15.7 inches

VESA Mounting Pattern (in centimeters):

  • 43” LG UQ8000: 20 cm x 20 cm
  • 50” LG UQ8000: 20 cm x 20 cm
  • 55” LG UQ8000: 30 cm x 30 cm
  • 65” LG UQ8000: 30 cm x 30 cm
  • 70” LG UQ8000: 40 cm x 40 cm
  • 75” LG UQ8000: 40 cm x 40 cm
  • 86” LG UQ8000: 60 cm x 40 cm

VESA Mounting Pattern (in millimeters):

  • 43” LG UQ8000: 200 mm x 200 mm
  • 50” LG UQ8000: 200 mm x 200 mm
  • 55” LG UQ8000: 300 mm x 300 mm
  • 65” LG UQ8000: 300 mm x 300 mm
  • 70” LG UQ8000: 400 mm x 400 mm
  • 75” LG UQ8000: 400 mm x 400 mm
  • 86” LG UQ8000: 600 mm x 400 mm
VESA Mounting Pattern (example from different TV).

What wall mounts are compatible with the LG UQ8000?

For a wall mount to be compatible with the LG UQ8000 AUB series, it needs to be able to support the VESA Mounting Pattern on the television screen.

The 43” and 50” screen sizes feature a 200 mm x 200 mm pattern while the 55” and 65” variations use 300 mm x 300 mm. The 70” and 75” version have a 400 mm x 400 mm pattern while the 86” variant is the only one out of this group to utilize 600 mm x 400 mm.

You also need to make sure that the maximum carrying weight capacity of the mount is more than the weight of your UQ8000 screen. These televisions can weigh as much as 99.6 lbs. (or 45.2 kg).

You can check out this article to see our list of recommended wall mounts you can get for your UQ8000.

Resource:

Samsung Q80B wall mount specs

The Q80B is a new 4K QLED television set that came out in 2022. If you are looking for a fixed, tilting or full motion wall mount for this Samsung TV, then we recommend that you first take a look at this guide at Seeking Tech.

Screen Size

The Q80B comes in five screen size options, all of which can be mounted on a wall.

You can find the model number for each of these variations, which could be slightly different depending on which region you bought your television from, below:

  • 50″ Samsung Q80B QLED 4K Smart TV (QN50Q80BAFXZA)
  • 55″ Samsung Q80B QLED 4K Smart TV (QN55Q80BAFXZA)
  • 65″ Samsung Q80B QLED 4K Smart TV (QN65Q80BAFXZA)
  • 75″ Samsung Q80B QLED 4K Smart TV (QN75Q80BAFXZA)
  • 85″ Samsung Q80B QLED 4K Smart TV (QN85Q80BAFXZA)

Dimensions

Dimensions without Stand (in inches):

  • 50″ Samsung Q80B: 43.9 inches x 25.4 inches x 2.1 inches
  • 55″ Samsung Q80B: 48.3 inches x 27.8 inches x 2.2 inches
  • 65″ Samsung Q80B: 56.9 inches x 32.7 inches x 2.2 inches
  • 75″ Samsung Q80B: 65.8 inches x 37.7 inches x 2.2 inches
  • 85″ Samsung Q80B: 74.5 inches x 42.6 inches x 2.2 inches

Dimensions without Stand (in centimeters):

  • 50″ Samsung Q80B: 111.5 cm x 64.5 cm x 5.3 cm
  • 55″ Samsung Q80B: 122.7 cm x 70.6 cm x 5.6 cm
  • 65″ Samsung Q80B: 144.5 cm x 83.1 cm x 5.6 cm
  • 75″ Samsung Q80B: 167.1 cm x 95.8 cm x 5.6 cm
  • 85″ Samsung Q80B: 189.2 cm x 108.2 cm x 5.6 cm

Dimensions without Stand (in millimeters):

  • 50″ Samsung Q80B: 1115.1 mm x 645.2 mm x 53.3 mm
  • 55″ Samsung Q80B: 1226.8 mm x 706.1 mm x 55.9 mm
  • 65″ Samsung Q80B: 1445.3 mm x 830.6 mm x 55.9 mm
  • 75″ Samsung Q80B: 1671.3 mm x 957.6 mm x 55.9 mm
  • 85″ Samsung Q80B: 1892.3 mm x 1082.0 mm x 55.9 mm

Weight (without Stand)

Weight without Stand (in pounds):

  • 50″ Samsung Q80B: 30.2 lbs.
  • 55″ Samsung Q80B: 39.5 lbs.
  • 65″ Samsung Q80B: 53.1 lbs.
  • 75″ Samsung Q80B: 75.8 lbs.
  • 85″ Samsung Q80B: 95.5 lbs.

Weight without Stand (in kilograms):

  • 50″ Samsung Q80B: 13.7 kg
  • 55″ Samsung Q80B: 17.9 kg
  • 65″ Samsung Q80B: 24.1 kg
  • 75″ Samsung Q80B: 34.4 kg
  • 85″ Samsung Q80B: 43.3 kg

VESA Mounting Pattern

You should be able to see four screw holes located on the back side of your Q80B. You need to use them in order to install a part of the wall mount to your television set.

Depending on the screen size of your QLED, the horizontal and vertical dimensions may be different.

You can find these measurements below:

VESA Mounting Pattern (in inches):

  • 50″ Samsung Q80B: 7.9 inches x 7.9 inches
  • 55″ Samsung Q80B: 7.9 inches x 7.9 inches
  • 65″ Samsung Q80B: 15.7 inches x 11.8 inches
  • 75″ Samsung Q80B: 15.7 inches x 15.7 inches
  • 85″ Samsung Q80B: 23.6 inches x 15.7 inches

VESA Mounting Pattern (in centimeters):

  • 50″ Samsung Q80B: 20 cm x 20 cm
  • 55″ Samsung Q80B: 20 cm x 20 cm
  • 65″ Samsung Q80B: 40 cm x 30 cm
  • 75″ Samsung Q80B: 40 cm x 40 cm
  • 85″ Samsung Q80B: 60 cm x 40 cm

VESA Mounting Pattern (in millimeters):

  • 50″ Samsung Q80B: 200 mm x 200 mm
  • 55″ Samsung Q80B: 200 mm x 200 mm
  • 65″ Samsung Q80B: 400 mm x 300 mm
  • 75″ Samsung Q80B: 400 mm x 400 mm
  • 85″ Samsung Q80B: 600 mm x 400 mm
VESA Mounting Pattern (example from different TV).

Mounting Screw Type

The 50-inch, 55-inch, 65-inch, 75-inch and 85-inch variants of this QLED series use the M8 screw type in order to attach the mounting bracket to the back of the screen.

Mounting Screw Hole Depth

The 50-inch, 55-inch, 65-inch and 75-inch screen sizes have a mounting screw hold depth of 26 mm to 28 mm. For the 85-inch version, the depth is 25 mm to 27 mm.

What wall mounts are compatible with the Samsung Q80B?

For a fixed, tilting or full motion wall mount to be compatible with the Samsung Q80B, it needs to support the VESA Mounting Pattern and weight of the television set.

The 50” and 55” screen sizes have the same Mounting VESA Pattern at 200 mm x 200 mm. The 65″ variant uses 400 mm x 300 mm while the 75” features 400 mm x 400 mm. The biggest size, the 85”, uses 600 mm x 400 mm.

In terms of weight, the 50” Q80B weigh just 30.2 lbs. while the 55” screen size is slightly heavier at 39.5 lbs. The 65” version measures in at 53.1 lbs. while the 75” variant is 75.8 lbs. The 85” model is the heaviest at 95.5 lbs.

For specific product recommendations, you can take a look at this guide to find a fixed, tilting or full motion mounting bracket that should be able to work with the Q80B.

Resource: