INZONE H7 and INZONE H9 battery life guide

The Sony INZONE H7 Wireless Gaming Headset has a maximum battery life of up to 40 hours while the Sony INZONE H9 Wireless Noise Canceling Gaming Headset can last up to 32 hours. The battery usage can vary drastically based on how you use these devices, however.

To find out more details about the battery charges of the INZONE H7 and INZONE H9, you can take a look at this article from Seeking Tech.

INZONE H7 battery life breakdown

When compared to the INZONE H9, the INZONE H7 is better when it comes to battery life.

With the Bluetooth mode disabled, you can get a maximum of 40 hours from a full battery charge before needing to be recharged.

If you decide to use the Bluetooth mode, however, then the battery life will deplete a lot faster. If the headset is using the AAC Codec, then the headset will top out at 26 hours. The SBC codec takes up even more energy as you will be limited to a maximum of 22 hours before needing a recharge.

You can find a breakdown of the battery life for the Sony INZONE H7 Wireless Gaming Headset below:

  • With Bluetooth Disabled: Up to 40 hours
  • With Bluetooth Enabled for Phone Calls Only: Up to 25 hours
  • With Bluetooth Enabled for Music Playback (AAC Codec) Only: Up to 26 hours
  • With Bluetooth Enabled for Music Playback (SBC Codec) Only: Up to 22 hours

INZONE H9 battery life breakdown

Unlike the INZONE H7, the INZONE H9 offers Noise Cancellation and Ambient Sound Mode. Noise Cancellation will block out any external noises. On the other hand, Ambient Sound Mode will make it easier to hear external noises.

If you use either of these features, however, than the battery life of the INZONE H9 will dramatically shorten the battery charge of the headset.

In terms of music playback, for example, the most you will get is 16 hours if you decide to turn on either Noise Cancellation or Ambient Sound Mode.

You can find a breakdown for the battery life of the Sony INZONE H9 Wireless Noise Canceling Gaming Headset below:

  • With Bluetooth Disabled: Up to 32 hours
  • With Bluetooth Disabled and Noise Cancellation Enabled: Up to 20 hours
  • With Bluetooth Disabled and Ambient Sound Mode Enabled: Up to 20 hours
  • With Bluetooth Enabled for Phone Calls Only: Up to 20 hours
  • With Bluetooth Enabled for Phone Calls Only and Noise Cancellation Enabled: Up to 15 hours
  • With Bluetooth Enabled for Phone Calls Only and Ambient Sound Mode Enabled: Up to 15 hours
  • With Bluetooth Enabled for Music Playback (AAC Codec) Only: Up to 22 hours
  • With Bluetooth Enabled for Music Playback (AAC Codec) Only and Noise Cancellation Enabled: Up to 16 hours
  • With Bluetooth Enabled for Music Playback (AAC Codec) Only and Ambient Sound Mode Enabled: Up to 16 hours
  • With Bluetooth Enabled for Music Playback (SBC Codec) Only: Up to 20 hours
  • With Bluetooth Enabled for Music Playback (SBC Codec) Only and Noise Cancellation Enabled: Up to 15 hours
  • With Bluetooth Enabled for Music Playback (SBC Codec) Only and Ambient Sound Mode Enabled: Up to 15 hours

How to fix Switch, Switch Lite and Switch OLED Bluetooth audio delay/lag

Support for Bluetooth earphones, headsets, headphones and speakers were recently added to the Nintendo Switch, Nintendo Switch Lite and Nintendo Switch OLED systems.

When using the Bluetooth connection for audio, you may notice that there is a delay or lag in relations to what is happening on the screen.

You can check out this troubleshooting guide at Seeking Tech to see how you can fix these wireless audio latency issues.

1. The first step we recommend taking is to turn off your console and then turn it back on again.

In order to do so, you need to do the following:

  • Press and hold the power button on your Switch, Switch Lite or Switch OLED until the Power menu shows up on screen.
  • In the Power menu, select Power Options.
  • Select Turn Off.
  • Press the power button again on your system to turn it back on.

2. You can also try turning off the connected Bluetooth audio device, turn it back on again and then reconnect it you’re your Switch system.

To do so, you need to take the following steps:

  • Follow the instructions from the manufacture of the Bluetooth audio device to turn it off.
  • Follow the instructions from the manufacture of the Bluetooth audio device to turn it back on again.
  • On your Switch system, go to System Settings.
  • On the left column of the System Settings menu, scroll down and then select Bluetooth Audio.
  • On the right side of the same screen, select your Bluetooth audio device.
  • In the next screen, select Connect Device.

3. If possible, you may want to factory reset your Bluetooth audio device and then pair it to your Switch system again.

You can do so by doing the following:

  • Follow the instructions from the manufacture of the Bluetooth audio device to factory reset it.
  • Go to System Settings on your Switch system.
  • Scroll down and then select Bluetooth Audio on the left side of the System Settings menu.
  • Next, select your Bluetooth audio device on the right side of the same screen.
  • In the next screen, select Remove Device.
  • In the pop-up notification, select Remove Device again.
  • Follow the instructions from the manufacture’s Bluetooth audio device to set the device to pairing mode.
  • On the Nintendo Switch system, you should be back in the Bluetooth Audio menu. Here, you need to select Pair Device.
  • In the Pair Bluetooth Audio Device menu, select your device.
  • In the pop-up notification, select OK.

4. You can also try updating the firmware of your Nintendo Switch, Nintendo Switch Lite or Nintendo Switch OLED.

You can do so by taking the following steps:

  • From the Home menu, select System Settings.
  • Inside the System Settings menu, scroll down on the left column and then select System.
  • On the right side in the same screen, select System Update.

5. If the Bluetooth audio latency issue is only happening when you play one specific game, then you can try closing the game and then opening it again.

You can also try updating the game by taking the following steps:

  • From the Home menu, navigate to the problematic game.
  • With the game highlighted, press either the + button or – button.
  • Select Software Update from the left column in the next screen.
  • On the right side of the same screen, select Via the Internet.

6. Furthermore, you can try repositioning the Bluetooth audio device to your Switch, Switch Lite or Switch OLED system.

You should try to move connected Bluetooth audio device as close as possible to the game system.

You should also make sure that there are no solid objects that may block the direct line of sight in between the audio device and your Switch.

Other wireless devices may also interrupt Bluetooth connection between the audio device and the system. Therefore, you should make sure you aren’t near any Wi-Fi, Bluetooth and any other wireless devices.

7. If none of the aforementioned potential solutions help resolve the Bluetooth audio delay and lag issues, then we recommend using a wired connection.

A wired connection will generally have less latency when compared to a Bluetooth connection.

So, if you have earphones, headsets, headphones or speakers with an audio cable, you can try connecting it to the audio jack of your Switch system. You should experience less delay and lag by doing so.

What’s the difference between the Razer Opus and Opus X?

Razer recently released the Opus X wireless headset. So, how does it compare to the older Opus? You can find out in this comparison guide.

Quick Summary

While the Razer Opus X is strictly a Bluetooth headset, you can connect the Razer Opus using wired (via the included 3.5 mm audio cable) or Bluetooth wireless.

The older Opus is also the only headset to come with a carrying case and airline headphone adapter. Furthermore, this headset is also the only one of the two products to by certified by THX in addition to coming with the automictic pause and play feature.

Not to mention that the Opus uses more advanced active noise cancellation and features a longer battery life, with noise cancellation enabled, when compared to the Opus X.

So, while the Opus is more expensive, you will be getting a better headset than the Opus X.

The two headsets have the same frequency ranges. Both also feature a Gaming Mode and Quick Attention Mode in addition to having the same warranty length.

Opus vs. Opus X Comparison Chart

You can take a look at Seeking Tech’s comparison table between the Opus and Opus X below.

Razer Opus Wireless HeadsetRazer Opus X Wireless Headset
Color OptionsBlack

Midnight Blue
Green

Mercury

Quartz
Weight270 grams270 grams
What’s in the BoxRazer Opus Headset

Carry Case

1.3 m length 3.5 mm analog cable

Airline headphone adapter

0.5 m length USB-A to USB-C charging cable
Razer Opus X Headset

0.5m length USB-A to USB-C charging cable
Connection Options3.5 mm audio cable

Bluetooth
Bluetooth
Ear CupsCircumauralCircumaural
Earpads MaterialsNylon with foam

Protein leather
Nylon with foam

Protein leather
Driver Type2x 40 mm dynamic drivers2x 40 mm dynamic drivers
Frequency Response20 Hz to 20 kHz20 Hz to 20 kHz
Impedance12 ohm at 1 kHzN/A
Sensitivity105 dB/mW by HATS at 1 kHzN/A
Microphone Setup4x mics for hybrid noise cancellation technology

2x mics for voice chat
2x mics for active noise cancellation technology

2x mics for voice chat
Active Noise CancellationHybridFeedforward
Microphone Frequency Response100 Hz to 10 kHzN/A
Microphone Sensitivity at 1 kHz-38 dBV/PaN/A
THX CertificationYesNo
Gaming ModeYesYes
Quick Attention ModeYesYes
Auto Pause/PlayYesNo
Battery Life with Active Noise CancellingUp to 32 hoursUp to 30 hours
Battery Life without Active Noise CancellingUp to 40 hoursUp to 40 hours
Warranty2-year warranty2-year warranty
PricingCheck price on Amazon.(#CommissionsEarned)Check price on Amazon.(#CommissionsEarned)

Color Options

You can check out the available colors for the two headsets below:

Razer Opus:

  • Black
  • Midnight Blue

Razer Opus X:

  • Green
  • Mercury
  • Quartz

Weight

Both of the products in this versus showdown weigh around 270 grams.

What’s in the Box

The regular Opus is the only one of the two headsets to come with a 3.5 mm audio cable. The Razer Opus also includes a carrying case and airline headphone adapter.

You can find a breakdown of the included content inside each box below:

Razer Opus:

  • Razer Opus Headset
  • Carry Case
  • 1.3 m length 3.5 mm analog cable
  • Airline headphone adapter
  • 0.5 m length USB-A to USB-C charging cable

Razer Opus X:

  • Razer Opus X Headset
  • 0.5m length USB-A to USB-C charging cable

Connection Options

You can connect the Opus wirelessly over Bluetooth in addition to over a wired connection using the aforementioned 3.5 mm audio cable.

The Razer Opus X can only be connected wirelessly via Bluetooth.

Ear Cups

Both of these Razer headsets are equipped with circumaural ear cups.

Earpads Materials

The earpads for the Opus and Opus X are built with nylon with foam in addition to protein leather.

Driver Type

Both of these products are equipped with two 40 mm dynamic drivers.

Frequency Response

The two headsets have the same frequency response at 20 Hz to 20 kHz.

Impedance

The Razer Opus is the only one of the two to have a listed impedance specification, which is 12 ohm at 1 kHz.

Sensitivity

The Opus is also the only version to have a listed sensitivity spec, which is 105 dB/mW by HATS at 1 kHz.

Microphone Setup

When it comes to microphone, the Razer Opus uses two additional mics for noise cancellation. Both headsets do use two mics for voice chatting.

You can check out the microphone setup below:

Razer Opus:

  • 4 mics for hybrid noise cancellation technology
  • 2 mics for voice chat

Razer Opus X:

  • 2 mics for active noise cancellation technology
  • 2 mics for voice chat

Active Noise Cancellation

The Razer Opus uses a more advanced hybrid active noise cancellation method when compared to the feedforward noise cancellation of the Razer Opus X.

Microphone Frequency Response

The Opus is the only headset in this versus showdown to have a listed frequency range for its microphone, which is at 100 Hz to 10 kHz.

Microphone Sensitivity at 1 kHz

Furthermore, the Razer Opus is the only one to have a microphone sensitivity specification listed, which is -38 dBV/Pa.

THX Certified

The Opus is the only one of the two wireless headsets to be certified by THX, which ensures that you are getting an optimized listening experience.

Gaming Mode

These headsets feature a gaming mode, which provides low latency so that you will experience very little noticeable audio delay when playing a videogame.

For the best experience, you should make sure that your headset is as close to its connected device as possible.

Quick Attention Mode

Both Opus products also feature a Quick Attention Mode that you can use to instantly raise the level of ambient noise so that you will be more aware of your surroundings.

Auto Pause/Play

The Opus is the only one of the two headsets to feature Auto Pause/Play. With this feature, removing the headset will automatically pause the media (audio and video) while putting it back on will automatically play the media again.

Battery Life with Active Noise Cancelling

The Razer Opus has a slightly longer battery life if you are using active noise cancelling.

You can find the lengths below:

  • Razer Opus: Up to 32 hours
  • Razer Opus X: Up to 30 hours

Battery Life without Active Noise Cancelling

With active noise cancellation disabled, both of the headsets should have a battery life of up to 40 hours.

Warranty

The Razer Opus Wireless Headset and Razer Opus X Wireless Headset each comes with a 2-year warranty.

Resources:

How to connect, setup and optimize Arctis 7P to PS5

One of the best wireless gaming headsets for the PlayStation 5 and PlayStation 5 Digital Edition is the SteelSeries Arctis 7P.

You can follow this tutorial from Seeking Tech to see how you can connect, setup and optimize the Arctis 7P on your game console.

Updating the SteelSeries Arctis 7P firmware

Before connecting to the PlayStation 5, you should see if there is a firmware update available for the SteelSeries Arctis 7P. It is also a good idea to occasionally check for any new software versions to keep the wireless headset up-to-date.

To see if you need a firmware update, you need to take the following steps:

1. Download and install the SteelSeries Engine on your computer. This program requires Windows 7 (or newer) if you have a Windows PC or macOS 10.12 (or newer) if you have a Mac.

2. Open the SteelSeries Engine program.

3. Connect the SteelSeries Arctis 7P to your computer.

If your computer has a USB-C port, you just need to connect the USB-C Wireless Dongle.

If your computer only has USB-A ports, you need to connect the USB-C Wireless Dongle to the USB-C to USB-A Adapter Cable. You can then connect the other end of the USB-C to USB-A Adapter Cable to the USB-A port of your computer.

The Arctis 7P comes with both the USB-C Wireless Dongle and USB-C to USB-A Adapter Cable included in the box.

4. Turn on the Arctis 7P by pressing and holding the power button on the wireless headset. After around three seconds, you will hear a tone and lights will be displayed on the headset.

5. The SteelSeries Engine should detect the Arctis 7P and will notify you if there is a firmware update available.

How to connect SteelSeries Arctis 7P to PlayStation 5

There are two ways to connect to the SteelSeries Arctis 7P to the PS5 as you can use the USB-C port or the USB-A ports.

For the USB-C port, you just have to connect the USB-C Wireless Dongle to the USB-C port on the front side of the PlayStation 5. With that said, the wireless dongle will block the USB-A port next to the USB-C port at the front of the system.

To connect using any of the three USB-A ports on the PS5, you firrst need to connect the USB-C Wireless Dongle to the USB-C to USB-A Adapter Cable. You can then connect the USB-C to USB-A Adapter Cable to any of the USB-A ports on the game system.

With the USB-C Wireless Dongle connected to the PS5, turn on both the game system and the headset. For the Arctis 7P, you need to press and hold the power button until you hear a chime and see illuminating lights.

After connecting the dongle in addition to powering on both the headset and PlayStation 5, the game system should automatically detect and switch the audio output and microphone input over to the headset.

To optimize the Arctis 7P for the PS5, there are several settings you can configure.

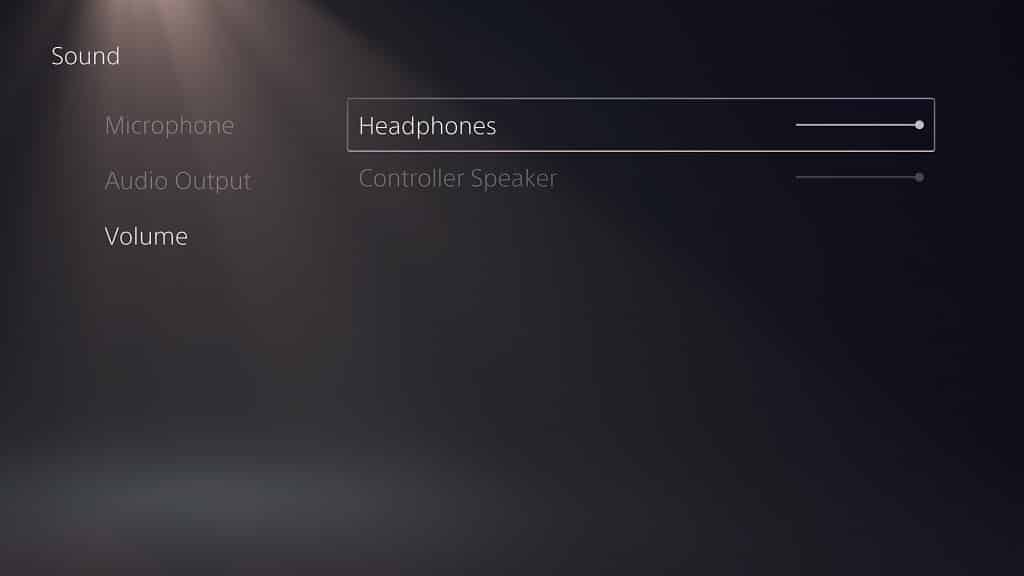
How to maximize the Arctis 7P audio volume on PS5

SteelSeries recommends setting the audio output volume on the PlayStation 5 to the maximum so that the Arctis 7P is able to utilize the full volume range. You can then use the volume control on the headset to increase or decrease the volume level.

In order to maximize the audio output on the PS5, you need to do the following:

1. First off, you need to be in the home screen, which is the main menu for the system where you can select which game to play.

2. In the home screen, you need to find and select the gear cog symbol on the upper right corner of the screen, which should bring you to the Settings menu.

3. In the Settings menu, you need to select Sound.

4. In the Sound menu, you need to select Volume on the left side.

5. On the right side in the same Sound menu, you need to select Headphones.

6. Use the analog stick or directional pad to move the circle all the way to the right.

How to use and optimize 3D audio with Arctis 7P on PS5

If you want to use the PlayStation 5’s 3D audio with the Arctis 7P, you need to do the following:

1. Go to the Settings menu from the home screen.

2. Inside the Settings menu, select Sound.

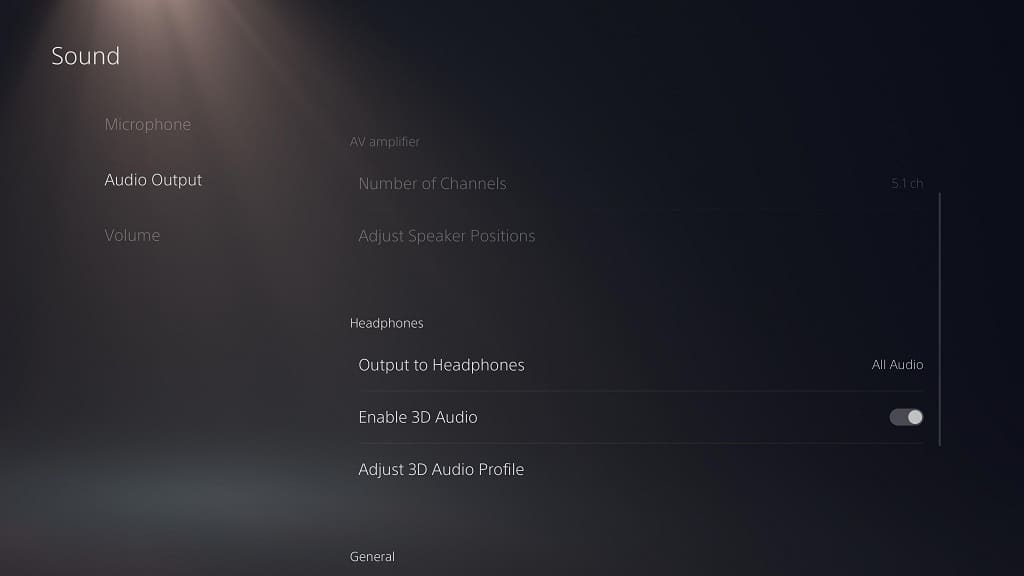
3. Inside the Sound menu, you will see the Enable 3D Audio option. If the switch to the right of the wording is black, select the option to turn it white as this will enable 3D audio.

It should be noted that 3D audio may cause audio issues when used with games that don’t support that feature. If you are experiencing problems, you can disable 3D audio.

For more information on headset audio issues, you can check out this troubleshooting guide.

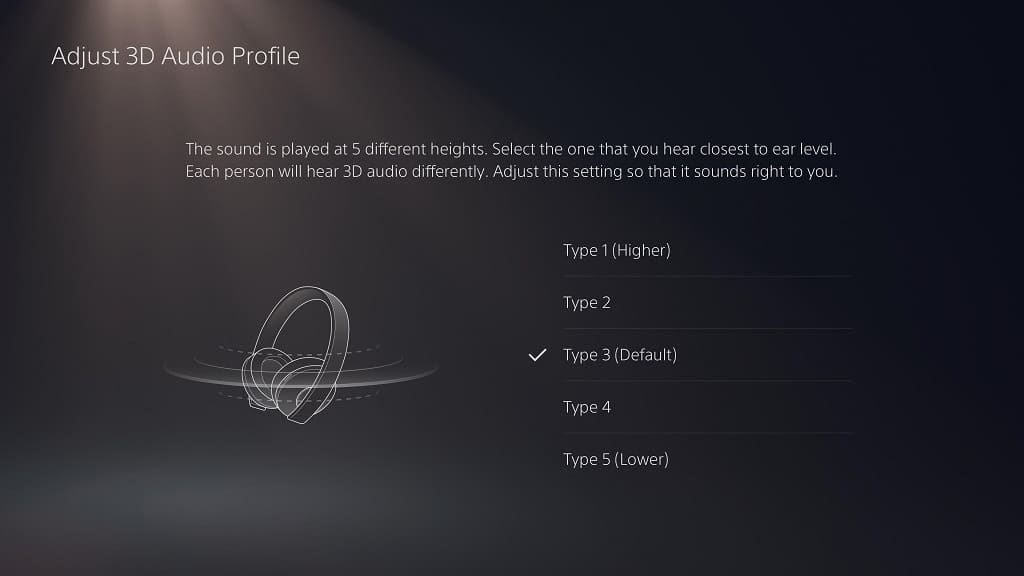
4. In you want to use 3D Audio, then you optimize the feature by selecting the Adjust 3D Audio Profile option that is just below the Enable 3D Audio option.

5. In the Adjust 3D Audio Profile menu, you can select between five different height types. Choose the type that is closest to your ear level.

How to optimize microphone audio with Arctis 7P on PS5

To optimize the microphone audio with the SteelSeries Arctis 7P on PlayStation 5, you can take the following steps:

1. From the home screen, go into Settings.

2. From the Settings menu, go into Sound.

3. From the Sound menu, select Microphone on the left side of the screen.

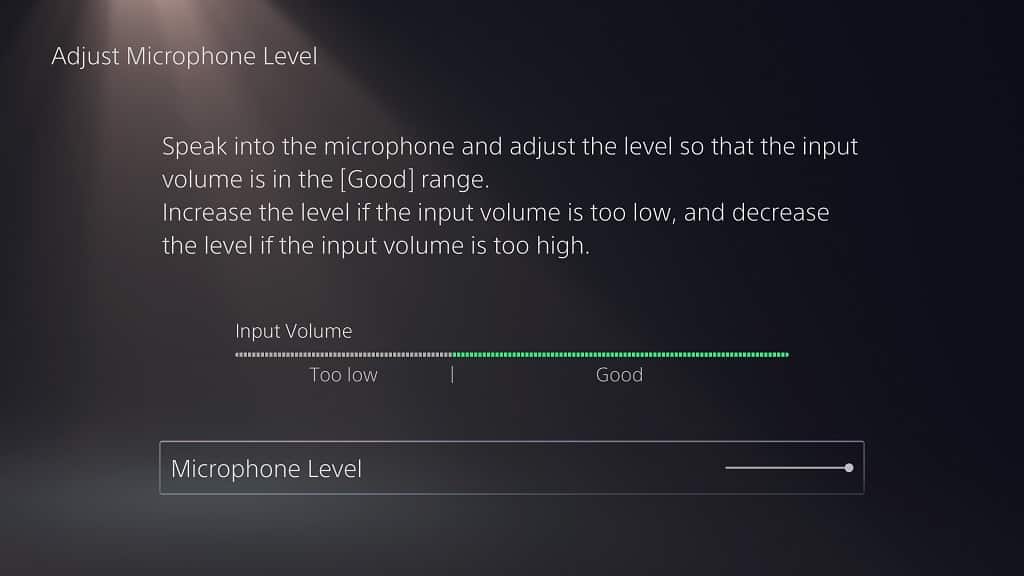
4. On the right side of the same Sound menu, select Adjust Microphone Level.

5. In the Adjust Microphone Level menu, you can increase or decrease the mic level of your Arctis 7P. You will also see Input Volume, which measures the current mic volume.

Speak into the mic and then check out the Input Volume to see if your voice consistently hit the good portion of the measurement gauge.

If not, you can use the Adjust Microphone Level. option below to adjust the mic level.

How to fix issues with muffled, tinny and low-quality headset audio on PS5

When using your headset with the PlayStation 5 (or PlayStation 5 Digital Edition), you may notice that the sound is muffled, tinny and/or generally of lower quality than what you were expecting.

If your headset is not sounding right when playing games on the PS5, you can follow this Seeking Tech guide to find some potential fixes.

Before we being, we recommend taking a look at your headset to see if it is functioning normally. To do so, we suggest testing it on another device, like a computer or a non-PS5 game system.

If your headset is working normally on other devices, then the next step we recommend you take is to see if it can be updated via a firmware. If it is, you can usually find the new software file, as well as instructions to updating, on the official website of the manufacturer of your headset.

You should also make sure that your PlayStation 5 is up-to-date as the latest firmware could fix your headset audio issues. If your console is connected to the Internet, then it will automatically download the newest firmware if there is an update available.

Furthermore, if you are using a wireless headset that connects to your PS5 via an USB transmitter, then we recommend using the USB port in the front as many players are reporting issues with the two back ports.

What are the best compatible PS5 headsets?

Keep in mind that not all headsets are compatible with the PlayStation 5. If you are looking for a new headset, we recommend either the official PULSE 3D Wireless Headset or the SteelSeries Arctis 7P Wireless.

If you are interested, you can purchase either of the two on Amazon with the following links:

To find out more about these two headsets, you can take a look at our compatibility guides for Sony and SteelSeries PS5 headsets.

How to disable 3D audio on PS5

If none of the aforementioned suggestions fix the bad quality headset audio issues, then one of the more common fixes is by disabling 3D audio.

The PlayStation 5 comes with the Tempest Engine to deliver 3D audio. Not all PS5 games support this feature. Not to mention that PS4 backwards compatible games also do not support the Tempest Engine.

Games that do not support PS5’s 3D audio feature may end up sounding distorted. So, if you are experiencing headset issues, you can try disabling 3D audio.

You can do so with the following steps:

1. Turn on your PlayStation 5 and then select a user profile. This will bring you to the Home Screen main menu.

2. In the main menu, head to “Settings,” which you can find on the top right corner of the screen.

3. In the Settings menu, select “Sound.”

4. In the Sound menu, select “Audio Output” on the left side.

5. On the right side of the same screen, scroll down until you see the “Enable 3D Audio” option. If it is greyed out, you need to make sure your headset is plugged in.

6. If the to the right of the “Enable 3D Audio” option is white, it means that the feature is currently enabled. Select “Enable 3D Audio” to turn it off.

How to adjust 3D audio profile on PS5

Another potential fix for the muffled, tinny and/or low-quality headset sound is by adjusting the 3D audio profile.

You can do so with the following steps:

1. Return to the aforementioned Sound menu in Settings.

2. In the Sound menu, select “Audio Output” on the left side and the “Adjust 3D Audio Profile” option under Headphones on the right side of the same screen. If this is greyed out, make sure your headset is plugged in and “Enable 3D Audio” is enabled.

3. In the Adjust 3D Audio Profile menu, follow the instructions on the screen. Basically, you want the water line to be as close to your ear level as possible.

How to change the audio format of PS5

If you still getting bad audio from your headset, you can try changing the audio format on the PlayStation 5.

To do so, you can take the following steps:

1. Head back to the Sound menu in Settings and then select “Audio Output” on the left side of the screen.

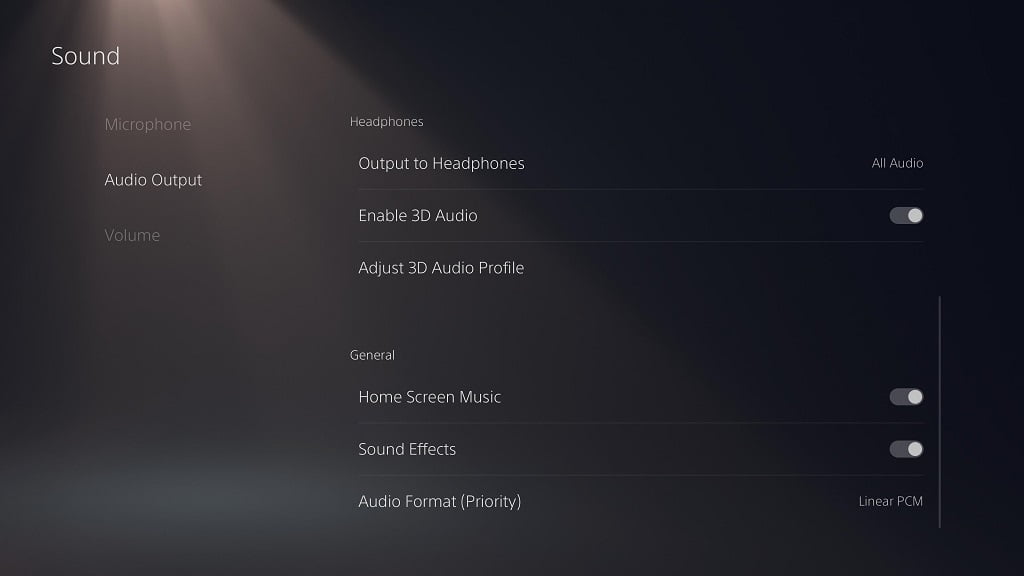
2. Scroll all the way down and select “Audio Format (Priority)” under General.

2. You have three options as you can choose between “Linear PCM,” “Bitstream (Dolby)” and “Bitstream DTS.” Test out all three to see if changing the audio format will resolve the distorted sound.

How to rebuild database on PS5

If none of the above fixes worked, then you can try rebuilding the database on your PlayStation 5.

To do so, you need to take the following steps:

1. Turn your PS5 completely off.

2. Locate the power button on your PlayStation 5. Press down and hold. You should hear a beep immediately. After seven seconds, you should hear a second beep. At this point, you can let go of the power button.

3. If done correctly, the PS5 will boot up in Safe mode. Follow the onscreen instructions to connect your DualSense controller to go to the menu.

4. In the menu, select “Rebuild Data” to start the process.

How to fix unresponsive microphone input in Astro’s Playroom

Astro’s Playroom is a videogame that is pre-installed with every PlayStation 5 and PlayStation 5 Digital Edition. When playing, you may eventually come up to a section where the game will tell you to blow into the microphone input of your DualSense controller.

If you are having issues in this section, you can follow this guide at Seeking Tech for some potential fixes.

Why the DualSense mic is unresponsive in Astro’s Playroom

Based on our tests, this issue mainly occurs when you are using a headphone or headset with your PlayStation 5. Once the system detects your headphone or headset, it will automatically switch the microphone input device from the microphone on the DualSense controller to the microphone on your headphone or headset. Keep in mind that not all headphones will have this issue.

You can check the microphone input device in the Settings section of the system menu. From there, select “Sound” and then “Microphone.”

Solution for Headphone

If you running into issues with unresponsive microphone input when using a headphone (which don’t have a microphone), then an easy way to get past these sections that require you to blow on a mic is by pressing the mic mute button. The button is located below the “PS” button on your DualSense controller. You can tell the microphone Is muted when it displays an orange light.

Once the Astro’s Playroom game detects that your microphone has been muted, it will move you through the problematic section without any inputs.

Solution for Headset

If you have a headset, you need to blow directly into the mic on your headset.

If you are still having issues, you can try going to “Settings” from the main system menu and then select “Sound.” From there, select “Microphone” and then “Adjust Microphone Level.” In this section, you can test out the sensitivity of your headset microphone and adjust the microphone level. If your input level is too low, try increasing the microphone level.

If blowing into your headset microphone still does not work, you can try muting your microphone on your headset during the mic-blowing sections in Astro’s Playroom and see if the game will move you through without any inputs.

If none of the above works, simply disconnect your headset from the PlayStation 5. The system will automatically revert the microphone input to your DualSense controller. So, you should now be able to blow on it. Once again, you can check your mic status from the main system menu by going to “Settings,” then “Sound” and then “Microphone.”

Razer Xbox Series X|S Wireless Gaming Headset: Kaira vs. Kaira Pro

Razer released two new Xbox Series X|S Wireless Gaming Headsets with the Kaira and Kaira Pro. So, what are the differences between these officially licensed headsets?

You can find out in this comparison guide.

Quick Summary

When compared to the Razer Kaira, the Razer Kaira Pro comes with support for Bluetooth 5.0 as well as a dedicated mobile microphone.

If you are planning to stream videogames from Xbox Game Pass on a mobile device via xCloud, then you should get the pro version.

The Razer Kaira Pro also comes RGB lighting as well as a longer battery life (although the battery life is the same as the regular version if you decide to use the aforementioned RGB lighting).

If you don’t mind missing out on the above-mentioned features, then the Razer Kaira is the more affordable option that provides the same sound output and microphone quality as the pro version on the Xbox Series X and Xbox Series S.

Razer Kaira vs. Razer Kaira Pro Comparison Chart

You can check out Seeking Tech’s comparison table for the two gaming headsets below.

Razer Kaira Wireless Gaming HeadsetRazer Kaira Pro Wireless Gaming Headset
Weight0.73 lb. or 332 grams0.80 lb. or 365 grams
Frequency Response20 Hz to 20 kHz20 Hz to 20 kHz
Impedance at 1 kHz32 ohms32 ohms
Headphone Sensitivity108 dB108 dB
Driver TypeRazer TriForce TitaniumRazer TriForce Titanium
Driver Size50 mm50 mm
Earcups MaterialFlowKnit breathable memory foam cushionsFlowKnit breathable memory foam cushions
Inner Earcup Diameter2.2" x 2.64" (or 56 mm x 67 mm)2.2" x 2.64" (or 56 mm x 67 mm)
Windows Sonic Support?YesYes
Headphone Noise Cancelling Support?NoNo
Wireless Connection TypesDirect to Xbox Series X|S

Xbox Wireless Adapter for Windows 10
Direct to Xbox Series X|S

Xbox Wireless Adapter for Windows 10

Bluetooth 5.0
On-Earcup ControlsEQ/Xbox Pairing Button

Game/Chat Balance Wheel

Mic Mute Switch

Power Button

Volume Wheel
Bluetooth/Multi-Function Button

EQ / Xbox Pairing Button

Game/Chat Balance Wheel

Mic Mute Switch

Power Button

Volume Wheel
Wireless Frequency2.4 GHz and 5 GHz2.4 GHz and 5 GHz
Wireless Range30 feet (or 10 meters)30 feet (or 10 meters)
Microphone TypesBendable Razer HyperClear Cardioid MicrophoneDetachable Razer HyperClear Cardioid Microphone

Dedicated Mobile Microphone
Microphone Frequency Response100 Hz to 10,000 Hz100 Hz to 10,000 Hz
Microphone Sensitivity at 1 kHz54 ± 3 dB at 1 kHz54 ± 3 dB at 1 kHz
LightingNoneRazer Chroma RGB underglow lighting
Battery LifeUp to 15 hoursUp to 15 hours with RGN lighting

Up to 20 hours without RGB lighting
Warranty2-year warranty2-year warranty
PricingCheck price on Amazon.(#CommissionsEarned)Check price on Amazon.(#CommissionsEarned)

Weight

The Pro version of the Razer Kaira Wireless Gaming Headset is around 10 percent heavier when compared to the regular version.

You can check out the weight specifications for both below:

  • Razer Kaira: 0.73 lbs. or 332 grams
  • Razer Kaira Pro: 0.80 lbs. or 365 grams

Frequency Response

The two gaming headsets have a frequency response range of 20 Hz to 20 kHz.

Impedance at 1 kHz

Both Xbox Series S and X headsets also has an impedance of 32 ohms at 1 kHz.

Headphone Sensitivity

The Razer Kaira Wireless Gaming Headset and Razer Kaira Pro Wireless Gaming Headset have identical headphone sensitivity ratings of 108 dB.

Driver Type

The two products in this versus guide are built with Razer TriForce Titanium, which features custom-tuned drivers for bass, mid and treble sound output.

The titanium diaphragms also add vocal clarity.

Driver Size

The Razer Kaira and Razer Kaira Pro are both equipped with 50 mm drivers.

Earcups Material

The ear cups for the Pro and standard versions are built with FlowKnit breathable memory foam cushions.

This material is designed to minimize sweating, heat buildup and soften the headset’s clamp force.

Inner Earcup Diameter

The Kaira and Kaira Pro have the same inner ear cup diameter at 2.2″ x 2.64″ (or 56 mm x 67 mm).

Windows Sonic

Both products also support Windows Sonic, which provides surround sound when playing videogames on your Xbox Series S and/or Xbox Series X.

Headphone Noise Cancelling

None of the headsets support headphone noise cancellation.

Wireless Connection Types

In terms of wireless connections, both gaming headsets can connect directly to the Xbox Series X and Xbox Series.

The two products can also connect to Windows 10 PCs and other devices via the Xbox Wireless Adapter.

The Razer Kaira Pro is the only one of the two headsets to support Bluetooth 5.0, which means you can connect it to smartphones and other mobile devices to play games on the Xbox Game Pass via the xCloud streaming service.

You can find a full breakdown of the available connection types below:

Razer Kaira:

  • Direct to Xbox Series X|S
  • Xbox Wireless Adapter for Windows 10

Razer Kaira Pro:

  • Direct to Xbox Series X|S
  • Xbox Wireless Adapter for Windows 10
  • Bluetooth 5.0

On-Earcup Controls

The Pro version has a Bluetooth/Multi-Function button while the standard version does not.

Otherwise, the two Xbox Series gaming headsets have the same on-earcup controls.

You can check out the control options for each headset below:

Razer Kaira Wireless Gaming Headset:

  • EQ/Xbox Pairing Button
  • Game/Chat Balance Wheel
  • Mic Mute Switch
  • Power Button
  • Volume Wheel

Razer Kaira Pro Wireless Gaming Headset:

  • Bluetooth/Multi-Function Button
  • EQ / Xbox Pairing Button
  • Game/Chat Balance Wheel
  • Mic Mute Switch
  • Power Button
  • Volume Wheel

Wireless Frequency

The two gaming headsets use the 2.4 GHz and 5 GHz frequency for wireless connection.

Wireless Range

The wireless range for both is 30 feet (or 10 meters).

Microphone Types

Both headphones come with a Razer HyperClear Cardioid Microphone, which features noise cancellation and an open housing that minimize obstruction.

The Pro version also includes a dedicated mobile microphone.

You can take a look at the microphone types included in each product below:

Razer Kaira Wireless Gaming Headset:

  • Bendable Razer HyperClear Cardioid Microphone

Razer Kaira Pro Wireless Gaming Headset:

  • Detachable Razer HyperClear Cardioid Microphone
  • Dedicated Mobile Microphone

Microphone Frequency Response

The two Kaira headsets have the same microphone frequency response range of 100 Hz to 10,000 Hz.

Microphone Sensitivity at 1 kHz

The microphones of both products also have identical microphone sensitivity of 54 ± 3 dB at 1 kHz.

Lighting

The Razer Kaira Pro is the only wireless gaming headset in this comparison guide to feature Razer Chroma RGB underglow lighting.

Battery Life

The Razer Kaira has a battery life of up to 15 hours.

The Razer Kaira Pro has a battery life of up to 15 hours if you are using the aforementioned Razer Chroma RGB underglow lighting. Without the use of RGB lighting, the pro version has a battery life of up to 20 hours.

Warranty

The Razer Kaira Wireless Gaming Headset for Xbox Series X|S and Razer Kaira Pro Wireless Gaming Headset for Xbox Series X|S each come with a 2-year warranty.

Resources: