What to do if Star Wars Jedi: Survivor looks too dark on PS5

When playing Star Wars Jedi: Survivor on your PlayStation 5 or PlayStation 5 Digital Edition, you may notice that the graphics look too dark. In some cases, you may not be able to see anything at all due to the server black crush.

To see how you can fix this specific display issue, you can take a look at this troubleshooting guide from Seeking Tech.

1. If you haven’t done so already, make sure you download the latest patch for Jedi Survivor. You can manually check if a new update is available by doing the following:

  • Go to the home screen of your PS5 console.
  • On the home screen, move the cursor to the Star Wars Jedi: Survivor icon.
  • Press the Options button on the DualSense controller.
  • In the pop-up menu, select Check for Update.

This brightness issue appears to be widespread for gamers who are playing the game on the PS5 platform. Therefore, it is very likely that the development team at Respawn Entertainment will fix it in a new patch sooner rather than later.

2. If you don’t want to wait for a new patch, then you can try manually adjusting the brightness output of your console, as well as by using the in-game menu, in order to temporarily fix the crushed blacks.

We suggest following the directions provided by the GamingTech YouTube channel by taking the following step:

  • To start off, turn off Dynamic Tone Mapping or HGiG from your television set if it uses any of these two HDR features.
  • Next, open the Settings menu on your PS5 and then head over to Screen and Video > Video Output > Adjust HDR.
  • In the next three screens, keep pressing Up on the directional until you are no longer able to increase the brightness.
  • Go to the Options > Visuals menu in Star Wars Jedi: Survivor and then select HDR Brightness.
  • In the HDR Calibration menu, set HDR Brightness to a value of 20 and HDR Black Point to a value of 5.

If you need a visual guide for these directions, then you can check out GamingTech’s video on this temporary fix below:

Keep in mind that changing the HDR brightness output for your PS5 by using the Adjust HDR option will also be applicable to the other games you play on the console. So, if you decide to play another game, then you will need to re-calibrate the console HDR brightness output.

3. If you don’t want to mess with the HDR brightness output of your PlayStation 5 or PlayStation 5 Digital Edition, then you might want to try playing Jedi Survivor in SDR instead of HDR.

In order to do so, you need to do the following:

  • Go to the Settings menu of your PS5 from the home screen.
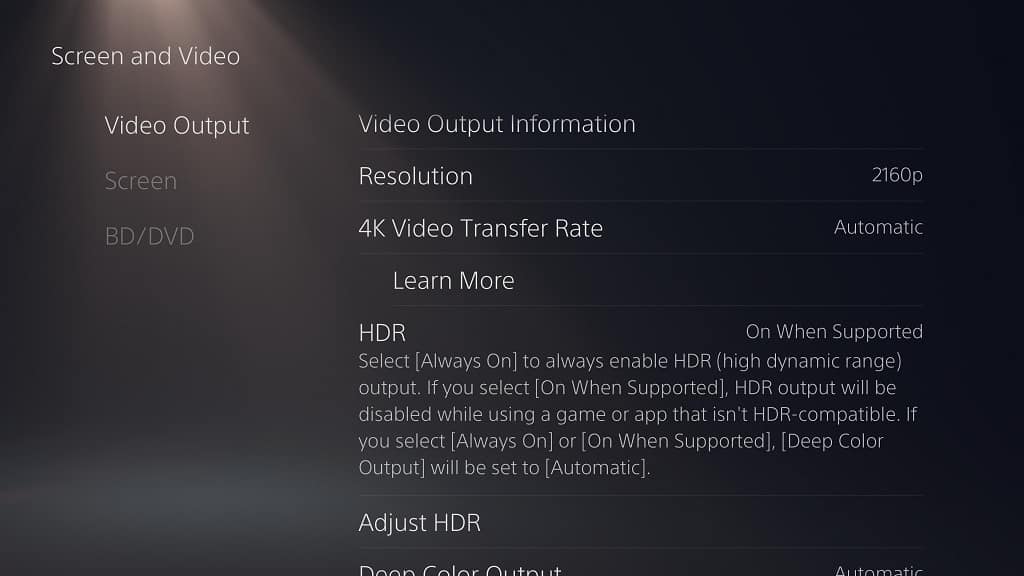
  • Inside of Settings, go to Screen and Video > Video Output.
  • From the Video Output menu, make sure that HDR is set to On When Supported.
  • Open Star Wars Jedi: Survivor and then head over to its Options menu.
  • From there, select Visuals.
  • Finally, make sure that HDR Output is turned off.
  • Afterwards, you can select Brightness from the same menu to change the brightness output in SDR.

How to disable slow motion in Disney Speedstorm

If you managed to stun another racer in Disney Speedstorm, then time will slow down in order to highlight your accomplishment. If you find that this mechanism is throwing you off of your rhythm when it comes to racing around the track, then you can take a look at this tutorial from Seeking Tech to see how you can disable it.

1. For the first step, you need to head over to the Game Settings menu.

One of the ways to do so is from the main menu. From there, you can press the following button:

  • Option button if you are playing on the PlayStation 4, PlayStation 4 Pro, PlayStation 5 or PlayStation 5 Digital Edition.
  • Menu button if you are playing on Xbox One, Xbox One S, Xbox One X, Xbox Series S or Xbox Series X.
  • + button if you are playing on Nintendo Switch, Nintendo Switch OLED of Nintendo Switch Lite.

Alternatively, you can go to Games Settings from the paused screen. You can pause the game during an offline race by pressing the same aforementioned buttons.

2. Once you get to the Game Settings menu, you need to select Cameras & Display from the list of options.

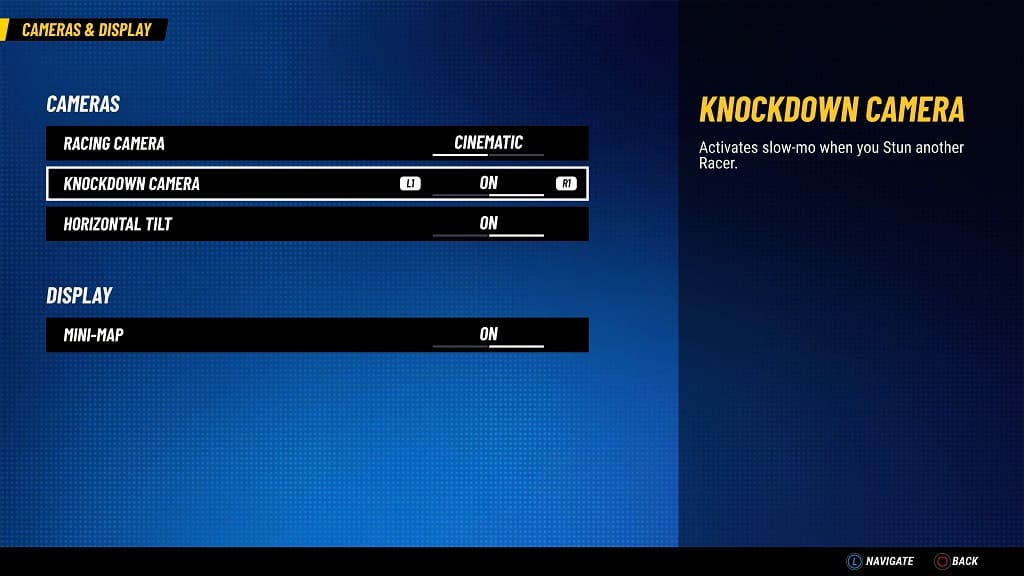
3. From the Cameras & Display menu, move the cursor down to Knockdown Camera, which should have the following description:

  • “Activates slow-mo when you Stun another racer.”

4. By default, this setting is enabled.

To turn this feature off, you can use the following buttons:

  • L1 and R1 buttons on PlayStation
  • LB and RB buttons on Xbox
  • L or R buttons on Nintendo Switch

5. Once you set the Knockdown Camera to off, you can exit the Cameras & Display and then back out of the Game Settings menu.

6. When you start racing again in Disney Speedstorm, the action should no longer slow down to highlight your stun attack on another racer.

How to change the camera angle in Disney Speedstorm

By default, the Disney Speedstorm uses a “Cinematic” camera angle that is closer to the kart and tends to move around during the race. If you find that you have a hard time seeing the track while racing, then you can check out this tutorial from Seeking Tech.

1. To start off, you need to enter the Game Settings menu.

You can do so from the main menu by pressing the Options button if you are playing on PS4/PS5, Menu button on Xbox One/Xbox Series or + button on Nintendo Switch.

You can also find Game Settings from the Game Paused screen. You can pause the game during the offline races by pressing the Options button on PlayStation, Menu button on Xbox or + button on Switch.

2. Inside the Game Settings menu, you need to select Cameras & Display.

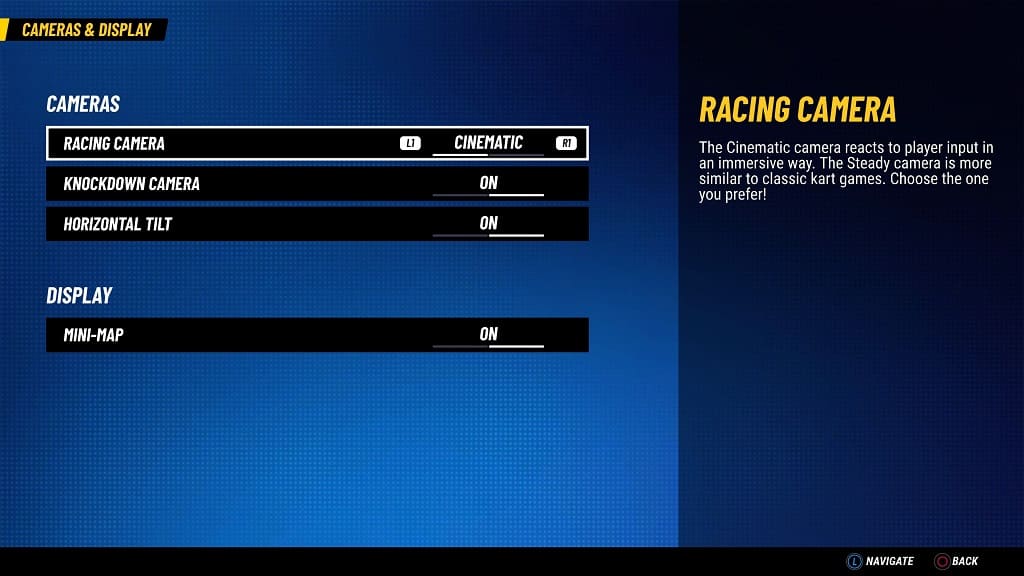
3. After getting to the Cameras & Display menu, make sure that the cursor is at the Racing Camera setting in the Cameras setting. This should have the following description:

  • “The Cinematic camera reacts to the player input in an immersive way. The Stead camera is more similar to classic kart games. Choose the one you prefer!”

4. By default, the Racing Camera is set to Cinematic.

To change it to Steady, you need to press the L1/R1 buttons on PlayStation, L/R buttons on Switch or LB/RB buttons on Xbox.

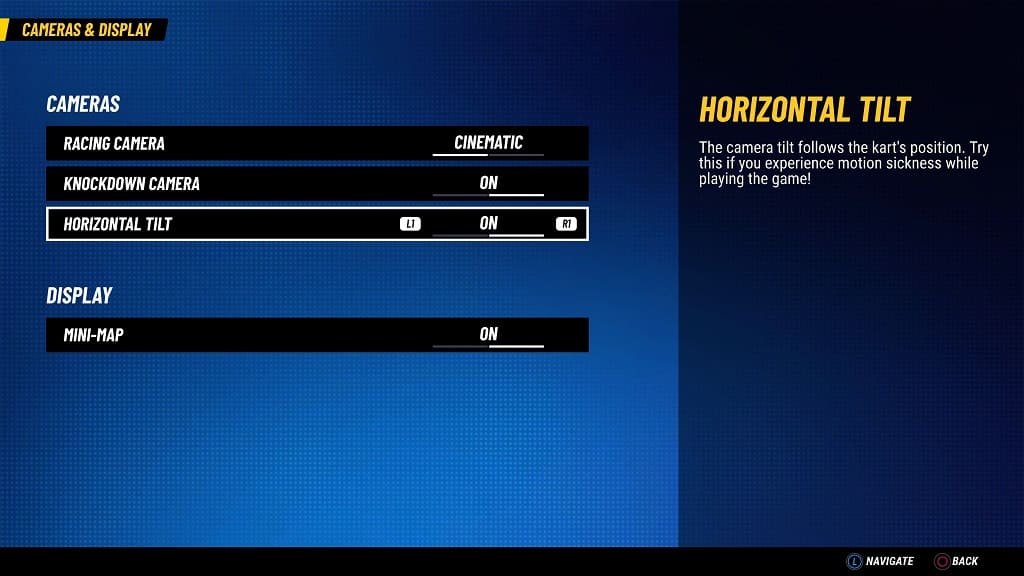
5. Also in the same Cameras & Display menu, you will find the Horizontal Tilt setting, which should show the following description:

  • “The camera tilt follows the kart’s position. Try this if you experience motion sickness while playing the game.”

6. By default, the Horizontal Tilt setting is turned on. We recommend that you try playing Disney Speedstorm with this feature enabled to see if you prefer the camera tilt following your kart around.

If you find that you have a hard time seeing the racetrack with this feature, then you can try disabling it so see if your racing performance improves.

How to prevent motion sickness while playing Dead Island 2

When playing Dead Island 2, you may start to feel a little dizzy. If you are experiencing nausea, then you can take a look at this guide from Seeking Tech to see how you can feel more comfortable during gameplay.

1. For the first step, you can try increasing the field of view, which moves the camera angle backwards so that you can see more of the environment. By increasing the FoV, you may be able to get rid of the nausea while playing this first-person action-adventure game.

In order to do so, you need to do the following:

  • To start off, you need to head over to the Options menu in Dead Island 2.
  • From the Options menu, you then need to select Display.
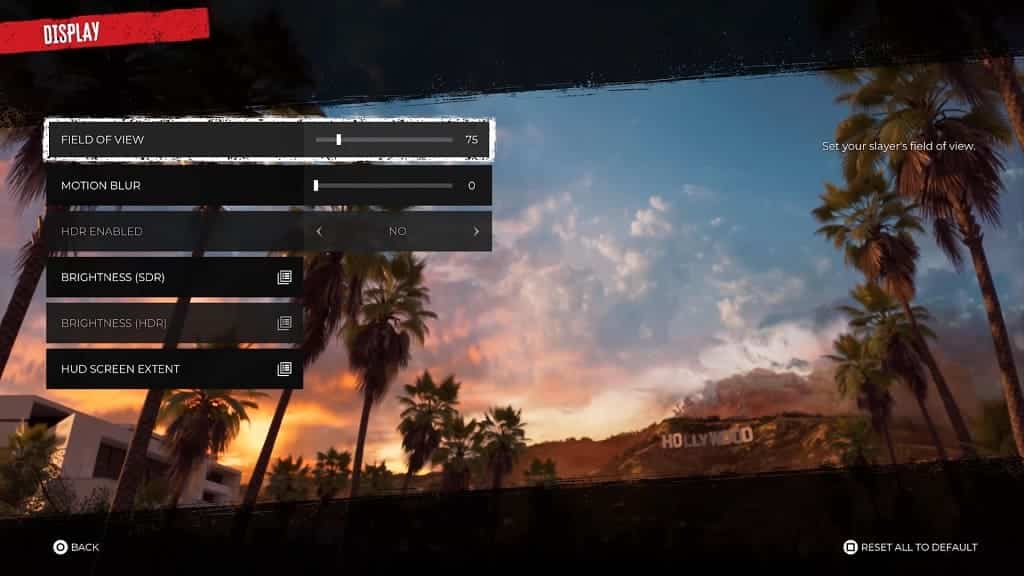
  • After getting to the Display menu, move the cursor down to Field of View.

  • Use the directional pad or left analog stick to change the FoV for the game.
  • Afterwards, we recommend testing out the new field of view angle to see if you are still getting motion sickness. If you are, then you can re-adjust the Field of View from the aforementioned Display menu.
  • You may have to go through several different angles in order to find your comfort zone.

2. If you find that the game is too blurry, then it may lead to your motion sickness. In this case, you can return to the Options > Display menu. From there, you can move the Motion Blur slider to 0 in order to disable any blurring effects when it comes to objects in motion.

3. If the character isn’t moving or aiming as snappy as you would like, then it may also be triggering your nausea.

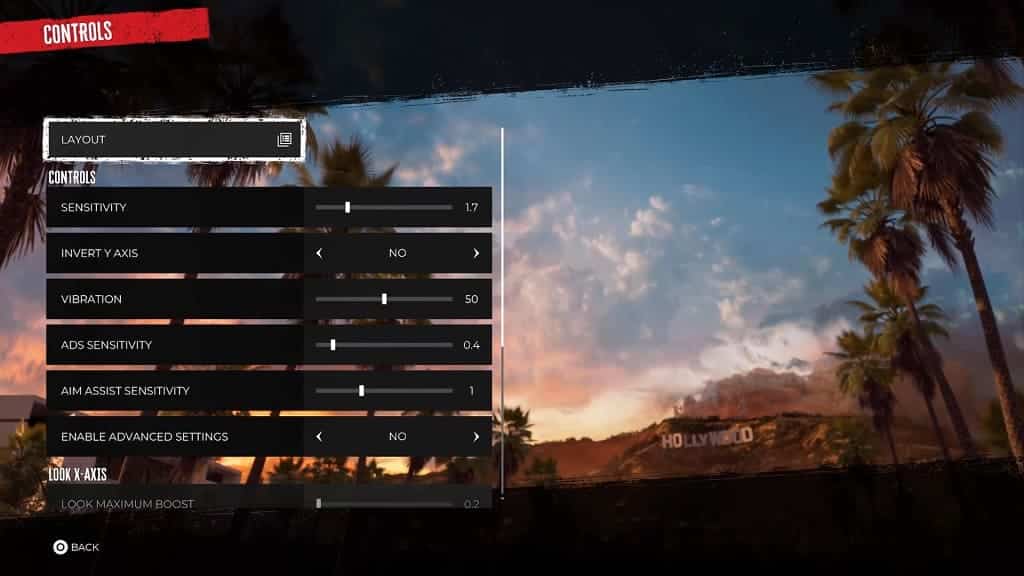
To edit the sensitivity and deadzones for both the left and right analog sticks, you need to open the Options menu and then head over to Controls.

In the Controls menu, you will be able change the following:

Controls:

  • Sensitivity
  • Invert Y-Axis
  • ADS Sensitivity
  • Aim Assist Sensitivity

If you enable Advanced Settings, then you can also adjust the following:

Look X Axis:

  • Look Maximum Boost
  • Look Boost Ramp Time
  • Look Boost Threshold

Look Y Axis:

  • Look Maximum Boost
  • Look Boost Ramp Time
  • Look Boost Threshold

Left Stick:

  • Inner Deadzone
  • Outer Deadzone
  • Invert Y Axis
  • X Axis Sensitivity

Right Stick:

  • Inner Deadzone
  • Outer Deadzone
  • Y Axis Sensitivity
  • Invert Y Axis
  • X Axis Sensitivity

To find out more about how you can deal with the input lag when playing Dead Island 2, you can take a look at this troubleshooting post.

How to find a list of PS5 games with accessibility options

If you have a PlayStation 5 or PlayStation 5 Digital Edition console, then you will be able to find a list of games that offer accessibility options. To see how you can locate these titles, you can take a look at this tutorial from Seeking Tech.

1. To start off, you need to head to the home screen of your gaming system if you aren’t there already.

2. From the home screen, you should then head over to the PlayStation Store App.

3. Once you have opened the shopping application, you should be in the Latest tab. Here, you need to press the R1 button to switch over to the Collections tab.

4. Once you get to the Collections tab, you should be able to see the Discover – Accessibility option appear at the top in the Featured Collections section. Make sure you select it.

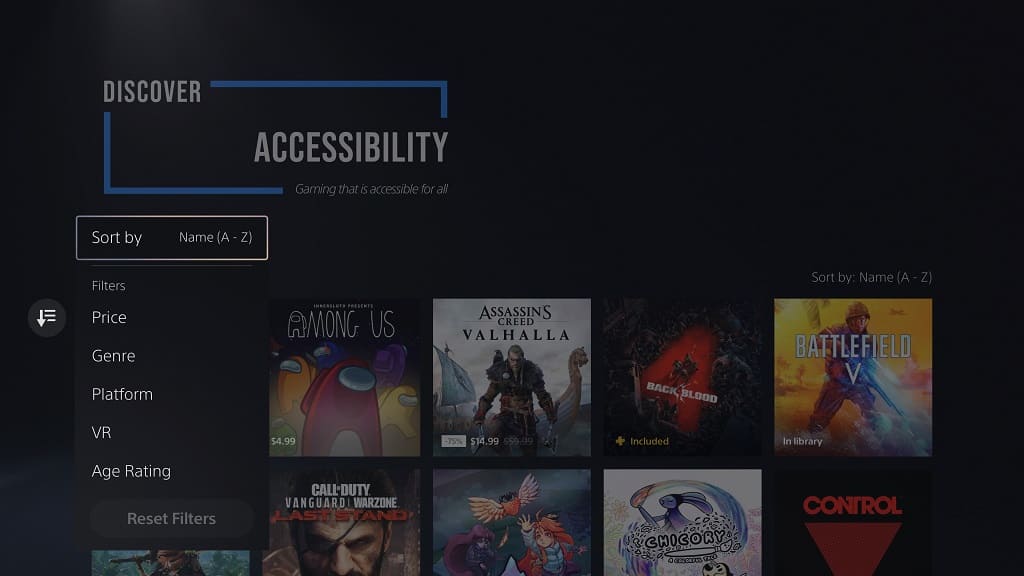
5. You should now be in the Discover – Accessibility menu, which should show the following description:

  • “Gaming that is accessible to all.”

6. By default, the listing appears to be randomly ordered. In order to sort this list, you can select the Sort and Filter option that appears on the left edge of the screen.

7. You can then select the “Sort by” option from the pop-up menu.

8. Next, you can select to sort the listing based alphabetical order or other options.

9. You can also filter out the listing from the Sort and Filter menu.

10. To see the accessibility options for a specific game, select it from the Discover – Accessibility menu.

11. On the product page of the video game, you then need to press the Triangle button.

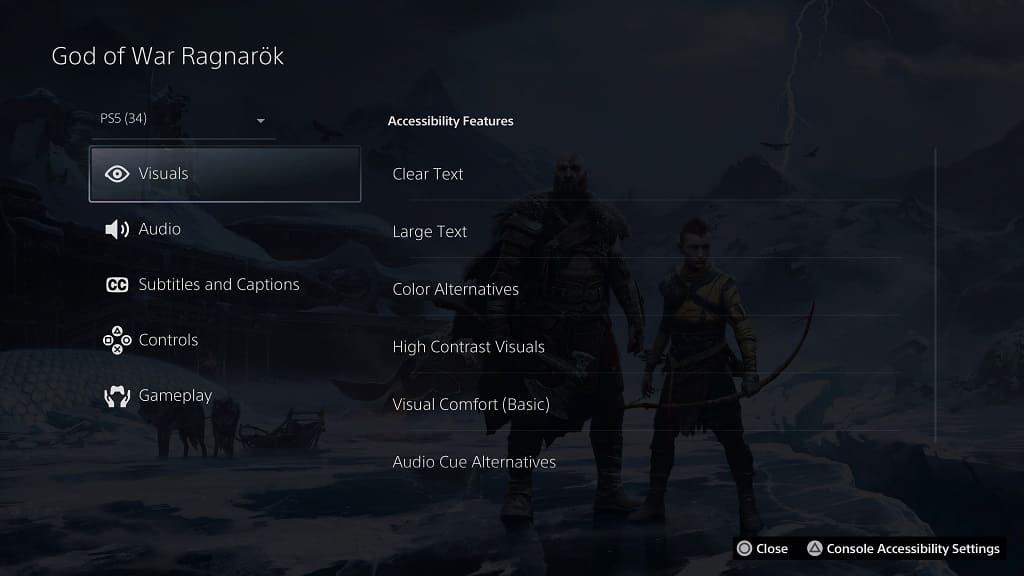
12. In the Accessibility Features menu of the game, you may see a drop-down option on the top left side. You can use it to check the accessibility options for the PS4 or PS5 version of the game. By default, you will be viewing the options available on the PlayStation 5 release.

13. You can use the rest of the Accessibility Features menu to look at the available options for the game.

With God of War Ragnarök, for example, you should see the following:

Visuals:

  • Clear Text
  • Large Text
  • Color Alternatives
  • High Contrast Visuals
  • Visual Comfort (Basic)
  • Audio Cue Alternatives
  • Directional Audio Indicators

Audio:

  • Volume Controls
  • Mono Audio
  • 3D Audio
  • Screen Reader (Basic)
  • Visual Cue Alternatives

Subtitles and Captions:

  • Subtitles (Basic)
  • Clear Subtitles
  • Large Subtitles
  • Captions (Basic)
  • Clear Captions
  • Large Captions

Controls:

  • Controller Remapping (Basic)
  • Adjustable Stick Sensitivity (Basic)
  • Adjustable Stick Inversion (Basic)
  • Playable with Button Holds
  • Playable without Rapid Button Presses
  • Playable without Motion Controls
  • Playable without Touch Controls
  • Playable without Controller Vibration
  • Playable without Adaptive Trigger Effect

Gameplay:

  • Adjustable Difficulty (Basic)
  • Game Speed (Basic)
  • Control Reminders
  • Tutorial Reminders
  • Practice Mode
  • Game Pausing
  • Manual Saving

How to disable Final Fantasy Pixel Remaster trophy notifications

The PlayStation 4 versions of Final Fantasy, Final Fantasy II, Final Fantasy III, Final Fantasy IV, Final Fantasy V and Final Fantasy VI all feature trophies. Each of these titles offer a platinum trophy if you feel like earning it.

With that said, the pop-up notifications that appear every time you earn a trophy may be too distracting for your eyes, especially if you want an authentic experience when it comes to playing these classic Japanese role-playing games.

To see how you can disable the trophy notifications for all six games in the Final Fantasy Pixel Remaster collection, you can take a look at this article from Seeking Tech.

1. The first step you need to take is to return to home menu of your PlayStation 4, PlayStation 4 Pro, PlayStation 5 or PlayStation 5 Digital Edition console.

2. From the home menu, you need to head over to Settings.

3. Inside of the Settings menu, find and select Notifications.

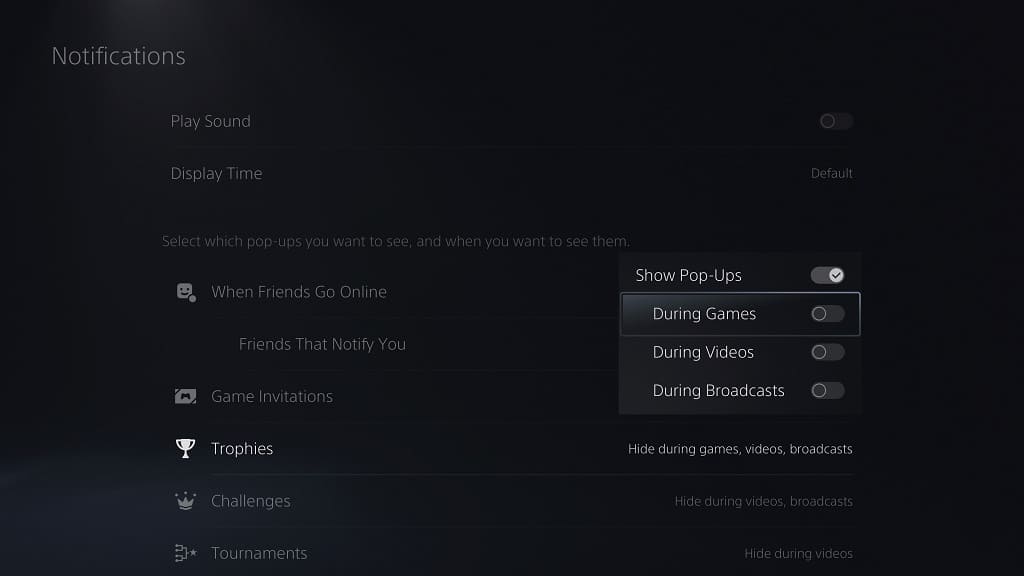
4. You will be able to disable the trophy pop-up from the Notifications menu.

On the PlayStation 5 or PlayStation 5 Digital Edition, you need to select Trophies. In the small pop-up menu, make sure that the During Game settings is disabled.

On the PlayStation 4 or PlayStation 4 Pro, you need to select Pop-Up Notifications. Afterwards, make sure that the Trophies setting is deselected in the Pop-Up Notifications menu.

5. Once you are done, you can exit the Settings menu and then return to your game.

While you can still earn trophies in Final Fantasy, Final Fantasy 2, Final Fantasy 3, Final Fantasy 4, Final Fantasy 5 and Final Fantasy 6, you will no longer see any trophy pop-up notifications.

By disabling the trophy messages on a system-level, you won’t see them pop-up on any other games on play on your PS4, PS4 Pro, PS5 or PS5 Digital Edition.

So, if you want to enable these notifications again, you can do so from the Settings > Notifications > Pop-Up Notifications menu on PlayStation 4 and Settings > Notifications > Trophies menu on PlayStation 5.

How to change the voice and text language in Live A Live

The U.S. version of Live A Live supports both English and Japanese voice dialogue. To see how you can change the language in this unique Japanese role-playing game, you can take a look at this tutorial from Seeking Tech.

1. Before we start, it is important to note that the Language Settings can only be accessed from the title screen of Live A Live. So, if you are currently playing the game, then you need to save your progress and then quit back to the title screen.

On the PlayStation 4 and PlayStation 5 versions of the game, for example, you need to do the following:

  • Press the Triangle button to open the Main Menu.
  • In the Main Menu, press the Options button to open the Save Menu.
  • Save your game in the Save Menu and then return to the Main Menu.
  • Afterwards, select Settings.
  • Inside of Settings, you need to select Return to Title.
  • You should see a message warning you that you will be losing any unsaved progress. Here, you need to select Confirm.

2. Once you get to the title screen of Live A Live, press any button to open a list of options.

3. Next, you need to select the Settings option.

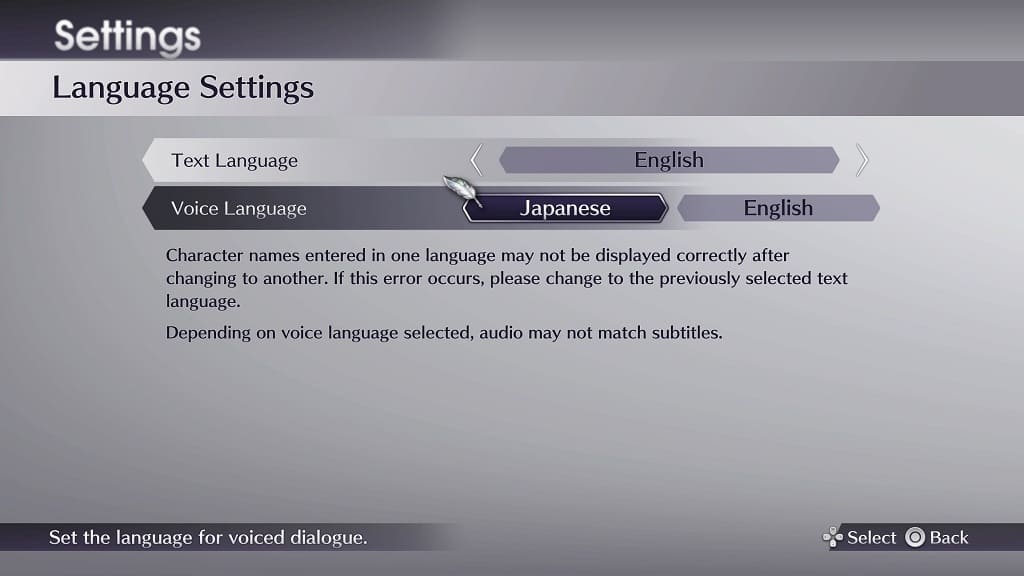
4. You should then select Language Settings from the Settings menu.

5. Inside the Language Settings sub-menu, you should see the Voice Language setting. By default, this is set to English if you are playing the U.S. region.

You can use the left analog stick or directional pad to change to a different voiced dialogue language.

6. From the same Language Settings sub-menu, you can also change the text language, which is set to English by default if you are playing the U.S. copy.

You should see the following options:

  • English
  • French
  • Italian
  • German
  • Spanish
  • Korean
  • Simplified Chinese
  • Traditional Chinese
  • Japanese

7. Once you are done making the changes, go back out of the Language Setting menu. You should get a message saying that the new settings have been saved.

8. Load back into your game and should see the new language options enabled.

How to fix Dead Island 2 HDR and brightness issues

You may find some of the environments in Dead Island 2 to be too bright while others to be too dark. To see how you can fix the brightness, as well as HDR, issues with this first-person action-adventure game, you can take a look at this troubleshooting guide from Seeking Tech.

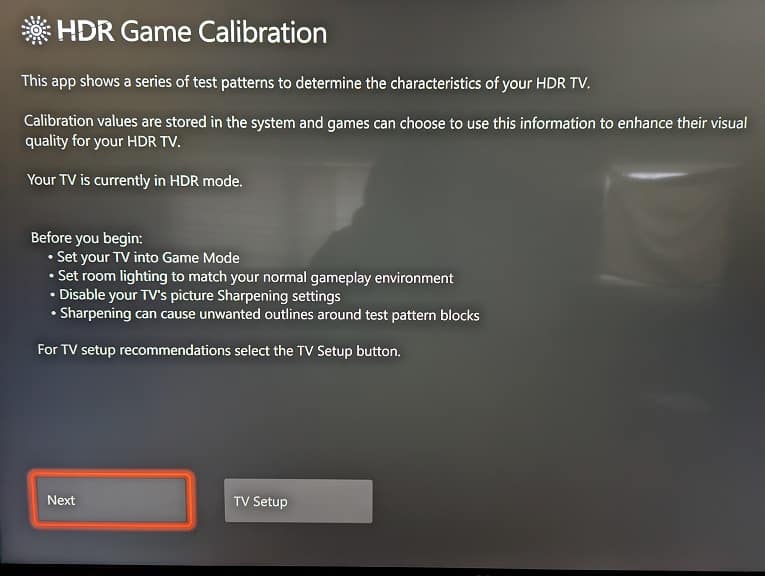
1. For the first step, we suggest calibrating the HDR brightness output of your gaming system to the television screen or monitor.

If you are playing on the PlayStation 4 or PlayStation 4 Pro, then you need to go to your console’s Settings menu and then select Sound and Screen > Video Output Settings > Adjust HDR.

On the PlayStation 5 or PlayStation 5 Digital Edition, you should go to Settings > Screen and Video > Video Output > Adjust HDR.

For the Xbox One, Xbox One S, Xbox One X, Xbox Series S or Xbox Series X, you need to head over to Settings > General > TV & display options > Calibrate HDR for games.

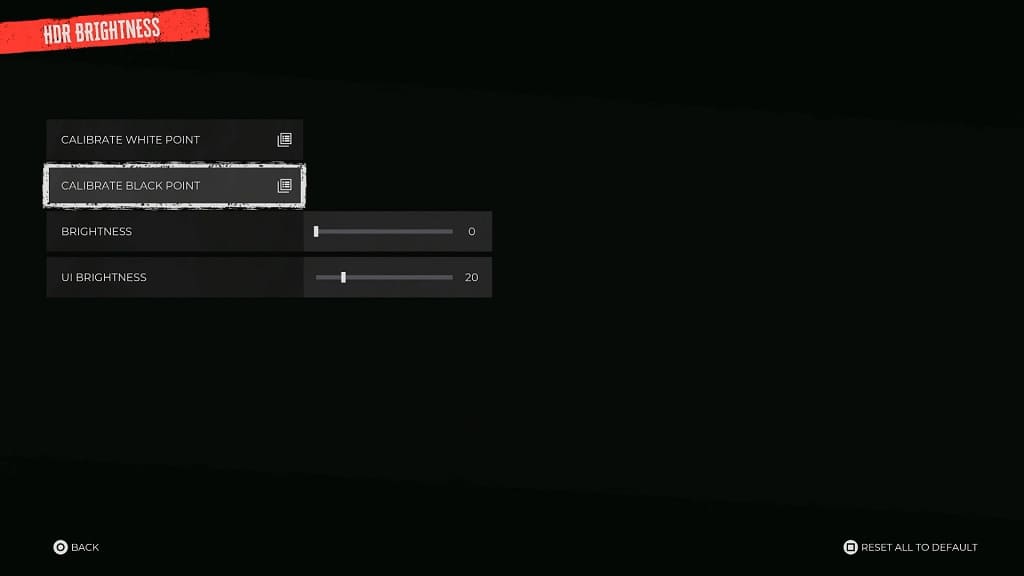
2. Next, we recommend using the HDR menu in Dead Island 2 for further calibration. You can get there by going to the Options menu and then selecting Display. From the Display menu, make sure that HDR is enabled and then select Brightness (HDR).

In the Brightness (HDR) menu, you will be able to adjust the following:

  • Calibrate White Point
  • Calibrate Black Point
  • Brightness
  • UI Brightness

Depending on the HDR brightness output of your screen, as well as the ambient room lighting, we may need to re-adjust these settings occasionally.

In regards to the ambient room lighting, you can try turning off the lights or playing at night. If you are getting a lot of sunlight, then you can try putting blinders on the windows to darken the room.

3. It is important to note that some screens are better at displaying HDR games when compared to others. So, if possible, you can try playing Dead Island 2 on a different HDR-supported TV or monitor to see if you can get a more suitable picture quality.

When changing screens, make sure you re-calibrate the HDR brightness output by using the system menus as well as the in-game Brightness HDR menu.

4. If you don’t have a good HDR capable television set or monitor available, then you can try playing Dead Island 2 in SDR.

In order to do so, open the Options menu while playing the game and then go to Display. From there, make sure that the HDR Enabled Setting is set to No in order to disable the HDR feature. Afterwards, the Brightness (SDR) option can be selected.

In the Brightness (SDR) menu, you should be able to adjust the following:

  • Calibrate White Point
  • Calibrate Black Point
  • Brightness

You may need to go back to this menu occasionally depending on the time of day you are playing this video game as the ambient room lighting may affect your visibility. If you are playing during a bright sunny day with no window blinders, for example, then the darker areas in Dead Island 2 will be harder to see due to the brighter ambient lighting.

How to turn off Dead Island 2 enemy health bars and damage numbers

Dead Island 2 will display a health bar for the enemy you are targeting. The first-person action-adventure game will also show the damage number when you connect on an attack. While these can be very helpful, they will also add some clutter to the user interface.

If you find that both of these elements to be very distracting and, therefore, end up breaking your immersion, then you can take a look at this tutorial to see how you can disable these features.

1. For the first step, you need to head over to the Options menu while playing Dead Island 2 if you aren’t there already.

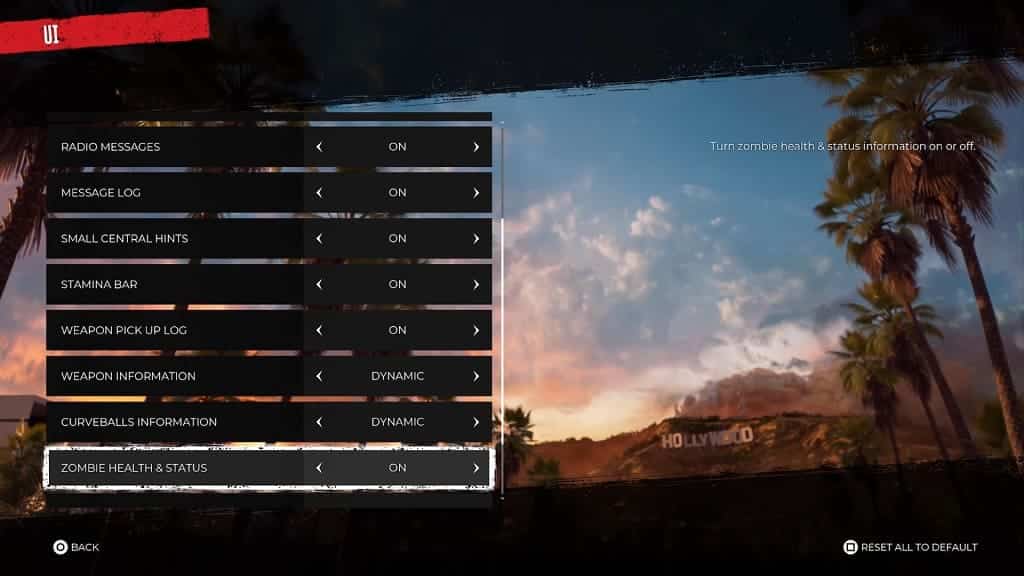
2. After getting to the Options menu, you need to select UI.

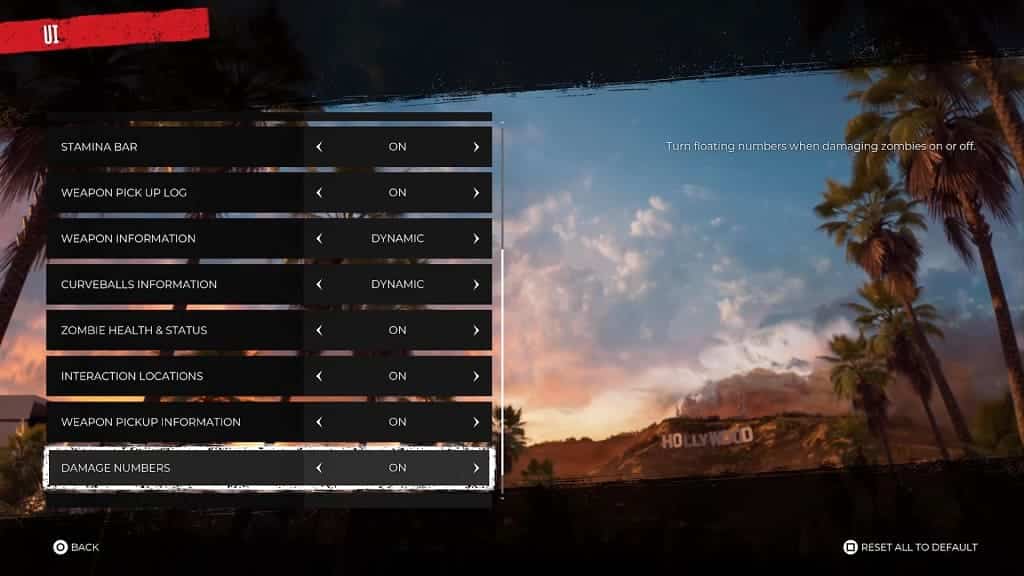
3. Once you are in the UI menu, you need to scroll down and move the cursor to Zombie Health & Status, which should have the following description:

  • “Turn zombie health & status information on or off.”

4. Make sure that the Zombie Health & Status setting is turned off.

5. Afterwards, keep scrolling down the UI menu in Dead Island 2 until you get to Damage Numbers. This setting should show the following description:

  • “Turn floating numbers when damaging zombies on or off.”

6. You should set the Damage Numbers to Off.

7. After disabling both Zombie Health & Status and Damage Numbers settings, you need to exit the UI menu.

8. You should see a notification pop-up saying that you have updated the settings. Here, you need to save the changes in order to apply them in the game.

To save, you need to press the X button if you are playing Dead Island 2 on a PlayStation 4, PlayStation 4 Pro or PlayStation 5.

If you are playing DI2 on the Xbox One, Xbox One S, Xbox One X, Xbox Series S or Xbox Series X, then you need to press the A button to save the edited settings.

How to fix Dead Island 2 input lag issues on PS5, Xbox Series X and S

If you are playing Dead Island 2 on the PlayStation 5, PlayStation 5 Digital Edition, Xbox Series X or Xbox Series S, then you may notice that your character may not be as responsive to your control inputs as you would like.

To see how you can reduce the input lag for this first-person action-adventure game, you can take a look at this troubleshooting article from Seeking Tech.

1. To begin, we recommend connecting your controller to the console directly so that you can take advantage of the wired connection. Doing so should result in less latency when compared to using the same gamepad wirelessly.

For the Xbox Series X and Xbox Series S, you simply need to plug the controller in.

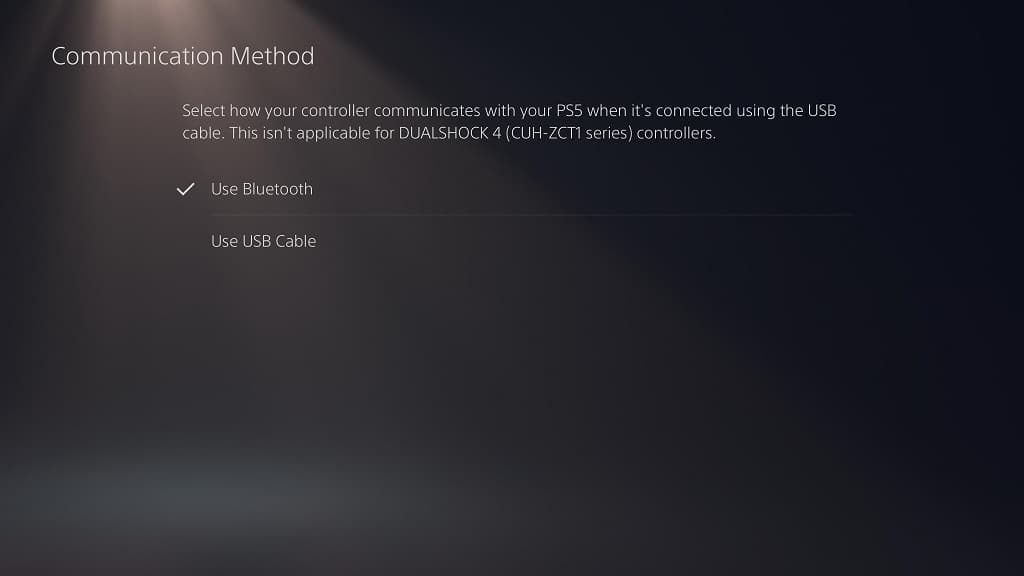
For the PS5 consoles, you need to plug the controller in and then go to its Settings menu. Afterwards, you need to head over to Accessories > Controller (General) > Communication Method. Finally, select USB Cable from the Communication Method menu.

2. If your television set supports a Game Mode, or a similarly named, picture setting, then we highly recommend using it. These modes are designed to lower the input lag when it comes to playing video games like Dead Island 2.

3. If you feel like your character is moving and/or aiming slowly, then you can use the Controls menu in Dead Island 2 to make some adjustments. You get there from the Options menu in the game.

From the Controls menu, you will be able to adjust the Sensitivity, ADS (Aiming Down Sight) Sensitivity and Aim Assist Sensitivity.

For additional options, you can set the Enable Advanced Settings from the same screen to On. You can then be able to make the following adjustments:

Look X-Axis:

  • Look Maximum Boost
  • Look Boost Ramp Time
  • Look Boost Threshold

Look Y-Axis:

  • Look Maximum Boost
  • Look Boost Ramp Time
  • Look Boost Threshold

Left Stick:

  • Inner Deadzone
  • Outer Deadzone
  • Invert Y Axis
  • X-Axis Sensitivity

Right Stick:

  • Inner Deadzone
  • Outer Deadzone
  • Y-Axis Sensitivity
  • Invert Y-Axis
  • X-Axis Sensitivity

4. The DualSense Edge and Xbox Elite controllers also come additional settings that will let you adjust the dead zone of the analog sticks as well as adjust the trigger sensitivity.

So, if you have these premium gamepads, then you can try messing around with the settings of these controllers to see if you can get a more responsive experience while playing the game.

5. If you are still experiencing some input lag, then you can try playing Dead Island 2 on a different television set or monitor.

Some screens are better at reducing latency when compared to others.

6. You should also make sure that your PS5, Series X or Series S is directly connected to the TV or monitor as any pass-through device or splitter may add additional lag.

7. Of course, you should also keep the game updated as the development team at Dambuster Studios could release a new patch that may fix your input lag problems.