How to fix Star Wars Jedi Survivor input lag issues on PS5, Xbox Series X and S

If you are playing Star Wars Jedi: Survivor on PlayStation 5, Xbox Series X or Xbox Series S, you may notice that Cal may not be super responsive to your controller inputs. You can check out this troubleshooting guide from Seeking Tech to see how you can reduce the input lag for this action-adventure title.

1. To start off, you should make sure that you have sufficient battery life on your controller if you are using it wirelessly. A gamepad with low battery may not be as fast as sending the signals to your console.

If you have one bar or zero bar left, then you should recharge your DualSense or change the batteries for your Xbox Wireless Controller.

2. You should also make sure that the controller is close enough to your console. If it is too far away, or there is an obstacle in between the direct line of sight, then the communication could be weakened.

Other wireless devices near the vicinity may also obstruct the wireless connection between the gamepad and your console as well.

3. Of course, you can also use the same controller over a wired USB connection. To do so on the Xbox Series X and Xbox Series S, you can simply plug in the pad via a USB cable.

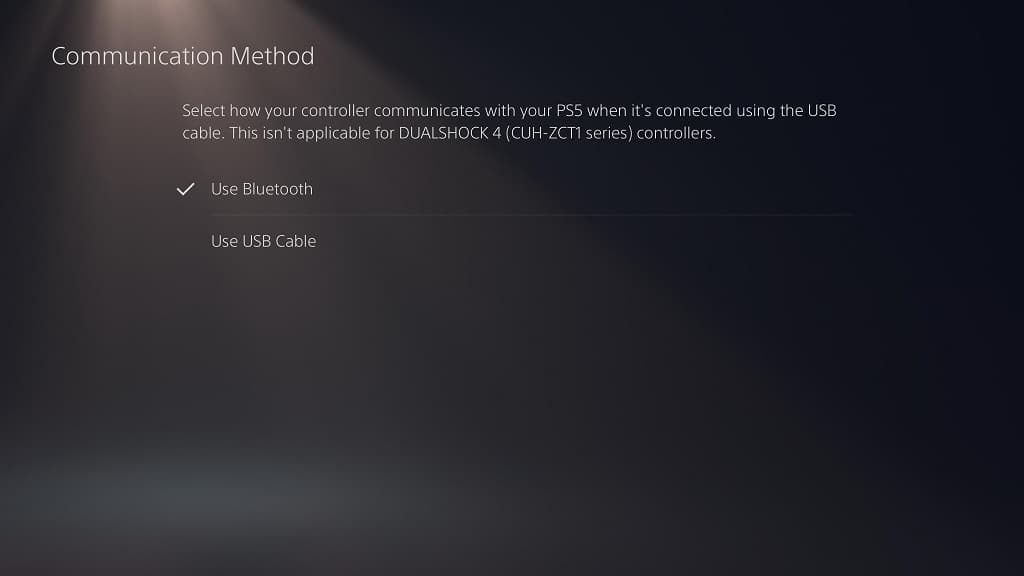
For the PS5 and PS5 Digital Edition, you need to plug in the controller and then head over to the console’s Settings menu. From there, you need to select Accessories > Controller (General) > Communication Method > USB Cable.
4. On the PlayStation 5 and Xbox Series X, you can also play the game at up to 60 frames per second. The higher frame rate should help reduce the input latency.

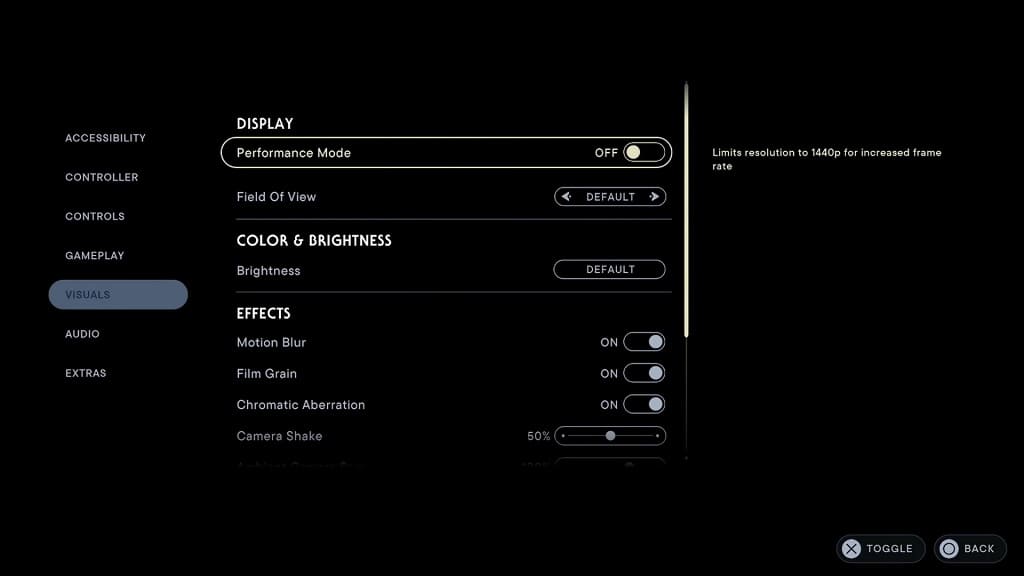
To enable this mode, open the Options menu in Jedi Survivor and then select Visuals. From there, make sure that Performance Mode is set to On.
5. You should make sure that your television set is displaying in Game Mode, or something similar, as this will help with lowering the input lag.

6. If your television or monitor is capable of Variable Refresh Rate, then we recommend that you enable it on the screen’s settings as doing so should help with reducing the input delay.

You should also do the same on your game console. If you are playing the game on the PlayStation 5, then you need to go to the system’s settings menu and then select Settings > Screen and Video > Video Output > VRR > Automatic.
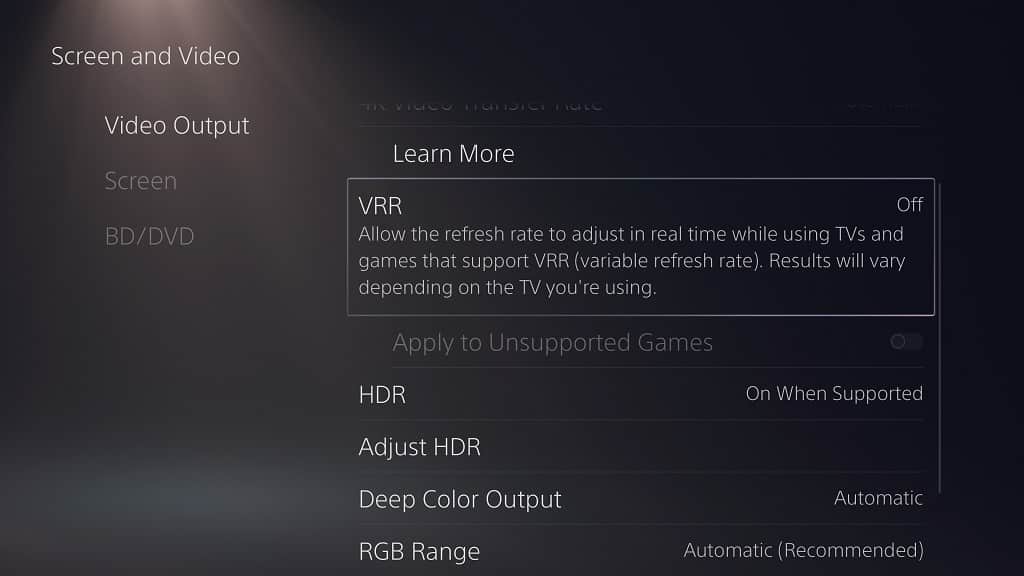
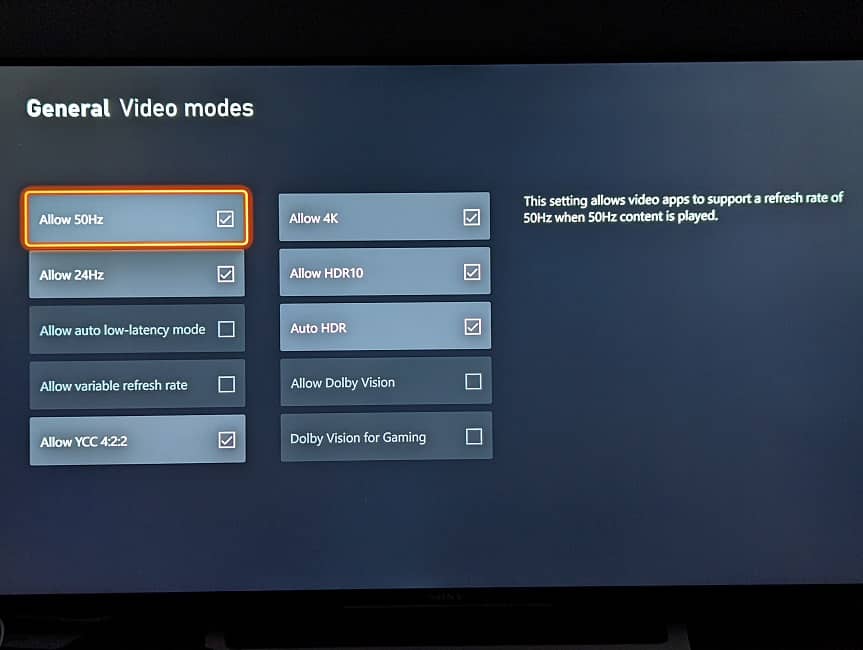
If you are playing Star Wars Jedi Survivor on the Series X or Series S, then you need to go to the console’s settings menu and then select General > TV & display options > Video modes. From there, you need to make sure the “Allow variable refresh rate” setting is enabled.
7. If you find that moving the in-game camera around feels a little too laggy, then you can try increasing the sensitivity of the right analog stick.

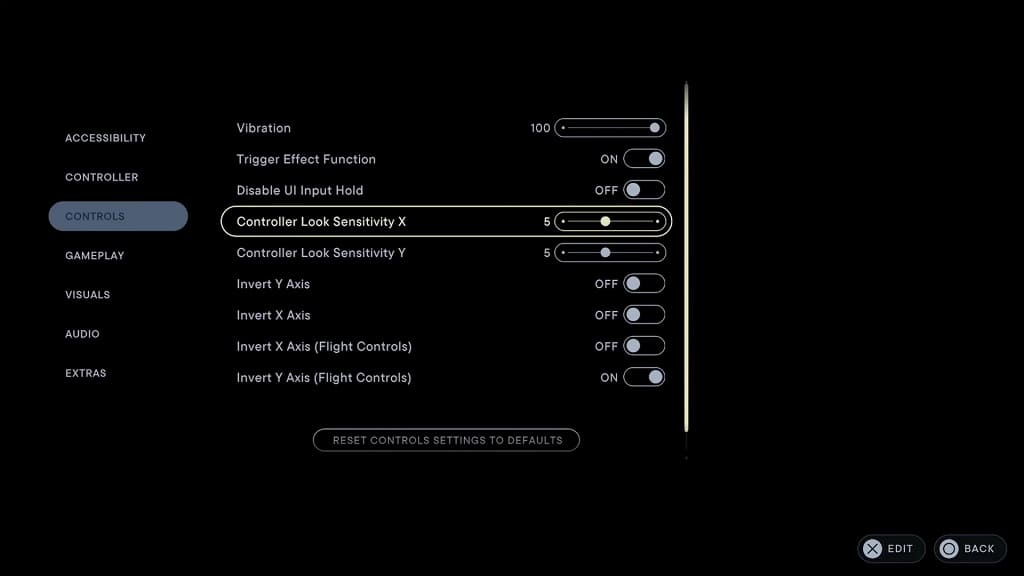
You find the sliders for both the X-axis and Y-axis camera movements in the Controls section of the Options menu in Star Wars Jedi Survivor.
How to fix Star Wars Jedi Survivor PS5 performance issues

When playing Star Wars Jedi Survivor on your PlayStation 5 or PlayStation 5 Digital Edition console, you may notice that there are frame rate problems. To see how you can improve the performance when playing this action-adventure game, you can take a look at this troubleshooting article from Seeking Tech.

1. For the first step, we suggest that you disable the Usage Sharing feature by doing the following:

  • Open the Options menu from the title screen of the pause menu. In the pause menu, you can get to options by pressing the R1 button until you get to the gear icon.
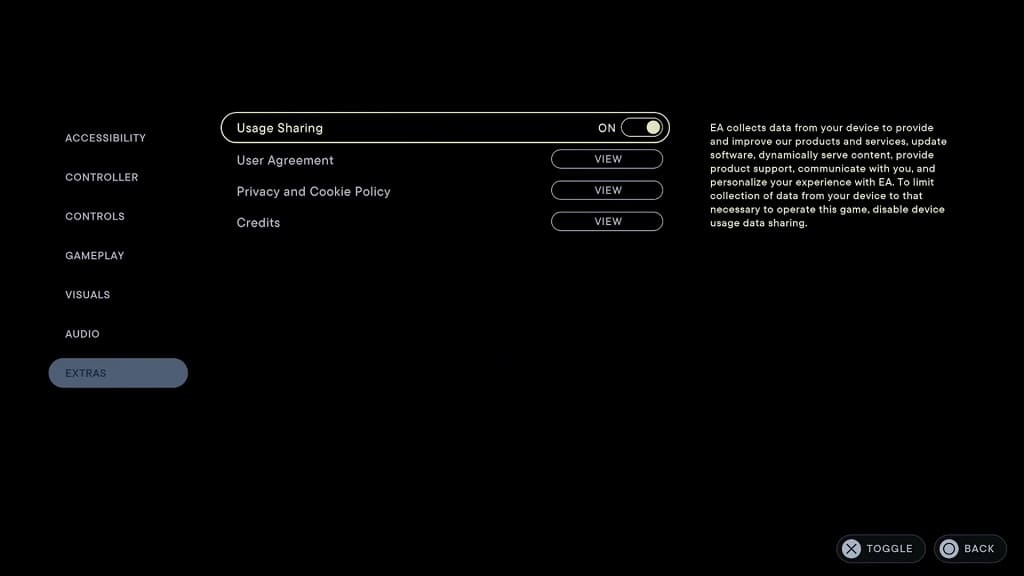
  • From the Options menu, select Extras on the left column.
  • On the right side of the same screen, make sure that Usage Sharing is set to Off.

You can also try playing the game with your console disconnected from the internet to disable the data sharing.

For the uninformed, this feature will allow the game to send your play data from the PlayStation 5 to Electronic Arts. This apparently takes up some resources and, as a result, makes the game drop some frames.

2. You may also be able to get better performance by disabling some visual effects.

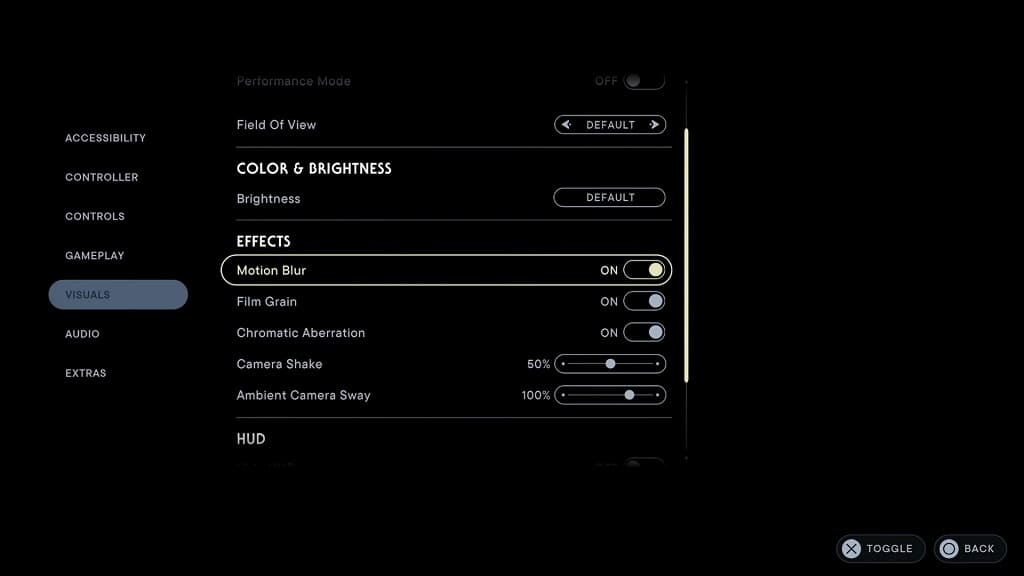
To do so, you need to select Visuals from the aforementioned Options menu. From there, you can turn off chromatic aberration, film grain and motion blur.

3. Restarting the game may also help with fixing the performance issues, especially if you have been playing and/or leaving the game in a suspended state for an extended amount of time.

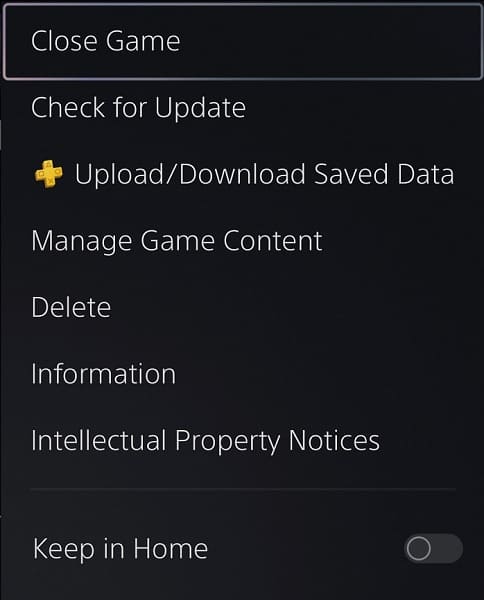
To restart, press and hold the PS button to open the home screen of your console. From there, move the cursor over to the Star Wars Jedi Survivor icon and then press the Options button on the DualSense. In the pop-up window, select Close Game.

Once you have closed the game, open it again.

4. If you have been using the Rest Mode for your PS5 or PS5 Digital Edition console, then it may be causing some general performance problems.

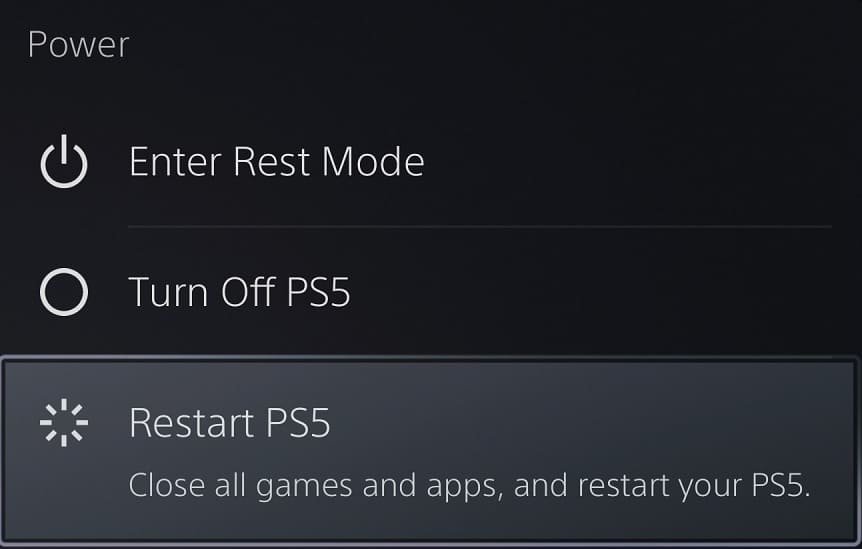
In this case, you can try restarting your system by pressing the PS button, selecting the Power option located at the bottom-side menu and then picking the Restart PS5 option.

5. If your television set or monitor supports Variable Refresh Rate, then you should make sure that it is enabled for both the screen and your console. On your PS5, you need to head over to Settings > Screen and Video > Video Output > VRR and then select Automatic.

VRR will help make the game appear to run at a smoother performance if frame rate drops all the way to 48 fps.

6. You should also make sure that you have the latest patch installed for the PlayStation 5 version of Jedi Survivor.

The developers at Respawn Entertainment admitted that the game launched at an un-optimized state. Therefore, future updates should most likely improve the frame rate.

7. The game runs smoother when Performance Mode is disabled. The caveat is that you will be limited to 30 fps instead of 60 fps.

If you just want a consistent performance, then you can turn off this mode from the Options > Visuals in-game menu.

How to find missing Star Wars Jedi Survivor pre-order and deluxe edition DLC

You will get bonus DLC packs by pre-ordering Star Wars Jedi: Survivor. If you manage to get the deluxe edition of the action-adventure game, you will also get additional extras as well. If you can’t find these downloadable contents, then you can check out this troubleshooting article from Seeking Tech.

Before we start, you should make sure that you qualify for the bonus DLC packs. If you pre-order the game before the official April 28, 2023 launch date, then you should get the following:

  • Hermit cosmetic
  • Hermit lightsaber set
  • Combustion blaster set

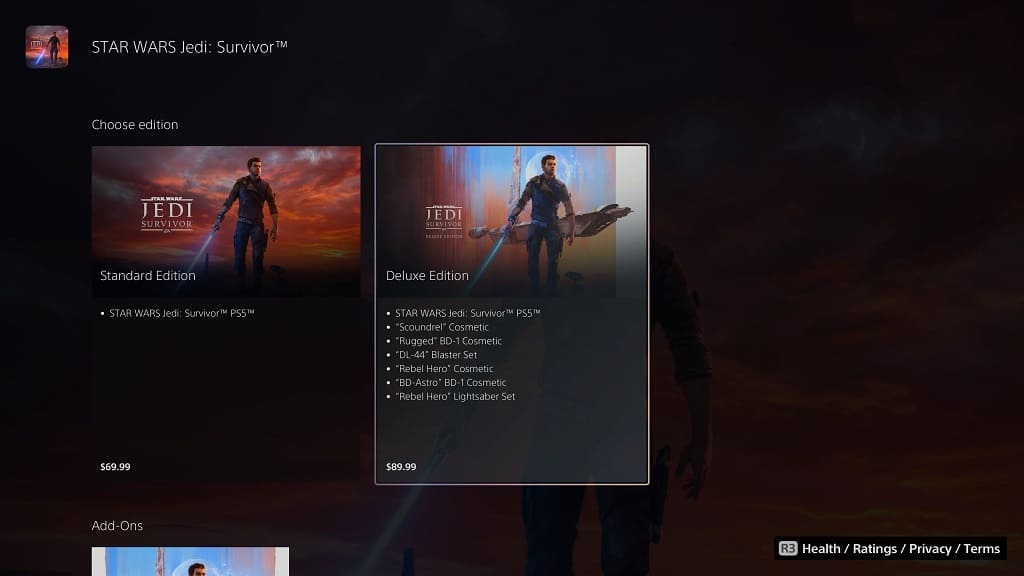
If you purchase Star Wars Jedi Survivor Deluxe Edition, then you also should be getting the following extras:

  • Scoundrel cosmetic
  • Rugged BD-1 cosmetic
  • DL-44 blaster set
  • Rebel hero cosmetic
  • BD-ASTRO BD-1 cosmetic
  • Rebel hero lightsaber set

1. If you bought the physical disc version of game, then you need to redeem the code that came with your purchase.

Try to check your receipt and/or email to see if you can find a voucher that you can enter. If you can’t locate the code, then you can try to contact the seller or retailer of the game to see if you can get one from them.

2. If you bought the game digitally, then the pre-order and/or deluxe edition bonuses should automatically be added to your account on the platform where you made the purchase.

3. You can also check to see if the content is installed on your platform.

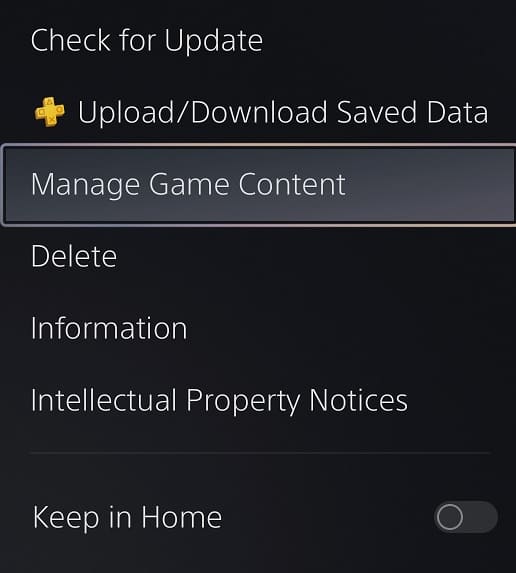
On the PlayStation 5 or PlayStation 5 Digital Edition, you need to move the cursor over the Star Wars Jedi Survivor on the home screen of the console, press the Options button on the DualSense and then select Manage Game Content.

On the Xbox Series X or Xbox Series S, you need to move the cursor over to the game’s icon on the home screen of the console’s dashboard, press the Menu button and then select “Manage game and add-ons.” Afterwards, select the top option on the right side of the screen.

On Steam, you need to right click on the game in the Library menu, select Properties and then select DLC.

From the Epic Games Launcher, you need to tap the three dots next to the game in the Library menu and then select Manage Add-ons.

In the EA App, go to My Collection, click the three dots on the Star Wars Jedi Survivor and then select
Manage Add-ons.

4. If the content appears to be installed, then you should make sure that you progress deep enough into the campaign of Jedi Survivor until you are able to change the cosmetics, blaster and/or lightsaber sets for your character to see if you are able to access the bonuses.

5. If the content is still missing, then you can try to download the files from the PlayStation Store, Microsoft Store, Steam, EA App or Epic Games Store.

6. You can also try verifying your game files.

On the PS5, you need to go to Settings > Settings > Users and Accounts > Other > Restore Licenses > Restore.

For Steam, you need to head over to the DLC page of Star Wars Jedi Survivor, uncheck all of the downloadable content. Afterwards, launch and then exit the game. Finally, go back to the DLC page, checkmark all of the DLC available to you and then re-launch the game.

If you are using the Epic Games Launcher, click on the three dots on the game’s icon from the Library and then select Manage. Afterwards, select Verify.

For the EA App, go to My Collection and then click on the three dots on the game icon. Finally, select the Repair option.

How to fix Star Wars Jedi Survivor ‘failed to launch’ issue

When trying to open the PC version of Star Wars Jedi: Survivor through the EA App, the game may not launch. You may also see the following error message:

  • “Your game failed to launch. An error on our end caused your launch to fail. Try again a little later.”

If you still can’t get this game to launch after numerous attempts, then you can take a look at this troubleshooting article from Seeking Tech.

1. For the first step, we recommend that you try to manually download the latest patch for Star Wars Jedi Survivor.

The game is suffering from numerous bugs and glitches after launching on April 28, 2023. So, it may take some time to get some of the issues, including the “failed to launch” problem, fixed by the development team at Respawn Entertainment.

2. You can also try deleting and then re-installing the EA App. When you open it again, you will see a message to repair the application. Once you do, you may be able to launch the game without any issues.

3. You can also try downloading and installing the EA Origin App. When you open it, you may see the same aforementioned repair message for the EA App.

4. If you are using anti-virus and firewalls, then you should make sure that these tools are blocking the EA App or Star Wars Jedi: Survivor.

If you are using the Windows Firewall, for example, you need to whitelist the following processes:

  • EABackgroundService.exe
  • EAConnect_microsoft.exe
  • EADesktop.exe
  • EALocalHostSvc.exe
  • EASteamProxy.exeLink2EA.exe

Afterwards, you need to do a clean boot by taking the following steps:

  • Select Start from the Taskbar and search for msconfig.
  • From the System Configuration menu, switch over to the Services tab.
  • Afterwards, make sure that the Hide all Microsoft Services box has a checkmark and then select the “Disable all” option.
  • Next, switch over to the Startup tab and then select Open Task Manager.
  • Right click on each of the programs on the list and then select Disable.
  • Exit the Task Manage and then return to the System Configuration menu.
  • You will be asked to save your changes. Select OK to do so and then restart your PC.
  • Once your computer has restarted, try to launch Jedi Survivor in the EA App.

5. The EA App may not work if you are connecting to the internet by using a VPN. In this case, you can try launching the game without connection online via a VPN.

6. You may not have the Windows Administrator Privileges to launch the game. In this case, you can try adjusting the admin settings, if possible, to allow you to open the software.

How to fix Star Wars Jedi Survivor crashing issues when loading a save

When you try to resume your progress in Star Wars Jedi: Survivor, the game may end up crashing. On the PlayStation 5 or PlayStation 5 Digital Edition consoles, you may also see the following error message appear after the game is forced to close down:

  • “CE-108255-1: Something went wrong with the game or app.”

If this keeps happening to you when you attempt to load into your save file, then you can check out this troubleshooting article from Seeking Tech to see how you can potentially fix this specific issue.

1. When Star Wars Jedi: Survivor kept crashing for us when we tried to load into our current save, one method that worked for us was to first start a new game by selecting Start A New Journey from the title screen.

Once the new save file has loaded normally, you can quit out of it by doing the following:

  • Open the menu by pressing the Options button on PlayStation 5 or Menu button on the Xbox Series X or Xbox Serie S.
  • In the menu, you need to head over to the Options section. You can change sections by using the L1 and R1 buttons on PS5 or LB and RB buttons on Xbox. For the uninformed, the Options section is represented by the gear cog icon.
  • From the Options section, you should be able to find and select Quit.
  • After returning to the title screen, select Load Journey and then try to load back to the save file from your previous playthrough. Hopefully, you will no longer encounter any crashes when loading into the game.

2. If you still can’t resume your progress without Star Wars Jedi: Survivor unexpectedly closing down, then you can try changing the enabling or disabling the Performance Mode.

You can do so by opening the Options menu and then selecting Visuals. From there, you can turn Performance Mode either On or Off.

From our experience, the game seems more stable with this mode turned off. With that said, the frame rate will only be running at maximum of 30 fps instead of 60 fps with this mode enabled.

It is important to note that the Xbox Series S version of Star Wars Jedi: Survivor does not offer a Performance Mode as the game is limited to only running at a maximum frame rate of 30.

3. You can also try turning off the Usage Sharing setting by going to the Options menu and then heading to its Extra section.

4. Disabling chromatic aberration, film grain and/or motion blur may also help as well. To find out how you can turn off these visual effects, you can take a look at our previous guide.

5. If the game is still crashing when you try to load a save data, then you can try deleting the game off of your console storage and then re-installing it again.

6. Of course, you should also make sure that you have the latest updates installed for both the Star Wars Jedi: Survivor game as well as your gaming systems.

These new software versions may improve the stability of the game and, therefore, eliminate crashes when loading back into your previous save.

How to fix Star Wars Jedi Survivor screen tearing on PS5, Xbox Series X and Xbox Series S

When playing Star Wars Jedi Survivor on console, you may notice that the screen will tear. This is due to the refresh rate of your television set or monitor not being synchronized with the frame rate of the action-adventure game. As a result, a part of the screen will not refresh at the same rate as the rest.

To see how you can potentially fix the screen tearing when playing this title on your PlayStation 5, PlayStation 5 Digital Edition, Xbox Series X or Xbox Series S, then you can take a look at this guide from Seeking Tech.

1. If you have a television or monitor that is capable of Variable Refresh Rate, then you should make sure that you enable this feature from its settings menu. Afterwards, you need to enable VRR support on your console’s system menus.

On the PS5, you need to head over to Settings > Screen and Video > Video Output > VRR. From there, set VRR to Automatic.

For the Xbox Series X, you need to go to Settings > General > TV & display options > Video modes. From there, you need to make sure that the “Allow variable refresh rate” option is selected.

For the uninformed, VRR helps synchronize the refresh rate of the screen with the frame rate of Star Wars Jedi Survivor. Therefore, you should no longer screen tearing as long as the fps of the game stays 48 or higher on PS5. On the Series X, the fps of the game needs to maintain at least 40 in order to prevent any potential screen tearing.

The frame rate for Star Wars Jedi Survivor on Xbox Series S tops out at 30. Therefore, VRR may not be helpful on this console.

2. You can also try disabling the Usage Sharing feature, which should help improve the performance of the game, resulting in a more stable frame rate and potentially less screen tearing. In order to do so, you need to take the following steps:

  • Open the Options menu in title menu or pause menu of Jedi Survivor.
  • From there, select Extra from the list.
  • In the Extra section, set Usage Sharing to Off.

3. You may also be able to improve performance by disabling chromatic aberration, film grain and/or motion blur.

To find out how you can turn these graphical effects off, you can take a look at this step-by-step walkthrough.

4. If you haven’t done so already, you should make sure that you have the latest patch download.

The development team at Respawn Entertainment admitted that Star Wars Jedi Survivor launched at an un-optimized state. With that said, they are committed to fixing the numerous issues with the game, which should hopefully include the frequent screen tears, weeks after the initial launch date of April 28, 2023.

You can find the comments regarding the launch state of the game below:

So, if you are still seeing a lot of screen tears after all of the three previous potential solutions, then we suggest waiting until a new patch is released that will, hopefully, optimize the game’s graphical performance.

How to turn off Star Wars Jedi Survivor quick time events

In some scenarios, you will need to press a button that appears on the screen in Star Wars Jedi Survivor. These sequences can be tiring, especially if you are constantly trying to mash the same button rapidly. Not to mention that they can come out of nowhere and break your rhythm due to their jarring nature.

If you find that these QTEs to be annoying, then you are able to disable this feature from the in-game menu of this PC, PlayStation 5, Xbox Series X and Xbox Series S game. To find out how to do so, you can check out this tutorial from Seeking Tech by taking the following steps:

1. For the first step, you need to head over to the Options menu while playing Star Wars Jedi Survivor. You can do so from the title screen.

If you are currently playing the game, then you can bring up the pause menu by pressing the Options button on the DualSense gamepad or Menu button on the Xbox controller.

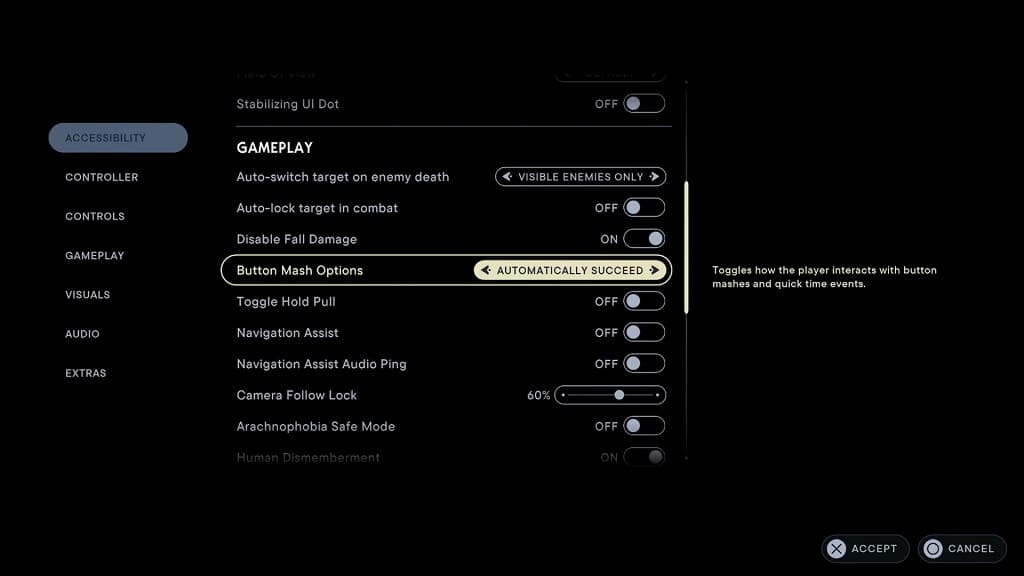
2. Once you open the Options menu, you need to either select Accessibility or Gameplay.

3. On the right side of the same screen, you should move the cursor down until you get to Button Mash Options. This setting should show the following description:

  • “Toggles how the player interacts with button mashes and quick time events.”

4. The Button Mash Options setting is set to Default. In order to disable QTEs, you need to change it to Automatically Succeed.

5. Once you are done making the change, you can exit out of the Options menu and then resume your game.

The next time you encounter a quick time event in Star Wars Jedi Survivor, the sequence will automatically be completed successfully without you having to press the correct inputs that are being shown on the screen.

How to disable Star Wars Jedi Survivor chromatic aberration, film grain and motion blur

By default, Star Wars Jedi: Survivor uses chromatic aberration, film grain and motion blur. While these graphical effects make the action-adventure game more cinematic, it also makes it look less sharp. If you want to disable any of these three visual options, you can follow the steps laid out in this article from Seeking Tech to find out how you can properly do so.

1. For the first step, you need to head over to the Options menu in the game. You can do so by selecting “Options” from the main menu.

Alternatively, you can open the in-game menu while you are playing Star Wars Jedi Survivor by either pressing the Options button on the DualSense controller or Menu button on the Xbox controller if you are playing with a gamepad.

From the in-game menu, you can then press the R1 button on PlayStation or RB button on Xbox until you get to the Options menu, which is represented by the gear icon.

2. After getting to the Options menu, you need to select Visuals on the left column.

3. Next, you need to scroll down until you get to the Effects section.

4. In the Effects section, you should be able to see the following:

  • Motion Blur
  • Film Grain
  • Chromatic Aberration

5. To disable these effects, you need to make sure that Motion Blur, Film Grain or Chromatic Aberration are set to Off.

6. Once you are done, you can exit the Options menu.

When you resume your progress in Star Wars Jedi Survivor, you should no longer see chromatic aberration, film grain and motion blur if you disable these graphical effects from the Options menu.

Recommended DualSense Edge settings for Star Wars Jedi Survivor

You can use the DualSense Edge to play Star Wars Jedi Survivor. To see what are the best settings you can use for the premium controller when it comes to this action-adventure game, you can take a look at this guide from Seeking Tech.

Analog Caps and Back Buttons Attachments

With the DualSense Edge, you are able to replace the analog caps and back button attachments. For Star Wars Jedi Survivor, we suggest going with the combination that provides the most comfort.

Trigger Stops

As for the trigger stops located on the back of the controller, we suggest moving the sliders all the way to the bottom. By doing so, you should be able to use the Force Pull and Force Push actions quicker.

Not to mention that the trigger stops will also disable the adaptive trigger effects in Jedi Survivor, which may have been making the game less responsive to your L2 and R2 inputs.

If you want to further fine tune the trigger sensitivity, then you can do so from the DualSesne Edge’s Trigger Deadzone menu on your PlayStation 5.

Customize Button Assignments

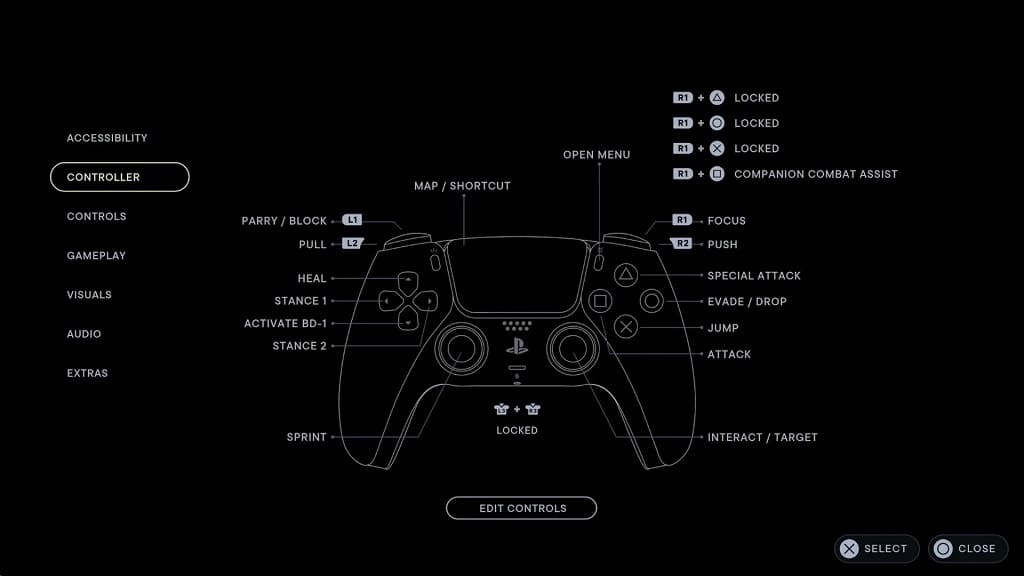
The action-adventure game has the following default button layout:

  • Left Analog Stick: Move Character
  • Right Analog Stick: Move Camera
  • Triangle: Heavy Attack or Special Attack
  • Circle: Evade or Drop
  • X: Jump
  • Square: Attack
  • L1: Parry or Block
  • L2: Force Pull
  • R1: Focus
  • R2: Force Push
  • L3: Sprint
  • R3: Interact or Target
  • L3 and R3: Force Slow
  • Up Directional Pad Button: Heal
  • Down Directional Pad Button: BD-1 Scan
  • Left Directional Pad Button: Lightsaber Stance 1
  • Right Directional Pad Button: Lightsaber Stance 2
  • R1 and Triangle: Lift
  • R1 and Circle: Confuse
  • R1 and X: Slam
  • R1 and Square: Companion Combat Assist
  • Options: Open Menu
  • Touchpad: Map or Shortcut

With the DualSense Edge, you have two additional back buttons. To take advantage of these, we recommend that you use Customize Button Assignments menu of the controller on your PS5 to bind L3 to the back left back button and then R3 to the right back button. Afterwards, you can disable both the L3 and R3 buttons.

By default, you need to press down on the left analog stick to run, right analog stick to target/interact and both analogs to use Force Slow. The L3 and R3 buttons don’t feel as natural when pressed down compared to the other buttons on the controller. Not to mention that you may accidentally trigger an unintended action if you are put too much pressure on the sticks.

Therefore, we suggest re-binding the L3 and R3 buttons to the back buttons. By doing so, running, targeting, interacting and using Force Slow feels should end up feeling more natural. By disabling the L3 and R3 buttons, you will be able to avoid accidental inputs as well.

Stick Sensitivity/Deadzone

If you feel that moving the camera around isn’t responsive, then you can open the Options menu in Star Wars Jedi Survivor and then select Controls. From there, you are able to adjust the sensitivity settings of both the X and Y axis when you are moving the right analog stick.

You can also fine tune the sensitivity and deadzones for both sticks of the controller from the Edge’s Stick Sensitivity/Deadzone menu on your PS5.

How to turn off DualSense adaptive triggers in Star Wars Jedi Survivor

The adaptive triggers of the DualSense controller add to the immersion of Star Wars Jedi Survivor with the added rumble and extra resistance. If you find that this feature is limiting your performance in this action-adventure game, however, then you can check out this tutorial from Seeking Tech to see how you can disable it.

Method #1

For the first method, you can disable adaptive triggers from the in-game menu of Jedi Survivor. In order to do so, you need to take the following steps:

1. First off, you should head over to Options menu in Star Wars Jedi Survivor.
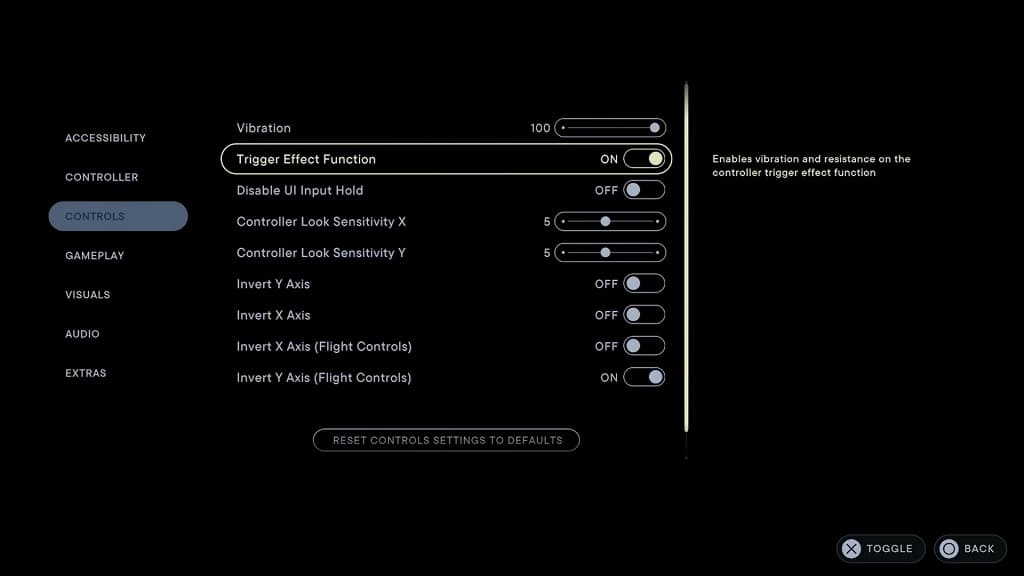
2. In the Options menu, select Controller on the left column.

3. On the right side of the same screen, move the cursor down to Trigger Effect Function. This setting should have a description that reads:

  • “Enables vibration and resistance on the controller trigger effect function.”

4. Set the Trigger Effect Function setting to Off.

When you start playing Star Wars Jedi Survivor again, you should no longer experience any rumble and resistance on the L2 and R2 buttons of your DualSense controller.

Method #2

You can also disable the adaptive trigger effect on a system-wide basis. If you are interested in doing so, you need to do the following:

1. Head to the home menu of your PlayStation 5 or PlayStation 5 Digital Edition console. You can do so by pressing and holding the PS logo button for around a second.

2. From the home menu, you need to navigate to the Settings menu by selecting the gear icon that can be found on the top right side.

3. In the Settings menu, scroll down and then select Accessories.

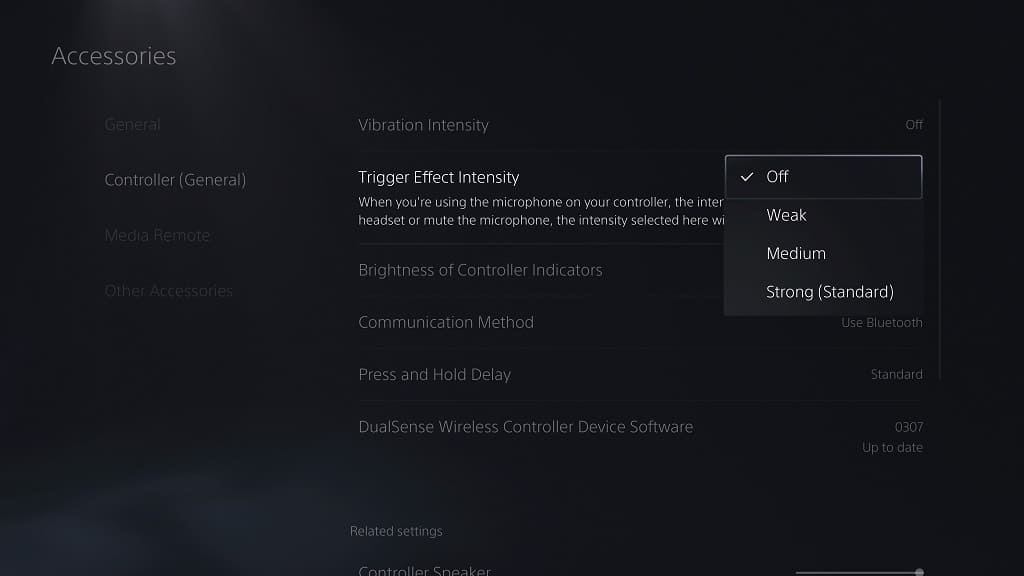
4. From the Accessories menu, you first need to select Controller (General) on the left side and then Trigger Effect Intensity on the right side of the same screen.

In the pop-up menu, you need to select Off. Alternatively, you can also select Weak or Medium option if you want to keep the adaptive trigger effects but also make them less intensive.

Keep in mind that the changes you made in the Settings menu on your PlayStation 5 will also apply to other PS5 games you are playing aside from Star Wars Jedi Survivor. So, if you want to use the full effects of adaptive triggers in the future, then you need to go back to the Settings > Accessories > Controller (General) > Trigger Effect Intensity menu and then set this setting to Strong (Standard).