You can use the DualSense Edge to play Star Wars Jedi Survivor. To see what are the best settings you can use for the premium controller when it comes to this action-adventure game, you can take a look at this guide from Seeking Tech.
Analog Caps and Back Buttons Attachments
With the DualSense Edge, you are able to replace the analog caps and back button attachments. For Star Wars Jedi Survivor, we suggest going with the combination that provides the most comfort.
Trigger Stops
As for the trigger stops located on the back of the controller, we suggest moving the sliders all the way to the bottom. By doing so, you should be able to use the Force Pull and Force Push actions quicker.
Not to mention that the trigger stops will also disable the adaptive trigger effects in Jedi Survivor, which may have been making the game less responsive to your L2 and R2 inputs.
If you want to further fine tune the trigger sensitivity, then you can do so from the DualSesne Edge’s Trigger Deadzone menu on your PlayStation 5.
Customize Button Assignments
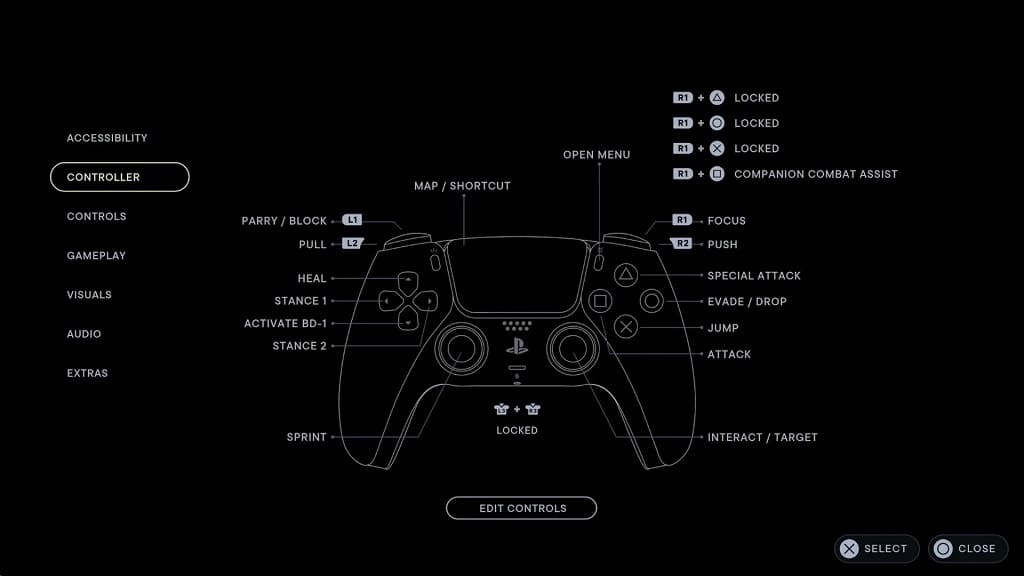
The action-adventure game has the following default button layout:
- Left Analog Stick: Move Character
- Right Analog Stick: Move Camera
- Triangle: Heavy Attack or Special Attack
- Circle: Evade or Drop
- X: Jump
- Square: Attack
- L1: Parry or Block
- L2: Force Pull
- R1: Focus
- R2: Force Push
- L3: Sprint
- R3: Interact or Target
- L3 and R3: Force Slow
- Up Directional Pad Button: Heal
- Down Directional Pad Button: BD-1 Scan
- Left Directional Pad Button: Lightsaber Stance 1
- Right Directional Pad Button: Lightsaber Stance 2
- R1 and Triangle: Lift
- R1 and Circle: Confuse
- R1 and X: Slam
- R1 and Square: Companion Combat Assist
- Options: Open Menu
- Touchpad: Map or Shortcut
With the DualSense Edge, you have two additional back buttons. To take advantage of these, we recommend that you use Customize Button Assignments menu of the controller on your PS5 to bind L3 to the back left back button and then R3 to the right back button. Afterwards, you can disable both the L3 and R3 buttons.
By default, you need to press down on the left analog stick to run, right analog stick to target/interact and both analogs to use Force Slow. The L3 and R3 buttons don’t feel as natural when pressed down compared to the other buttons on the controller. Not to mention that you may accidentally trigger an unintended action if you are put too much pressure on the sticks.
Therefore, we suggest re-binding the L3 and R3 buttons to the back buttons. By doing so, running, targeting, interacting and using Force Slow feels should end up feeling more natural. By disabling the L3 and R3 buttons, you will be able to avoid accidental inputs as well.
Stick Sensitivity/Deadzone
If you feel that moving the camera around isn’t responsive, then you can open the Options menu in Star Wars Jedi Survivor and then select Controls. From there, you are able to adjust the sensitivity settings of both the X and Y axis when you are moving the right analog stick.
You can also fine tune the sensitivity and deadzones for both sticks of the controller from the Edge’s Stick Sensitivity/Deadzone menu on your PS5.