How to view download speed and do a speed test on the Steam Deck

The Steam Deck uses a Wi-Fi connection for downloading games, updates as well as other digital content. To see how you can view the download speed, as well as perform a speed test, you can take a look at this tutorial from Seeking Tech.

How to view the download speed when downloading from the Steam Store

In order to view the download speed while you are downloading a game (or other content) from the Steam Store, you need to take the following steps:

1. First off, turn on your Steam Deck portable console if you haven’t done so already.

2. You should make sure that the system is connected to the internet as well.

3. Furthermore, you should make sure that you are currently downloading a file.

4. When you are downloading a file on the Steam Deck, you need to open the Steam Menu.

You can do so by pressing the Steam button. Alternatively, you can tap the Steam Menu icon located on the bottom right corner of the screen if it is visible.

5. With the Steam Menu opened, select Downloads from the list of available options.

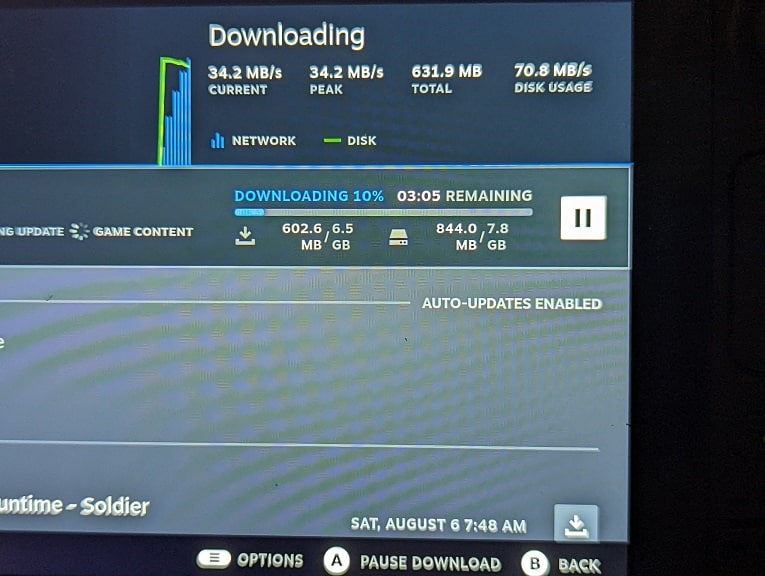
6. You should now be in the Downloads section. Here, you can see the download process of the content you are currently downloading. You will find the download speed at the top right side.
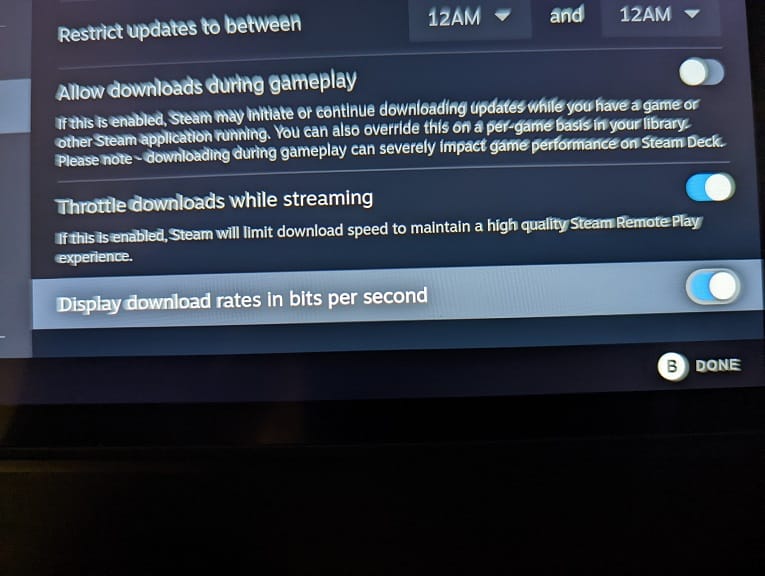
7. If you want to view the download speeds in bits per second, then you need to open the Steam Menu and then select Settings. Inside of Settings, you need to select Downloads on the left column and then make sure that the “Display download rates in bits per second” setting is enabled.
How to perform a speed test on Steam Deck

If you want to perform a speed test on the Steam Deck, you need to do the following:

1. For the most accurate results, make sure you aren’t downloading or streaming anything during the process. Otherwise, the download and upload speeds will appear to be slower.

2. Once you are ready, turn on your portable console and then make sure it is connected to the internet.

3. Next, you need to switch over to the Desktop Mode, which you can do by taking the following steps:

  • Open the Steam Menu.
  • Inside the Steam Menu, select the Power option.
  • From the Power Menu, select Switch to Desktop.

4. After the Steam Deck has been switched to Desktop Mode, you need to open a web browser.

If you are unfamiliar with using the Desktop Mode, then you need to use the right touch pad as a mouse. To bring up the virtual keyboard, you need to press the Steam and X buttons at the same time.

5. With the web browser opened, you need to go to a web site that can test your download and upload speed.

We used the tool from Google. To find it, search for the term “speed test” on the Google website. The first option you should see should be the speed test tool. Select the Run Speed Test option in order to test your download and upload speeds.

How to invert controls when playing PS1, PS2 and PSP games on PS5

With the launch of PlayStation Plus Premium, a curated list of PS1, PS2 and PSP videogames can be played on your PlayStation 5 or PlayStation 5 Digital Edition system. In addition to being included in the subscription service, some of these games can be bought individually as well.

If you want to invert your controls for these classic titles, then you can take a look at this tutorial from Seeking Tech.

1. The first step we recommend taking is to check the pause menu and/or main menu of the PS1, PS2 or PSP game you are currently playing on your PlayStation 5.

Some titles may offer a setting where you can invert the camera and/or flight controls.

2. If you don’t see an in-game setting to invert, then you need to go to the home screen of your PS5. In order to do so, you need to press and hold the PS button.

3. After getting to the home screen, you then need to head to Settings. To get there, select the gear icon located on the top right corner.

4. In Settings, scroll down and then selected Saved Data and Game/App Settings.

5. From the Saved Data and Game/App Settings menu, select Game Presets on the left side.

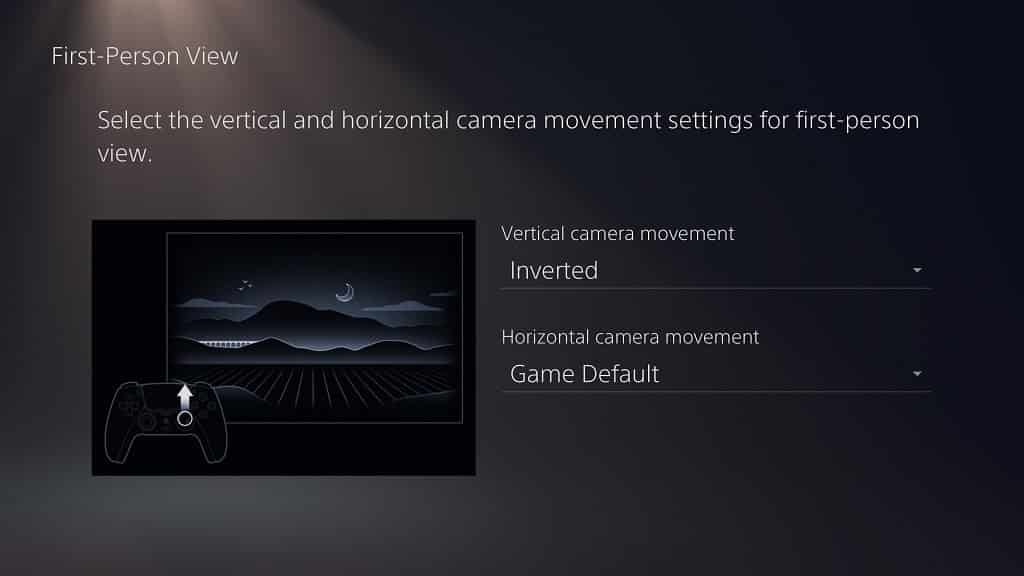
6. On the right side, you can select either First-Person View or Third-Person View depending on the type of game you are currently playing.

7. In the next screen, change the vertical and horizontal movement to your preference.

8. With the changes made, open your PS1, PS2 or PSP game and then test to see if the controls have changed.

9. If it hasn’t, then you can return to Settings and then select Accessibility.

10. From the Accessibility menu, you first need to select Controllers from the left column and then Custom Button Assignments on the right side of the same screen.

11. After getting to the Custom Button Assignments menu, make sure that the Enable Custom Assignments setting is turned on.

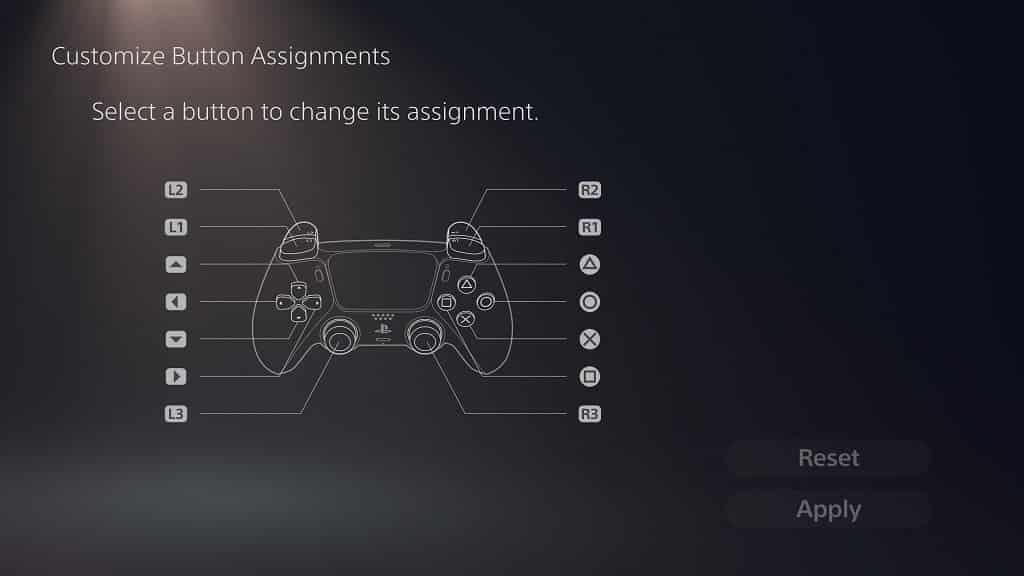
12. In the same screen, select Customize Button Assignment.

13. Inside the Customize Button Assignment, select the button that you want to invert.

14. In the pop-up menu, you can choose the new button assignment.

If your game is using L1 and R1 to control the camera or flight, for example, then you can try switching these two buttons.

Some games may also use L2 and R2 for camera or light controls. The up and down, as well as the left and right, buttons of the directional pad may be used for camera movement as well.

15. Once you made all the necessary changes to the button assignments, you need to select the Apply option to confirm your choices.

16. After making the changes, open your PS1, PS2 or PSP game and then test to see if your controls have been inverted from the original default setting.

How to turn off notifications on the Steam Deck

When playing games or browsing through the system menus on your Steam Deck, you may get pop-up notifications for achievements, when friends go online, when you redirect cat message and more. These messages may also be accompanied by a sound effect.

If you want to disable notifications from popping up on the screen of this portable console, then you can check out this tutorial at Seeking Tech to find out how to do so.

1. Of course, make sure you turn on your Steam Deck if you haven’t done so already.

2. Once the Steam Deck has booted up, you need to go to the Steam Menu. To do so, you can touch the Steam Menu icon located on the bottom left corner of the screen if you are using the system menus.

Alternatively, you can bring up the same menu by simply pressing the Steam button. You can find this button in between the left track pad and the bottom left speaker on the portable system.

3. With the Steam Menu opened, you then need to select Settings.

4. After opening the Settings menu, select Notifications from the column located on the left. It should be in between the Internet and Display options.

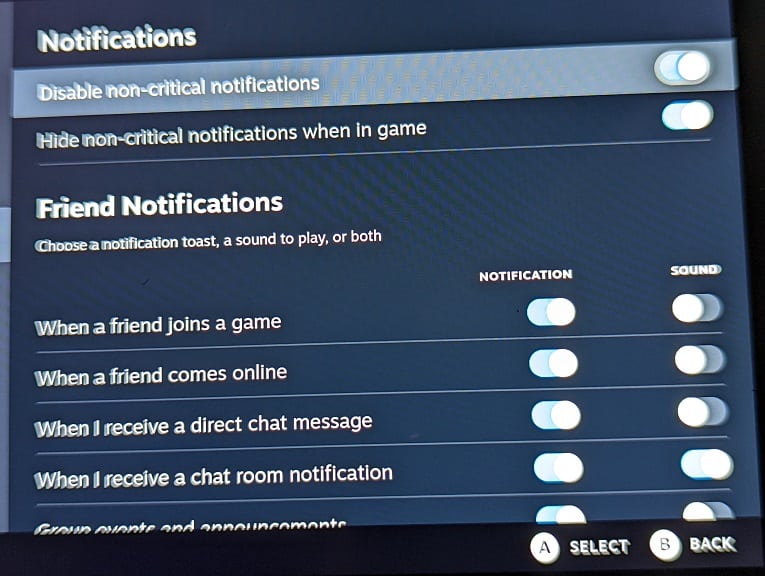
5. On the right side of the same screen, you should now be in the Notifications section. This is where you can customize the pop up messages that appear on the Steam Deck screen.

6. Make sure that you enable the following settings in order to disable general pop-up messages:

  • Disable non-critical notifications
  • Hide non-critical notifications when in game

7. You can also choose to disable the sound effects that played when a friend notification pops up. By doing so, the text messages will still pop-up on the screen but they won’t be accompanied by a sound notification.

Furthermore, you can disable friend notifications altogether.

The following friend notification settings can be customized:

  • When a friend joins a game
  • When a friend comes online
  • When I receive a direct chat message
  • When I receive a chat room notification
  • Group events and announcements

By disabling the notification type, it should no longer pop-up on the screen of your portable gaming system.

What to do if streamed PS3 games are not loading on your PS5

When trying to launch or play a stream of a PlayStation 3 game on your PS5 or PS5 Digital Edition system, you may notice that your game is not loading at all. To see how you can get it to properly load, you can take a look at this article from Seeking Tech.

1. To start off, we recommend checking the server status of the PlayStation Network. You can do so with this link.

If PSN is down, then there isn’t anything you can do except to wait for the servers to go back up again to be able to stream PS3 games on your PS5.

2. If the servers appear to be functioning normally, then the next step you can take is to check your internet connection speed.

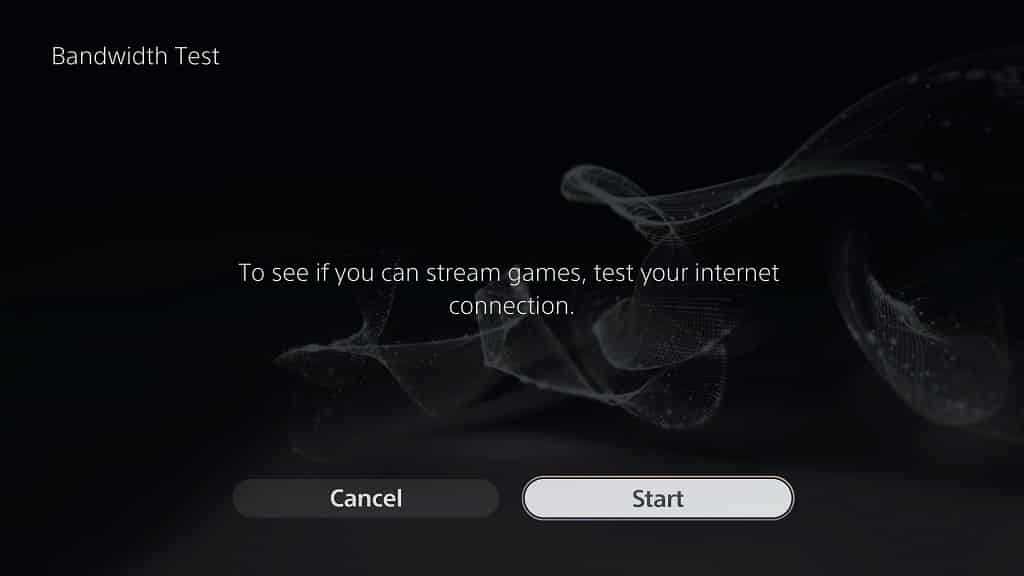
For a quick test, you need to open the PlayStation Plus App from the home screen of your PlayStation 5. Afterwards, select the More option located on the top right side of the screen. In the pop-up menu, select Bandwidth Test and then Start.

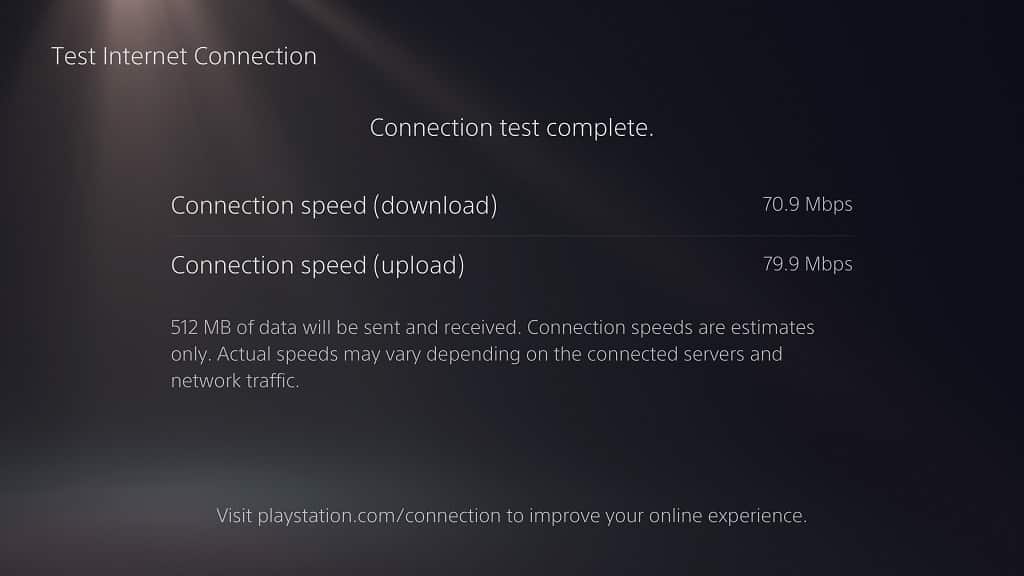
If you want to check the download and upload internet connection speeds on your PS5, then you need to go to the Settings menu of your console and then head to Network. Afterwards, you need to select Connection Status and then Test Internet Connection.

To be able to stream PS3 games without any loading issues on your PlayStation 5, you will need at least 5 Mbps in both download and upload speeds.

3. There is a possibility that the PS3 game you are streaming may have crashed or frozen.

In this case, you can restart the game, without having to exit the current stream, by taking the following steps:

  • Begin by opening the quick menu by pressing the PS button on your controller.
  • In the quick menu, select the Now Streaming card in order to expand it.
  • From the expanded Now Streaming card menu, you then need to select Show/Hide PS3 Menu.
  • Inside the new menu, select Saved Data Utility (PS3) and then Yes to close the game.
  • Afterwards, press the O button and then Yes to reboot the game.

4. If rebooting the game does not get rid of the loading problems, then you can try restarting the stream by doing the following:

  • To start off, open the home screen menu of your PS5 by pressing and holding the PS button.
  • In the home screen, highlight the PS3 game that you are currently streaming.
  • You then need to select the Close Game option to exit out of the stream.
  • Afterwards, open the stream again to see if the loading issues go away.

5. Keep in mind that, even if the PSN server status appears to be good to go, it may still be overloaded to the point where some players may have a hard time loading into a game.

Therefore, you may want to try streaming the game again at a less busy time to see if having less server load will lead to less loading problems.

How to customize trackpad haptics on the Steam Deck

The left trackpad and right trackpad of the Steam Deck features haptics to provide feedback for touch inputs. To see how you can disable, enable and/or customize this feature, you can take a look at this article from Seeking Tech.

How to enable and customize the Steam Deck trackpad haptics

In order to turn on, as well as customize, the trackpad haptics of the Steam Deck, you need to take the following steps:

1. If you haven’t done so already, make sure your turn on your Steam Deck console.

2. Next, you need to select a game.

Keep in mind that you aren’t able to turn on or customize the trackpad haptics on a system-wide level. Instead, you can only do so on a game-by-game basis.

3. On the game page, select the controller icon located on the right side.

If you are already playing a game that you want to add trackpad haptics to, then you can press the Steam button. From the Steam menu, move to the top option of the left column and then move to the right several times to get to the controller layout section. Here, you need to select Controller Settings.

4. In the Controller Settings menu, select Edit Layout.

5. After arriving at the new screen, select Trackpads on the left column.

6. On the right side of the same screen, you should be in the Trackpads section.

Here, you can select the gear icon next to Right Trackpad Behavior if you want to customize the vibrations for the right trackpad or the Left Trackpad Behavior if you want to customize the vibrations for the left trackpad.

If you don’t see the gear icon next to the Right Trackpad Behavior or Left Trackpad Behavior, then you need to assign an action to these settings first by selecting the drop-down menu. Afterwards, the gear icon show appear on the right side.

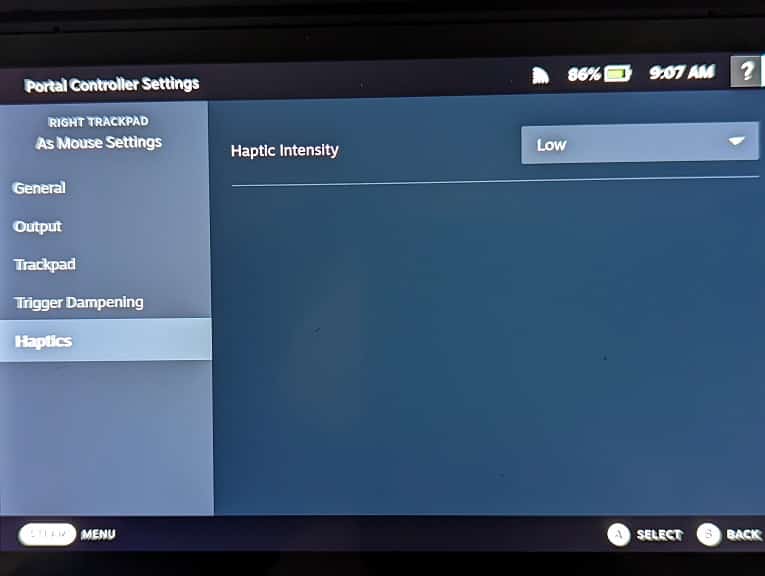
7. In the next section, scroll down and then select Haptics on the left column.

8. On the right side of the same section, select the drop-down menu next to Haptic Intensity.

9. In the drop-down menu, you can choose between the Low, Medium and High force feedback levels.

How to disable trackpad haptics on the Steam Deck

If you want to disable vibration effects for either, or both, trackpads of your portable system, then you can go back to the aforementioned drop-down menu for Haptic Intensity and then select the Off option.

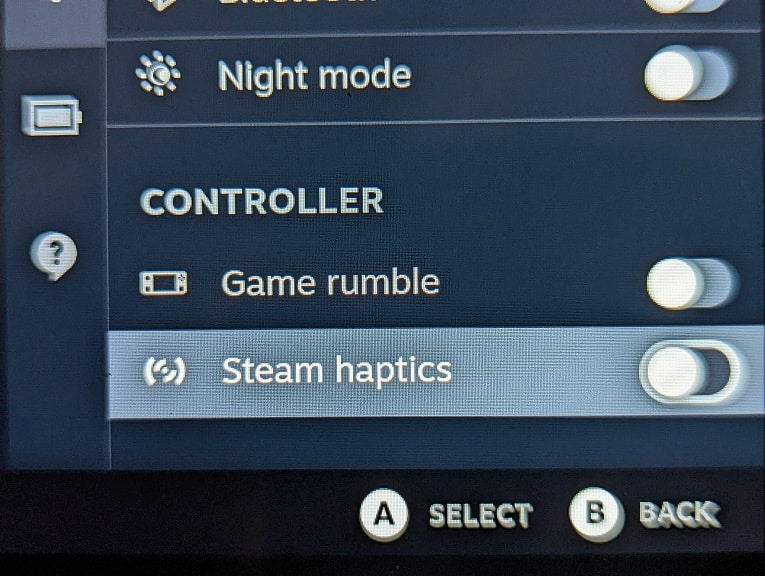
Alternatively, you can press the button that has the three dots on your portable console. From the Quick Access menu, scroll down until you get to the gear icon. In the Quick Settings section, make sure that Steam Haptics is disabled. You may also want to disable Game Rumble as well.

After disabling haptics, you can test out the changes by playing the game on your Steam Deck.

How to fix ‘PlayStation Network is temporarily unavailable’ issue when streaming games on PS5

If you have a PlayStation Plus Premium subscription, then you are able to stream select PS1, PS2, PSP, PS3 and PS4 games on your PlayStation 5 or PlayStation 5 Digital Edition console.

When streaming, you may encounter the following error message:

  • “PlayStation Network is temporarily unavailable. Please try again later.”

To see how you can fix this connection problem, you can check out this guide from Seeking Tech.

1. To start off, you can try looking up whether or not the PlayStation servers are currently down. In order to do so, you need to head to this website.

2. If everything appears to be fine on the official PlayStation servers, then the next step you can try is to do a quick bandwidth test on your internet connection.

To do so on your PS5 or PS5 Digital Edition system, you will need to take the following steps:

  • First off, you need to be in the home menu. If you aren’t, then you can press and hold the PS button on the DualSense controller until the home menu appears.
  • From the home menu, find and open the PlayStation Plus app.
  • Inside of the application, you need to find and select the More option located in the top right side.
  • In the pop-up menu, you should then select Bandwidth Test.
  • From the Bandwidth Test screen, you need to select Start.

3. We also recommend testing the download and upload speeds of your PlayStation 5 or PlayStation 5 Digital Edition console by doing the following:

  • Select the gear icon located on the top right corner in the home menu in order to make your way to Settings.
  • Inside of Settings, select Network.
  • In the Network screen, select Connecting Status from the left side and then Test Internet Connection on the right side.
  • After the test is completed, you should be able to see your download and upload speeds. For the best streaming quality, make sure that both of these speeds are well above the 15 Mbps.
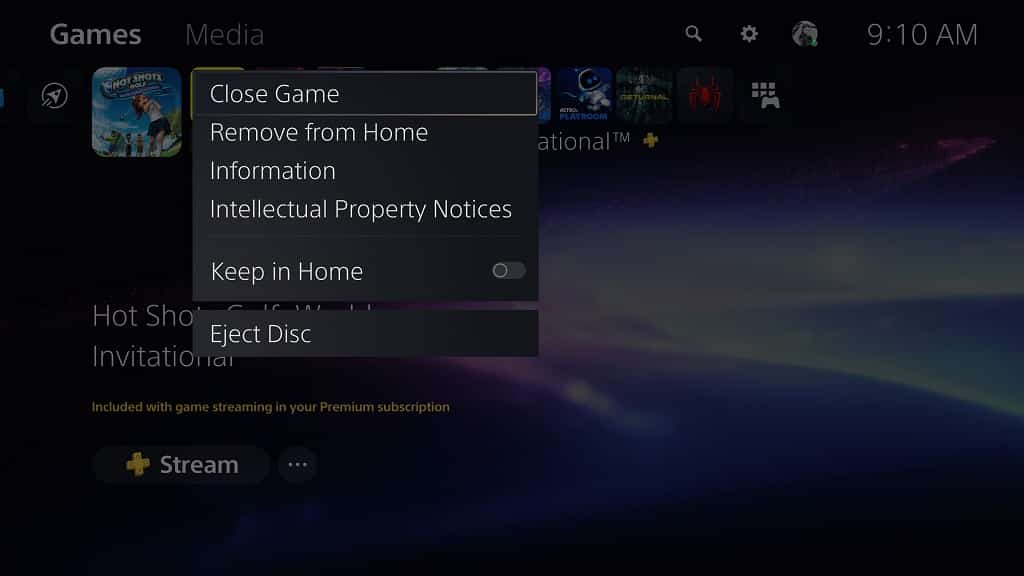
4. You can also try restarting the streaming game app.

In order to do so, you can try doing the following:

  • Press and hold the PS button to go to the home menu.
  • In the home menu, highlight the game stream app.
  • Press the options button on your DualSense.
  • In the pop-up menu, select Close Game.
  • Once the game app has closed, open it again to see if the “PlayStation Network is temporarily unavailable” will still appear.

5. Restarting your PS5 or PS5 Digital Edition system may also help. By doing so, you will not only close the streaming game app, but you will also refresh your Internet connection and clear up any potential conflicting processes.

6. If you are downloading and/or uploading a lot of data on your console, or any other device, then you may not have enough bandwidth to sustain a stable connection for streaming.

Therefore, make sure that you aren’t using your bandwidth heavily when trying to stream on your PS5.

7. The PlayStation streaming servers could also be overburden currently with many simultaneous connections. So, if you are seeing the “PlayStation Network is temporarily unavailable” message, then you might want to try connecting again at a less busy time.

How to use the right trackpad as a trackball on the Steam Deck

In addition to using the right trackpad of the Steam Deck as a mouse, you can also utilize this input as a trackball. To find out how to do so, you can follow this tutorial at Seeking Tech.

Before we begin, it is important to note that you can only simulate the right trackpad as a trackball as the same customization can’t be done with the left trackpad.

Furthermore, there is currently no way to utilize the right trackpad as a trackball on a system-wide basis. Instead, you need to customize this controller feature individually for each game.

1. To start off, make sure you turn on your Steam Deck.

2. With the portable system powered on, select a game in your library that you customize its controller layout where you can use the right trackpad as a trackball.

3. On the game’s page, select the controller icon.

If you are currently playing the game that you want to add trackball functionality to, then you can press the Steam button. In the Steam menu, make sure you are you are in the top most row, where the game’s name is displayed. From there, navigate to the right until you get to the controller’s layout section. Afterwards, select the Controller Settings option.

4. After getting to the Controller Settings for the game, you then need to select the Edit Layout option.

5. In the next screen, you can switch between two different action sets.

If you want to use the right trackpad as a trackball when playing the game, then you need to switch over to the In-Game Controls Action Set.

If you want to use the right trackpad as a trackball when using the in-game menus, then you need to switch over to the Menu Controls Action Set.

6. In the same screen, scroll down and then select Trackpads.

7. From the Trackpads section, you should see Right Trackpad Behavior. Select the drop-down menu and then set it to #Mouse.

8. Afterwards, select the gear icon located on the same row as the Right Trackpad Behavior.

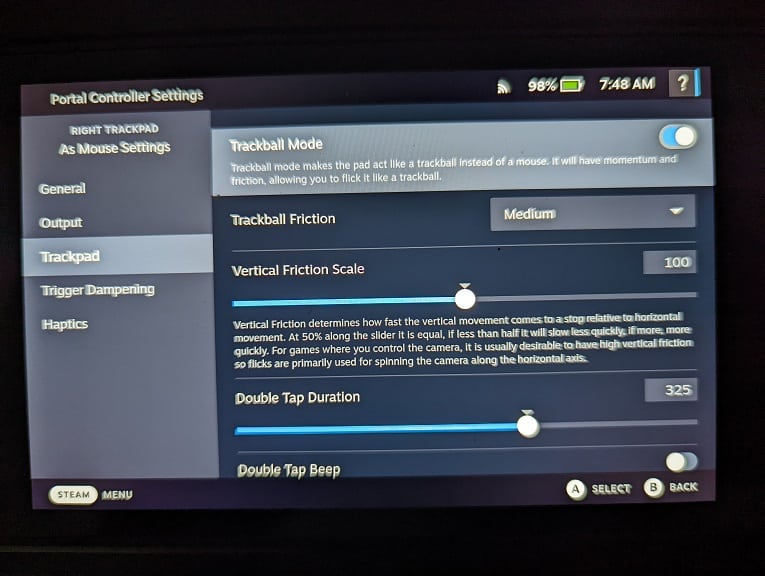
9. After getting to the Right Trackpad as Mouse Settings section, scroll down and then select Trackpad on the left column.

10. On the right side of the same screen, make sure that the Trackball Mode setting has been turned on.

11. There are also other settings that you can customize when using the right trackpad as a trackball:

  • You can change the Trackball Friction to low, medium, high or none.
  • You can adjust the Vertical Friction Scale from a value of 0 to 200.
  • You can modify the Double Tap Duration from a value of 20 to 500.
  • You can choose to enable or disable the Double Tap Beep.
  • You can change the Edge Spin Speed from a value of 0 to 1000.
  • You can adjust the Edge Spin Radius from a value of 0 to 32767.

12. Once you are done enabling and customize Trackball Mode, you can test out the changes by playing the game and using the right trackpad on your Steam Deck.

How to download PlayStation Plus exclusive DLC packs on PS5

If you are subscribed to any of the PlayStation Plus plans, then you are able to download exclusive DLC packs for select games such as Call of Duty Warzone, Fortnite, Genshin Impact, Rocket League, Warframe, World of Tanks and more.

To see how you can get these downloadable contents on your PlayStation 5 or PlayStation 5 Digital Edition console, you can take a look at this tutorial.

1. In order to download these exclusive DLC packs, you need to be subscribed to the following plans:

  • PlayStation Plus Essential
  • PlayStation Plus Extra
  • PlayStation Plus Deluxe
  • PlayStation Plus Premium

2. Once you are ready, you first need to turn on your PS5 or PS5 Digital Edition system if you haven’t done so already.

3. If your console has multiple PSN profiles, then you need to make sure you select the correct profile that is subscribed to PlayStation Plus.

4. Next, you need to be in the home menu. This is the screen where you can select which game to play and more.

If you are playing a game or using an application currently, then you can go to the home menu by pressing and hold the PS button on your controller. You can also get to this screen by pressing the PS button and then selecting the house icon.

5. Inside the home menu, you need to be in the Games section. If you are at the Media section instead, then you simply need to press L1 to switch over.

6. In the game section, scroll all the way to the left and then select the icon that has the yellow PlayStation Plus logo.

7. After getting to the PlayStation Plus app, you need to PlayStation Plus Exclusive Packs menu. There are three ways to do this:

Method #1:

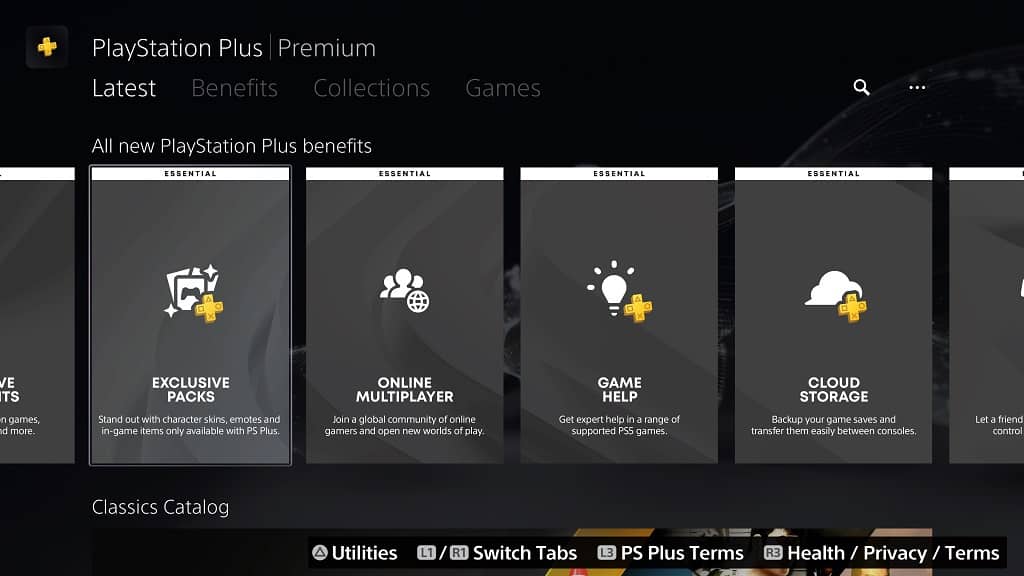
  • From the Latest section of the PlayStation Plus app, scroll down until you get to the “All new PlayStation Plus benefits” row.
  • On this row, scroll to the right and then select Exclusive Packs.
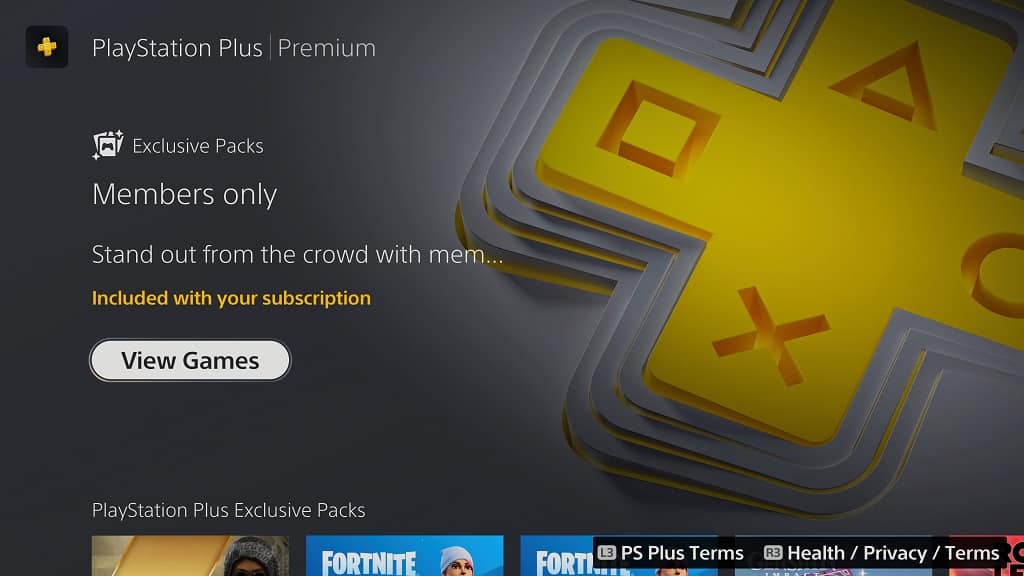
  • In the next screen, select View Games.

Method #2:

  • In the Latest section of the PS Plus App, scroll all the way down to near the bottom to the “Explore PlayStation Plus benefits” row.
  • Inside this row, you need to select Exclusive Packs.
  • After getting to this screen, you then need to select View Games.

Method #3:

  • In the PlayStation App of your PlayStation 5, switch over to the Benefits section. To switch sections, you can use the L1 and R1 buttons on your controller.
  • After getting to the Benefits section, scroll down until you get to “Explore PlayStation Plus benefits” row.
  • On this row, select Exclusive Packs.
  • Finally, select View Games in the next screen.

8. In the PlayStation Plus Exclusive Packs menu, you will see a list of DLC packs that are only available for Plus members.

To sort and/or filter this listing, you can select the Sort and Filter option, which is located on the top left side.

In the pop-up menu, you can then sort the games based on name, release date and recently added. With this menu, you can also filter out the results based on game genre.

9. Select a DLC pack you are interested in downloading in the PlayStation Plus Exclusive Packs menu.

10. On the product page of the DLC, select the Add to Library or $0.00 option in order to get the downloadable content on to your PlayStation 5 or PlayStation 5 Digital Edition console.

How to mute the menu sound effects on the Steam Deck

When browsing through the system menus of your Steam Deck, you will hear a sound effect any time you move or perform an action. If you want to disable these noises, then you can take a look at this tutorial from Seeking Tech.

How to turn off menu sound effects on the Steam Deck

In order to turn off the sound effects that are played when you are using the system menus of your portable system, you need to take the following steps:

1. To start off, open the Steam menu, which you can do by pressing the Steam button.

2. With the Steam menu opened, scroll down and then select Settings.

3. Once you get to the Settings menu, scroll down on the left column and then select Audio.

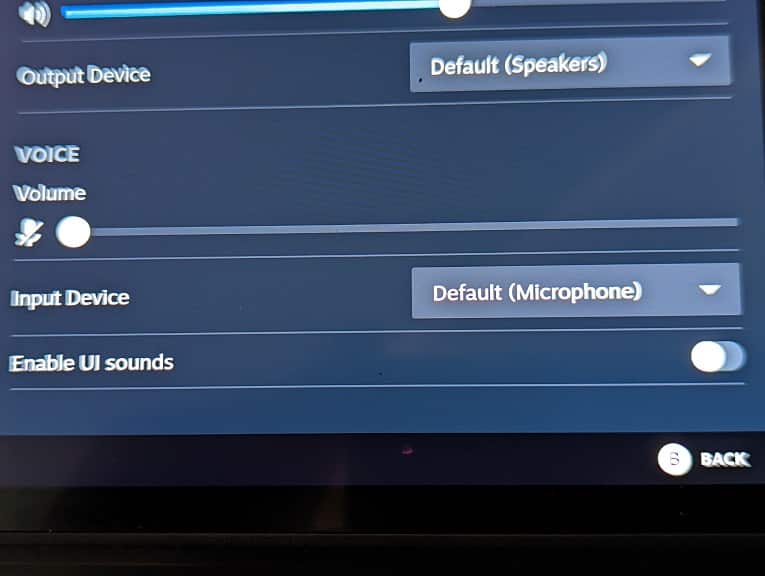
4. In the Audio section, make sure that the switch next to the “Enable UI sounds” setting is set to off.

5. If you can still hear audio when using the system menus after disabling the “Enable UI sounds” setting, then you can try putting your Steam Deck to Sleep Mode and then turning it back on again.

To put your console into sleep mode, you can simply press the power button. Alternatively, you can press the Steam button to bring up the Steam Menu, select Power and then select Sleep.

If putting your system to sleep and then waking it does not work, then you can try restarting the Steam Deck. If a restart does not work, then you can try turning it off completely and then turn it back on again.

Can turn off the startup sound of the Steam Deck?

When turning on your Steam Deck, or waking it up from Sleep Mode, you will hear audible noises coming from the portable system. Unfortunately, there is currently no way to mute these startup sounds.

To avoid hearing these noises, you can try putting on earphones or headphones. To prevent others from hearing the startup noises, you can try temporary covering the system in order to reduce its noise level. Alternatively, you can also try moving to a different location to avoid bothering others when booting up the portable system.

Hopefully, Valve will be able to add an option to disable the startup sound in a future firmware update. To manually update the firmware of your Steam Deck, open the Steam menu and then select Settings. Inside of Settings, select System on the left side and then Check for Updates on the right side. If there is a new file to download, then you can start the update process.

How to improve image quality when streaming PS3 games on PS5

If you are subscribed to PlayStation Plus Premium, then you can play a curated list of PS3 games via cloud streaming on your PlayStation 5 or PlayStation 5 Digital Edition console.

When playing a PS3 over the cloud, you may experience bad image quality, low details, low resolution and visual artifacts.

To see how you can improve the picture quality when streaming a PlayStation 3 game on your PS5 console, you can take a look at this article from Seeking Tech.

1. If you haven’t done so already, we recommend using a wired LAN cable to connect your PlayStation 5 to the internet. This is because using wired provides a faster and more stable connection.

2. If you can only connect your console to Wi-Fi, then you can try switching wireless frequencies. By doing so, you may get a better connection.

In order to do so, you can take a look at this tutorial.

3. For the best streaming quality, your internet connection needs to have a download speed of at least 15 Mbps as well as an upload speed of at least 15 Mbps.

In order to test these speeds on your PlayStation 5 or PlayStation 5 Digital Edition console, you need to do the following:

  • Go to the Settings menu of your console.
  • Select Network from the Settings menu.
  • Inside the Network menu, you first need to select Connection Status from the left side and then Test Internet Connection on the right side.
  • When the test is completed, you can view the download and upload speed test results as detected by your PS5.

4. If you have a fast enough internet but the streaming quality is still bad, then you can try restarting the stream by doing the following:

  • While streaming the PS3 game, press and hold the PS button to open the home menu.
  • In the home menu, hover over to the game you are currently streaming.
  • Press the options button on the DualSense.
  • From the pop-up menu, select the Close Game option.
  • After closing the game, open it again to restart the stream.

5. If the cloud streaming servers are busy, then it may cause poor image quality.

In this case, you can try streaming at a different time of the day, if possible, to see if you can get better visuals when there is less traffic.

6. It is also important to note that the PS3 games you are streaming are running on PlayStation 3 hardware.

As a result, the resolution will be low as 1080p at the maximum. Some games target 720p or even less.

7. Furthermore, games tend to look worse when being streamed as opposed to being played natively on local hardware.

If you want the best experience, then you need to play the PlayStation 3 game on a PS3 console.