How to adjust the trackpad click sensitivity on the Steam Deck

The left and right trackpads can be pressed down, allowing you to simulate a mouse click or perform other actions. To see how you can adjust the click sensitivity of these touch pads, you can take a look at this tutorial from Seeking Tech.

1. Before you start, it is important to note that there is no system-wide way to change the click sensitivity of the left trackpad and right trackpad. Instead, you need to adjust this parameter on a game-by-game basis.

2. To begin, turn on your portable system if you haven’t done so already.

3. Next, you need to select a game that you want to change the trackpad click sensitivity setting for.

4. On the Steam page for the game, select the controller icon on the right side of the screen.

5. After getting to the Controller Settings screen, select Edit Layouts.

6. In the next screen, you first need to select Trackpads on the left column.

7. On the right side of the same screen, you should see the Trackpads menu.

If you want to change the click sensitivity of the right trackpad, then you need to select the gear icon located on the R Click row.

If you want to change the click sensitivity of the left trackpad, then you need to select the gear icon located on the L Click row.

8. In the pop-up window, select Settings.

9. Depending on the trackpad press type, you can adjust the click sensitivity in the next screen.

  • If you are using Double Press, then you can adjust the Double Tap Time setting.
  • If you are using Long Press, then you can adjust the Long Press Time setting.
  • If you are using Soft Press, then you can adjust the Soft Press Threshold setting.
  • If you are using Analog, then you can adjust the Analog Range Start and Analog Range End settings.

The Regular Press, Start Press, Release Press and Button Chord types don’t have click sensitivity settings.

In order to change press type, select the gear icon on the R Click for the right trackpad or L Click for the left trackpad. In the pop-up screen, you then need to select the top row option and then select the press type that you want to switch over to.

10. After changing the click sensitivity level, you can then test it out by playing the game on your Steam Deck.

If the same game comes with a setting where you can adjust the click sensitivity of your trackpad, then you can try using that as well to fine tune the clicks.

How to adjust the right touch pad sensitivity on the Steam Deck

You can use the right touch pad of the Steam Deck as mouse movement as well as control other aspects of a game. You can take a look at this tutorial from Seeking Tech to see how you can adjust the sensitivity of this trackpad.

1. Before we begin, it should be noted that you can only change the touch pad sensitivity on a game-by-game basis as there is no system-wide setting.

It is also important to note that you can only change the sensitivity of the right trackpad as the left trackpad’s touch sensitivity level currently can’t be adjusted.

2. To start off, you need to go to the Controller Settings for a game.

In order to do so, you can open the game’s Steam page and then select the controller icon.

If you are currently playing a game, then you can press the Steam icon to open the Steam menu. Inside the Steam menu, move right to switch screens until you get to the In-Game Controls/Menu Controls section. From there, select Controller Settings.

3. Once you get to the Controller Settings menu, make sure you are in the correct tab.

If you want to adjust the touch pad sensitivity during gameplay, then you should be in the In-Game Controls section. If you want to adjust the touch pad sensitivity when using the in-game menus, then you should switch over to Menu controls.

In order to switch between different sections, you can press the L1 and R1 buttons while you are in the Controller Settings menu.

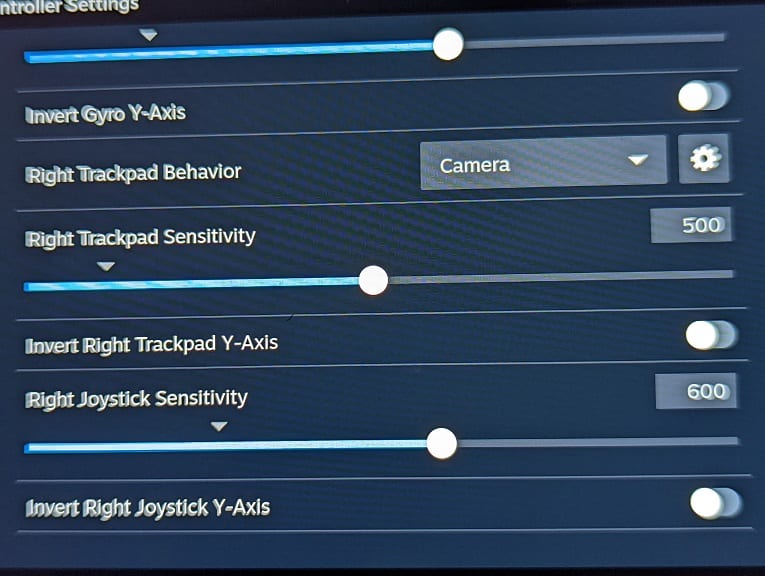
4. Once you verified that you are in the correct section, you then need to scroll down until you see the Right Trackpad Sensitivity.

If you don’t see this option, then you make sure you bind the Right Trackpad Behavior to a specific action.

If you can’t find the Right Trackpad Behavior setting in the Controller Settings menu, then you can select the Edit Layout option located near the top. You then need to select Trackpads in the next screen. The Right Trackpad Behavior setting should be located here.

5. Next, select the Right Trackpad Sensitivity option from the Controller Settings menu and then adjust the sensitivity level by using the slider.

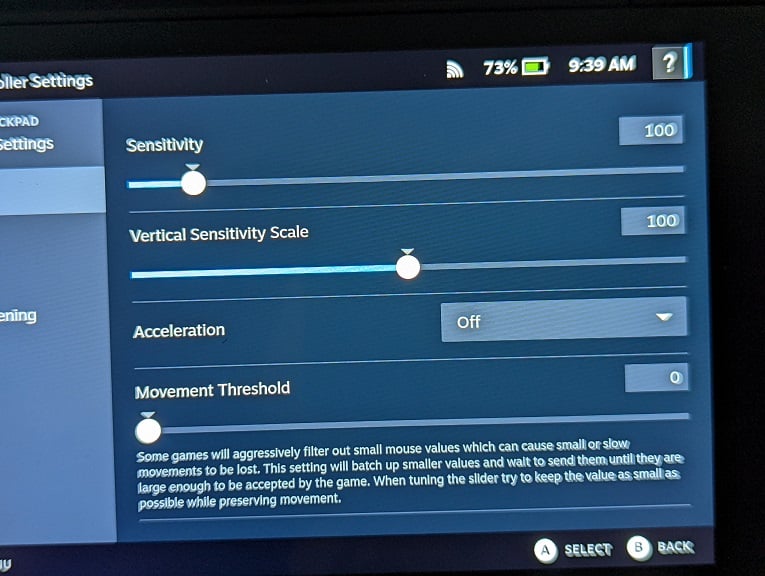
6. If you want more options when it comes to adjust the sensitive levels of the right touch pad, then you can select the gear icon right next to the Right Trackpad Behavior option in the Controller Settings menu.

In the next menu, you are able to adjust the general sensitivity, vertical sensitivity scale, acceleration, movement threshold as well as make other changes to how the right trackpad will function.

7. After adjusting the sensitivity levels, you can test it out in the game.

Keep in mind that some games may also let you adjust the sensitivity levels of the right touch pad as well. So, you might want to use the in-game setting as well in order to find tune the right trackpad sensitivity.

How to remove games and DLC from the PS Store shopping cart on PS5

You can use the PlayStation Store App on your PlayStation 5 or PlayStation 5 Digital Edition console to purchase games, downloadable content as well as other digital products.

If you added a product to your shopping cart but later decided to change your mind about purchasing it, then removing it can be somewhat confusing.

To see how you can remove items from the PS Store cart on your PS5 console, you can take a look at this tutorial from Seeking Tech.

1. To start off, make sure you power on your PS5 or PS5 Digital Edition gaming system if you haven’t done so already.

2. If you have multiple user profiles, then make sure you select the PlayStation Network account that has the item or items in the shopping cart that you want to remove.

3. Next, you should arrive at the home screen menu.

If you are currently playing a game or using an app, then you can get to the home screen by pressing and holding the PS button on your controller.

An alternate method to go home is to press the PS button to open the quick menu. From this menu, you then need to select the home icon from the bottom menu.

4. After getting to the home screen, make sure you are in the Games section.

If you are in the Media section, then you can press the L1 button to switch back.

5. In the Games section, scroll to the left and then select the shopping bag icon in order to head over the PlayStation Store.

6. Inside of the PlayStation Store, there are two ways that you can view your digital shopping cart.

The first method is the fastest and simplest as you can simply select the Shopping Cart icon located at the top right side of the screen from the main menu of the store.

Alternatively, you can go to the product page for any of the items in the cart. Afterwards, you need to select the In Cart option to open your shopping cart.

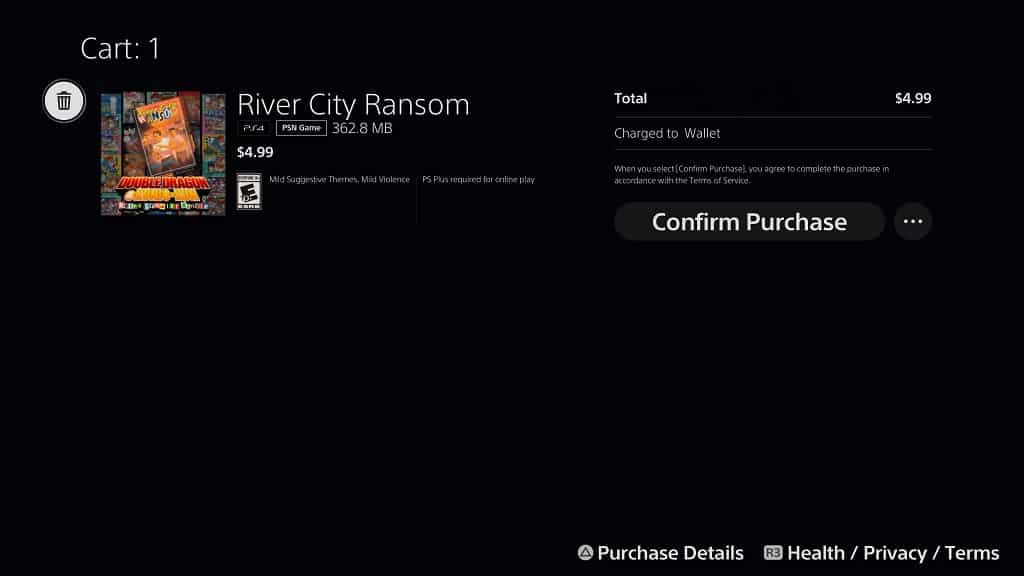
7. In the Shopping Cart menu, scroll to the left and the highlight the game or DLC that you want to remove.

8. With the digital product highlighted, you should see a garbage can icon located on the top left side its listing. You need to select this icon in order to remove the product from your shopping cart.

9. If you have multiple products in your cart, then you will be bought back to the shopping cart menu. Here, you can press the circle button to go back to the PlayStation Store, choose the Confirm Purchase option to buy the remaining items in the cart or remove more products from the cart.

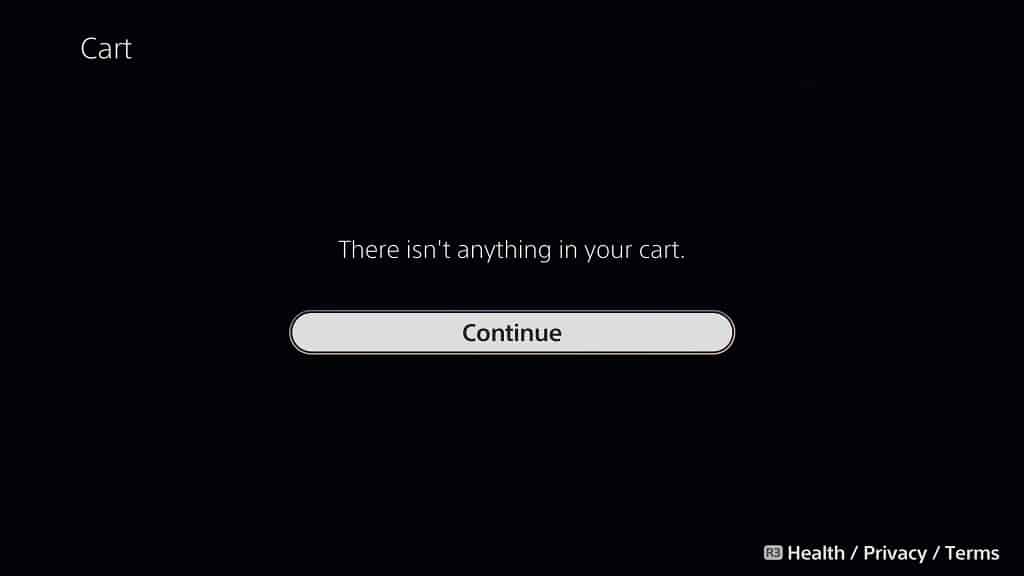
10. If you deleted every item in your shopping cart, then you will get a message saying that the cart is empty.

You can then select Continue in order to return to the PlayStation Store.

How to enable 40 Hz mode on the Steam Deck

Thanks to a recent firmware update, you can play games using the 40 Hz mode on the Steam Deck. To find out how you can turn this feature on, you can take a look at this tutorial at Seeking Tech.

Why should you use Steam Deck 40 Hz mode?

The 40 Hz mode will let you play games at up to 40 frames per second. 40 fps should look a lot smoother, as well as feature lower input lag, when compared to 30 fps.

While 60 fps is smoother and more responsive than 40 fps, the differences aren’t as noticeable as when going from 30 fps to 40 fps.

By limiting the screen to a refresh rate of 40 Hz instead of 60 Hz, you can also put more hardware resources towards visual fidelity. Alternatively, you can leave the graphical settings as is so that you can save some battery life.

How to change the screen refresh rate to 40 Hz on the Steam Deck

1. Before we begin, make sure you update the Steam Deck to the latest available firmware as you may have an older software version that does not support the 40 Hz refresh rate mode.

In order to manually update, you can try taking the following steps:

  • With the Steam Deck turned on and connected to the internet, open the Steam menu by pressing the Steam button.
  • Next, you need to select Settings from the Steam menu.
  • After getting to Settings, select System on the left column and the Check for Updates on the right side.
  • If there is a new firmware available, download and install it.
  • The new update should be applied when the portable system restarts.

2. Once you have your Steam Deck updated, open the Quick Access menu by pressing the button that has the three dots icon on the portable system.

3. In the Quick Access menu, scroll down until you reach the battery icon.

4. You should now be in the Performance menu.

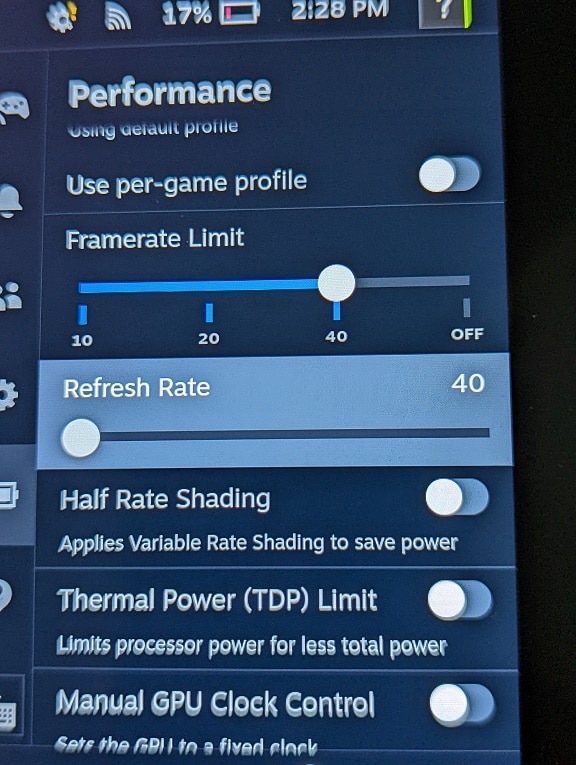
Here, you need to scroll down to the Refresh Rate slider. You may need to click the Advanced View option to expand the Performance menu in order to find this slider.

5. Select the Refresh Rate slider and then move it all the way to the left in order to set the Refresh Rate to 40 Hz.

6. In the same Performance menu, make sure that the Framerate Limit is also set to 40 frames per second.

7. In order to see whether or not a game is running in 40 Hz mode, you need to do the following:

  • In the Quick Access menu, you first need to go back to the Performance menu.
  • From the Performance menu, you then need to select the Performance Overlay Level slider at the top of the screen.
  • You should then set the Performance Overlay Level to 1.
  • On the top left side of the screen, you should see the frames per second counter.

How to find PlayStation Plus exclusive discounts on the PS5

If you are subscribed to one of the PlayStation Plus plans, then you will be able to take advantage of exclusive discounts on select games and DLC.

To see how you can locate these deals and sales on your PlayStation 5 or PlayStation 5 Digital Edition console, you can take a look at this tutorial from Seeking Tech.

1. It should be noted that, if you want to take advantage of the discounted prices, then you need to be a member of PlayStation Plus Essential, PlayStation Plus Extra, PlayStation Plus Deluxe or PlayStation Plus Premium.

2. You should turn on your PS5 or PS5 Digital Edition game console if you haven’t done so already.

3. Next, make sure you are logged into the PlayStation Network that you used to subscribe to any of the aforementioned PlayStation Plus plans.

4. You should now be in the home screen menu.

If not, you can press the PS button on the controller you are using and then select the home icon located at the bottom left side of the screen. Alternatively, you can just press and hold the PS button until the home menu shows up on screen.

5. Next, you need to get to the PlayStation Plus Exclusive Discounts menu. To do so, you can try the following methods:

Method #1:

  • From the home screen, go to the PlayStation Store App.
  • In the PlayStation Store, press the R1 buttons several times to switch to the Deals tab.
  • Once you get to the Deals tab, scroll down until you get to the PlayStation Plus Exclusive Discounts.
  • From this section, scroll all the way to the right and then select View All.

Method #2:

  • Select the PlayStation Plus App from the home screen.
  • After getting to the PlayStation Plus section, make sure that you are at the Latest tab.
  • Next, you can scroll down to the All New PlayStation Plus Benefits section and then select Exclusive Discounts. Alternatively, you scroll all the way down to the Explore PlayStation Plus Benefits section and then select Exclusive Discounts. You can also switch over to the Benefits tab, scroll down to the Explore PlayStation Plus Benefits section and then select Exclusive Discounts.
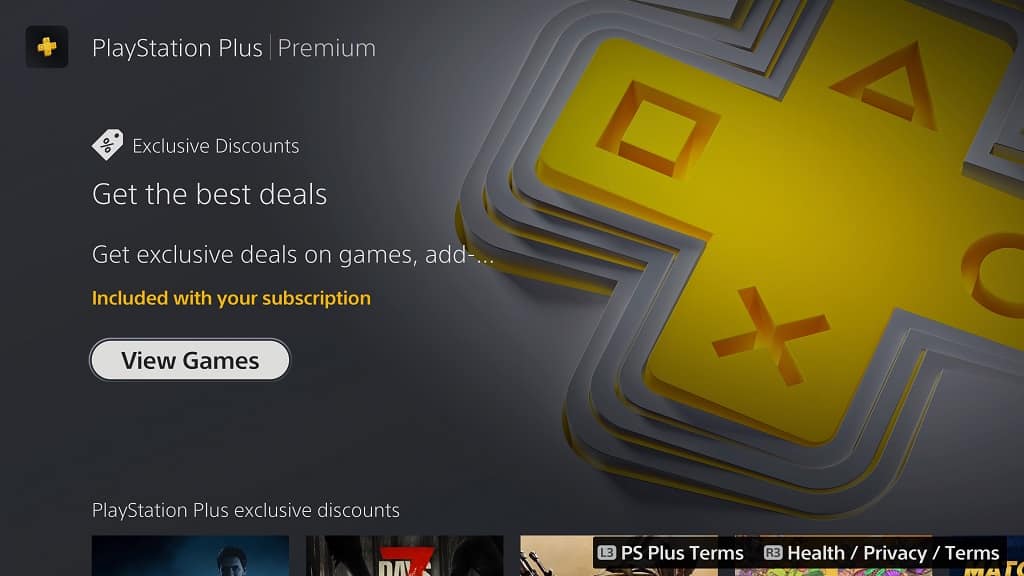
  • In the next screen, select View Games.

6. In the PlayStation Plus Exclusive Discounts menu, you will find a list of discounts that are only available to subscribers.

7. If you want to sort this listing, then make sure you select the Sort and Filter icon located to the left side of the screen.

From the pop-up menu, you can then select the Sort By option and then select the following criteria:

  • Default
  • Name (A to Z)
  • Name (Z to A)
  • Release Date (Old to New)
  • Release Date (New to Old)
  • Recently Added to PS Plus

You can also use the Sort and Filter menu in order to filter out the listing base of the game genre.

8. If you are interested in buying a game or DLC from the PlayStation Plus Exclusive Discounts menu, then you need to select it.

9. In the product page, you then need to select its price to add the product your cart and start the checkout process.

What to do if you can’t unlock your Pixel 6a

It is recommended that you lock your Google Pixel 6a so that other people won’t be able to fully access the device.

If you aren’t able to unlock this smartphone by using your finger print as well as any other unlock methods, then you can take a look at this troubleshooting guide at Seeking Tech to see how you can potentially fix this conundrum.

How to unlock the screen for the Google Pixel 6a

When you set up your Google Pixel 6a, you may be asked to provide a fingerprint to quickly unlock your phone.

If you are having problems trying to use the fingerprint sensor for this phone model, then you can check out this article.

You can also set up a secondary unlock method as you can use a swipe gesture, drawing pattern, PIN number or password.

What can be done if you can’t unlock your Pixel 6a

If you can’t get the fingerprint sensor to work and don’t remember the information required for the secondary unlock method, then you have no other choice but to factory reset your Google Pixel 6a. By doing so, you will delete all of the data, include the screen lock security, stored on the device.

If you are holding your Pixel 6a phone currently, then you can do the following:

1. Start by powering off your phone. You should be able to do so by pressing and holding the power and volume up buttons at the same time to bring up the power menu. From there, tap the power off option.

2. With the Pixel 6a shut down, you press and hold the power and volume down buttons simultaneously for around 10 to 15 seconds.

3. If done correctly, the phone should boot up in a text only menu. From there, press the volume down button until you see the Recovery Mode option.

4. After getting to the Recovery Mode option, press the power button.

5. Your Pixel 6a should now show a No Command screen. Here, you need to press and hold the power button.

6. Press the volume up button with the power button held down and then let go of both buttons.

7. If done correctly, you should now appear in the Android Recovery menu. From there, use the volume down button navigate over to the Wipe Data/Factory Reset.

8. Finally, press the power button to start the factory reset.

You can also factory reset your Pixel 6a remotely if it is far away. With that said, you will lose its tracking location after doing so. Therefore, we only recommend doing a remote factory reset only if you lost your phone and have no hope of recovering it.

After you are done factory resetting the Google Pixel 6a, you need to go through the initialization process again. During this setup, you should be able to add a new fingerprint unlock profile as well as a secondary unlock method.

To see how you can change the unlock method of the Pixel 6a, you can take a look at this link.

How to change the Pixel 6a screen lock security

The Google Pixel 6a features multiple methods in terms of how you can unlock the screen of your smartphone. You can check out this guide at Seeking Tech to see how you can change the screen lock security for this device.

How to change the screen unlock method for Pixel 6a

In order to change the screen lock security of your Google Pixel 6a, you need to take the following steps:

1. To start off, you need to turn on your phone and then unlock its screen.

2. With your smartphone accessible, you need to open the Settings App.

If you can’t find it in the home screen, then you can swipe upwards from an unoccupied space in the home screen to bring up the full list of installed applications.

3. In the Settings App, the first step you need to take is to head into Security.

4. From the Security menu, you then need to go to Screen Lock.

5. You will be asked to unlock your screen again in order to continue.

6. You should now be in the Choose a New Screen Lock menu, which will allow you to do the following:

  • The first option on this list is None, which means that you won’t have any screen lock method.
  • You can also select Swipe, which will unlock the screen based on a swiping gesture.
  • With the Pattern option, you can pick a pattern that unlock the screen based on a drawn pattern.
  • When it comes to the PIN method, you can use a four-digit number for the screen unlock.
  • Last but not least, you can also use the Password method for the screen lock security.

After selecting some of the aforementioned methods, you will get a “Delete Screen Lock” notification, which warns that you currently stored screen unlock method and fingerprint profiles will be deleted when making this change.

How to make your Pixel 6a screen stay unlocked

In addition to the aforementioned manual methods, you can also make your Google Pixel 6a screen stay unlocked by doing the following:

1. Open the Settings App and then select Security.

2. You then need to select Advanced Settings from the Security menu.

3. From the Advanced Settings menu, you need to go to Smart Lock.

4. You need to unlock your phone screen in order to continue.

5. After getting to the Smart Lock menu, you have the following methods:

  • You can select the On-Body Detection method, which will keep your Pixel 6a unlocked when it detects that it is near your body.
  • With the Trusted Places method, your smartphone will stay unlocked once it detects that it is in a trusted location.
  • With the Trusted Devices option, the phone will stay unlocked if it is connected to a trusted device.

For all three of these methods, you phone will stay unlocked for 4 hours at the maximum.

How to prevent Samsung Odyssey Neo G8 burn-in issues

If you display the same static image on your Samsung Odyssey Neo G8, then you may run into burn-in issues. To see how you can prevent these problems with this curved gaming monitor, you can follow this guide at Seeking Tech.

How to prevent screen burn-in for the Odyssey Neo G8

In order to prevent screen burn-in for this curved gaming monitor, you can try taking the following precautionary actions:

1. The first step is pretty easy as you can simply turn off the Odyssey Neo G8 when you are not looking at it.

2. If you need to use the monitor for many continuous hours, then we suggest taking short breaks every hour. During your break, make sure you turn off your screen.

3. If possible, avoid displaying static images in the same spot on your monitor.

If you are playing a videogame with a head-up-display, then look through the in-game options to see if there is anyway where you can turn off or limit the HUD.

For apps with static images, you can try displaying a different app occasionally.

You should also check to see if these is an option where you can adjust the opacity level of static content.

4. If the connected device comes with a setting that will dim its image output after a certain amount of time has passed since it last detected any activities, then we suggest enabling this feature.

5. You can also set up a screen saver on the connected device.

If you are using a Windows 10 PC, for example, then you can do the following:

  • Go to Settings.
  • Make sure you are in the Home section of Settings.
  • Next, you need to select Personalization.
  • Inside the Personalization menu, select Lock Screen on the left column.
  • You then need to select Screen Saver Settings on the right side of the same menu.
  • In the pop-up Screen Saver Settings menu, you can select the screen saver type that you want to use as well as the wait time until it activates when your computer detects so sign of any activities.

6. We also highly recommend using the screen timeout setting as it will automatically turn off the Samsung Odyssey Neo G8 after a certain amount of past since the last activity was detected.

In order to do so with a Windows 10 PC, for instance, you need to take the following steps:

  • Head to Settings.
  • You should then go to the Home section of Settings.
  • In the Home section, go to Personalization.
  • After getting to the Personalization menu, you need to select Lock Screen on the left column and then Screen Timeout Settings on the right side.
  • In the Power & Sleep menu, you can set when the screen timeout will go into effect. We recommend going with 30 minutes or less for this setting.

What to do if you see burn-in on your Samsung Odyssey Neo G8

If you see a burned-in image on your Samsung Odyssey Neo G8, then there is a possibility that it is only temporary. In this case, we recommend that you let your monitor display something else aside from the static image that cause the problem in order to see if the afterimage will eventually fade away on its own.

If the burned-in image remains after some time has passed, then it may be permanent. If this is the case, you may need to get your monitor replaced.

How to fix Samsung Odyssey Neo G8 sound issues

When using your Samsung Odyssey Neo G8, you may get low volume sound output. In some cases, you may not be able to hear anything at all. To see how you can fix these problems, you can take a look at this troubleshooting guide at Seeking Tech.

1. To start off, make sure you connect the other device directly to the curved gaming monitor.

Using a DVI to HDMI cable won’t transfer any audio. Other adapters, splitters and pass-through devices may also mute the sound output.

2. You should also check to see if the video cable has any visible damage. If there are notable defects, then you can try getting a new cable.

3. If the connected device offers multiple ways of outputting sound, then you need to set this setting to the Odyssey Neo G8.

If you are using a Windows 10 PC, for example, then you need to go to Settings > System > Sound. Select the dropdown menu in the “Choose your output device” section and then select the monitor for the sound output.

4. Make sure you accidentally didn’t mute the audio in the media player, videogame and/or the connected device.

5. You can also try increasing the volume level in the media player, videogame and/or the connected device.

6. If you have your earphones, headphones or headset connected to the monitor, then you should try unmuting your listening device.

7. You can also try turning up the volume level on your earphones, headphones or headset.

8. A new firmware for the Samsung Odyssey Neo G8 may help fix its sound output problems as well.

If you are having a difficult time trying to update this gaming monitor, then we recommend that you take a look at this article.

9. Power cycling the monitor, as well as the connected device, may be able to fix this problem.

In order to do so, you can try taking the following steps:

  • Turn off the Samsung Odyssey Neo G8 and the connected device.
  • Next, you need to unplug both from the power outlets.
  • Wait for several minutes and then plug both back into the power outlets.
  • Turn on the Odyssey Neo G8 and the connected device again.
  • Test to see if you are able to get any sound output after the power cycle process.

How to prevent your Samsung Odyssey Neo G8 from running too hot

When using your Samsung Odyssey Neo G8, you may notice that the curved gaming monitor is running hot. To see how you can prevent this display from overheating, you can take a look at this troubleshooting article from Seeking Tech.

How to prevent your Odyssey Neo G8 from getting too hot

In order to avoid overheating your curved gaming monitor, you need to do the following:

1. The first step we recommend taking is to make sure you have enough space behind the monitor. Samsung suggests that you should leave at least 10 cm of open-air space for proper heat dissipation.

2. You should also avoid putting the Odyssey Neo G8 is an enclosed space as doing so will trap the heat being dissipated from the screen, causing the monitor to heat up faster than normal.

3. Do not place the curved gaming monitor near any heat source such as a fireplace, heater or stove.

4. When it comes to temperature, the Samsung Odyssey Neo G8 should be operated within the recommended range of 10 °C to 40 °C (or 50 °F to 104 °F).

For non-operation, the monitor should be stored within the range of -20 °C to 45 °C (or -4 °F to 113 °F).

5. For humidity, the device should be operated within a range of non-condensing 10% to 80%.

The recommended humidity range for storage is a little bit wider at non-condensing 5% to 95%.

6. The aforementioned precautionary steps for the screen should also be applied to the AC/DC adapter as well since this part can easily overheat and may end up causing issues.

7. Keeping your Samsung Odyssey Neo G8 dust-free should also help with heat dissipation.

You can check out this guide to see how you can properly clean this gaming monitor.

8. If your monitor heats up easily even if you take all of the aforementioned precautionary steps, then we suggest contacting Samsung in order to get additional support.

What to do if your Odyssey Neo G8 gets too hot

If your Samsung Odyssey Neo G8 gets very hot, then you can try doing the following:

1. To start off, turn off the curved gaming monitor.

2. After shutting down the device, unplug it from the power outlet.

3. You may also want to unplug any other cables you have connected to the screen as well.

4. Next, we recommend that you let your Samsung monitor cool down at room temperature.

If you want to cool down the screen faster, you can use a fan in order to increase the air circulation around the device.

5. Once the Odyssey Neo G8 has cooled down, you can plug it back into the power outlet and then reconnect any cables you previously unplugged.

6. You should be able to turn the screen back on and then use it normally.

Keep in mind that you may hear cracking or popping noises when your monitor is heating up and cooling downing. This is due to the internal components of the device expanding or contracting. While it may sound alarming, these noises are considered to be normal.