How to find ‘Optimized for Xbox Series X and S’ games on Xbox Game Pass

The Xbox Game Pass features hundreds of titles that you can download. With that said, not all of these video games have been optimized for the Xbox Series X and Xbox Series S systems. To see how you can find these optimized releases, you can take a look at this tutorial from Seeking Tech.

1. To start off, you need to go the home screen of your Series X or Series S.

If you are playing a game, using an app or doing something else currently, then you can press the Xbox button on the controller to open the Guide menu. From there, you can select Home.

2. In the home screen, find and select the shopping bag icon in order to head to the Store App.

While there is an Xbox Game Pass App available, you aren’t able to sort and filter the listing from that application.

3. Once you open the Store App on your Xbox Series X or Xbox Series S, go left until you open the left column menu.

4. From the left column menu, you need to select Home.

5. Scroll down the Home screen of the Store App until you get to the Xbox Game Pass section.

6. Select the “All games A – Z” tile from the Xbox Game Pass section.

7. You should now be in the All Console Games menu, which has the following description:

  • “Explore every game included with Xbox Game Pass Console.”

Here, you first need to press the X button to open the Filter/Sort menu.

8. In the menu that appears on the right side, you then need to select Technical Features.

9. From the Technical Features menu, make sure that the “Optimized for Xbox …” box is checked. You can also tick the other boxes if you are looking for games with other features.
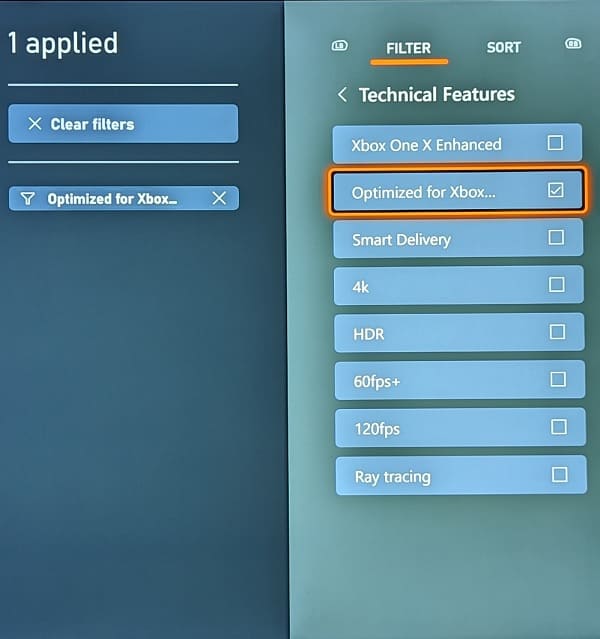
10. The listing should now be filtered to only show games that are optimized for the Xbox Series X and Xbox Series S consoles.

11. You can press the B button on the controller to exit the Filter/Sort menu and view the full list of these titles.

For the uninformed, optimized games take advantage of the extra horsepower of the Xbox Series X and Xbox Series S. As a result, these games can run at a higher resolution, better frame rate as well as featuring other graphical enhancements.

How to find ‘120 fps’ games on Xbox Game Pass

You can play select Xbox Series X and Xbox Series S games from the Xbox Game Pass subscription service at 120 frames per second. To see how you can locate these titles from your console, you can take a look at this tutorial from Seeking Tech.

1. For the first step, you need to head over to the home menu of your Series X or Series S if you aren’t there already.

To get there, press the Xbox logo button on the controller and then select Home.

2. It should be noted that you can’t filter the listing of available titles from the Xbox Game Pass App. Instead, you need to use the Store App.

Therefore, you need to find and select the shopping bag icon from the home menu.

3. Once you open the Store App, move to the left until you see the left column menu appear.

4. From there, you need to select Home.

5. After getting to the Home screen of the Store App, scroll down until you get to the Xbox Game Pass row.

6. The left-most option of the Xbox Game Pass row should be “All games A – Z.” Make sure you select it.

7. If done correctly, you should now be in the “All Console Games” menu, which shows all of the currently available games that you can download, install and play if you have an Xbox Game Pass subscription.

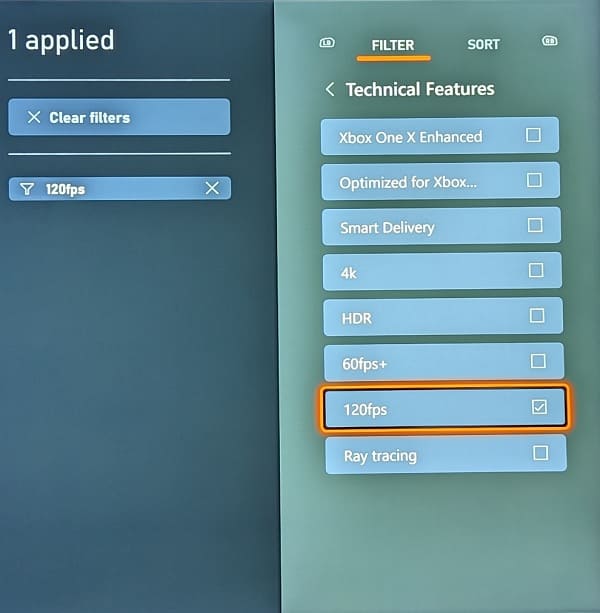
Here, you need to press the X button in order to open the Filter/Sort menu on the right side of the screen.

8. Next, you need to select Technical Features, which should be the last option.

9. From the Technical Features sub-menu, make sure that the “120 fps” box is checked.

10. If you would like, you can also add additional filter options as well as change the sorting order from the Filter/Sort menu.

11. Once you are done, you can exit the Filter/Sort menu by pressing the B button.

12. The “All Console Games” menu should now be filtered to only show Xbox Game Pass games that are capable of running at 120 frames per second.

In order to play the 120 fps titles, you need a television set or monitor that supports a refresh rate of 120 Hz. You may also need to change the Graphics Mode in the in-game settings menu for that title in order to unlock 120 fps.

How to turn off storage on Xbox Series X and S

With the Xbox Series X and Xbox Series S, you are able to turn off the storage drives of these consoles when they are put into Sleep Mode. To see how you can do so, you can follow the steps laid out in this article from Seeking Tech.

Why use the “When console is turn off, turn off storage” feature?

By turning off the storage of your Xbox Series X or Xbox Series S in Sleep Mode, you can prevent the internal SSD or external USB storage drives from getting corrupted in case your console completely shuts down during the middle of a firmware and/or game patch update.

Furthermore, you should be able to safely unplug the external drive in Sleep Mode without any issues by enabling this setting.

This feature is also helpful if you want to save on your energy bill as your Xbox system should use less energy without having to power on its storage options.

How to disable storage on Xbox Series X and S

To stop your storage from being left powered on while you put your Series X or Series S console in Sleep Mode, you need to take the following steps:

1. To start off, you need to head over to the Settings menu of your gaming system. You can do so by selecting the gear cog icon in the home screen menu.

Alternatively, you can press the Xbox button in order to open the Guide menu, which is where you can then head over to the Profile & System tab by using the LB and RB buttons. Finally, select Settings from the Profile & System tab of the Guide menu.

2. Once you get to Settings, you need to first select General from the list of options available on the left column.

3. From the right side of the same screen, you then need to select “Power options.”

4. Inside the “General – Power Options” menu, make sure you select the Sleep option in the “Choose how this console turns off” section.

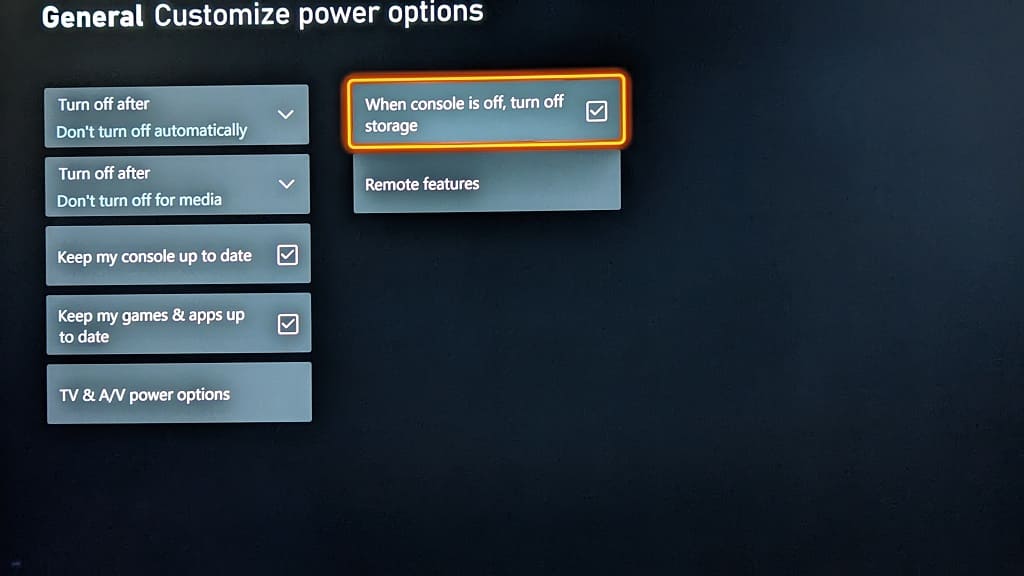
5. Afterwards, you need to select “Customize power options.”

6. In the “General – Customize Power Options” menu, make sure that the “When console is off, turn off storage” box is checked.

How to disable the game art home screen background on Xbox Series X and S

By default, the Xbox Series X and Xbox Series S home screen backgrounds will change when you move the cursor over to a game in the Recently Played section of the home screen. If you find that having the background changed to the home screen to the game art is too distracting and/or not aesthetically pleasing, then you can check out this guide to see how you can disable it.

1. To start off, make sure you updated your Series X or Series S to the latest available firmware if you haven’t done so already. This is because the ability to disable the game art background in the home screen was added through a system software update.

2. Once your console has been updated, you need to head back to the Settings menu. To get there, select the gear icon from the home screen.

You can also press the Xbox button on your Xbox game pad in order to bring up the Guide menu and then the RB button a few times to move over to the Profile and System section. From there, you can head into Settings.

3. In the Settings menu, the first thing you need to do is to select General from the list of available options in the left column.

4. On the right side of the same screen, you should then select Personalization.

5. After getting to the “General – Personalization” menu, head over to My Background.

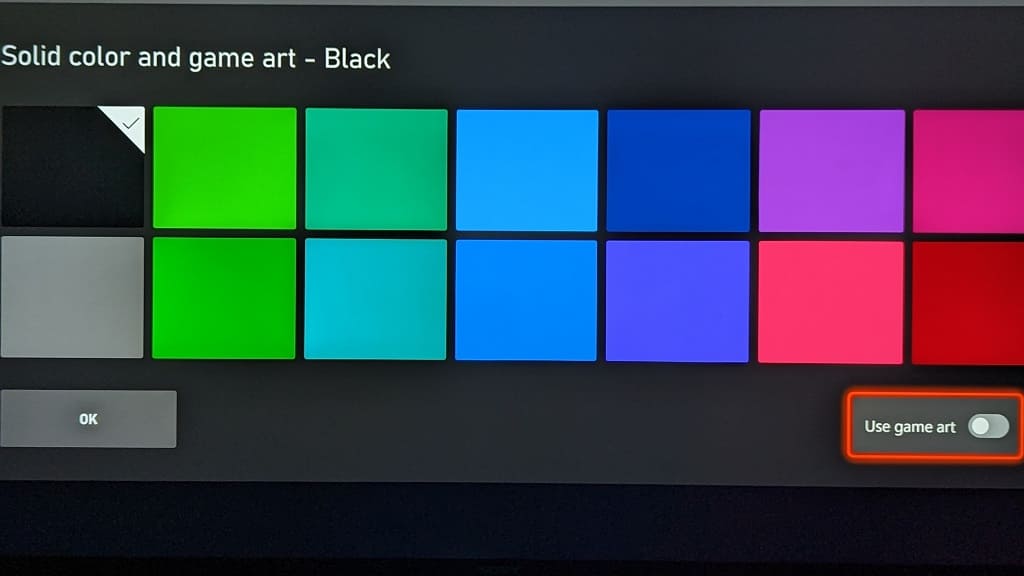
6. From the “Personalization – My Background” menu, you need to select Solid Color and Game Art.

7. On the next screen, make sure that the “Use Game Art” option located on the bottom right corner of the screen is deselected.

By doing so, you should be able to disable the game art from appearing in the home screen background when you move the cursor in the Recently Played section.

8. In the same screen as the “Use Game Art” option, you can also select a solid background color for your home screen.

9. Once you are done with making these changes, select the OK option to head back to the “Personalization – My Background” menu.

10. You can then press the B button several times in order to back out to the Xbox home screen menu.

How to find and pre-install Xbox Game Pass coming soon games on Series X and S

Xbox Game Pass gets a constant stream of new games added. To see how you can find these “coming soon” titles for the subscription service from your Xbox Series X or Xbox Series S console, you can take a look at this step-by-step tutorial from Seeking Tech.

1. To start off, you need to power on your Series X or Series S console if you haven’t done so already.

2. You should then head over to the home screen menu.

If you are playing a game, using an app or in another place at the moment, then you need to press the Xbox logo button on your game pad and then select the Home option in the Guide menu.

3. Once you get to the home menu, you need to find and select the Xbox Game Pass icon.

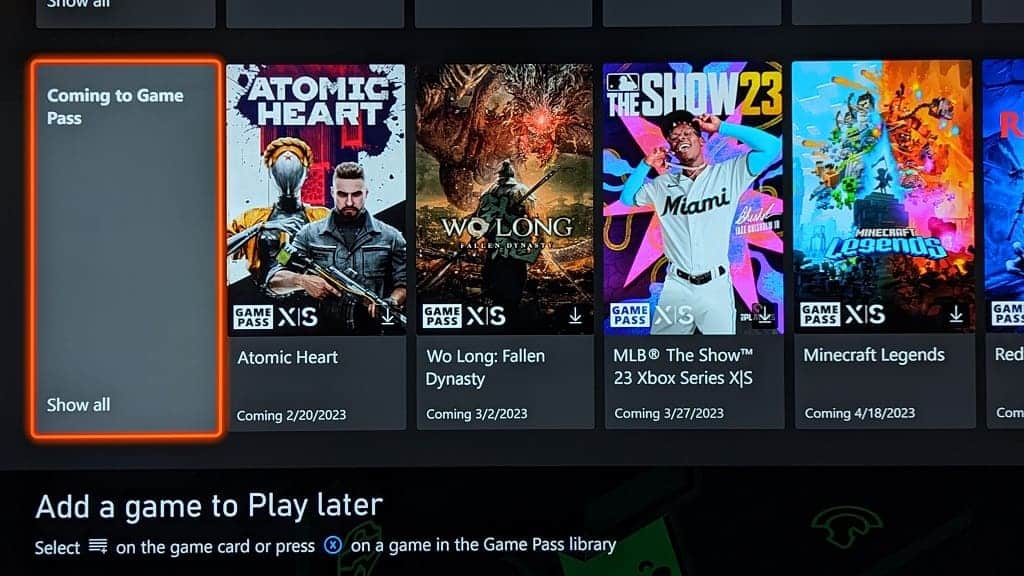
4. After getting inside the Game Pass App, scroll down until you get to the Coming to Game Pass row. Here, you will see a list of five notable upcoming videogames that will be added to the streaming service.

5. If you want to see more, then you need to select the “Coming to Game Pass – Show all” option located on the left side of this row.

You should then be able to find more games in the Coming to Games Pass menu.

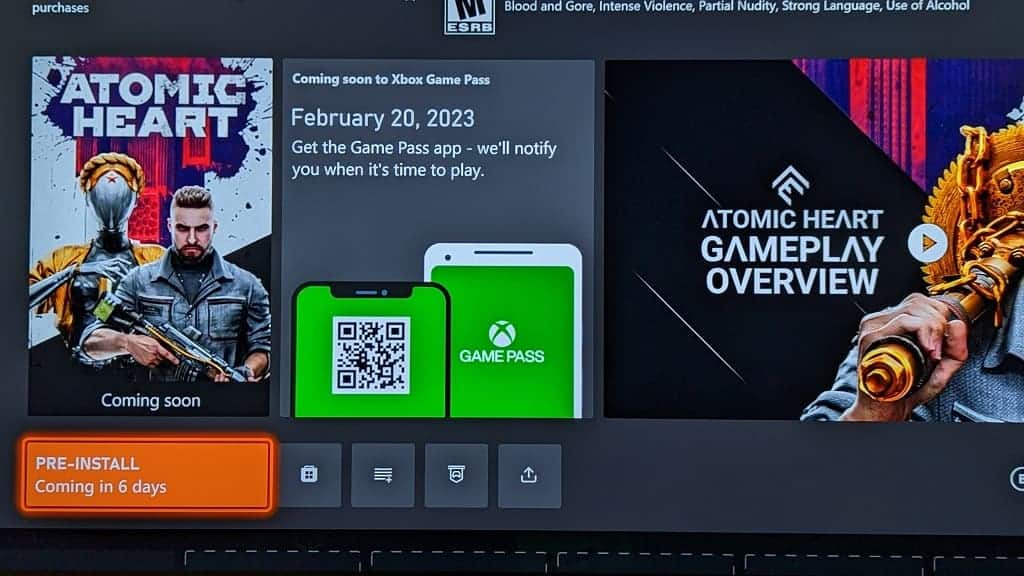
6. In order to pre-install a game from the Coming to Game Pass section, you need to first select it.

7. On the product page, you then need to select the Pre-Install option.

8. The download and installation process should then start.

9. By pre-installing the game in advance, you should be able to play it right away without having to first download when it official comes out digitally.

How to find complete list of Xbox Game Pass games on Xbox Series X and S

The Xbox Game Pass features hundreds of games that you have full access to as long as you remain a member to the subscription service.

To see how you can full the complete list of titles that are currently being offered on your Xbox Series X or Xbox Series S, you can take a look at this tutorial from Seeking Tech.

Method #1:

For the first method, you need to take the following steps:

1. Turn on the home console and then head over to the home menu.

If you are doing something else at the moment on your Series X or Series S, then you can press the Xbox logo button on your controller and the select Home.

2. In the home menu, find and select Xbox Game Pass.

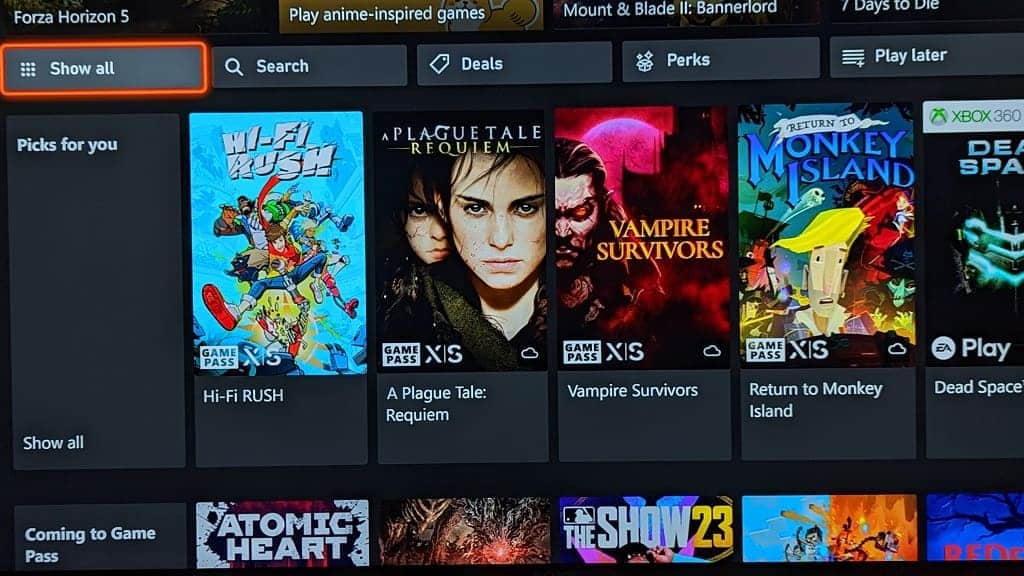
3. Inside of the Game Pass App, scroll a little bit down from the top until you get to the row that has the following listed from left to right:

  • Show all
  • Search
  • Deals
  • Perks
  • Play Later

4. On this row, select the “Show all” option.

5. You should now be able to view the full list of games currently available on Xbox Game Pass.

Method #2:

For the second method, you can do the following:

1. Turn on your console and the go to the Xbox Game Pass App from the home menu.

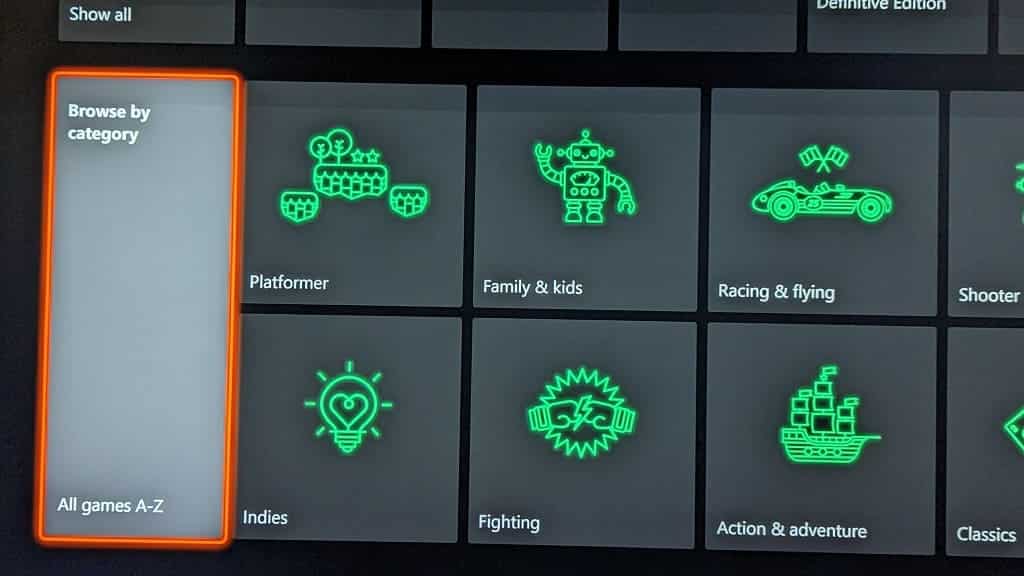
2. After getting to the Xbox Game Pass App, scroll all the way down to the very bottom.

3. Here, you need to select the “Browse by category: All games A – Z” option.

4. You should now be able to view the full list of Xbox Game Pass titles that are currently available for download and installation.

The Game Pass menu are sorted based on the name of the videogame. Any titles that start with a number are listed first at the top, followed by other titles in alphabetical order. Unfortunately, there are no other way to sort or filter this listing from this menu.

In order to download a game from Xbox Game Pass, you should first make sure you are signed into the account is subscribed to the appropriate subscription tier. Afterwards, select a game from the aforementioned Game Pass menu. Finally, you need to select the Install option on the product page.

Once the game has been installed, you can play it as long as you remain a member of Xbox Game Pass. The same game must also remain on the subscription service; if it leaves, then you will lose access.

How to download and update the Netflix App on Xbox Series X and S

The Netflix App does not come pre-installed on the Xbox Series X or Xbox Series S. To see how you can download and update this streaming application on your game console, you can take a look at this tutorial from Seeking Tech.

How to get Netflix on Xbox Series X and S

To download and install the Netflix streaming app on these Microsoft gaming console, you need to take the following steps:

1. To start off, make sure you power on your Series X or Series S if you haven’t done so already.

2. Next, you need to head over to the home screen. If you aren’t there, then you can simply press the Xbox button on your controller and then select Home.

3. From the home screen, scroll down and then select Store.

4. Inside of the Store App, move the cursor to the left in order to open the left column menu.

5. From there, select Apps.

6. In the Apps section of the store, select Netflix.

If you can’t find the streaming app, then you can scroll to the Top Entertainment Apps row, go all the way to the right and then select Show All. You should be able to find Netflix from the Top Entertainment Apps menu.

7. In the Download page of the Netflix App select the Get (Free) option.

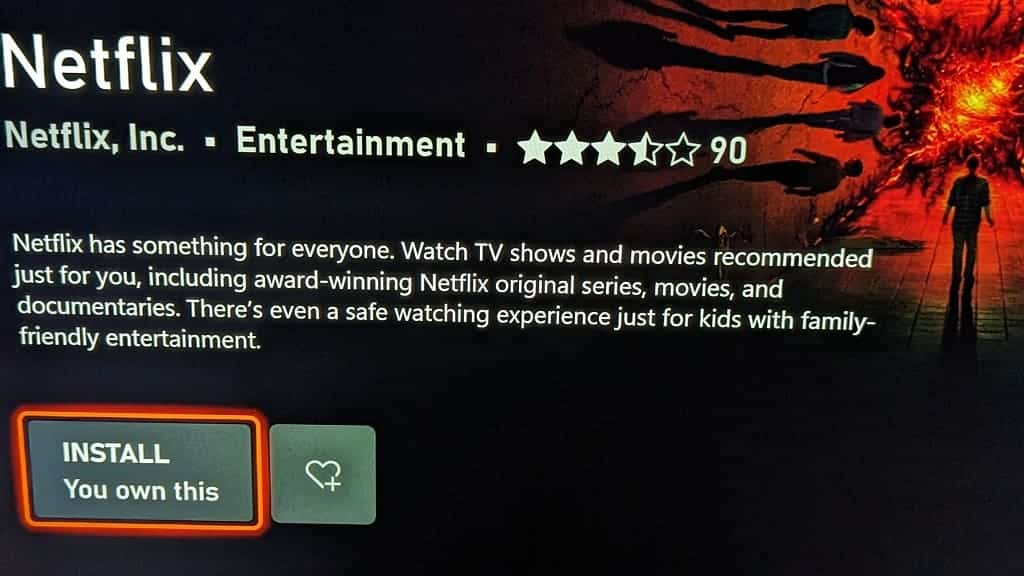
If you previously downloaded and then deleted Netflix, then you need to select the Install (You Own This) option.

8. The download for the application should start. Once the installation has completed, you should be able to use Netflix on your Xbox Series X or Xbox Series S.

How to manually update the Netflix App on Xbox Series X and S

To manually update the Netflix App on these game systems, you need to do the following:

1. To begin, turn on your console and then go to its home screen menu.

2. From the home screen, move the cursor to Netflix and then press the Menu button.

If you can’t find Netflix in the home screen, then you need to select the My Games & Apps option. In the next screen, select Apps on the left side. You should then be able to find Netflix.

3. In the small pop-up menu, you need to select Manage App.

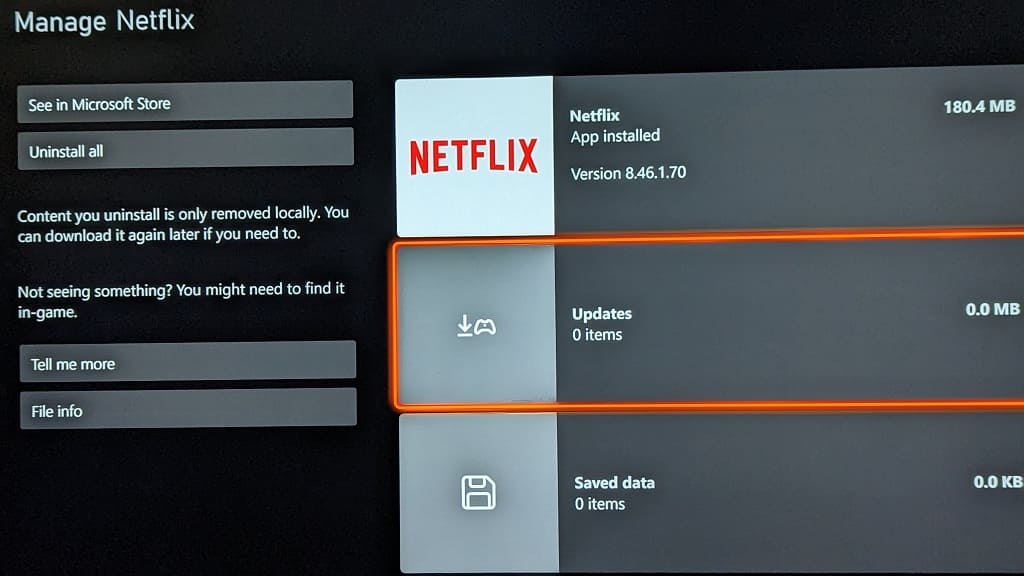
4. After getting to the Manage – Netflix menu, you need to select Updates.

5. The Netflix – Updates menu will show whether or not a new version of the application is available to download. If there is, then you should be able to download it directly from this screen.

How to disable pop up notification sounds on Xbox Series X and S

When you get a message or unlock an achievement on your Xbox Series X or Xbox Series S, you will see a message appear on the screen accompanied by an audio cue.

If you want to keep the graphic but disable the sound effect, then you can take a look at this tutorial at Seeking Tech to see how you can do so.

1. For the first step, you need to open the Settings menu on your console. If you can’t find this option on the home screen menu, then you need to do the following:

  • Press the Xbox button to open the Guide menu and then the RB button several times to switch over to the Profile & System tab.
  • Select Settings from the Profile & System tab in the Guide menu.

2. Once you get to Settings, select General on the left column.

3. From the right side in the same screen, you should then select Voice & Audio Output.

4. If done correctly, you should now be in the General – Volume Voice & Audio Output menu. Here, you need to select Additional Options from the Advanced column.

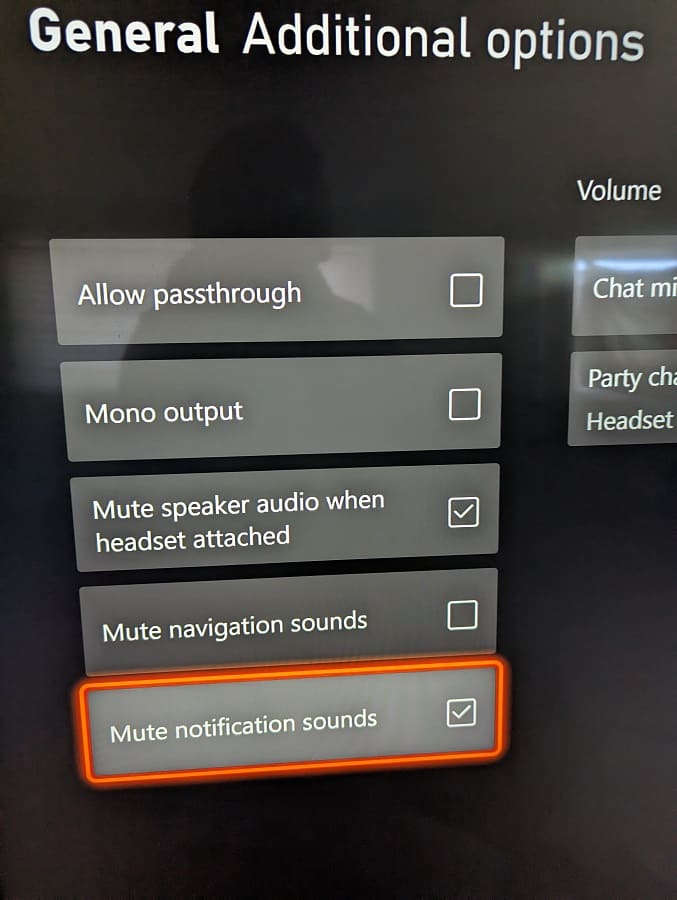
5. Inside of the General – Additional Options menu, you need to make sure that the Mute Notification Sounds box is checked.

By doing so, you should no longer hear any sound when an alert or achievement shows up on the screen.

If you want to re-enable the pop-up notification sound on your Xbox Series X or Xbox Series S, then you need to head back to the Settings menu and then go to General > Voice & Audio Output > Additional Options. You should then make sure that the Mute Notification Sounds box is unchecked if you want to hear the audio cues.

How to disable menu navigation sounds on Xbox Series X and S

When moving the cursor around in the system menus of your Xbox Series X or Xbox Series, you will hear a sound effect being played. To see how you can disable this audio cue, you can take a look at this tutorial from Seeking Tech.

1. For the first step, you need to head over to the Settings menu of your console.

If you can’t locate it from the home page menu, then you can press the Xbox button on your controller to open the Guide quick menu. From there, press the RB button a few times to get over Profile & System tab. You should then be able to find and select Settings.

2. From the front page of Settings, select General on the left column.

3. On the right side of the same screen, you then need to select the Volume & audio output option.

4. After getting to the General – Volume & audio output menu, you need to select Additional options under the Advanced column.

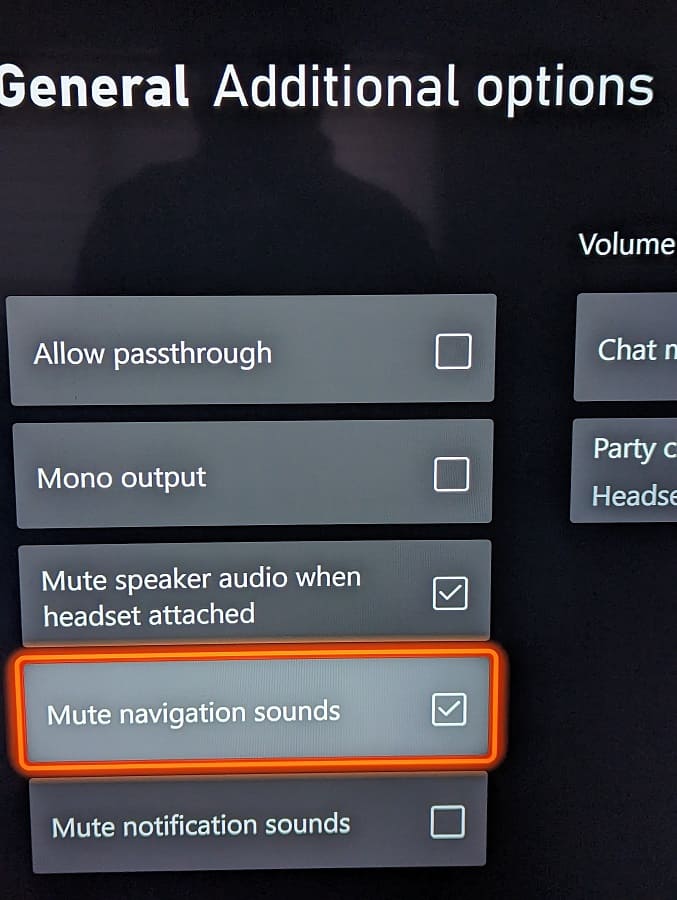
5. You should now be in the General – Additional options menu. Here, you need to make sure that the Mute navigation sounds box is checked.

You should no longer hear any audio feedback when navigation through the system menus of your Xbox Series X or Xbox Series S.

If you want to enable the navigation sound again, then you need to head back to the Settings menu and then select General > Volume & audio output > Additional options. In the General – Additional options menu, you need to make sure that the Mute navigation sounds box is unchecked to turn the sound effect back on again.

How to disable autoplay videos in the Xbox Series X and S Store

When browsing through the Microsoft Store App on your Xbox Series X or Xbox Series S console, you may see videos start to automatically play. If you want to disable the autoplay feature, then you can take a look at this tutorial from Seeking Tech. 

1. To start off, turn on your console and then open the Store App if you haven’t done so already. 

The application has a shopping bag icon on the Home screen. If you can’t find it, then you can press the Xbox logo button on your controller to bring up the Guide menu. The shopping bag icon should then appear at the bottom of the menu. 

2. Inside of the Xbox Series X or Xbox Series S Store App, navigate all the way to the left until you get to the left column menu. 

If you are looking at a product page at the moment, then you need to press the B button to back out so that you are able to navigate to the left column menu. 

3. From there, you need to select the Settings option located near the bottom. 

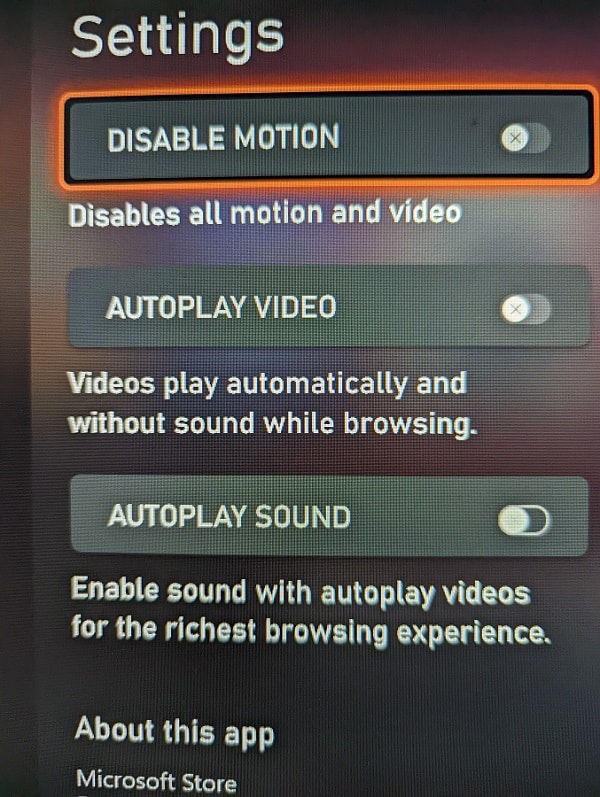
4. Once you get to the Settings menu, you should see the following options: 

  • The Disable Motion option will turn off all auto-playing videos in addition to any other animations.  
  • With the Autoplay Video option, you can choose to enable or disable auto-playing videos (without any sound) when you are browsing through the Microsoft Store App. By default, this option is turned on; therefore, you need to select it in order to turn disable auto-playing vids.  
  • The Autoplay Sound option will automatically add sound to the auto-playing videos. By default, this option is automatically disabled; thus, you can leave it as is unless you want to enable auto-playing videos with sound while you are browsing.  

5. Once you are done making any changes in the Settings menu, press the B button to back out and then the same button again to exit from the left column menu. 

When you browse the Microsoft App Store on your Xbox Series X or Xbox Series S after disabling the auto-play video feature, you should no longer see any trailers or other types of footage automatically start to play.