How to hold to sprint in Lego Fortnite

If you are playing Lego Fortnite with a controller, then you need to press left analog stick to put your character into sprint mode. To move slowly again, you have to press the same stick.

If you would rather hold down the analog to sprint and then let go to stop running, then you can check out this tutorial from Seeking Tech.

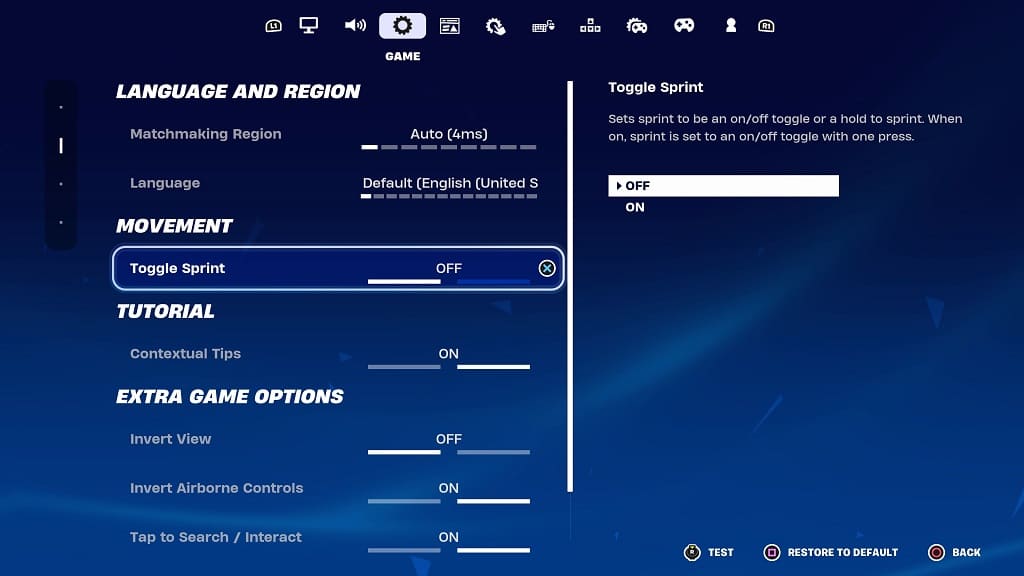
1. Start off by heading to the Setting screen.

2. From there, switch over to the Game tab.

You can change tabs with the L1 and R1 buttons on PlayStation, LB and RB buttons on Xbox or L and R buttons on Switch.

3. In the Game tab, you should find the Toggle Sprint setting, which has the following description:

Sets sprint to be an on/off toggle or hold to sprint. When on, sprint is set to an on/off toggle with one press.

4. Make sure that Toggle Sprint is set to “Off.”

5. Apply the change. This can be done by pressing Triangle on PlayStation, Y on Xbox or X on Switch.

How to change voice chat settings in Lego Fortnite

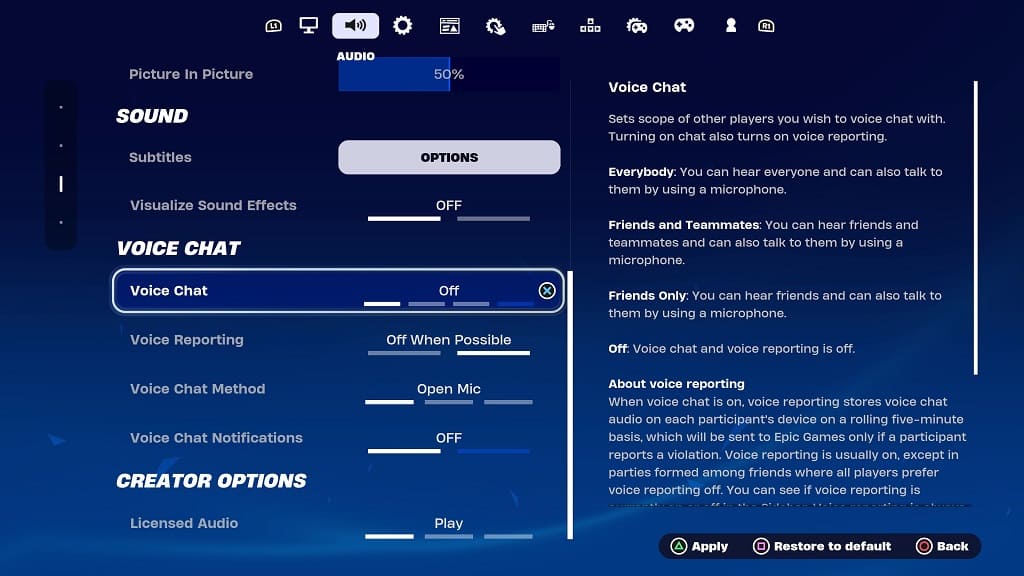
You can check out this guide at Seeking Tech to see how you can change the voice chat, voice reporting, voice chat method and voice chat notifications settings in Lego Fortnite.

1. To start off, you need to open the Settings menu in Lego Fortnite.

2. Once you are there, move over to the Sound tab. If you are playing with a controller, then you can change tabs with the L1/R1, LB/RB or L/R buttons.

3. Select the Voice Chat option on the left column.

4. On the right column, you should see the following options:

Voice Chat: This lets you change the scope of your voice communications with other players. You will be able to change it to any of the following:

  • Off
  • Friends Only
  • Friends and Teammates
  • Everybody

Voice Reporting: This is a feature that captures a voice conversation. If the conversation gets reported, then the audio log will be sent to EPic Games for further review. This can be changed to the following:

  • Always On
  • Off When Possible

Voice Chat Method: This setting lets you change how you want to activate voice chat. You can do so with the following methods:

  • Open Mic
  • Push to Talk
  • Mute

Voice Chat Notifications: This lets you disable or enable on-screen notifications when another player speaks.

5. Once you are done, apply the settings. On a controller, you can do so by pressing the Triangle on PlayStation, X button on Switch or Y button on Xbox.

6. You can then exit the Settings menu and return to playing Lego Fortnite.

How to change the server region in Lego Fortnite

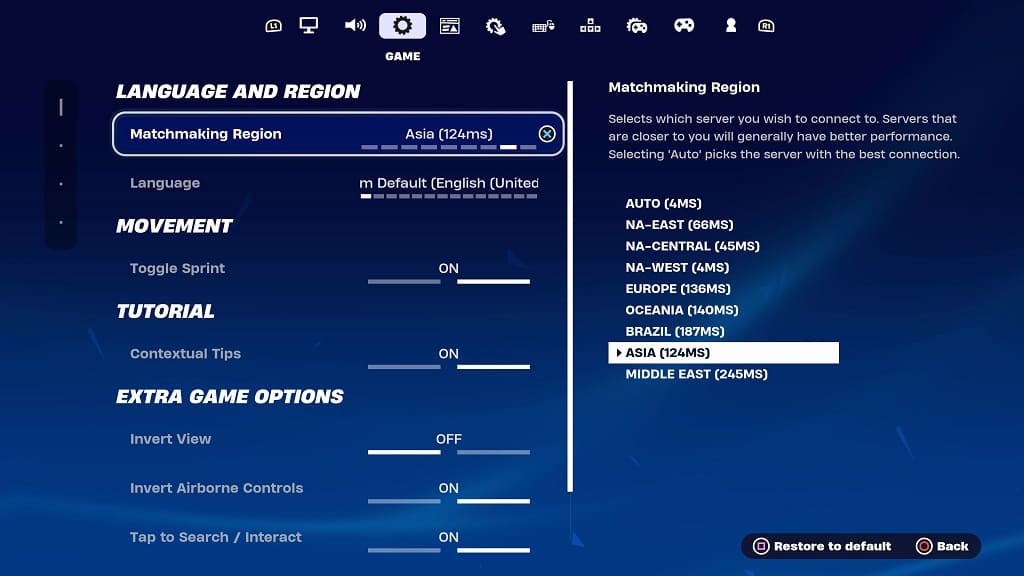
You can switch over to a different server region in Lego Fortnite if you want to play with other players from different parts of the world. To find out how you can properly do so for this battle royale game, you can check out this tutorial from Seeking Tech.

1. To start off, open the Settings menu from the home screen of Lego Fortnite.

2. From there, go to the Game tab.

If you are playing with a controller, then you can switch tabs by pressing L1/R1, LB/RB or L/R/

3. From the Game tab, move the cursor to Matchmaking Region. It should have the following description:

Selects which server you wish to connect to. Severs that are closer to you will generally have better performance. Select ‘Auto’ picks the server with the best connection.

4. By default, the Matchmaking Region setting is set to Auto, you will be able to change to any of the following region:

  • NA-East
  • NA-Central
  • NA-West
  • Europe
  • Oceania
  • Brazil
  • Asia
  • Middle East

5. Once you have changed the server region, apply it. On a controller, this can be done by pressing Triangle on PlayStation, Y on Xbox or X on Nintendo Switch.

TCL Q550G wall mount specs

If you purchased the 2023 TCL Q5, which has a model number that ends with Q550G, then you can check out this compatibility guide at Seeking Tech to see what specifications you should know when picking out a supported wall mount.

Screen Sizes

All three screen size variants of the Q550G will be covered in this post. You can find the names and model numbers of each version below:

  • TCL 50″ Q Class 4K QLED HDR Smart TV (Model Number: 50Q550G)
  • TCL 55″ Q Class 4K QLED HDR Smart TV (Model Number: 55Q550G)
  • TCL 65″ Q Class 4K QLED HDR Smart TV (Model Number: 65Q550G)

TCL Q550G Dimensions (without Stand)

Dimensions without Stand (in inches):

  • 50” TCL Q550G: 43.8 inches x 25.4 inches x 3.2 inches
  • 55” TCL Q550G: 48.3 inches x 28.0 inches x 3.2 inches
  • 65” TCL Q550G: 56.9 inches x 32.8 inches x 3.2 inches

Dimensions without Stand (in millimeters):

  • 50” TCL Q550G: 505 mm x 645 mm x 81 mm
  • 55” TCL Q550G: 1227 mm x 711 mm x 81 mm
  • 65” TCL Q550G: 1445 mm x 833 mm x 81 mm

Dimensions without Stand (in centimeters):

  • 50” TCL Q550G: 50.5 cm x 64.5 cm x 8.1 cm
  • 55” TCL Q550G: 122.7 cm x 71.1 cm x 8.1 cm
  • 65” TCL Q550G: 144.5 cm x 83.3 cm x 8.1 cm

TCL Q550G Weight (without Stand)

Weight without Stand (in pounds):

  • 50” TCL Q550G: 19.0 lbs.
  • 55” TCL Q550G: 24.2 lbs.
  • 65” TCL Q550G: 33.7 lbs.

Weight without Stand (in kilograms):

  • 50” TCL Q550G: 8.6 kg
  • 55” TCL Q550G: 11.0 kg
  • 65” TCL Q550G: 15.3 kg

TCL Q550G VESA Mounting Pattern

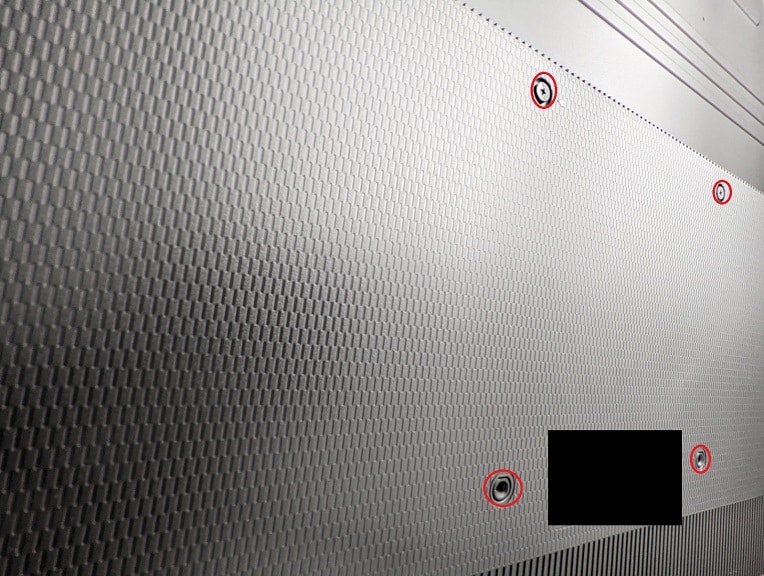
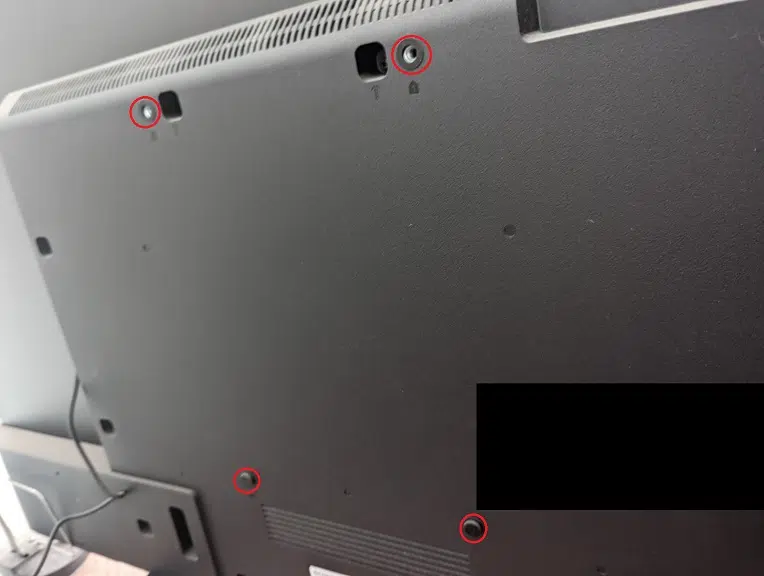
The VESA Mounting Pattern refers to the four screw holes you find on the back of the Q550G. These are used to attach the mounting bracket to the screen. It is measured in millimeters as horizontal distance by vertical distance.

VESA Mounting Pattern (example from different TV).

Wall mounts support a range of patterns, so make sure you pick one that fits.

You can find the specs for all three screen sizes below:

  • 50” TCL Q550G: 200 mm x 200 mm
  • 55” TCL Q550G: 200 mm x 300 mm
  • 65” TCL Q550G: 300 mm x 300 mm

TCL Q550G Mounting Screw Size

When it comes to the screw size you should be using to attach a wall mount to the Q550G, TCL recommends that you use M6 x 12 mm for all three variants.

What wall mounts are compatible with the TCL Q550G?

To recap, when picking a wall mount for your TCL Q550G, you need to make sure that it is strong enough to hold the weight of the screen. Fortunately, this series is extremely lightweight as the biggest unit weighs no more than 33.7 pounds (or 15.3 kilograms).

The mount also needs to fit the four mounting screw holes on the back of your Q550G, so you need to know the VESA Mounting Pattern. The 50-inch version uses 200 mm x 200 mm while the 55-inch variant utilizes 200 mm x 300 mm. The biggest size, the 65-incher, supports 300 mm x 300 mm.

You can check out our fixed, tilting and full motion wall mount recommendations guide with this link if you one to find one that is compatible with the weight and VESA Mounting Pattern of your Q550G.

Resource:

How to turn off motion blur in Killer Instinct: Anniversary Edition

Be default, motion blurring is enabled in Killer Instinct: Anniversary Edition. If you would rather the game look as sharp as possible at all times, then you can check out this tutorial from Seeking Tech to see how you can disable this visual feature.

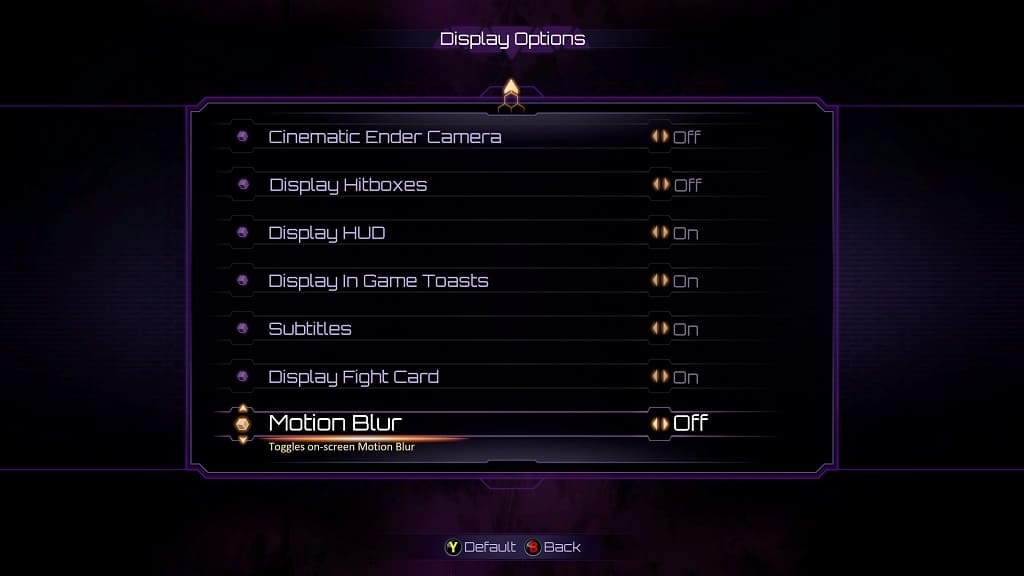
1. For the first step, you need to head into the Help & Options section from the pause menu or main menu.

2. Once you get there, you need to select Display.

3. From the Display Options screen, scroll down and move the cursor to Motion Blue. It should have the following description:

Toggles on-screen Motion Blur.

4. Use the left analog stick or directional pad buttons to change this setting from “On” to “Off.”

5. You can then back out of the Help & Options menu.

During gameplay, you should no longer notice any blurring for objects that are in motion.

How to fix God of War Ragnarök: Valhalla infinite loading issue

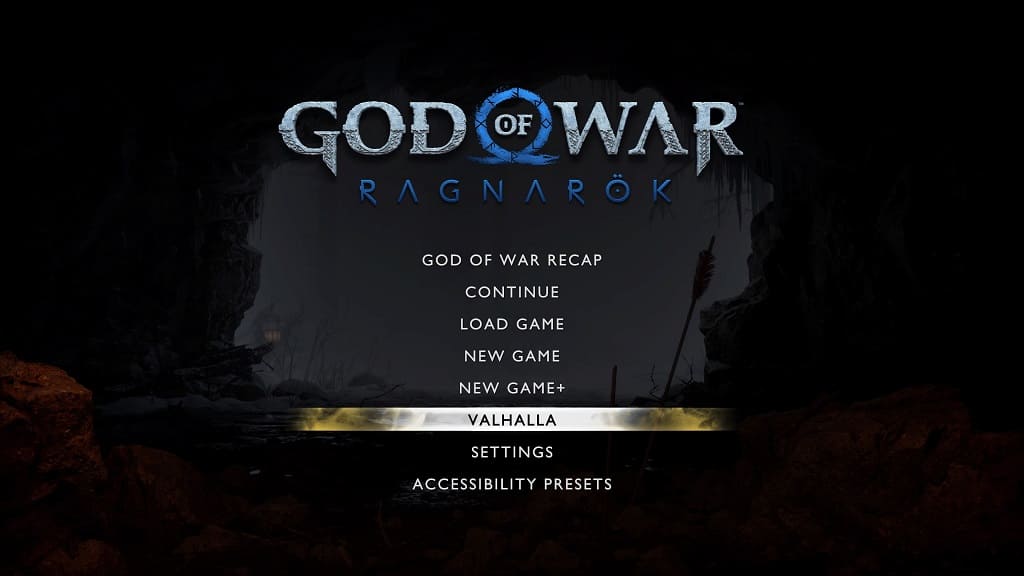
When you try to open the new Valhalla DLC from the main menu of God of War Ragnarök, you may notice that the game stay stuck in loading. To see how you can fix this issue, you can take a look at this guide from Seeking Tech.

The infinite loading for the DLC may occur if you try to play the downloadable content before fully installing the base game. So, in order to fix this issue, we recommend that you try doing the following:

1. Close God of War Ragnarök.

You can do so by pressing and holding the PS button to bring up the PlayStation 5 home menu. From there move the cursor over to the God of War Ragnarök icon and then press the Options button. Finally, select the Close Game option.

2. Next, you need to wait until the download and installation for God of War Ragnarök is completed.

In order to check, press the PS button to bring up the Control Center quick menu. From there, select the Downloads/Uploads option at the bottom. You should then see the current progress for the download.

3. Once the base game has been fully downloaded, boot up God of War Ragnarök and then select Valhalla from the main menu.

The DLC should now load properly without any issues.

Roku Plus Series wall mount specs

If you picked up the Roku Plus Series television set and would like to hang it up on a wall, then you can check out this compatibility guide at Seeking Tech to see what you specfications should look out for when choosing a wall mount.

Screen Sizes

This article will cover all three available screen sizes of this series, you can find the names and model numbers of these variants below:

  • 55-inch Roku Plus Series 4K QLED TV (Model Number: 55R6A5R)
  • 65-inch Roku Plus Series 4K QLED TV (Model Number: 65R6A5R)
  • 75-inch Roku Plus Series 4K QLED TV (Model Number: 75R6A5R)

Dimensions (without Stand)

Dimensions without Stand (in inches):

  • 55” Roku Plus Series: 48.4 inches x 28.3 inches x 4.0 inches
  • 65” Roku Plus Series: 57.0 inches x 33.1 inches x 4.0 inches
  • 75” Roku Plus Series: 65.8 inches x 38.1 inches x 3.5 inches

Dimensions without Stand (in millimeters):

  • 55” Roku Plus Series: 1229 mm x 719 mm x 102 mm
  • 65” Roku Plus Series: 1448 mm x 841 mm x 102 mm
  • 75” Roku Plus Series: 1671 mm x 968 mm x 89 mm

Dimensions without Stand (in centimeters):

  • 55” Roku Plus Series: 122.9 cm x 71.9 cm x 10.2 cm
  • 65” Roku Plus Series: 144.8 cm x 84.1 cm x 10.2 cm
  • 75” Roku Plus Series: 167.1 cm x 96.8 cm x 8.9 cm

Weight (without Stand)

Weight without Stand (in pounds):

  • 55” Roku Plus Series: 30.0 lbs.
  • 65” Roku Plus Series: 36.7 lbs.
  • 75” Roku Plus Series: 49.9 lbs.

Weight without Stand (in kilograms):

  • 55” Roku Plus Series: 13.6 kg
  • 65” Roku Plus Series: 16.6 kg
  • 75” Roku Plus Series: 22.6 kg

VESA Mounting Pattern

If you look at the backside of your Roku Plus television set, you should see four screw holes. The wall mount needs to match up with these screw openings; otherwise, you won’t be able to attach it to the back side of the screen.

VESA Mounting Pattern (example from different TV).

All three screen sizes of this series use the 400 mm x 300 mm VESA Mounting Pattern. The first number refers to the horizontal distance while the second one refers to the vertical distance.

What wall mounts are compatible with the Roku Plus TV?

For a wall mount to be compatible with the 55-inch, 65-inch and 75-inch Roku Plus TV, it needs to hold more than 50 pounds. Furthermore, the mounting bracket must fit the 400 mm x 300 mm VESA Mounting Pattern on the backside of the screen.

If you are looking for specific fixed, tilting or full motion wall mount recommendations, then you can check out this article.

Resource:

How to prevent motion sickness while playing Resident Evil 4 Remake VR

You can get sick quite easily while playing the virtual reality mode of the Resident Evil 4 Remake. To see how you can potentially prevent your nausea from getting triggered, you can take a look at this guide from Seeking Tech.

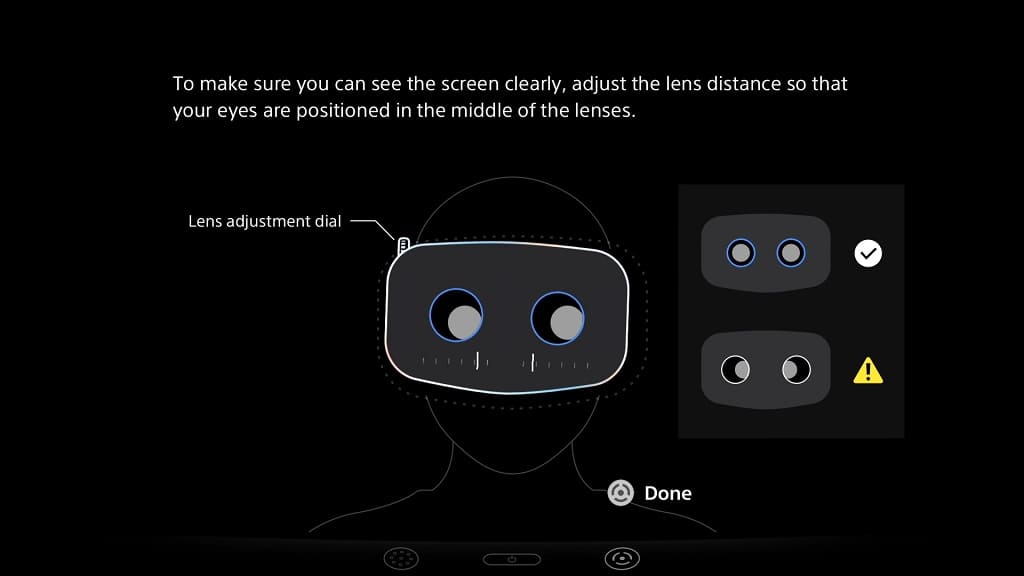
1. To start off, you should make sure that you get the image to appear as sharp as possible of the PlayStation VR2 headset. Otherwise, you will get a blurry image, which increases the chances of you feeling motion sickness.

To see how you can fix the blurriness of this VR game, you can take a look at this article.
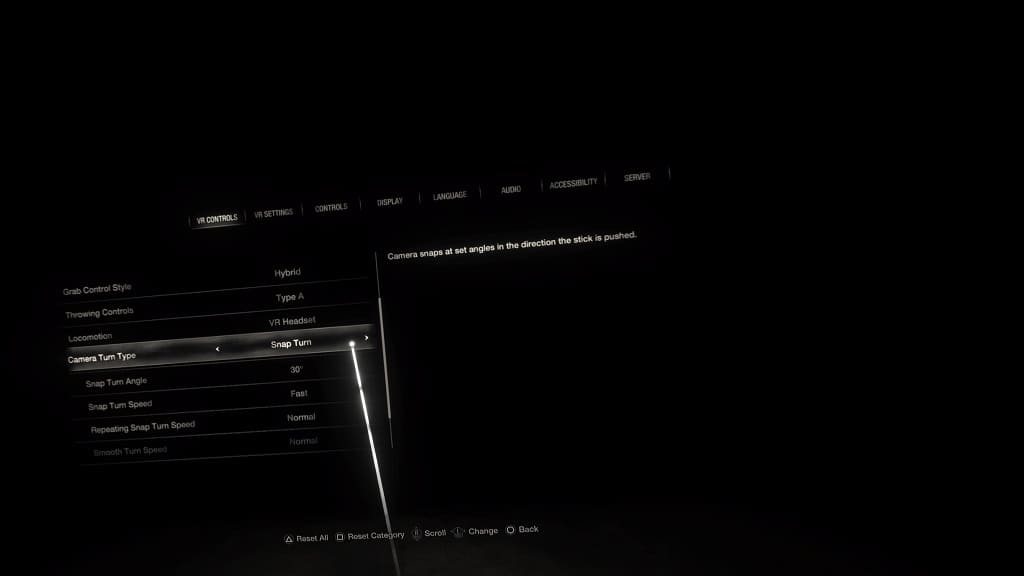
2. Next, you need to make sure that you have the right comfort settings. In order to do so, you should first go to the VR Controls tab. From there, we recommend the following settings:

  • Locomotion: VR Headset
  • Camera Turn Type: Snap Turn

Afterwards, you can adjust the Snap Turn Angle, Snap Turn Speed and/or Repeating Snap Turn Speed options. We suggest playing around with these three until you reach an acceptable comfort level.
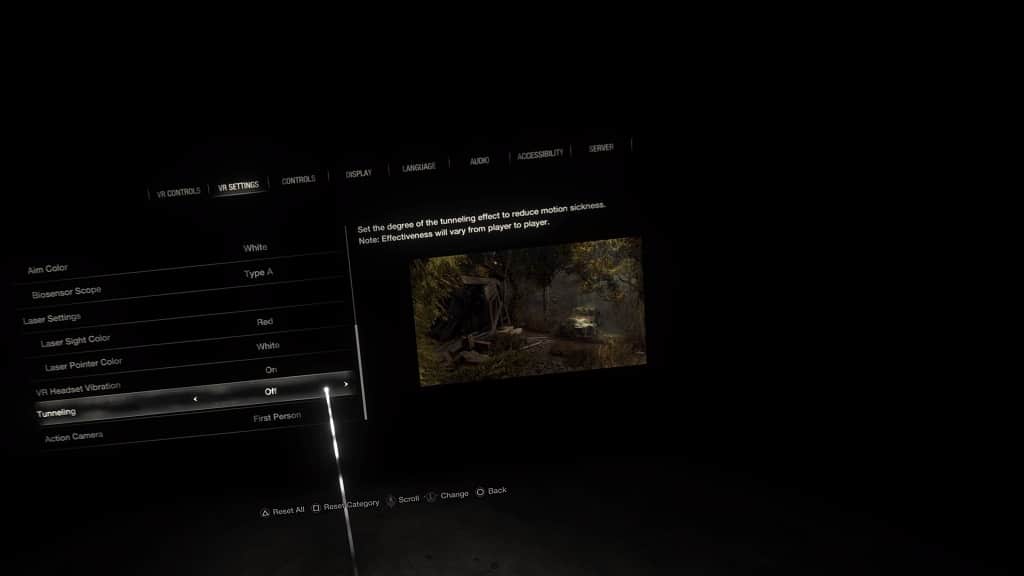
3. We also recommend increasing the tunneling. This feature narrows your field of view while you are walking, which helps prevent motion sickness.

To enable this feature, go to Options > VR Settings > Tunneling. Afterwards, make sure you set it to High.
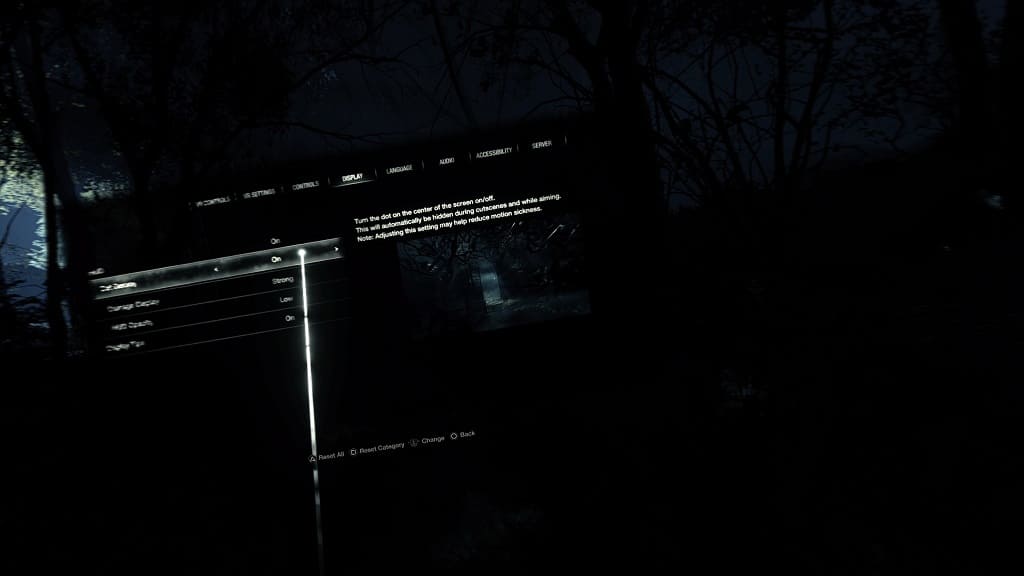
4. You can also select the Display tab from the Options menu. From there, we recommend enabling the Dot Display setting, which adds a white dot to the center of the screen.

This dot helps you concentrate while looking at the middle of the screen, which should help with nausea prevention.
5. Outside of the game, we found that chewing gum and/or having a fan blow on your face works well. You should also make sure you stay hydrated.

6. When you do feel sick, we recommend that you stop playing Resident Evil 4 Remake immediately. Otherwise, you will only feel worse as you try to power through.

Over time, you should feel less nausea as you get used to the motion in the game. As a result, your play sessions would end up being longer.
How to disable the damage indicator in Resident Evil 4 Remake VR

When you take damage in the virtual reality mode of the Resident Evil 4 Remake, the border of the screen will flash red. If you find that this special effect to be very distracting, especially in the middle of combat, then you can check out this Seeking Tech guide to see how you can disable it.

1. If you haven’t done so already, open the Options menu in the VR mode of RE4.

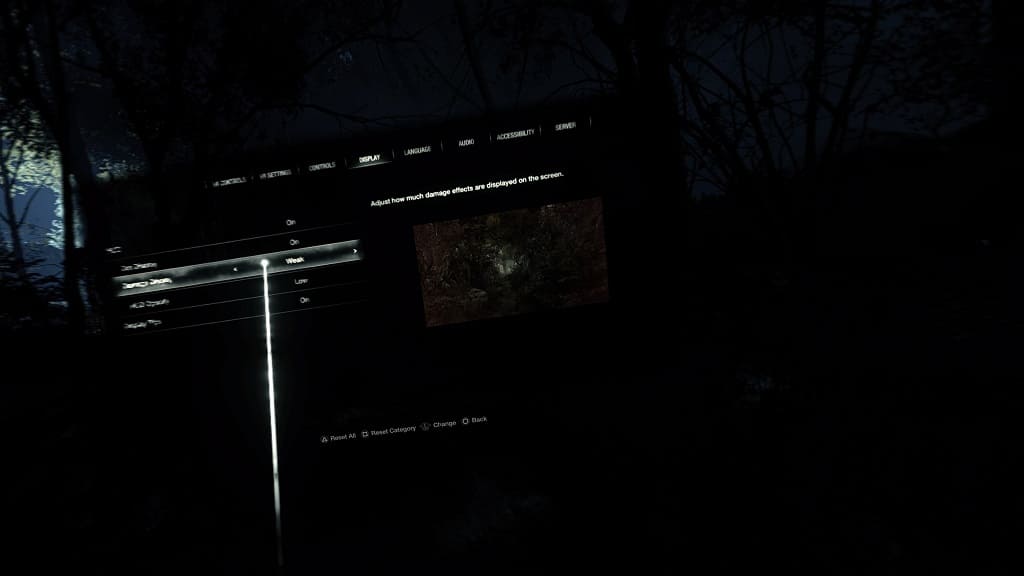
2. From there, select the Display tab.

3. You should now be able to find Damage Display setting with the following description:

Adjust how much damage effects are displayed on screen.

4. You will be able to switch this setting to three different options: Strong, Weak or Off. To completely disable this feature, make sure you select Off.

5. Exit the Options menu. When you start playing Resident Evil 4 in VR again, you should no longer see any flashing red border when you take a hit.

How to turn off adaptive triggers in Resident Evil 4 Remake VR

The L2 and R2 buttons of the PlayStation VR2 Sense Controllers may provide some resistance depending on the weapon you are using in the VR Mode of the Resident Evil 4 Remake.

If you would rather disable the adaptive trigger feature, then you can check out this guide from Seeking Tech to see how you can properly do so.

1. To start off, open up the Options menu in the game.

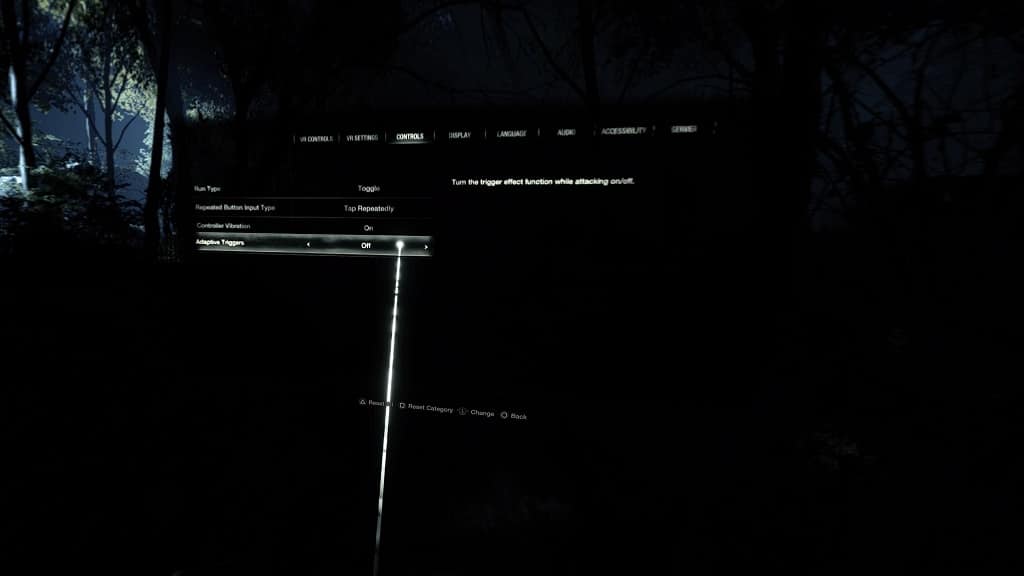
2. You then need to select the Controls tab at the top of the screen.

3. Afterwards, you will be able to find the Adaptive Triggers setting.

4. Set Adaptive Triggers to “Off” and then back out of the Options menu.

5. When you resume playing RE4 Remake in virtual reality, you should no longer notice any resistance from the L2 and R2 triggers.