How to fix Valheim frame rate issues on Xbox Series X and S

When playing Valheim on your Xbox Series X or Xbox Series S, you may notice that the game will become choppy. To see how you can potentially fix these frame rate problems with this survival sandbox title, you can take a look at this troubleshooting article from Seeking Tech.

1. For the first step, we recommend enabling Variable Refresh Rate support on your television or monitor if this feature is supported.

Afterwards, open the home menu of your Series X or Series S console and then head over to General > TV & display options > Video modes. Finally, make sure that the “Allow variable refresh rate” box is checked.
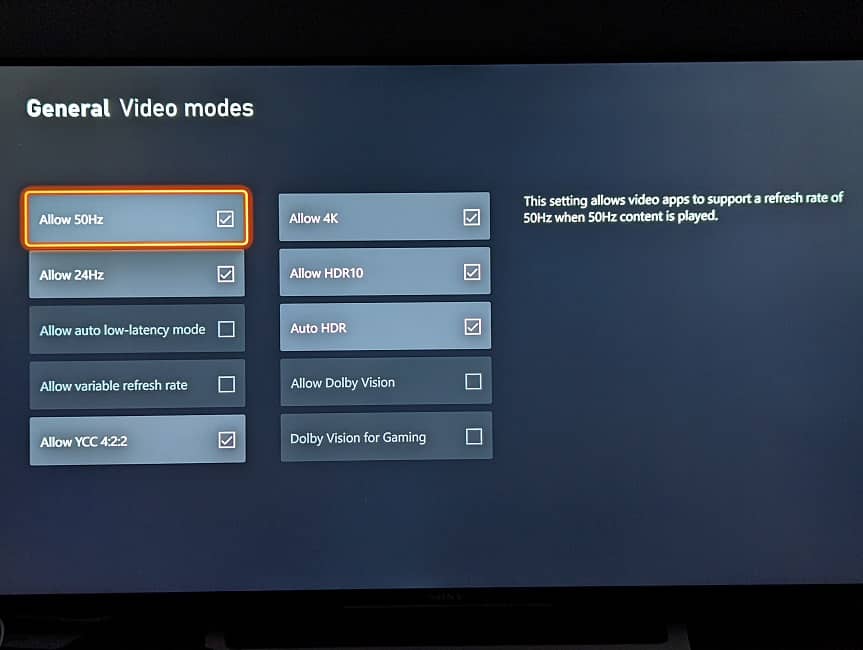
VRR should make minor frame rate drops less noticeable when playing Valheim.

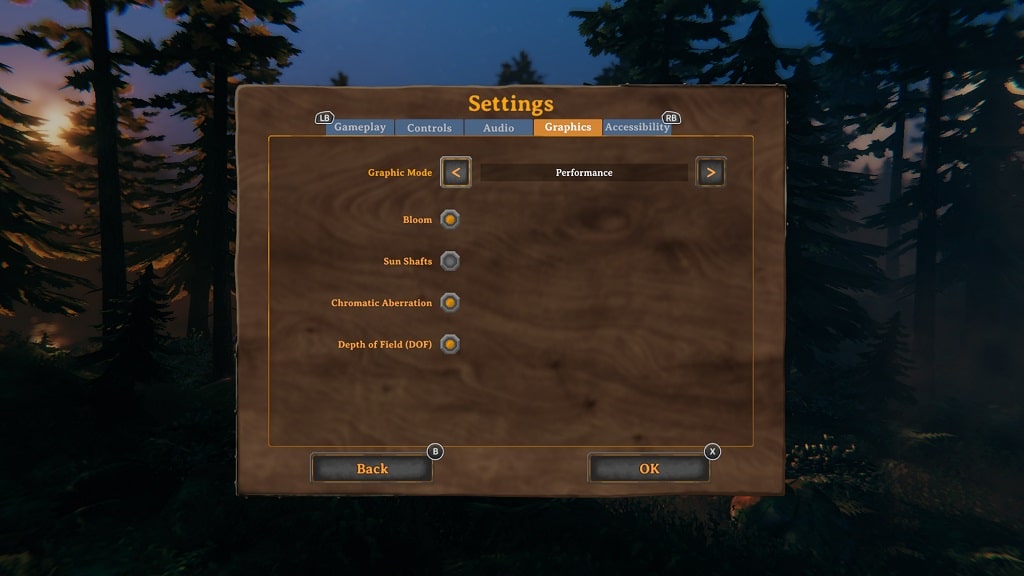
2. Moreover, make sure that you are playing this game in Performance mode. You can do so by taking the following steps:

  • To start off, you need to head over to the Settings menu in the game, which you can do by selecting Settings from the Main Menu or Pause Menu.
  • From the Settings menu, move over to the Graphics tab. You can change tabs by using the LB and RB buttons of the Xbox controller in Valheim.
  • After getting to the Graphics tab, move the cursor down to the Graphics Mode section.
  • Use the arrows in the Graphics Mode section in order to switch over to Performance.
  • Press the X button on the controller to save the change you previously made and then return to your game session.
  • By switching over to Performance mode, Valheim will now target 60 fps instead of 30 fps.
3. The Sleep Mode and Quick Resume features of the Xbox Series X and S consoles may also cause frame drops for this survival game.

In order to prevent this from happening, we recommend that you restart both the game and console by taking the following steps:

  • While playing Valheim, press the Xbox button to bring up the Guide menu.
  • In the Guide menu, move the cursor over the Valheim icon and then press the Menu button on the controller.
  • Next, you need to select Quit from the pop-up menu.
  • Once you close the game, press and hold the Xbox button to open the Power menu, where you can then select the Restart Console option.
  • After your Xbox Series X or Xbox Series S has rebooted, open Valheim again to see if you can get a smoother experience.

4. It is important to note that Valheim is currently in the “Game Preview” state as the full game has not been fully developed. Therefore, you aren’t playing the game at a polished state, which is resulting to a less than stable frame rate.

So, if you haven’t done so already, make sure you have the latest patch installed for this title as a new update may make the frame rate run better.

You can manually download a new patch by moving the cursors over to the game’s icon in the home screen of your Series X or Series S and then pressing the Menu button. Afterwards, you need to select Manage game and add-ons > Updates.

How to start or request share screen on PS5

The new firmware update for the PlayStation 5 and PlayStation 5 Digital Edition console makes it easier to share your screen with a friend and watch a shared screen from your friend. To see how you can set up the Share Screen feature, you can take a look at this tutorial from Seeking Tech.

1. To start off, we recommend updating the system software of your PS5 if you haven’t done so already as it streamlines the share screen access.

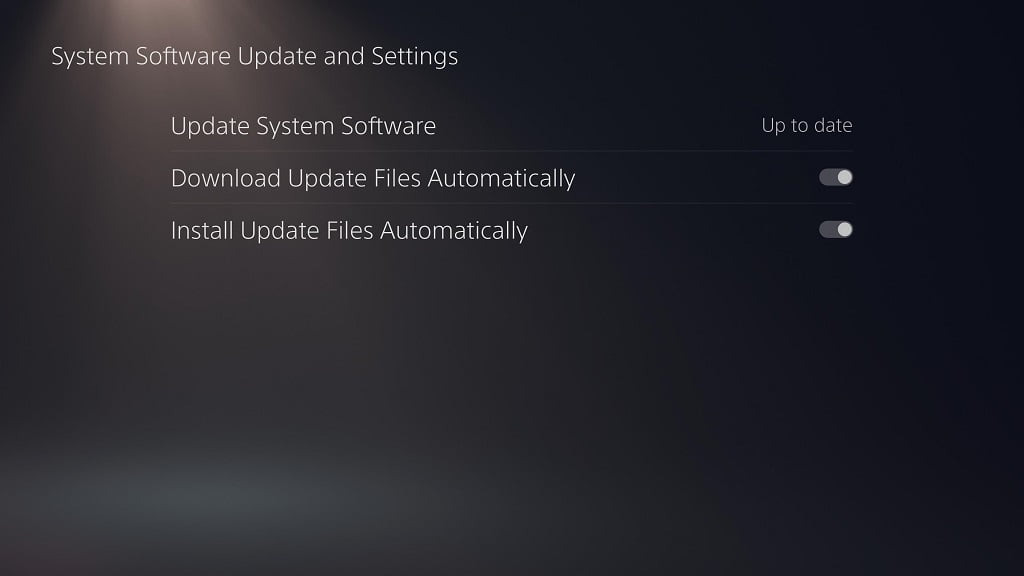
To manually update the console, you need to go to the Settings menu from the home screen. Afterwards, you need to select System > System Software > System Software Update and Settings > Update System Software > Update Using the Internet.

If there is a new firmware available, then the console will download and install it. The system will then restart on its own in order to complete the installation process.

2. Once you have the latest firmware installed, make sure that you added your friend’s PlayStation Network username to your Friends list if you haven’t done so already.

3. You should also make sure that your friend is currently online. You and/or your friend may also need to change some privacy settings on the PS5 in order to get the Share Screen feature to work.

4. Next, you need to press the PS logo button on your DualSense controller in order to bring up the Control Center menu.

5. From the Control Center menu, select Game Base located at the bottom. This setting should be in between the NotiCom and Music options.

6. In the Game Base menu, select a friend.

7. On your friend’s profile screen, you should find the Share Screen option located in the middle.

8. In the pop-up menu, you can select the Share Your Screen option, which has the following description:

  • “Share your gameplay in a party. Share Screen isn’t supported on PS4.”

This option will let your friend watch what you are currently playing on your PlayStation 5.

9. In the same pop-up menu, you can also select Request Share Screen, which has the following description:

  • “Request to watch the player’s gameplay.”

This option will let you watch what your friend is currently playing on their PS5 console.

How to fix Resident Evil 4 Remake input lag

You may notice that there is input lag when you are playing the new remake of Resident Evil 4 on the PC, PlayStation 4, PlayStation 4 Pro, PlayStation 5, PlayStation 5 Digital Edition, Xbox Series S or Xbox Series X.

To see how you can potentially reduce the latency in this game, you can take a look at this troubleshooting article from Seeking Tech.

1. For the first step, you should make sure that your gaming system is directly connected to your screen. If you are using a splitter or pass-through device, then these may add extra latency to the control input.

2.If you are playing on TV, then make sure you have Game Mode, or a similar picture mode, enabled as it will reduce latency when playing games.

3. If your television or monitor supports Variable Refresh Rate, then you should have it enabled on the screen’s settings as this feature should help reduce input delay in Resident Evil 4 Remake and other games. You can then enable VRR on your system.

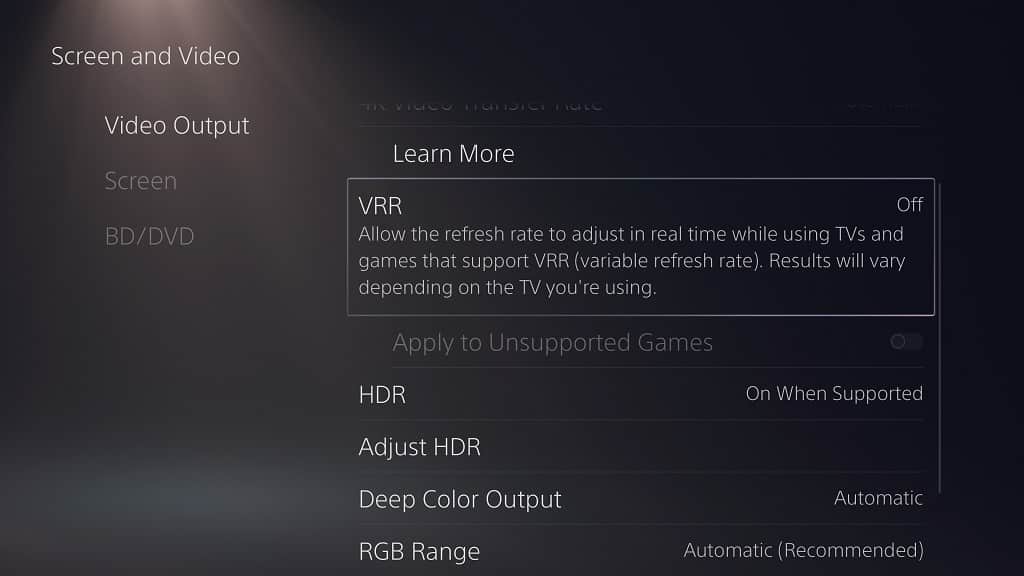
For the PlayStation 5 and PlayStation 5 Digital Edition consoles, you need to go to Settings > Screen and Video > Video Output > VRR and then select Automatic.

On the Xbox Series X and Xbox Series S, you need to enable the “Allow variable refresh rate” setting from the Settings > General > TV & display options > Video modes menu.

4. Moreover, you should make sure that you have the right Display settings in the game so that it can run as smooth as possible without any frame drops.

To see how you can deal with the frame rate issues in the RE4 Remake, you can take a look at this previous guide.

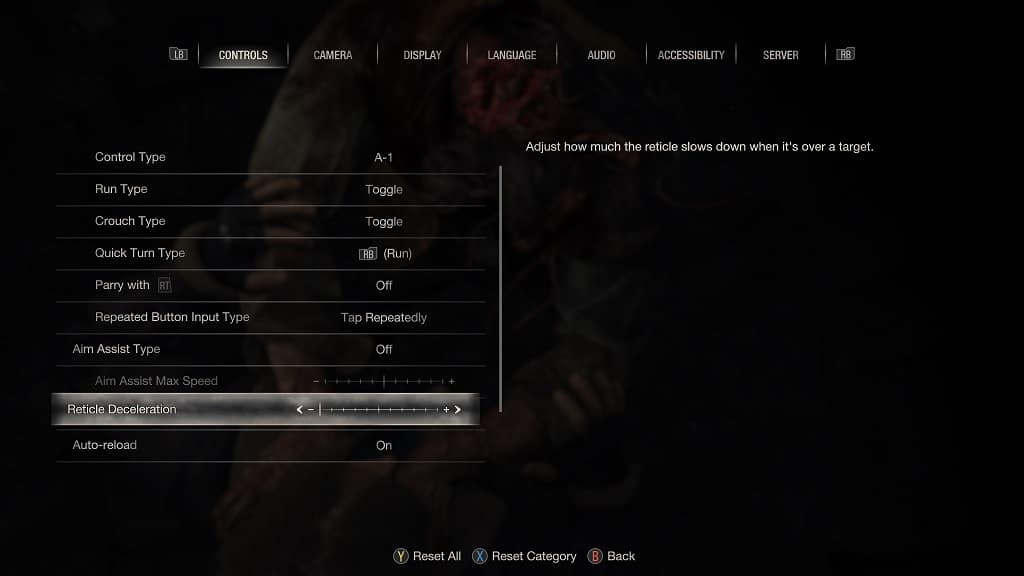
5. There are also several settings that you can change by using the in-game settings menu. The first of which is Reticle Deceleration, which you can get to by taking the following steps:

  • To start off, you need to head over to the Options menu of Resident Evil 4 Remake. You can get there by either selecting Options from the Main Menu or Pause Menu.
  • From the Options menu, switch over to the Controls section. You can switch sections by using the L1 and R1 buttons on PlayStation or LB or RB buttons on Xbox.
  • From the Controls section, you should find Reticle Deceleration. We recommend that you set this setting to the minimum to prevent the aiming reticle from slowing down when it is over a target.

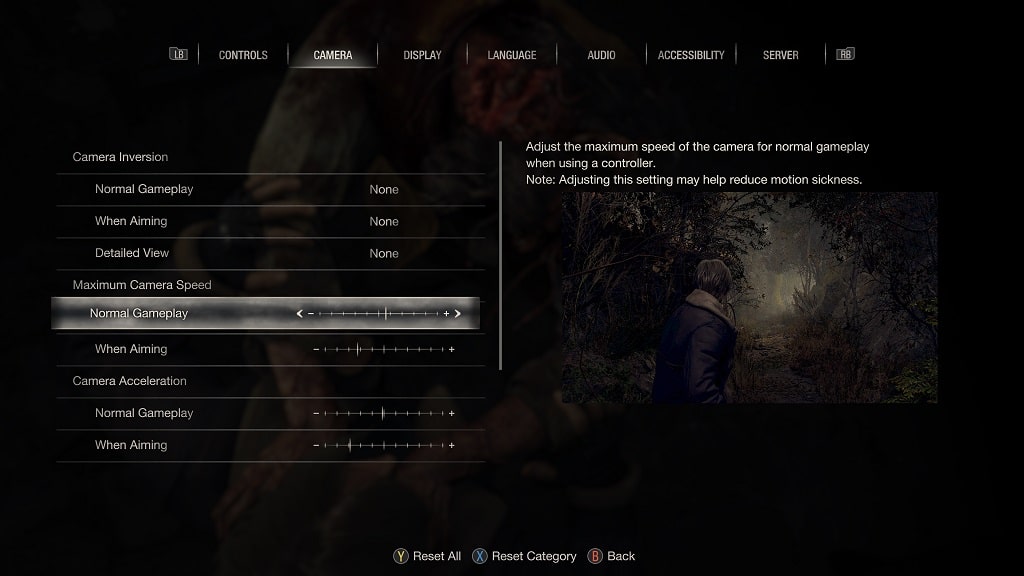
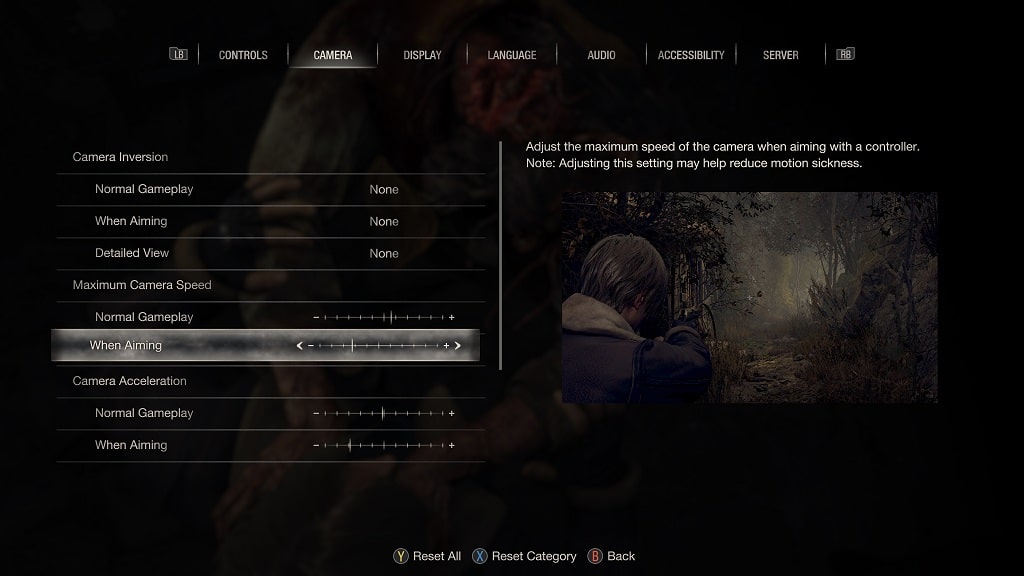
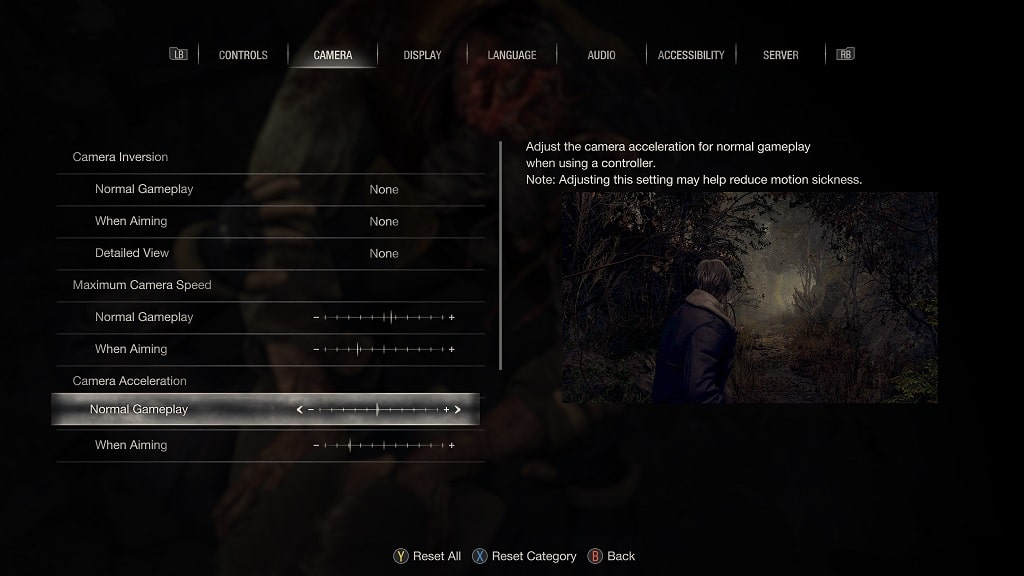
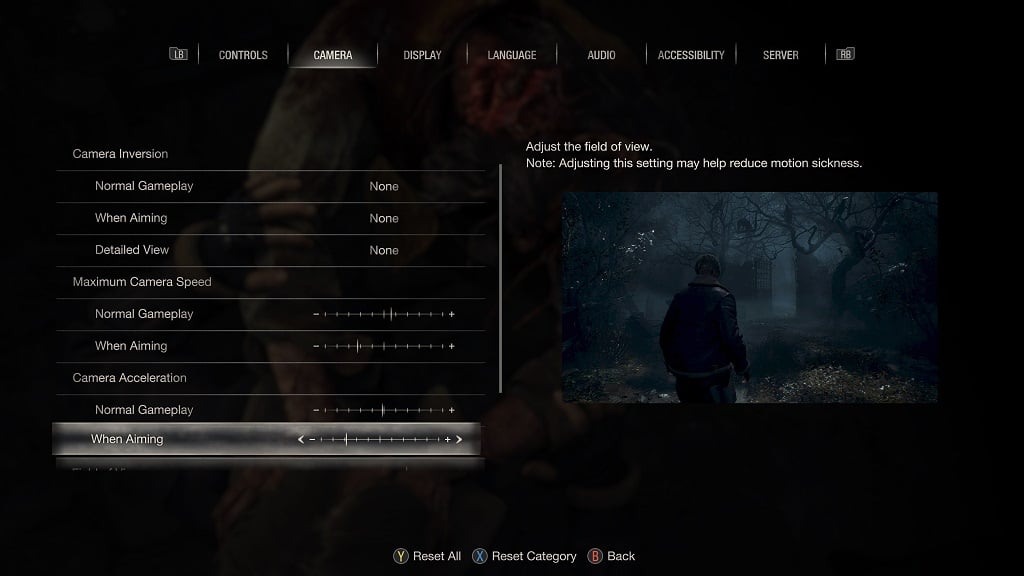
6. From the same Options menu, you can then switch over to the Camera section. From there, you will be able to adjust the following camera movements when playing the Resident Evil 4 remake:

  • Maximum Camera Speed During Normal Gameplay

  • Maximum Camera Speed When Aiming

  • Camera Acceleration During Normal Gameplay

  • Camera Acceleration When Aiming

We suggest that you experiment with these four settings until moving the camera around and aiming your weapon feels just right. It may take a few tries to be able to move the camera and aim without any noticeable input lag.

How to fix Resident Evil 4 Remake blurry graphics on PS5, Xbox Series X and S

When playing the Resident Evil 4 Remake on your PlayStation 5, PlayStation 5 Digital Edition, Xbox Series X or Xbox Series S console, you may notice that the graphics look blurrier than what you may be expecting. To see how you can get a sharper image, you can take a look at this troubleshooting article from Seeking Tech.

1. For the first step, we recommend playing this game in Resolution Mode, which should make the image quality clearer. To change graphics mode in RE4, you need to do the following:

  • If you are playing the game at this moment, then you need to go back to the main menu. In order to do so, save your progress, open the pause screen and then quit.
  • From the main menu, select Options.
  • In the Options section, switch over to the Display tab, which you can do by using the L1 and R1 buttons on the DualSense or LB and RB buttons on the Xbox controller.
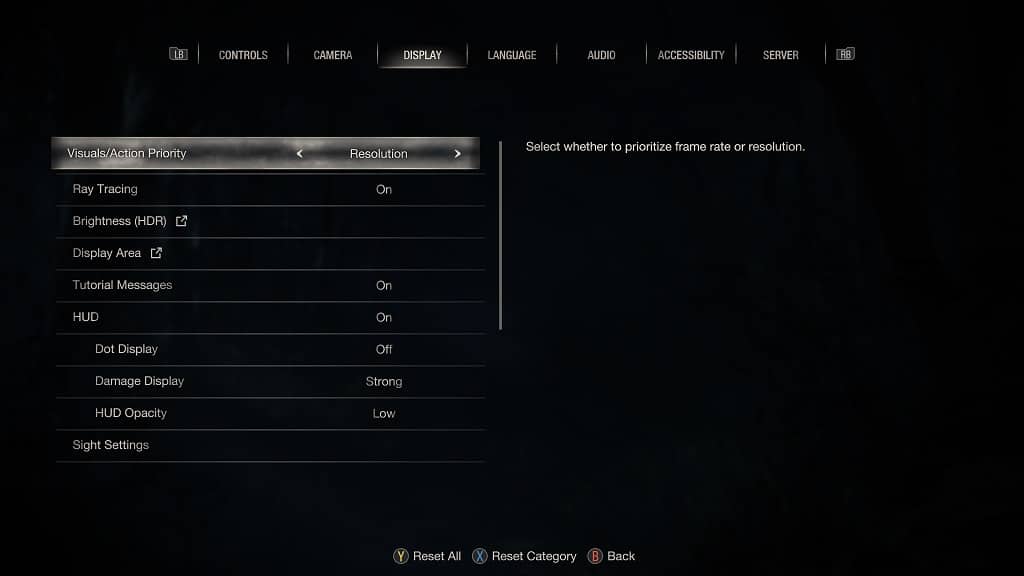
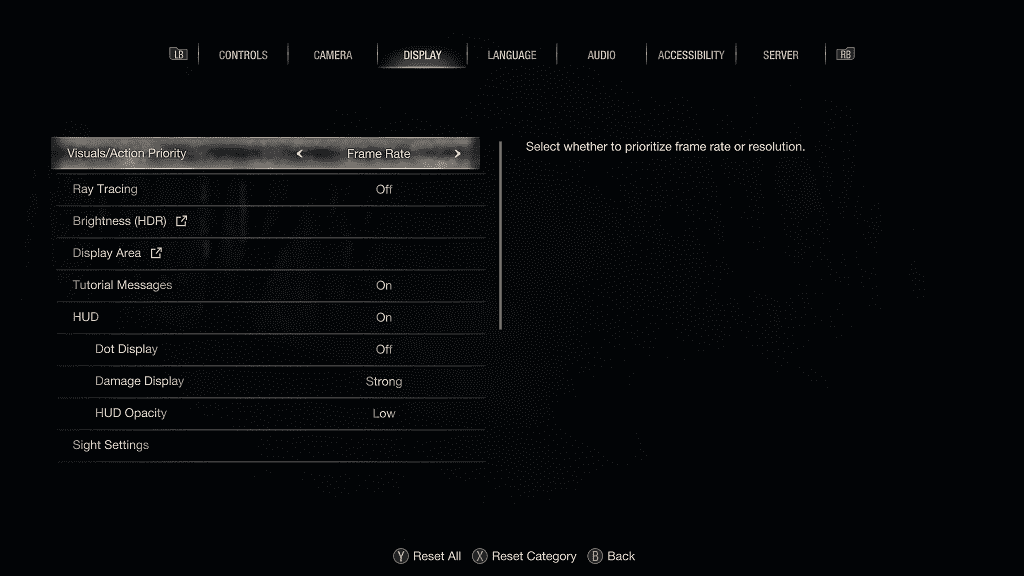
  • After getting to the Display tab, move the cursor over to Visual/Action Priority.
  • From there, you can use the directional pad or left analog stick to change the graphics to prioritize Resolution.

  • By playing in this mode, Resident Evil 4 should still target 60 frames per second. However, you will end up getting more frame drops.
  • To prevent the game from getting choppy, you can try enabling variable refresh rate on your screen and console. You can also try disabling the Ray Tracing and Hair Strands settings from the same Display tab.

For more tips about how you can improve the frame rate for this game, you can check out this link.

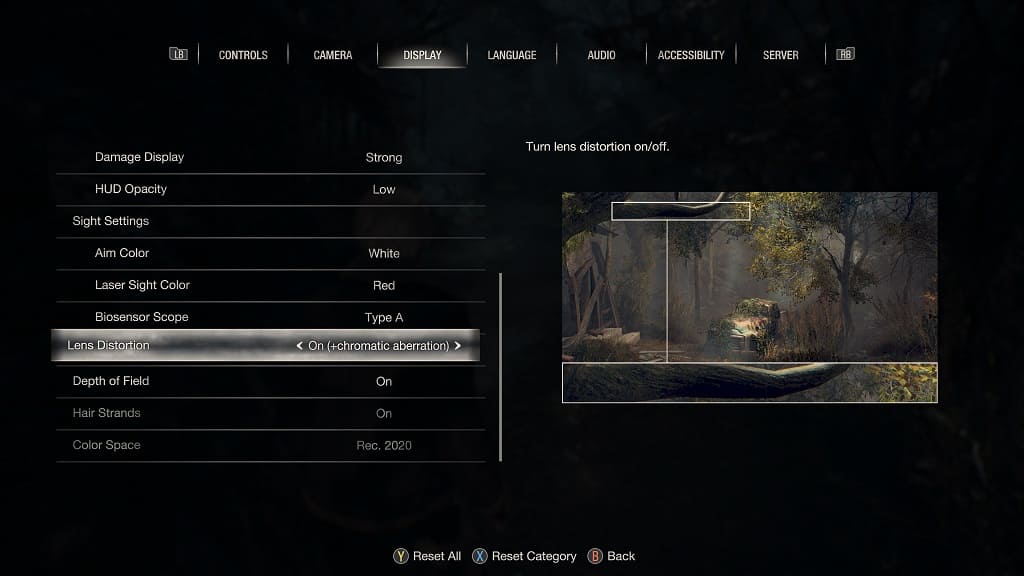
2. If the RE4 graphics still look blurry, then you can try removing chromatic aberration as it causes the edges to appear out of focus.

To find out how you can properly do so, you can follow the steps laid out in this prior tutorial.

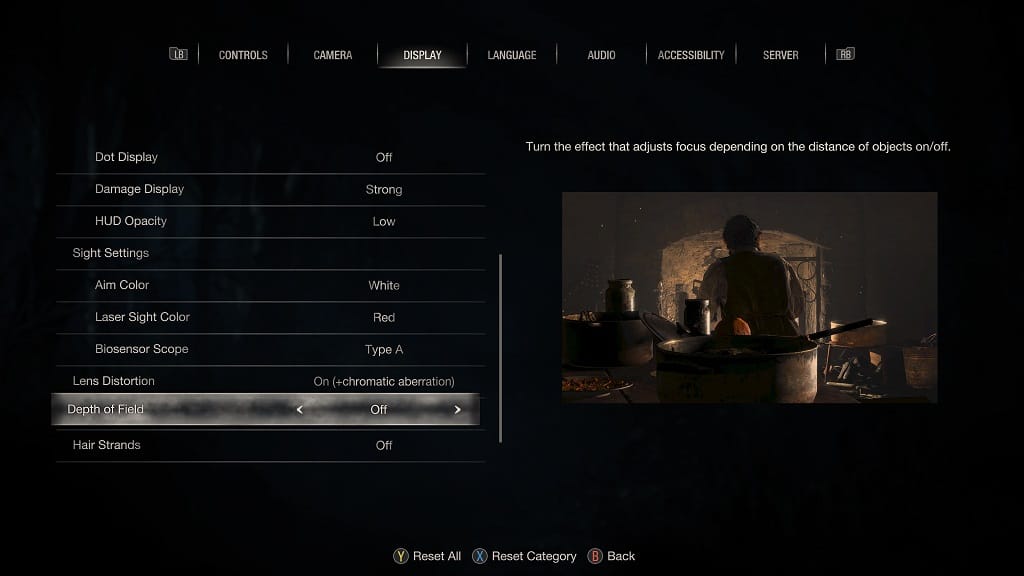
3. We also recommend disabling the depth of field effect, which can cause certain objects to appear blurry.

In order to do so, you need to set the Depth of Field setting to Off from the aforementioned Display tab in the Options menu.

4. If you are playing on the PS5 console, make sure that you have the PS5 version of the game installed instead of the PS4 version.

If you have the PS4 version installed, then you should be able to upgrade to the PS5 version of Resident Evil 5 for free from the PlayStation Store.

5. Capcom may also improve the graphics in the remake over time through patch updates. Therefore, we recommend that you have the latest version of the game downloaded on your PlayStation 5, PlayStation 5 Digital Edition, Xbox Series X or Xbox Series S if you haven’t done so already.

How to fix Resident Evil 4 Remake frame rate issues on PS5, Xbox Series X and S

When playing Resident Evil 4 Remake on the new consoles, you may notice that it may not run smoothly in some instances. You can check out this guide at Seeking Tech to see how you can improve the frame rate for this survivor horror title on PlayStation 5, PlayStation 5 Digital Edition, Xbox Series X and Xbox Series S.

1. For the first step, we recommend enabling Variable Refresh Rate if your television set or gaming monitor supports this feature. After doing so for your screen, you need to do the same on your console.

For the PS5 systems, you need to select Settings > Screen and Video > Video Output > VRR > Automatic.

For the Xbox Series consoles, you will need to select Settings > General > TV & display options > Video modes > Allow Variable refresh rate.

By enabling VRR, the micro stutters should be eliminated when playing the new version of RE4.

2. If you don’t have Variable Refresh Rate capable screen, then you can try playing the game in performance mode. In order to do so, you need to take the following steps:

  • First off, you need to head over to the main menu of Resident Evil 4. If you are currently playing the game, then you need to open the pause screen and then quit to the main menu as you won’t be able to change the graphics mode in game.
  • From the main menu, you need to select Options.
  • After getting to the Options menu, head over to the Display tab. You can use the L1 and R1 buttons on PS5 or LB and RB buttons on Xbox Series X/S to change tabs.
  • In the Display tab, move the cursor to the Visuals/Action Priority row.
  • You can then use the left and right directional pad, or move the left analog stick to the left and right, to change the Visuals/Action Priority setting to Frame Rate.

3. In addition to prioritizing the graphics mode to frame rate, there are also other graphical options that you can disable in order to get a more stable performance.

From the same aforementioned Display tab of Options menu, we recommend that you disable the following:

  • Ray Tracing
  • Lens Distortion
  • Depth of Field
  • Hair Strands

The Ray Tracing and Hair Strands settings can really cause the fps to dip.; therefore, you should at least disable these two if you want as smooth of a frame rate as possible.

4. If you have been keeping your game suspended and then putting your console in Rest/Sleep Mode, then these actions may be causing the lower frame rate.

In this case, we recommend that you restart your PlayStation 5 or PlayStation 5 Digital Edition console.

On Xbox Series X or S, we suggest that you quit the game first by pressing the Xbox button, moving the cursor over to the RE4 icon in the Guide menu and then pressing the Menu button. Finally, select Quit.

After quitting the remake, you can then restart your Series X or Series S.

To see what the differences are between the standard and deluxe editions of Resident Evil 4, you can check out this comparison.

How to set up multiplayer presets on PS5

Thanks to a new firmware update, you are able to set up presets for online multiplayer sessions on your PlayStation 5 or PlayStation 5 Digital Edition console. As a result, the game you are playing may automatically apply your preferences when it comes to who you let join or who you invite in online lobbies.

To see how you can set up these new presets, you can take a look at this tutorial from Seeking Tech.

1. As we stated above, the ability to use online multiplayer presets was added in a recent firmware update. So, if you haven’t done so already, make sure you have the latest system software installed.

In order to check, you need to head to the home menu of your PS5 and then go to Settings from there. Afterwards, you should select System > System Software > System Software Update and Settings > Update System Software > Update Using the Internet.

2. After making sure that your PlayStation 5 or PlayStation 5 Digital Edition console has been updated, you need to head back to the front page of Settings. From there, you need to select Settings > Saved Data and Game/App Settings > Game Presets.

3. On the right side of the Game Presets menu, you should be able to find and select Online Multiplayer Sessions, which has the following description:

“Select which players can join and invite other players to your online multiplayer sessions.”

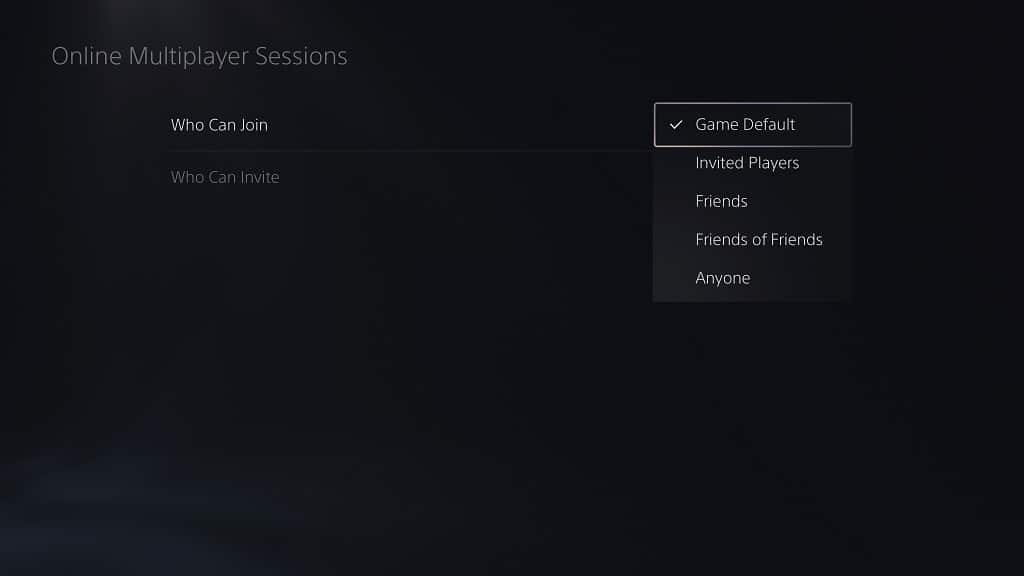
4. In the Online Multiplayer Sessions menu, you can select Who Can Join to bring up a small window with the following options:

  • Game Default
  • Invited Players
  • Friends
  • Friend of Friends
  • Anyone

The Game Default option means that nothing will be changed as your joining preferences will be based on the game’s matchmaking settings.

The “Friends” terminology mentioned above refers to PlayStation Network users that have been added to Friends list. You can find this list by pressing the PS button on the controller and then select Game Base from the bottom menu.

5. The Who Can Invite setting offers the following options:

  • Game Default
  • Leader Only
  • All Members

The Game Default option means that the PS5 will let the game decide who can do the inviting in an online multiplayer session.

How to update the DualSense wirelessly on PS5

Thanks to a recent firmware release, you can now update the DualSense controller without having to connect it to your PlayStation 5 or PlayStation 5 Digital Edition console by using a USB cable. To find out you can do so, you can take a look at this tutorial from Seeking Tech.

The ability to update the DualSense controller wirelessly was added through a recent system software for the PS5. Therefore, you should make sure that your console is updated if you haven’t done so already. You should get an update prompt when you turn on the gaming system and connect it to the PlayStation Network.

You can also manually update the console by taking the following steps:

1. To begin, you need to head over to the home menu of the PlayStation 5 or PlayStation 5 Digital Edition, which can be done quickly by pressing and holding the PS button of the DualSense controller for around 1 second. You can also press and then quickly release the same PS button; afterwards, select the home icon from the Control Center quick menu.

2. Next, you need to head over to the Settings menu, which you can do by selecting the gear cog icon on the top right side from the home menu.

3. Once you get to Settings, you need to select System > System Software > System Software Update and Settings > Update System Software > Update Using Internet.

4. Once your PS5 has been updated, it should automatically reboot. After the system has restarted, you can then turn on the DualSense controller.

5. If there is a new firmware available to be downloaded or installed for the gamepad, then you should see a message appear on the screen.

If you don’t see the notification, then you need to take the following steps:

1. Go back to the home screen of your PlayStation 5 or PlayStation 5 Digital Edition if you aren’t there already.

2. You then need to select the gear icon to head into Settings.

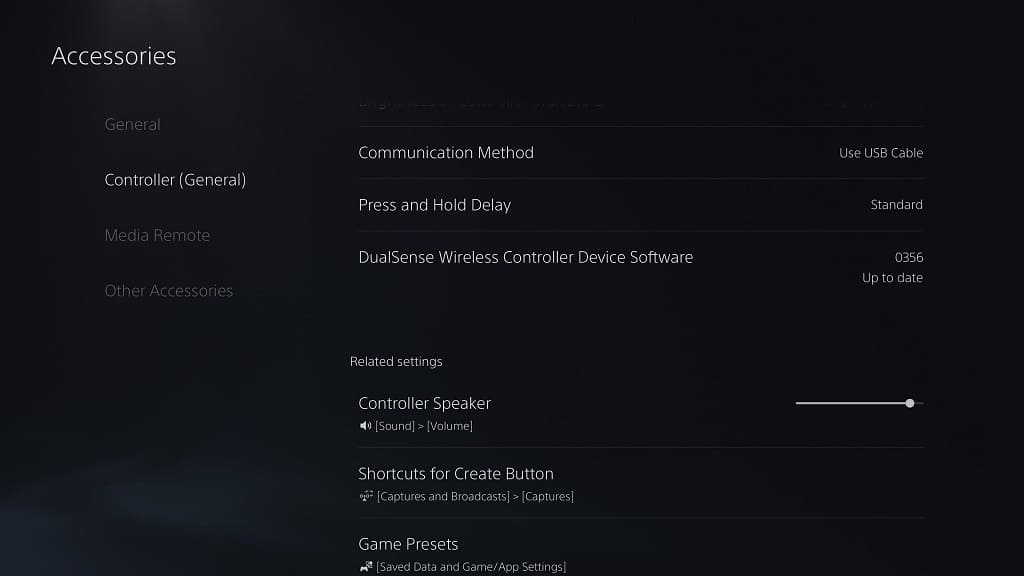
3. From the Settings menu, select Accessories.

4. After getting to the Accessories menu, you first need to select Controller (General).

5. On the right side of the same screen, scroll down until you see “DualSense Wireless Controller Software” option.

6. If this setting shows that the gamepad is “Up to Date” then it has already been updated to the latest firmware.

Otherwise, you need to select “DualSense Wireless Controller Software” to manually start the update process.

7. Do not turn off the system while the update is occurring. The process should only take seconds to be completed.

How to fix Resident Evil 4 Remake HDR issues on PS5, Xbox Series X and S

You can play Resident Evil 4 Remake in HDR on the PlayStation 5, PlayStation 5 Digital Edition, Xbox Series X and Xbox Series S. If the image ends up looking overly bright, extremely dark and/or too washed out, then you can take a look at this troubleshooting article from Seeking Tech.

1. For the first step, you should make sure that you have HDR enabled and calibrated properly on your console.

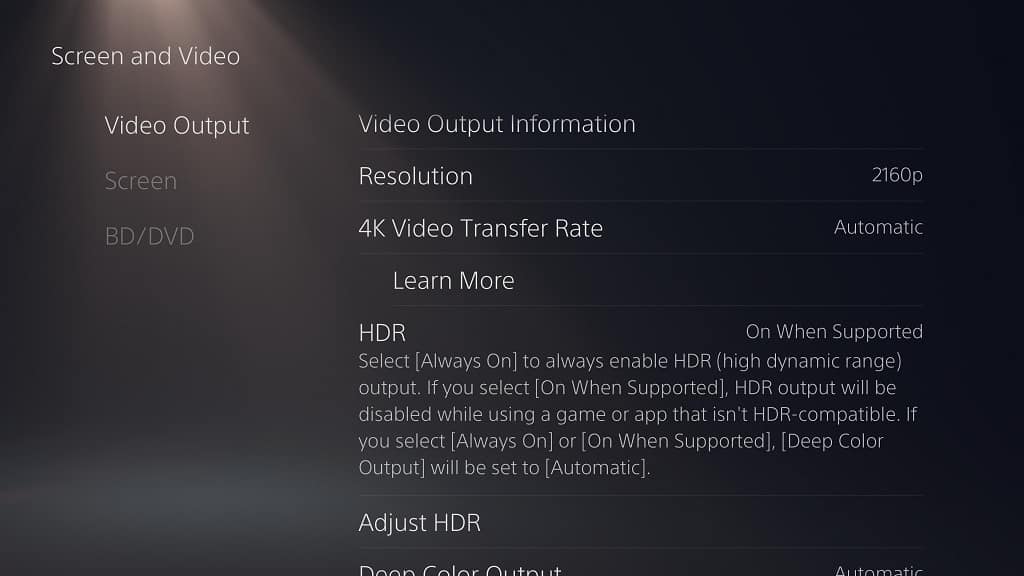
On the PlayStation 5 platforms, you need to go to Settings > Screen and Video > Video Output and then make sure that HDR is set to On When Supported. Afterwards, select Adjust HDR and then follow the on-screen instructions.

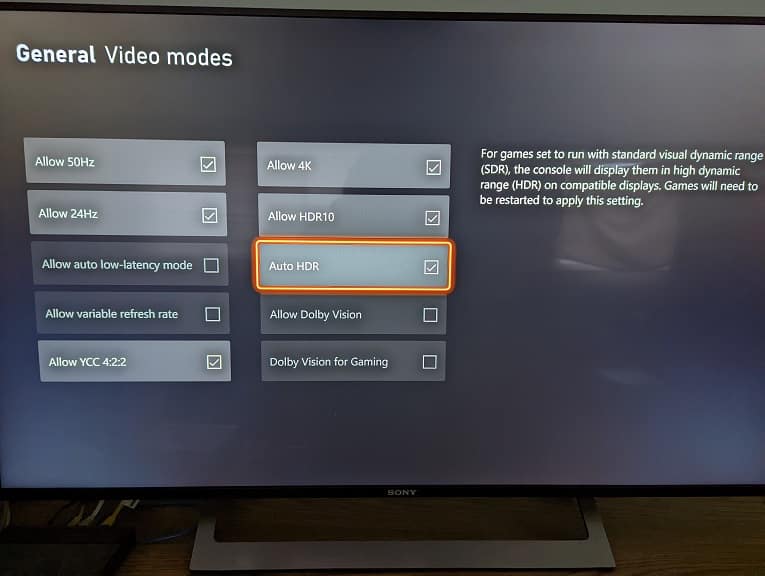
For the Xbox Series platforms, head over to Settings > General > TV & Display Options > Video Modes and then make sure that Allow HDR10 is enabled. Afterwards, go to Settings > General > TV & Display Options, select Calibrate HDR and then follow the on-screen steps.

2. You can also adjust the HDR brightness directly from the in-game menus of RE4. In order to do so, you need to take the following steps:

  • Open the Options menu in the game.
  • From the Options menu, switch over to the Display tab. You can change tabs by using the L1 and R1 buttons on PlayStation 5 and PlayStation 5 Digital Edition. You need to use the LB and RB buttons on the Xbox Series X and Xbox Series S consoles.
  • From the Display tab, you need to select Brightness HDR.
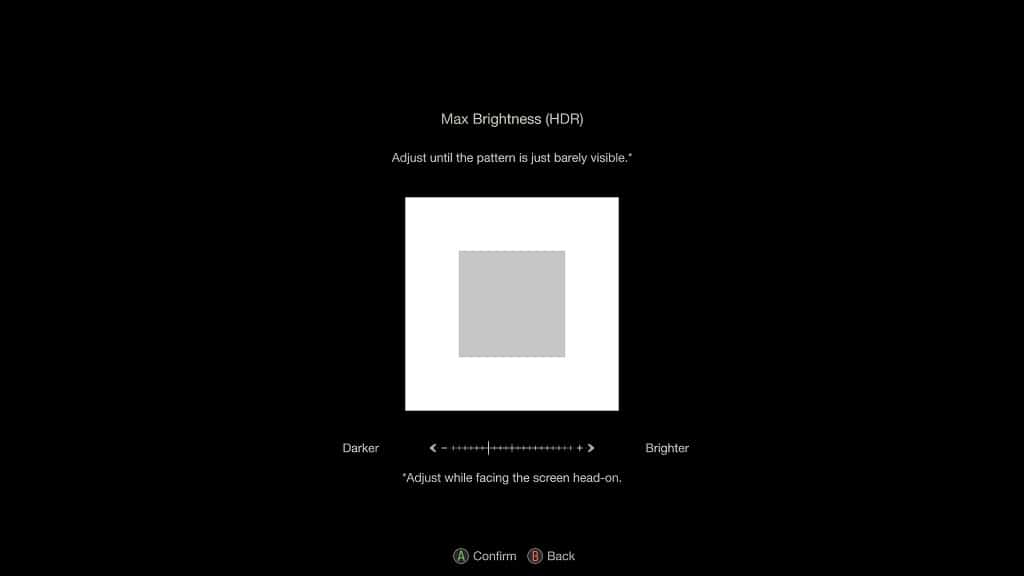
  • The first screen should be the Max Brightness (HDR) setting with the following description: “Adjust until the pattern is just barely visible.” When doing so, you should be looking directly at the screen head-on.

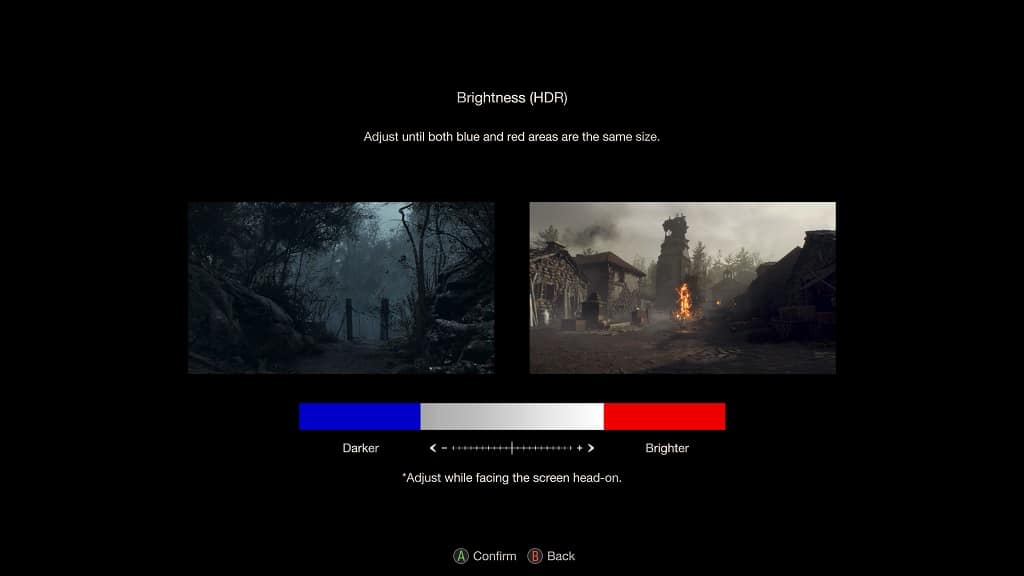
  • The next screen should be the Brightness (HDR) setting with the following description: “Adjust until both blue and red areas are the same size.” Just like the previous step, you need to do this one while facing the screen head-on.

3. Depending on the black and brightness levels of your television set or monitor, you may need to go back to the Brightness HDR screens occasionally when moving from a light area to a dark area or vice versa in order to get an optimal viewing experience.

4. If you don’t like how the game looks in HDR, then you can simply turn off this feature and play Resident Evil 4 Remake in SDR instead.

In order to do so on the PS5, go to the console’s Settings menu and then select Screen and Video > Video Output > HDR. You should then set HDR to Off.

On the Xbox Series X and S, head over to the system’s Settings menu and then select General > TV & Display Options > Video Modes. Afterwards, make sure that the Allow HDR10, Allow Dolby Vision and Dolby Vision for Gaming and Auto HDR settings are all disabled.

How to change or turn off Resident Evil 4 Remake adaptive triggers on PS5

Resident Evil 4 Remake features adaptive triggers support on PlayStation 5 and PlayStation 5 Digital Edition. Depending on the type of weapon you are using, you may feel that the L2 and R2 buttons require more pressure to press down. When paired with haptic feedback, adaptive triggers add an extra layer of immersion for this remake.

If you would like to change the intensity level of the adaptive triggers, or turn this setting off altogether, then you can take a look at this guide to see how you can properly do so.

Method #1:

If you would like to simply disable the adaptive trigger effects, then you can use the in-game menu of Resident Evil 4 Remake by doing the following:

  • To begin, you need to open the Options menu, which you can do by selecting Options from the Main Menu. If you are actually playing RE4 at this moment, then you can press the Options button on the DualSense to bring up the Pause screen, which is where you can then select Options.
  • From the Options screen, make sure that you are in the Controls tab. You can change tabs by using the L1 and R1 buttons on the controller if you need to do so.
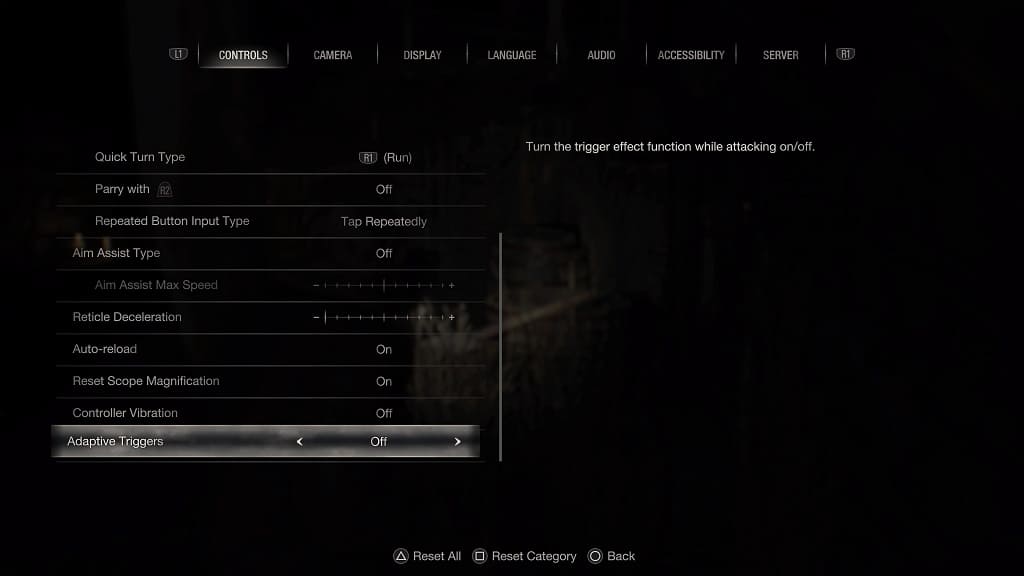
  • In the Controls tab, scroll down and then move the cursor over to Adaptive Triggers.
  • You can then use the left directional button, right directional button, move the left analog stick to the left or move the left analog stick to the right in order to change the Adaptive Triggers setting to “Off.”

Method #2:

If you want to keep the adaptive trigger feature but lower its intensity, then you need to do the following:

  • To start off, head over to the home menu of your PS5. If you are playing Resident Evil 4, then you can head home quickly by pressing and holding the PS button on the DualSense.
  • From the home screen, select the gear cog icon that is placed on the top right corner.
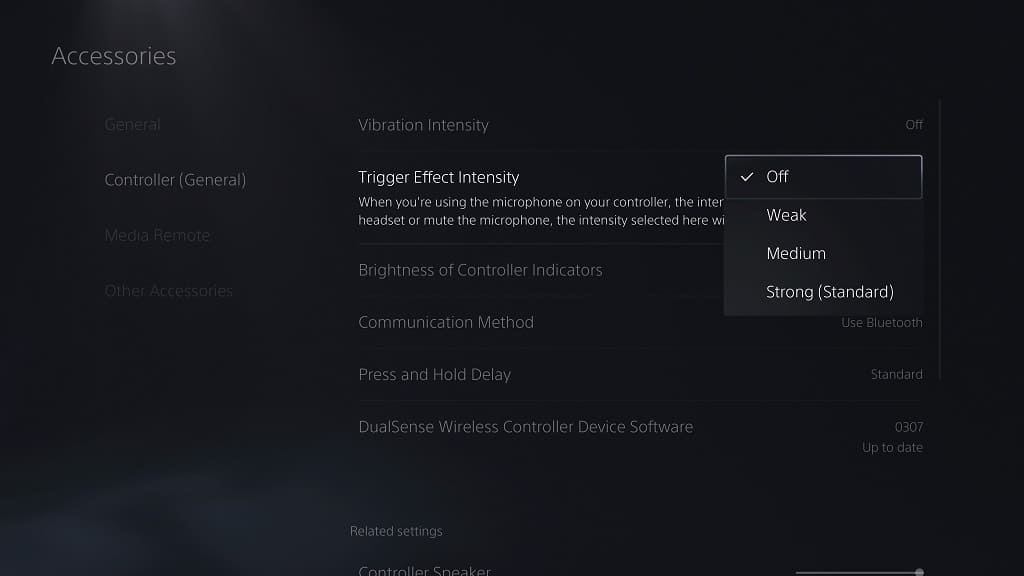
  • You should now be in the Accessories menu, which is where you need to select Controller (General).
  • You then need to select Trigger Effect Intensity.
  • By default, Trigger Effect Intensity is set to “Strong (Standard).” You need to select the “Low” or “Medium” options in order to lower the resistance. To simply turn this feature off on a system level, you can select the “Off” option instead.

How to change or turn off Resident Evil 4 Remake haptic feedback on PS5

The PlayStation 5 version of Resident Evil 4 Remake features haptic feedback as the more nuanced rumble should add more to the immersion. If you would like to change, or completely disable, this vibration feature, then you can take a look at this tutorial from Seeking Tech.

1. To start off, you need to go into the Options menu in this survivor horror game.

From the main menu, you can simply select Options.

If you are currently playing RE4, then you need to press the Options button on the DualSense controller to bring up the Pause screen. You can then head into the Options menu from there.

2. From the Options menu, make sure you are in the Controls tab. If you are in another tab, then you can use the L1 and R1 buttons on the DualSense to switch tabs.

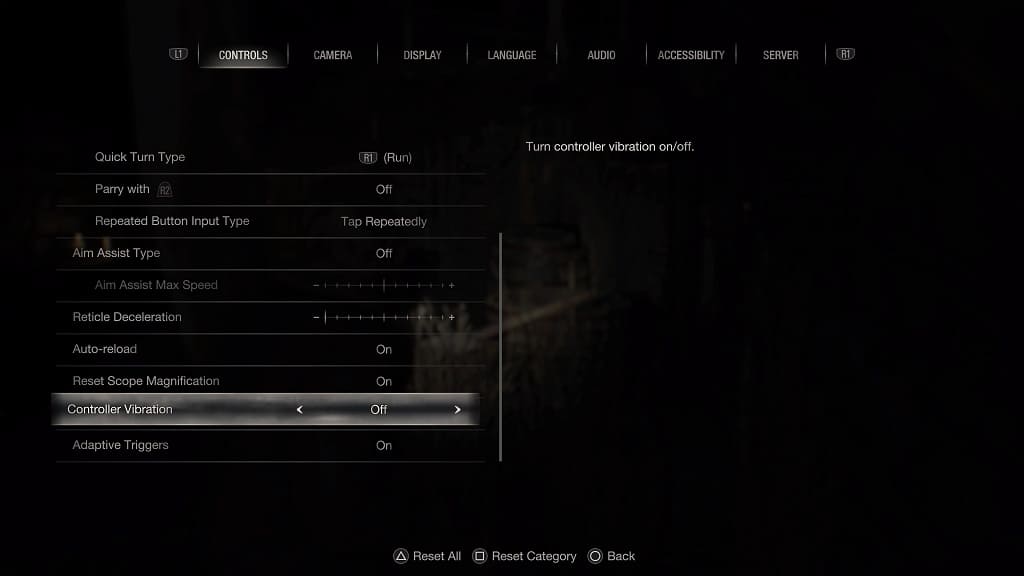
3. In the Controls tab of the Options menu, scroll down and then move the cursor over to Controller Vibration.

By default, this setting is set to On.

4. You can use the left and right directional pad buttons, or push the left analog stick to the left and right, to change this setting to “On (Excludes Running)” or “Off.”

The “On (Excludes Running)” option will leave the haptic feedback turned on for every other action aside from when you are running. Off course, the “Off” option will turn off rumble entirely in Resident Evil 4 Remake.

5. If you want to keep haptic feedback but would like to lessen its intensity level, then you need to do the following:

  • First off, you need to head over to the home screen of your PlayStation 5 or PlayStation 5 Digital Editon console. You can do so by pressing and holding the PS button on the DualSesne. You can also quick press the PS button and then select the home icon located at the bottom of the quick menu.
  • In the home menu of your console, select the gear icon to head over to Settings.
  • From the Settings menu, select Accessories.
  • Inside the Accessories menu, you first need to select Controller (General).
  • On the right side of the same screen, select Vibration Intensity.
  • By default, Vibration Intensity is set to Strong (Standard). To lower to rumble effects in Resident Evil 4 Remake, you can change this setting to either “Low” or “Medium.” You can also select “Off” to turn off vibrations completely on a system level.