How to enable and customize subtitles for Resident Evil 4 Remake

By default, subtitles are disabled in the Resident Evil 4 Remake. If you don’t want to miss out on the dialogue in this survivor horror game, then we recommend that you enable this feature.

To find out how you can turn on subtitles, as well as customize the look of the text that will be appearing, you can take a look at this tutorial from Seeking Tech.

1. For the first step, make sure you open the new version of RE4 on your PC, PlayStation 4, PlayStation 5, PlayStation 5 Digital Edition, Xbox Series X or Xbox Series S if you haven’t done so already.

2. With the game opened, head over to the Options menu either from the main menu or pause screen.

3. From the Options menu, you need to head over to the Language tab.

You are able to change tabs with the L1 and R1 buttons on your PlayStation controller to the LB or RB buttons on the Xbox controller.

4. Once you get to the Language tab in the Options menu, move the cursor down to Subtitles.

5. You can then use the left directional pad button, right directional pad button, move the left analog stick to the left or move the left analog stick to the right in order to set Subtitles to On.
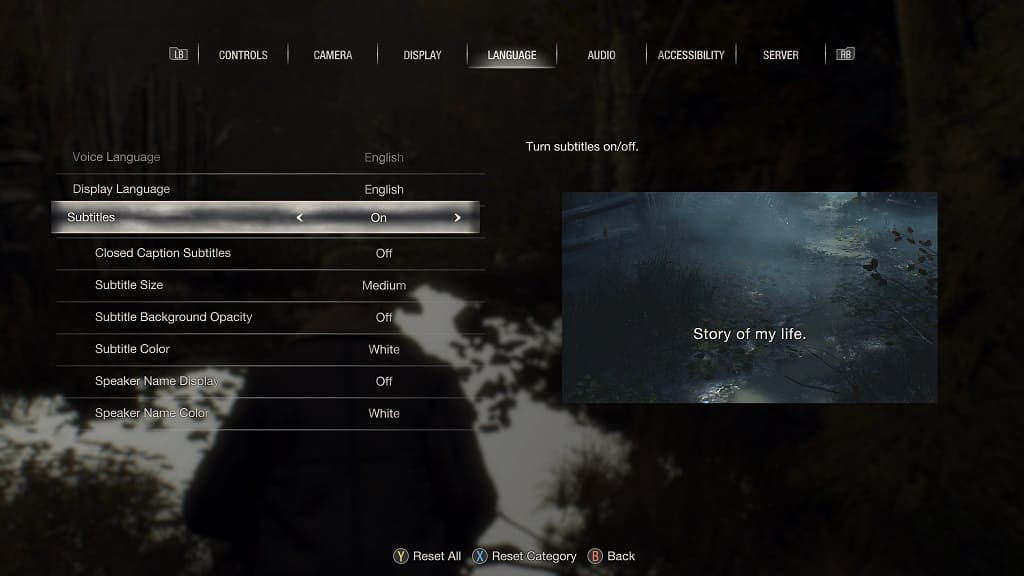
6. After turning on Subtitles, there are several customization options that you can also change in regards to how these texts are displayed.

You can choose to enable Closed Caption Subtitles, which describes the action that occurs on the screen.

The Subtitle Size can also be changed to Small, Medium (which is the default option) or Large.

The Subtitle Background Opacity allows you to add a transparent background to the subtitle text. You can set this setting to Off (which is default), Low, Medium or High.

You can also change the Subtitle Color to White (which is the Default choice), Red, Green, Blue or Yellow.

By enabling Speaker Name Display, you will see the name of the person who is speaking the dialogue.

You can also use the Speaker Name Color setting, to change the color of speaker name text to White (which is the Default option), Red, Green, Blue or Yellow. The Speaker Name Color does not need to match the aforementioned Subtitle Color.

7. To save and apply the changes you made in the Language tab of the Options menu, press the circle button on PlayStation or B button on Xbox to exit the screen.

The changes should automatically be saved and applied in the game.

How to change the field of view in Resident Evil 4 Remake

You may find that the default camera angle may be a little too close to the character in the Resident Evil 4 Remake. Furthermore, the close proximity may also be triggering some of your motion sickness. Thankfully, you are able to change the FoV setting in this title.

To find out the location of this feature, you can take a look at this tutorial from Seeking Tech.

1. If you haven’t already, make sure that you open the RE4 remake on your PC, PlayStation 4, PlayStation 5, PlayStation 5 Digital Edition, Xbox Series X or Xbox Series S.

2. In the game, you need to head over to the Options menu, which you can do by either selecting Options from the main menu or pause screen.

You can access the pause screen by pressing the Options button on your PlayStation controller or Menu button on your Xbox controller.

3. From the Options screen, you need to move the Camera tab.

On the PlayStation controller, you can change tabs with the L1 and R1 buttons. For the Xbox gamepad, you need to use the LB and RB buttons.

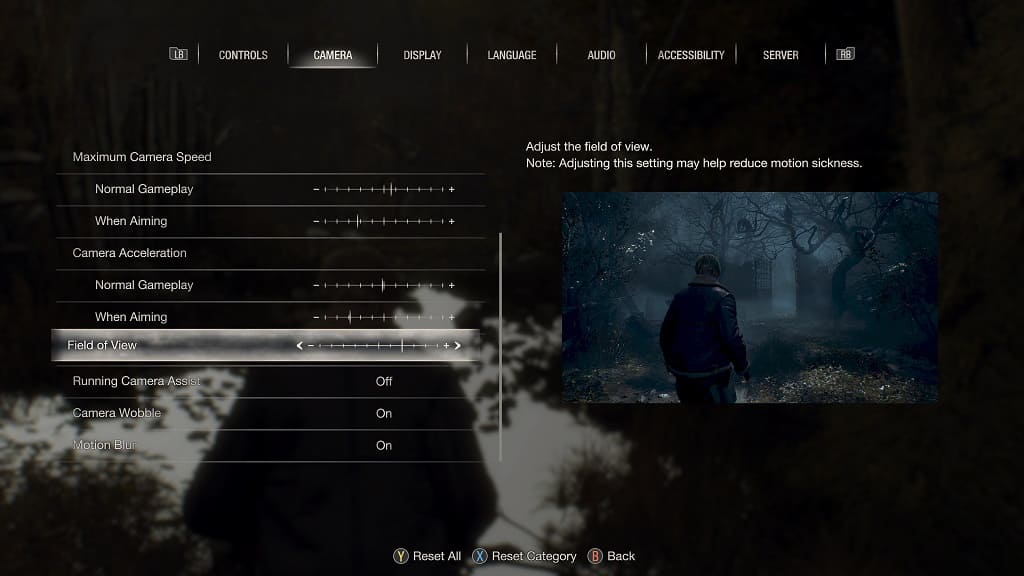
4. Once you get to the Camera tab, scroll down and then move the cursor to the Field of View, which has the following description:

  • “Adjust the field of view. Note: Adjusting the setting may help reduce motion sickness.”

5. You can use the left and right directional buttons or tilt the left analog stick to the left and right in order to move the Field of View slider.

For this setting, you can change between a value 0 to 10. By default, the value is set to 7.

If you want to move the camera back more, then you need to move the slider to the right. If you want the camera angle to be closer to the character, then you need to move the slider to the left.

On the right side of the screen, you should see a preview image that shows the field of view changes you made on the slider.

If you want to reset the slider, as well as other settings you made in the Options menu, then you can press the triangle button on PlayStation or Y button on Xbox.

6. Once you are done making changes to the field of view, press the circle button or B button to exit the Options menu. The new settings should automatically be applied and saved.

How to fix Resident Evil 4 Remake aiming issues

When you are playing the Resident Evil 4 Remake, you may find that aiming your weapon to be extremely clunky. As a result, you aren’t able to hit the faster moving target as accurately as you would like.

So, if you have a hard time trying to aim in this new version of RE4, then you can take a look at this troubleshooting guide from Seeking Tech to see how you can improve your accuracy.

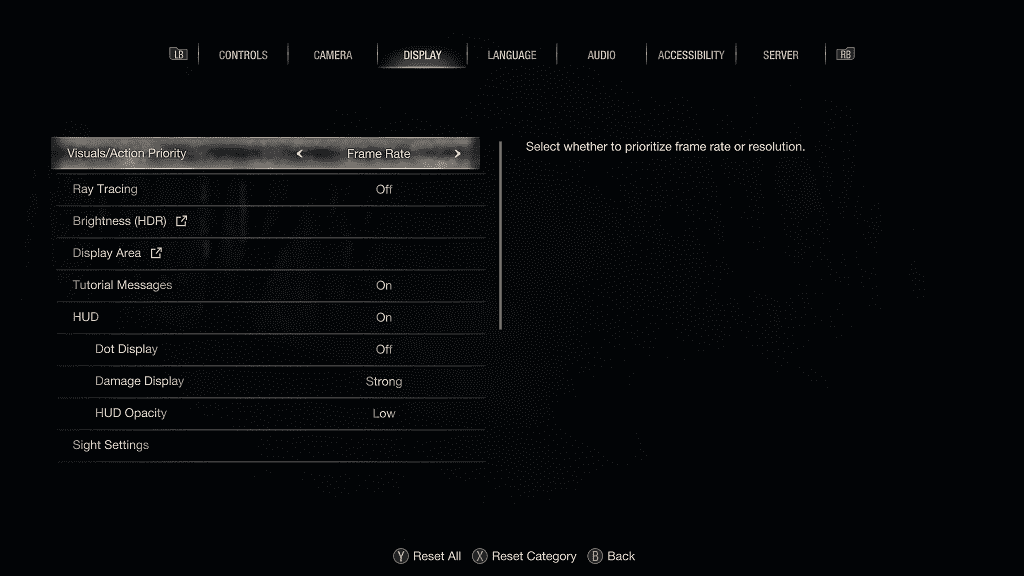
1. For the first step, we recommend playing Resident Evil 4 changing the Visuals/Action Priority setting to Frame Rate as doing so will prevent any frame drops that may make aiming harder than usual.

To change this setting, you need to select Options > Display from the Main Menu. You aren’t able to switch between graphics mode from the Pause Menu.

To find out more about how you can deal with frame rate problems, you can check out this previous post.

2. You should also make sure that your television set and monitor have been optimized to minimize input latency. Otherwise, you will end up having a hard time lining up your shots in this third-person game.

To see how you can reduce input lag for this specific title, we suggest that you check out this link.

3. You can also adjust the analog stick sensitivity from the in-game menus of Resident Evil 4.

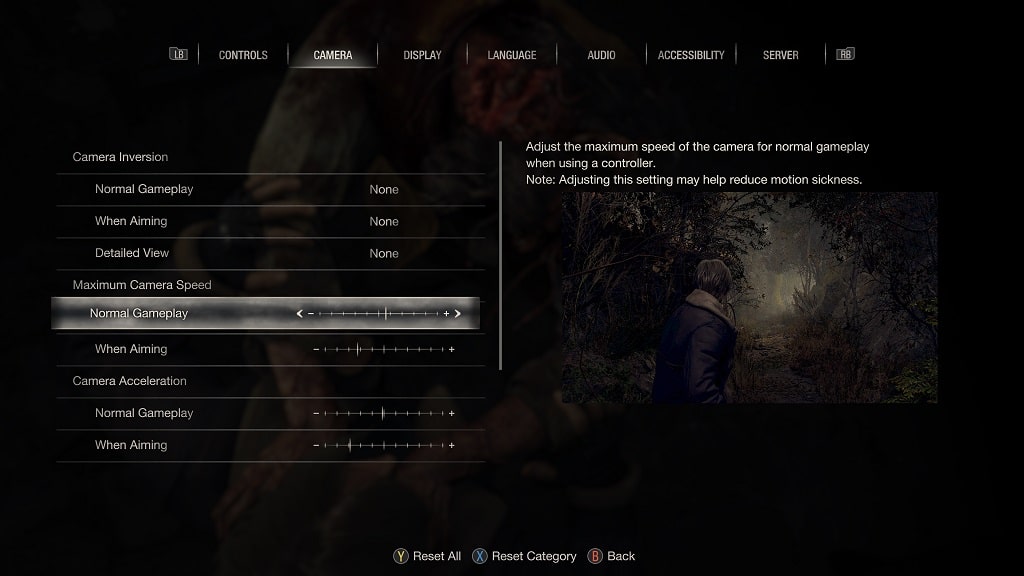
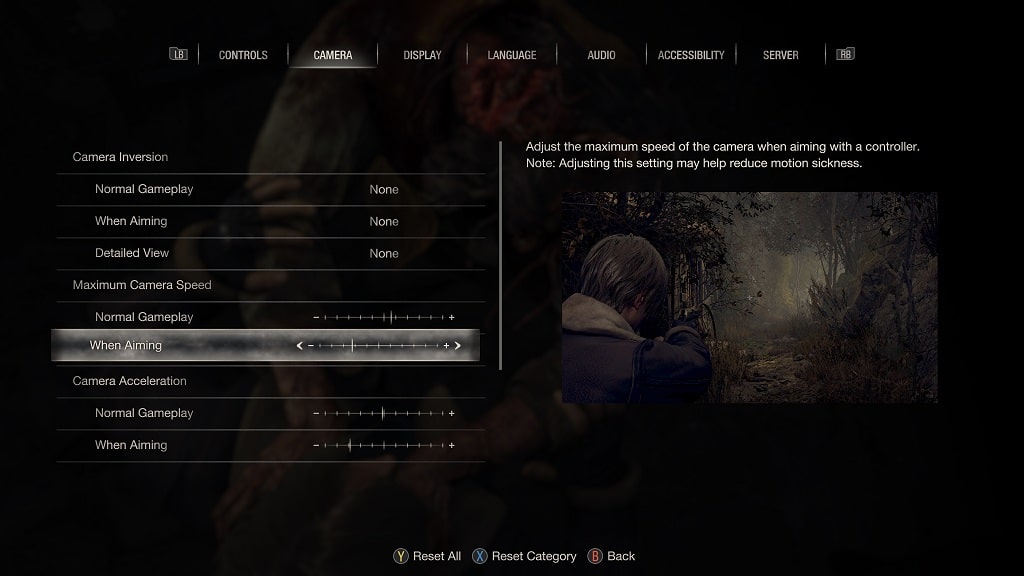
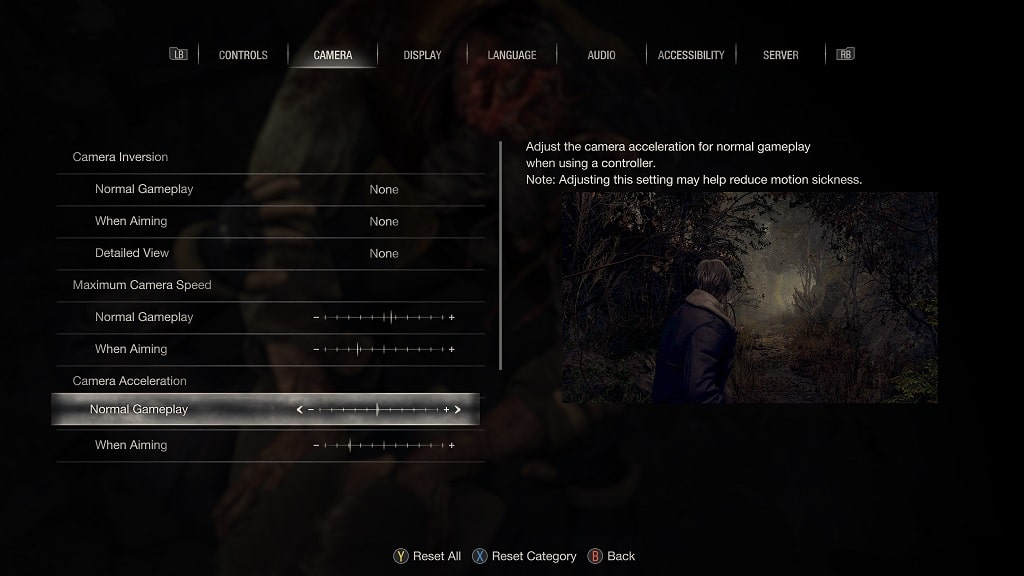
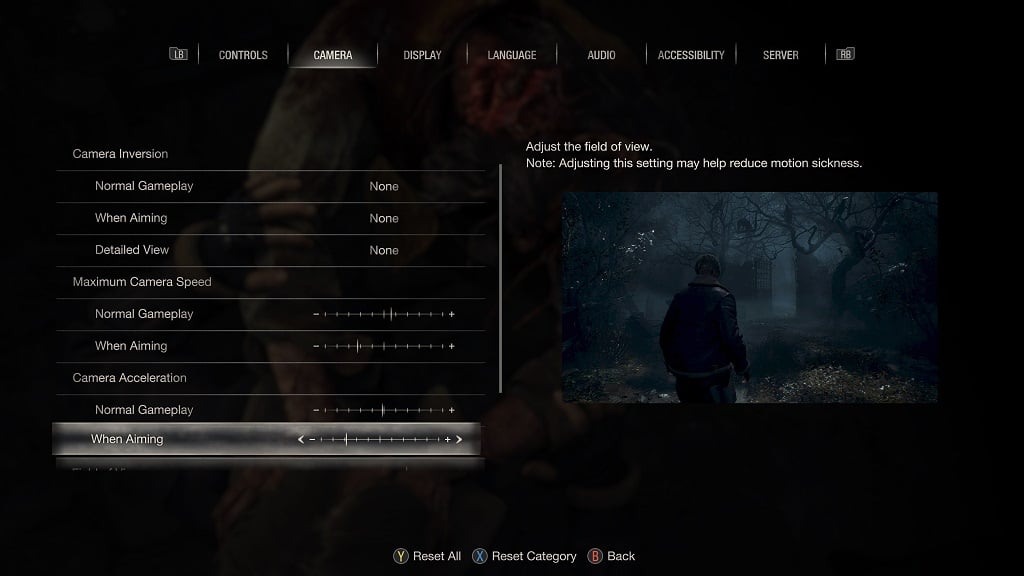
In order to do so, go to the Options menu from either the main or pause menu. Once you get there, go to the Camera tab. You can then adjust the following sliders:

Maximum Camera Speed for Normal Gameplay

Maximum Camera Speed When Aiming

Camera Acceleration for Normal Gameplay

Camera Acceleration When Aiming

4. From the same Options menu, you can then switch over to the Controls tab.

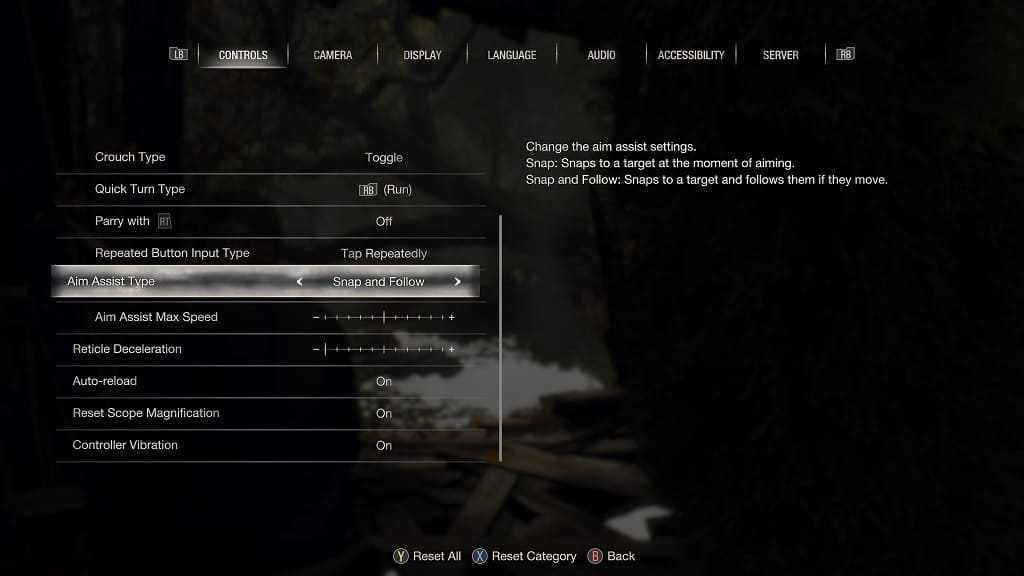
In the Controls tab, you can set Aim Assist to Snap or Snap and Follow.

By using Snap, the aiming reticle will immediately target the nearest target when you aim your weapon. With the Follow feature, the reticle will stay on the target even when it moves.

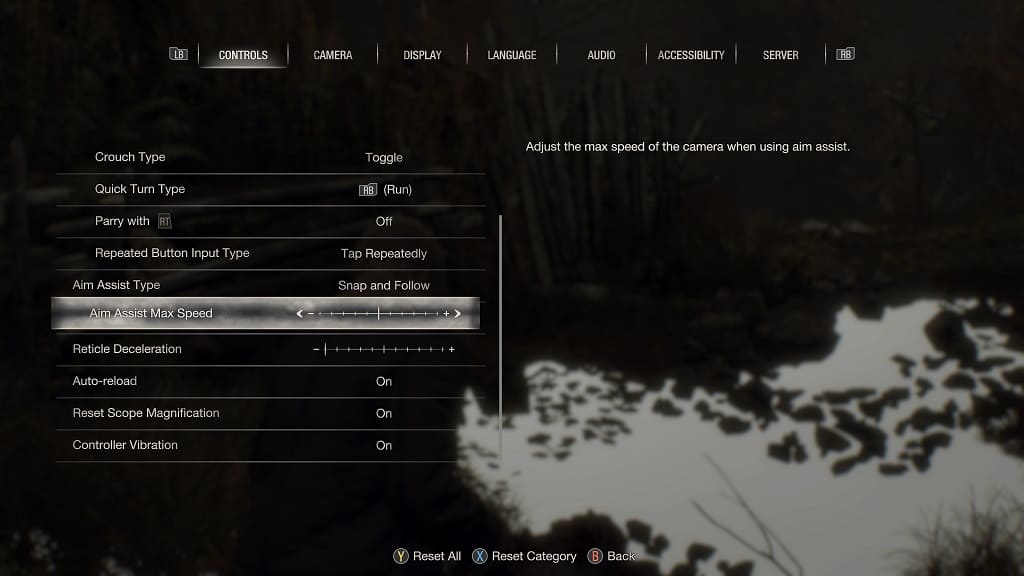
You can also adjust the camera speed when using aim assist with the Aim Assist Max Speed slider.

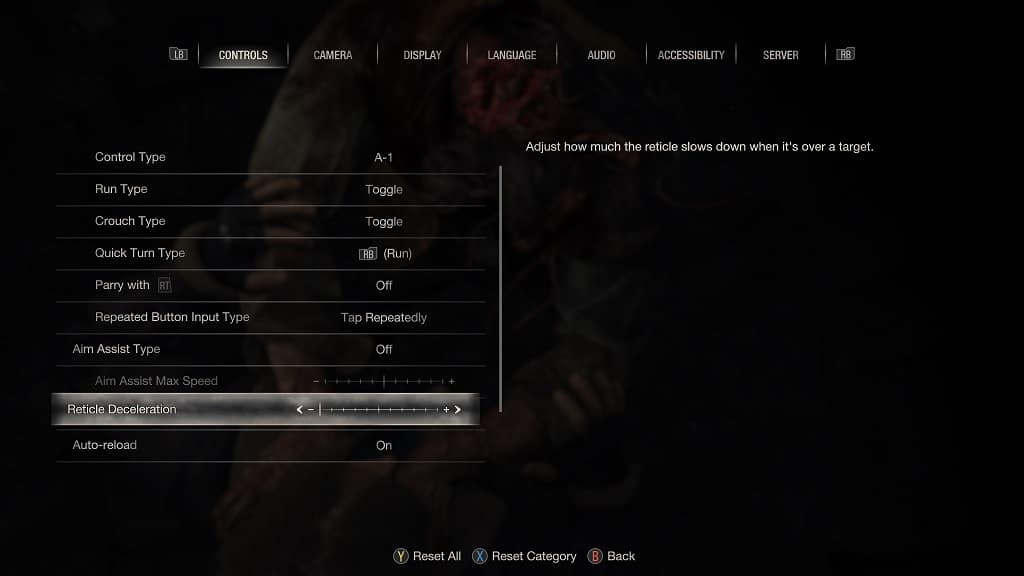
5. Also in the Controls tab, there is a slider named Reticle Deceleration, which slows down the aiming reticle when it is on a target.

We recommend setting this to the minimum if you haven’t done so already. Otherwise, the controls will feel sluggish when trying to aim at a different body part.

6. You should play around with the Maximum Camera Speed for Normal Gameplay, Maximum Camera Speed When Normal Gameplay, Camera Acceleration for Normal Gameplay, Camera Acceleration When Normal Gameplay, Aim Assist and Aim Assist Max Speed settings until aiming feels perfect.

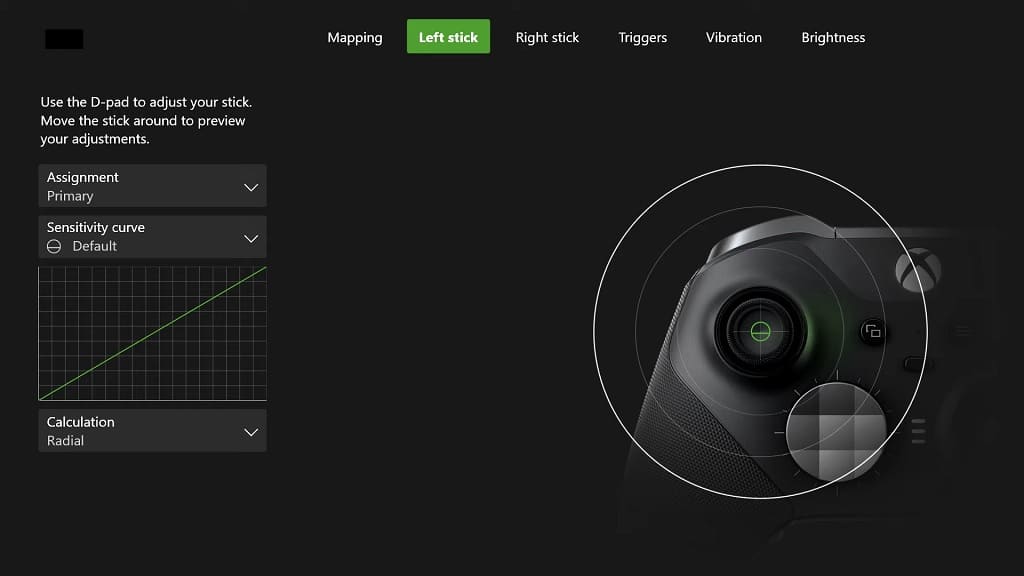
7. If you have a DualSense Edge or Xbox Elite Wireless Controller Series 2, then you can use the advanced settings of these controllers to adjust the deadzones of the analog sticks. By doing so, you may be able to improve your aiming accuracy.

8. As we stated above, the sluggish aiming is a common complaint for Resident Evil 4 Remake. Therefore, you should make sure that you keep your game updated to the latest patch as Capcom may eventually fix these aiming problems.

Xbox Elite Wireless Controller Series 2 settings for Resident Evil 4 Remake

If you are planning to use the Xbox Elite Wireless Controller Series 2 to play the Resident Evil 4 Remake, then there are several customizations you can do in order to optimize your experience with this survivor horror game.

You can check out this guide from Seeking Tech to see how you can get the best out of this gamepad when playing the version of RE4.

Directional Pad and Thumbsticks

If you have regular version for Xbox Elite Wireless Controller Series 2 or bought the component pack, then we recommend using the standard directional pad for the Resident Evil 4 Remake.

This is because you only need to use the up, down, left and right directions when changing to a different weapon in real-time. By using the plus-shaped directional pad, you will be less likely to have any accidental inputs during intense fights.

As for the thumbsticks, we recommend using any variation you are comfortable with when it comes to playing first or third person shooters.

Of course, make sure you add the paddle components to the back of the Xbox Elite Wireless Controller Series 2 if you haven’t done so already.

Trigger Locks

For the trigger locks, we suggest that you move the LT and RT sliders located at the back of the gamepad all the way down.

By doing so, the game should be able to recognize your trigger input almost immediately when you start pressing down on the button.

Trigger Deadzones

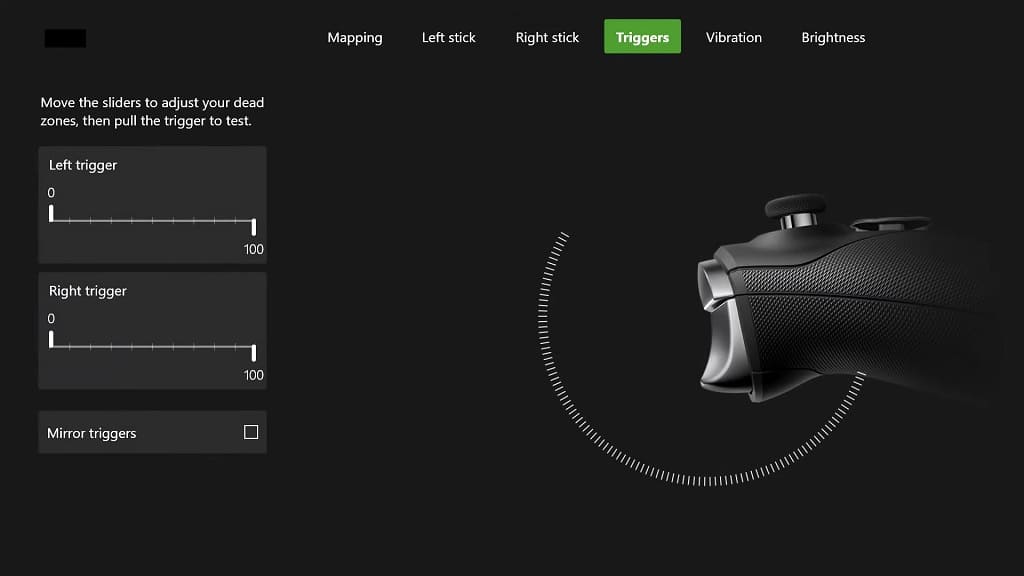
You can also make additional adjustment to the trigger deadzones from the Xbox Elite Wireless Controller Series 2 menu.

P1, P2, P3 and P4 Button Assignments

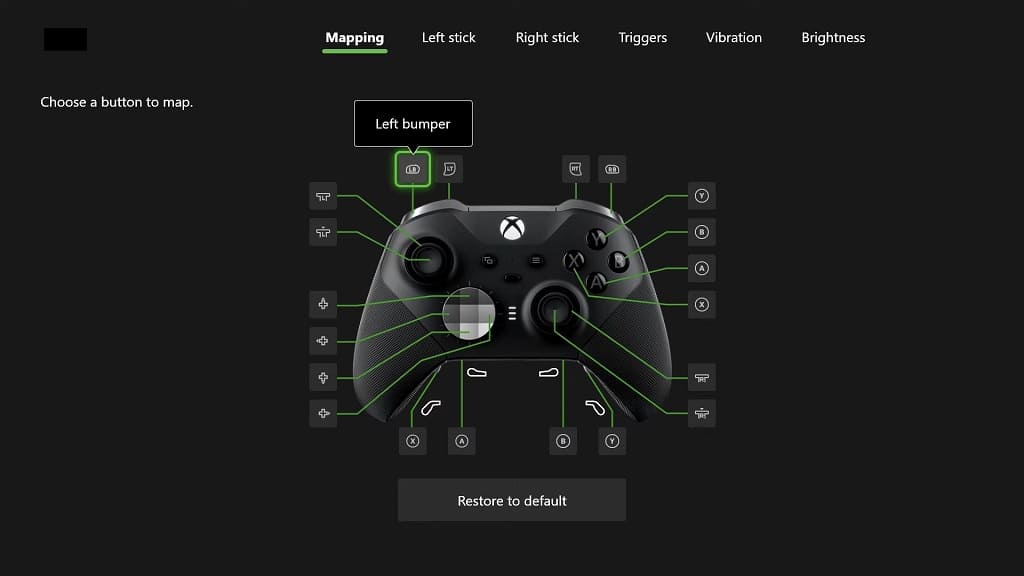
When it comes to using the back buttons, we recommend assigning either P1 or P2 to the same function as when you press down on the left analog stick. You can then unmap the press down on the left analog stick button. By doing so, you won’t accidentally run when you put pressure on the left analog.

We also suggest assigning the press down on the right analog stick button to any of the back buttons on the controller and then unmapping the press down on the right analog stick button. This should also prevent any accidental inputs when you put pressure on the right analog.

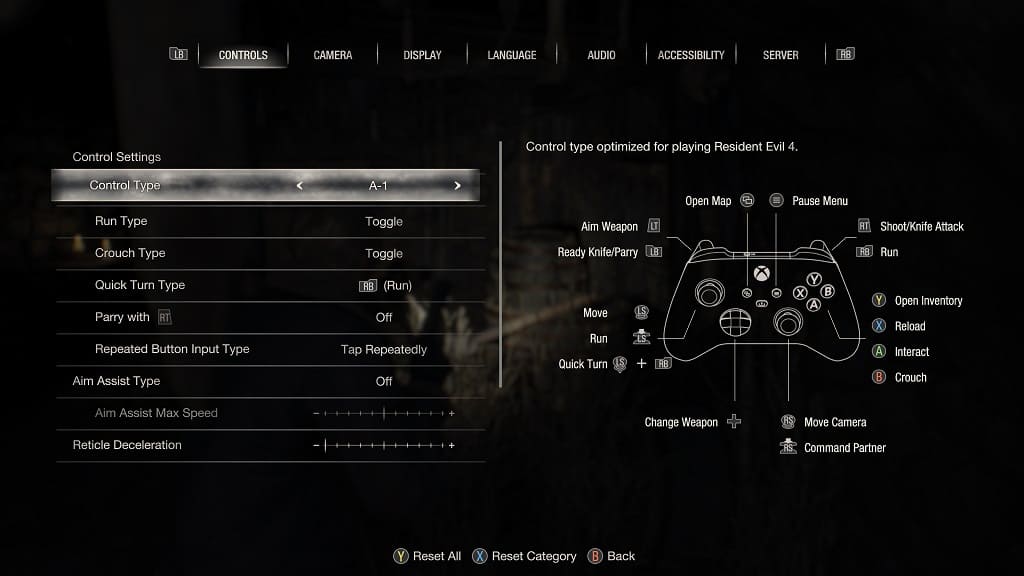
If you are using the default A-1 control type for Resident Evil 4, then pressing down on the right analog stick is used to command your partner.

Stick Deadzones

There is currently a major issue when it comes to deadzone in the RE4 Remake. As a result, aiming can feel extremely clunky, especially on the Xbox Series X and Xbox Series S.

To fix this problem, you can try going to the Options menu in the game and then heading over to the Camera tab. From there, you will be able to change the maximum camera speed during normal gameplay and when aiming as well as the camera acceleration during normal gameplay and when aiming.

If making in-game adjustments did not work, then you can use the left and right analog stick sections of the Xbox Elite Wireless Controller Series 2 to adjust the deadzones.

How to record videos by using voice commands on PS5

Thanks to a new update, you are now able to use voice commands in order to tell your PlayStation 5 or PlayStation 5 Digital Edition console to record gameplay. To find out how you can use this new feature, you can take a look at this tutorial from Seeking Tech.

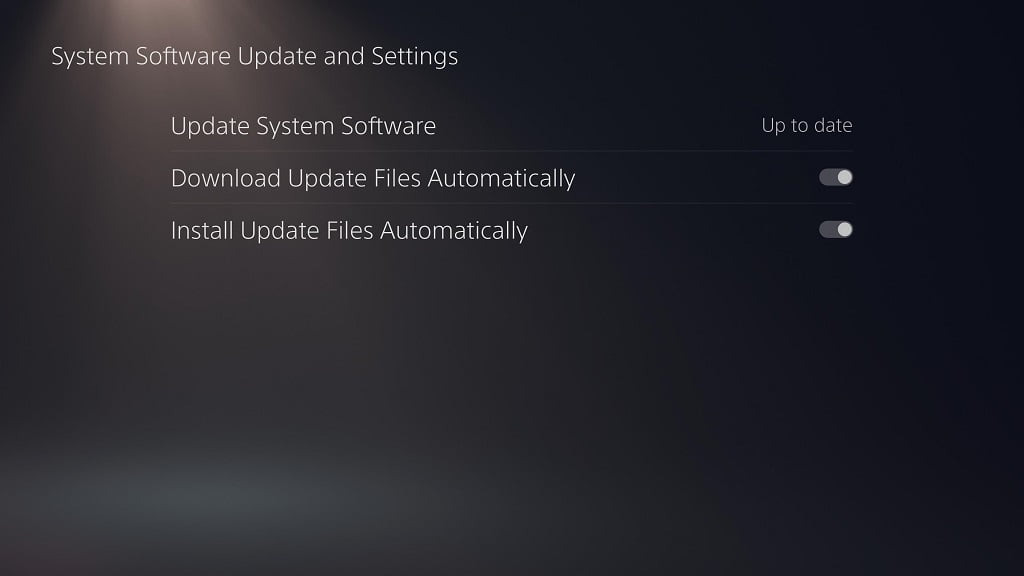
1. If you haven’t already, make sure your console has the latest system software installed as the ability to use your voice to start a gameplay recording was added through a firmware update.

To manually download and install the new system software, you can go to your PS5’s Settings menu and then select System > System Software > System Software Update and Settings > Update System Software > Update Using the Internet.

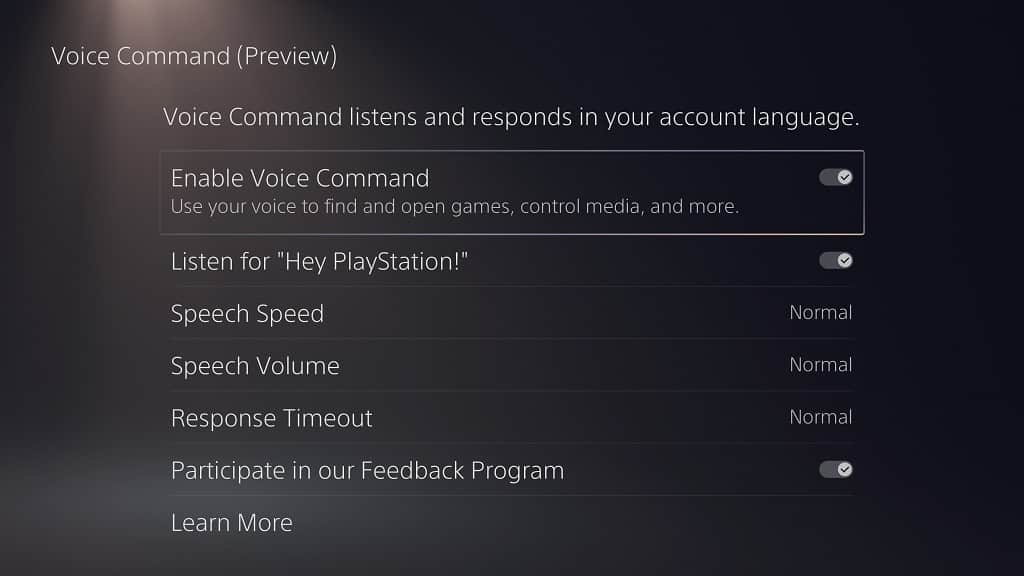
2. Next, you need to make sure that you have Voice Command enabled. This feature is currently available as a Preview in the U.S. and U.K.

If you are from those regions, then you need to open the Settings menu on your console and then select Voice Command > Enable Voice Command. Afterwards, turn on the Listen for Hey PlayStation feature from the same Voice Command menu.

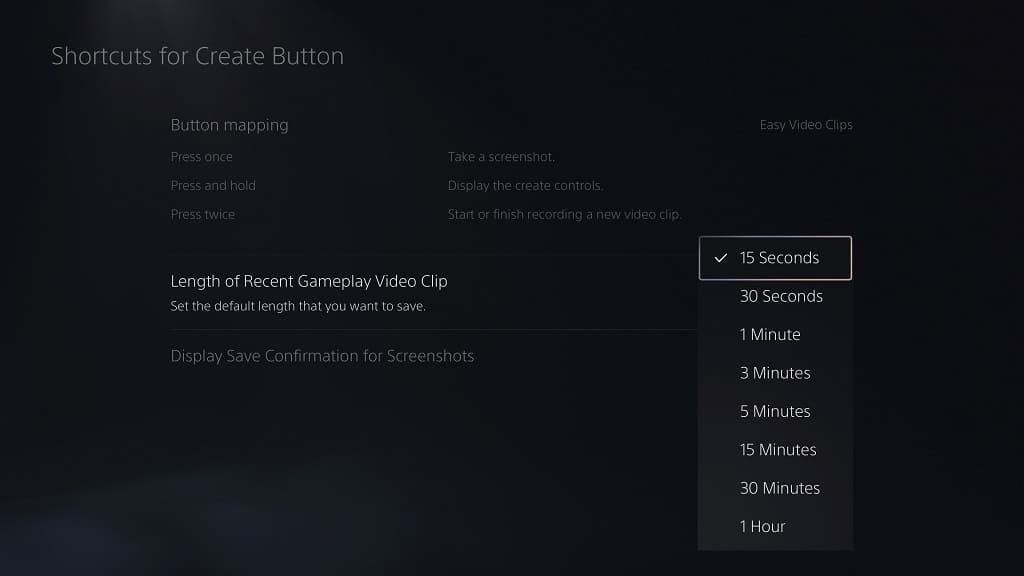
3. If you want to specific the default length of the recorded videos, then you need to head to Settings > Captures and Broadcasts > Captures > Shortcuts for Create Button > Length of Recent Gameplay Clip. You can then pick between the following length options:

  • 15 seconds
  • 30 seconds
  • 1 minute
  • 3 minutes
  • 5 minutes
  • 15 minutes
  • 30 minutes
  • 1 hour


4. Of course, you should also make sure that you don’t have the microphone on your DualSense or headset muted. Otherwise, the PS5 won’t be able to listen and act out your voice commands.

5. If you want to capture your past gameplay, then you need to say the following:

“Hey PlayStation, capture that.”

The console should then capture your previous gameplay based on the time you set from the aforementioned Shortcuts for Create Button menu. For example, if you set the Length of Recent Gameplay Clip to 1 hour, then saying, “Hey PlayStation, capture that,” will tell the PS5 to capture the last hour of gameplay.

6. You can also manually start a recording session of your current gameplay. In order to do so, you need to say Hey PlayStation, start recording.”

To stop an active recording, you need to say, “Hey PlayStation, stop recording.”

DualSense Edge settings for Resident Evil 4 Remake

When compared to the normal DualSense, the Edge version adds two back buttons, trigger stops and many other features. To see what the best settings are for this controller when it comes to playing the Resident Evil 4 Remake on your PlayStation 5 or PlayStation 5 Digital Edition console, you can take a look at this guide.

Analog Caps

When it comes to the analog caps for the DualSense, you can use whichever you are comfortable with. In our case, we used the same standard caps you found installed on the normal DualSense.

Back Buttons Attachments

We also recommend using whichever back button attachment you are comfortable with.

If you have smaller hands, then the levers may feel more accessible. If you have bigger hands, then the half dome attachments may be more comfortable.

Trigger Stops

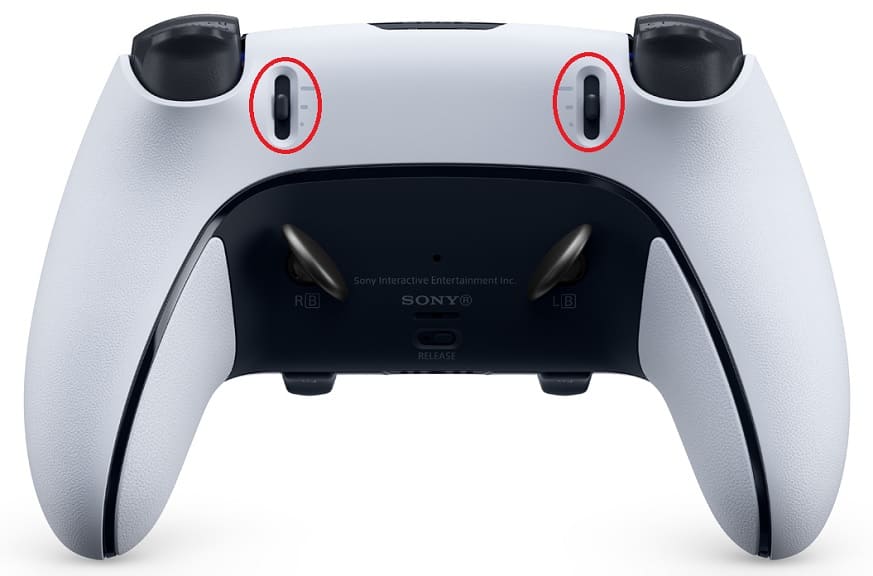
If you want to fire your weapon as quickly as possible in the Resident Evil 4 Remake, then we suggest that you move the sliders located at the top back side of the gamepad all the way down.

By doing so, you should be able to aim your weapon faster by holding the L2 button. You can also shoot your weapon or attack with your knife quickly by pressing down on the R2 button.

Keep in mind that, by setting the trigger stop sliders all the way down, you will also disable the adaptive trigger features in RE4. Therefore, you will no longer feel any resistance when pressing down on the two triggers.

If you would want to feel more immersive, then we recommend that you set the trigger stops all the way up and then make sure that the Trigger Effects setting is set to Strong (Standard) on the PS5 system menus. Afterwards, make sure that the Adaptive Triggers setting is enabled in the in-game menu of Resident Evil 4.

If you would rather have the quick-fire benefits, then you can keep the trigger stop sliders all the way down.

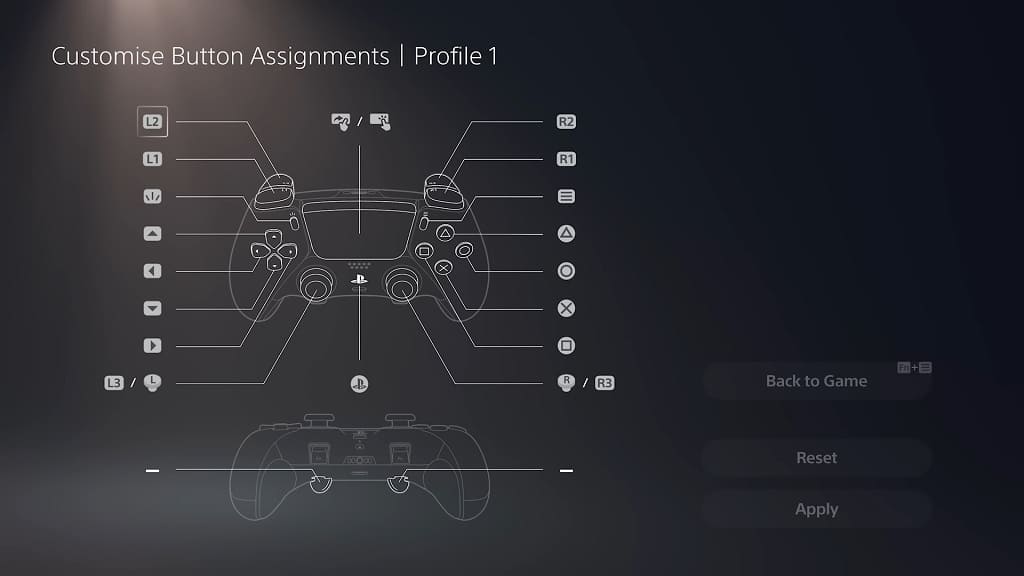
Customize Button Assignments

When it comes to the custom button assignments, we recommend setting the left back button to the run button. If you are using the default A-1 Control Type for Resident Evil 4 Remake, then you can set the left back button to function as R1 and then disable the L3 button.

To perform the quick turn action with this new setup, you need hold the left back button and then move the left analog downwards.

You can set the right back button to any button you want. For us, we replaced the R3 functionality, which is to command your partner in the A-1 Control Type, with the right back button. Afterwards, we disable the R3 button.

By disabling the L3 and R3 button, you should prevent yourself from doing any unintended actions if you accidentally press down on your control sticks.

Stick Sensitivity/Deadzone and Trigger Deadzone

There is a notable issue in the Resident Evil 4 Remake when it comes to aiming as there seem to be major deadzones for the analog sticks.

In this case, you can try adjusting the camera controls by going to the Camera tab in the Options in the game.
If the analog sticks still don’t feel quite right even if you turn up the sensitivity settings in the game’s menus, then you can use the Stick Sensitivity/Deadzone section the DualSense Edge Profile menu in order to adjust your controller’s deadzone.

You can also fine tune the trigger deadzone of the controller as well from the same Profile menu.

How to change to classic controls and more in Resident Evil 4 Remake

If you prefer using the button layout of the original Resident Evil 4 game that was first released for the Nintendo GameCube in 2005, then you can play the new remake with the same setup. To find out how you can change the control layout in the new game, you can check out this tutorial from Seeking Tech.

1. First off, you need to head over to the Options menu in Resident Evil 4 Remake. You can do so by selecting Options from either the main menu or pause menu.

2. In the Options menu, you should be in the Controls tab by default.

If you are in another tab, then you can use the L1 and R1 buttons if you are playing on the PlayStation 4 or PlayStation 5 to switch over to the Controls tab. On the Xbox Series X and Xbox Series S, you can use the LB and RB buttons to change over to the correct tab.

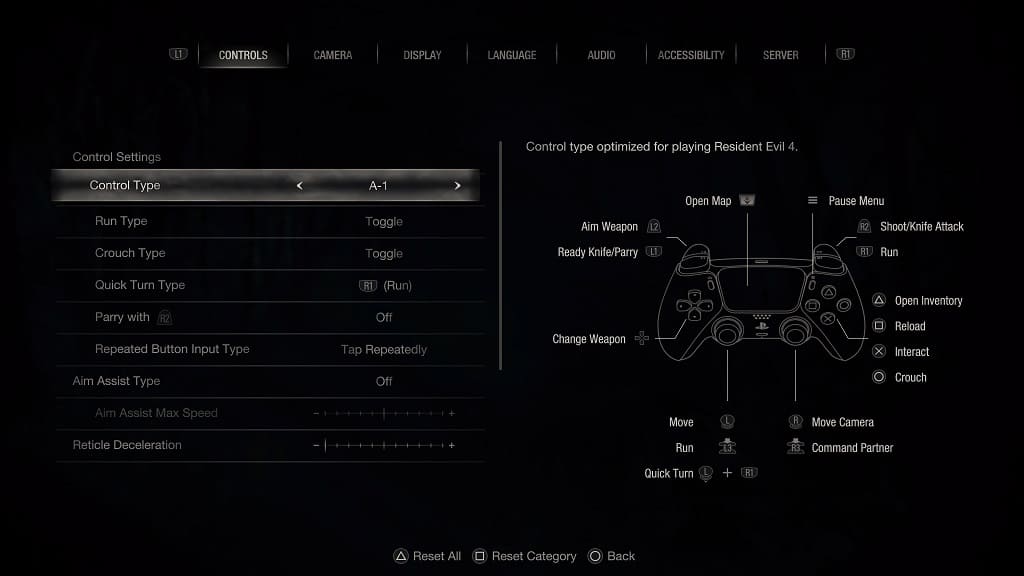
3. In the Controls tab, move the cursor over to Control Type.

By default, the Control Type should be set to A-1, which has the following description:

  • “Control type optimized for playing Resident Evil 4.”

This button layout is based on modern third-person shooters.

4. In order to change to a different control type, you can press the left directional button, right direction button, move the left analog stick to the left or move the left analog stick to the right.

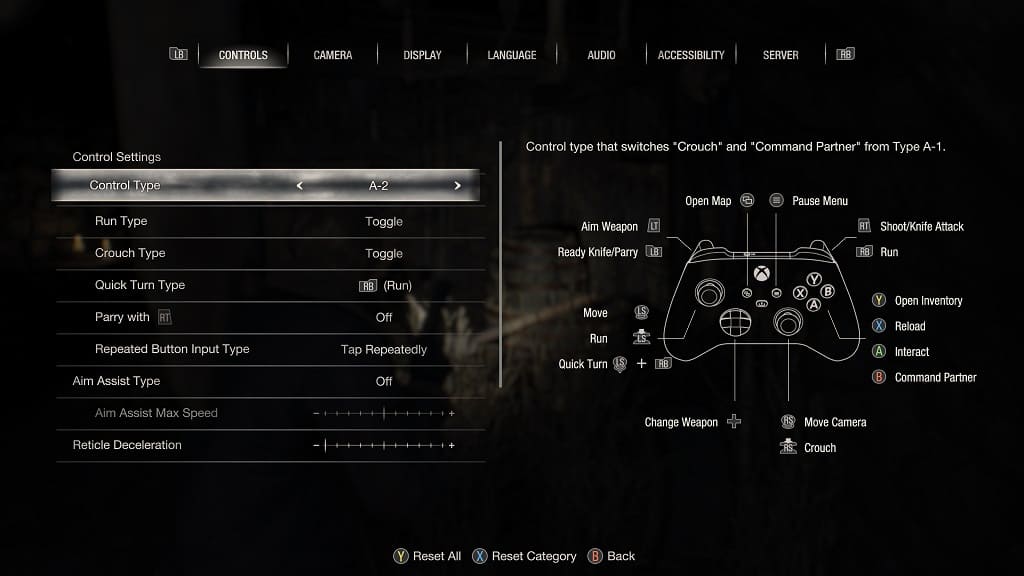
You will be able to change to the following layouts:

A-2: “Control type that switches Crouch and Command Partner from Type A-1.”

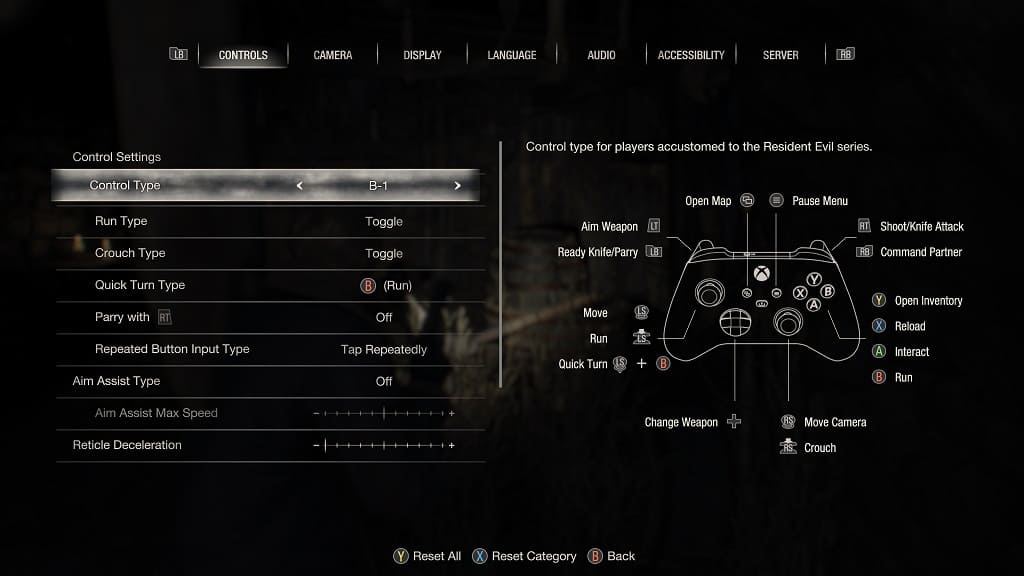
B-1: “Control type for players accustomed to the Resident Evil series.”

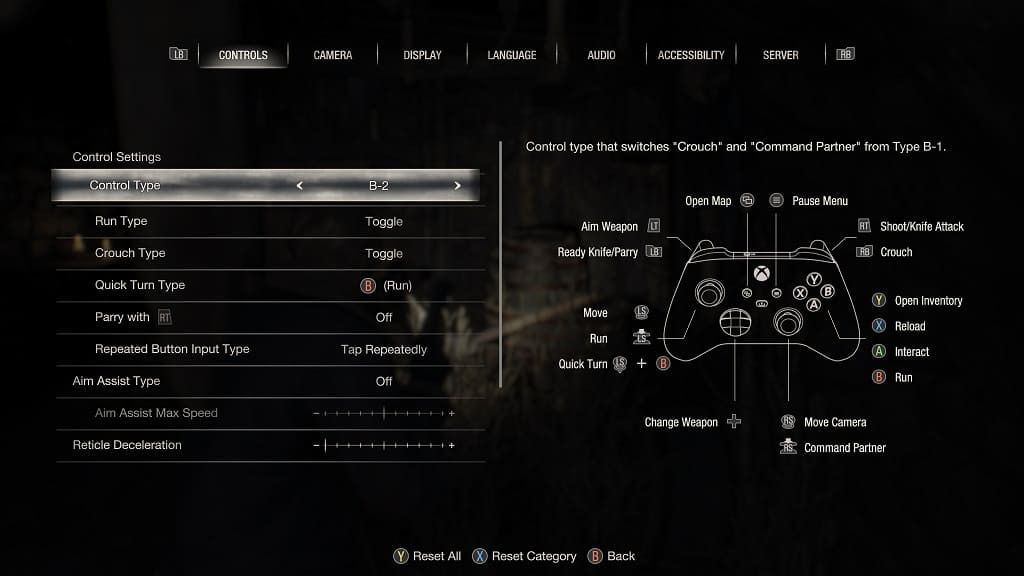
B-2: “Control type that switches Crouch and Command Partner from Type B-1.”

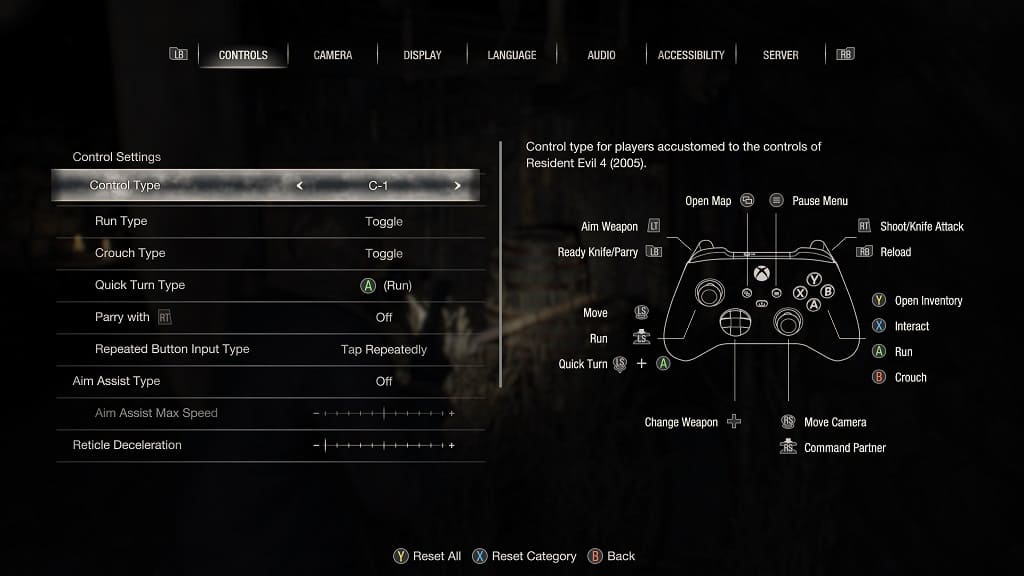
C-1: “Control type for players accustomed to the controls of Resident Evil 4 (2005).”

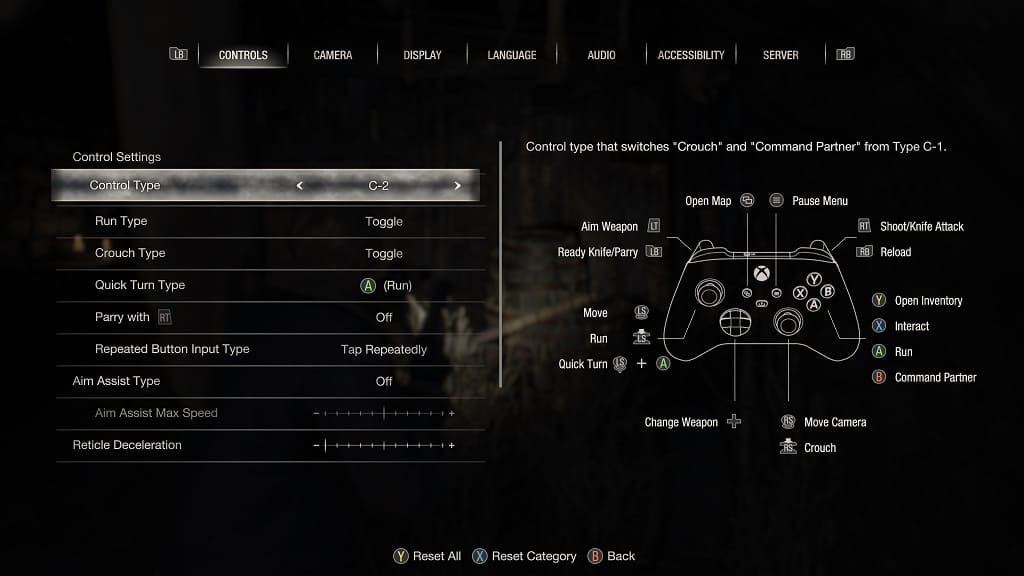
C-2: “Control type that switches Crouch and Command Partner from Type C-1.”

If you want to play the Resident Evil 4 Remake with the same controls as the original, then we recommend selecting C-1 or C-2. If you want to mimic the button layout for other Resident Evil titles, then you can select B-1 or B-2 instead.

5. In addition to changing the Control Type, you can also adjust the following button functions from the Controls tab of the Options menu:

Run Type:

  • Hold
  • Toggle

Crouch Type:

  • Hold
  • Toggle

Quick Turn Type:

  • L3 or press down on the left analog stick on Xbox
  • R1 or PlayStation or RB on Xbox
  • Circle on PlayStation or B on Xbox

Parry with R2 or Rt:

  • On
  • Off

Repeated Button Input Type:

  • Hold
  • Tap Repeatedly

Aim Assist Type:

  • Off
  • Snap
  • Snap and Follow

Aim Assist Max Speed

Reticle Deceleration

Auto-Reload:

  • On
  • Off

Reset Scope Magnification:

  • On
  • Off

Controller Vibration:

  • On
  • Off

6. Once you are done making the controller changes, you need to back out of the Options menu, which you can do by pressing the circle button on PlayStation or B button on Xbox.

7. The game should automatically save the new control settings.

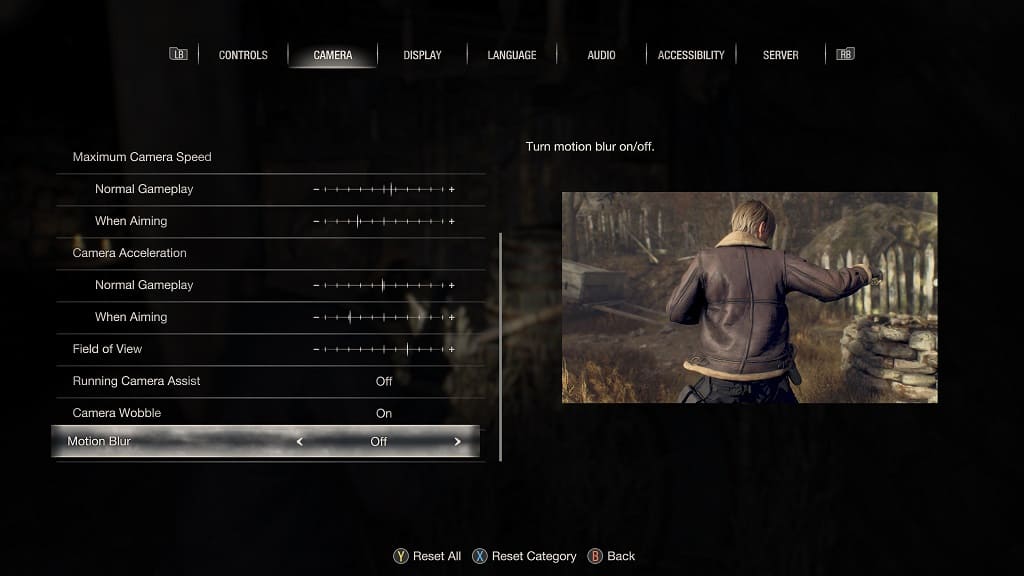
How to turn off motion blur in Resident Evil 4 Remake

When you decide to move the camera or character around in the Resident Evil 4 Remake, you may notice that there is a lot of motion blur. If this effect makes it hard to see for your eyes, then we recommend disabling the feature.

To find out how you can properly do so on the PC, PlayStation 4, PlayStation 5, PlayStation 5 Digital Edition, Xbox Series X and Xbox Series S systems, you can follow the steps laid out in this tutorial from Seeking Tech.

1. To start off, you need to select Options from either the main menu or pause screen while playing the RE4 remake.

2. Once you get to the Options screen, you should notice that there are several tabs located at the top. Here, you need to go to the Camera tab.

In order to change tabs on the PlayStation 4 and PlayStation 5 consoles, you need to use the L1 and R1 shoulder buttons on the DualShock 4 or DualSense controllers.

To change tabs on the Xbox Series X and Xbox Series S systems, you need to press LB and RB shoulder buttons on the Xbox controller.

3. Once you arrive at the Camera tab, scroll all the way down to the bottom. The last setting should be Motion Blur with the following description:

  • “Turn motion blur on/off.”

4. You can use the following methods to set Motion Blur to Off:

  • Press the left directional pad button.
  • Press the right directional pad button.
  • Move the left analog stick to the left direction.
  • Move the left analog stick to the right direction.

5. Once you set Motion Blur to Off, you need to back out of the Options menu.

On PlayStation, you can press the circle button. For Xbox, you need to press the B button.

6. The game should automatically save any changes you made in the Options menu, including turning the motion blur effects off. When you resume playing Resident Evil 4, you should no longer see any blur when moving your character and/or camera.

If you want to re-enable motion blur, then you need to return to the Camera tab in the Options menu. From there, make sure that the Motion Blur setting is set to On.

How to fix Valheim blurry graphics on Xbox Series X and S

You may notice that the graphics for Valheim are a little bit blurry when you are playing this sandbox survival videogame on your Xbox Series X or Xbox Series S console. To see how you can get a shaper looking title, you can check out this guide from Seeking Tech.

1. To start off, you should head over to the Settings menu from either the Main Menu or Pause Menu.

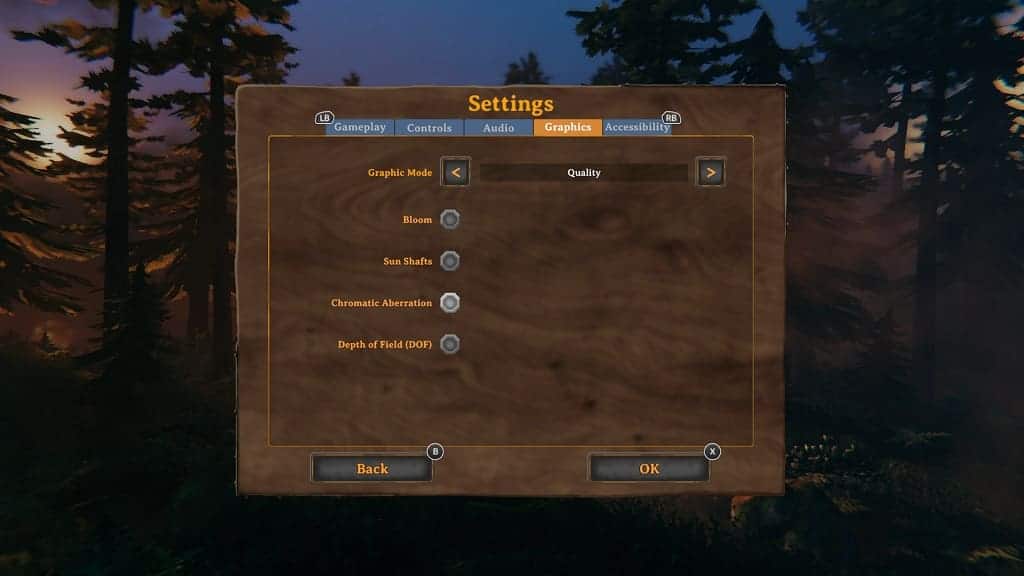
2. Once you get to the Settings menu, use the LB and RB buttons on the Xbox controller to switch tabs until you get to Graphics.

3. From the Graphics tab, we recommend disabling Bloom, Chromatic Aberration and Depth of Field (DOF).

Bloom adds an extra layer of brightness to some of the objects, which makes the game appear blurrier. Moreover, Chromatic Aberration also blurs the edges while adding red and/or blue borders. Last but not least, Depth of Field will blur surround objects that aren’t focused.

4. From the same Graphics tab, you can also change the Graphics Mode to Quality, which should provide a sharper image due to the higher resolution. With that said, the frame rate of Valheim will top out at just 30 frames per second in this mode.

While the Performance Mode will run the game at a lower resolution, it will target a much smoother 60 fps.

In this case, we recommend playing around between the Graphics Mode to see if you prefer the higher resolution (Quality) or smoother frame rate (Performance).

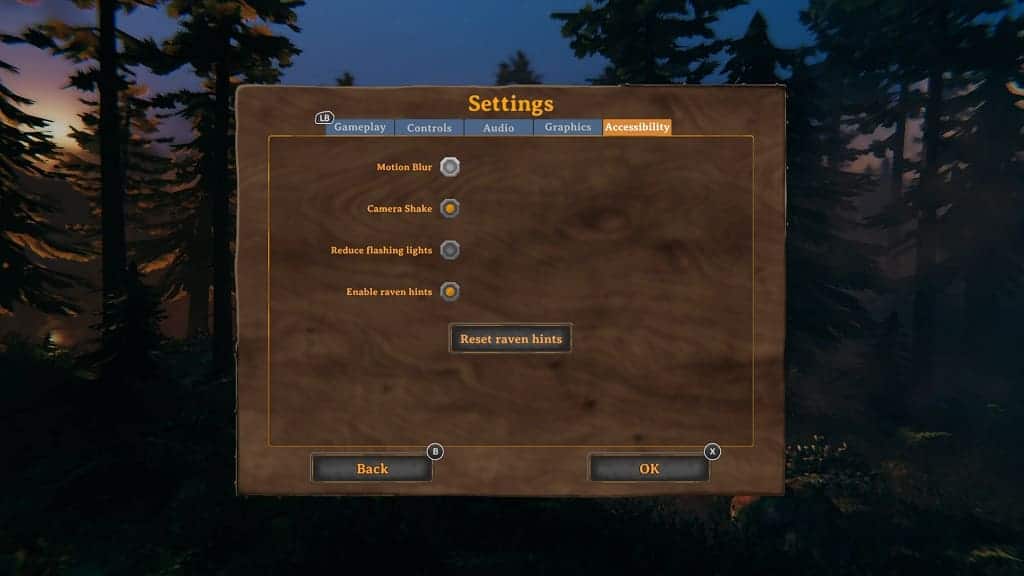
5. Next, we recommend that you use the LB and RB buttons on the Xbox controller in order to navigate over to the Accessibility tab in Settings.

6. Once you get to the Accessibility tab, we suggest disabling Motion Blur.

As its name suggests, this setting adds blur to objects in motion. This includes moving the in-game camera around even if your character and surrounding objects remain still.

7. To save the changes you made, press the X button on the controller.

8. It is also important to note that the development team at Iron Gate Studio purposely made this game with lower resolution and pixelated graphics in mind. Therefore, even if you did all of the previous steps, the picture quality may not end up being as sharp as you would like.

How to disable camera shake in Resident Evil 4 Remake

When playing the Resident Evil 4 Remake, you may notice that the camera likes to wobble around when you are moving the character. While this may add a sense of immersion, it does make it harder to see in some instances. Furthermore, you may feel a little nauseous with this feature turned on.

To see how you can disable the camera shake effect in this new version of Resident Evil 4, you can take a look at this article from Seeking Tech.

1. For the first step, open the game on your PC, PlayStation 4, PlayStation 5, PlayStation 5 Digital Edition, Xbox Series S or Xbox Series X system if you haven’t done so already.

2. Next, you need to go to either the Main Menu or Pause Screen.

3. You can then select Options from either of the aforementioned menus.

4. Inside of the Options menu, you need to navigate your way over to the Camera tab.

On the PlayStation platforms, you can move tabs by using the L1 and R1 shoulder buttons. For the Xbox systems, you can use the LB and RB buttons.,

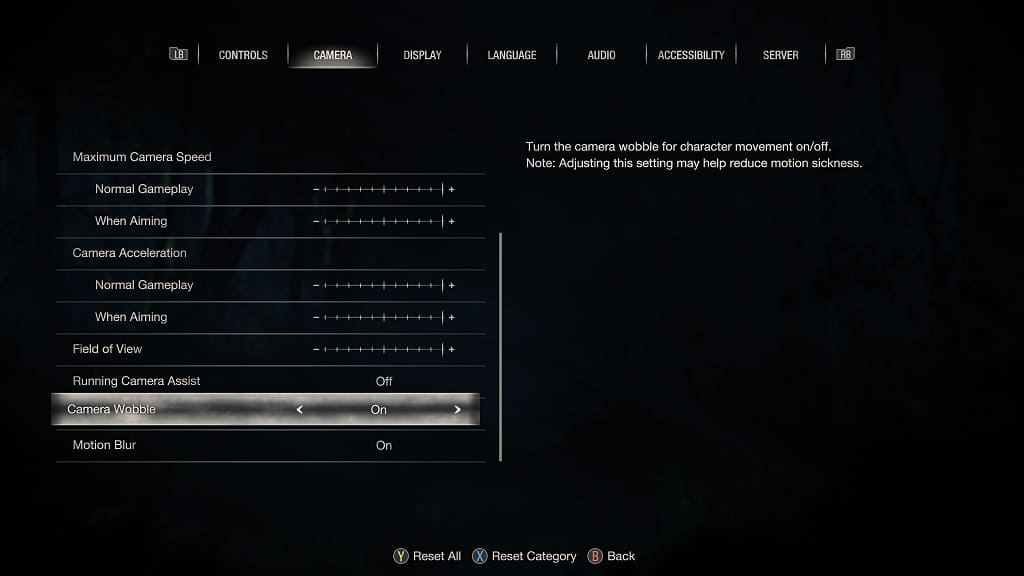
5. Once you get to the Camera tab, you need to scroll down and then move the cursor over to the Camera Wobble setting, which should have the following description:

“Turn the camera wobble for character movement on/off. Note: Adjusting this setting may help reduce motion sickness.”

6. By default the Camera Wobble setting is set to On.

To disable this feature, use the left directional button, right directional button, move the left analog stick to the left or move the left analog stick to the right in order to change this setting to Off.

7. Once you are done making this change, press the circle button on PlayStation or B button on the Xbox controller to back out and save your edit.

8. The next game you decide to play the Resident Evil 4 Remake, you should no longer see any camera shaking when you are moving your character.

9. If you would like to re-enable this feature, then you need to go back to the Camera tab from the Options menu. From there, you need to make sure that the Camera Wobble setting is set to On.